window YAMAHA TMAX 2020 Owners Manual
[x] Cancel search | Manufacturer: YAMAHA, Model Year: 2020, Model line: TMAX, Model: YAMAHA TMAX 2020Pages: 126, PDF Size: 21.59 MB
Page 12 of 126

Safety information
1-3
1Avoi
d Car bon Monoxi de Poisonin g
All engine exhaust contains carbon
monoxide, a deadly gas. Breathing
carbon monoxide can cause head-
aches, dizziness, drowsiness, nausea,
confusion, and eventually death.
Carbon Monoxide is a colorless, odor-
less, tasteless gas which may be pres-
ent even if you do not see or smell any
engine exhaust. Deadly levels of car-
bon monoxide can collect rapidly and
you can quickly be overcome and un-
able to save yourself. Also, deadly lev-
els of carbon monoxide can linger for
hours or days in enclosed or poorly
ventilated areas. If you experience any
symptoms of carbon monoxide poi-
soning, leave the area immediately, get
fresh air, and SEEK MEDICAL TREAT-
MENT. Do not run engine indoors. Even if
you try to ventilate engine exhaust
with fans or open windows and
doors, carbon monoxide can rap-
idly reach dangerous levels.
Do not run engine in poorly venti-
lated or partially enclosed areas
such as barns, garages, or car-
ports.
Do not run engine outdoors where
engine exhaust can be drawn into
a building through openings such
as windows and doors.
Loa din g
Adding accessories or cargo to your
scooter can adversely affect stability
and handling if the weight distribution
of the scooter is changed. To avoid the
possibility of an accident, use extreme
caution when adding cargo or acces-
sories to your scooter. Use extra care
when riding a scooter that has added
cargo or accessories. Here, along with
the information about accessories be-
low, are some general guidelines to fol-
low if loading cargo to your scooter:
The total weight of the operator, pas-
senger, accessories and cargo must
not exceed the maximum load limit.
Operation of an overloa ded vehicle
coul d cause an acci dent. When loading within this weight limit,
keep the following in mind:
Cargo and accessory weight
should be kept as low and close to
the scooter as possible. Securely
pack your heaviest items as close
to the center of the vehicle as pos-
sible and make sure to distribute
the weight as evenly as possible
on both sides of the scooter to
minimize imbalance or instability.
Shifting weights can create a sud-
den imbalance. Make sure that
accessories and cargo are se-
curely attached to the scooter be-
fore riding. Check accessory
mounts and cargo restraints fre-
quently.
• Properly adjust the suspension for your load (suspension-ad-
justable models only), and
check the condition and pres-
sure of your tires.
• Never attach any large or heavy items to the handlebar, front
fork, or front fender. Such items
can create unstable handling or
a slow steering response.
Maximum loa d:
195 kg (430 lb) (XP560D)
197 kg (434 lb) (XP560E)
UB3TE0E0.book Page 3 Tuesday, September 17, 2019 9:35 AM
Page 16 of 126

Description
2-1
2
EAU10411
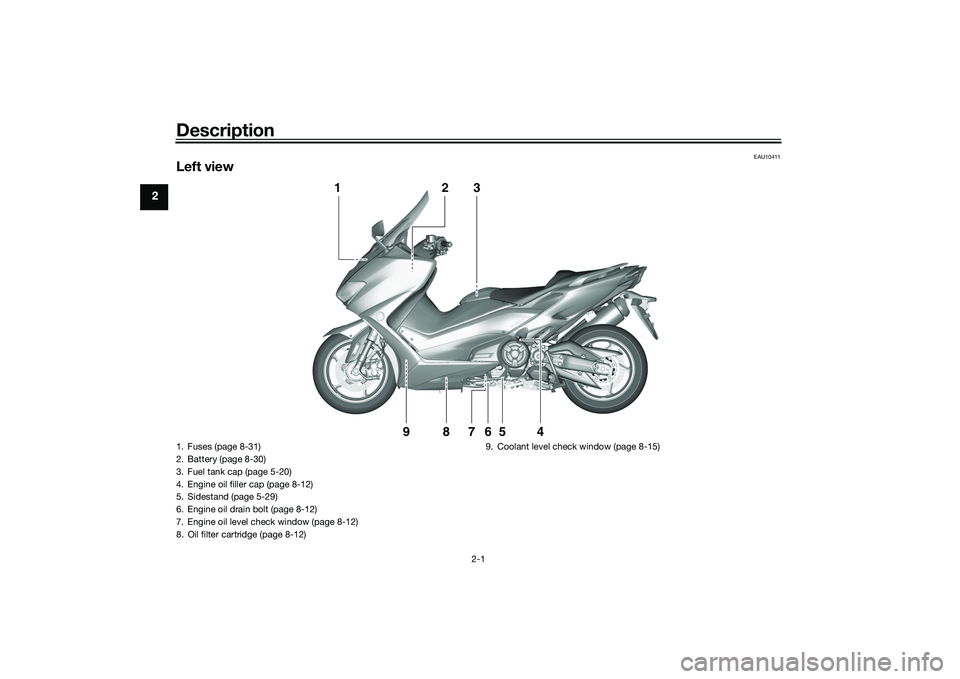
Left view
1
2
3
4
5
6
9
8
7
1. Fuses (page 8-31)
2. Battery (page 8-30)
3. Fuel tank cap (page 5-20)
4. Engine oil filler cap (page 8-12)
5. Sidestand (page 5-29)
6. Engine oil drain bolt (page 8-12)
7. Engine oil level check window (page 8-12)
8. Oil filter cartridge (page 8-12)9. Coolant level check window (page 8-15)UB3TE0E0.book Page 1 Tuesday, September 17, 2019 9:35 AM
Page 86 of 126

Periodic maintenance an d a djustment
8-12
8
TIPIf a torque wrench is not available
when installing a spark plug, a good
estimate of the correct torque is 1/4–
1/2 turn past finger tight. However, the
spark plug should be tightened to the
specified torque as soon as possible.
EAU36112
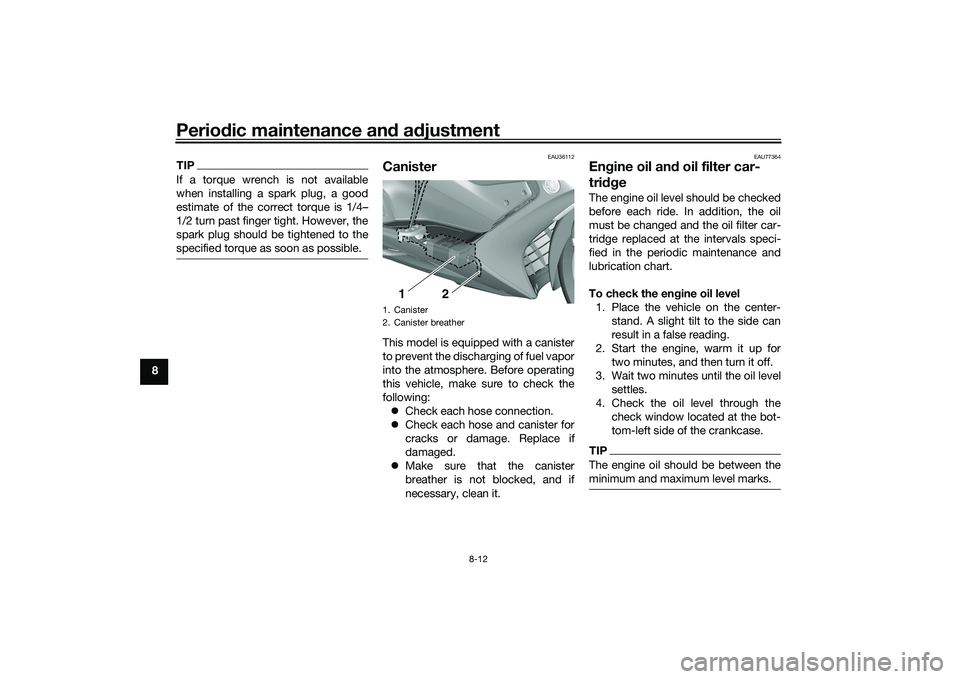
CanisterThis model is equipped with a canister
to prevent the discharging of fuel vapor
into the atmosphere. Before operating
this vehicle, make sure to check the
following:
Check each hose connection.
Check each hose and canister for
cracks or damage. Replace if
damaged.
Make sure that the canister
breather is not blocked, and if
necessary, clean it.
EAU77364
Engine oil an d oil filter car-
tri dg eThe engine oil level should be checked
before each ride. In addition, the oil
must be changed and the oil filter car-
tridge replaced at the intervals speci-
fied in the periodic maintenance and
lubrication chart.
To check the en gine oil level
1. Place the vehicle on the center- stand. A slight tilt to the side can
result in a false reading.
2. Start the engine, warm it up for two minutes, and then turn it off.
3. Wait two minutes until the oil level settles.
4. Check the oil level through the check window located at the bot-
tom-left side of the crankcase.TIPThe engine oil should be between the
minimum and maximum level marks.
1. Canister
2. Canister breather
12
UB3TE0E0.book Page 12 Tuesday, September 17, 2019 9:35 AM
Page 87 of 126

Periodic maintenance an d a djustment
8-13
8
5. If the engine oil is below the mini-
mum level mark, add sufficient oil
of the recommended type to raise
it to the correct level.
To chan ge the en gine oil (an d re-
place the oil filter cartri dge)
1. Place the vehicle on a level sur- face.
2. Start the engine, warm it up for several minutes, and then turn it
off.
3. Place an oil pan under the engine to collect the used oil. 4. Remove the engine oil filler cap,
and then the engine oil drain bolt
and its gasket.
5. Check the O-ring for damage and replace it if necessary.
TIPSkip steps 6–8 if the oil filter cartridge
is not being replaced.6. Remove the oil filter cartridge withan oil filter wrench.TIPAn oil filter wrench is available at a
Yamaha dealer.7. Apply a thin coat of clean engineoil to the O-ring of the new oil filter
cartridge.
1. Engine oil level check window
2. Maximum level mark
3. Minimum level mark
1
2
3
1. Engine oil filler cap
1. Engine oil drain bolt
2. O-ring
3. Gasket
1
12
3
1. Oil filter wrench
2. Oil filter cartridge
1
2
UB3TE0E0.book Page 13 Tuesday, September 17, 2019 9:35 AM
Page 90 of 126

Periodic maintenance an d a djustment
8-16
8 3. Look at the coolant level through
the check window.
4. If the coolant is at or below the minimum level mark, remove the
left floorboard mat by pulling it up. 5. Remove the coolant reservoir cov-
er by removing the screws.
6. Remove the coolant reservoir cap. WARNING! Remove only the
coolant reservoir cap. Never at-
tempt to remove the ra diator
cap when the en gine is hot.
[EWA15162]
7. Add coolant to the maximum level
mark. NOTICE: If coolant is not
availa ble, use d istilled water or
soft tap water instea d. Do not
use har d water or salt water
since it is harmful to the en gine.
If water has been used instead
of coolant, replace it with cool-
ant as soon as possi ble, other-
wise the coolin g system will not
b e protecte d a gainst frost an d
corrosion. If water has been
a dde d to the coolant, have a
Yamaha dealer check the anti-
freeze content of the coolant as
soon as possi ble, otherwise the
effectiveness of the coolant will
b e re duce d.
[ECA10473]
1. Coolant level check window
2. Maximum level mark
3. Minimum level mark
1. Floorboard mat
12
3
1
1. Coolant reservoir cover
2. Screw
1
2
1. Coolant reservoir cap
1
UB3TE0E0.book Page 16 Tuesday, September 17, 2019 9:35 AM