clutch YAMAHA TRACER 900 2020 User Guide
[x] Cancel search | Manufacturer: YAMAHA, Model Year: 2020, Model line: TRACER 900, Model: YAMAHA TRACER 900 2020Pages: 110, PDF Size: 7.67 MB
Page 65 of 110

Periodic maintenance an d a djustment
6-5
6
EAU71352
General maintenance an d lu brication chartNO. ITEM CHECK OR MAINTENANCE JOB ODOMETER READING
ANNUAL
CHECK
1000 km
(600 mi) 10000 km
(6000 mi) 20000 km
(12000 mi) 30000 km
(18000 mi) 40000 km
(24000 mi)
1 *Dia
gnostic system
check • Perform dynamic inspection us-
ing Yamaha diagnostic tool.
• Check the error codes. √√√√√√
2 *Air filter element • Replace. Every 40000 km (24000 mi)
3Clutch • Check operation.
•Adjust. √√√√√
4 *Front brake • Check operation, fluid level, and
for fluid leakage.
• Replace brake pads if necessary. √√√√√√
5 *Rear brake • Check operation, fluid level, and
for fluid leakage.
• Replace brake pads if necessary. √√√√√√
6 *Brake hoses • Check for cracks or damage.
√√√√√
• Replace. Every 4 years
7 *Brake flui d • Change. Every 2 years
8 *Wheels • Check runout and for damage.
• Replace if necessary. √√√√
9 *Tires • Check tread depth and for dam-
age.
• Replace if necessary.
• Check air pressure.
• Correct if necessary. √√√√√
10 *Wheel bearin gs • Check bearing for looseness or
damage. √√√√
UB5CE1E0.book Page 5 Monday, August 6, 2018 1:13 PM
Page 66 of 110

Periodic maintenance an d a djustment
6-6
6
11 *Swin
garm pivot
b earin gs • Check operation and for exces-
sive play. √√√√
• Lubricate with lithium-soap- based grease. Every 50000 km (30000 mi)
12 Drive chain • Check chain slack, alignment and
condition.
• Adjust and lubricate chain with a special O-ring chain lubricant
thoroughly. Every 1000 km (600 mi) and after washing the motorcycle, riding in the rain or
riding in wet areas
13 *Steerin g b earin gs • Check bearing assemblies for
looseness. √√ √
• Moderately repack with lithium- soap-based grease. √√
14 *Chassis fasteners • Make sure that all nuts, bolts and
screws are properly tightened. √√√√√
15 Brake lever pivot
shaft • Lubricate with silicone grease.
√√√√√
16 Brake ped
al pivot
shaft • Lubricate with lithium-soap-
based grease. √√√√√
17 Clutch lever pivot
shaft • Lubricate with lithium-soap-
based grease. √√√√√
18 Shift pe
dal pivot
shaft • Lubricate with lithium-soap-
based grease. √√√√√
19 Si
destan d, center-
stan d • Check operation.
• Lubricate with lithium-soap-
based grease. √√√√√
NO. ITEM CHECK OR MAINTENANCE JOB
ODOMETER READING
ANNUAL
CHECK
1000 km
(600 mi) 10000 km
(6000 mi) 20000 km
(12000 mi) 30000 km
(18000 mi) 40000 km
(24000 mi)UB5CE1E0.book Page 6 Monday, August 6, 2018 1:13 PM
Page 71 of 110
Periodic maintenance an d a djustment
6-11
6
EAU36112
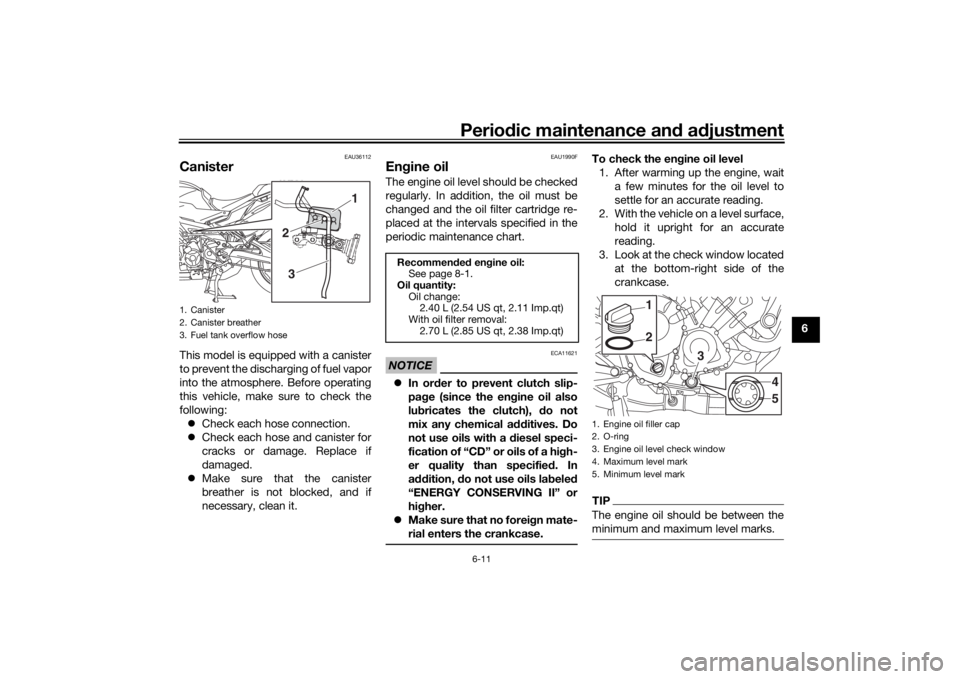
CanisterThis model is equipped with a canister
to prevent the discharging of fuel vapor
into the atmosphere. Before operating
this vehicle, make sure to check the
following:
Check each hose connection.
Check each hose and canister for
cracks or damage. Replace if
damaged.
Make sure that the canister
breather is not blocked, and if
necessary, clean it.
EAU1990F
Engine oilThe engine oil level should be checked
regularly. In addition, the oil must be
changed and the oil filter cartridge re-
placed at the intervals specified in the
periodic maintenance chart.NOTICE
ECA11621
In or der to prevent clutch slip-
pa ge (since the en gine oil also
lu bricates the clutch), do not
mix any chemical add itives. Do
not use oils with a diesel speci-
fication of “CD” or oils of a hi gh-
er quality than specified . In
a dd ition, do not use oils lab eled
“ENERGY CONSERVING II” or
hi gher.
Make sure that no forei gn mate-
rial enters the crankcase.
To check the en gine oil level
1. After warming up the engine, wait a few minutes for the oil level to
settle for an accurate reading.
2. With the vehicle on a level surface, hold it upright for an accurate
reading.
3. Look at the check window located at the bottom-right side of the
crankcase.TIPThe engine oil should be between the
minimum and maximum level marks.
1. Canister
2. Canister breather
3. Fuel tank overflow hose
1
2
3
Recommen ded en gine oil:
See page 8-1.
Oil quantity: Oil change:2.40 L (2.54 US qt, 2.11 Imp.qt)
With oil filter removal: 2.70 L (2.85 US qt, 2.38 Imp.qt)
1. Engine oil filler cap
2. O-ring
3. Engine oil level check window
4. Maximum level mark
5. Minimum level mark
21
3
45
UB5CE1E0.book Page 11 Monday, August 6, 2018 1:13 PM
Page 79 of 110
Periodic maintenance an d a djustment
6-19
6
EAU21963
Cast wheelsTo maximize the performance, durabil-
ity, and safe operation of your vehicle,
note the following points regarding the
specified wheels.
The wheel rims should be
checked for cracks, bends, warp-
age or other damage before each
ride. If any damage is found, have
a Yamaha dealer replace the
wheel. Do not attempt even the
smallest repair to the wheel. A de-
formed or cracked wheel must be
replaced.
The wheel should be balanced
whenever either the tire or wheel
has been changed or replaced. An
unbalanced wheel can result in
poor performance, adverse han-
dling characteristics, and a short-
ened tire life.
EAU22083
Adjustin g the clutch lever free
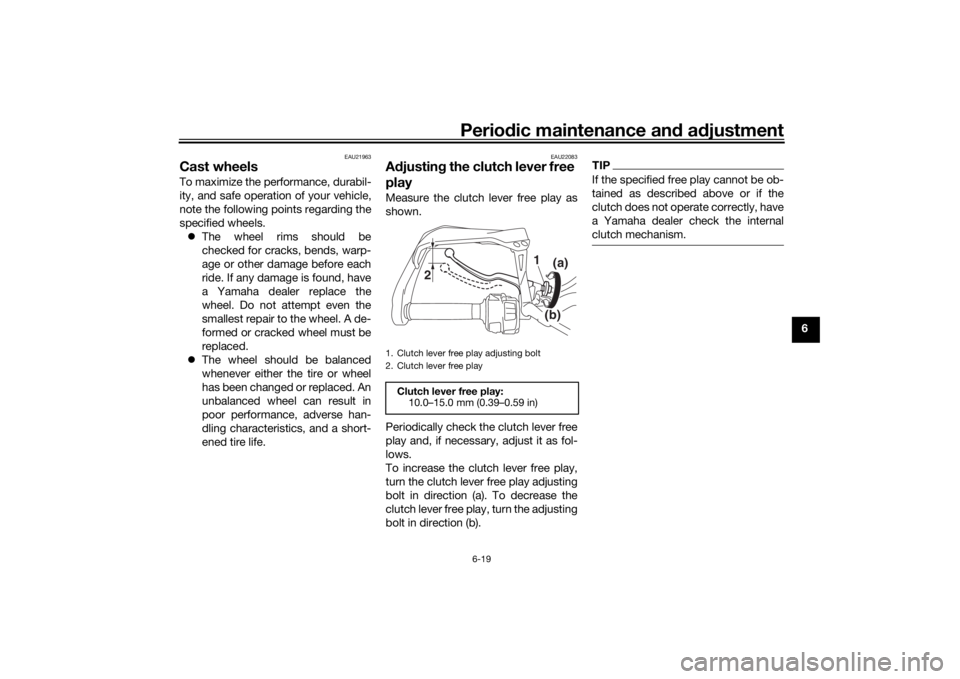
playMeasure the clutch lever free play as
shown.
Periodically check the clutch lever free
play and, if necessary, adjust it as fol-
lows.
To increase the clutch lever free play,
turn the clutch lever free play adjusting
bolt in direction (a). To decrease the
clutch lever free play, turn the adjusting
bolt in direction (b).
TIPIf the specified free play cannot be ob-
tained as described above or if the
clutch does not operate correctly, have
a Yamaha dealer check the internal
clutch mechanism.
1. Clutch lever free play adjusting bolt
2. Clutch lever free play
Clutch lever free play: 10.0–15.0 mm (0.39–0.59 in)
2 1
(b)(a)
UB5CE1E0.book Page 19 Monday, August 6, 2018 1:13 PM
Page 87 of 110
Periodic maintenance an d a djustment
6-27
6
EAU23144
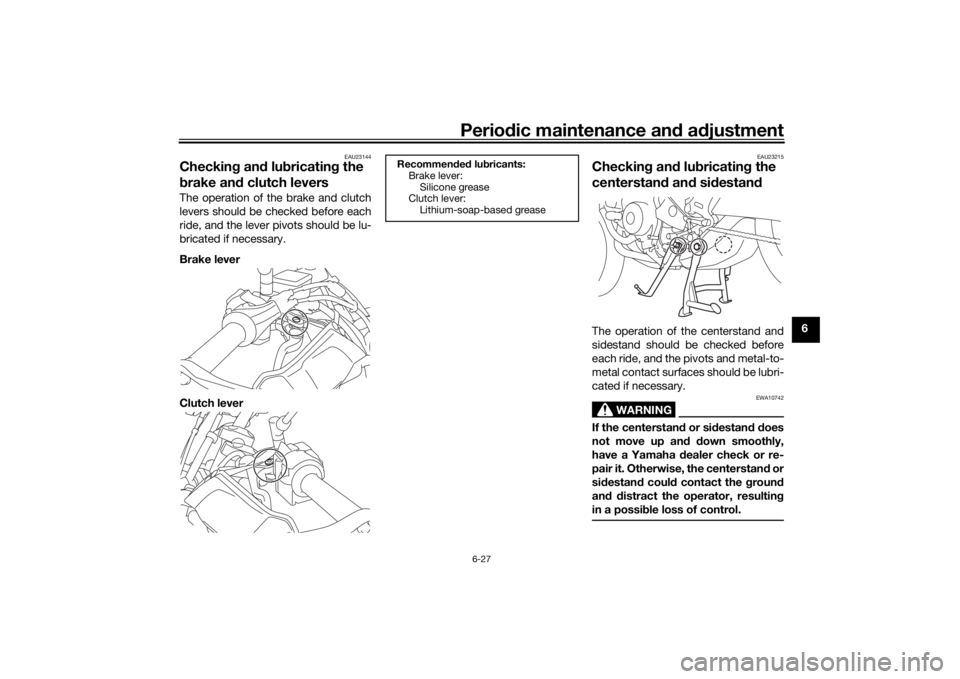
Checkin g an d lu bricatin g the
b rake an d clutch leversThe operation of the brake and clutch
levers should be checked before each
ride, and the lever pivots should be lu-
bricated if necessary.
Brake lever
Clutch lever
EAU23215
Checkin g an d lu bricatin g the
centerstan d an d si destan dThe operation of the centerstand and
sidestand should be checked before
each ride, and the pivots and metal-to-
metal contact surfaces should be lubri-
cated if necessary.
WARNING
EWA10742
If the centerstan d or si destan d d oes
not move up an d d own smoothly,
have a Yamaha dealer check or re-
pair it. Otherwise, the centerstan d or
si destan d coul d contact the groun d
an d d istract the operator, resultin g
in a possi ble loss of control.
Recommen ded lu bricants:
Brake lever:
Silicone grease
Clutch lever:
Lithium-soap-based grease
UB5CE1E0.book Page 27 Monday, August 6, 2018 1:13 PM
Page 107 of 110

10-1
10
Index
AABS....................................................... 3-21
ABS warning light ................................... 3-4
Air filter element.................................... 6-15
Auxiliary DC connector ......................... 3-36
Auxiliary DC jack .................................. 3-36BBattery .................................................. 6-30
Brake and clutch levers, checking and
lubricating........................................... 6-27
Brake and shift pedals, checking and lubricating........................................... 6-26
Brake fluid, changing............................ 6-23
Brake fluid level, checking.................... 6-21
Brake lever............................................ 3-20
Brake lever free play, checking ............ 6-20
Brake light switches ............................. 6-20
Brake pedal .......................................... 3-21CCables, checking and lubricating ......... 6-25
Canister ................................................ 6-11
Care ........................................................ 7-1
Catalytic converter ............................... 3-27
Centerstand and sidestand, checking and lubricating ................................... 6-27
Clutch lever........................................... 3-20
Clutch lever free play, adjusting ........... 6-19
Coolant ................................................. 6-14DData recording, vehicle........................... 9-2
Diagnostic connector ............................. 9-2
Dimmer/Pass switch............................. 3-18
D-mode (drive mode)............................ 3-17
Drive chain, cleaning and lubricating ... 6-25 Drive chain slack .................................. 6-23
EEngine break-in ...................................... 5-4
Engine idling speed, checking ............. 6-15
Engine oil.............................................. 6-11
Engine serial number ............................. 9-1
Engine trouble warning light .................. 3-4FFront and rear brake pads, checking ... 6-21
Front fork, adjusting ............................. 3-33
Front fork, checking ............................. 6-28
Fuel ...................................................... 3-25
Fuel consumption, tips for reducing ...... 5-3
Fuel tank cap........................................ 3-24
Fuel tank overflow hose ....................... 3-26
Fuses, replacing ................................... 6-31HHandlebar position, adjusting .............. 3-32
Handlebar switches ............................. 3-18
Hazard switch ...................................... 3-19
Headlight beams, adjusting ................. 3-32
Helmet holder....................................... 3-31
High beam indicator light ....................... 3-4
Horn switch .......................................... 3-18IIdentification numbers ........................... 9-1
Ignition circuit cut-off system .............. 3-37
Immobilizer system ................................ 3-1
Immobilizer system indicator light ......... 3-5
Indicator lights and warning lights ......... 3-3LLicense plate light bulb, replacing ....... 6-34MMain switch/steering lock ...................... 3-2Maintenance and lubrication, periodic ... 6-5
Maintenance, emission control
system .................................................. 6-3
Matte color, caution................................ 7-1
Menu switch ......................................... 3-19
Model label ............................................. 9-1
Multi-function meter unit ........................ 3-6
NNeutral indicator light ............................. 3-4OOil level warning light .............................. 3-4PPanel, removing and installing ................ 6-9
Parking.................................................... 5-4
Part locations.......................................... 2-1RRider seat height, adjusting .................. 3-29SSafety information................................... 1-1
Seats ..................................................... 3-27
Select switch ........................................ 3-19
Shifting.................................................... 5-2
Shift pedal............................................. 3-20
Shock absorber assembly, adjusting ... 3-34
Sidestand.............................................. 3-37
Spark plugs, checking .......................... 6-10
Specifications ......................................... 8-1
Starting the engine ................................. 5-1
Steering, checking ................................ 6-29
Stop/Run/Start switch .......................... 3-18
Storage ................................................... 7-3
Storage compartment........................... 3-31
Swingarm pivots, lubricating ................ 6-28
UB5CE1E0.book Page 1 Monday, August 6, 2018 1:13 PM