check oil YAMAHA TRICITY 2016 Owners Manual
[x] Cancel search | Manufacturer: YAMAHA, Model Year: 2016, Model line: TRICITY, Model: YAMAHA TRICITY 2016Pages: 87, PDF Size: 2.59 MB
Page 6 of 87

Table of contentsSafety information ............................ 1-1
Further safe-riding points ............... 1-5
Description ....................................... 2-1
Left view ......................................... 2-1
Right view ....................................... 2-2
Controls and instruments ............... 2-3
Instrument an d control functions ... 3-1
Main switch/steering lock............... 3-1
Keyhole shutter .............................. 3-3
Indicator lights and warning lights............................................ 3-3
Self-diagnosis device .................... 3-5
Multi-function meter unit ................ 3-5
Handlebar switches ........................ 3-9
Front brake lever .......................... 3-10
Rear brake lever ........................... 3-10
ABS (for ABS models) .................. 3-11
Fuel tank cap ................................ 3-12
Fuel ............................................... 3-13
Catalytic converter ....................... 3-14
Seat .............................................. 3-15
Passenger footrest ....................... 3-15
Storage compartment .................. 3-16
Luggage hook............................... 3-17
Sidestand ..................................... 3-17
Ignition circuit cut-off system ....... 3-18
Auxiliary DC connector ................. 3-20 For your safety – pre-operation
checks
............................................... 4-1
Operation an d important ri din g
points ................................................. 5-1
Starting the engine .......................... 5-1
Starting off ...................................... 5-2
Acceleration and deceleration ........ 5-3
Braking ............................................ 5-3
Tips for reducing fuel consumption ................................ 5-3
Engine break-in ............................... 5-4
Parking ............................................ 5-4
Perio dic maintenance an d
a d justment ........................................ 6-1
Owner’s tool kit ............................... 6-2
Periodic maintenance chart for
the emission control system ........ 6-3
General maintenance and
lubrication chart ........................... 6-4
Removing and installing the panel ............................................ 6-8
Checking the spark plug ................. 6-8
Engine oil and oil strainer .............. 6-10
Final transmission oil..................... 6-12
Coolant.......................................... 6-13
Air filter and V-belt case air filter elements .................................... 6-14
Checking the throttle grip free play ..................................... 6-16 Valve clearance............................. 6-16
Tires .............................................. 6-17
Cast wheels .................................. 6-18
Checking the front brake lever
free play..................................... 6-19
Checking the rear brake lever free play..................................... 6-19
Checking the front and rear
brake pads ................................ 6-20
Checking the brake fluid level ...... 6-20
Changing the brake fluid .............. 6-22
Checking and lubricating the cables ........................................ 6-22
Checking and lubricating the
throttle grip and cable ............... 6-22
Lubricating the front and rear brake levers ............................... 6-23
Checking and lubricating the centerstand and sidestand........ 6-23
Checking the front fork ................. 6-24
Checking the steering................... 6-25
Checking the wheel bearings ....... 6-25
Checking the steering tie rod ....... 6-25
Checking the leaning system ....... 6-26
Battery .......................................... 6-26
Replacing the fuses ...................... 6-27
Replacing the headlight bulb ........ 6-29
Auxiliary lights............................... 6-30
Tail/brake light .............................. 6-30
Turn signal light bulb .................... 6-31
Troubleshooting............................ 6-31U2CME2E0.book Page 1 Friday, August 21, 2015 9:16 AM
Page 21 of 87
Instrument and control functions
3-5
3
all, use extra caution to avoi
d possi-
b le wheel lock durin g emer gency
b rakin g. Have a Yamaha d ealer
check the brake system an d electri-
cal circuits as soon as possi ble.
TIPThe ABS warning light may come on
while accelerating the engine with the
vehicle on its centerstand, but this
does not indicate a malfunction.
EAU12096
Self- dia gnosis device This model is equipped with a self-di-
agnosis device for various electrical
circuits.
If a problem is detected in any of those
circuits, the engine trouble warning
light will come on or flash. If this oc-
curs, have a Yamaha dealer check the
vehicle.NOTICE
ECA11171
To prevent en gine damag e, be sure
to consult a Yamaha dealer as soon
as possi ble if this occurs.
EAUU1731
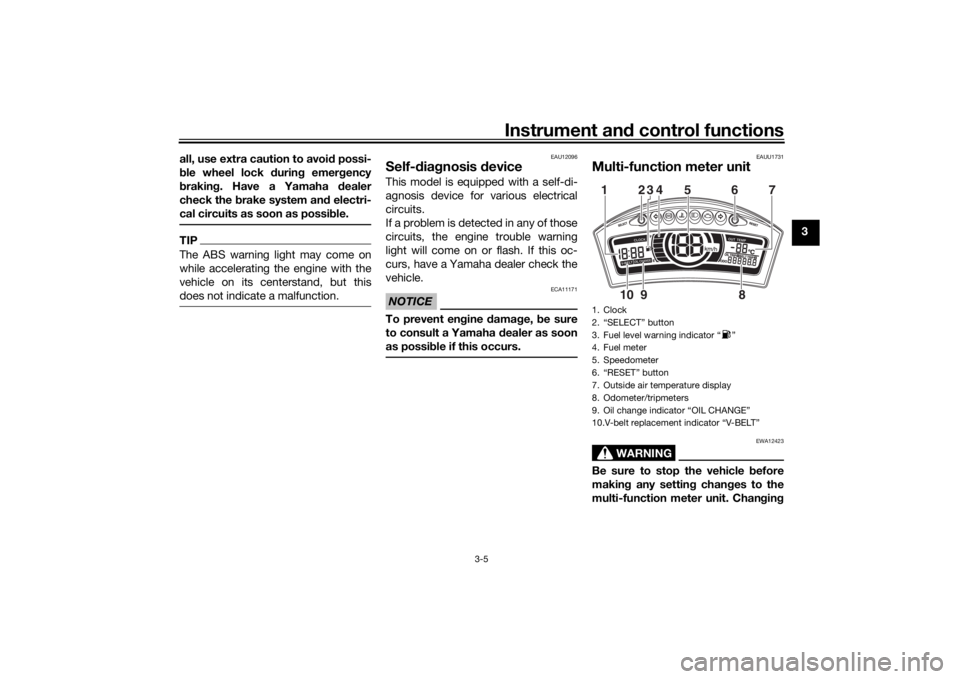
Multi-function meter unit
WARNING
EWA12423
Be sure to stop the vehicle before
makin g any settin g chan ges to the
multi-function meter unit. Chan gin g1. Clock
2. “SELECT” button
3. Fuel level warning indicator “ ”
4. Fuel meter
5. Speedometer
6. “RESET” button
7. Outside air temperature display
8. Odometer/tripmeters
9. Oil change indicator “OIL CHANGE”
10.V-belt replacement indicator “V-BELT”12345 6
8
910 7
U2CME2E0.book Page 5 Friday, August 21, 2015 9:16 AM
Page 37 of 87
For your safety – pre-operation checks
4-1
4
EAU15599
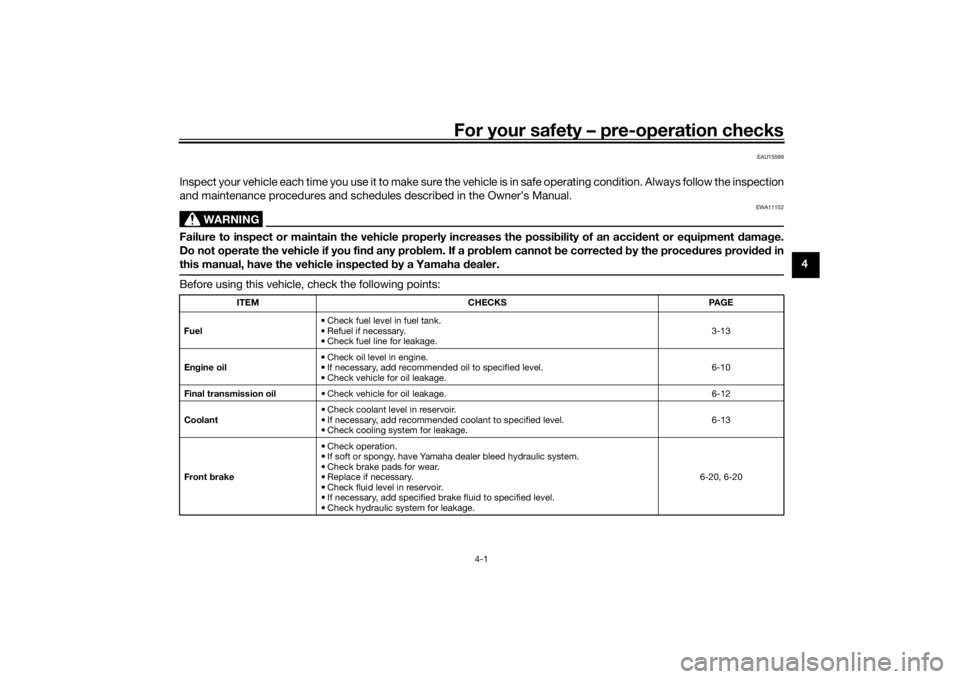
Inspect your vehicle each time you use it to make sure the vehicle is in safe operating condition. Always follow the inspection
and maintenance procedures and schedules described in the Owner’s Manual.
WARNING
EWA11152
Failure to inspect or maintain the vehicle properly increases the possibility of an accident or equipment d amage.
Do not operate the vehicle if you fin d any pro blem. If a pro blem cannot b e corrected b y the proce dures provi ded in
this manual, have the vehicle inspecte d b y a Yamaha dealer.Before using this vehicle, check the following points:
ITEM CHECKS PAGE
Fuel • Check fuel level in fuel tank.
• Refuel if necessary.
• Check fuel line for leakage. 3-13
En gine oil • Check oil level in engine.
• If necessary, add recommended oil to specified level.
• Check vehicle for oil leakage. 6-10
Final transmission oil • Check vehicle for oil leakage. 6-12
Coolant • Check coolant level in reservoir.
• If necessary, add recommended coolant to specified level.
• Check cooling system for leakage. 6-13
Front brake • Check operation.
• If soft or spongy, have Yamaha dealer bleed hydraulic system.
• Check brake pads for wear.
• Replace if necessary.
• Check fluid level in reservoir.
• If necessary, add specified brake fluid to specified level.
• Check hydraulic system for leakage. 6-20, 6-20
U2CME2E0.book Page 1 Friday, August 21, 2015 9:16 AM
Page 42 of 87
Operation and important rid ing points
5-4
5
EAU16831
En gine break-inThere is never a more important period
in the life of your engine than the period
between 0 and 1000 km (600 mi). For
this reason, you should read the fol-
lowing material carefully.
Since the engine is brand new, do not
put an excessive load on it for the first
1000 km (600 mi). The various parts in
the engine wear and polish themselves
to the correct operating clearances.
During this period, prolonged full-throt-
tle operation or any condition that
might result in engine overheating
must be avoided.
EAU61040
0–150 km (0–90 mi)
Avoid prolonged operation above 1/3
throttle.
After every hour of operation, stop the
engine, and then let it cool for five to
ten minutes.
Vary the engine speed from time to
time. Do not operate the engine at one
set throttle position. 150–500 km (90–300 mi)
Avoid prolonged operation above 1/2
throttle.
Rev the engine freely through the
gears, but do not use full throttle at any
time.
500–1000 km (300–600 mi)
Avoid prolonged operation above 3/4
throttle.
1000 km (600 mi) an
d b eyon d
Avoid prolonged full-throttle operation.
Vary the engine speed occasionally.
NOTICE: After 1000 km (600 mi) of
operation, be sure to chan ge the en-
g ine oil an d final transmission oil,
an d to clean the oil strainer.
[ECA16502]
NOTICE
ECA10271
If any en gine trou ble shoul d occur
d uring the en gine break-in perio d,
imme diately have a Yamaha dealer
check the vehicle.
EAU17214
Parkin gWhen parking, stop the engine, and
then remove the key from the main
switch.
WARNING
EWA10312
Since the en gine an d exhaust
system can become very hot,
park in a place where pe destri-
ans or chil dren are not likely to
touch them an d b e burne d.
Do not park on a slope or on soft
groun d, otherwise the vehicle
may overturn, increasin g the
risk of a fuel leak an d fire.
Do not park near grass or other
flammab le materials which
mi ght catch fire.
U2CME2E0.book Page 4 Friday, August 21, 2015 9:16 AM
Page 47 of 87

Periodic maintenance an d a djustment
6-5
6
10 *Wheel bearin gs • Check bearings for looseness or
damage. √√√√
11 *Steerin g system • Check bearing play and steering
for roughness. √√√√√
• Lubricate with lithium-soap- based grease. Every 24000 km (14000 mi)
• Check steering tie rod, and re- place if necessary. √√√√√
12 *Leanin g system • Check bearing play. √√√√√
13 *Chassis fasteners • Make sure that all nuts, bolts and
screws are properly tightened. Every 12000 km (7200 mi)
14 Front
brake lever
pivot shaft • Lubricate with silicone grease.
√√√√
15 Rear
brake lever
pivot shaft • Lubricate with silicone grease.
√√√√
16 *Unifie
d b rake sys-
tem • Lubricate link pivots and moving
parts with silicone grease. √√√√
• Lubricate cable end with lithium- soap-based grease. √√√√
17 Si
destan d, center-
stan d • Check operation.
• Lubricate with lithium-soap-
based grease. √√√√√
18 *Sidestan d switch • Check operation. √√√√√√
19 *Front fork • Check operation and for oil leak-
age. √√√√
NO. ITEM CHECK OR MAINTENANCE JOB
ODOMETER READING
ANNUAL
CHECK
1000 km
(600 mi) 4000 km
(2400 mi) 8000 km
(4800 mi) 12000 km
(7200 mi) 1600
0 km
(9600 mi)
U2CME2E0.book Page 5 Friday, August 21, 2015 9:16 AM
Page 48 of 87

Periodic maintenance an d a djustment
6-6
6
20 *Shock a
bsor ber as-
sem blies • Check operation and shock ab-
sorbers for oil leakage. √√√√
21 En gine oil • Change.
• Check oil level and vehicle for oil
leakage. √√√√√
22 En gine oil strainer • Clean. √√√√√
23 *Coolin g system • Check coolant level and vehicle
for coolant leakage. √√√√
• Change coolant. Every 3 years
24 Final transmission
oil • Check vehicle for oil leakage.
√√√√√
• Change. √Every 12000 km (7500 mi)
25 *V-belt • Replace. Every 20000 km (12000 mi)
26 *Front an
d rear
b rake switches • Check operation.
√√√√√√
27 Movin
g parts an d
cab les • Lubricate.
√√√√√
28 *Throttle grip • Check operation.
• Check throttle grip free play, and
adjust if necessary.
• Lubricate cable and grip housing. √√√√√
29 *Li
ghts, si gnals an d
switches • Check operation.
• Adjust headlight beam.
√√√√√√
NO. ITEM CHECK OR MAINTENANCE JOB
ODOMETER READING
ANNUAL
CHECK
1000 km
(600 mi) 4000 km
(2400 mi) 8000 km
(4800 mi) 12000 km
(7200 m i
)16000 km
(9600 mi)
U2CME2E0.book Page 6 Friday, August 21, 2015 9:16 AM
Page 49 of 87
Periodic maintenance an d a djustment
6-7
6
EAU38263
TIP Engine air filter and V-belt air filters
• This model’s engine air filter is equipped with a disposable oil-coated paper element, which must not be cleaned with compressed air to avoid damaging it.
• The engine air filter element needs to be replaced and the V-belt air filter elements need to be serviced more fre- quently when riding in unusually wet or dusty areas.
Hydraulic brake service
• After disassembling the brake master cylinders and calipers, always change the fluid. Regularly check the brake fluid levels and fill the reservoirs as required.
• Every two years replace the internal components of the brake master cylinders and calipers, and change the brake fluid.
• Replace the brake hoses every four years and if cracked or damaged.
U2CME2E0.book Page 7 Friday, August 21, 2015 9:16 AM
Page 52 of 87
Periodic maintenance an d a djustment
6-10
6
EAU61002
En gine oil an d oil strainerThe engine oil level should be checked
before each ride. In addition, the oil
must be changed and the oil strainer
cleaned at the intervals specified in the
periodic maintenance and lubrication
chart.
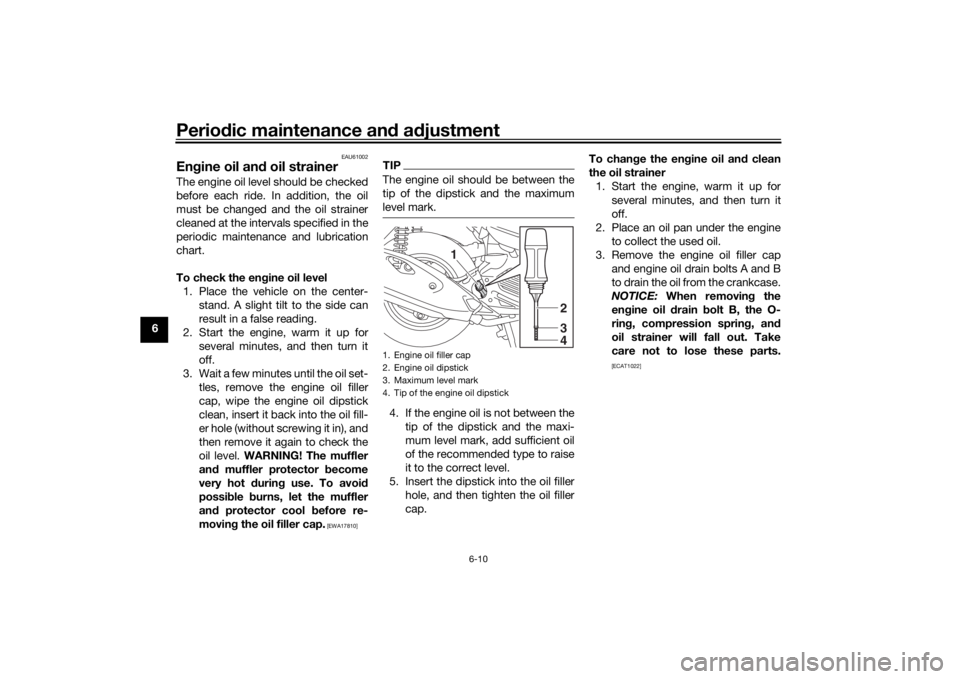
To check the en gine oil level
1. Place the vehicle on the center- stand. A slight tilt to the side can
result in a false reading.
2. Start the engine, warm it up for several minutes, and then turn it
off.
3. Wait a few minutes until the oil set- tles, remove the engine oil filler
cap, wipe the engine oil dipstick
clean, insert it back into the oil fill-
er hole (without screwing it in), and
then remove it again to check the
oil level. WARNING! The muffler
an d muffler protector become
very hot during use. To avoi d
possi ble burns, let the muffler
an d protector cool before re-
moving the oil filler cap.
[EWA17810]
TIPThe engine oil should be between the
tip of the dipstick and the maximum
level mark.4. If the engine oil is not between the
tip of the dipstick and the maxi-
mum level mark, add sufficient oil
of the recommended type to raise
it to the correct level.
5. Insert the dipstick into the oil filler hole, and then tighten the oil filler
cap. To chan
ge the en gine oil an d clean
the oil strainer 1. Start the engine, warm it up for several minutes, and then turn it
off.
2. Place an oil pan under the engine to collect the used oil.
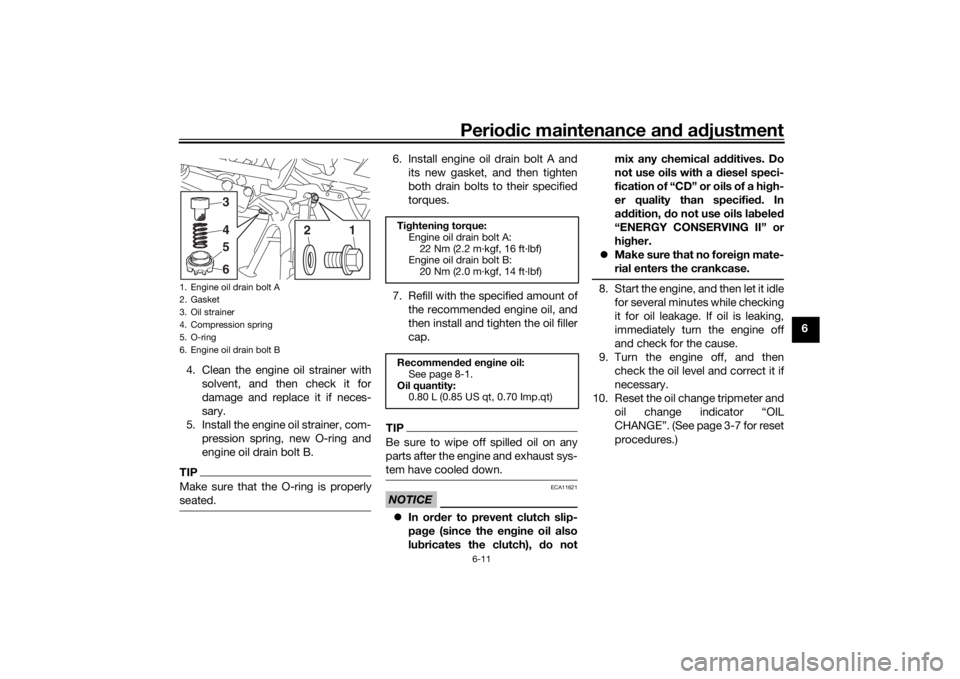
3. Remove the engine oil filler cap and engine oil drain bolts A and B
to drain the oil from the crankcase.
NOTICE: When removin g the
en gine oil d rain bolt B, the O-
rin g, compression sprin g, an d
oil strainer will fall out. Take
care not to lose these parts.
[ECAT1022]
1. Engine oil filler cap
2. Engine oil dipstick
3. Maximum level mark
4. Tip of the engine oil dipstick
1
234
U2CME2E0.book Page 10 Friday, August 21, 2015 9:16 AM
Page 53 of 87
Periodic maintenance an d a djustment
6-11
6
4. Clean the engine oil strainer with solvent, and then check it for
damage and replace it if neces-
sary.
5. Install the engine oil strainer, com- pression spring, new O-ring and
engine oil drain bolt B.
TIPMake sure that the O-ring is properly
seated.
6. Install engine oil drain bolt A andits new gasket, and then tighten
both drain bolts to their specified
torques.
7. Refill with the specified amount of the recommended engine oil, and
then install and tighten the oil filler
cap.TIPBe sure to wipe off spilled oil on any
parts after the engine and exhaust sys-
tem have cooled down.NOTICE
ECA11621
In or der to prevent clutch slip-
pa ge (since the en gine oil also
lu bricates the clutch), do not mix any chemical additives. Do
not use oils with a
diesel speci-
fication of “CD” or oils of a hi gh-
er quality than specifie d. In
a dd ition, do not use oils la bele d
“ENERGY CONSERVING II” or
hi gher.
Make sure that no forei gn mate-
rial enters the crankcase.
8. Start the engine, and then let it idle for several minutes while checking
it for oil leakage. If oil is leaking,
immediately turn the engine off
and check for the cause.
9. Turn the engine off, and then check the oil level and correct it if
necessary.
10. Reset the oil change tripmeter and oil change indicator “OIL
CHANGE”. (See page 3-7 for reset
procedures.)
1. Engine oil drain bolt A
2. Gasket
3. Oil strainer
4. Compression spring
5. O-ring
6. Engine oil drain bolt B
1
3456
2
Tightenin g torque:
Engine oil drain bolt A: 22 Nm (2.2 m·kgf, 16 ft·lbf)
Engine oil drain bolt B:
20 Nm (2.0 m·kgf, 14 ft·lbf)
Recommen ded en gine oil:
See page 8-1.
Oil quantity: 0.80 L (0.85 US qt, 0.70 Imp.qt)
U2CME2E0.book Page 11 Friday, August 21, 2015 9:16 AM
Page 54 of 87
Periodic maintenance an d a djustment
6-12
6
EAU60660
Final transmission oilThe final transmission case must be
checked for oil leakage before each
ride. If any leakage is found, have a
Yamaha dealer check and repair the vehicle. In addition, the final transmis-
sion oil must be changed as follows at
the intervals specified in the periodic
maintenance and lubrication chart. 1. Start the engine, warm up the final transmission oil by riding the vehi-
cle for several minutes, and then
stop the engine.
2. Place the vehicle on the center- stand.
3. Place an oil pan under the final transmission case to collect the
used oil.
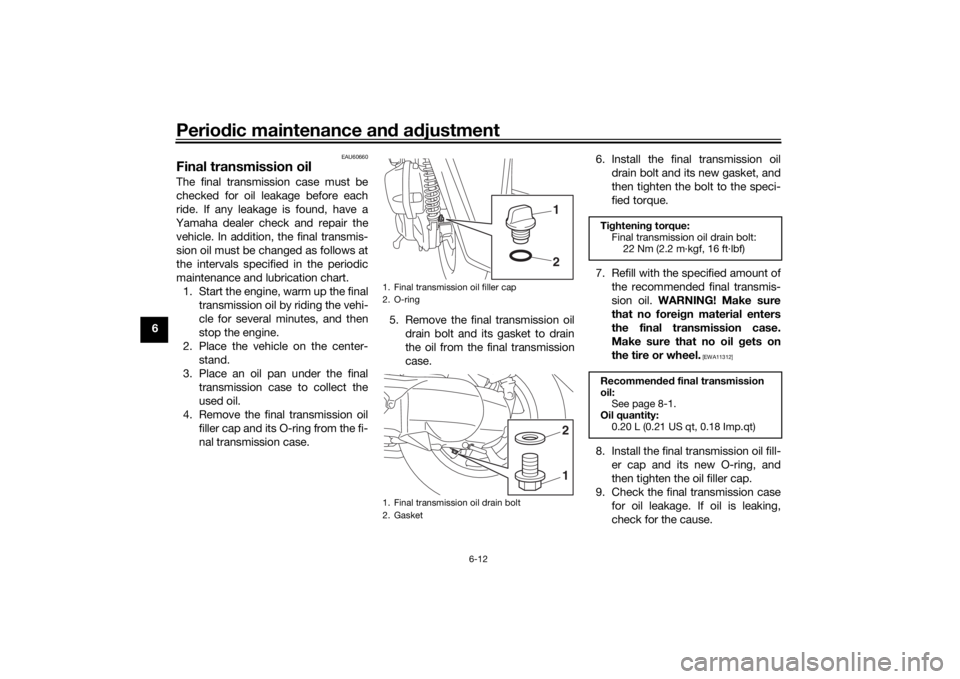
4. Remove the final transmission oil filler cap and its O-ring from the fi-
nal transmission case. 5. Remove the final transmission oil
drain bolt and its gasket to drain
the oil from the final transmission
case. 6. Install the final transmission oil
drain bolt and its new gasket, and
then tighten the bolt to the speci-
fied torque.
7. Refill with the specified amount of the recommended final transmis-
sion oil. WARNING! Make sure
that no forei gn material enters
the final transmission case.
Make sure that no oil gets on
the tire or wheel.
[EWA11312]
8. Install the final transmission oil fill- er cap and its new O-ring, and
then tighten the oil filler cap.
9. Check the final transmission case for oil leakage. If oil is leaking,
check for the cause.
1. Final transmission oil filler cap
2. O-ring
1. Final transmission oil drain bolt
2. Gasket
1
212
Tightenin g torque:
Final transmission oil drain bolt: 22 Nm (2.2 m·kgf, 16 ft·lbf)
Recommen ded final transmission
oil: See page 8-1.
Oil quantity: 0.20 L (0.21 US qt, 0.18 Imp.qt)
U2CME2E0.book Page 12 Friday, August 21, 2015 9:16 AM