wheel YAMAHA TT-R110E 2020 User Guide
[x] Cancel search | Manufacturer: YAMAHA, Model Year: 2020, Model line: TT-R110E, Model: YAMAHA TT-R110E 2020Pages: 88, PDF Size: 2.26 MB
Page 69 of 88

Periodic maintenance an d a djustment
7-27
7
EAU23292
Checkin g the wheel b earings
The front and rear wheel bearings must
be checked at the intervals specified in
the periodic maintenance and lubrica-
tion chart. If there is play in the wheel
hub or if the wheel does not turn
smoothly, have a Yamaha dealer
check the wheel bearings.
EAU23397
Battery
The battery is located behind panel B.
(See page 7-6.)
This model is equipped with a VRLA
(Valve Regulated Lead Acid) battery.
There is no need to check the electro-
lyte or to add distilled water. However,
the battery coupler needs to be
checked and, if necessary, securely
fastened.
WARNING
EWA10761
Electrolyte is poisonous an d
d an gerous since it contains sul-
furic aci d, which causes severe
b urns. Avoi d any contact with
skin, eyes or clothin g an d al-
ways shiel d your eyes when
workin g near b atteries. In case
of contact, ad minister the fol-
lowin g FIRST AID.
EXTERNAL: Flush with plenty of water.
INTERNAL: Drink lar ge quan-
tities of water or milk an d im-
me diately call a physician.
EYES: Flush with water for 15 minutes and seek prompt
me dical attention.
1. Battery coupler
2. Battery band
3. Battery
2
3
1
UB5185E0.book Page 27 Monday, June 17, 2019 9:04 AM
Page 71 of 88

Periodic maintenance an d a djustment
7-29
7
EAU50432
Replacin g the fuse
The fuse is located inside the battery
coupler. (See page 7-27.)
If the fuse is blown, replace it as fol-
lows.
1. Turn the key to “OFF” and turn off all electrical circuits.
2. Disconnect the battery coupler.
3. Remove the blown fuse, and then install a new fuse of the specified
amperage. WARNING! Do not
use a fuse of a hi gher ampera ge
ratin g than recommen ded to
avoi d causin g extensive dam-
a g e to the electrical system an d
possi bly a fire.
[EWA15132]
4. Connect the battery coupler.
5. Turn the key to “ON”.
6. If the fuse immediately blows
again, have a Yamaha dealer
check the electrical system.
EAU24351
Supportin g the motorcycle
Since this model is not equipped with a
centerstand, follow these precautions
when removing the front and rear
wheel or performing other mainte-
nance requiring the motorcycle to
stand upright. Check that the motorcy-
cle is in a stable and level position be-
fore starting any maintenance. A
strong wooden box can be placed un-
der the engine for added stability.
To service the front wheel
1. Stabilize the rear of the motorcy- cle by using a motorcycle stand
or, if an additional motorcycle
stand is not available, by placing a
jack under the frame in front of the
rear wheel.
2. Raise the front wheel off the ground by using a motorcycle
stand.
To service the rear wheel
Raise the rear wheel off the ground by
using a motorcycle stand or, if a motor-
cycle stand is not available, by placing
a jack either under each side of the
frame in front of the rear wheel or under
each side of the swingarm.
1. Battery coupler
2. Fuse
3. Spare fuse
Specified fuse:
10.0 A
1 3
2
UB5185E0.book Page 29 Monday, June 17, 2019 9:04 AM
Page 72 of 88

Periodic maintenance an d a djustment
7-30
7
EAU24361
Front wheel
EAU56491
To remove the front wheel
WARNING
EWA10822
To avoi d injury, securely support the
vehicle so there is no d anger of it
fallin g over.
1. Slide the rubber cover back at the
brake lever.
2. Loosen the locknut, and then turn the brake lever free play adjusting
bolt fully in direction (a).
3. Loosen the axle nut. 4. Lift the front wheel off the ground
according to the procedure in the
previous section “Supporting the
motorcycle”.
5. Remove the axle nut and washer.
6. Pull the wheel axle out.
7. Remove the brake shoe assembly from the wheel hub by pulling it
out.
8. Remove the wheel.
To install the front wheel 1. Install the brake shoe assembly into the wheel hub.
2. Lift the wheel up between the fork legs.
TIP
Make sure that the slot in the brake
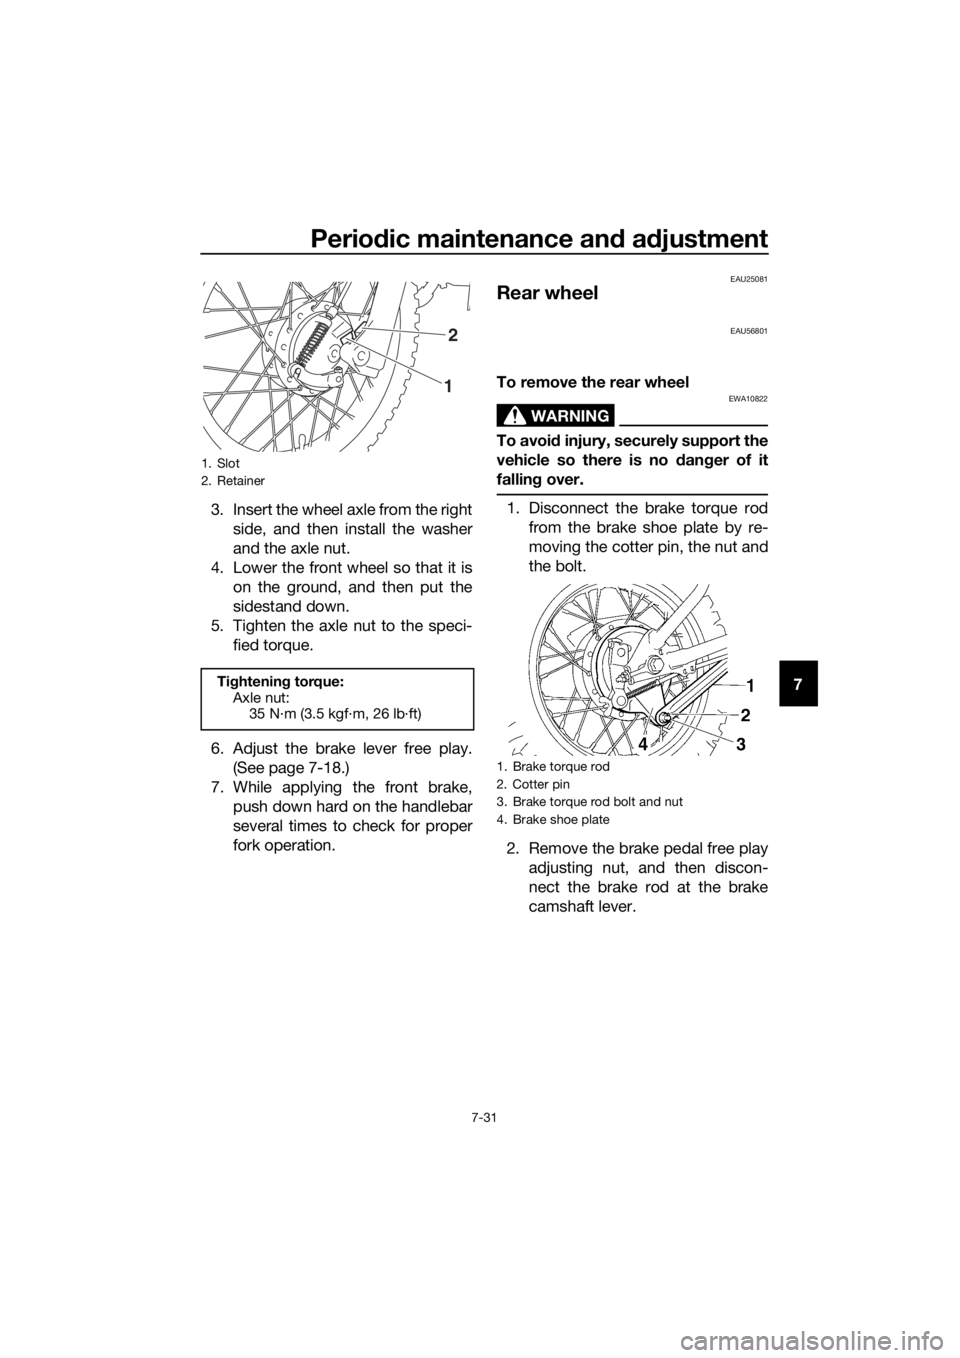
shoe plate fits over the retainer on the
fork leg.
1. Rubber cover
2. Brake lever free play adjusting bolt
3. Locknut
1. Axle nut
2. Washer
(a)
3
21
(a)
1. Wheel axle
1. Brake shoe assembly
1
UB5185E0.book Page 30 Monday, June 17, 2019 9:04 AM
Page 73 of 88
Periodic maintenance an d a djustment
7-31
7
3. Insert the wheel axle from the right
side, and then install the washer
and the axle nut.
4. Lower the front wheel so that it is on the ground, and then put the
sidestand down.
5. Tighten the axle nut to the speci- fied torque.
6. Adjust the brake lever free play. (See page 7-18.)
7. While applying the front brake, push down hard on the handlebar
several times to check for proper
fork operation.
EAU25081
Rear wheel
EAU56801
To remove the rear wheel
WARNING
EWA10822
To avoi d injury, securely support the
vehicle so there is no dan ger of it
fallin g over.
1. Disconnect the brake torque rod
from the brake shoe plate by re-
moving the cotter pin, the nut and
the bolt.
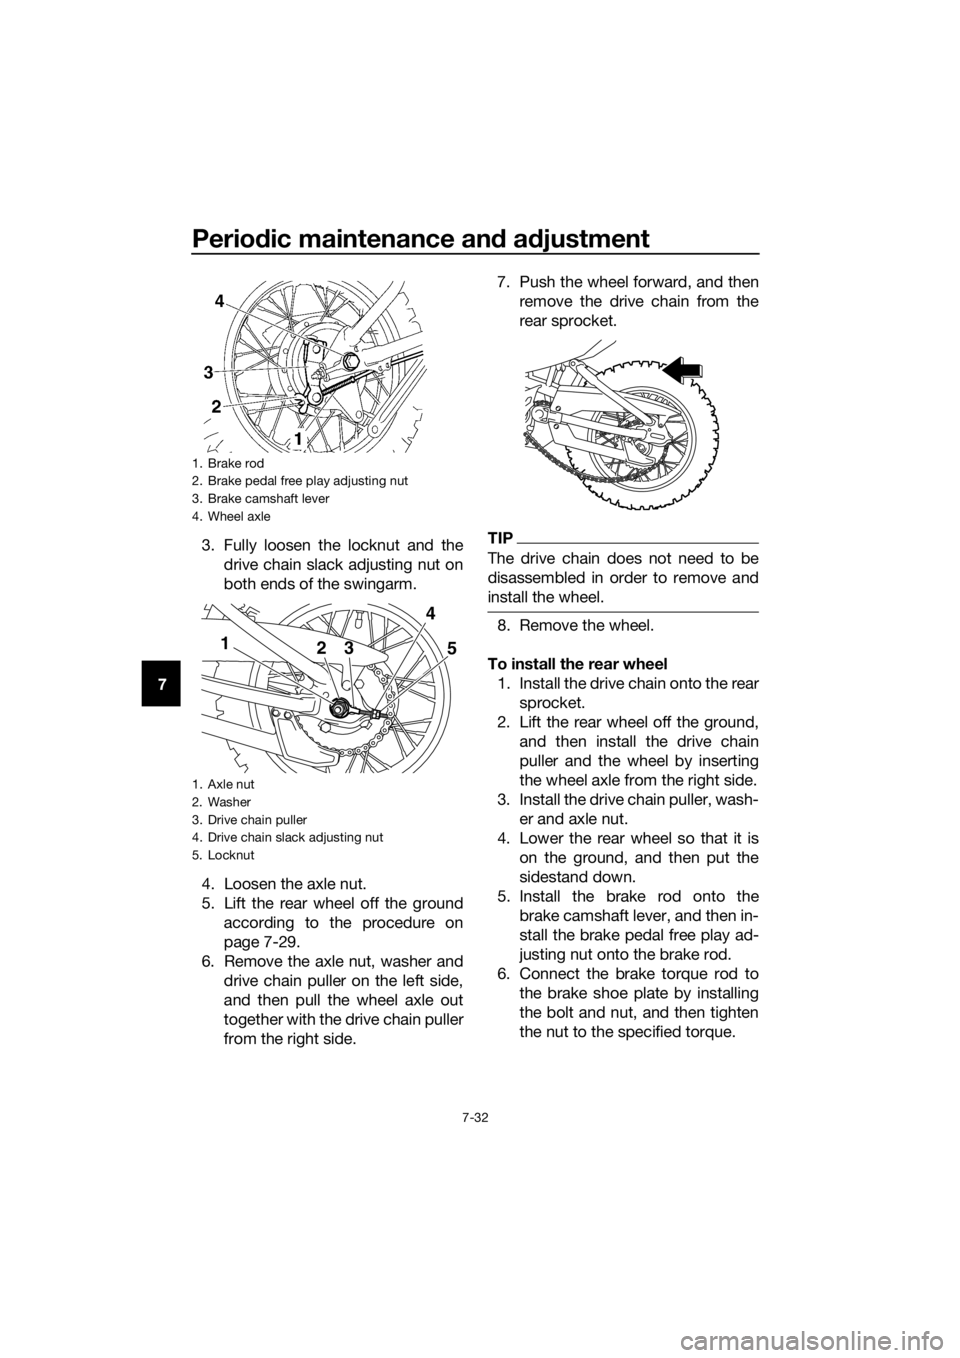
2. Remove the brake pedal free play adjusting nut, and then discon-
nect the brake rod at the brake
camshaft lever.
1. Slot
2. Retainer
Tightening torque:
Axle nut: 35 N·m (3.5 kgf·m, 26 lb·ft)
2
1
1. Brake torque rod
2. Cotter pin
3. Brake torque rod bolt and nut
4. Brake shoe plate
UB5185E0.book Page 31 Monday, June 17, 2019 9:04 AM
Page 74 of 88
Periodic maintenance an d a djustment
7-32
7 3. Fully loosen the locknut and the
drive chain slack adjusting nut on
both ends of the swingarm.
4. Loosen the axle nut.
5. Lift the rear wheel off the ground according to the procedure on
page 7-29.
6. Remove the axle nut, washer and drive chain puller on the left side,
and then pull the wheel axle out
together with the drive chain puller
from the right side. 7. Push the wheel forward, and then
remove the drive chain from the
rear sprocket.
TIP
The drive chain does not need to be
disassembled in order to remove and
install the wheel.
8. Remove the wheel.
To install the rear wheel 1. Install the drive chain onto the rear sprocket.
2. Lift the rear wheel off the ground, and then install the drive chain
puller and the wheel by inserting
the wheel axle from the right side.
3. Install the drive chain puller, wash- er and axle nut.
4. Lower the rear wheel so that it is on the ground, and then put the
sidestand down.
5. Install the brake rod onto the brake camshaft lever, and then in-
stall the brake pedal free play ad-
justing nut onto the brake rod.
6. Connect the brake torque rod to the brake shoe plate by installing
the bolt and nut, and then tighten
the nut to the specified torque.
1. Brake rod
2. Brake pedal free play adjusting nut
3. Brake camshaft lever
4. Wheel axle
1. Axle nut
2. Washer
3. Drive chain puller
4. Drive chain slack adjusting nut
5. Locknut
1 23 5
4
UB5185E0.book Page 32 Monday, June 17, 2019 9:04 AM
Page 77 of 88
Motorcycle care and stora ge
8-1
8
EAU37834
Matte color caution
NOTICE
ECA15193
Some mo dels are equipped with
matte colored finished parts. Be
sure to consult a Yamaha dealer for
a d vice on what pro ducts to use be-
fore cleanin g the vehicle. Usin g a
b rush, harsh chemical prod ucts or
cleanin g compoun ds when cleanin g
these parts will scratch or damag e
their surface. Wax also shoul d not
b e applie d to any matte colored fin-
ishe d parts.
EAU40466
Care
While the open design of a motorcycle
reveals the attractiveness of the tech-
nology, it also makes it more vulnera-
ble. Rust and corrosion can develop
even if high-quality components are
used. A rusty exhaust pipe may go un-
noticed on a car, however, it detracts
from the overall appearance of a mo-
torcycle. Frequent and proper care
does not only comply with the terms of
the warranty, but it will also keep your
motorcycle looking good, extend its
life and optimize its performance.
Before cleanin g
1. Cover the muffler outlet with a plastic bag after the engine has
cooled down.
2. Make sure that all caps and cov- ers as well as all electrical cou-
plers and connectors, including
the spark plug cap, are tightly in-
stalled.
3. Remove extremely stubborn dirt, like oil burnt onto the crankcase,
with a degreasing agent and a
brush, but never apply such prod-
ucts onto seals, gaskets, sprock-
ets, the drive chain and wheel
axles. Always rinse the dirt and
degreaser off with water.
Cleanin g
NOTICE
ECA10773
Avoi d using strong aci dic wheel
cleaners, especially on spoked
wheels. If such pro ducts are
use d on har d-to-remove dirt, do
not leave the cleaner on the af-
UB5185E0.book Page 1 Monday, June 17, 2019 9:04 AM
Page 78 of 88

Motorcycle care and stora ge
8-2
8 fected
area any lon ger than in-
structe d. Also, thorou ghly rinse
the area off with water, imme di-
ately dry it, an d then apply a cor-
rosion protection spray.
Improper cleanin g can d amage
plastic parts (such as cowlin gs,
panels, win dshield s, hea dlig ht
lenses, meter lenses, etc.) an d
the mufflers. Use only a soft,
clean cloth or spon ge with wa-
ter to clean plastic. However, if
the plastic parts cannot be thor-
ou ghly cleaned with water, di-
lute d mil d d eter gent with water
may be used . Be sure to rinse
off any d etergent resi due usin g
plenty of water, as it is harmful
to plastic parts.
Do not use any harsh chemical
prod ucts on plastic parts. Be
sure to avoi d using cloths or
spon ges which have been in
contact with stron g or a brasive
cleanin g pro ducts, solvent or
thinner, fuel (g asoline), rust re-
movers or inhi bitors, brake flui d,
antifreeze or electrolyte.
Do not use hi gh-pressure wash-
ers or steam-jet cleaners since
they cause water seepa ge an d
d eterioration in the followin g ar-
eas: seals (of wheel an d swin g-
arm bearin gs, fork an d b rakes),
electric components (couplers,
connectors, instruments,
switches an d lig hts), breather
hoses an d vents.
For motorcycles equippe d with
a win dshield : Do not use stron g
cleaners or har d spon ges as
they will cause dullin g or scratching
. Some cleanin g
compoun ds for plastic may
leave scratches on the win d-
shield . Test the pro duct on a
small hi dden part of the win d-
shield to make sure that it d oes
not leave any marks. If the win d-
shield is scratche d, use a quality
plast
ic polishin g compoun d af-
ter washin g.
After normal use
Remove dirt with warm water, a mild
detergent, and a soft, clean sponge,
and then rinse thoroughly with clean
water. Use a toothbrush or bottlebrush
for hard-to-reach areas. Stubborn dirt
and insects will come off more easily if
the area is covered with a wet cloth for
a few minutes before cleaning.
After riding in the rain or near the sea
Since sea salt is extremely corrosive,
carry out the following steps after each
ride in the rain or near the sea.
1. Clean the motorcycle with cold water and a mild detergent, after
the engine has cooled down.
NOTICE: Do not use warm wa-
ter since it increases the corro-
sive action of the salt.
[ECA10792]
2. Apply a corrosion protection spray on all metal, including chrome-
and nickel-plated, surfaces to pre-
vent corrosion.
After cleaning 1. Dry the motorcycle with a chamois or an absorbing cloth.
2. Immediately dry the drive chain and lubricate it to prevent it from
rusting.
UB5185E0.book Page 2 Monday, June 17, 2019 9:04 AM
Page 80 of 88
Motorcycle care and stora ge
8-4
8
EAU26153
Stora ge
Short-term
Always store your motorcycle in a cool,
dry place and, if necessary, protect it
against dust with a porous cover. Be
sure the engine and the exhaust sys-
tem are cool before covering the mo-
torcycle.
NOTICE
ECA10811
Storin g the motorcycle in a
poorly ventilated room or cover-
in g it with a tarp, while it is still
wet, will allow water an d humi d-
ity to seep in an d cause rust.
To prevent corrosion, avoi d
d amp cellars, sta bles ( because
of the presence of ammonia)
an d areas where stron g chemi-
cals are stored .
Long-term
Before storing your motorcycle for sev-
eral months: 1. Follow all the instructions in the “Care” section of this chapter.
2. For motorcycles equipped with a fuel cock that has an “OFF” posi-
tion: Turn the fuel cock lever to
“OFF”.
3. Drain the carburetor float chamber by loosening the drain bolt; this
will prevent fuel deposits from
building up. Pour the drained fuel
into the fuel tank.
4. Fill up the fuel tank and add fuel stabilizer (if available) to prevent
the fuel tank from rusting and the
fuel from deteriorating. 5. Perform the following steps to
protect the cylinder, piston rings,
etc. from corrosion.a. Remove the spark plug cap and spark plug.
b. Pour a teaspoonful of engine oil into the spark plug bore.
c. Install the spark plug cap onto the spark plug, and then place
the spark plug on the cylinder
head so that the electrodes are
grounded. (This will limit spark-
ing during the next step.)
d. Turn the engine over several times with the starter. (This will
coat the cylinder wall with oil.)
WARNING! To prevent d am-
a g e or injury from sparkin g,
make sure to groun d the
spark plu g electro des while
turnin g the en gine over.
[EWA10952]
e. Remove the spark plug cap
from the spark plug, and then
install the spark plug and the
spark plug cap.
6. Lubricate all control cables and the pivoting points of all levers and
pedals as well as of the side-
stand/centerstand.
7. Check and, if necessary, correct the tire air pressure, and then lift
the motorcycle so that both of its
wheels are off the ground. Alterna-
tively, turn the wheels a little every
month in order to prevent the tires
from becoming degraded in one
spot.
8. Cover the muffler outlet with a plastic bag to prevent moisture
from entering it.
UB5185E0.book Page 4 Monday, June 17, 2019 9:04 AM
Page 82 of 88
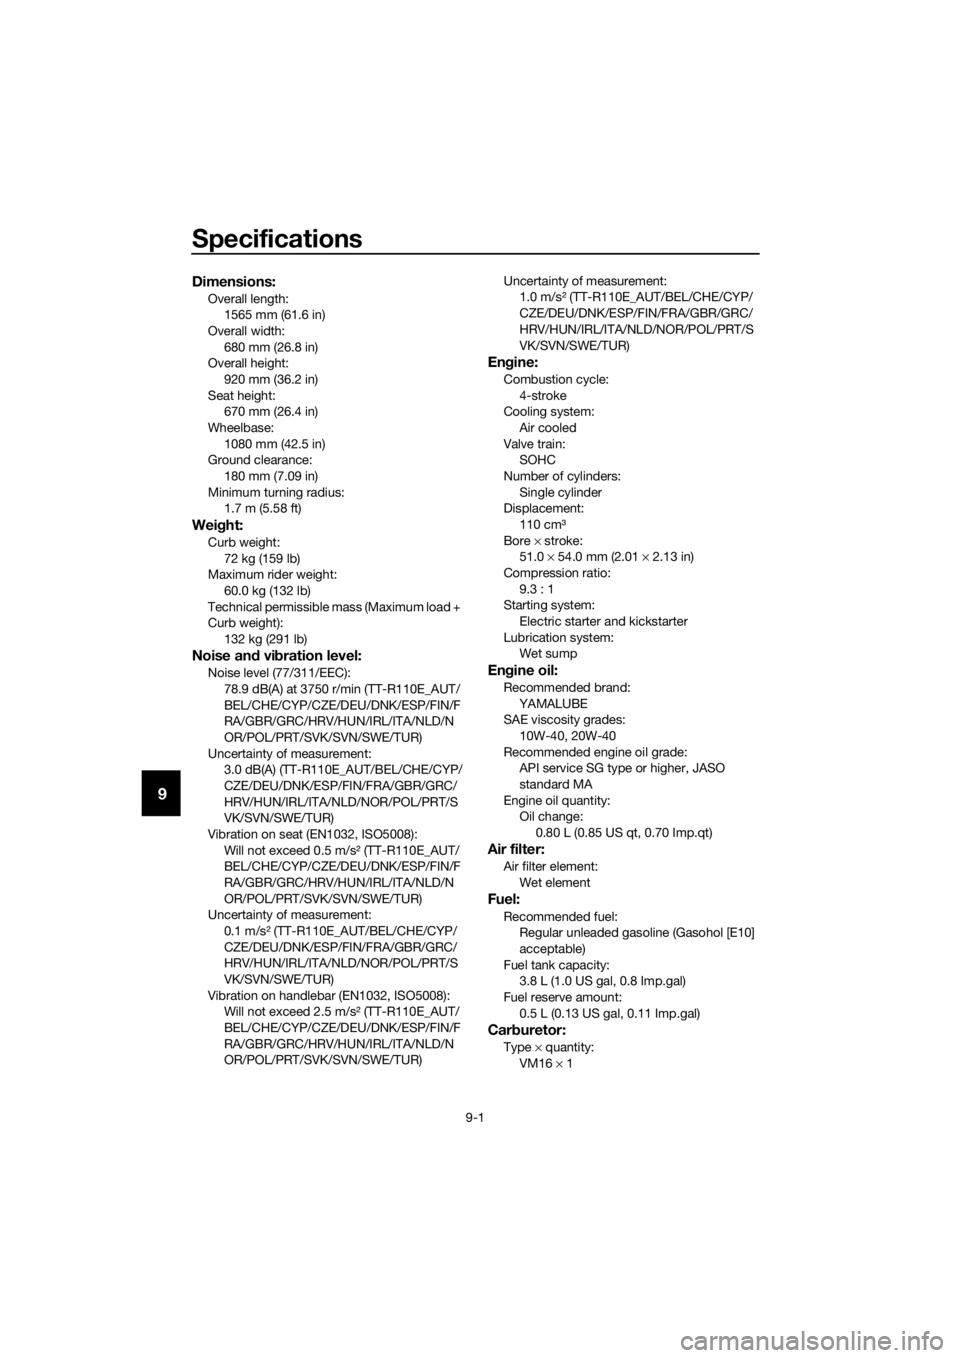
Specifications
9-1
9
Dimensions:
Overall length:1565 mm (61.6 in)
Overall width:
680 mm (26.8 in)
Overall height: 920 mm (36.2 in)
Seat height: 670 mm (26.4 in)
Wheelbase:
1080 mm (42.5 in)
Ground clearance: 180 mm (7.09 in)
Minimum turning radius: 1.7 m (5.58 ft)
Wei ght:
Curb weight:
72 kg (159 lb)
Maximum rider weight: 60.0 kg (132 lb)
Technical permissible mass (Maximum load +
Curb weight): 132 kg (291 lb)
Noise an d vi bration level:
Noise level (77/311/EEC):
78.9 dB(A) at 3750 r/min (TT-R110E_AUT/
BEL/CHE/CYP/CZE/DEU/DNK/ESP/FIN/F
RA/GBR/GRC/HRV/HUN/IRL/ITA/NLD/N
OR/POL/PRT/SVK/SVN/SWE/TUR)
Uncertainty of measurement: 3.0 dB(A) (TT-R110E_AUT/BEL/CHE/CYP/
CZE/DEU/DNK/ESP/FIN/FRA/GBR/GRC/
HRV/HUN/IRL/ITA/NLD/NOR/POL/PRT/S
VK/SVN/SWE/TUR)
Vibration on seat (EN1032, ISO5008): Will not exceed 0.5 m/s² (TT-R110E_AUT/
BEL/CHE/CYP/CZE/DEU/DNK/ESP/FIN/F
RA/GBR/GRC/HRV/HUN/IRL/ITA/NLD/N
OR/POL/PRT/SVK/SVN/SWE/TUR)
Uncertainty of measurement:
0.1 m/s² (TT-R110E_AUT/BEL/CHE/CYP/
CZE/DEU/DNK/ESP/FIN/FRA/GBR/GRC/
HRV/HUN/IRL/ITA/NLD/NOR/POL/PRT/S
VK/SVN/SWE/TUR)
Vibration on handlebar (EN1032, ISO5008): Will not exceed 2.5 m/s² (TT-R110E_AUT/
BEL/CHE/CYP/CZE/DEU/DNK/ESP/FIN/F
RA/GBR/GRC/HRV/HUN/IRL/ITA/NLD/N
OR/POL/PRT/SVK/SVN/SWE/TUR) Uncertainty of measurement:
1.0 m/s² (TT-R110E_AUT/BEL/CHE/CYP/
CZE/DEU/DNK/ESP/FIN/FRA/GBR/GRC/
HRV/HUN/IRL/ITA/NLD/NOR/POL/PRT/S
VK/SVN/SWE/TUR)
Engine:
Combustion cycle:
4-stroke
Cooling system: Air cooled
Valve train: SOHC
Number of cylinders:
Single cylinder
Displacement:
110 cm³
Bore × stroke:
51.0 × 54.0 mm (2.01 × 2.13 in)
Compression ratio: 9.3 : 1
Starting system:
Electric starter and kickstarter
Lubrication system: Wet sump
Engine oil:
Recommended brand:
YAMALUBE
SAE viscosity grades: 10W-40, 20W-40
Recommended engine oil grade: API service SG type or higher, JASO
standard MA
Engine oil quantity: Oil change: 0.80 L (0.85 US qt, 0.70 Imp.qt)
Air filter:
Air filter element:
Wet element
Fuel:
Recommended fuel:Regular unleaded gasoline (Gasohol [E10]
acceptable)
Fuel tank capacity: 3.8 L (1.0 US gal, 0.8 Imp.gal)
Fuel reserve amount:
0.5 L (0.13 US gal, 0.11 Imp.gal)
Car buretor:
Type × quantity:
VM16 × 1
UB5185E0.book Page 1 Monday, June 17, 2019 9:04 AM
Page 83 of 88
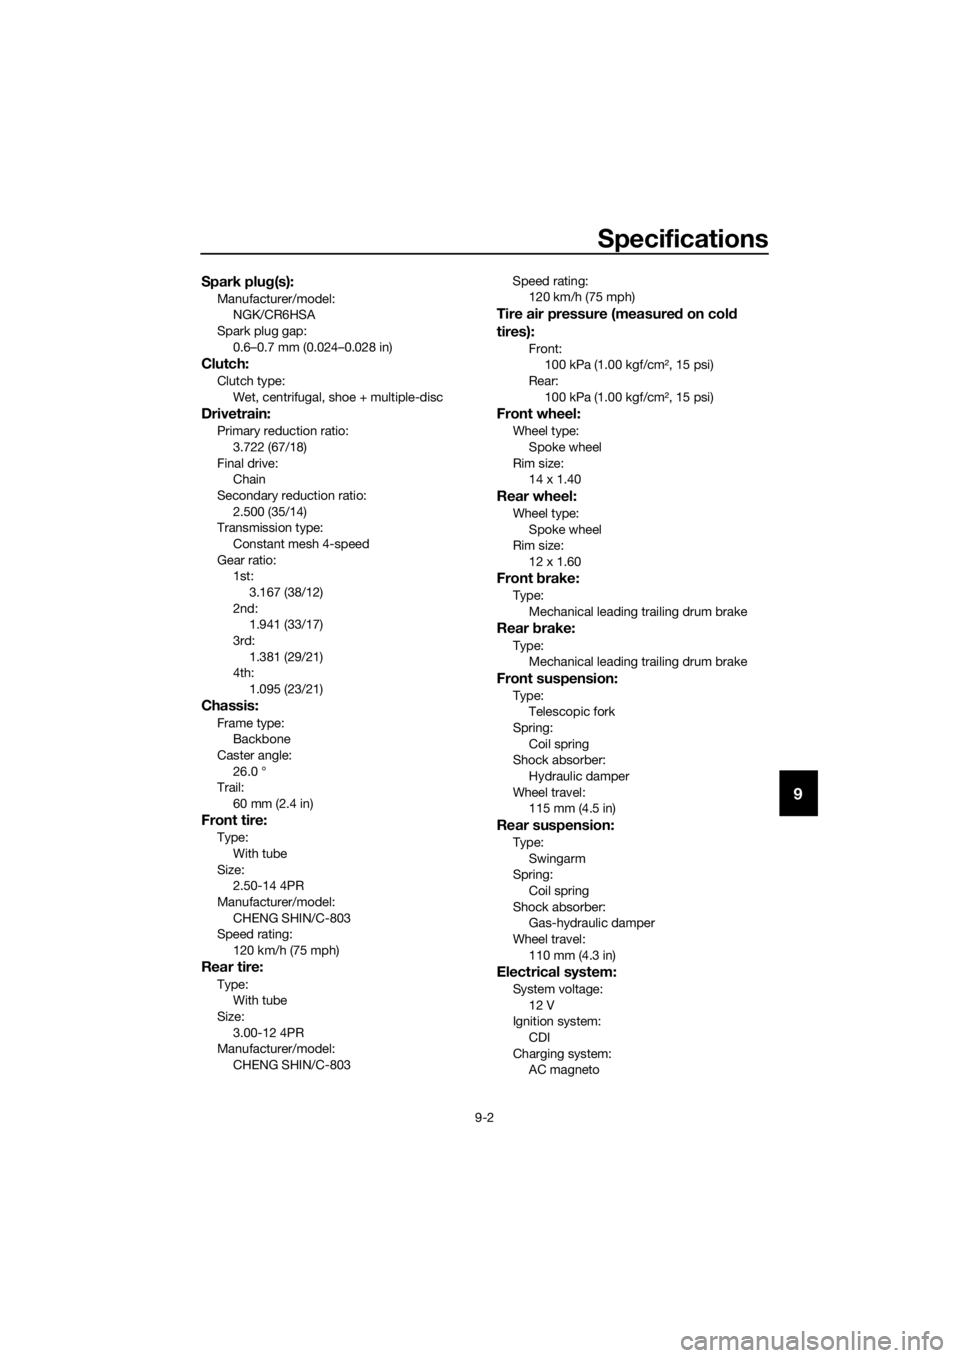
Specifications
9-2
9
Spark plug(s):
Manufacturer/model:
NGK/CR6HSA
Spark plug gap:
0.6–0.7 mm (0.024–0.028 in)
Clutch:
Clutch type:Wet, centrifugal, shoe + multiple-disc
Drivetrain:
Primary reduction ratio:3.722 (67/18)
Final drive: Chain
Secondary reduction ratio:
2.500 (35/14)
Transmission type:
Constant mesh 4-speed
Gear ratio: 1st:
3.167 (38/12)
2nd: 1.941 (33/17)
3rd: 1.381 (29/21)
4th:
1.095 (23/21)
Chassis:
Frame type:Backbone
Caster angle:
26.0 °
Trail: 60 mm (2.4 in)
Front tire:
Type:
With tube
Size: 2.50-14 4PR
Manufacturer/model: CHENG SHIN/C-803
Speed rating:
120 km/h (75 mph)
Rear tire:
Type:With tube
Size:
3.00-12 4PR
Manufacturer/model: CHENG SHIN/C-803 Speed rating:
120 km/h (75 mph)
Tire air pressure (measure d on col d
tires):
Front:
100 kPa (1.00 kgf/cm², 15 psi)
Rear: 100 kPa (1.00 kgf/cm², 15 psi)
Front wheel:
Wheel type: Spoke wheel
Rim size: 14 x 1.40
Rear wheel:
Wheel type:
Spoke wheel
Rim size: 12 x 1.60
Front brake:
Type:
Mechanical leading trailing drum brake
Rear brake:
Type:
Mechanical leading trailing drum brake
Front suspension:
Type:Telescopic fork
Spring: Coil spring
Shock absorber:
Hydraulic damper
Wheel travel: 115 mm (4.5 in)
Rear suspension:
Type:
Swingarm
Spring: Coil spring
Shock absorber: Gas-hydraulic damper
Wheel travel:
110 mm (4.3 in)
Electrical system:
System voltage:12 V
Ignition system:
CDI
Charging system: AC magneto
UB5185E0.book Page 2 Monday, June 17, 2019 9:04 AM