engine YAMAHA TTR125 2002 Manual Online
[x] Cancel search | Manufacturer: YAMAHA, Model Year: 2002, Model line: TTR125, Model: YAMAHA TTR125 2002Pages: 509, PDF Size: 16.83 MB
Page 388 of 509

5 - 12
CHAS
FRONT BRAKE (TT-R125LW)
Extent of removal:1 Brake hose removal 2 Brake caliper removal
3 Brake master cylinder removal
Extent of removal Order Part name Q’ty Remarks
Preparation for removalFRONT BRAKE REMOVAL
Hold the machine by placing the
suitable stand under the engine.
Drain the brake fluid.
WARNING
Support the machine securely so there is nodanger of it falling over.
Refer to “REMOVAL POINTS”.
1 Brake hose holder 2
2 Union bolt 1
3 Brake hose 1
4 Joint 1
5 Brake caliper support bolt 1
6 Brake caliper 1 Refer to “REMOVAL POINTS”.
7 Brake lever 1
8 Brake master cylinder bracket 1
9Brake master cylinder
1
3
12
2
3
FRONT BRAKE (TT-R125LW)
Page 390 of 509
5 - 13
CHASFRONT BRAKE (TT-R125LW)
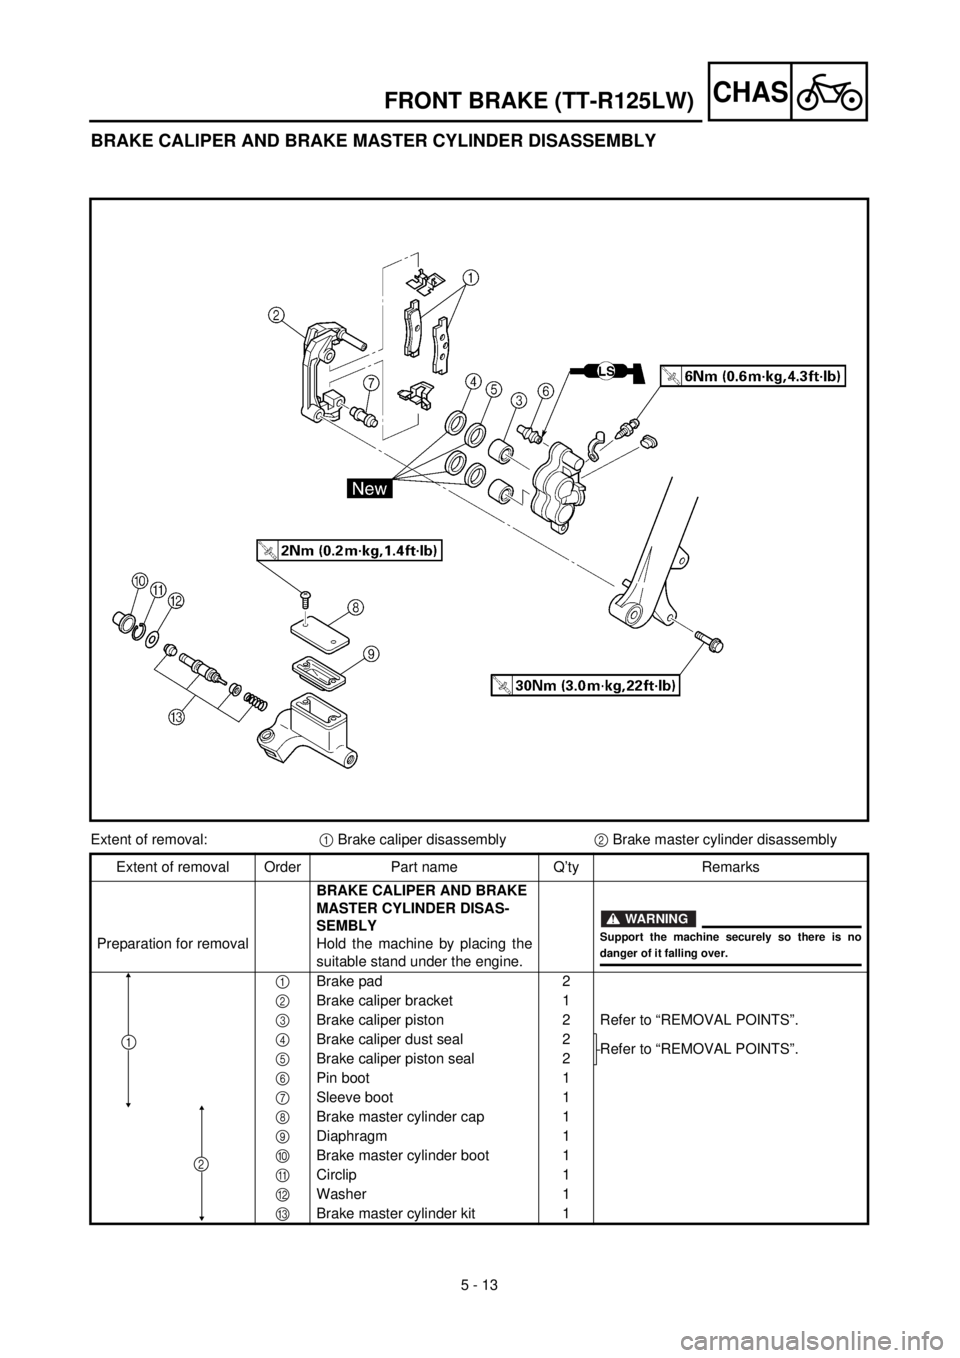
BRAKE CALIPER AND BRAKE MASTER CYLINDER DISASSEMBLY
Extent of removal:1 Brake caliper disassembly2 Brake master cylinder disassembly
Extent of removal Order Part name Q’ty Remarks
Preparation for removalBRAKE CALIPER AND BRAKE
MASTER CYLINDER DISAS-
SEMBLY
Hold the machine by placing the
suitable stand under the engine.
WARNING
Support the machine securely so there is nodanger of it falling over.
1Brake pad 2
2Brake caliper bracket 1
3Brake caliper piston 2 Refer to “REMOVAL POINTS”.
4Brake caliper dust seal 2
Refer to “REMOVAL POINTS”.
5Brake caliper piston seal 2
6Pin boot 1
7Sleeve boot 1
8Brake master cylinder cap 1
9Diaphragm 1
0Brake master cylinder boot 1
ACirclip 1
BWasher 1
CBrake master cylinder kit 1
2
1
Page 412 of 509
5 - 24
CHAS
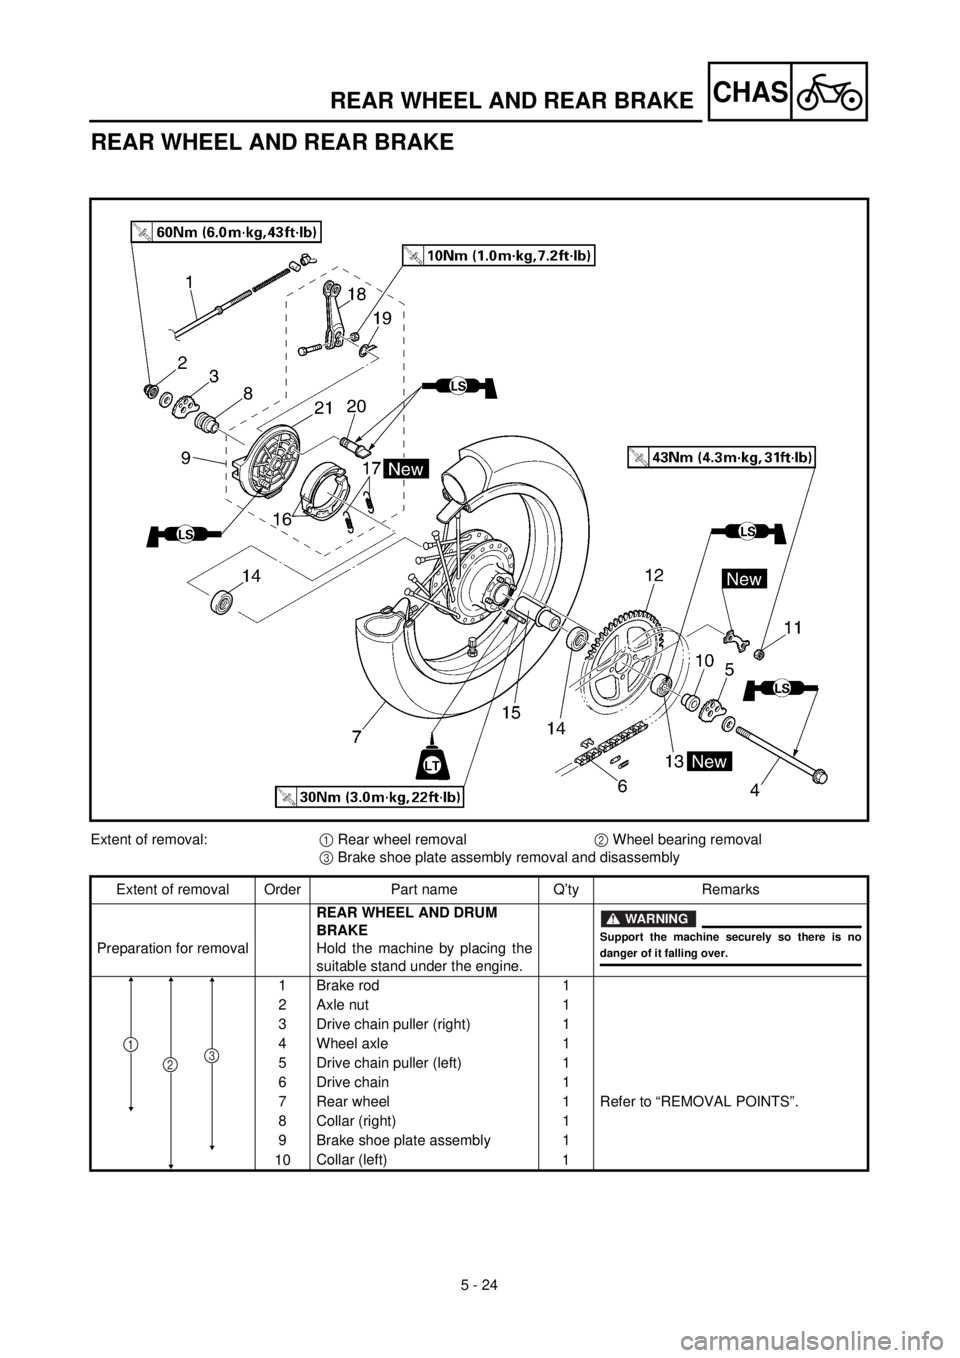
REAR WHEEL AND REAR BRAKE
Extent of removal:1 Rear wheel removal 2 Wheel bearing removal
3 Brake shoe plate assembly removal and disassembly
Extent of removal Order Part name Q’ty Remarks
Preparation for removalREAR WHEEL AND DRUM
BRAKE
Hold the machine by placing the
suitable stand under the engine.
WARNING
Support the machine securely so there is nodanger of it falling over.
1 Brake rod 1
2 Axle nut 1
3 Drive chain puller (right) 1
4 Wheel axle 1
5 Drive chain puller (left) 1
6 Drive chain 1
7 Rear wheel 1 Refer to “REMOVAL POINTS”.
8 Collar (right) 1
9 Brake shoe plate assembly 1
10Collar (left)
1
231
REAR WHEEL AND REAR BRAKE
Page 428 of 509
5 - 32
CHASFRONT FORK
EC550000
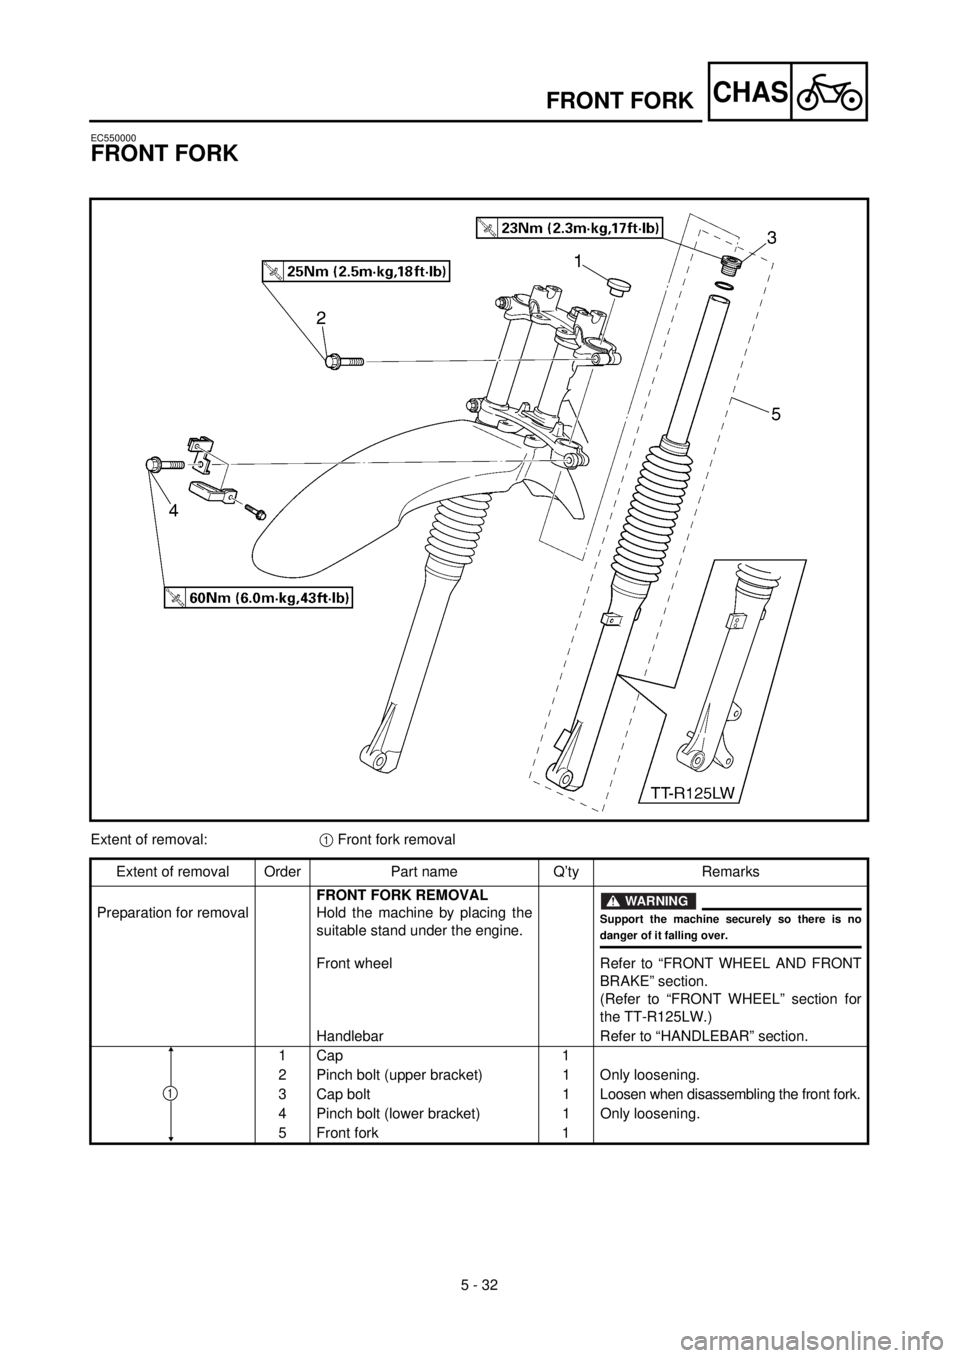
FRONT FORK
Extent of removal:1 Front fork removal
Extent of removal Order Part name Q’ty Remarks
Preparation for removalFRONT FORK REMOVAL
Hold the machine by placing the
suitable stand under the engine.
WARNING
Support the machine securely so there is nodanger of it falling over.
Front wheel Refer to “FRONT WHEEL AND FRONT
BRAKE” section.
(Refer to “FRONT WHEEL” section for
the TT-R125LW.)
Handlebar Refer to “HANDLEBAR” section.
1 Cap 1
2 Pinch bolt (upper bracket) 1 Only loosening.
3 Cap bolt 1Loosen when disassembling the front fork.
4 Pinch bolt (lower bracket) 1 Only loosening.
5Front fork
1
1
Page 446 of 509
5 - 41
CHASHANDLEBAR
EC5B0000
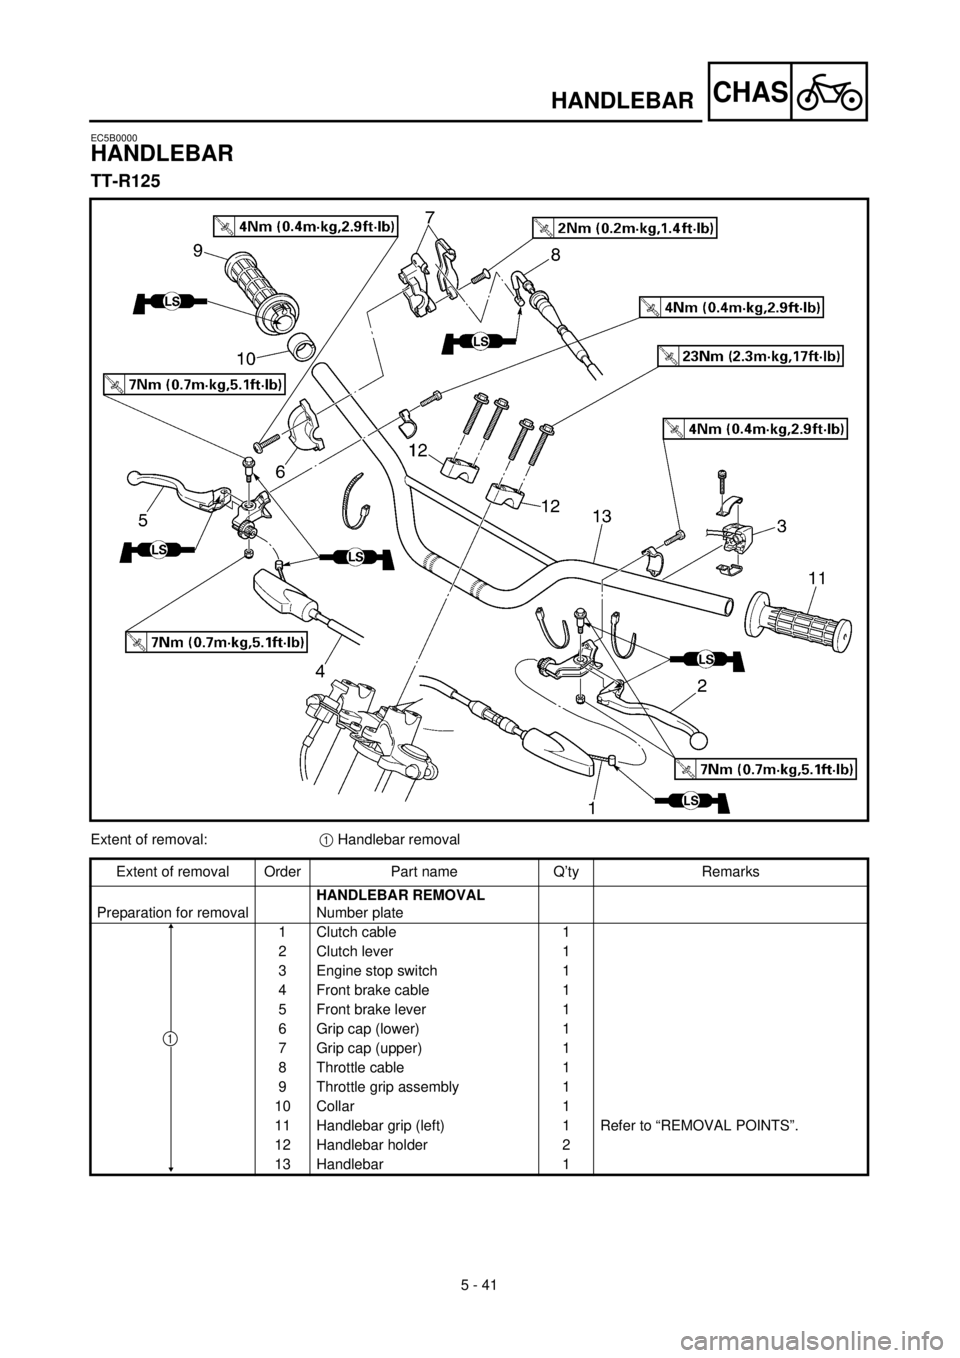
HANDLEBAR
TT-R125
Extent of removal:1 Handlebar removal
Extent of removal Order Part name Q’ty Remarks
Preparation for removalHANDLEBAR REMOVAL
Number plate
1 Clutch cable 1
2 Clutch lever 1
3 Engine stop switch 1
4 Front brake cable 1
5 Front brake lever 1
6 Grip cap (lower) 1
7 Grip cap (upper) 1
8 Throttle cable 1
9 Throttle grip assembly 1
10 Collar 1
11 Handlebar grip (left) 1 Refer to “REMOVAL POINTS”.
12 Handlebar holder 2
13 Handlebar 1
1
Page 448 of 509
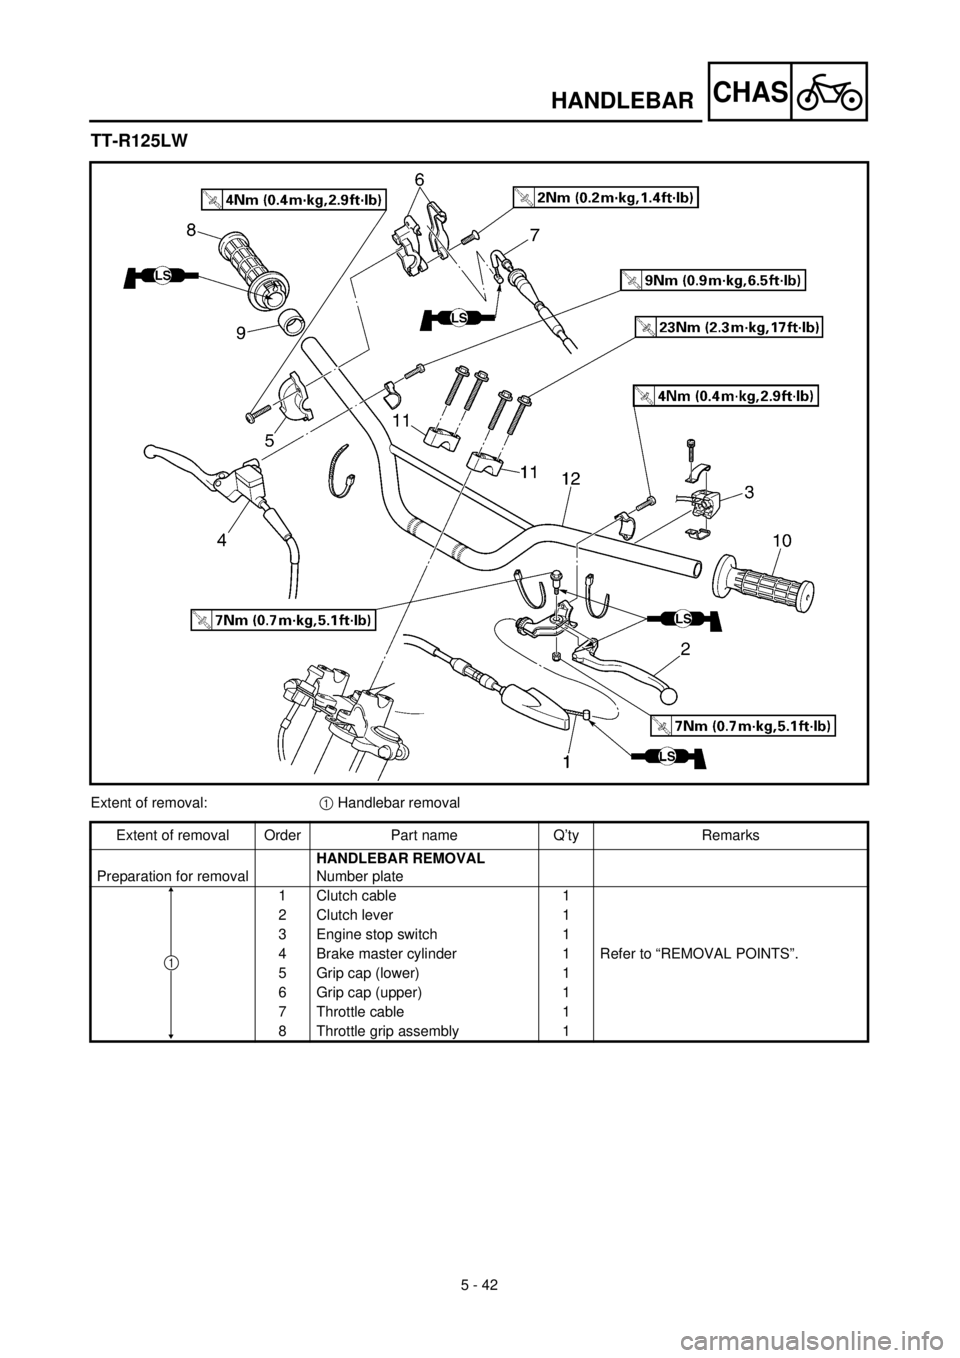
5 - 42
CHASHANDLEBAR
TT-R125LW
Extent of removal:1 Handlebar removal
Extent of removal Order Part name Q’ty Remarks
Preparation for removalHANDLEBAR REMOVAL
Number plate
1 Clutch cable 1
2 Clutch lever 1
3 Engine stop switch 1
4 Brake master cylinder 1 Refer to “REMOVAL POINTS”.
5 Grip cap (lower) 1
6 Grip cap (upper) 1
7 Throttle cable 1
8 Throttle grip assembly 1
1
Page 460 of 509
5 - 48
CHAS
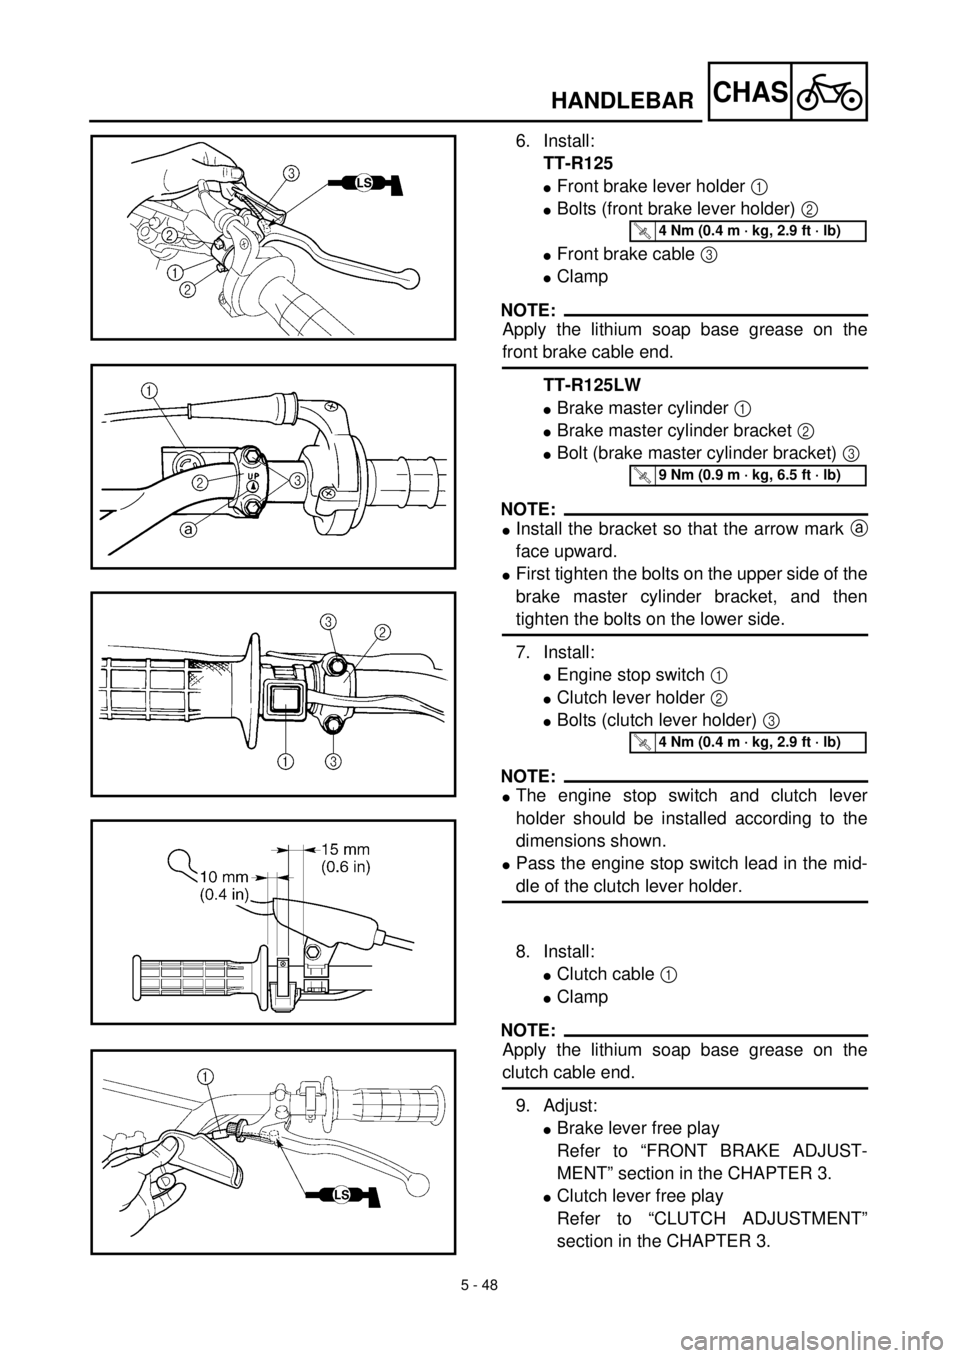
6. Install:
TT-R125
lFront brake lever holder 1
lBolts (front brake lever holder) 2
lFront brake cable 3
lClamp
NOTE:
Apply the lithium soap base grease on the
front brake cable end.
TT-R125LW
lBrake master cylinder 1
lBrake master cylinder bracket 2
lBolt (brake master cylinder bracket) 3
NOTE:
lInstall the bracket so that the arrow mark a
face upward.
lFirst tighten the bolts on the upper side of the
brake master cylinder bracket, and then
tighten the bolts on the lower side.
7. Install:
lEngine stop switch 1
lClutch lever holder 2
lBolts (clutch lever holder) 3
NOTE:
lThe engine stop switch and clutch lever
holder should be installed according to the
dimensions shown.
lPass the engine stop switch lead in the mid-
dle of the clutch lever holder.
8. Install:
lClutch cable 1
lClamp
NOTE:
Apply the lithium soap base grease on the
clutch cable end.
9. Adjust:
lBrake lever free play
Refer to “FRONT BRAKE ADJUST-
MENT” section in the CHAPTER 3.
lClutch lever free play
Refer to “CLUTCH ADJUSTMENT”
section in the CHAPTER 3.
T R..4 Nm (0.4 m · kg, 2.9 ft · lb)
T R..9 Nm (0.9 m · kg, 6.5 ft · lb)
T R..4 Nm (0.4 m · kg, 2.9 ft · lb)
HANDLEBAR
Page 462 of 509
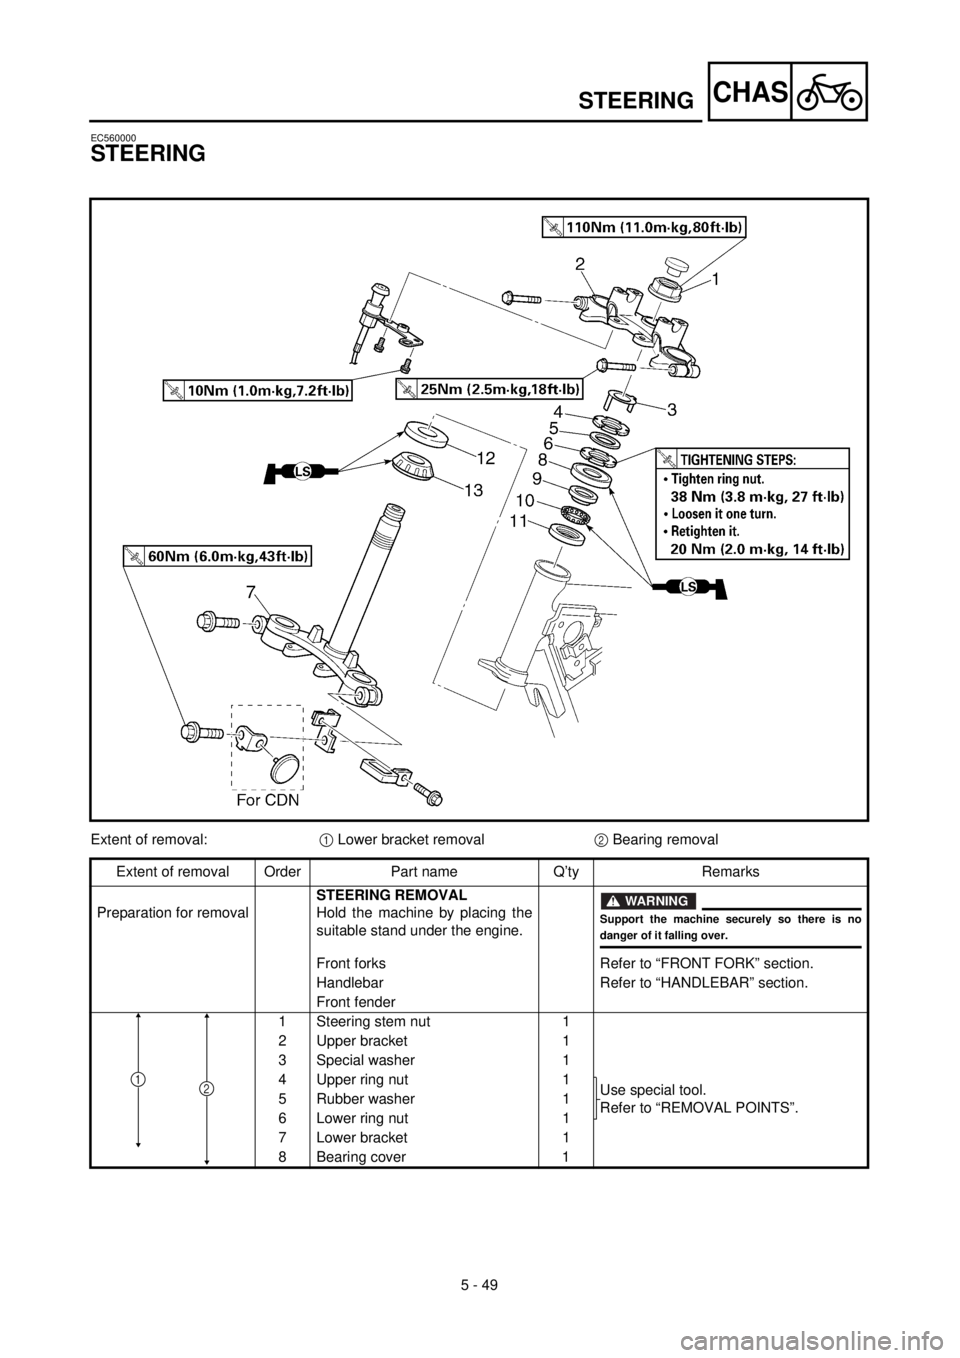
5 - 49
CHASSTEERING
EC560000
STEERING
Extent of removal:1 Lower bracket removal2 Bearing removal
Extent of removal Order Part name Q’ty Remarks
Preparation for removalSTEERING REMOVAL
Hold the machine by placing the
suitable stand under the engine.
WARNING
Support the machine securely so there is nodanger of it falling over.
Front forks Refer to “FRONT FORK” section.
Handlebar Refer to “HANDLEBAR” section.
Front fender
1 Steering stem nut 1
2 Upper bracket 1
3 Special washer 1
4 Upper ring nut 1
Use special tool.
Refer to “REMOVAL POINTS”. 5 Rubber washer 1
6 Lower ring nut 1
7 Lower bracket 1
8Bearing cover
1
21
Page 474 of 509

5 - 55
CHASSWINGARM
EC570000
SWINGARM
Extent of removal:1 Swingarm removal
Extent of removal Order Part name Q’ty Remarks
Preparation for removalSWINGARM REMOVAL
Hold the machine by placing the
suitable stand under the engine.
WARNING
Support the machine securely so there is nodanger of it falling over.
Rear wheel Refer to “REAR WHEEL AND REAR
BRAKE” section.
1 Drive chain tensioner (upper) 1
2 Drive chain tensioner (lower) 1
3 Bolt (connecting arm-frame) 1
4 Bolt (rear shock absorber-relay arm) 1Hold the swingarm.
5 Pivot shaft 1
6 Swingarm 1
1
Page 488 of 509
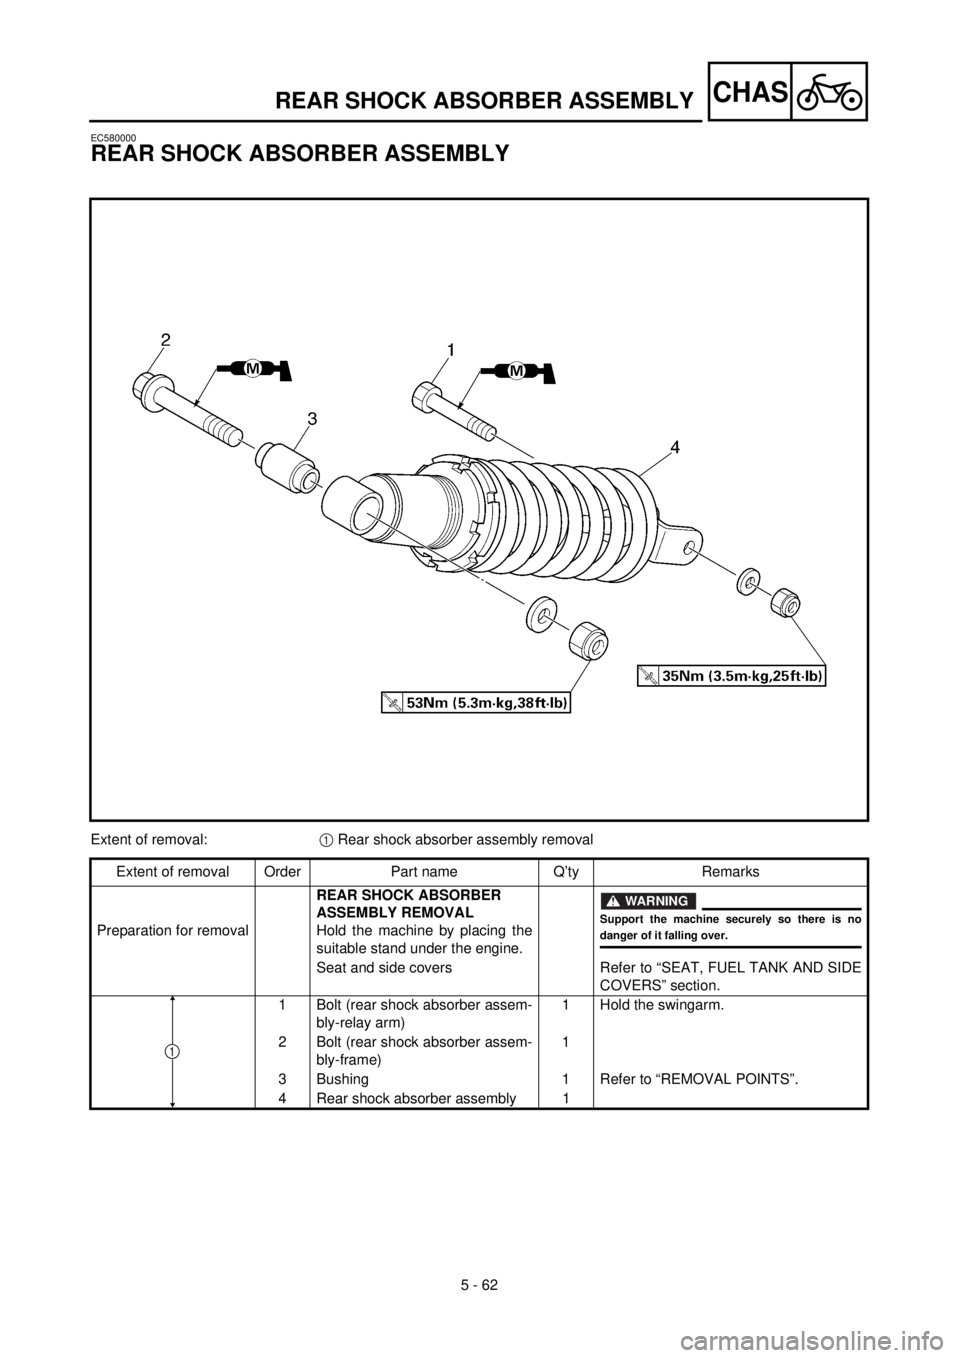
5 - 62
CHASREAR SHOCK ABSORBER ASSEMBLY
EC580000
REAR SHOCK ABSORBER ASSEMBLY
Extent of removal:1 Rear shock absorber assembly removal
Extent of removal Order Part name Q’ty Remarks
Preparation for removalREAR SHOCK ABSORBER
ASSEMBLY REMOVAL
Hold the machine by placing the
suitable stand under the engine.
WARNING
Support the machine securely so there is nodanger of it falling over.
Seat and side covers Refer to “SEAT, FUEL TANK AND SIDE
COVERS” section.
1 Bolt (rear shock absorber assem-
bly-relay arm)1 Hold the swingarm.
2 Bolt (rear shock absorber assem-
bly-frame)1
3 Bushing 1 Refer to “REMOVAL POINTS”.
4 Rear shock absorber assembly 1
1