check engine YAMAHA TTR125 2002 Owners Manual
[x] Cancel search | Manufacturer: YAMAHA, Model Year: 2002, Model line: TTR125, Model: YAMAHA TTR125 2002Pages: 509, PDF Size: 16.83 MB
Page 6 of 509
IMPORTANT NOTICE
This machine is designed for off-road use only
by young operators under adult instruction and
supervision. It is illegal for this machine to be
operated on any public street, road, or high-
way.
Off-road use on public lands may be illegal.
Please check local regulations before riding.
1. GASOLINE IS HIGHLY FLAMMABLE:
* Always turn off the engine when
refueling.
* Take care not to spill on the engine
or exhaust pipe/muffler, when refu-
eling.
* Never refuel while smoking or in
the vicinity of an open flame.
2. If you should swallow some gasoline
or inhale a lot of gasoline vapor, or
allow some gasoline to get in your
eye(s), see your doctor immediately.
If any gasoline spills on your skin or
clothing, immediately wash it with
soap and water, and change your
clothes.
3. Always turn off the engine before
leaving the machine unattended.
When parking the machine, note the
following:
* The engine and exhaust pipe(s)/
muffler(s) may be hot. Park the
machine in a place where pedestri-
ans or children are not likely to
touch the machine.
* Do not park the machine on a slope
or soft ground; the machine may
overturn.
SAFETY INFORMATION
Page 12 of 509
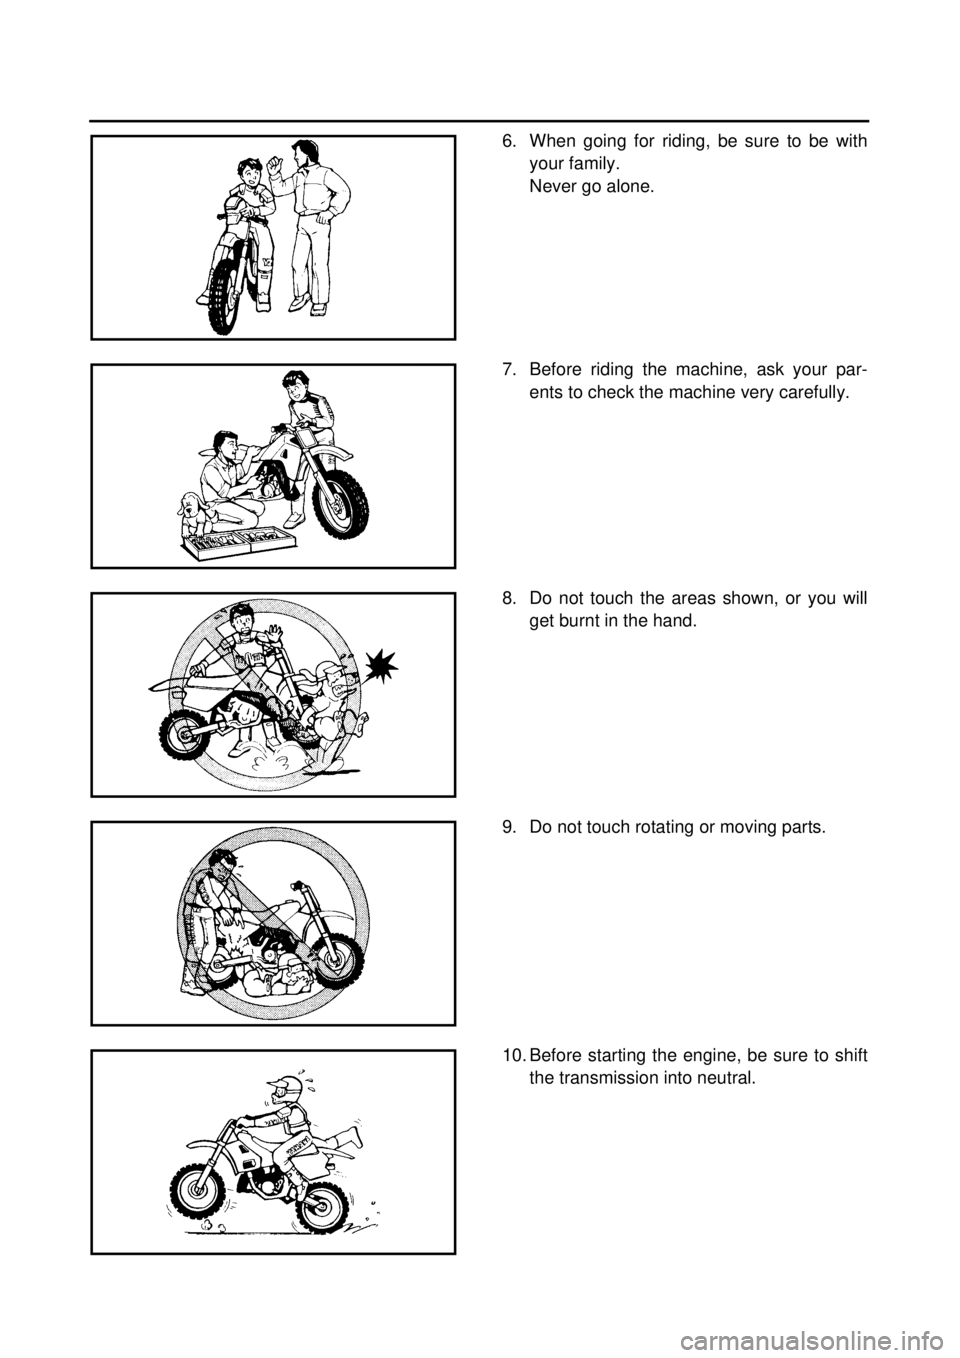
6. When going for riding, be sure to be with
your family.
Never go alone.
7. Before riding the machine, ask your par-
ents to check the machine very carefully.
8. Do not touch the areas shown, or you will
get burnt in the hand.
9. Do not touch rotating or moving parts.
10. Before starting the engine, be sure to shift
the transmission into neutral.
Page 24 of 509

EC0A0000
CONTENTS
CHAPTER 1
GENERAL INFORMATION
DESCRIPTION
.......................................... 1-1
MACHINE IDENTIFICATION
.................... 1-2
IMPORTANT INFORMATION
................... 1-3
CHECKING OF CONNECTION
................ 1-5
SPECIAL TOOLS
...................................... 1-6
CONTROL FUNCTIONS
........................... 1-9
FUEL
....................................................... 1-12
STARTING AND BREAK-IN
................... 1-13
TORQUE-CHECK POINTS
...................... 1-15
TT-R125
.............................................. 1-15
TT-R125LW
........................................ 1-16
CLEANING AND STORAGE
................... 1-17
CHAPTER 2
SPECIFICATIONS
GENERAL SPECIFICATIONS
................... 2-1
TT-R125
................................................ 2-1
TT-R125LW
.......................................... 2-4
MAINTENANCE SPECIFICATIONS
......... 2-7
ENGINE
................................................... 2-7
CHASSIS
............................................... 2-15
TT-R125
.............................................. 2-15
TT-R125LW
........................................ 2-19
ELECTRICAL
........................................ 2-23
GENERAL TORQUE
SPECIFICATIONS
.................................. 2-24
DEFINITION OF UNITS
.......................... 2-24
CABLE ROUTING DIAGRAM
................ 2-25
CHAPTER 3
REGULAR INSPECTION AND
ADJUSTMENTS
MAINTENANCE INTERVALS
................... 3-1
PRE-OPERATION INSPECTION
AND MAINTENANCE
............................... 3-3
ENGINE
..................................................... 3-4
CHASSIS
................................................. 3-15
ELECTRICAL
.......................................... 3-29
Page 56 of 509

1 - 13
GEN
INFO
STARTING AND BREAK-IN
EC190000
STARTING AND BREAK-IN
CAUTION:
Before starting the machine, perform the
checks in the pre-operation check list.
WARNING
Never start or run the engine in a closed
area. The exhaust fumes are poisonous;
they can cause loss of consciousness and
death in a very short time. Always operate
the machine in a well-ventilated area.
STARTING A COLD ENGINE
1. Shift the transmission into neutral.
2. Turn the fuel cock to “ON” and full open
the starter knob (CHOKE).
3. With the throttle completely closed start
the engine by kicking the kickstarter
crank forcefully with firm stroke.
4. Run the engine at idle or slightly higher
until it warms up: this usually takes about
one or two minutes.
5. The engine is warmed up when it
responds normally to the throttle with the
starter knob (CHOKE) turned off.
CAUTION:
Do not warm up the engine for extended
periods.
EC193001
STARTING A WARM ENGINE
Do not operate the starter knob (CHOKE).
Open the throttle slightly and start the engine
by kicking the kickstater forcefully with firm
stroke.
CAUTION:
Observe the following break-in procedures
during initial operation to ensure optimum
performance and avoid engine damage.
Page 58 of 509
1 - 14
GEN
INFO
STARTING AND BREAK-IN
BREAK-IN
Break-in is important to better fit the moving
and sliding parts as well as the installed parts.
It is also important to accustom the rider to the
machine better.
Avoid full-throttle run on a new machine for the
first 5 hours.
After the trial run, check for loose parts, oil
leakage and other problems.
Make full inspection and adjustment especially
of slack cables and drive chain and loose
spokes.
CAUTION:
After the break-in or before each ride, you
must check the entire machine for loose fit-
tings and fasteners as per “TORQUE-
CHECK POINTS”.
Tighten all such fasteners as required.
BREAKING IN AFTER REPLACEMENT
After a part is replaced with a new one, it is
necessary to break it in as in a new machine.
This is required especially when the following
engine-related parts are replaced.
lCylinder
lPiston
lPiston ring
lValve
lCamshaft
lCrankshaft
lClutch
lTransmission gear
lShift fork
* For warming up and inspection during
break-in, refer to “GENERAL INSPECTION
AND MAINTENANCE” and if there is any
problem, stop the engine immediately and
check.
Page 60 of 509
1 - 15
GEN
INFO
TORQUE-CHECK POINTS
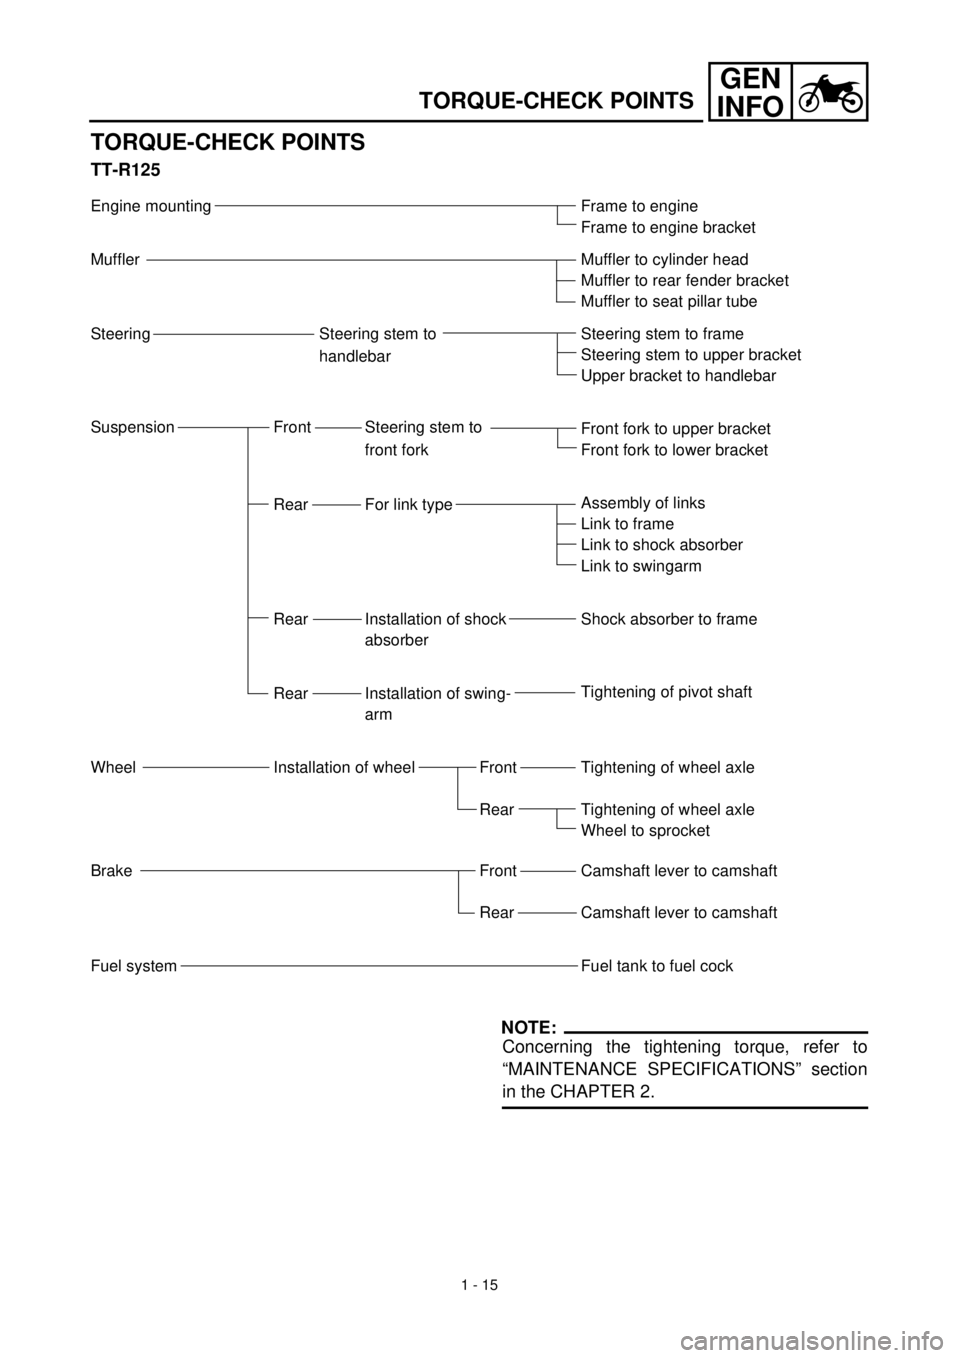
TORQUE-CHECK POINTS
TT-R125
Engine mounting
Muffler
Steering Steering stem to
handlebar
Suspension Front Steering stem to
front fork
Rear For link type
Rear Installation of shock
absorber
Rear Installation of swing-
arm
Wheel Installation of wheel Front
Rear
Brake Front
Rear
Fuel systemFrame to engine
Frame to engine bracket
Muffler to cylinder head
Muffler to rear fender bracket
Muffler to seat pillar tube
Steering stem to frame
Steering stem to upper bracket
Upper bracket to handlebar
Front fork to upper bracket
Front fork to lower bracket
Assembly of links
Link to frame
Link to shock absorber
Link to swingarm
Shock absorber to frame
Tightening of pivot shaft
Tightening of wheel axle
Tightening of wheel axle
Wheel to sprocket
Camshaft lever to camshaft
Camshaft lever to camshaft
Fuel tank to fuel cock
NOTE:
Concerning the tightening torque, refer to
“MAINTENANCE SPECIFICATIONS” section
in the CHAPTER 2.
Page 61 of 509
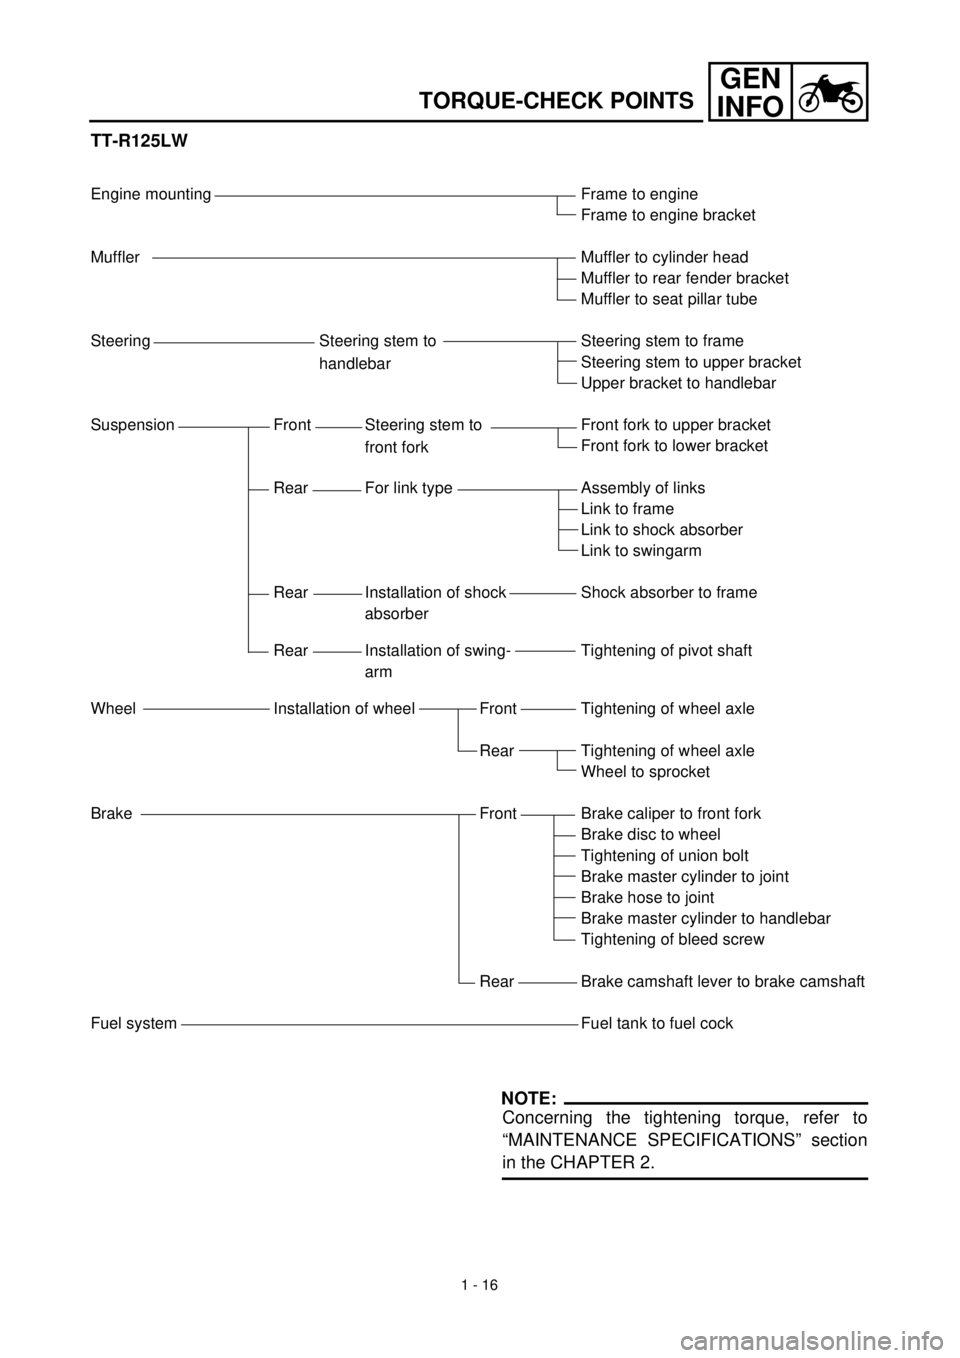
1 - 16
GEN
INFO
TORQUE-CHECK POINTS
TT-R125LW
Engine mounting
Muffler
Steering Steering stem to
handlebar
Suspension Front Steering stem to
front fork
Rear For link type
Rear Installation of shock
absorber
Rear Installation of swing-
arm
Wheel Installation of wheel Front
Rear
Brake Front
Rear
Fuel systemFrame to engine
Frame to engine bracket
Muffler to cylinder head
Muffler to rear fender bracket
Muffler to seat pillar tube
Steering stem to frame
Steering stem to upper bracket
Upper bracket to handlebar
Front fork to upper bracket
Front fork to lower bracket
Assembly of links
Link to frame
Link to shock absorber
Link to swingarm
Shock absorber to frame
Tightening of pivot shaft
Tightening of wheel axle
Tightening of wheel axle
Wheel to sprocket
Brake caliper to front fork
Brake disc to wheel
Tightening of union bolt
Brake master cylinder to joint
Brake hose to joint
Brake master cylinder to handlebar
Tightening of bleed screw
Brake camshaft lever to brake camshaft
Fuel tank to fuel cock
NOTE:
Concerning the tightening torque, refer to
“MAINTENANCE SPECIFICATIONS” section
in the CHAPTER 2.
Page 82 of 509

SPEC
2 - 13
MAINTENANCE SPECIFICATIONS
Part to be tightened Thread size Q’tyTightening torque
Nm m•kg ft•lb
Spark plug M10
´
1.0 1 13 1.3 9.4
Cylinder head bolt M8
´
1.25 4 22 2.2 16
Cylinder head bolt M6
´
1.0 2 10 1.0 7.2
Oil pressure check bolt M6
´
1.0 1 7 0.7 5.1
Cylinder head side cover M6
´
1.0 2 10 1.0 7.2
Tappet cover M45
´
1.5 2 18 1.8 13
Timing chain guide M6
´
1.0 1 10 1.0 7.2
Adjusting screw (valve) and locknut M5
´
0.5 2 8 0.8 5.8
Camshaft sprocket M8
´
1.25 1 20 2.0 14
Bearing plate cover (camshaft) M6
´
1.0 1 10 1.0 7.2
Timing chain tensioner cap bolt M6
´
1.0 1 8 0.8 5.8
Timing chain tensioner M6
´
1.0 2 10 1.0 7.2
Oil pump assembly M6
´
1.0 2 7 0.7 5.1
Oil pump cover M5
´
0.8 1 5 0.5 3.6
Engine oil drain bolt M12
´
1.5 1 20 2.0 14
Carburetor joint M6
´
1.0 2 10 1.0 7.2
Carburetor joint clamp (air filter) M4
´
0.7 1 2 0.2 1.4
Coasting enricher cover M4
´
0.7 2 2 0.2 1.4
Air filter case M6
´
1.0 3 7 0.7 5.1
Muffler M6
´
1.0 2 10 1.0 7.2
Muffler M10
´
1.25 1 60 6.0 43
Muffler M8
´
1.25 1 30 3.0 22
Muffler guard M6
´
1.0 7 10 1.0 7.2
Spark arrester M6
´
1.0 3 10 1.0 7.2
Crankcase M6
´
1.0 10 10 1.0 7.2
Left crankcase cover M6
´
1.0 7 10 1.0 7.2
Drive sprocket cover M6
´
1.0 2 12 1.2 8.7
Right crankcase cover M6
´
1.0 9 10 1.0 7.2
Lead guide (CDI magneto lead) M6
´
1.0 1 7 0.7 5.1
Timing mark accessing screw M14
´
1.5 1 7 0.7 5.1
Crankshaft end accessing screw M32 ´ 1.5 1 7 0.7 5.1
Kickstarter crank M12 ´ 1.0 1 50 5.0 36
Primary drive gear M12 ´ 1.0 1 70 7.0 50
Clutch spring M5 ´ 0.8 4 6 0.6 4.3
Clutch boss M12 ´ 1.0 1 60 6.0 43
Adjusting screw (push rod) and locknut M6 ´ 1.0 1 8 0.8 5.8
Bearing plate cover (main axle) M6 ´ 1.0 2 7 0.7 5.1
Drive sprocket M5 ´ 0.8 2 6 0.6 4.3
Shift arm M6 ´ 1.0 1 10 1.0 7.2
Shift rod and shift pedal M6 ´ 1.0 1 7 0.7 5.1
Shift rod and shift arm M6 ´ 1.0 1 7 0.7 5.1
Shift pedal M6 ´ 1.0 1 12 1.2 8.7
Segment M6 ´ 1.0 1 12 1.2 8.7
Stopper lever M6 ´ 1.0 1 10 1.0 7.2
Page 91 of 509

SPEC
2 - 22
MAINTENANCE SPECIFICATIONS
NOTE:
- marked portion shall be checked for torque tightening after break-in or before each ride.Part to be tightened Thread size Q’tyTightening torque
Nm m•kg ft•lb
Bead stopper M8 ´ 1.25 1 3 0.3 2.2
Driven sprocket (nut) M10 ´ 1.25 4 43 4.3 31
Driven sprocket (stud) M10 ´ 1.25 4 30 3.0 22
Sidestand mounting (nut) M10 ´ 1.25 1 44 4.4 32
Engine mounting:
Engine bracket (front) and frame M8 ´ 1.25 2 40 4.0 29
Engine bracket (front) and engine M8 ´ 1.25 2 40 4.0 29
Engine bracket (upper) and frame M8 ´ 1.25 2 40 4.0 29
Engine bracket (upper) and cylinder head M8 ´ 1.25 1 40 4.0 29
Engine and frame (rear) M8 ´ 1.25 2 40 4.0 29
Pivot shaft and nut M12 ´ 1.25 1 53 5.3 38
Relay arm and swingarm M12 ´ 1.25 1 53 5.3 38
Relay arm and connecting arm M10 ´ 1.25 1 35 3.5 25
Connecting arm and frame M10 ´ 1.25 1 35 3.5 25
Rear shock absorber assembly and frame M12 ´ 1.25 1 53 5.3 38
Rear shock absorber assembly and relay arm M10 ´ 1.25 1 35 3.5 25
Rear shock absorber and locknut (preload) M46 ´ 1.5 1 42 4.2 30
Drive chain tensioner (upper) M8 ´ 1.25 1 23 2.3 17
Drive chain tensioner (lower) M6 ´ 1.0 1 7 0.7 5.1
Drive chain support and swingarm M6 ´ 1.0 2 7 0.7 5.1
Drive chain guide and swingarm M6 ´ 1.0 2 7 0.7 5.1
Drive chain guard mounting M6 ´ 1.0 2 7 0.7 5.1
Fuel tank mounting M6 ´ 1.0 2 10 1.0 7.2
Fuel tank and fuel cock M6 ´ 1.0 2 7 0.7 5.1
Fuel tank and fuel tank bracket M6 ´ 1.0 4 7 0.7 5.1
Front fender mounting M6 ´ 1.0 4 7 0.7 5.1
Rear fender mounting M6 ´ 1.0 4 7 0.7 5.1
Flap guard mounting M6 ´ 1.0 2 4 0.4 2.9
Left side cover mounting M6 ´ 1.0 2 7 0.7 5.1
Seat mounting M6 ´ 1.0 2 7 0.7 5.1
Page 148 of 509
3 - 1
INSP
ADJ
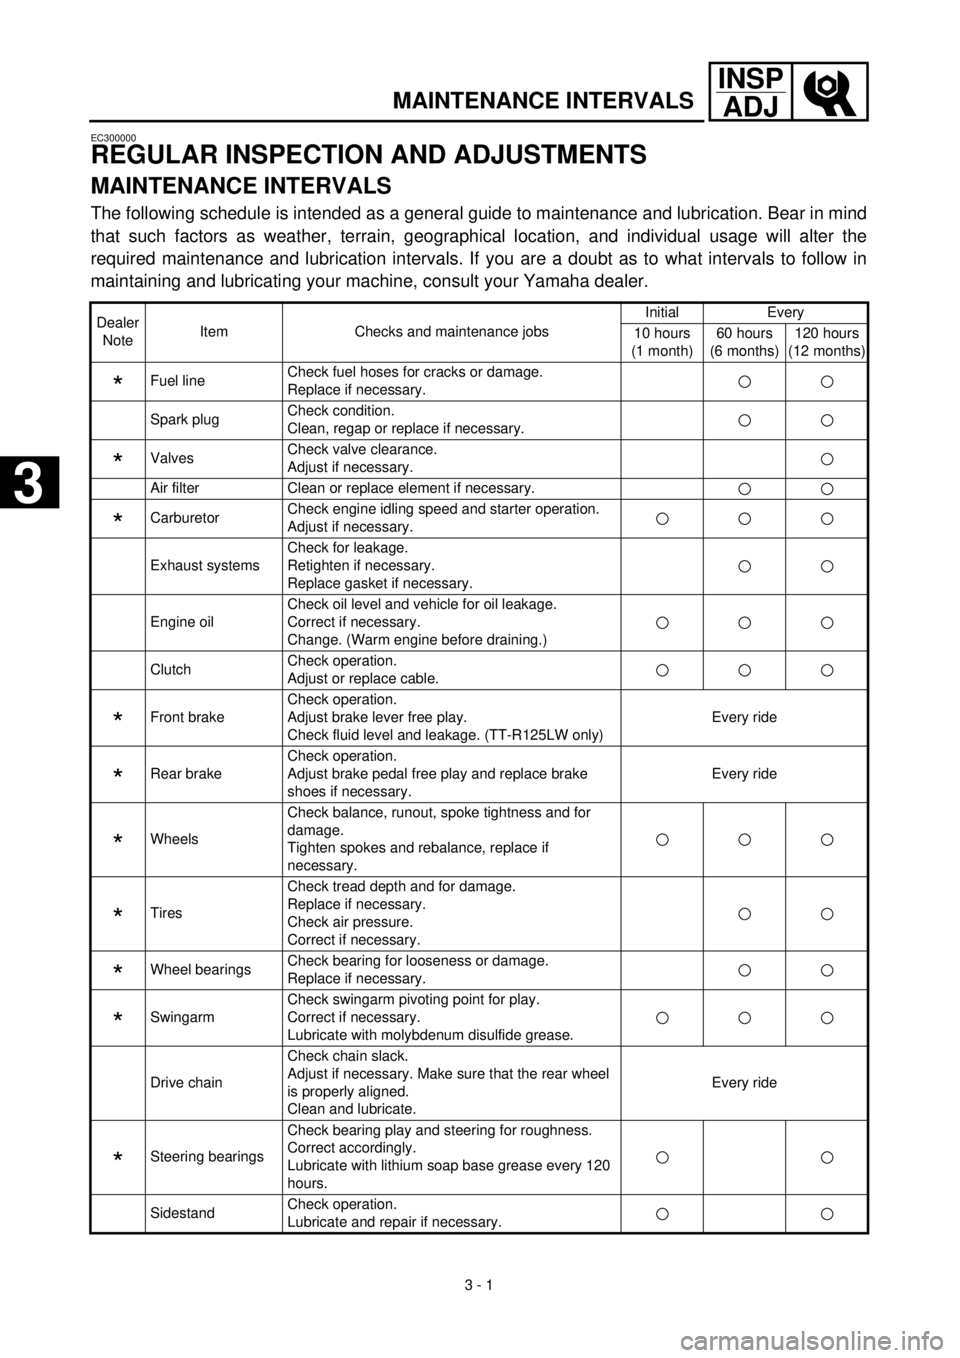
MAINTENANCE INTERVALS
EC300000
REGULAR INSPECTION AND ADJUSTMENTS
MAINTENANCE INTERVALS
The following schedule is intended as a general guide to maintenance and lubrication. Bear in mind
that such factors as weather, terrain, geographical location, and individual usage will alter the
required maintenance and lubrication intervals. If you are a doubt as to what intervals to follow in
maintaining and lubricating your machine, consult your Yamaha dealer.
Dealer
NoteItem Checks and maintenance jobsInitial Every
10 hours
(1 month)60 hours
(6 months)120 hours
(12 months)
*
Fuel lineCheck fuel hoses for cracks or damage.
Replace if necessary.
Spark plugCheck condition.
Clean, regap or replace if necessary.
*
ValvesCheck valve clearance.
Adjust if necessary.
Air filter Clean or replace element if necessary.
*
CarburetorCheck engine idling speed and starter operation.
Adjust if necessary.
Exhaust systemsCheck for leakage.
Retighten if necessary.
Replace gasket if necessary.
Engine oilCheck oil level and vehicle for oil leakage.
Correct if necessary.
Change. (Warm engine before draining.)
ClutchCheck operation.
Adjust or replace cable.
*
Front brakeCheck operation.
Adjust brake lever free play.
Check fluid level and leakage. (TT-R125LW only)Every ride
*
Rear brakeCheck operation.
Adjust brake pedal free play and replace brake
shoes if necessary.Every ride
*
WheelsCheck balance, runout, spoke tightness and for
damage.
Tighten spokes and rebalance, replace if
necessary.
*
TiresCheck tread depth and for damage.
Replace if necessary.
Check air pressure.
Correct if necessary.
*
Wheel bearingsCheck bearing for looseness or damage.
Replace if necessary.
*
SwingarmCheck swingarm pivoting point for play.
Correct if necessary.
Lubricate with molybdenum disulfide grease.
Drive chainCheck chain slack.
Adjust if necessary. Make sure that the rear wheel
is properly aligned.
Clean and lubricate.Every ride
*
Steering bearingsCheck bearing play and steering for roughness.
Correct accordingly.
Lubricate with lithium soap base grease every 120
hours.
SidestandCheck operation.
Lubricate and repair if necessary.
3