stop start YAMAHA TTR50 2006 Notices Demploi (in French)
[x] Cancel search | Manufacturer: YAMAHA, Model Year: 2006, Model line: TTR50, Model: YAMAHA TTR50 2006Pages: 390, PDF Size: 9.69 MB
Page 105 of 390
2 - 17
SPEC
KABELFÜHRUNGSDIAGRAMME
1 Z
ündbox-Kabel
2 Kabelf
ührung
3 Vergaserheizung
4 Vergaserheizungs-Anschlussklemme (flach)
5 Vergaserheizungs-Anschlussklemme (L-f
örmig)
6 Kabelf
ührung
7 Starterschalter-Kabel
8 Z
ündschloss-Kabel
9 Motorstoppschalter-Kabel
0 Chokezug
A Gaszug
B Kabelbinder
C Thermoschalter-Kabel
D Z
ündkabel
E Vergaser-Bel
üftungsschlauch
F Kurbelgeh
äuse-Entl üftungsschlauch
G Lichtmaschinen-Kabel
H Kabelbaum
CHEMINEMENT DES CABLES
KABELF ÜHRUNGSDIAGRAMME
CHEMINEMENT DES CABLES
1 Fil du bo îtier CDI
2 Guide-fil
3 Réchauffeur de carburateur
4 Borne plate du fil du r échauffeur de carburateur
5 Borne en L du fil du r échauffeur de carburateur
6 Guide-c âble
7 Fil du contacteur du d émarreur
8 Fil du contacteur à cl é
9 Fil du coupe-circuit du moteur
0 Câble de starter
A Câble des gaz
B Collier en plastique
C Fil du contacteur thermique
D Fil de bougie
E Durit de ventilation du carburateur
F Durit de mise à l ’air du carter moteur
G Fils de l ’alternateur avec rotor à aimantation perma-
nente
H Faisceau de fils
Page 106 of 390
2 - 18
SPECCABLE ROUTING DIAGRAM
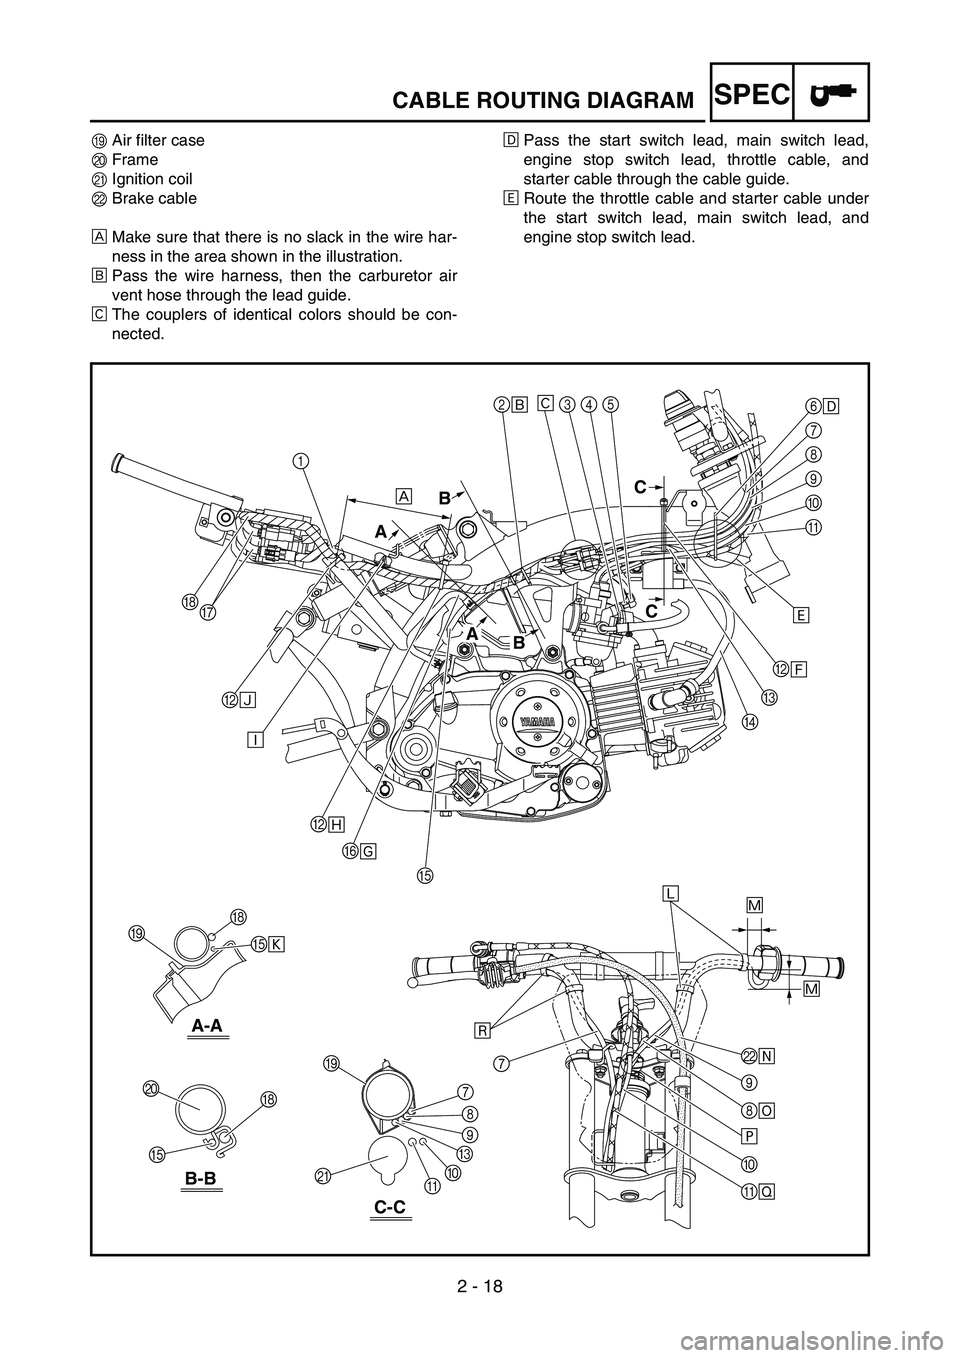
IAir filter case
J Frame
K Ignition coil
L Brake cable
È Make sure that there is no slack in the wire har-
ness in the area shown in the illustration.
É Pass the wire harness, then the carburetor air
vent hose through the lead guide.
Ê The couplers of identical colors should be con-
nected. Ë
Pass the start switch lead, main switch lead,
engine stop switch lead, throttle cable, and
starter cable through the cable guide.
Ì Route the throttle cable and starter cable under
the start switch lead, main switch lead, and
engine stop switch lead.
2
É
BÍ
B Ñ
BÏ
F Î
LÕ
\b
8 \b
×
0
\f Ø
E
E Ò 6
\f
7
8
\b
0
\f
C
D
H
H
7
J
I
I
K 8
7
\b
C
0
\f
E H
G 345
Ê
Ì
Ð
ÙÓ
Ô
Ô
È
B
A C
C
B
A
B-B
A-A
C-C
1
Page 107 of 390
2 - 18
SPEC
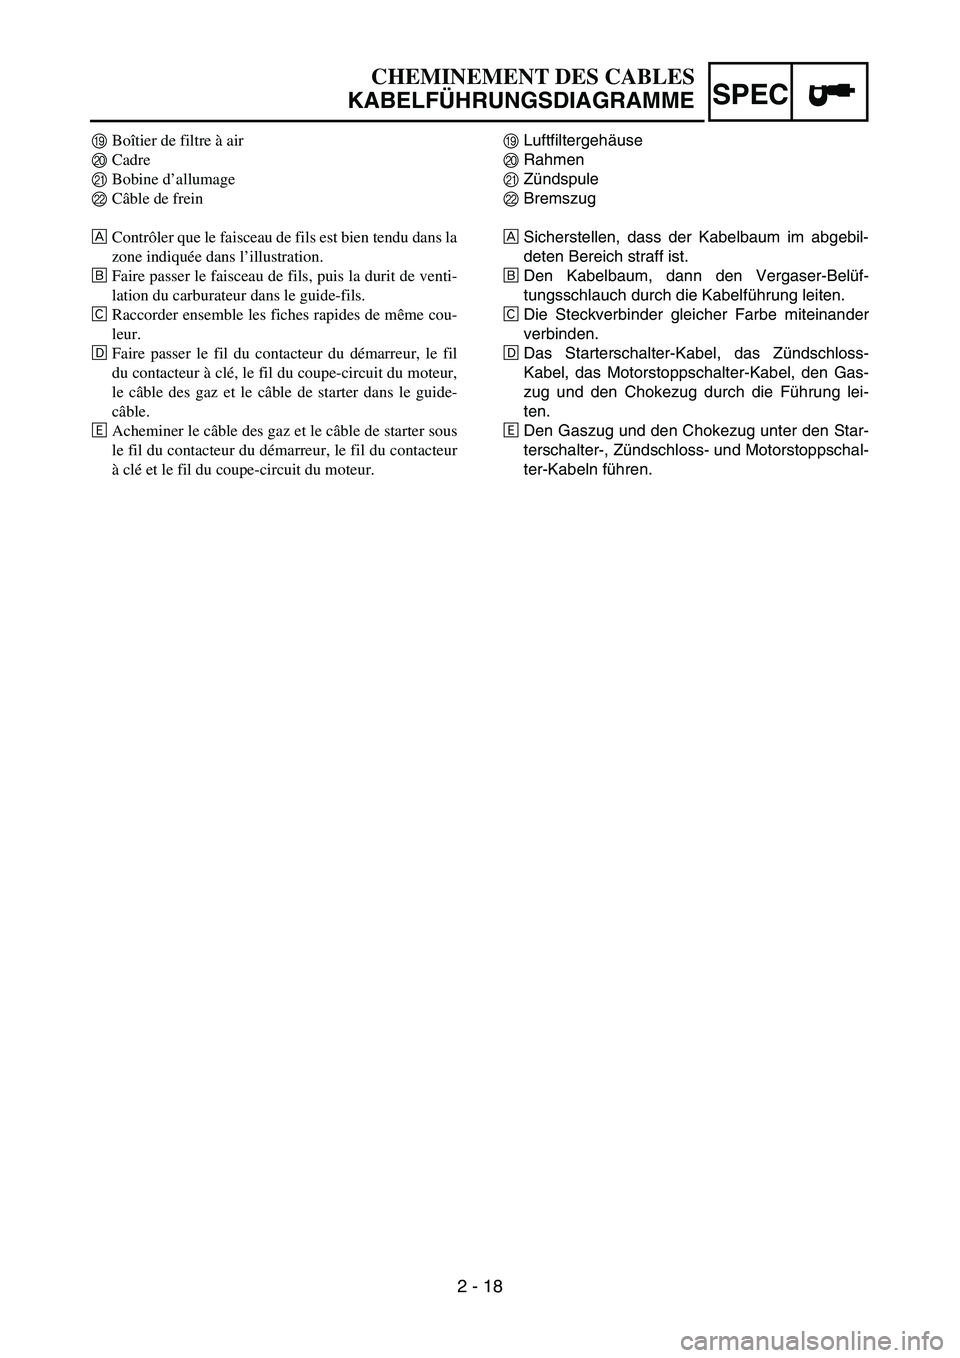
ILuftfiltergeh
äuse
J Rahmen
K Z
ündspule
L Bremszug
È Sicherstellen, dass der Kabelbaum im abgebil-
deten Bereich straff ist.
É Den Kabelbaum, dann den Vergaser-Bel
üf-
tungsschlauch durch die Kabelf ührung leiten.
Ê Die Steckverbinder gleicher Farbe miteinander
verbinden.
Ë Das Starterschalter-Kabel, das Z
ündschloss-
Kabel, das Motorstoppschalter-Kabel, den Gas-
zug und den Chokezug durch die F ührung lei-
ten.
Ì Den Gaszug und den Chokezug unter den Star-
terschalter-, Z
ündschloss- und Motorstoppschal-
ter-Kabeln f ühren.
CHEMINEMENT DES CABLES
KABELF ÜHRUNGSDIAGRAMME
I Boîtier de filtre à air
J Cadre
K Bobine d ’allumage
L Câble de frein
È Contr ôler que le faisceau de fils est bien tendu dans la
zone indiqu ée dans l ’illustration.
É Faire passer le faisceau de fils, puis la durit de venti-
lation du carburateur dans le guide-fils.
Ê Raccorder ensemble les fiches rapides de m ême cou-
leur.
Ë Faire passer le fil du contacteur du d émarreur, le fil
du contacteur à cl é, le fil du coupe-circuit du moteur,
le c âble des gaz et le c âble de starter dans le guide-
c âble.
Ì Acheminer le c âble des gaz et le c âble de starter sous
le fil du contacteur du d émarreur, le fil du contacteur
à cl é et le fil du coupe-circuit du moteur.
Page 108 of 390
2 - 19
SPECCABLE ROUTING DIAGRAM
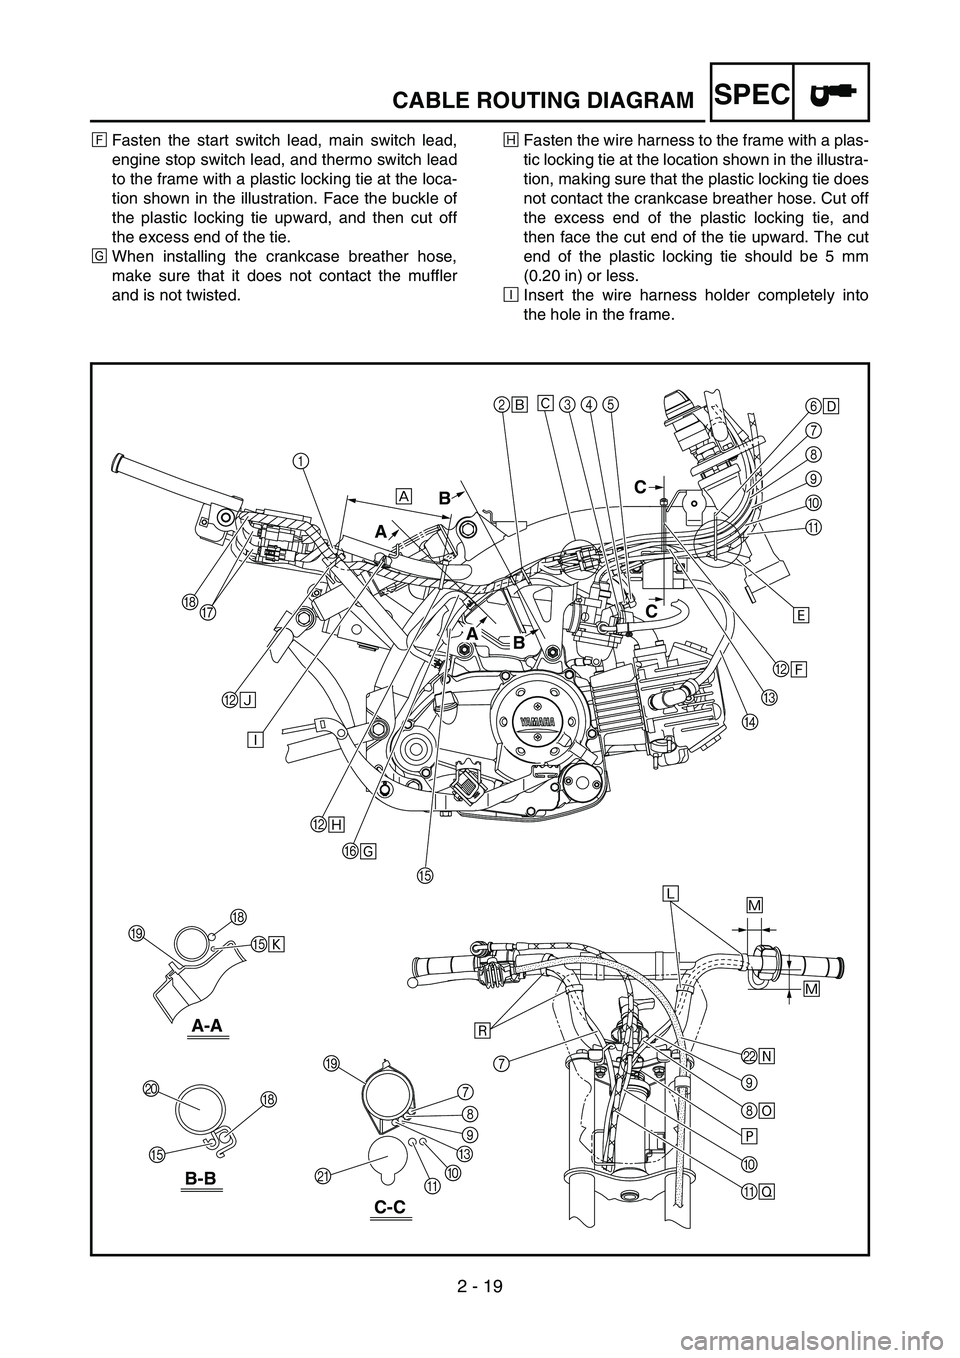
ÍFasten the start switch lead, main switch lead,
engine stop switch lead, and thermo switch lead
to the frame with a plastic locking tie at the loca-
tion shown in the illustration. Face the buckle of
the plastic locking tie upward, and then cut off
the excess end of the tie.
Î When installing the crankcase breather hose,
make sure that it does not contact the muffler
and is not twisted. Ï
Fasten the wire harness to the frame with a plas-
tic locking tie at the location shown in the illustra-
tion, making sure that the plastic locking tie does
not contact the crankcase breather hose. Cut off
the excess end of the plastic locking tie, and
then face the cut end of the tie upward. The cut
end of the plastic locking tie should be 5 mm
(0.20 in) or less.
Ð Insert the wire harness holder completely into
the hole in the frame.
2
É
BÍ
B Ñ
BÏ
F Î
LÕ
\b
8 \b
×
0
\f Ø
E
E Ò 6
\f
7
8
\b
0
\f
C
D
H
H
7
J
I
I
K 8
7
\b
C
0
\f
E H
G 345
Ê
Ì
Ð
ÙÓ
Ô
Ô
È
B
A C
C
B
A
B-B
A-A
C-C
1
Page 109 of 390
2 - 19
SPEC
ÍDie Starterschalter-, Z
ündschloss-, Motorstopp-
schalter- und Thermoschalter-Kabel an der
abgebildeten Stelle mit einem Kabelbinder am
Rahmen befestigen. Den Kabelbinderverschluss
nach oben richten und das Kabelbinderende
abschneiden.
Î Der Kurbelgeh
äuse-Entl üftungsschlauch darf
weder den Schalld ämpfer ber ühren noch ver-
dreht werden.
Ï Den Kabelbaum an der abgebildeten Stelle mit
einem Kabelbinder am Rahmen befestigen,
sicherstellen, dass der Kabelbinder den Kurbel-
geh
äuse-Entl üftungsschlauch nicht ber ührt. Das
Kabelbinderende abschneiden und dann nach
oben richten. Das Kabelende darf nicht l änger
als 5 mm (0,20 in) sein.
Ð Den Kabelbaum-Halter v
öllig in die Bohrung im
Rahmen stecken.
CHEMINEMENT DES CABLES
KABELF ÜHRUNGSDIAGRAMME
Í Attacher le fil du contacteur du d émarreur, le fil du
contacteur à cl é, le fil du coupe-circuit du moteur et
le fil du contacteur thermique au cadre à l ’aide d ’un
collier en plastique à l ’emplacement indiqu é dans
l ’ illustration. Placer la boucle du collier en plastique
vers le haut, puis couper la partie exc édentaire du col-
lier.
Î En installant la durit de mise à l ’air du carter moteur,
veiller à ce qu ’elle n ’entre pas en contact avec le pot
d ’é chappement et ne soit pas tordue.
Ï Fixer le faisceau de fils au cadre à l ’aide d ’un collier
en plastique à l ’emplacement indiqu é dans l ’illustra-
tion, en veillant à ce que le collier ne soit pas en con-
tact avec la durit de mise à l ’air du carter moteur.
Couper l ’extr émit é exc édentaire du collier en plasti-
que, puis orienter l ’extr émit é coup ée du collier vers
le haut. La longueur de l ’extr émit é coup ée du collier
en plastique doit être de 5 mm (0,20 in) maximum.
Ð Insérer compl ètement le support du faisceau de fils
dans le trou du cadre.
Page 110 of 390
2 - 20
SPECCABLE ROUTING DIAGRAM
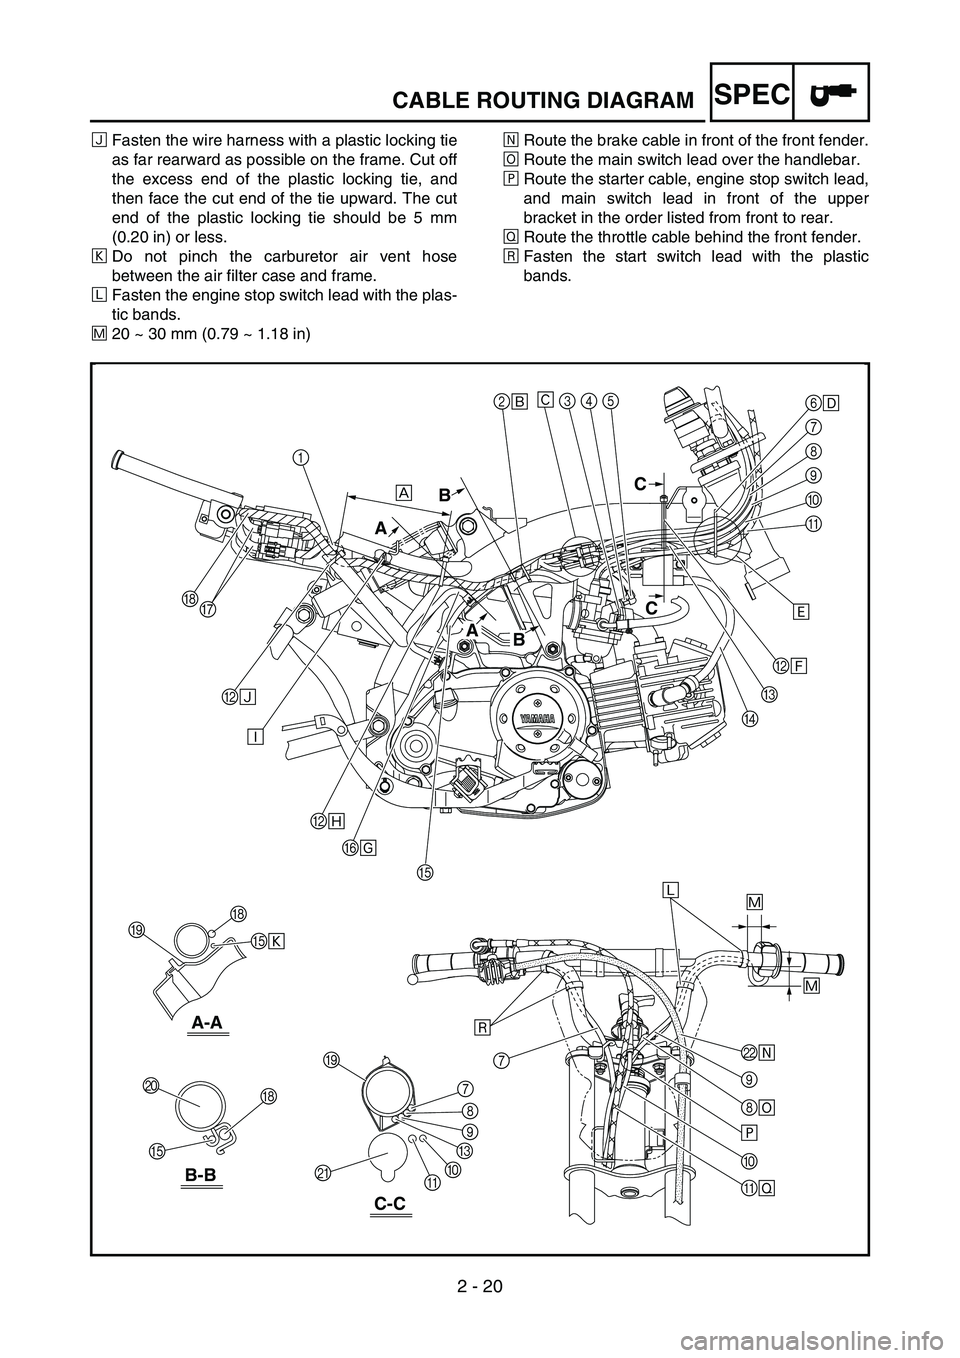
ÑFasten the wire harness with a plastic locking tie
as far rearward as possible on the frame. Cut off
the excess end of the plastic locking tie, and
then face the cut end of the tie upward. The cut
end of the plastic locking tie should be 5 mm
(0.20 in) or less.
Ò Do not pinch the carburetor air vent hose
between the air filter case and frame.
Ó Fasten the engine stop switch lead with the plas-
tic bands.
Ô 20 ~ 30 mm (0.79 ~ 1.18 in) Õ
Route the brake cable in front of the front fender.
Ö Route the main switch lead over the handlebar.
× Route the starter cable, engine stop switch lead,
and main switch lead in front of the upper
bracket in the order listed from front to rear.
Ø Route the throttle cable behind the front fender.
Ù Fasten the start switch lead with the plastic
bands.
2
É
BÍ
B Ñ
BÏ
F Î
LÕ
\b
8 \b
×
0
\f Ø
E
E Ò 6
\f
7
8
\b
0
\f
C
D
H
H
7
J
I
I
K 8
7
\b
C
0
\f
E H
G 345
Ê
Ì
Ð
ÙÓ
Ô
Ô
È
B
A C
C
B
A
B-B
A-A
C-C
1
Page 111 of 390
2 - 20
SPEC
ÑDen Kabelbaum mit einem Kabelbinder m
ög-
lichst weit nach hinten am Rahmen befestigen.
Das Kabelbinderende abschneiden und dann
nach oben richten. Das Kabelende darf nicht
l ä nger als 5 mm (0,20 in) sein.
Ò Den Vergaser-Bel
üftungsschlauch nicht zwi-
schen dem Luftfiltergeh äuse und dem Rahmen
einquetschen.
Ó Das Motorstoppschalter-Kabel mit Kunststoffbin-
dern befestigen.
Ô 20
–30 mm (0,79 –1,18 in)
Õ Den Bremszug vor der Vorderradabdeckung
f
ü hren.
Ö Das Z
ündschloss-Kabel über dem Lenker f üh-
ren.
× Die Starter-, Motorstoppschalter- und Z
ünd-
schloss-Kabel in der angegebenen Reihenfolge
von vorn nach hinten vor der oberen Gabelbr ü-
cke f ühren.
Ø Den Gaszug hinter der Vorderradabdeckung
f
ü hren.
Ù Das Starterschalter -Kabel mit Kunststoffbindern
befestigen.
CHEMINEMENT DES CABLES
KABELF ÜHRUNGSDIAGRAMME
Ñ Fixer le faisceau de fils à l ’aide d ’un collier en plasti-
que le plus à l ’arri ère possible du cadre. Couper
l ’ extr émit é exc édentaire du collier en plastique, puis
orienter l ’extr émit é coup ée du collier vers le haut. La
longueur de l ’extr émit é coup ée du collier en plastique
doit être de 5 mm (0,20 in) maximum.
Ò Ne pas pincer la durit de ventilation du carburateur
entre le bo îtier de filtre à air et le cadre.
Ó Fixer le fil du coupe-circuit du moteur à l ’aide des
colliers r éutilisables.
Ô 20 à 30 mm (0,79 à 1,18 in)
Õ Acheminer le c âble de frein devant le garde-boue
avant.
Ö Acheminer le fil du contacteur à cl é au-dessus du gui-
don.
× Acheminer le c âble de starter, le fil du coupe-circuit
du moteur et le fil du contacteur à cl é devant le sup-
port sup érieur, dans l ’ordre indiqu é, de l ’avant vers
l ’ arri ère.
Ø Acheminer le c âble des gaz derri ère le garde-boue
avant.
Ù Fixer le fil du contacteur du d émarreur à l ’aide des
colliers r éutilisables.
Page 142 of 390

3 - 10
INSPADJIDLE SPEED ADJUSTMENT/
VALVE CLEARANCE ADJUSTMENT
IDLE SPEED ADJUSTMENT
1. Start the engine and thoroughly warm it up.
2. Attach:
Tachometer
To spark plug lead.
3. Adjust:
Idle speed
Adjustment steps:
Turn the throttle stop screw 1 until the
engine runs at the lowest possible speed.
To increase idle speed → Turn the throt-
tle stop screw 1 in
a.
To decrease idle speed → Turn the throt-
tle stop screw 1 out
b.
Engine idling speed:
1,600 ~ 1,800 r/min
1
a
b
VALVE CLEARANCE ADJUSTMENT
NOTE:
The valve clearance should be adjusted
when the engine is cool to the touch.
The piston must be at Top Dead Center
(T.D.C.) on compression stroke to check or
adjust the valve clearance.
1. Remove: Spark plug cap 1
Spark plug
Tappet cover (intake side) 2
Tappet cover (exhaust side) 3
Camshaft sprocket cover 4
3
4
1
2
2. Remove:
Timing plug 1
Crankshaft end cover 2
O-rings
1
2
Page 320 of 390
5 - 10
CHASHANDLEBAR
HANDLEBAR
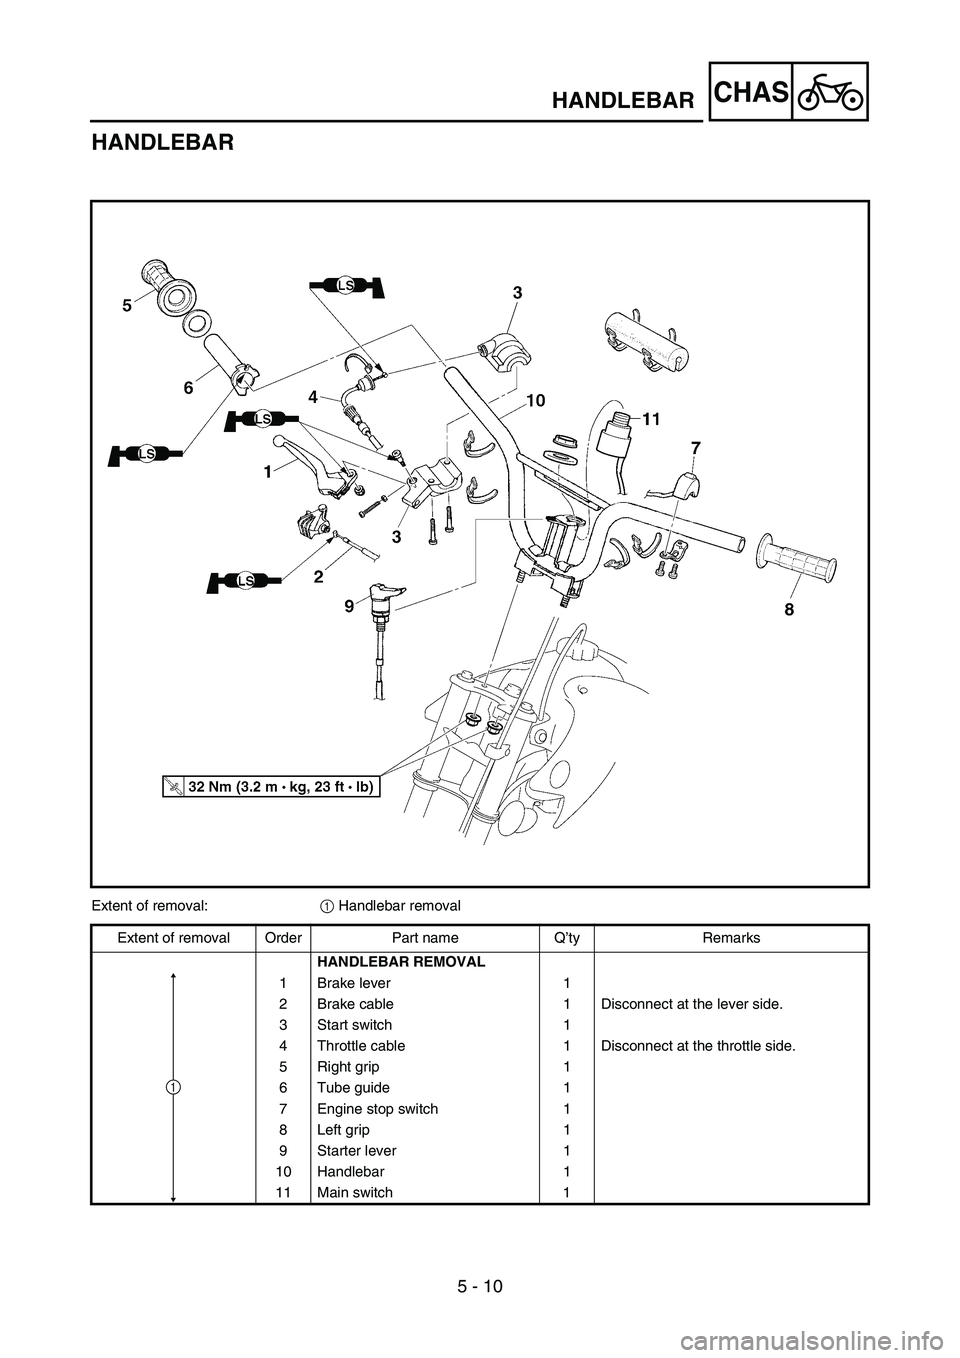
Extent of removal: 1 Handlebar removal
Extent of removal Order Part name Q ’ty Remarks
HANDLEBAR REMOVAL
1Brake lever 1
2 Brake cable 1 Disconnect at the lever side.
3 Start switch 1
4 Throttle cable 1 Disconnect at the throttle side.
5 Right grip 1
6 Tube guide 1
7 Engine stop switch 1
8Left grip 1
9Starter lever 1
10 Handlebar 1
11 Main switch 1
1
Page 321 of 390
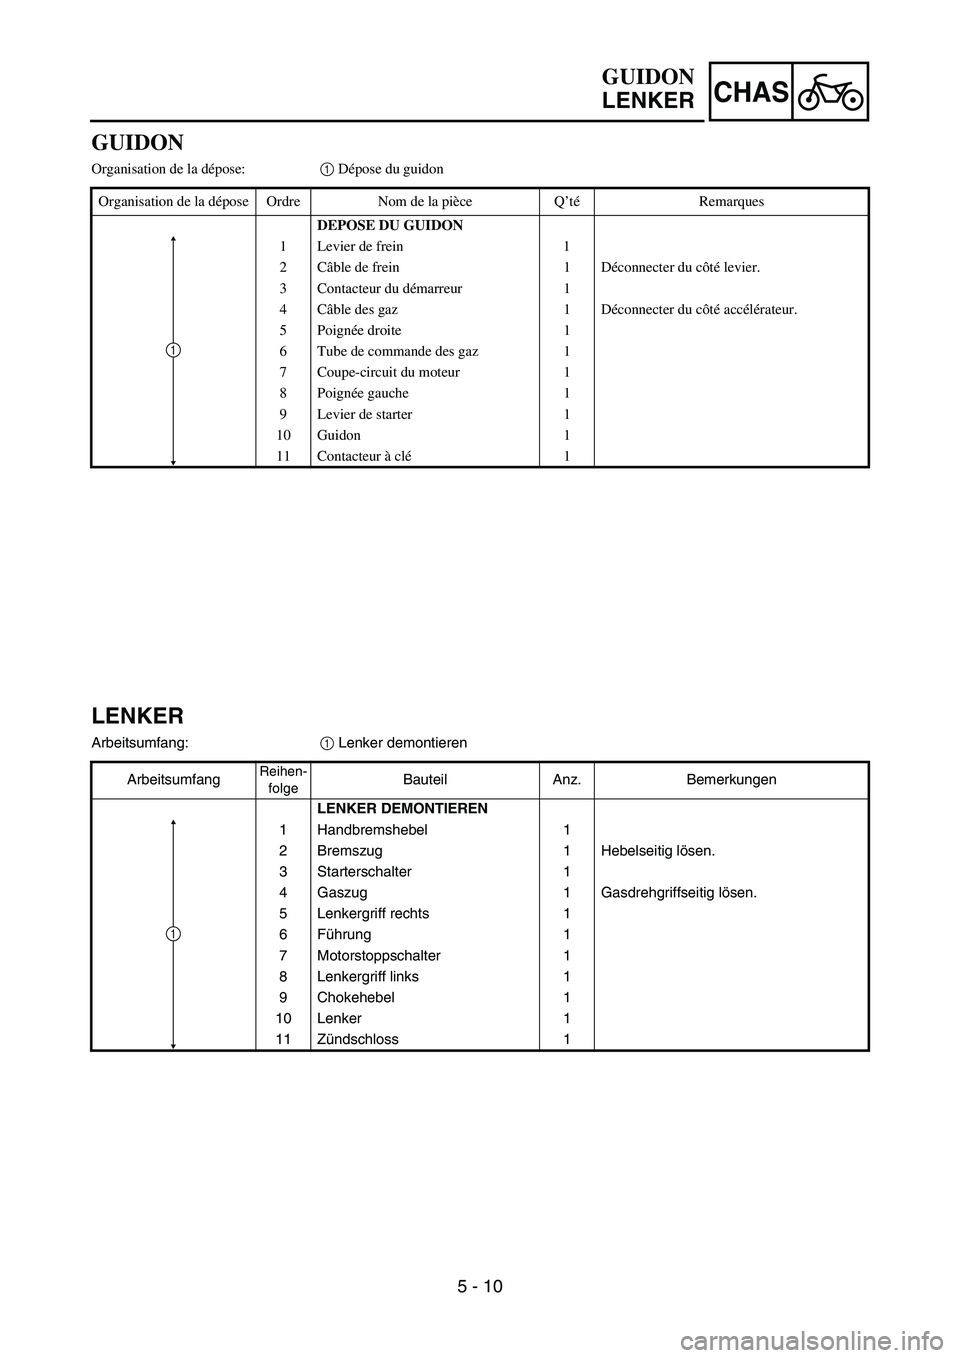
5 - 10
CHAS
GUIDON
Organisation de la dépose: 1 Dépose du guidon
Organisation de la d épose Ordre Nom de la pi èce Q ’té Remarques
DEPOSE DU GUIDON
1 Levier de frein 1
2C âble de frein 1 D éconnecter du c ôté levier.
3 Contacteur du d émarreur 1
4C âble des gaz 1 D éconnecter du c ôté acc élé rateur.
5 Poign ée droite 1
6 Tube de commande des gaz 1
7 Coupe-circuit du moteur 1
8 Poign ée gauche 1
9Levier de starter 1
10 Guidon 1
11 Contacteur à cl é 1
1
LENKER
Arbeitsumfang:
1 Lenker demontieren
Arbeitsumfang
Reihen- folgeBauteil Anz. Bemerkungen
LENKER DEMONTIEREN
1 Handbremshebel 1
2 Bremszug 1 Hebelseitig l ösen.
3 Starterschalter 1
4 Gaszug 1 Gasdrehgriffseitig l ösen.
5 Lenkergriff rechts 1
6F ührung 1
7 Motorstoppschalter 1
8 Lenkergriff links 1
9 Chokehebel 1
10 Lenker 1
11 Z ündschloss 1
1
GUIDON
LENKER