check engine light YAMAHA TTR50 2006 Owners Manual
[x] Cancel search | Manufacturer: YAMAHA, Model Year: 2006, Model line: TTR50, Model: YAMAHA TTR50 2006Pages: 390, PDF Size: 9.69 MB
Page 50 of 390
GEN
INFO
1 - 12
STARTING AND OPERATION
STARTING AND OPERATION
CAUTION:
Prior to operating the machine, perform
steps listed in pre-operation check list.
WARNING
Never start your engine or let it run for any
length of time in a closed area. The exhaust
fumes are poisonous and can cause loss of
consciousness and death within a short
time. Always operate your machine in an
area with adequate ventilation.
STARTING A COLD ENGINE
WARNING
Before starting the engine, be sure to shift
the transmission into neutral.
NOTE:
This model is equipped with an ignition cir-
cuit cut-off system. In case of electric start-
ing, the engine can be started only when the
transmission is in neutral.
If the engine fails to start by pushing the start
switch, release the switch, wait a few sec-
onds, and then try again. Each starting
attempt should be as short as possible to
preserve the battery. Do not crank the
engine more than 10 seconds on any one
attempt.
1. Turn the fuel cock to “ON ”.
2. Turn the main switch to “ON ”.
3. Shift the transmission into neutral.
4. Operate the starter (choke) and completely close the throttle grip.
5. Slide the “engine stop ” switch to the “”.
6. Start the engine by pushing the start switch.
7. After the engine starts, warm up for one or
two minutes. Make sure the stater (choke) is
returned to the original position before riding. STARTING A WARM ENGINE
To start a warm engine, refer to the
“START-
ING A COLD ENGINE ” section. The starter
(choke) should not be used. The throttle
should be opened slightly.
CAUTION:
See “Engine break-in Section ” prior to
operating engine for the first time.
WARMING UP
To get maximum engine life, always “warm-up ”
the engine before starting off. Never accelerate
hard with a cold engine! To see whether or not
the engine is warm, see if it responds to throttle
normally with the stater (choke) turned off.
WARNING
Before starting off, be sure to turn up or
remove the side stand.
Failure to retract the side stand completely
can result in a serious accident when you
try to turn a corner.
ENGINE BREAK-IN
Break-in is important to better fit the moving
and sliding parts as well as the installed parts.
It is also important to accustom the rider to the
machine better.
Avoid full-throttle run on a new machine for the
first 5 hours.
After the trial run, check for loose parts, oil
leakage and other problems.
Make full inspection and adjustment especially of
slack cables and drive chain and loose spokes.
CAUTION:
After the break-in period, check every fit-
ting and fastener for looseness.
If any loose is found, retighten it securely.
Page 120 of 390
3 - 1
INSPADJ
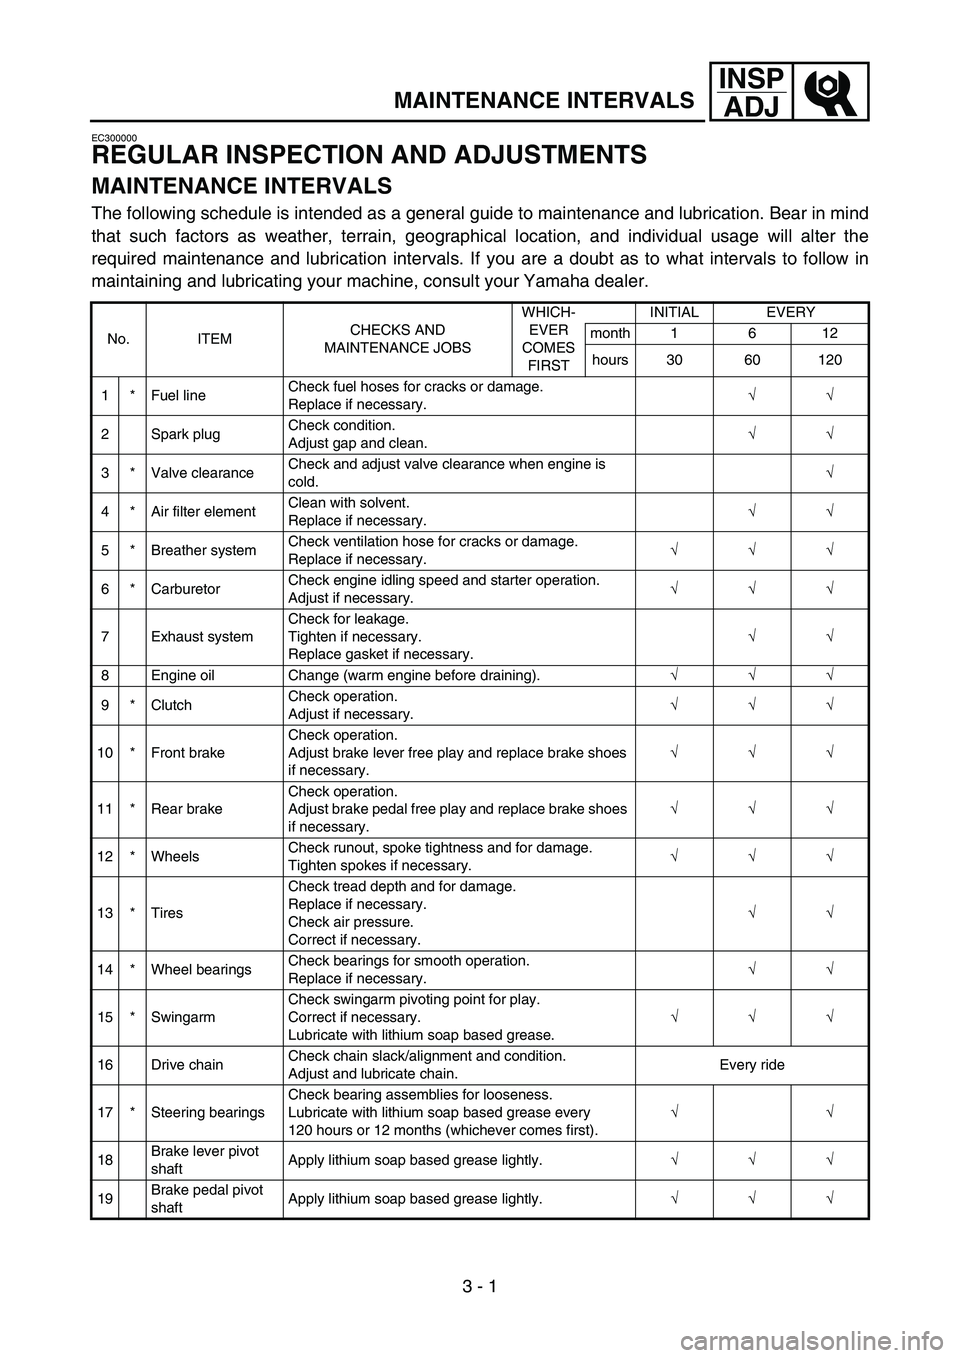
MAINTENANCE INTERVALS
EC300000
REGULAR INSPECTION AND ADJUSTMENTS
MAINTENANCE INTERVALS
The following schedule is intended as a general guide to maintenance and lubrication. Bear in mind
that such factors as weather, terrain, geographical location, and individual usage will alter the
required maintenance and lubrication intervals. If you are a doubt as to what intervals to follow in
maintaining and lubricating your machine, consult your Yamaha dealer.
No. ITEM CHECKS AND
MAINTENANCE JOBS WHICH-
EVER
COMES
FIRST INITIAL EVERY
month 1 6 12
hours 30 60 120
1 * Fuel line Check fuel hoses for cracks or damage.
Replace if necessary.
√
√
2 Spark plug Check condition.
Adjust gap and clean.
√
√
3 * Valve clearance Check and adjust valve clearance when engine is
cold.
√
4 * Air filter element Clean with solvent.
Replace if necessary.
√
√
5 * Breather system Check ventilation hose for cracks or damage.
Replace if necessary.
√
√
√
6 * Carburetor Check engine idling speed and starter operation.
Adjust if necessary.
√
√
√
7 Exhaust system Check for leakage.
Tighten if necessary.
Replace gasket if necessary.
√
√
8 Engine oil Change (warm engine before draining). √
√
√
9 * Clutch Check operation.
Adjust if necessary.
√
√
√
10 * Front brake Check operation.
Adjust brake lever free play and replace brake shoes
if necessary.
√
√
√
11 * Rear brake Check operation.
Adjust brake pedal free play and replace brake shoes
if necessary. √
√
√
12 * Wheels Check runout, spoke tightness and for damage.
Tighten spokes if necessary.
√
√
√
13 * Tires Check tread depth and for damage.
Replace if necessary.
Check air pressure.
Correct if necessary.
√
√
14 * Wheel bearings Check bearings for smooth operation.
Replace if necessary.
√
√
15 * Swingarm Check swingarm pivoting point for play.
Correct if necessary.
Lubricate with lithium soap based grease. √
√
√
16 Drive chain Check chain slack/alignment and condition.
Adjust and lubricate chain. Every ride
17 * Steering bearings Check bearing assemblies for looseness.
Lubricate with lithium soap based grease every
120 hours or 12 months (whichever comes first).
√
√
18 Brake lever pivot
shaft Apply lithium soap based grease lightly.
√
√
√
19 Brake pedal pivot
shaft Apply lithium soap based grease lightly.
√
√
√
3
Page 121 of 390
3 - 2
INSPADJ
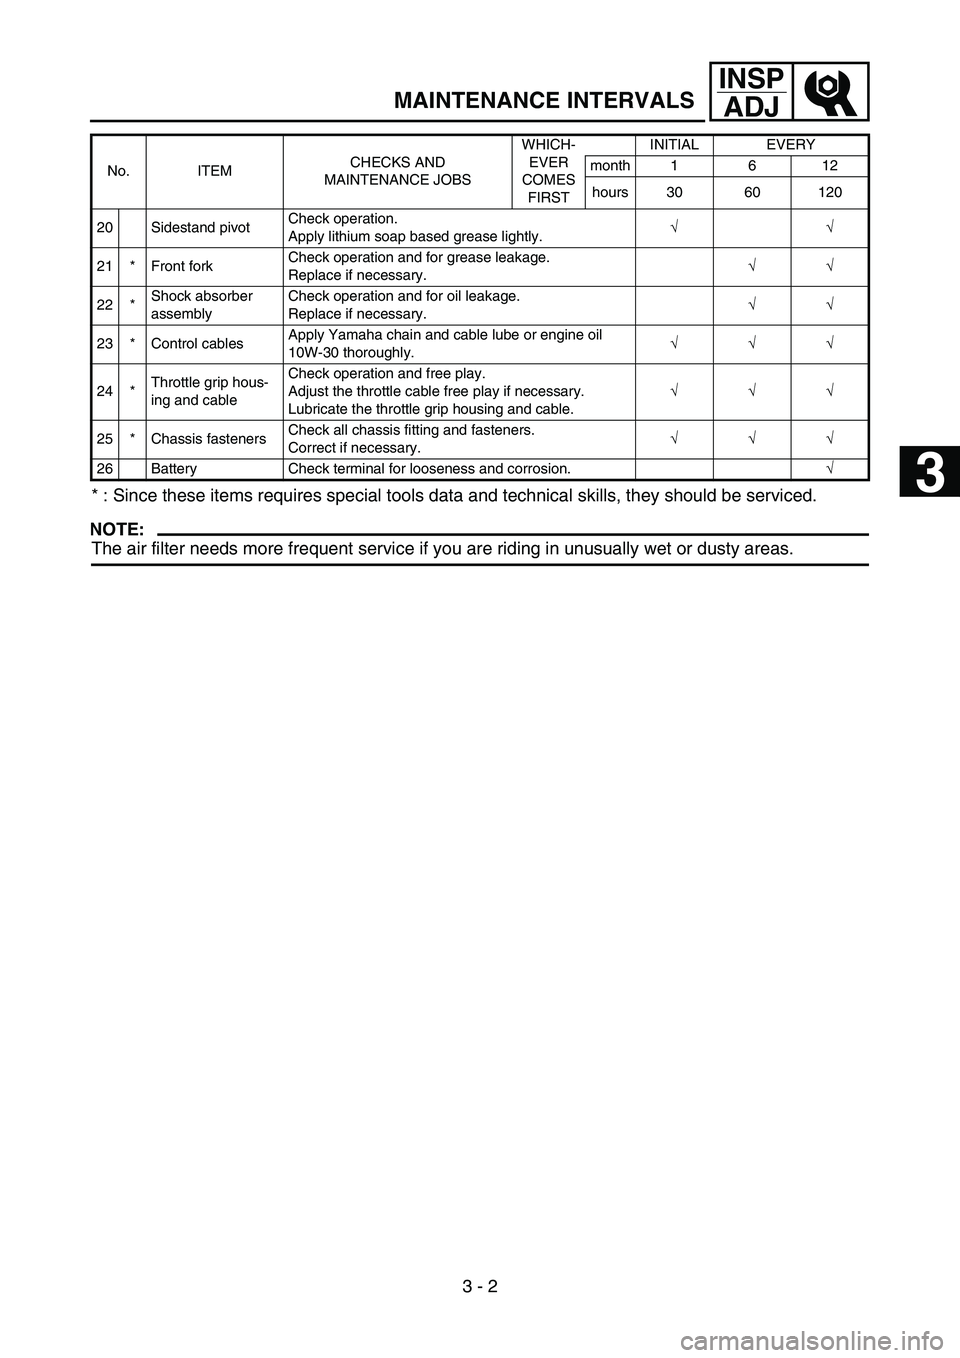
MAINTENANCE INTERVALS
* : Since these items requires special tools data and technical skills, they should be serviced.
NOTE:
The air filter needs more frequent service if you are riding in unusually wet or dusty areas.
20 Sidestand pivot Check operation.
Apply lithium soap based grease lightly.
√
√
21 * Front fork Check operation and for grease leakage.
Replace if necessary.
√
√
22 * Shock absorber
assembly Check operation and for oil leakage.
Replace if necessary.
√
√
23 * Control cables Apply Yamaha chain and cable lube or engine oil
10W-30 thoroughly.
√
√
√
24 * Throttle grip hous-
ing and cable Check operation and free play.
Adjust the throttle cable free play if necessary.
Lubricate the throttle grip housing and cable.
√
√
√
25 * Chassis fasteners Check all chassis fitting and fasteners.
Correct if necessary.
√
√
√
26 Battery Check terminal for looseness and corrosion. √
No. ITEM
CHECKS AND
MAINTENANCE JOBS WHICH-
EVER
COMES FIRST INITIAL EVERY
month 1 6 12
hours 30 60 120
1
2
3
4
5
6
Page 138 of 390
3 - 8
INSPADJ
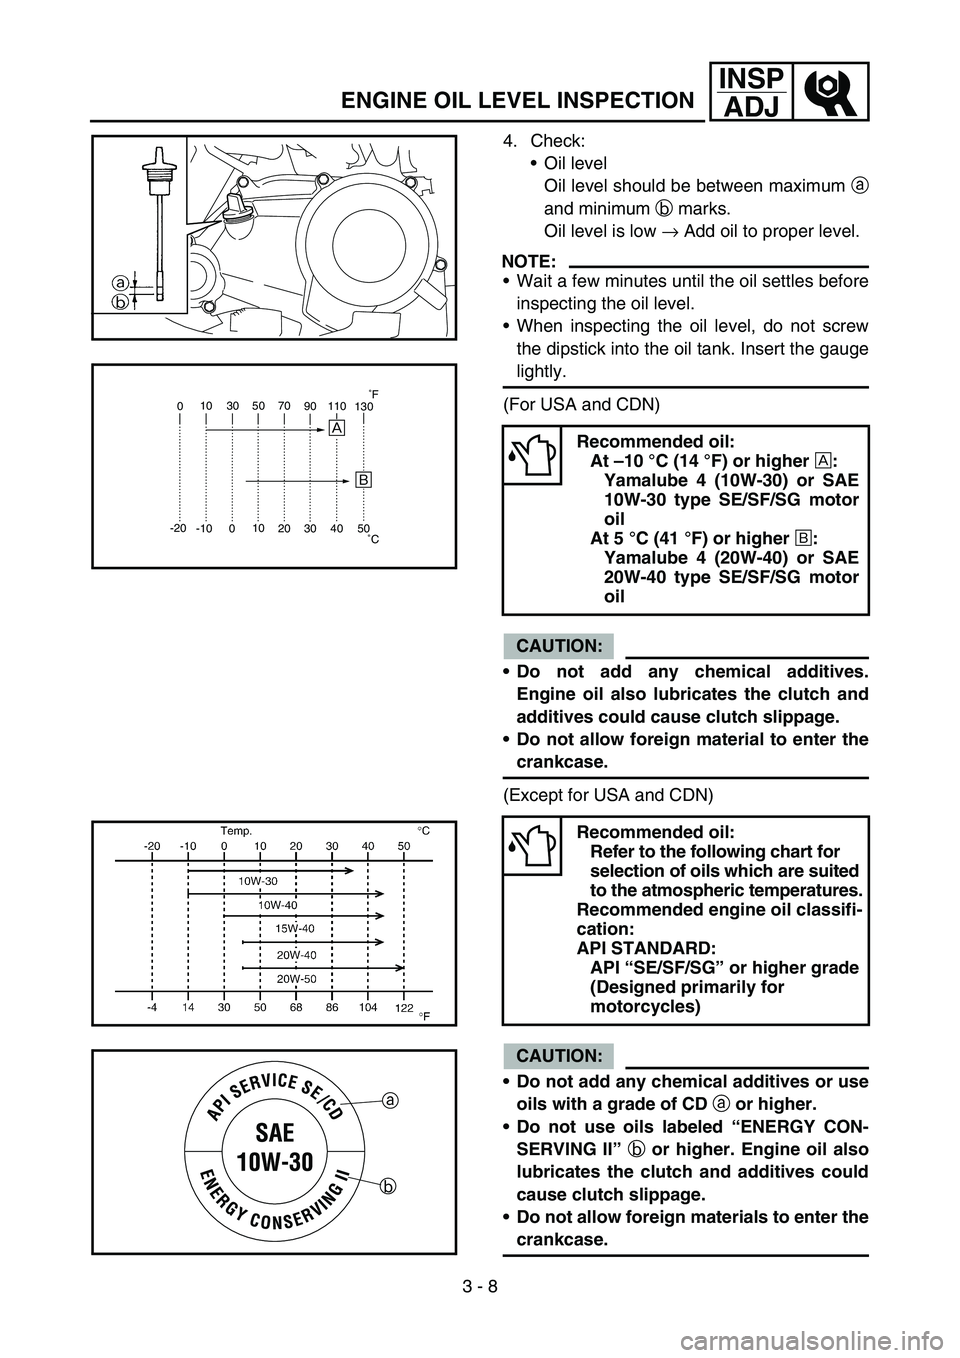
4. Check:
Oil level
Oil level should be between maximum a
and minimum b marks.
Oil level is low → Add oil to proper level.
NOTE:
Wait a few minutes until the oil settles before
inspecting the oil level.
When inspecting the oil level, do not screw
the dipstick into the oil tank. Insert the gauge
lightly.
(For USA and CDN)
CAUTION:
Do not add any chemical additives.
Engine oil also lubricates the clutch and
additives could cause clutch slippage.
Do not allow foreign material to enter the
crankcase.
(Except for USA and CDN)
CAUTION:
Do not add any chemical additives or use
oils with a grade of CD a or higher.
Do not use oils labeled “ENERGY CON-
SERVING II ” b or higher. Engine oil also
lubricates the clutch and additives could
cause clutch slippage.
Do not allow foreign materials to enter the
crankcase.
Recommended oil:
At –10 °C (14 °F) or higher È:
Yamalube 4 (10W-30) or SAE
10W-30 type SE/SF/SG motor
oil
At 5 °C (41 °F) or higher É:
Yamalube 4 (20W-40) or SAE
20W-40 type SE/SF/SG motor
oil
Recommended oil: Refer to the following chart for
selection of oils which are suited
to the atmospheric temperatures.
Recommended engine oil classifi-
cation:
API STANDARD: API “SE/SF/SG ” or higher grade
(Designed primarily for
motorcycles)
0 10 30 50 70
90110
130
-20 -10 010
20 30 40 50
È
É
˚C
˚
F
a
b
ENGINE OIL LEVEL INSPECTION
Page 168 of 390
3 - 23
INSPADJ
ELECTRICAL/SPARK PLUG INSPECTION
EC370000
ELECTRICAL
EC371001
SPARK PLUG INSPECTION
1. Remove:
Spark plug
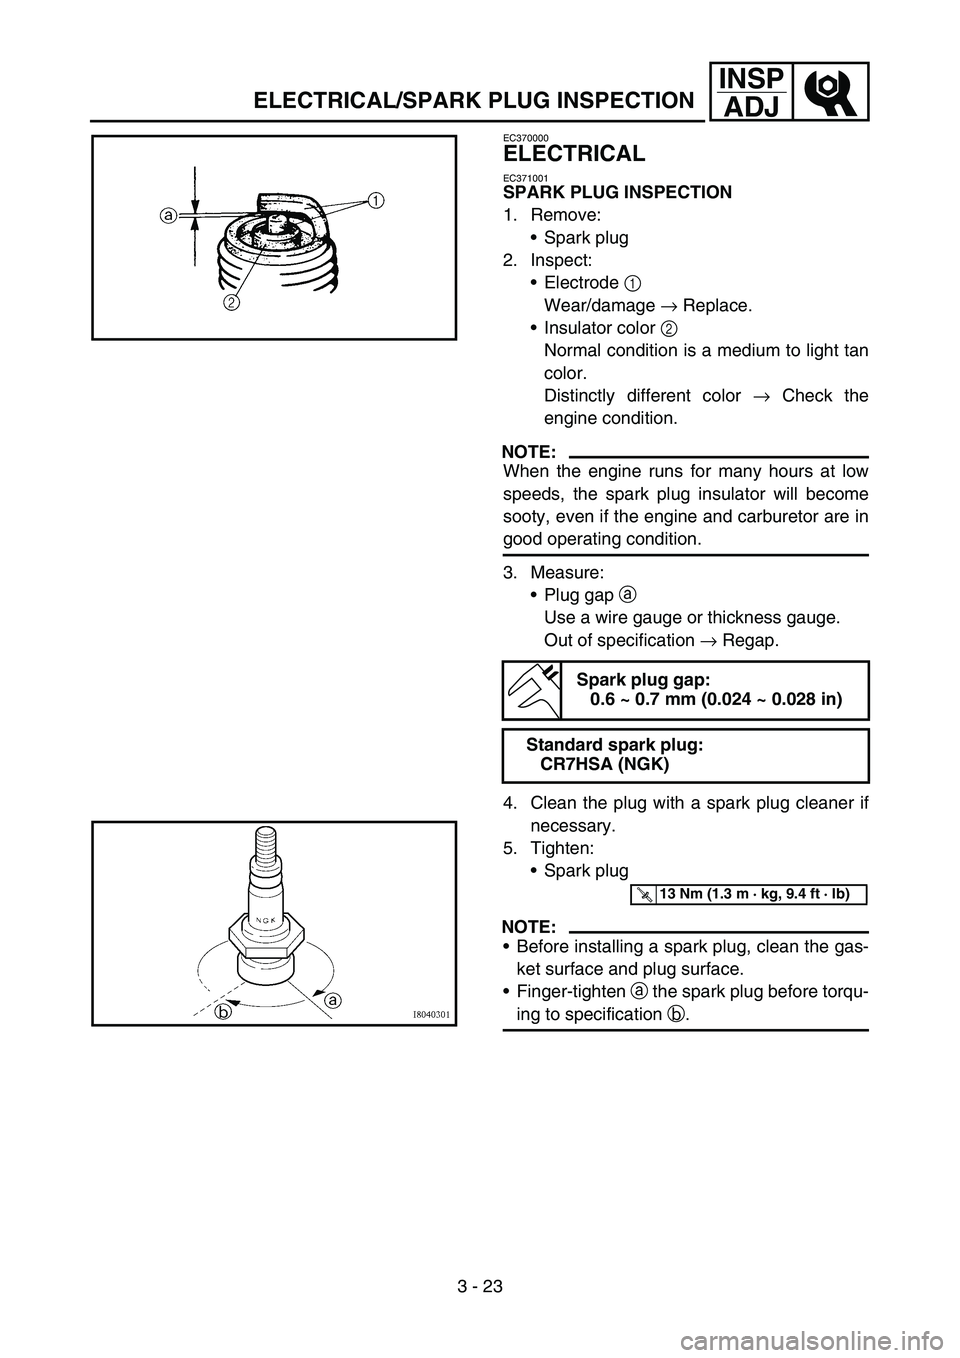
2. Inspect: Electrode 1
Wear/damage → Replace.
Insulator color 2
Normal condition is a medium to light tan
color.
Distinctly different color → Check the
engine condition.
NOTE:
When the engine runs for many hours at low
speeds, the spark plug insulator will become
sooty, even if the engine and carburetor are in
good operating condition.
3. Measure: Plug gap a
Use a wire gauge or thickness gauge.
Out of specification → Regap.
4. Clean the plug with a spark plug cleaner if necessary.
5. Tighten: Spark plug
NOTE:
Before installing a spark plug, clean the gas-
ket surface and plug surface.
Finger-tighten a the spark plug before torqu-
ing to specification b.
Spark plug gap:
0.6 ~ 0.7 mm (0.024 ~ 0.028 in)
Standard spark plug: CR7HSA (NGK)
T R..13 Nm (1.3 m · kg, 9.4 ft · lb)