width YAMAHA TTR90 2002 Owners Manual
[x] Cancel search | Manufacturer: YAMAHA, Model Year: 2002, Model line: TTR90, Model: YAMAHA TTR90 2002Pages: 288, PDF Size: 15.07 MB
Page 56 of 288

SPEC
2 - 1
EC200000
SPECIFICATIONS
EC211000
GENERAL SPECIFICATIONS
Model name: TT-R90P
(USA-except for California, CDN, AUS, NZ, ZA)
TT-R90PC (USA for California)
TT-R90 (Europe)
Model code number: 5HN8 (USA)
5HN9 (Europe, AUS, NZ, ZA)
5HNA (CDN)
Dimensions:
Overall length 1,525 mm (57.0 in)
Overall width 605 mm (23.8 in)
Overall height 865 mm (34.1 in)
Seat height 625 mm (24.6 in)
Wheelbase 1,040 mm (40.9 in)
Minimum ground clearance 160 mm (6.3 in)
Basic weight:
With oil and full fuel tank 64 kg (141 lb)
Engine:
Engine type Air cooled 4-stroke, SOHC
Cylinder arrangement Single cylinder, forward inclined
Displacement 89 cm
3 (5.43 cu.in)
Bore ´ stroke 47.0 ´ 51.8 mm (1.85 ´ 2.04 in)
Compression ratio 8.5 : 1
Compression pressure (STD) 1,000 kPa (10 kg/cm
2, 145 psi) at 1,000 r/min
Starting system Kick starter
Lubrication system: Wet sump
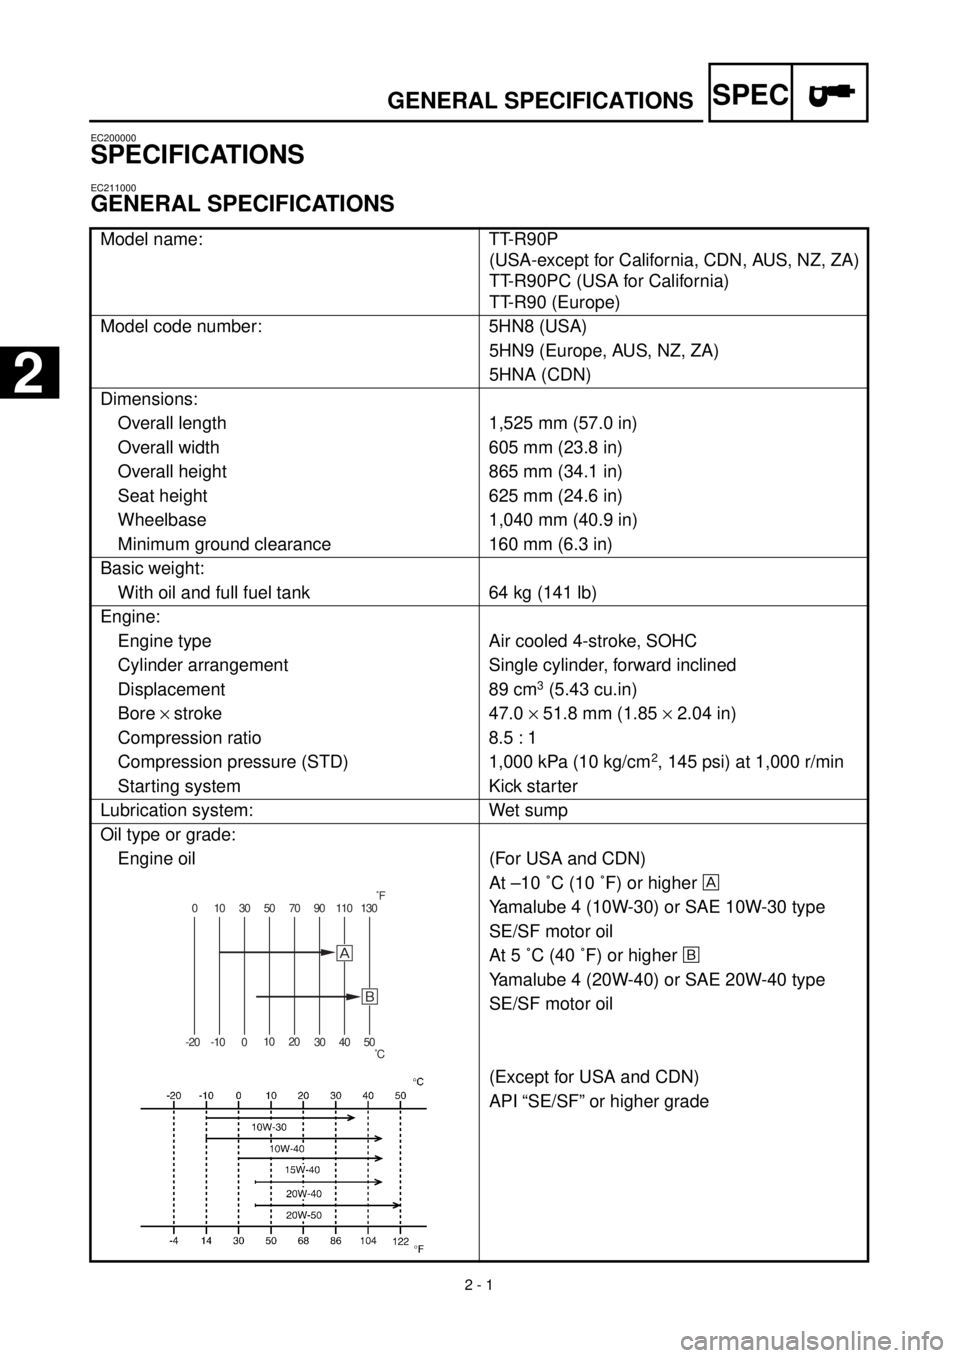
Oil type or grade:
Engine oil
(For USA and CDN)
At –10 ˚C (10 ˚F) or higher
Yamalube 4 (10W-30) or SAE 10W-30 type
SE/SF motor oil
At 5 ˚C (40 ˚F) or higher õ
Yamalube 4 (20W-40) or SAE 20W-40 type
SE/SF motor oil
(Except for USA and CDN)
API “SE/SF” or higher grade
0 10 30 50 70 90 110 130
-20 -10 01020
30 40 50
õ
˚F
˚C
GENERAL SPECIFICATIONS
2
Page 60 of 288

SPEC
2 - 5
Cam chain:
Cam chain type/No. of links 92RH2005-84M/84 ----
Cam chain adjustment method Automatic ----
Rocker arm/rocker arm shaft:
Shaft outside diameter 9.981 ~ 9.991 mm
(0.3930 ~ 0.3933 in)9.95 mm
(0.3917 in)
Rocker arm inside diameter 10.000 ~ 10.015 mm
(0.3937 ~ 0.3943 in)10.03 mm
(0.3949 in)
Valve, valve seat, valve guide:
Valve clearance (cold) IN 0.05 ~ 0.09 mm
(0.0020 ~ 0.0035 in)----
EX 0.08 ~ 0.12 mm
(0.0031 ~ 0.0047 in)----
Valve dimensions:
“A” head diameter IN 22.9 ~ 23.1 mm
(0.9016 ~ 0.9094 in)----
EX 19.9 ~ 20.1 mm
(0.7835 ~ 0.7913 in)----
“B” face width IN 1.19 ~ 2.51 mm
(0.0469 ~ 0.0989 in)----
EX 1.49 ~ 3.07 mm
(0.0587 ~ 0.1209 in)----
“C” seat width IN 0.9 ~ 1.1 mm
(0.0354 ~ 0.0433 in)1.6 mm
(0.0630 in)
EX 0.9 ~ 1.1 mm
(0.0354 ~ 0.0433 in)1.6 mm
(0.0630 in)
“D” margin thickness IN 0.5 ~ 0.9 mm
(0.0197 ~ 0.354 in)----
EX 0.8 ~ 1.2 mm
(0.0315 ~ 0.0472 in)----
Stem outside diameter IN 4.475 ~ 4.490 mm
(0.1762 ~ 0.1768 in)4.450 mm
(0.1752 in)
EX 4.460 ~ 4.475 mm
(0.1756 ~ 0.1762 in)4.435 mm
(0.1746 in)
Guide inside diameter IN 4.500 ~ 4.512 mm
(0.1772 ~ 0.1776 in)4.550 mm
(0.1791 in)
EX 4.500 ~ 4.512 mm
(0.1772 ~ 0.1776 in)4.550 mm
(0.1791 in)
Stem-to-guide clearance IN 0.010 ~ 0.037 mm
(0.0004 ~ 0.0015 in)0.08 mm
(0.003 in)
EX 0.025 ~ 0.052 mm
(0.0010 ~ 0.0020 in)0.10 mm
(0.004 in) Item Standard Limit
Head Diameter
B
Face WidthC
Seat Width
D
Margin ThicknessA
MAINTENANCE SPECIFICATIONS
Page 61 of 288

SPEC
2 - 6
Stem runout limit ---- 0.02 mm
(0.0008 in)
Valve seat width IN 0.9 ~ 1.1 mm
(0.0354 ~ 0.0433 in)1.6 mm
(0.0630 in)
EX 0.9 ~ 1.1 mm
(0.0354 ~ 0.0433 in)1.6 mm
(0.0630 in)
Valve spring:
Free length IN 32.09 mm (1.26 in) 30.5 mm
(1.20 in)
EX 32.09 mm (1.26 in) 30.5 mm
(1.20 in)
Set length (valve closed) IN 24.2 mm (0.95 in) ----
EX 24.2 mm (0.95 in) ----
Compressed pressure
(installed) IN 136.2 ~ 157.8 N
(13.9 ~ 16.1 kg, 30.64 ~ 35.49 lb)----
EX 136.2 ~ 157.8 N
(13.9 ~ 16.1 kg, 30.64 ~ 35.49 lb)----
Tilt limit IN ---- 2.5˚/1.4 mm
(2.5˚/0.06 in)
EX ---- 2.5˚/1.4 mm
(2.5˚/0.06 in)
Direction of winding
(top view) IN Clockwise ----
EX Clockwise ---- Item Standard Limit
*
MAINTENANCE SPECIFICATIONS
Page 63 of 288

SPEC
2 - 8
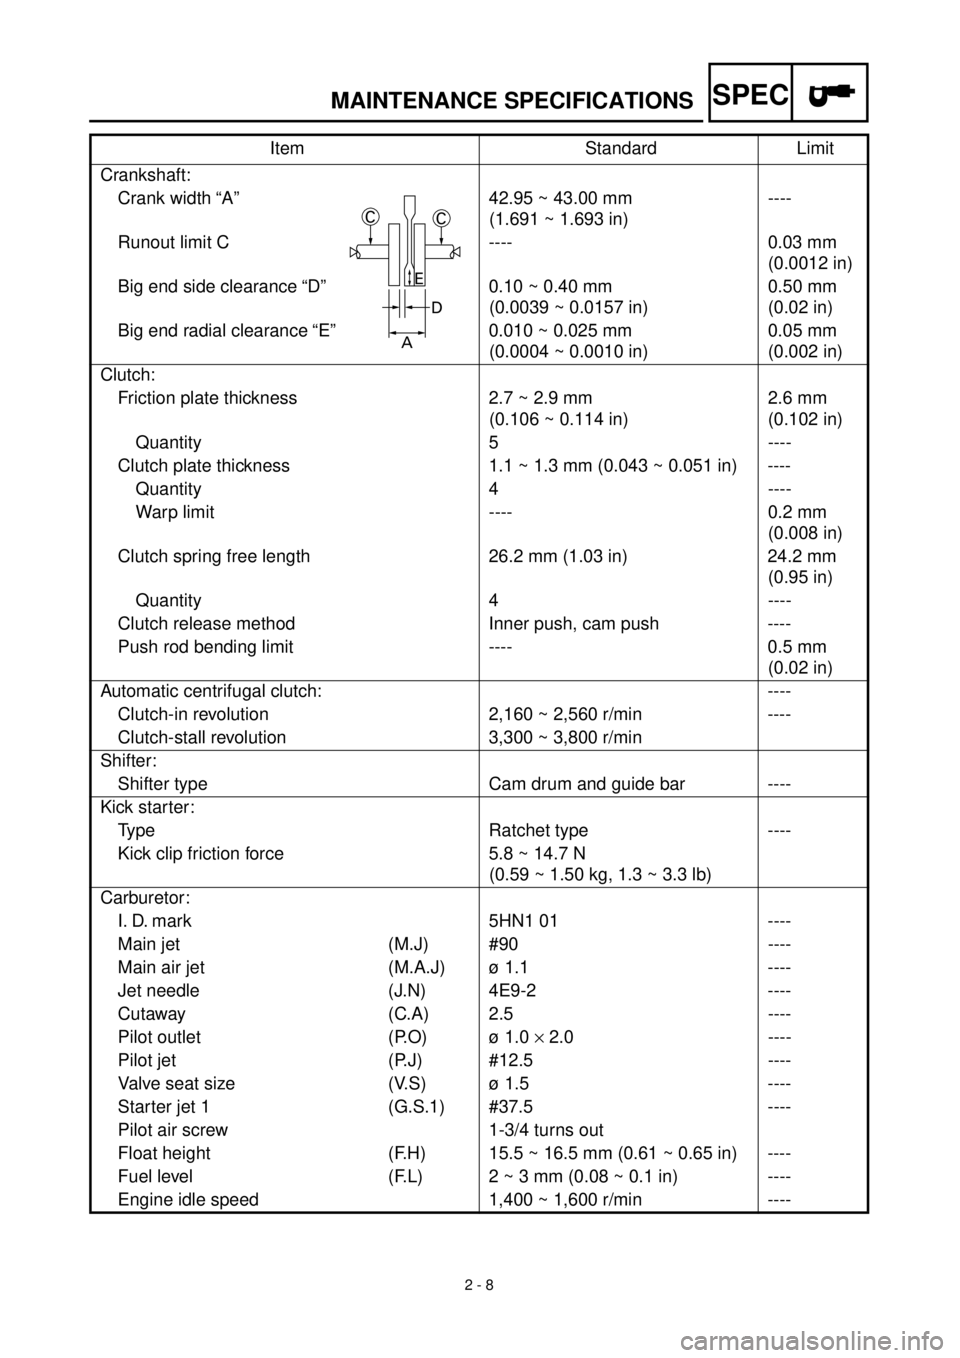
Crankshaft:
Crank width “A” 42.95 ~ 43.00 mm
(1.691 ~ 1.693 in)----
Runout limit C ---- 0.03 mm
(0.0012 in)
Big end side clearance “D” 0.10 ~ 0.40 mm
(0.0039 ~ 0.0157 in)0.50 mm
(0.02 in)
Big end radial clearance “E” 0.010 ~ 0.025 mm
(0.0004 ~ 0.0010 in)0.05 mm
(0.002 in)
Clutch:
Friction plate thickness 2.7 ~ 2.9 mm
(0.106 ~ 0.114 in)2.6 mm
(0.102 in)
Quantity 5 ----
Clutch plate thickness 1.1 ~ 1.3 mm (0.043 ~ 0.051 in) ----
Quantity 4 ----
Warp limit ---- 0.2 mm
(0.008 in)
Clutch spring free length 26.2 mm (1.03 in) 24.2 mm
(0.95 in)
Quantity 4 ----
Clutch release method Inner push, cam push ----
Push rod bending limit ---- 0.5 mm
(0.02 in)
Automatic centrifugal clutch: ----
Clutch-in revolution 2,160 ~ 2,560 r/min ----
Clutch-stall revolution 3,300 ~ 3,800 r/min
Shifter:
Shifter type Cam drum and guide bar ----
Kick starter:
Type Ratchet type ----
Kick clip friction force 5.8 ~ 14.7 N
(0.59 ~ 1.50 kg, 1.3 ~ 3.3 lb)
Carburetor:
I. D. mark 5HN1 01 ----
Main jet (M.J) #90 ----
Main air jet (M.A.J) ø 1.1 ----
Jet needle (J.N) 4E9-2 ----
Cutaway (C.A) 2.5 ----
Pilot outlet (P.O) ø 1.0 ´ 2.0 ----
Pilot jet (P.J) #12.5 ----
Valve seat size (V.S) ø 1.5 ----
Starter jet 1 (G.S.1) #37.5 ----
Pilot air screw 1-3/4 turns out
Float height (F.H) 15.5 ~ 16.5 mm (0.61 ~ 0.65 in) ----
Fuel level (F.L) 2 ~ 3 mm (0.08 ~ 0.1 in) ----
Engine idle speed 1,400 ~ 1,600 r/min ----Item Standard Limit
MAINTENANCE SPECIFICATIONS
CC
D
A
E
Page 182 of 288

4 - 18
ENGVALVES AND VALVE SPRINGS
Valve spring
1. Measure:
lValve spring free length a
Out of specification ® Replace.
2. Measure:
lSpring tilt a
Out of specification ® Replace.
Free length (valve spring):
Intake:
32.09 mm (1.26 in)
Exhaust:
32.09 mm (1.26 in)
Spring tilt limit:
Intake:
2.5˚/1.4 mm (0.06 in)
Exhaust:
2.5˚/1.4 mm (0.06 in)
Valve seat
1. Measure:
lValve seat width a
Out of specification ® Reface the valve
seat.
Valve seat width:
Intake:
0.9 ~ 1.1 mm (0.0354 ~ 0.0433 in)
Exhaust:
0.9 ~ 1.1 mm (0.0354 ~ 0.0433 in)
Measurement steps:
lApply Mechanic’s blueing dye (Dykem) b
to the valve face.
lInstall the valve into the cylinder head.
lPress the valve through the valve guide
and onto the valve seat to make a clear
pattern.
lMeasure the valve seat width. Where the
valve seat and valve face made contact,
blueing will have been removed.
lIf the valve seat is too wide, too narrow, or
the seat is not centered, the valve seat
must be refaced.
Page 184 of 288

4 - 19
ENGVALVES AND VALVE SPRINGS
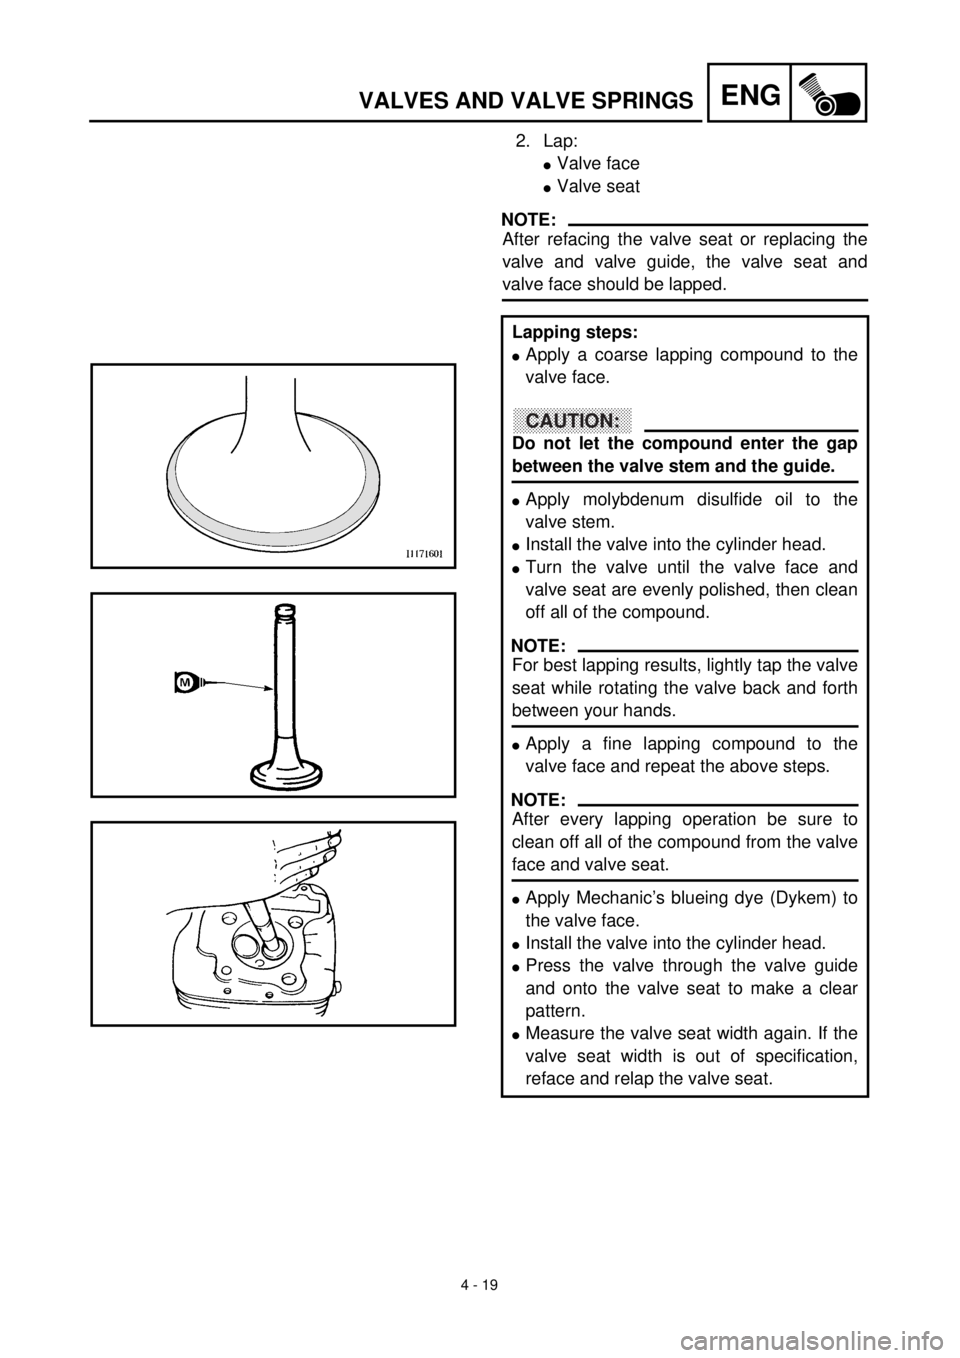
2. Lap:
lValve face
lValve seat
NOTE:
After refacing the valve seat or replacing the
valve and valve guide, the valve seat and
valve face should be lapped.
Lapping steps:
lApply a coarse lapping compound to the
valve face.
CAUTION:
Do not let the compound enter the gap
between the valve stem and the guide.
lApply molybdenum disulfide oil to the
valve stem.
lInstall the valve into the cylinder head.
lTurn the valve until the valve face and
valve seat are evenly polished, then clean
off all of the compound.
NOTE:
For best lapping results, lightly tap the valve
seat while rotating the valve back and forth
between your hands.
lApply a fine lapping compound to the
valve face and repeat the above steps.
NOTE:
After every lapping operation be sure to
clean off all of the compound from the valve
face and valve seat.
lApply Mechanic’s blueing dye (Dykem) to
the valve face.
lInstall the valve into the cylinder head.
lPress the valve through the valve guide
and onto the valve seat to make a clear
pattern.
lMeasure the valve seat width again. If the
valve seat width is out of specification,
reface and relap the valve seat.
Page 232 of 288

4 - 43
ENGCRANKCASE AND CRANKSHAFT
INSPECTION
Crankshaft
1. Measure:
lRunout limit a
lConnecting rod big end side clearance
b
lConnecting rod big end radial clear-
ance c
lCrank width d
Out of specification ® Replace.
Use the dial gauge and a thickness
gauge.
Standard Limit
Runout
limit—0.03 mm
(0.0012 in)
Side
clearance0.10 ~ 0.40 mm
(0.0039 ~ 0.0157 in)—
Radial
clearance0.010 ~ 0.025 mm
(0.0004 ~ 0.0010 in)0.05 mm
(0.002 in)
Crack
width42.95 ~ 43.00 mm
(1.691 ~ 1.693 in)—
ASSEMBLY AND INSTALLATION
Crankcase
1. Apply:
lSealant
On the crankcase (left).
NOTE:
lClean the contacting surface of crankcase
(left and right) before applying the sealant.
lDO NOT ALLOW any sealant to come in
contact with the oil gallery a.
Quick gasket®:
ACC-QUICK-GS-KT
YAMAHA Bond No. 1215:
90890-85505