wheel YAMAHA TW200 2002 Owners Manual
[x] Cancel search | Manufacturer: YAMAHA, Model Year: 2002, Model line: TW200, Model: YAMAHA TW200 2002Pages: 74, PDF Size: 1.57 MB
Page 7 of 74
Carburetor adjustment ..................................6-13
Idle speed adjustment ...................................6-13
Throttle cable free play inspection ...............6-14
Cam chain adjustment ...................................6-14
Valve clearance adjustment ..........................6-14
Tires.................................................................6-15
Wheels ............................................................6-17
Clutch lever free play adjustment .................6-18
Front brake lever free play adjustment ........6-18
Rear brake pedal height and free play
adjustment ......................................................6-19
Brake light switch adjustment.......................6-20
Checking the brake shoes..............................6-21
Drive chain slack check ..................................6-21
Drive chain slack adjustment ........................6-22
Drive chain lubrication...................................6-23
Cable inspection and lubrication ..................6-24
Throttle cable and grip lubrication ...............6-24
Brake and shift pedal lubrication ..................6-24
Brake and clutch lever lubrication ................6-25
Sidestand lubrication .....................................6-25
Rear suspension lubrication..........................6-25
Front fork inspection ......................................6-26
Steering inspection ........................................6-26
Wheel bearings ..............................................6-27
Battery .............................................................6-27Fuse replacement ...........................................6-29
Headlight bulb replacement ..........................6-30
Supporting the motorcycle ...........................6-31
Front wheel removal ......................................6-31
Front wheel installation .................................6-32
Rear wheel removal .......................................6-33
Rear wheel installation ..................................6-33
Troubleshooting .............................................6-34
Troubleshooting chart ...................................6-35
CLEANING AND STORAGE ...............................7-1
Cleaning ............................................................7-1
Storage..............................................................7-2
SPECIFICATIONS................................................8-1
How to use the conversion table ....................8-4
CONSUMER INFORMATION .............................9-1
Identification numbers record.........................9-1
Key identification number ...............................9-1
Vehicle identification number .........................9-1
Model label .......................................................9-2
TABLE OF CONTENTS
1
2
3
4
5
6
7
8
9
7
8
9
5FY-9-E0 (TW200) 7/29/02 10:54 AM Page 6
Page 23 of 74

4-1
EAU01114
PRE-OPERATION CHECKS
1
2
3
4
5
6
7
8
9Owners are personally responsible for their vehicle’s condition. Your motorcycle’s vital functions can start to
deteriorate quickly and unexpectedly, even if it remains unused (for instance, if it is exposed to the elements).
Any damage, fluid leak or loss of tire pressure could have serious consequences. Therefore, it is very important
that, in addition to a thorough visual inspection, you check the following points before each ride.
EAU00340PRE-OPERATION CHECK LIST
ITEM CHECKS PAGE
Brakes9Check operation, condition and free play.
3-5, 6-18 ~ 6-21
9Adjust if necessary.
Clutch9Check operation and free play.
3-4, 6-18
9Adjust if necessary.
9Check for smooth operation.
Throttle grip and housing9Lubricate.6-14, 6-24
9Adjust throttle cable free play if necessary.
Engine oil9Check oil level.
6-8 ~ 6-11
9Fill with oil if necessary.
Drive chain9Check chain slack and condition.
6-21 ~ 6-23
9Adjust if necessary.
Wheels and tires9Check tire pressure, wear, damage and spoke tightness.
6-15 ~ 6-17
9Tighten spokes if necessary.
Brake and shift pedal shafts9Check for smooth operation.
6-24
9Lubricate if necessary.
Brake and clutch lever pivots9Check for smooth operation.
6-25
9Lubricate if necessary.
Sidestand pivot9Check for smooth operation.
6-25
9Lubricate if necessary.
Chassis fasteners9Make sure that all nuts, bolts, and screws are properly tightened.
—
9Tighten if necessary.
5FY-9-E0 (TW200) 7/29/02 10:54 AM Page 22
Page 33 of 74
6-3
PERIODIC MAINTENANCE AND MINOR REPAIR
1
2
3
4
5
6
7
8
9
EAU00473
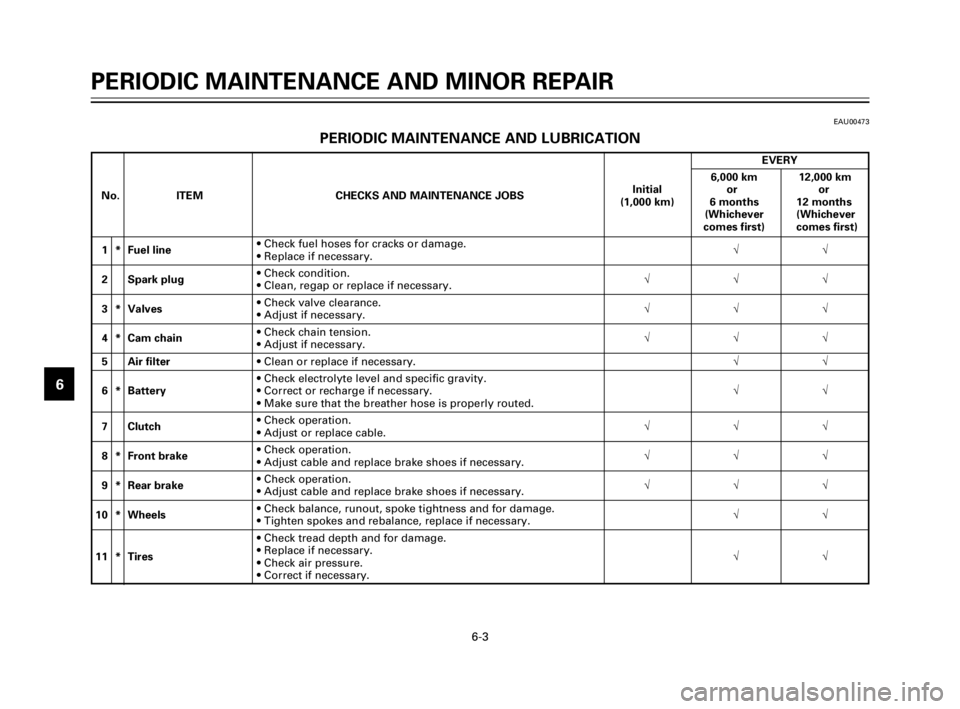
PERIODIC MAINTENANCE AND LUBRICATION
EVERY
6,000 km 12,000 km
No. ITEM CHECKS AND MAINTENANCE JOBSInitial or or
(1,000 km) 6 months 12 months
(Whichever (Whichever
comes first) comes first)
1 * Fuel line 9Check fuel hoses for cracks or damage.
√√
9Replace if necessary.
2 Spark plug9Check condition.
√√√
9Clean, regap or replace if necessary.
3 * Valves9Check valve clearance.
√√√
9Adjust if necessary.
4 * Cam chain9Check chain tension.
√√√
9Adjust if necessary.
5 Air filter9Clean or replace if necessary.√√
9Check electrolyte level and specific gravity.
6 * Battery9Correct or recharge if necessary. √√
9Make sure that the breather hose is properly routed.
7 Clutch9Check operation.
√√√
9Adjust or replace cable.
8 * Front brake9Check operation.
√√√
9Adjust cable and replace brake shoes if necessary.
9 * Rear brake9Check operation.
√√√
9Adjust cable and replace brake shoes if necessary.
10 * Wheels9Check balance, runout, spoke tightness and for damage.
√√
9Tighten spokes and rebalance, replace if necessary.
9Check tread depth and for damage.
11 * Tires9Replace if necessary.
√√
9Check air pressure.
9Correct if necessary.
5FY-9-E0 (TW200) 7/29/02 10:54 AM Page 32
Page 34 of 74

6-4
PERIODIC MAINTENANCE AND MINOR REPAIR
1
2
3
4
5
6
7
8
9
EVERY
6,000 km 12,000 km
No. ITEM CHECKS AND MAINTENANCE JOBSInitial or or
(1,000 km) 6 months 12 months
(Whichever (Whichever
comes first) comes first)
12 * Wheel bearings9Check bearing for looseness or damage.
√√
9Replace if necessary.
9Check swingarm pivoting point for play.
13 * Swingarm9Correct if necessary. √√
9Lubricate with lithium soap base grease.
9Check chain slack.
14 Drive chain9
Adjust if necessary. Make sure that the rear wheel is properly aligned.Every 500 km and after washing
9Clean and lubricate.the motorcycle or riding in the rain
9Check bearing play and steering for roughness.
15 * Steering bearings9Correct accordingly.
√√
9Lubricate with lithium soap grease every 24,000 km or
24 months (whichever comes first).
16 * Chassis fasteners9
Make sure that all nuts, bolts and screws are properly tightened.√√9Tighten if necessary.
17 Sidestand9Check operation.
√√
9Lubricate and repair if necessary.
18 Sidestand switch9Check operation.
√√√
9Replace if necessary.
19 * Front fork9Check operation and for oil leakage.
√√
9Correct accordingly.
20 *Rear shock absorber 9Check operation and shock absorber for oil leakage.
√√
assembly9Replace shock absorber assembly if necessary.
Rear shock absorber9Check operation.
21 * assembly pivoting9Lubricate with lithium soap base grease every 24,000 km or√√
points24 months (whichever comes first).
22 * Carburetor9Check engine idling speed and starter operation.
√√√
9Adjust if necessary.
5FY-9-E0 (TW200) 7/29/02 10:54 AM Page 33
Page 47 of 74

6-17
PERIODIC MAINTENANCE AND MINOR REPAIR
1
2
3
4
5
6
7
8
9
EAU00685Wheels
To ensure maximum performance,
long service, and safe operation,
note the following:
1. Always inspect the wheels
before a ride. Check for cracks,
bends or warpage of the
wheel. Be sure the spokes are
tight and undamaged. If any
abnormal condition exists in a
wheel, consult a Yamaha deal-
er. Do not attempt even small
repairs to the wheel. If a wheel
is deformed or cracked, it must
be replaced.
2. Tires and wheels should be
balanced whenever either one
is changed or replaced. Failure
to have a wheel balanced can
result in poor performance,
adverse handling characteris-
tics, and shortened tire life.3. Ride at moderate speeds after
changing a tire since the tire
surface must first be broken in
for it to develop its optimal
characteristics.
EAU00680
w
1. It is dangerous to ride with a
worn-out tire. When a tire
tread begins to show lines,
have a Yamaha dealer replace
the tire immediately. Brakes,
tires, and related wheel parts
replacement should also be
left to a Yamaha dealer.
2. Patching a punctured tube is
not recommended. If it is
absolutely necessary to do so,
use great care and replace the
tube as soon as possible with
a good quality replacement.
5FY-9-E0 (TW200) 7/29/02 10:54 AM Page 46
Page 50 of 74
6-20
PERIODIC MAINTENANCE AND MINOR REPAIR
1
2
3
4
5
6
7
8
9
b1
2a
EAU00713
Brake light switch
adjustment
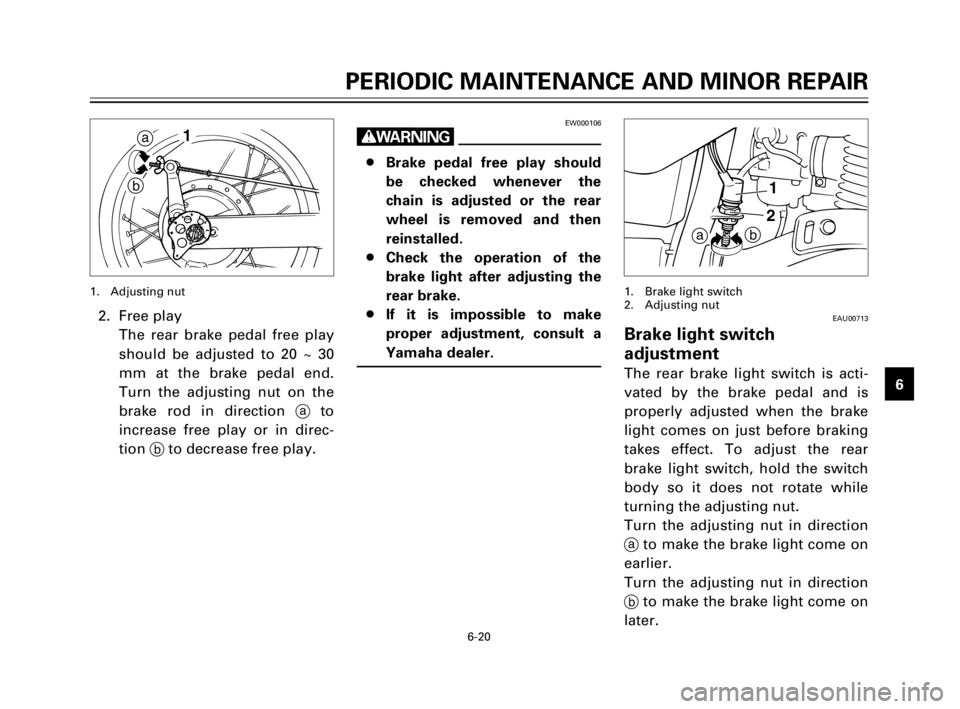
The rear brake light switch is acti-
vated by the brake pedal and is
properly adjusted when the brake
light comes on just before braking
takes effect. To adjust the rear
brake light switch, hold the switch
body so it does not rotate while
turning the adjusting nut.
Turn the adjusting nut in direction
ato make the brake light come on
earlier.
Turn the adjusting nut in direction
bto make the brake light come on
later.
1. Brake light switch
2. Adjusting nut
EW000106
w
8Brake pedal free play should
be checked whenever the
chain is adjusted or the rear
wheel is removed and then
reinstalled.
8Check the operation of the
brake light after adjusting the
rear brake.
8If it is impossible to make
proper adjustment, consult a
Yamaha dealer.
2. Free play
The rear brake pedal free play
should be adjusted to 20 ~ 30
mm at the brake pedal end.
Turn the adjusting nut on the
brake rod in direction ato
increase free play or in direc-
tion bto decrease free play.
a
b1
1. Adjusting nut
5FY-9-E0 (TW200) 7/29/02 10:54 AM Page 49
Page 51 of 74
6-21
PERIODIC MAINTENANCE AND MINOR REPAIR
1
2
3
4
5
6
7
8
9
EAU00744Drive chain slack check
NOTE:
Spin the wheel several times and
find the tightest position of the
chain. Check and/or adjust the
chain slack while it’s in this tightest
position.
EAU00719
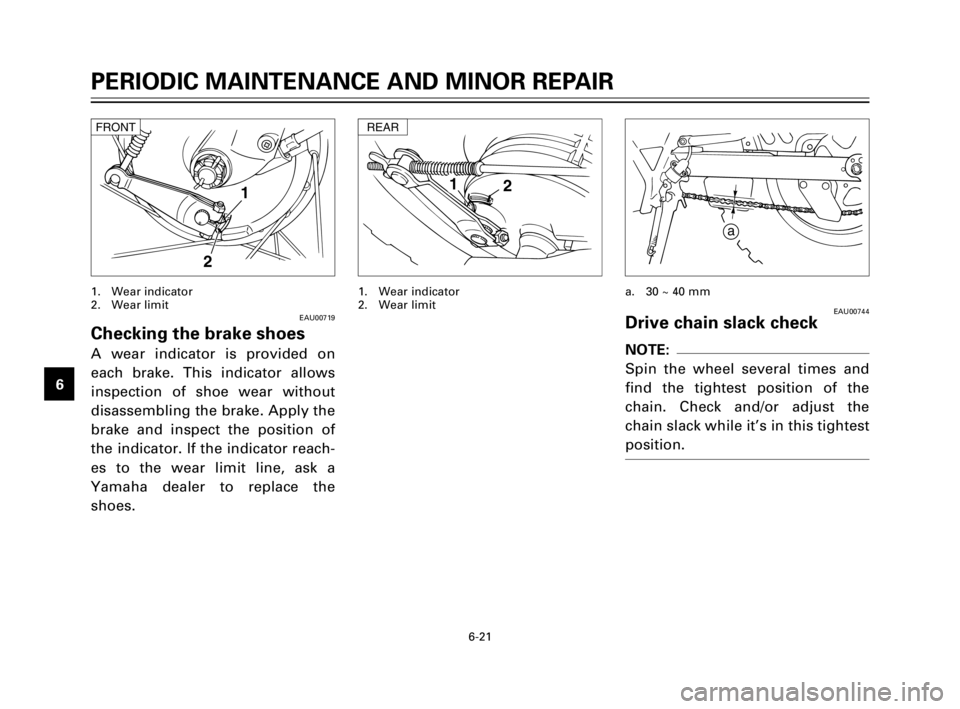
Checking the brake shoes
A wear indicator is provided on
each brake. This indicator allows
inspection of shoe wear without
disassembling the brake. Apply the
brake and inspect the position of
the indicator. If the indicator reach-
es to the wear limit line, ask a
Yamaha dealer to replace the
shoes.
1
2
1. Wear indicator
2. Wear limit
FRONT
21
1. Wear indicator
2. Wear limit
REAR
a
a. 30 ~ 40 mm
5FY-9-E0 (TW200) 7/29/02 10:54 AM Page 50
Page 52 of 74

6-22
PERIODIC MAINTENANCE AND MINOR REPAIR
1
2
3
4
5
6
7
8
9 To check the chain slack the motor-
cycle must be held straight up with
both wheels on the ground and
without rider. Check the slack at
the position shown in the illustra-
tion. Normal slack is approximately
30 ~ 40 mm. If the slack exceeds 40
mm, adjust.
EAU01302
Drive chain slack adjustment
1. Loosen the rear brake adjust-
ing nut.
2. Remove the cotter pin from
the axle nut.
3. Loosen the axle nut.
4. Turn both left and right chain
adjusting plates the same
amount. Make sure that they
are in the same position for
proper wheel alignment.
1
2
3 4
1. Adjusting nut
2. Axle nut
3. Cotter pin
4. Chain adjusting plate
EC000096
cC
Too little chain slack will overload
the engine and other vital parts.
Keep the slack within the specified
limits.
5. After adjusting, be sure to
tighten the axle nut to the
specified torque.
Tightening torque:
Axle nut:
90 Nm (9.0 m0kg)
5FY-9-E0 (TW200) 7/29/02 10:54 AM Page 51
Page 56 of 74

6-26
PERIODIC MAINTENANCE AND MINOR REPAIR
1
2
3
4
5
6
7
8
9
EAU00793Front fork inspection
EW000115
w
Securely support the motorcycle
so there is no danger of it falling
over.
1. Visual check
Check for scratches or damage
on the inner tube and exces-
sive oil leakage from the front
fork.2. Operation check
Place the motorcycle on a level
place.
a. Hold the motorcycle in an
upright position and apply the
front brake.
b. Push down hard on the han-
dlebars several times and
check if the fork rebounds
smoothly.
EC000098
cC
If any damage or unsmooth move-
ment is found with the front fork,
consult a Yamaha dealer.
EAU00794Steering inspection
Periodically inspect the condition
of the steering. Worn out or loose
steering bearings may be danger-
ous. Place a stand under the
engine to raise the front wheel off
the ground. Hold the lower end of
the front forks and try to move
them forward and backward. If any
free play can be felt, ask a Yamaha
dealer to inspect and adjust the
steering. Inspection is easier if the
front wheel is removed.
5FY-9-E0 (TW200) 7/29/02 10:54 AM Page 55
Page 57 of 74
6-27
PERIODIC MAINTENANCE AND MINOR REPAIR
1
2
3
4
5
6
7
8
9
EAU01144Wheel bearings
If there is play in the front or rear
wheel hub or if the wheel does not
turn smoothly, have a Yamaha
dealer inspect the wheel bearings.
EW000115
w
Securely support the motorcycle
so there is no danger of it falling
over.
EAU01071
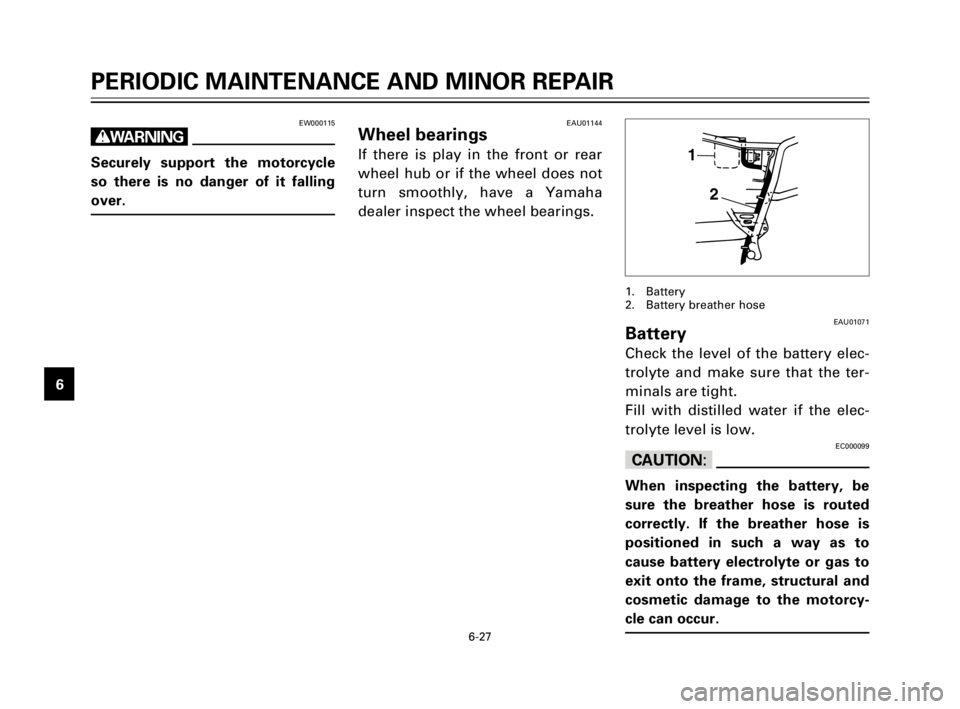
Battery
Check the level of the battery elec-
trolyte and make sure that the ter-
minals are tight.
Fill with distilled water if the elec-
trolyte level is low.
EC000099
cC
When inspecting the battery, be
sure the breather hose is routed
correctly. If the breather hose is
positioned in such a way as to
cause battery electrolyte or gas to
exit onto the frame, structural and
cosmetic damage to the motorcy-
cle can occur.
1
2
1. Battery
2. Battery breather hose
5FY-9-E0 (TW200) 7/29/02 10:54 AM Page 56