trouble shooting YAMAHA VIKING 2017 Owners Manual
[x] Cancel search | Manufacturer: YAMAHA, Model Year: 2017, Model line: VIKING, Model: YAMAHA VIKING 2017Pages: 172, PDF Size: 3.94 MB
Page 8 of 172

Checking the parking brake pads ...... 8-34
Checking the brake fluid level ............ 8-34
Brake fluid replacement ..................... 8-36
Checking the brake pedal .................. 8-36
Parking brake lever free play adjustment........................................ 8-36
Brake light switch adjustment ............ 8-38
Cable inspection and lubrication........ 8-38
Brake pedal and accelerator pedal lubrication ......................................... 8-38
Checking the stabilizer bushes .......... 8-39
Rear knuckle upper and lower pivot lubrication (left and right) .................. 8-39
Steering shaft lubrication ................... 8-40
Wheel removal.................................... 8-40
Tire replacement ................................ 8-41
Wheel installation ............................... 8-42
Battery ................................................ 8-42
Jump-starting ..................................... 8-46
Fuse replacement............................... 8-47
Replacing a headlight bulb................. 8-50
Headlight beam adjustment ............... 8-52
Tail/brake light bulb replacement ....... 8-53 Troubleshooting ..................................8-54
Troubleshooting charts .......................8-56
CLEANING AND STORAGE ....................9-1 Cleaning................................................9-1
Storage .................................................9-2
SPECIFICATIONS..................................10-1
CONSUMER INFORMATION ................11-1 Identification number records.............11-1
INDEX ....................................................12-1
UB427BE0.book Page 3 Friday, February 5, 2016 2:14 PM
Page 153 of 172

8-54
8
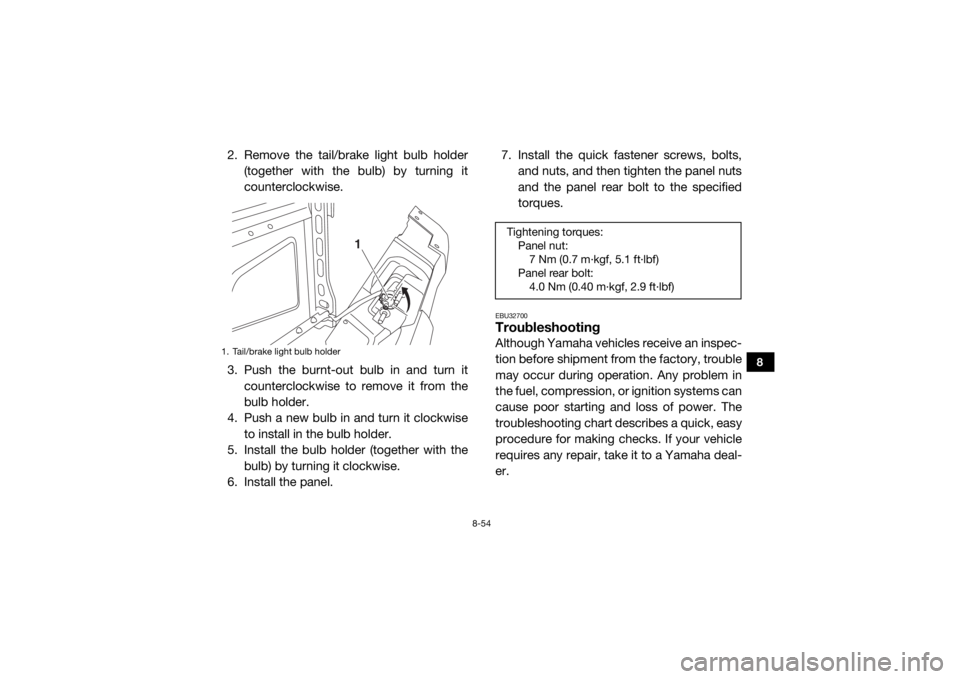
2. Remove the tail/brake light bulb holder(together with the bulb) by turning it
counterclockwise.
3. Push the burnt-out bulb in and turn it counterclockwise to remove it from the
bulb holder.
4. Push a new bulb in and turn it clockwise to install in the bulb holder.
5. Install the bulb holder (together with the
bulb) by turning it clockwise.
6. Install the panel. 7. Install the quick fastener screws, bolts,
and nuts, and then tighten the panel nuts
and the panel rear bolt to the specified
torques.
EBU32700TroubleshootingAlthough Yamaha vehicles receive an inspec-
tion before shipment from the factory, trouble
may occur during operation. Any problem in
the fuel, compression, or ignition systems can
cause poor starting and loss of power. The
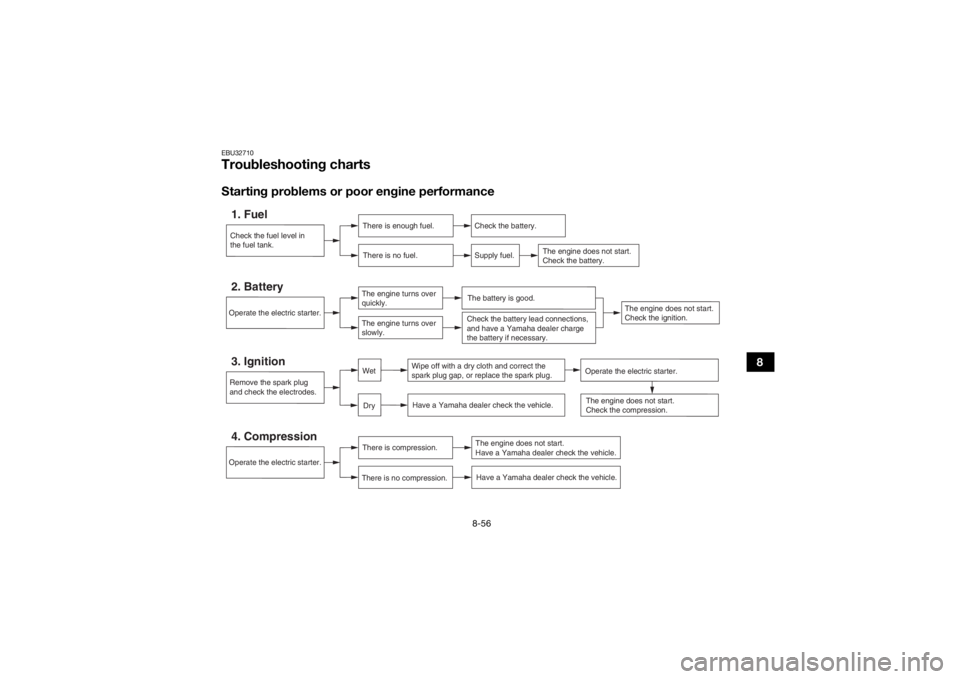
troubleshooting chart describes a quick, easy
procedure for making checks. If your vehicle
requires any repair, take it to a Yamaha deal-
er.
1. Tail/brake light bulb holder
1
Tightening torques:Panel nut:7 Nm (0.7 m·kgf, 5.1 ft·lbf)
Panel rear bolt: 4.0 Nm (0.40 m·kgf, 2.9 ft·lbf)
UB427BE0.book Page 54 Friday, February 5, 2016 2:14 PM
Page 155 of 172

8-56
8
EBU32710Troubleshooting chartsStarting problems or poor engine performanceCheck the fuel level in
the fuel tank.1. Fuel
There is enough fuel.
There is no fuel.
Check the battery.
Supply fuel.
The engine does not start.
Check the battery.
Operate the electric starter.4. Compression
There is compression.
There is no compression.
The engine does not start.
Have a Yamaha dealer check the vehicle.Have a Yamaha dealer check the vehicle.
Remove the spark plug
and check the electrodes.3. Ignition
Wipe off with a dry cloth and correct the
spark plug gap, or replace the spark plug. Have a Yamaha dealer check the vehicle.
The engine does not start.
Check the compression.
Operate the electric starter.2. Battery
The engine turns over
quickly.
The engine turns over
slowly.
The battery is good.
DryWet
Operate the electric starter.
Check the battery lead connections,
and have a Yamaha dealer charge
the battery if necessary.
The engine does not start.
Check the ignition.
UB427BE0.book Page 56 Friday, February 5, 2016 2:14 PM
Page 169 of 172

12-2
12
IIdentification number records ...................................... 11-1
Indicator lights and warning lights ................................. 4-2
Instruments, lights and switches, Pre-operation check ........................................................................... 5-7JJump-starting .............................................................. 8-46LLabel locations ............................................................... 1-1
Light switch .................................................................. 4-10
Loading .......................................................................... 6-7
Low-range indicator light ............................................... 4-2MMain switch .................................................................... 4-1
Maintenance and lubrication chart ................................ 8-6
Maintenance chart, emission control system ................ 8-4
Model label .................................................................. 11-1
Multi-function meter unit ............................................... 4-6NNeutral indicator light ..................................................... 4-3OOn-Command drive knob ............................................ 4-11
On-Command drive knob, operation ............................. 6-5
On-Command four-wheel-drive/differential gear lock indicator ....................................................................... 4-3
Owner’s manual and tool kit .......................................... 8-2PParking ........................................................................... 6-7
Parking brake indicator light .......................................... 4-3
Parking brake lever ...................................................... 4-13
Parking brake lever free play, adjusting ....................... 8-36 Parking brake pads, checking ..................................... 8-34
Passenger handhold, Pre-operation check ................... 5-7
RRear knuckle upper and lower pivot, lubrication ......... 8-39
Reverse indicator light ................................................... 4-3SSafety information .......................................................... 2-1
Seat belt indicator light .................................................. 4-5
Seat belts ..................................................................... 4-17
Seat belts, Pre-operation check .................................... 5-6
Seats ............................................................................ 4-15
Spark arrester, cleaning ............................................... 8-31
Spark plug, inspecting ................................................. 8-23
Specifications .............................................................. 10-1
Stabilizer bushes, checking ..........
............................... 8-39
Starting the engine ........................................................ 6-2
Steering, Pre-operation check ....................................... 5-7
Steering shaft, lubrication ............................................ 8-40
Storage .......................................................................... 9-2
Storage compartments ................................................ 4-18TTail/brake light bulb, replacing .................................... 8-53
Tire, replacing .............................................................. 8-41
Tires, Pre-operation check ............................................ 5-8
Trailer hitch bracket and receiver ................................ 4-23
Troubleshooting ........................................................... 8-54
Troubleshooting charts ................................................ 8-56VValve clearance ............................................................ 8-33
V-belt case drain plug .................................................. 8-31
Vehicle identification number ...................................... 11-1
UB427BE0.book Page 2 Friday, February 5, 2016 2:14 PM