brake light YAMAHA VIKING VI 2016 Owners Manual
[x] Cancel search | Manufacturer: YAMAHA, Model Year: 2016, Model line: VIKING VI, Model: YAMAHA VIKING VI 2016Pages: 184, PDF Size: 4.39 MB
Page 6 of 184

EBU31120
CONTENTS
LOCATION OF THE WARNING AND
SPECIFICATION LABELS ....................... 1-1
SAFETY INFORMATION ......................... 2-1
DESCRIPTION......................................... 3-1Left view ............................................... 3-1
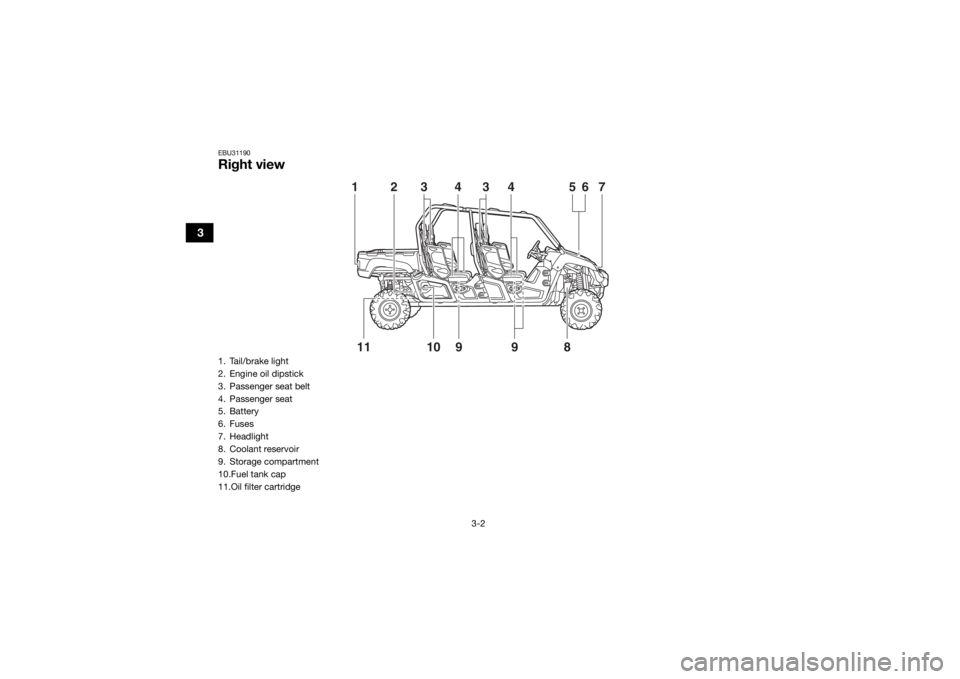
Right view ............................................. 3-2
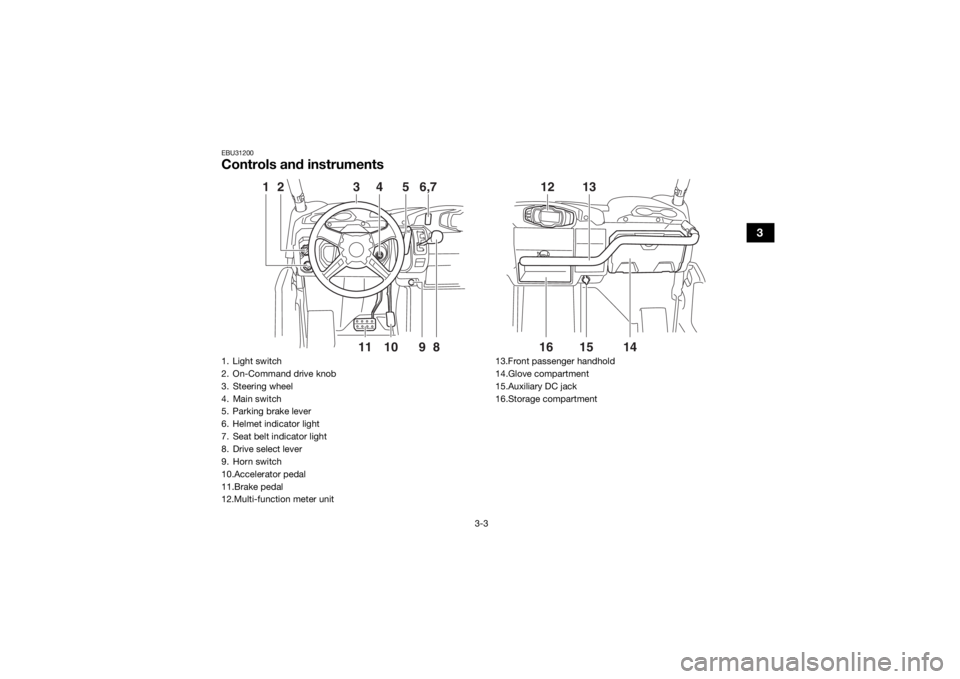
Controls and instruments ..................... 3-3
INSTRUMENT AND CONTROL
FUNCTIONS............................................ 4-1 Main switch .......................................... 4-1
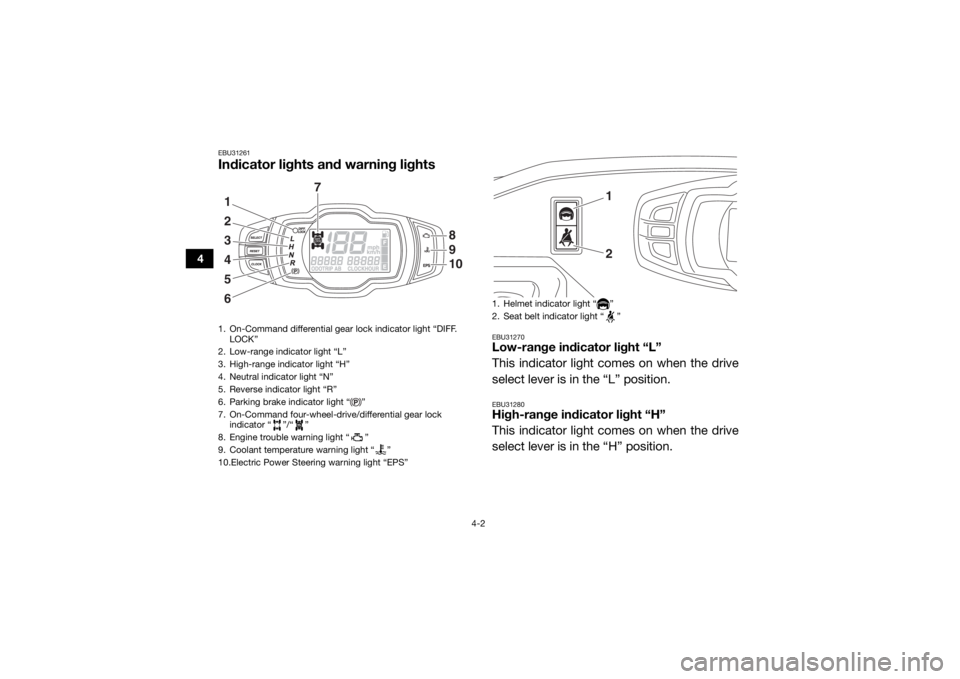
Indicator lights and warning lights ....... 4-2
Multi-function meter unit ...................... 4-6
Light switch ........................................ 4-10
On-Command drive knob “2WD/4WD/DIFF LOCK” .................. 4-11
Horn switch ....................................... 4-12
Accelerator pedal ............................... 4-12
Brake pedal ........................................ 4-12 Parking brake lever ............................ 4-13
Drive select lever ................................ 4-14
Fuel tank cap...................................... 4-14
Doors .................................................. 4-15
Seats .................................................. 4-15
Adjusting the driver seat position....... 4-16
Seat belts ........................................... 4-17
Glove compartment ........................... 4-18
Storage compartments ...................... 4-19
Cup holders ........................................ 4-21
Cargo bed .......................................... 4-22
The front and rear shock absorber
assemblies ....................................... 4-24
Trailer hitch bracket and receiver....... 4-25
Auxiliary DC jacks .............................. 4-25
FOR YOUR SAFETY –
PRE-OPERATION CHECKS.................... 5-1 Front and rear brakes ........................... 5-3
Fuel....................................................... 5-3
Engine oil.............................................. 5-5
Coolant ................................................. 5-6
Final gear oil ......................................... 5-6UB857AE0.book Page 1 Monday, August 24, 2015 8:59 AM
Page 7 of 184

Differential gear oil................................ 5-6
Accelerator pedal ................................. 5-7
Seat belts ............................................. 5-7
Passenger handhold ............................ 5-7
Steering ................................................ 5-7
Fittings and fasteners ........................... 5-8
Instruments, lights and switches .......... 5-8
Control cables ...................................... 5-8
Tires ...................................................... 5-8
OPERATION ............................................ 6-1 Engine break-in .................................... 6-1
Starting the engine ............................... 6-2
Drive select lever operation and reverse driving .................................... 6-3
On-Command drive knob..................... 6-5
Parking ................................................. 6-7
Loading................................................. 6-7
BASIC GUIDE FOR SAFE USE .............. 7-1 KNOW YOUR VEHICLE........................ 7-1
LEARNING TO OPERATE YOUR
VEHICLE ........................................... 7-13 PERIODIC MAINTENANCE AND
ADJUSTMENT .........................................8-1
Owner’s manual and tool kit .................8-2
Periodic maintenance chart for the emission control system .....................8-4
General maintenance and lubrication chart ....................................................8-6
Hood ...................................................8-10
Right rear panel ..................................8-11
Engine oil and oil filter cartridge .........8-12
Final gear oil .......................................8-16
Differential gear oil ..............................8-18
Coolant ...............................................8-20
Axle boots ...........................................8-25
Spark plug inspection .........................8-26
Cleaning the air filter element .............8-28
Cleaning the air filter case/duct
check hose........................................8-33
V-belt case drain plug.........................8-34
Cleaning the spark arrester ................8-34
Valve clearance...................................8-36
Brakes.................................................8-36
UB857AE0.book Page 2 Monday, August 24, 2015 8:59 AM
Page 8 of 184

Checking the front and rear brake pads.................................................. 8-36
Checking the parking brake pads ...... 8-37
Checking the brake fluid level ............ 8-37
Brake fluid replacement ..................... 8-39
Checking the brake pedal .................. 8-39
Parking brake lever free play adjustment........................................ 8-39
Brake light switch adjustment ............ 8-41
Cable inspection and lubrication........ 8-41
Brake pedal and accelerator pedal lubrication ......................................... 8-41
Checking the stabilizer bushes .......... 8-42
Rear knuckle upper and lower pivot
lubrication (left and right) .................. 8-42
Steering shaft lubrication ................... 8-43
Wheel removal.................................... 8-43
Tire replacement ................................ 8-44
Wheel installation ............................... 8-45
Battery ................................................ 8-45
Jump-starting ..................................... 8-49
Fuse replacement............................... 8-50
Replacing a headlight bulb................. 8-53 Headlight beam adjustment ...............8-55
Tail/brake light bulb replacement .......8-56
Troubleshooting ..................................8-57
Troubleshooting charts .......................8-59
CLEANING AND STORAGE ....................9-1 Cleaning................................................9-1
Storage .................................................9-2
SPECIFICATIONS..................................10-1
CONSUMER INFORMATION ................11-1 Identification number records.............11-1
INDEX ....................................................12-1
UB857AE0.book Page 3 Monday, August 24, 2015 8:59 AM
Page 38 of 184
3-2
3
EBU31190Right view
11 109
9856 7
44
33
2
1
1. Tail/brake light
2. Engine oil dipstick
3. Passenger seat belt
4. Passenger seat
5. Battery
6. Fuses
7. Headlight
8. Coolant reservoir
9. Storage compartment
10.Fuel tank cap
11.Oil filter cartridgeUB857AE0.book Page 2 Monday, August 24, 2015 8:59 AM
Page 39 of 184
3-3
3
EBU31200Controls and instruments
11
10
2
3
4
5
9
1
6,7
8
16
14
12
1315
1. Light switch
2. On-Command drive knob
3. Steering wheel
4. Main switch
5. Parking brake lever
6. Helmet indicator light
7. Seat belt indicator light
8. Drive select lever
9. Horn switch
10.Accelerator pedal
11.Brake pedal
12.Multi-function meter unit 13.Front passenger handhold
14.Glove compartment
15.Auxiliary DC jack
16.Storage compartmentUB857AE0.book Page 3 Monday, August 24, 2015 8:59 AM
Page 42 of 184
4-2
4
EBU31261Indicator lights and warning lights
EBU31270Low-range indicator light “L”
This indicator light comes on when the drive
select lever is in the “L” position.EBU31280High-range indicator light “H”
This indicator light comes on when the drive
select lever is in the “H” position.
1. On-Command differential gear lock indicator light “DIFF. LOCK”
2. Low-range indicator light “L”
3. High-range indicator light “H”
4. Neutral indicator light “N”
5. Reverse indicator light “R”
6. Parking brake indicator light “ ”
7. On-Command four-wheel-drive/differential gear lock indicator “ ”/“ ”
8. Engine trouble warning light “ ”
9. Coolant temperature warning light “ ”
10.Electric Power Steering warning light “EPS”356421
7
8109
1. Helmet indicator light “ ”
2. Seat belt indicator light “ ”
21
UB857AE0.book Page 2 Monday, August 24, 2015 8:59 AM
Page 43 of 184

4-3
4
EBU31290Neutral indicator light “N”
This indicator light comes on when the drive
select lever is in the “N” position.EBU31300Reverse indicator light “R”
This indicator light comes on when the drive
select lever is in the “R” position.EBU31310Parking brake indicator light “ ”
This indicator light comes on when the park-
ing brake is applied.EBU31320On-Command four-wheel-drive
indicator “ ”, On-Command differential
gear lock indicator “ ” and indicator light
“DIFF. LOCK”
The On-Command four-wheel-drive
indicator “ ” comes on when the On-Com-
mand drive knob “2WD/4WD/DIFF LOCK” is
set to the “4WD” position.The On-Command differential gear lock
indicator “ ” and the On-Command differen-
tial gear lock indicator light “DIFF. LOCK”
come on when the On-Command drive knob
“2WD/4WD/DIFF LOCK” is set to the “DIFF
LOCK” position.
TIP
Due to the synchronizing mechanism in the
differential gear case, the four-wheel-drive
indicator may not come on until the vehicle
starts moving.
When the On-Command drive knob
“2WD/4WD/DIFF LOCK” is set to “DIFF
LOCK” or “4WD”, the indicator “ ” and the
indicator light “DIFF. LOCK” will flash until
the differential gear is completely locked or
unlocked. If the indicator and the indicator
light continue to flash, the differential is not
completely locked or unlocked. In this
case, start moving to allow time for the dif-
ferential to lock or unlock.
UB857AE0.book Page 3 Monday, August 24, 2015 8:59 AM
Page 79 of 184
6-2
6
10–20 hours:
Avoid prolonged operation above three-quar-
ter throttle.
After break-in:
The vehicle may now be operated normally.EBU33080Starting the engine1. Turn the key to “ ” (on).NOTICEECB02290The coolant temperature warning light and
engine trouble warning light should come
on, then go off.
The EPS warning light should come on,
then go off when the engine is started.
If a warning light does not go off, see page
4-2 for the corresponding warning light
circuit check. 2. Apply the brake pedal.
3. Shift the drive select lever into the neutralposition.
When the drive select lever is in the
neutral position, the neutral indicator
light should come on. If the neutral indi-
cator light does not come on, ask a
Yamaha dealer to inspect the electric
circuit.
The engine can be started in any gear if
the brake pedal is applied. However, it
is recommended to shift into neutral
before starting the engine.
4. With your foot off the accelerator pedal,
start the engine by turning the key to “ ”
(start).
If the engine fails to start, release the key, and
then try starting it again. Wait a few seconds
before the next attempt. Each attempt should
be as short as possible, to preserve battery
energy. NOTICE: Do not crank the engine
more than 5 seconds on each attempt, or
starter damage could occur. Wait at least
5 seconds between each operation of the
electric starter to let it cool.
[ECB02140]
UB857AE0.book Page 2 Monday, August 24, 2015 8:59 AM
Page 81 of 184
6-4
6
Shifting: neutral to reverse
WARNING
EWB03300Before you shift into reverse, make sure
there are no obstacles or people behind
you. When it is safe to proceed, go slowly.
Hitting an obstacle or person could result
in serious injury or death. 1. Stop the vehicle, take your foot off the ac-celerator pedal, and check behind you.
2. Apply the brake pedal.
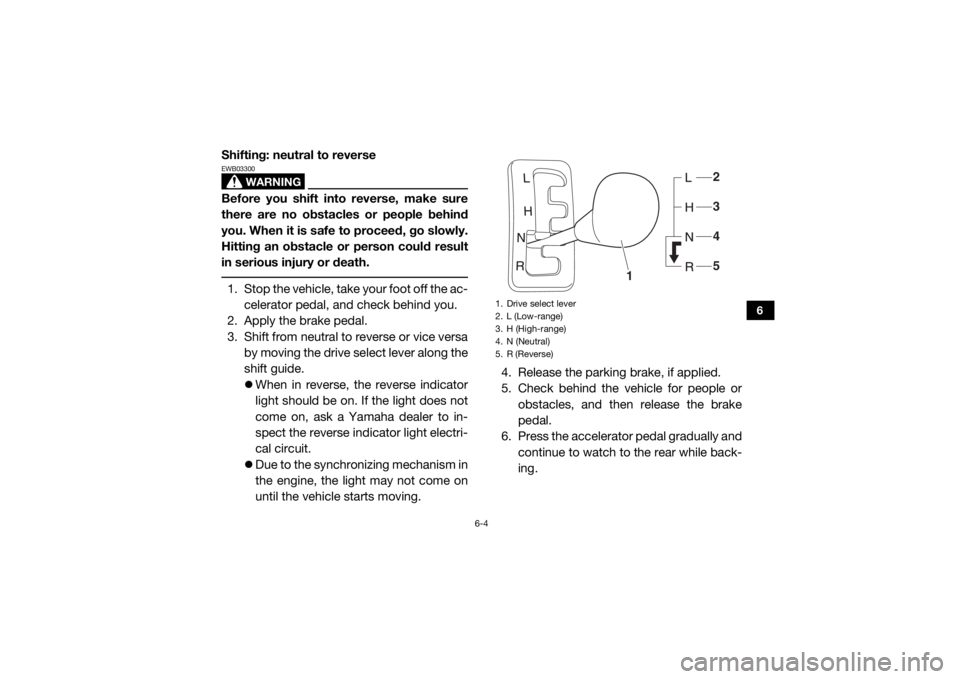
3. Shift from neutral to reverse or vice versa by moving the drive select lever along the
shift guide.
When in reverse, the reverse indicator
light should be on. If the light does not
come on, ask a Yamaha dealer to in-
spect the reverse indicator light electri-
cal circuit.
Due to the synchronizing mechanism in
the engine, the light may not come on
until the vehicle starts moving. 4. Release the parking brake, if applied.
5. Check behind the vehicle for people or
obstacles, and then release the brake
pedal.
6. Press the accelerator pedal gradually and
continue to watch to the rear while back-
ing.
1. Drive select lever
2. L (Low-range)
3. H (High-range)
4. N (Neutral)
5. R (Reverse)
1
2
5 4
3
UB857AE0.book Page 4 Monday, August 24, 2015 8:59 AM
Page 150 of 184
8-41
8
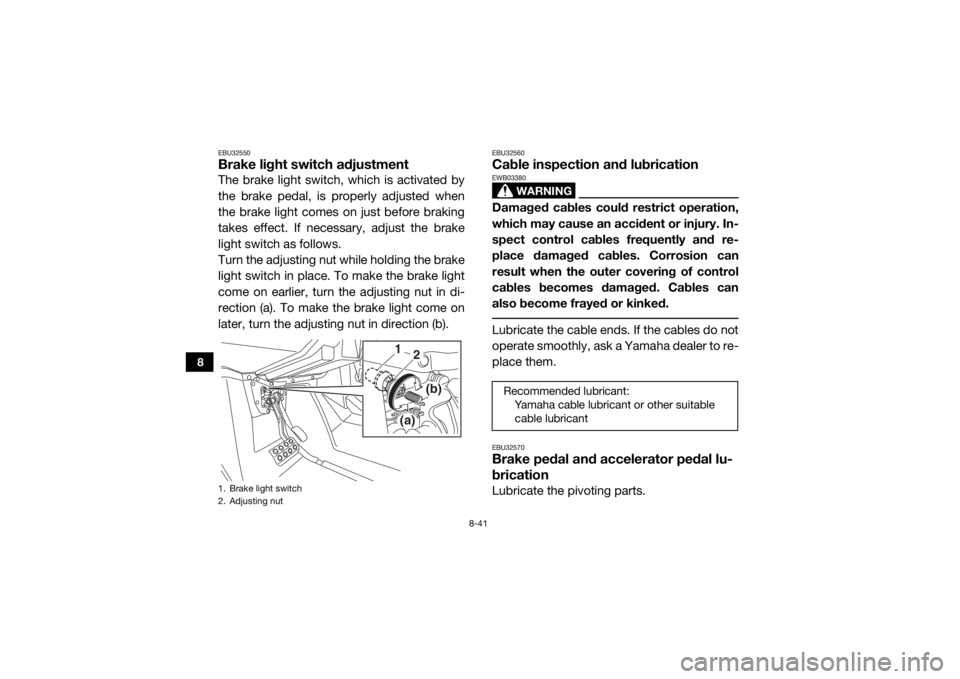
EBU32550Brake light switch adjustmentThe brake light switch, which is activated by
the brake pedal, is properly adjusted when
the brake light comes on just before braking
takes effect. If necessary, adjust the brake
light switch as follows.
Turn the adjusting nut while holding the brake
light switch in place. To make the brake light
come on earlier, turn the adjusting nut in di-
rection (a). To make the brake light come on
later, turn the adjusting nut in direction (b).
EBU32560Cable inspection and lubrication
WARNING
EWB03380Damaged cables could restrict operation,
which may cause an accident or injury. In-
spect control cables frequently and re-
place damaged cables. Corrosion can
result when the outer covering of control
cables becomes damaged. Cables can
also become frayed or kinked. Lubricate the cable ends. If the cables do not
operate smoothly, ask a Yamaha dealer to re-
place them.EBU32570Brake pedal and accelerator pedal lu-
bricationLubricate the pivoting parts.
1. Brake light switch
2. Adjusting nut
1(a)
(b)
2
Recommended lubricant:Yamaha cable lubricant or other suitable cable lubricant
UB857AE0.book Page 41 Monday, August 24, 2015 8:59 AM