YAMAHA VX LIMITED HO 2022 Workshop Manual
Manufacturer: YAMAHA, Model Year: 2022, Model line: VX LIMITED HO, Model: YAMAHA VX LIMITED HO 2022Pages: 112, PDF Size: 4.8 MB
Page 51 of 112
Instrument operation
43
shore, and have a Yamaha dealer check the
engine.
TIP
Push the “OK” button of the touchpad control
to display a description of the warning in the
center display.
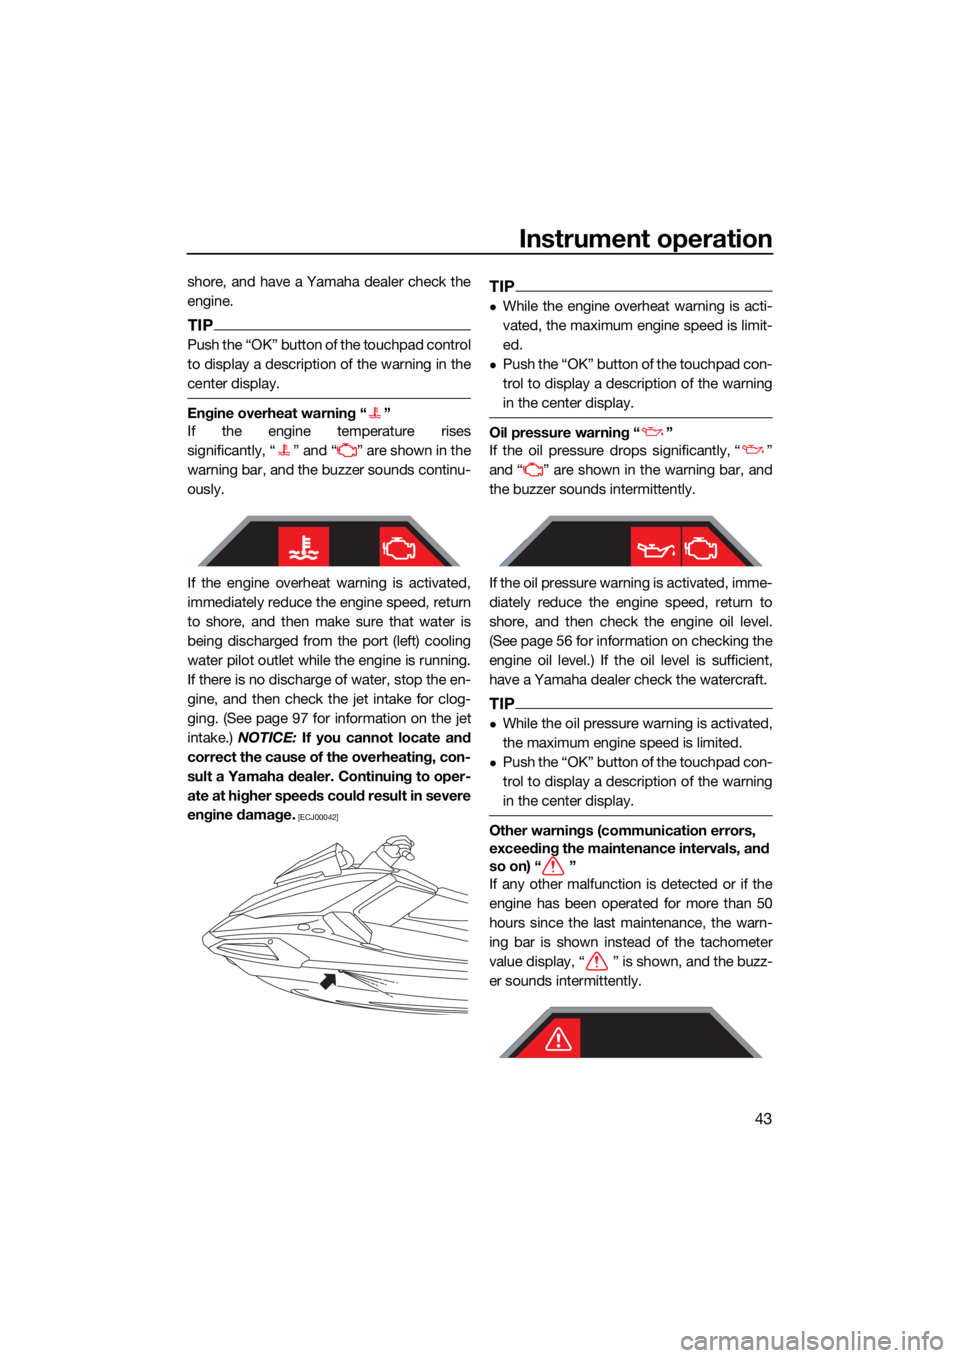
Engine overheat warning “ ”
If the engine temperature rises
significantly, “ ” and “ ” are shown in the
warning bar, and the buzzer sounds continu-
ously.
If the engine overheat warning is activated,
immediately reduce the engine speed, return
to shore, and then make sure that water is
being discharged from the port (left) cooling
water pilot outlet while the engine is running.
If there is no discharge of water, stop the en-
gine, and then check the jet intake for clog-
ging. (See page 97 for information on the jet
intake.) NOTICE: If you cannot locate and
correct the cause of the overheating, con-
sult a Yamaha dealer. Continuing to oper-
ate at higher speeds could result in severe
engine damage.
[ECJ00042]
TIP
While the engine overheat warning is acti-
vated, the maximum engine speed is limit-
ed.
Push the “OK” button of the touchpad con-
trol to display a description of the warning
in the center display.
Oil pressure warning “ ”
If the oil pressure drops significantly, “ ”
and “ ” are shown in the warning bar, and
the buzzer sounds intermittently.
If the oil pressure warning is activated, imme-
diately reduce the engine speed, return to
shore, and then check the engine oil level.
(See page 56 for information on checking the
engine oil level.) If the oil level is sufficient,
have a Yamaha dealer check the watercraft.
TIP
While the oil pressure warning is activated,
the maximum engine speed is limited.
Push the “OK” button of the touchpad con-
trol to display a description of the warning
in the center display.
Other warnings (communication errors,
exceeding the maintenance intervals, and
so on) “ ”
If any other malfunction is detected or if the
engine has been operated for more than 50
hours since the last maintenance, the warn-
ing bar is shown instead of the tachometer
value display, “ ” is shown, and the buzz-
er sounds intermittently.
UF4S71E0.book Page 43 Wednesday, August 4, 2021 5:18 PM
Page 52 of 112
Instrument operation
44
If a warning is activated, have the watercraft
serviced by a Yamaha dealer as soon as pos-
sible.
TIP
Push the “OK” button of the touchpad control
to display a description of the warning in the
center display.
EJU46301
Audio system (equipped models)
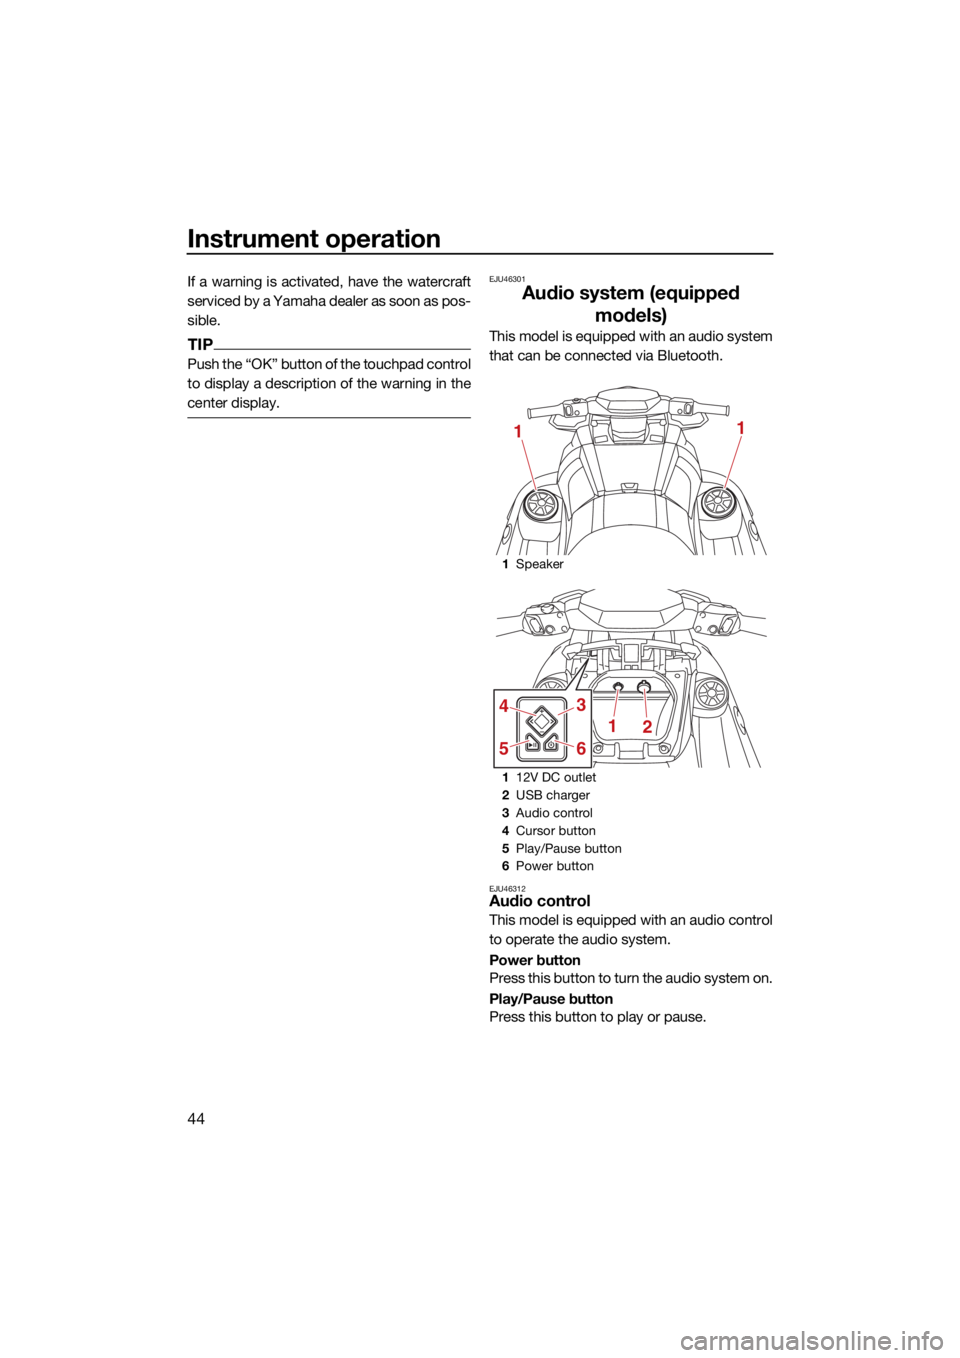
This model is equipped with an audio system
that can be connected via Bluetooth.
EJU46312Audio control
This model is equipped with an audio control
to operate the audio system.
Power button
Press this button to turn the audio system on.
Play/Pause button
Press this button to play or pause.
1Speaker
1 12V DC outlet
2 USB charger
3 Audio control
4 Cursor button
5 Play/Pause button
6 Power button
11
1
3
65
4
2
UF4S71E0.book Page 44 Wednesday, August 4, 2021 5:18 PM
Page 53 of 112
Instrument operation
45
Cursor button “ / ”
Press these buttons to skip to the previous or
next track.
Cursor button “ / ”
Press these buttons to adjust the volume.
To connect an external device:
(1) Turn on the Bluetooth function of the ex-ternal device, and then search for this
audio system.
(2) Turn the audio system on by pushing the power button on the audio control.
(3) Select this audio system to connect to it.
To disconnect an external device:
Turn the Bluetooth function of the external
device off.
EJU46321
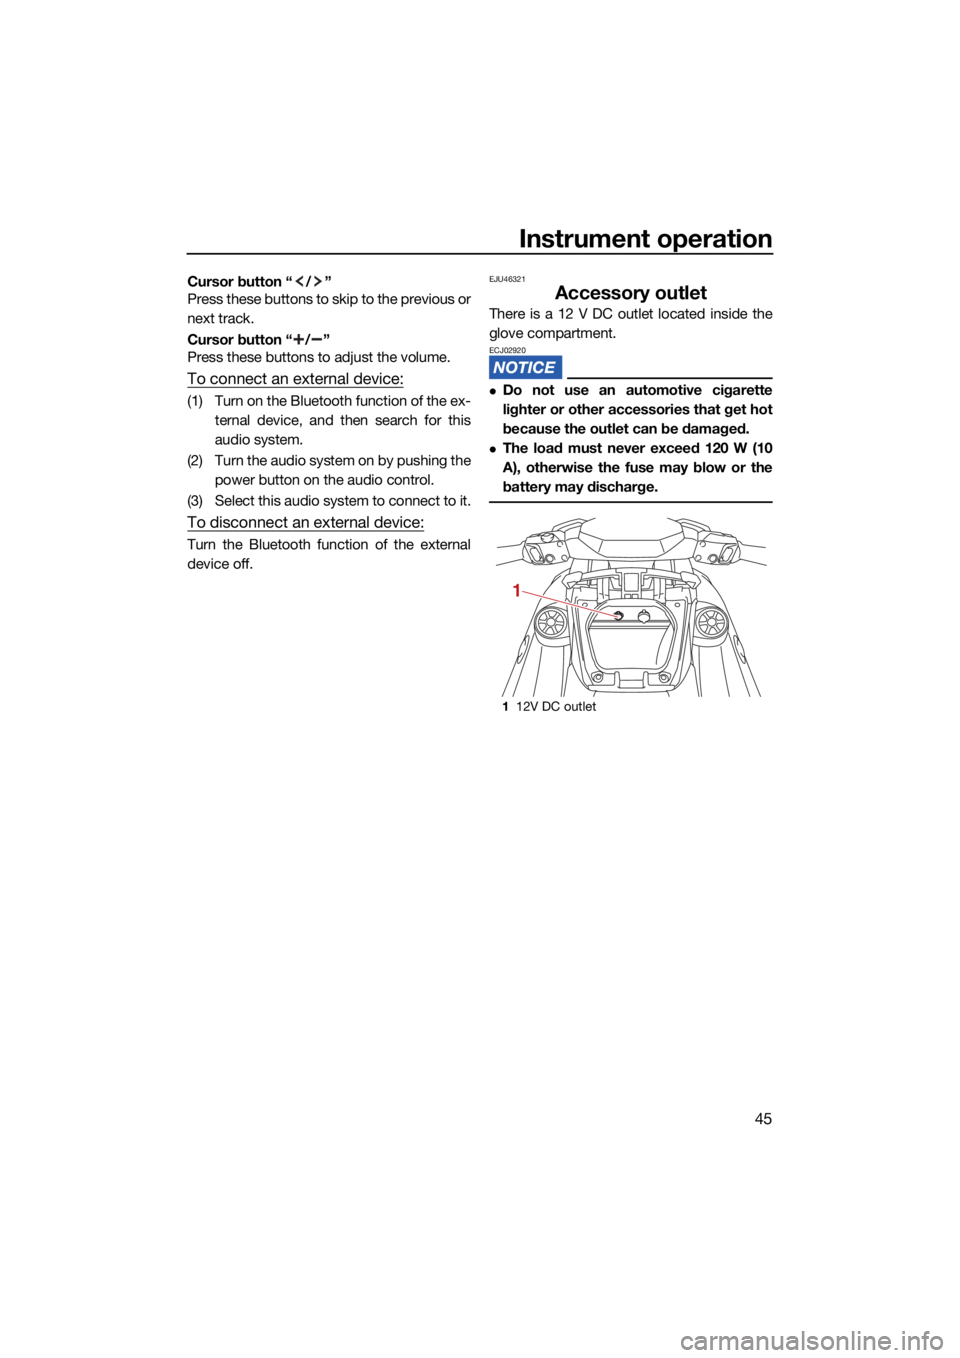
Accessory outlet
There is a 12 V DC outlet located inside the
glove compartment.
ECJ02920
Do not use an automotive cigarette
lighter or other accessories that get hot
because the outlet can be damaged.
The load must never exceed 120 W (10
A), otherwise the fuse may blow or the
battery may discharge.
1 12V DC outlet
1
UF4S71E0.book Page 45 Wednesday, August 4, 2021 5:18 PM
Page 54 of 112
Instrument operation
46
EJU46331
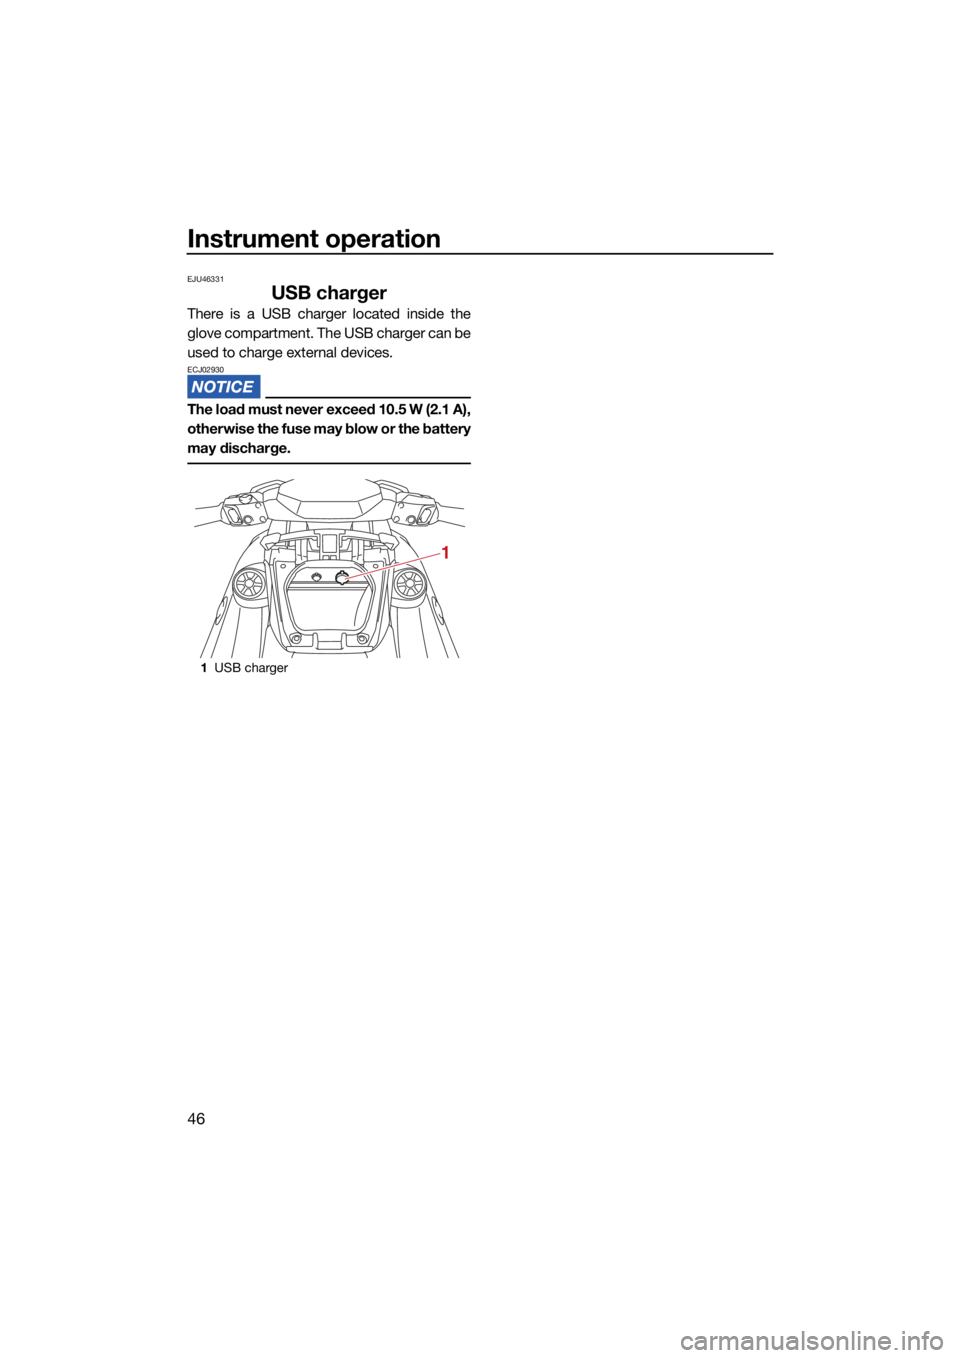
USB charger
There is a USB charger located inside the
glove compartment. The USB charger can be
used to charge external devices.
ECJ02930
The load must never exceed 10.5 W (2.1 A),
otherwise the fuse may blow or the battery
may discharge.
1USB charger
1
UF4S71E0.book Page 46 Wednesday, August 4, 2021 5:18 PM
Page 55 of 112
Equipment operation
47
EJU40336
EquipmentEJU31045Seats
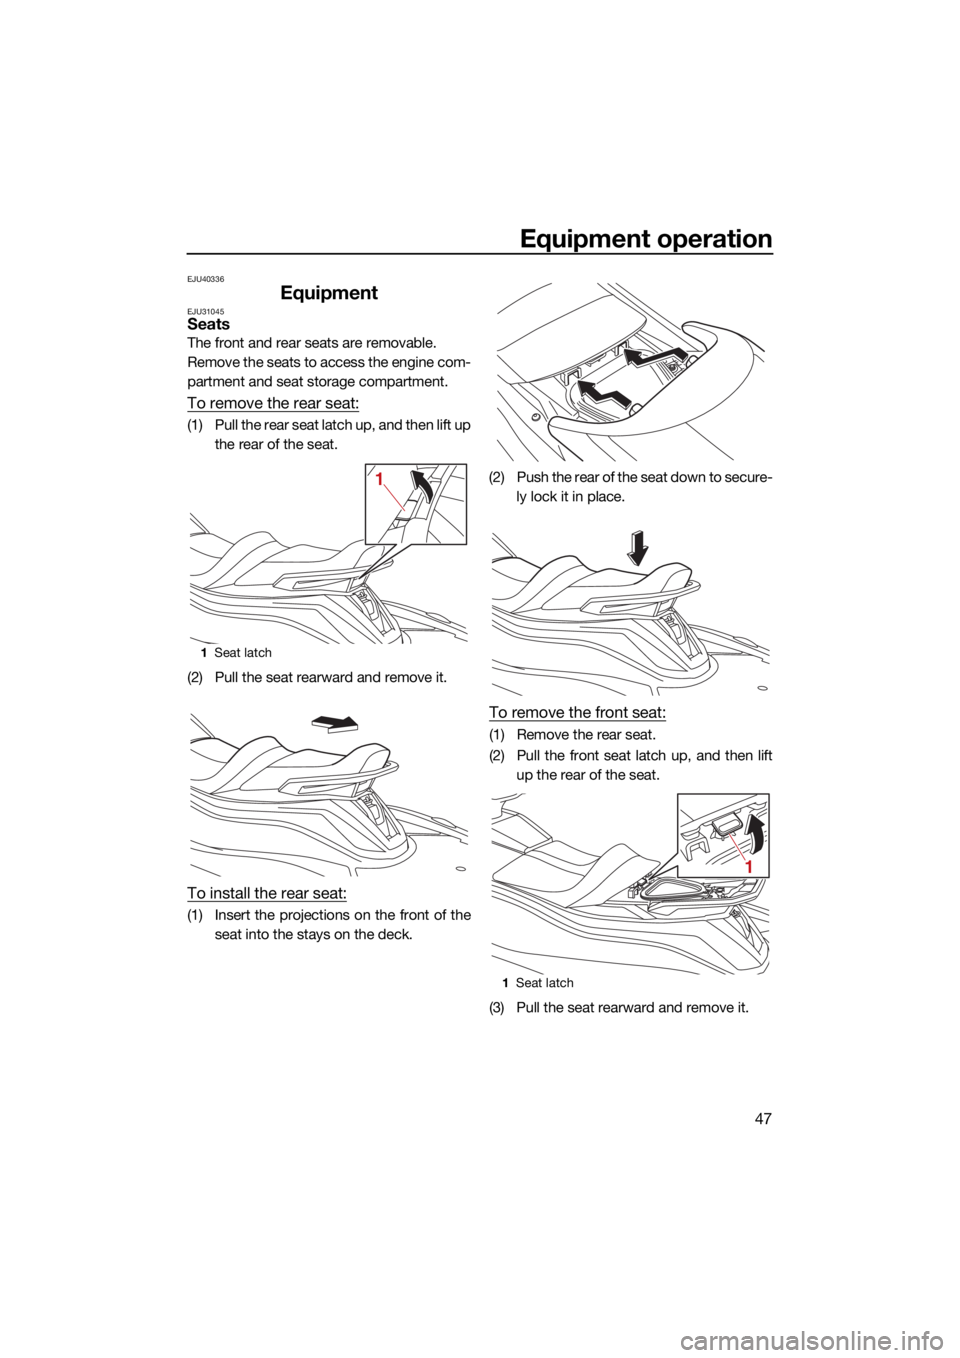
The front and rear seats are removable.
Remove the seats to access the engine com-
partment and seat storage compartment.
To remove the rear seat:
(1) Pull the rear seat latch up, and then lift upthe rear of the seat.
(2) Pull the seat rearward and remove it.
To install the rear seat:
(1) Insert the projections on the front of the seat into the stays on the deck. (2) Push the rear of the seat down to secure-
ly lock it in place.
To remove the front seat:
(1) Remove the rear seat.
(2) Pull the front seat latch up, and then liftup the rear of the seat.
(3) Pull the seat rearward and remove it.
1 Seat latch
1
1Seat latch
1
UF4S71E0.book Page 47 Wednesday, August 4, 2021 5:18 PM
Page 56 of 112
Equipment operation
48
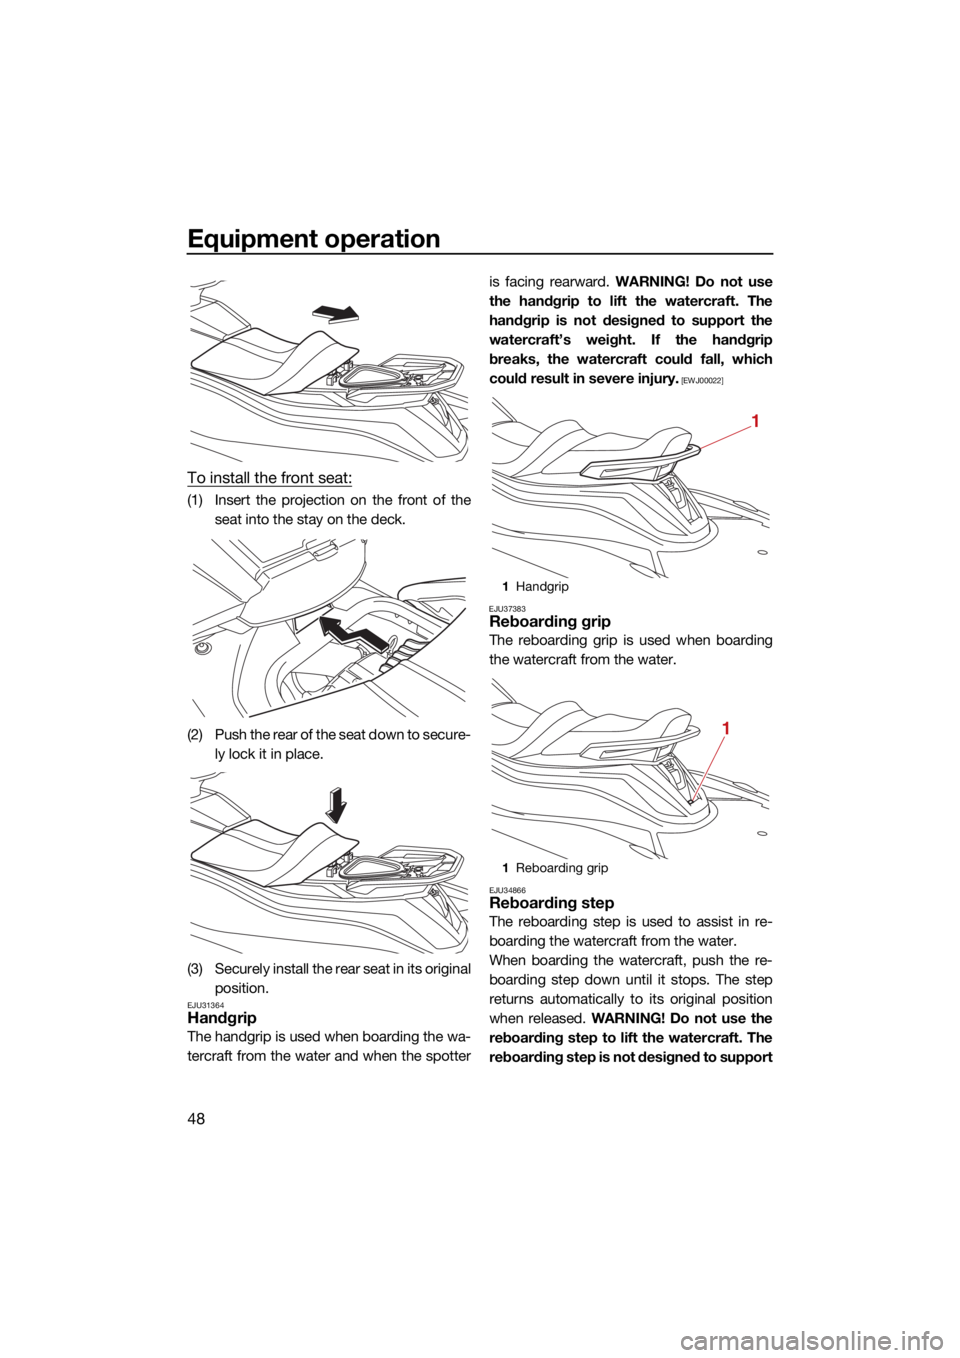
To install the front seat:
(1) Insert the projection on the front of theseat into the stay on the deck.
(2) Push the rear of the seat down to secure- ly lock it in place.
(3) Securely install the rear seat in its original position.
EJU31364Handgrip
The handgrip is used when boarding the wa-
tercraft from the water and when the spotter is facing rearward.
WARNING! Do not use
the handgrip to lift the watercraft. The
handgrip is not designed to support the
watercraft’s weight. If the handgrip
breaks, the watercraft could fall, which
could result in severe injury.
[EWJ00022]
EJU37383
Reboarding grip
The reboarding grip is used when boarding
the watercraft from the water.
EJU34866Reboarding step
The reboarding step is used to assist in re-
boarding the watercraft from the water.
When boarding the watercraft, push the re-
boarding step down until it stops. The step
returns automatically to its original position
when released. WARNING! Do not use the
reboarding step to lift the watercraft. The
reboarding step is not designed to support
1 Handgrip
1 Reboarding grip
1
1
UF4S71E0.book Page 48 Wednesday, August 4, 2021 5:18 PM
Page 57 of 112
![YAMAHA VX LIMITED HO 2022 Workshop Manual Equipment operation
49
the watercraft’s weight. If the reboarding
step breaks, the watercraft could fall,
which could result in severe injury.
[EWJ01212]
ECJ00743
Use the reboarding step only to bo YAMAHA VX LIMITED HO 2022 Workshop Manual Equipment operation
49
the watercraft’s weight. If the reboarding
step breaks, the watercraft could fall,
which could result in severe injury.
[EWJ01212]
ECJ00743
Use the reboarding step only to bo](/img/51/52146/w960_52146-56.png)
Equipment operation
49
the watercraft’s weight. If the reboarding
step breaks, the watercraft could fall,
which could result in severe injury.
[EWJ01212]
ECJ00743
Use the reboarding step only to board the
watercraft in the water. Do not use the re-
boarding step for any other purpose. The
watercraft can be damaged.
EJU34874Bow eye
The bow eye is used to attach a rope to the
watercraft when transporting, mooring, or
towing it in an emergency. (See page 99 for
information on towing the watercraft.)
EJU34883Stern eyes
The stern eyes are used to attach a rope to
the watercraft when transporting or mooring
it.
EJU40423Cleat
The cleat is used to attach a ski rope to the
watercraft when pulling a wakeboarder or
water-skier. WARNING! Do not use the
cleat to lift the watercraft. The cleat is not
designed to support the watercraft’s
weight. If the cleat breaks, the watercraft
could fall, which could result in severe in-
jury.
[EWJ01511]
1 Reboarding step
1
1Bow eye
1 Stern eye
1
1
UF4S71E0.book Page 49 Wednesday, August 4, 2021 5:18 PM
Page 58 of 112
Equipment operation
50
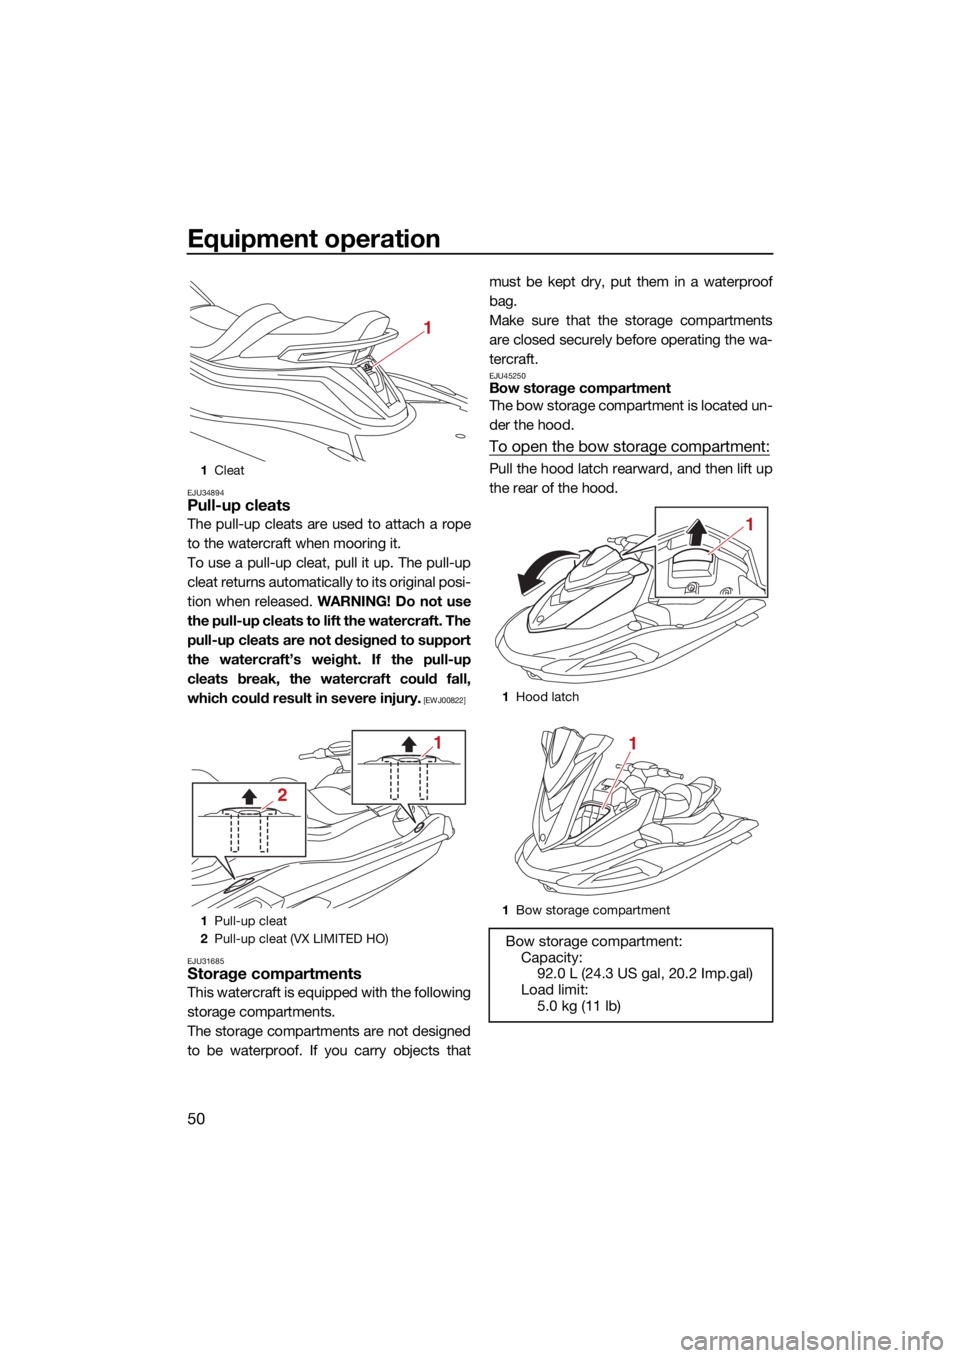
EJU34894Pull-up cleats
The pull-up cleats are used to attach a rope
to the watercraft when mooring it.
To use a pull-up cleat, pull it up. The pull-up
cleat returns automatically to its original posi-
tion when released. WARNING! Do not use
the pull-up cleats to lift the watercraft. The
pull-up cleats are not designed to support
the watercraft’s weight. If the pull-up
cleats break, the watercraft could fall,
which could result in severe injury.
[EWJ00822]
EJU31685
Storage compartments
This watercraft is equipped with the following
storage compartments.
The storage compartments are not designed
to be waterproof. If you carry objects that must be kept dry, put them in a waterproof
bag.
Make sure that the storage compartments
are closed securely before operating the wa-
tercraft.
EJU45250Bow storage compartment
The bow storage compartment is located un-
der the hood.
To open the bow storage compartment:
Pull the hood latch rearward, and then lift up
the rear of the hood.1
Cleat
1 Pull-up cleat
2 Pull-up cleat (VX LIMITED HO)
1
2
1
1Hood latch
1 Bow storage compartment
Bow storage compartment:
Capacity: 92.0 L (24.3 US gal, 20.2 Imp.gal)
Load limit: 5.0 kg (11 lb)
1
1
UF4S71E0.book Page 50 Wednesday, August 4, 2021 5:18 PM
Page 59 of 112
Equipment operation
51
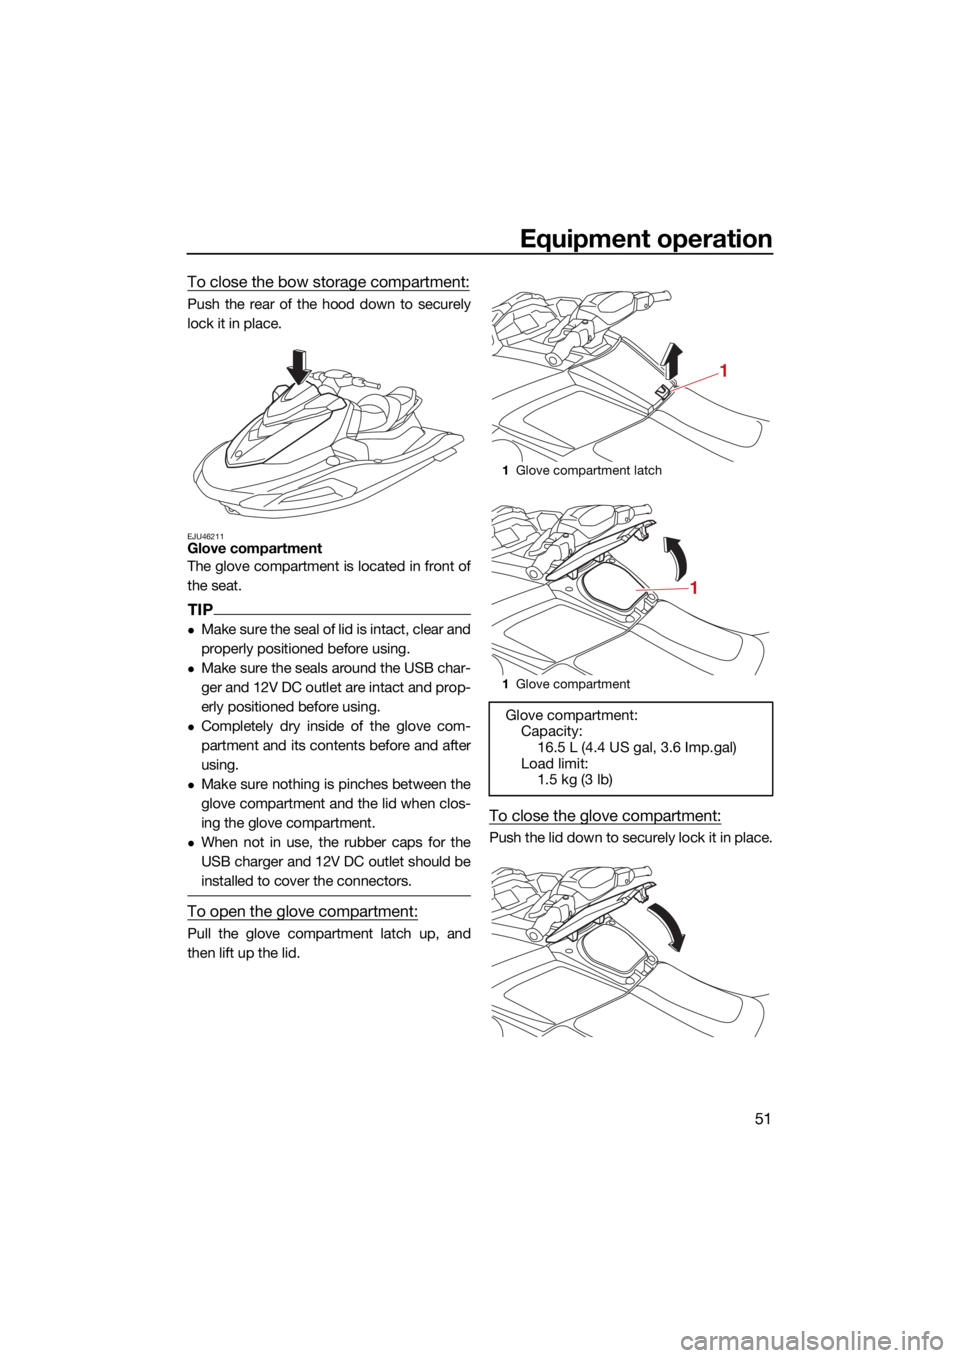
To close the bow storage compartment:
Push the rear of the hood down to securely
lock it in place.
EJU46211Glove compartment
The glove compartment is located in front of
the seat.
TIP
Make sure the seal of lid is intact, clear and
properly positioned before using.
Make sure the seals around the USB char-
ger and 12V DC outlet are intact and prop-
erly positioned before using.
Completely dry inside of the glove com-
partment and its contents before and after
using.
Make sure nothing is pinches between the
glove compartment and the lid when clos-
ing the glove compartment.
When not in use, the rubber caps for the
USB charger and 12V DC outlet should be
installed to cover the connectors.
To open the glove compartment:
Pull the glove compartment latch up, and
then lift up the lid.
To close the glove compartment:
Push the lid down to securely lock it in place.
1Glove compartment latch
1 Glove compartment
Glove compartment:
Capacity: 16.5 L (4.4 US gal, 3.6 Imp.gal)
Load limit: 1.5 kg (3 lb)
1
1
UF4S71E0.book Page 51 Wednesday, August 4, 2021 5:18 PM
Page 60 of 112
Equipment operation
52
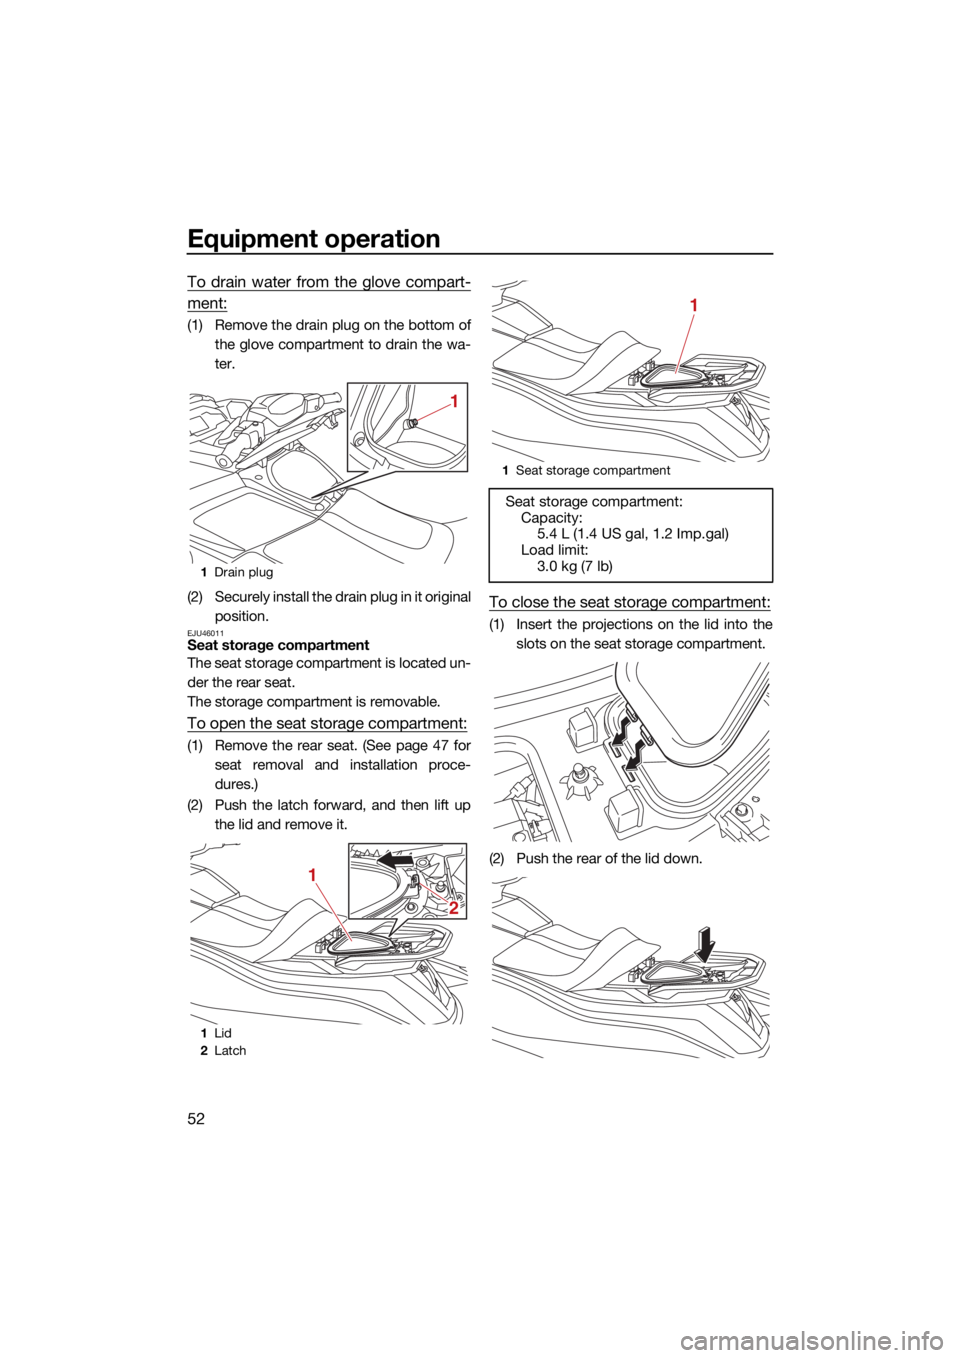
To drain water from the glove compart-
ment:
(1) Remove the drain plug on the bottom ofthe glove compartment to drain the wa-
ter.
(2) Securely install the drain plug in it original position.
EJU46011Seat storage compartment
The seat storage compartment is located un-
der the rear seat.
The storage compartment is removable.
To open the seat storage compartment:
(1) Remove the rear seat. (See page 47 forseat removal and installation proce-
dures.)
(2) Push the latch forward, and then lift up the lid and remove it.
To close the seat storage compartment:
(1) Insert the projections on the lid into theslots on the seat storage compartment.
(2) Push the rear of the lid down.
1 Drain plug
1 Lid
2 Latch
1
2
1
1
Seat storage compartment
Seat storage compartment:
Capacity: 5.4 L (1.4 US gal, 1.2 Imp.gal)
Load limit:
3.0 kg (7 lb)
1
UF4S71E0.book Page 52 Wednesday, August 4, 2021 5:18 PM