fuel YAMAHA WHY 50 2003 Owners Manual
[x] Cancel search | Manufacturer: YAMAHA, Model Year: 2003, Model line: WHY 50, Model: YAMAHA WHY 50 2003Pages: 80, PDF Size: 1.18 MB
Page 14 of 80
2
DESCRIPTION
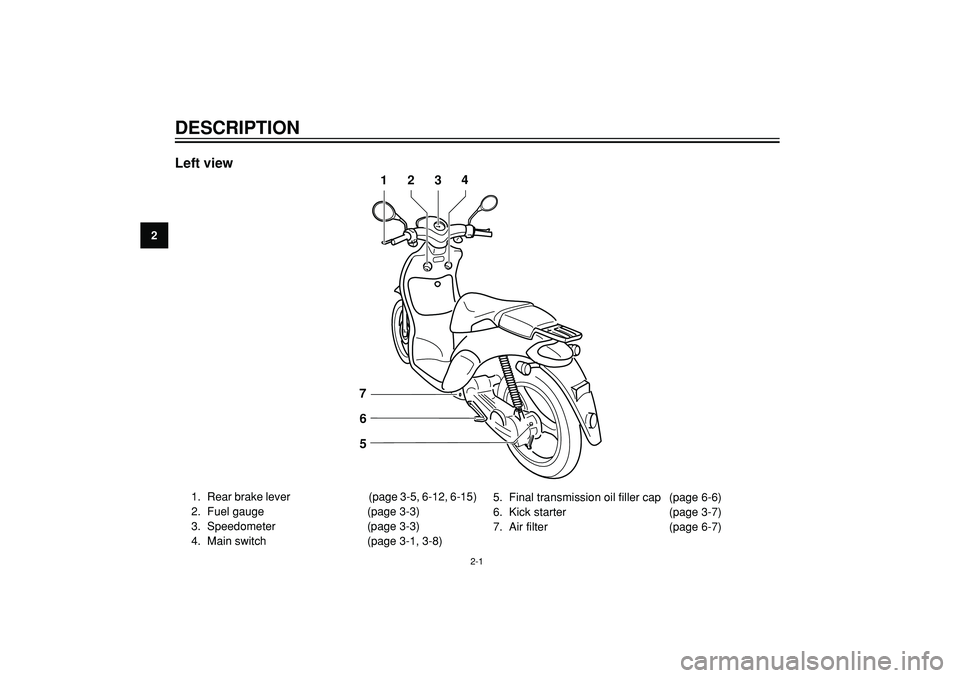
Left view
6
5 7
1234
1. Rear brake lever (page 3-5, 6-12, 6-15)
2. Fuel gauge (page 3-3)
3. Speedometer (page 3-3)
4. Main switch (page 3-1, 3-8)5. Final transmission oil filler cap (page 6-6)
6. Kick starter (page 3-7)
7. Air filter (page 6-7)
2-1
Page 15 of 80

2
DESCRIPTION
Right view
8910
11
12
13
14
8. Rear carrier (page 3-9)
9. Passenger seat —
10. Throttle grip (page 6-9, 6-15)
11. Front brake lever (page 3-5, 6-12, 6-15)12. Luggage hook (page 3-9)
13. Battery / fuse (page 6-18 — 6-19)
14. Fuel and oil tank cap (page 3-5)
2-2
Page 17 of 80
EAU00027
INSTRUMENT AND CONTROL FUNCTIONS
Main switch / steering lock .................................................................. 3-1
Indicator and warning lights ................................................................ 3-2
Speedometer unit ................................................................................ 3-3
Fuel gauge .......................................................................................... 3-3
Handlebar switches ............................................................................. 3-4
Front brake lever ................................................................................. 3-5
Rear brake lever .................................................................................. 3-5
Fuel and 2-stroke engine oil tank caps ............................................... 3-5
Fuel ..................................................................................................... 3-6
Catalytic converter .............................................................................. 3-7
2-stroke engine oil ............................................................................... 3-7
Kickstarter ........................................................................................... 3-7
Rider seat ............................................................................................ 3-8
Storage compartment ......................................................................... 3-8
Carrier ................................................................................................. 3-9
Luggage hook ..................................................................................... 3-9
3
Page 20 of 80

3
INSTRUMENT AND CONTROL FUNCTIONS
12
ZAUM0185
1. Speedometer
2. Odometer
EAU00098
Speedometer unit
The speedometer unit is equipped with
a speedometer and an odometer. The
speedometer shows riding speed. The
odometer shows the total distance
traveled.
1
ZAUM0358
1. Fuel gauge
EAU00113
Fuel gauge
The fuel gauge indicates the amount
of fuel in the fuel tank. The needle
moves towards "E" (Empty) as the fuel
level decreases. When the needle
reaches "E", refuel as soon as possi-
ble.
NOTE :
Do not allow the fuel tank to empty itself
completely.
3-3
Page 22 of 80

3
INSTRUMENT AND CONTROL FUNCTIONS
1
ZAUM0084
1
ZAUM0085
EAU03882
Front brake lever
The front brake lever is located on the
right handlebar grip. To apply the front
brake, pull this lever toward the
handlebar grip.
EAU00163
Rear brake lever
The rear brake lever is located on the
left handlebar grip. To apply the rear
brake, pull this lever toward the
handlebar grip.
1. Front brake lever
1. Rear brake lever
12
ZAUM0361
1. Oil tank cap
2. Fuel tank cap
EAU03463
Fuel and 2-stroke engine oil
tank caps
The fuel tank cap and the 2-stroke
engine oil tank cap are located under
the seat. (See page 3-8 for seat opening
and closing procedures.)
Fuel tank cap
To remove the fuel tank cap, turn it
counterclockwise, and then pull it off.
To install the fuel tank cap, turn it
clockwise.
3-5
Page 23 of 80

INSTRUMENT AND CONTROL FUNCTIONS
3
2-stroke engine oil tank cap
To remove the 2-stroke engine oil tank
cap, pull it off.
To install the 2-stroke engine oil tank
cap, push it into the oil tank opening.
EW000025
Make sure that the fuel and 2-stroke
engine oil tank caps are properly
installed before riding the scooter.
ZAUM0204
1
2
ZAUM0020
1. Filler tube
2. Fuel level
EAU03753
Fuel
Make sure that there is sufficient fuel
in the tank. Fill the fuel tank to the
bottom of the filler tube as shown.
EW000130
•Do not overfill the fuel tank,
otherwise it may overflow when
the fuel warms up and expands.
•Avoid spilling fuel on the hot
engine.
EAU00185
EC000008
Immediately wipe off spilled fuel with
a clean, dry, soft cloth, since fuel may
deteriorate painted surfaces or plas-
tic parts.
EAU04206
Recommended fuel:
REGULAR UNLEADED
GASOLINE ONLY
Fuel tank capacity:
Total amount:
7.2 L
Your Yamaha engine has been
designed to use regular unleaded
gasoline with a research octane
number of 91 or higher. If knocking (or
pinging) occurs, use a gasoline of a
different brand or premium unleaded
fuel. Use of unleaded fuel will extend
spark plug life and reduce maintenance
costs.
3-6
Page 28 of 80

PRE-OPERATION CHECKS
4
•Check fuel level in fuel tank.
Fuel•Refuel if necessary. 3-5 — 3-6
•Check fuel line for leakage.
•Check oil level in oil tank.
2-stroke engine oil•If necessary, add recommended oil to specified level. 3-5 — 3-7
•Check vehicle for oil leakage.
Final transmission oil•Check vehicle for oil leakage. 6-6
•Check operation.
•If soft or spongy, have Yamaha dealer bleed hydraulic system.
Front brake•Check fluid level in reservoir. 3-5, 6-13 — 6-15
•If necessary, add recommended brake fluid to specified level.
•Check hydraulic system for leakage.
•Check operation.
Rear brake•Check pedal free play. 3-5, 6-13 — 6-15
•Adjust if necessary.
•Make sure that operation is smooth.
Throttle grip•Check cable free play.
6-9, 6-15
•If necessary, have Yamaha dealer adjust cable free play
and lubricate cable and grip housing.
The condition of a vehicle is the owner’s responsibility. Vital components can start to deteriorate quickly and unexpectedly,
even if the vehicle remains unused (for example, as a result of exposure to the elements). Any damage, fluid leakage or
loss of tire air pressure could have serious consequences. Therefore, it is very important, in addition to a thorough visual
inspection, to check the following points before each ride.
EAU03439
Pre-operation check list
ITEM CHECKS PAGE
4-1
Page 31 of 80
EAU00372
OPERATION AND IMPORTANT RIDING POINTS
Starting the engine .............................................................................. 5-1
Starting off ........................................................................................... 5-2
Acceleration and deceleration ............................................................. 5-2
Braking ................................................................................................ 5-3
Tips for reducing fuel consumption ..................................................... 5-3
Engine break-in ................................................................................... 5-4
Parking ................................................................................................ 5-4
5
Page 34 of 80
OPERATION AND IMPORTANT RIDING POINTS
5
EAU00435
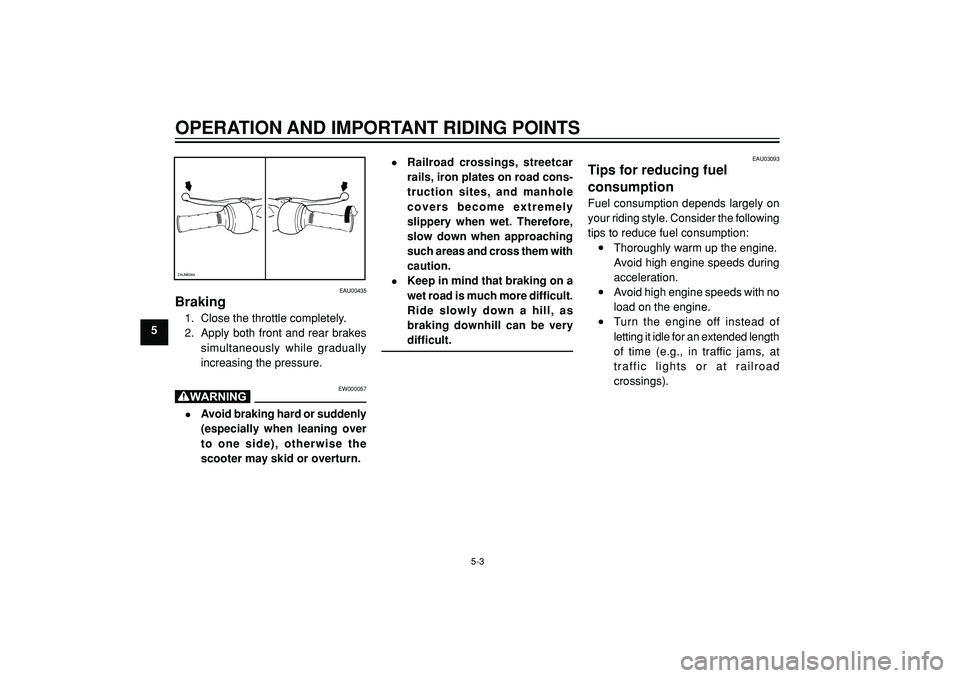
Braking
1. Close the throttle completely.
2. Apply both front and rear brakes
simultaneously while gradually
increasing the pressure.
EW000057
•Avoid braking hard or suddenly
(especially when leaning over
to one side), otherwise the
scooter may skid or overturn.
ZAUM0269
•Railroad crossings, streetcar
rails, iron plates on road cons-
truction sites, and manhole
covers become extremely
slippery when wet. Therefore,
slow down when approaching
such areas and cross them with
caution.
•Keep in mind that braking on a
wet road is much more difficult.
Ride slowly down a hill, as
braking downhill can be very
difficult.
EAU03093
Tips for reducing fuel
consumption
Fuel consumption depends largely on
your riding style. Consider the following
tips to reduce fuel consumption:
•Thoroughly warm up the engine.
Avoid high engine speeds during
acceleration.
•Avoid high engine speeds with no
load on the engine.
•Turn the engine off instead of
letting it idle for an extended length
of time (e.g., in traffic jams, at
traffic lights or at railroad
crossings).
5-3
Page 39 of 80
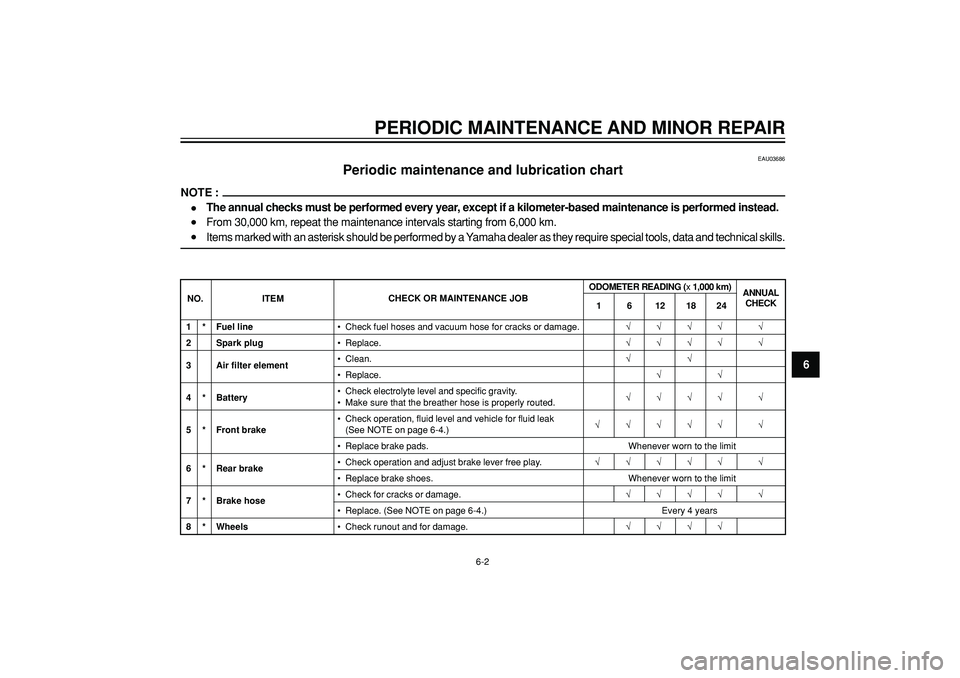
PERIODIC MAINTENANCE AND MINOR REPAIR
6
1 * Fuel line•Check fuel hoses and vacuum hose for cracks or damage.√√√√ √
2 Spark plug•Replace.√√√√ √
3 Air filter element•Clean.√√•Replace.√√
4 * Battery•Check electrolyte level and specific gravity.
√√√√ √
•Make sure that the breather hose is properly routed.
•Check operation, fluid level and vehicle for fluid leak
√√√√√ √
5 * Front brake(See NOTE on page 6-4.)
•Replace brake pads. Whenever worn to the limit
6 * Rear brake•Check operation and adjust brake lever free play.√√√√√ √•Replace brake shoes. Whenever worn to the limit
7 * Brake hose•Check for cracks or damage.√√√√ √•Replace. (See NOTE on page 6-4.) Every 4 years
8 * Wheels•Check runout and for damage.√√√√
EAU03686
Periodic maintenance and lubrication chart
NOTE :
•The annual checks must be performed every year, except if a kilometer-based maintenance is performed instead.
•From 30,000 km, repeat the maintenance intervals starting from 6,000 km.
•Items marked with an asterisk should be performed by a Yamaha dealer as they require special tools, data and technical skills.
ODOMETER READING (x 1,000 km)
NO. ITEMCHECK OR MAINTENANCE JOB
1
ANNUAL
CHECK
6121824
6-2