check engine YAMAHA WHY 50 2006 User Guide
[x] Cancel search | Manufacturer: YAMAHA, Model Year: 2006, Model line: WHY 50, Model: YAMAHA WHY 50 2006Pages: 80, PDF Size: 1.18 MB
Page 52 of 80

PERIODIC MAINTENANCE AND MINOR REPAIR
6
EAUM0008
Changing the brake fluid
Have a Yamaha dealer change the
brake fluid at the intervals specified in
the periodic maintenance and
lubrication chart. In addition, have the
brake hose replaced every four years
or whenever it is damaged or leaking.
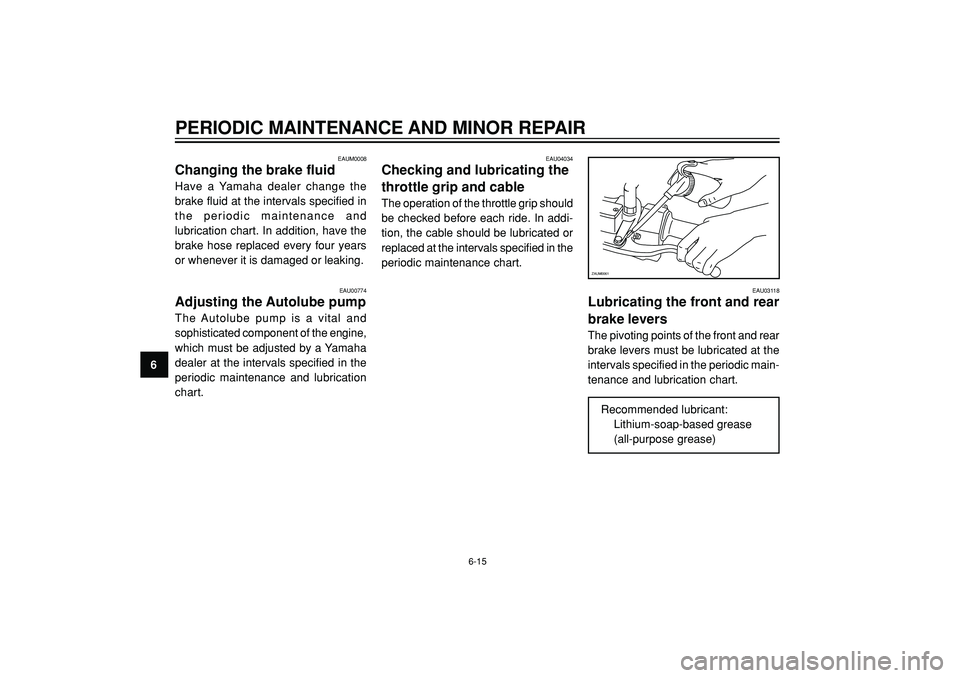
EAU04034
Checking and lubricating the
throttle grip and cable
The operation of the throttle grip should
be checked before each ride. In addi-
tion, the cable should be lubricated or
replaced at the intervals specified in the
periodic maintenance chart.
6-15
ZAUM0061
EAU00774
Adjusting the Autolube pump
The Autolube pump is a vital and
sophisticated component of the engine,
which must be adjusted by a Yamaha
dealer at the intervals specified in the
periodic maintenance and lubrication
chart.
EAU03118
Lubricating the front and rear
brake levers
The pivoting points of the front and rear
brake levers must be lubricated at the
intervals specified in the periodic main-
tenance and lubrication chart.
Recommended lubricant:
Lithium-soap-based grease
(all-purpose grease)
Page 54 of 80

PERIODIC MAINTENANCE AND MINOR REPAIR
6
EAU01144
Checking the wheel bearings
The front and rear wheel bearings must
be checked at the intervals specified in
the periodic maintenance and
lubrication chart. If there is play in the
wheel hub or if the wheel does not turn
smoothly, have a Yamaha dealer check
the wheel bearings.
6-17
2. Hold the lower ends of the front
fork legs and try to move them
forward and backward. If any free
play can be felt, have a Yamaha
dealer check or repair the
steering.
ZAUM0379
EAU00794
Checking the steering
Worn or loose steering bearings may
cause danger. Therefore, the operation
of the steering must be checked as
follows at the intervals specified in the
periodic maintenance and lubrication
chart.
1. Place a stand under the engine
to raise the front wheel off the
ground.
EW000115
Securely support the scooter so that
there is no danger of it falling over.
Page 60 of 80

PERIODIC MAINTENANCE AND MINOR REPAIR
6
EAU01397
Troubleshooting chartEW000125
Keep away open flames and do not smoke while checking or working on the fuel system.
Check the fuel level in
the fuel tank.
1. FuelThere is enough fuel.
There is no fuel.Check the compression.
Supply fuel.
The engine does not start.
Check the compression.
Operate the electric starter.
2. CompressionThere is compression.
There is no compression.Check the ignition.
Have a Yamaha dealer
check the vehicle.
Remove the spark plug
and check the electrodes.
3. IgnitionWipe off with a dry cloth and correct the
spark plug gap, or replace the spark plug.
Have a Yamaha dealer check the vehicle.
The engine does not start.
Have a Yamaha dealer
check the vehicle.
The engine does not start.
Check the battery.
Operate the electric starter.
4. BatteryThe engine turns over
quickly.
The engine turns over
slowly.The battery is good.
Check the battery lead connections,
and charge the battery if necessary.
Dry
WetOpen the throttle halfway and operate
the electric starter.
6-23
Page 65 of 80

SCOOTER CARE AND STORAGE
7 a. Remove the spark plug cap
and spark plug.
b. Pour a teaspoonful of engine
oil into the spark plug bore.
c. Install the spark plug cap onto
the spark plug, and then place
the spark plug on the cylinder
head so that the electrodes are
grounded. (This will limit
sparking during the next step.)
d. Turn the engine over several
times with the starter. (This will
coat the cylinder wall with oil.)
e. Remove the spark plug cap
from the spark plug, and then
install the spark plug and the
spark plug cap.
EWA00003
To prevent damage or injury from
sparking, make sure to ground the
spark plug electrodes while turning
the engine over.
5. Lubricate all control cables and
the pivoting points of all levers and
pedals as well as of the sidestand/
centerstand.
6. Check and, if necessary, correct
the tire air pressure, and then lift
the scooter so that both of its
wheels are off the ground.
Alternatively, turn the wheels a
little every month in order to
prevent the tires from becoming
degraded in one spot.
7. Cover the muffler outlet with a
plastic bag to prevent moisture
from entering it.
8. Remove the battery and fully
charge it. Store it in a cool, dry
place and charge it once a month.
Do not store the battery in an
excessively cold or warm place
(less than 0 °C or more than 30
°C). For more information on
storing the battery, see page 6-
18.
NOTE :
Make any necessary repairs before
storing the scooter.
7-4