ECU YAMAHA WHY 50 2006 Owners Manual
[x] Cancel search | Manufacturer: YAMAHA, Model Year: 2006, Model line: WHY 50, Model: YAMAHA WHY 50 2006Pages: 80, PDF Size: 1.18 MB
Page 11 of 80

GIVE SAFETY THE RIGHT OF WAY
1
1-2
EAU02964
Further safe-riding points
•Be sure to signal clearly when making turns.
•Braking can be extremely difficult on a wet road. Avoid hard braking, because the scooter could slide.
Apply the brakes slowly when stopping on a wet surface.
•Slow down as you approach a corner or turn. Once you have completed a turn, accelerate slowly.
•Be careful when passing parked cars. A driver might not see you and open a door in your path.
•Railroad crossings, streetcar rails, iron plates on road construction sites, and manhole covers become
extremely slippery when wet. Slow down and cross them with caution. Keep the scooter upright, otherwise
it could slide out from under you.
•The brake lining could get wet when you wash the scooter. After washing the scooter, check the brakes
before riding.
•Always wear a helmet, gloves, trousers (tapered around the cuff and ankle so they do not flap), and a
bright colored jacket.
•Do not carry too much luggage on the scooter. An overloaded scooter is unstable. Use a strong cord to
secure any luggage to the carrier. A loose load will affect the stability of the scooter and could divert
your attention from the road.
Page 25 of 80

INSTRUMENT AND CONTROL FUNCTIONS
3
EAU03091
Rider seat
To open the rider seat
1. Place the scooter on the
centerstand.
2. Insert the key into the main switch,
and then turn it counterclockwise.
NOTE :
Do not push inward when turning the
key.
3. Fold the rider seat up.To close the rider seat
1. Fold the rider seat down, and then
push it down to lock it in place.
2. Remove the key from the main
switch if the scooter will be left
unattended.
NOTE :
Make sure that the seat is properly
secured before riding.
PUSH
OPEN
ZAUM0253ZAUM0363
OPEN
OPEN
UNLOCKLOCK
OPEN
OPEN
UNLOCKLOCK
OPENOPEN
UNLOCKLOCK
ZAUM0364
3-8
EAUM0096
Storage compartment
To unlock the storage compartment
Insert the key in the lock and turn it 1/4
turn clockwise.
To open the storage compartment
when it is unlocked
Turn the knob 1/4 turn clockwise. The
knob will return to its original position
after released.
To close the storage compartment
Push the lid into the original position
To lock the storage compartment
Insert the key in the lock and turn it 1/4
turn counterclockwise, and then
remove the key.
Page 47 of 80

PERIODIC MAINTENANCE AND MINOR REPAIR
6
EAU04551
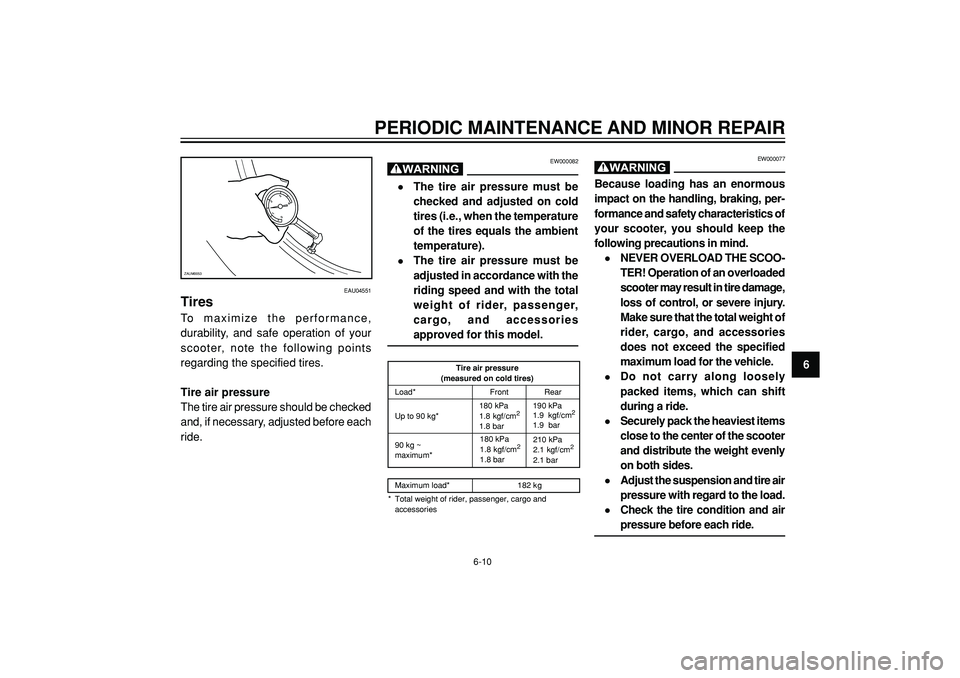
Tires
To maximize the performance,
durability, and safe operation of your
scooter, note the following points
regarding the specified tires.
Tire air pressure
The tire air pressure should be checked
and, if necessary, adjusted before each
ride.
EW000077
Because loading has an enormous
impact on the handling, braking, per-
formance and safety characteristics of
your scooter, you should keep the
following precautions in mind.
•NEVER OVERLOAD THE SCOO-
TER! Operation of an overloaded
scooter may result in tire damage,
loss of control, or severe injury.
Make sure that the total weight of
rider, cargo, and accessories
does not exceed the specified
maximum load for the vehicle.
•Do not carry along loosely
packed items, which can shift
during a ride.
•Securely pack the heaviest items
close to the center of the scooter
and distribute the weight evenly
on both sides.
•Adjust the suspension and tire air
pressure with regard to the load.
•Check the tire condition and air
pressure before each ride.
Tire air pressure
(measured on cold tires)
Load* Front Rear
Up to 90 kg*180 kPa
1.8 kgf/cm
2
1.8 bar190 kPa
1.9 kgf/cm
2
1.9 bar
90 kg ~
maximum*
180 kPa
1.8 kgf/cm2
1.8 bar210 kPa
2.1 kgf/cm
2
2.1 bar
Maximum load* 182 k g
* Total weight of rider, passenger, cargo and
accessories
6-10
EW000082
•The tire air pressure must be
checked and adjusted on cold
tires (i.e., when the temperature
of the tires equals the ambient
temperature).
•The tire air pressure must be
adjusted in accordance with the
riding speed and with the total
weight of rider, passenger,
cargo, and accessories
approved for this model.
ZAUM0053
Page 53 of 80

PERIODIC MAINTENANCE AND MINOR REPAIR
6 To check the operation
1. Place the scooter on a level sur-
face and hold it in an upright po-
sition.
2. While applying the front brake,
push down hard on the
handlebars several times to check
if the front fork compresses and
rebounds smoothly.
EC000098
If any damage is found or the front
fork does not operate smoothly, have
a Yamaha dealer check or repair it.
6-16
EAU02939
Checking the front fork
The condition and operation of the front
fork must be checked as follows at the
intervals specified in the periodic main-
tenance and lubrication chart.
To check the condition
EW000115
Securely support the scooter so that
there is no danger of it falling over.
Check the inner tubes for scratches,
damage and excessive oil leakage.
ZAUM0378
EAU04123
Checking and lubricating the
centerstand
The operation of the centerstand should
be checked before each ride, and the
pivots and metal-to-metal contact sur-
faces should be lubricated if necessary.
EWA00055
If the centerstand does not move up
and down smoothly, have a Yamaha
dealer check or repair it.
Recommended lubricant:
Lithium-soap-based grease
(all-purpose grease)
ZAUM0062
Page 54 of 80

PERIODIC MAINTENANCE AND MINOR REPAIR
6
EAU01144
Checking the wheel bearings
The front and rear wheel bearings must
be checked at the intervals specified in
the periodic maintenance and
lubrication chart. If there is play in the
wheel hub or if the wheel does not turn
smoothly, have a Yamaha dealer check
the wheel bearings.
6-17
2. Hold the lower ends of the front
fork legs and try to move them
forward and backward. If any free
play can be felt, have a Yamaha
dealer check or repair the
steering.
ZAUM0379
EAU00794
Checking the steering
Worn or loose steering bearings may
cause danger. Therefore, the operation
of the steering must be checked as
follows at the intervals specified in the
periodic maintenance and lubrication
chart.
1. Place a stand under the engine
to raise the front wheel off the
ground.
EW000115
Securely support the scooter so that
there is no danger of it falling over.
Page 57 of 80

PERIODIC MAINTENANCE AND MINOR REPAIR
6
EW000119
Headlight bulbs get very hot.
Therefore, keep flammable products
away from a lit headlight bulb, and
do not touch the bulb until it has
cooled down.
4. Place a new bulb into position,
and then secure it with the bulb
holder.
5. Connect the lead connectors, and
then install the headlight unit by
installing the screws.
6. Have a Yamaha dealer adjust the
headlight beam if necessary.
6-20
EAU00846
Replacing the headlight bulb
If the headlight bulb burns out, replace
it as follows.
1. Remove the headlight unit by
removing the screws.
2. Disconnect the headlight lead
connectors.
3. Remove the headlight bulb holder
by pushing it inward and turning it
counterclockwise, and then
remove the defective bulb.
1
ZAUM0381
1. Headlight bulb holder
EC000103
Do not use a fuse of a higher amperage
rating than recommended to avoid
causing extensive damage to the
electrical system and possibly a fire.
3. Turn the key to "
" and turn on
the electrical circuits to check if the
devices operate.
4. If the fuse immediately blows
again, have a Yamaha dealer
check the electrical system.
Page 58 of 80

PERIODIC MAINTENANCE AND MINOR REPAIR
6
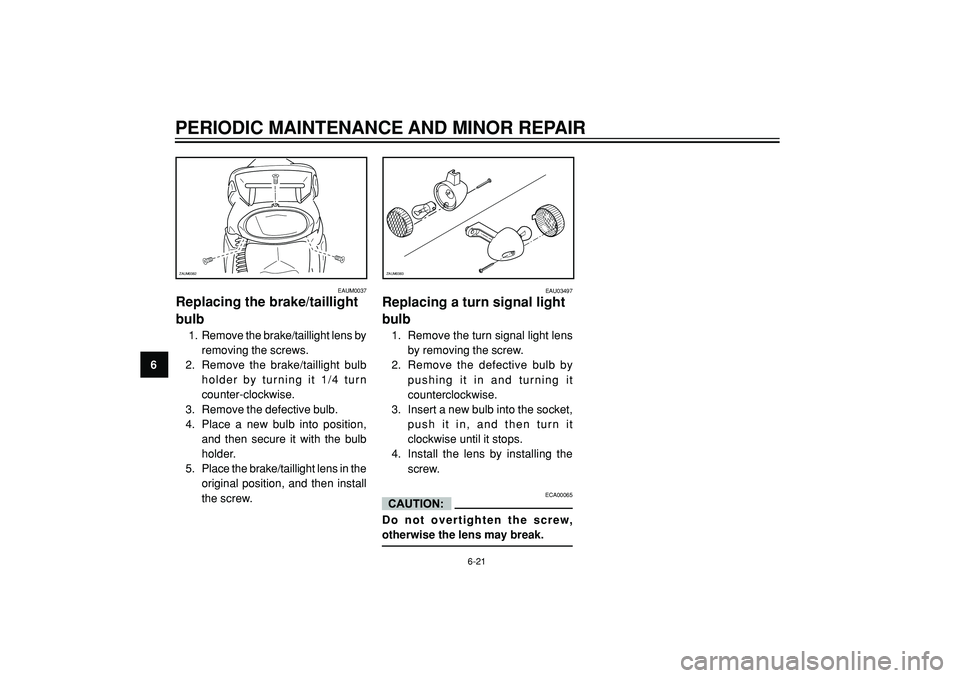
EAUM0037
Replacing the brake/taillight
bulb
1. Remove the brake/taillight lens by
removing the screws.
2. Remove the brake/taillight bulb
holder by turning it 1/4 turn
counter-clockwise.
3. Remove the defective bulb.
4. Place a new bulb into position,
and then secure it with the bulb
holder.
5. Place the brake/taillight lens in the
original position, and then install
the screw.
ZAUM0382
EAU03497
Replacing a turn signal light
bulb
1. Remove the turn signal light lens
by removing the screw.
2. Remove the defective bulb by
pushing it in and turning it
counterclockwise.
3. Insert a new bulb into the socket,
push it in, and then turn it
clockwise until it stops.
4. Install the lens by installing the
screw.
ECA00065
Do not overtighten the screw,
otherwise the lens may break.
ZAUM0383
6-21