Starter YAMAHA WOLVERINE 350 2007 Owners Manual
[x] Cancel search | Manufacturer: YAMAHA, Model Year: 2007, Model line: WOLVERINE 350, Model: YAMAHA WOLVERINE 350 2007Pages: 124, PDF Size: 11.46 MB
Page 8 of 124

EBU17420
TABLE OF CONTENTS
SAFETY INFORMATION .............................. 1-1
LOCATION OF THE WARNING AND
SPECIFICATION LABELS ............................ 2-1
DESCRIPTION .............................................. 3-1
Left view ...................................................... 3-1
Right view.................................................... 3-1
Controls and instruments ............................ 3-2
INSTRUMENT AND CONTROL
FUNCTIONS .................................................. 4-1
Main switch ................................................ 4-1
Indicator lights and warning light ................ 4-2
Handlebar switches .................................... 4-3
Throttle lever .............................................. 4-4
Speed limiter .............................................. 4-4
Front brake lever ........................................ 4-5
Brake pedal and rear brake lever ............... 4-5
Parking brake ............................................. 4-6
Drive select lever ........................................ 4-7
Fuel tank cap .............................................. 4-7
Fuel ............................................................ 4-8
Fuel cock .................................................... 4-9Starter (choke) ..........................................4-10
Seat ..........................................................4-11
Storage compartment ...............................4-12
Adjusting the front shock absorber
assemblies ..............................................4-13
Adjusting the rear shock absorber
assembly .................................................4-14
PRE-OPERATION CHECKS ..........................5-1
Pre-operation check list ..............................5-1
Fuel .............................................................5-3
Engine oil ....................................................5-3
Final gear oil ...............................................5-3
Front and rear brakes .................................5-3
Throttle lever ...............................................5-4
Tires ............................................................5-4
Measuring the tire pressure ........................5-5
Tire wear limit .............................................5-6
Chassis fasteners .......................................5-6
Instruments, lights and switches .................5-6
OPERATION...................................................6-1
Starting a cold engine .................................6-1
Starting a warm engine ...............................6-3U3D561E0.book Page 1 Thursday, June 29, 2006 11:03 AM
Page 19 of 124
3-2
3
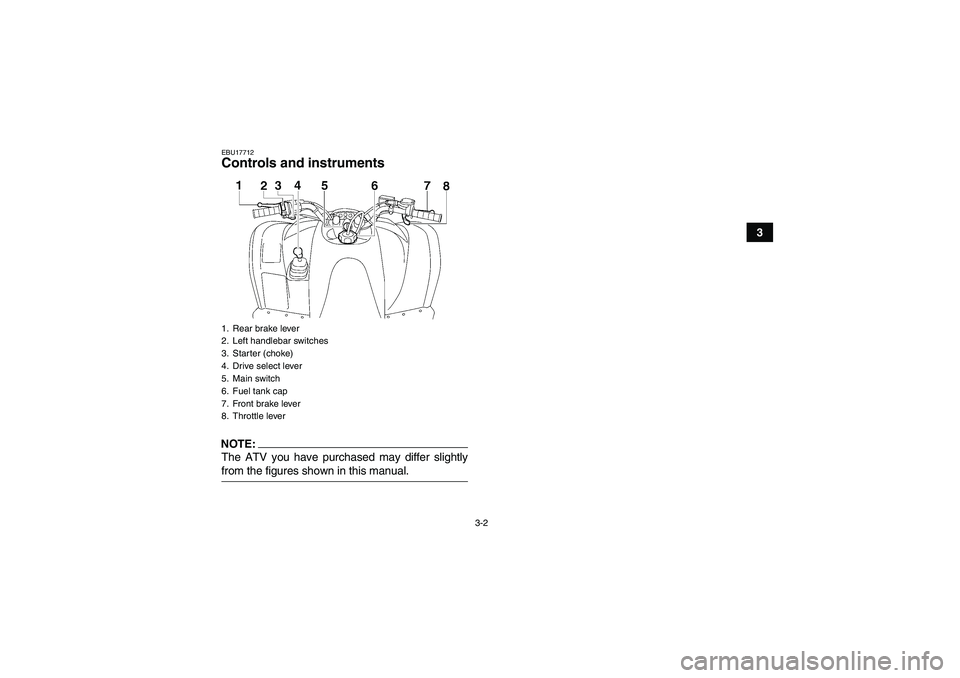
EBU17712Controls and instrumentsNOTE:The ATV you have purchased may differ slightlyfrom the figures shown in this manual.1. Rear brake lever
2. Left handlebar switches
3. Starter (choke)
4. Drive select lever
5. Main switch
6. Fuel tank cap
7. Front brake lever
8. Throttle leverU3D561E0.book Page 2 Thursday, June 29, 2006 11:03 AM
Page 22 of 124
4-3
4
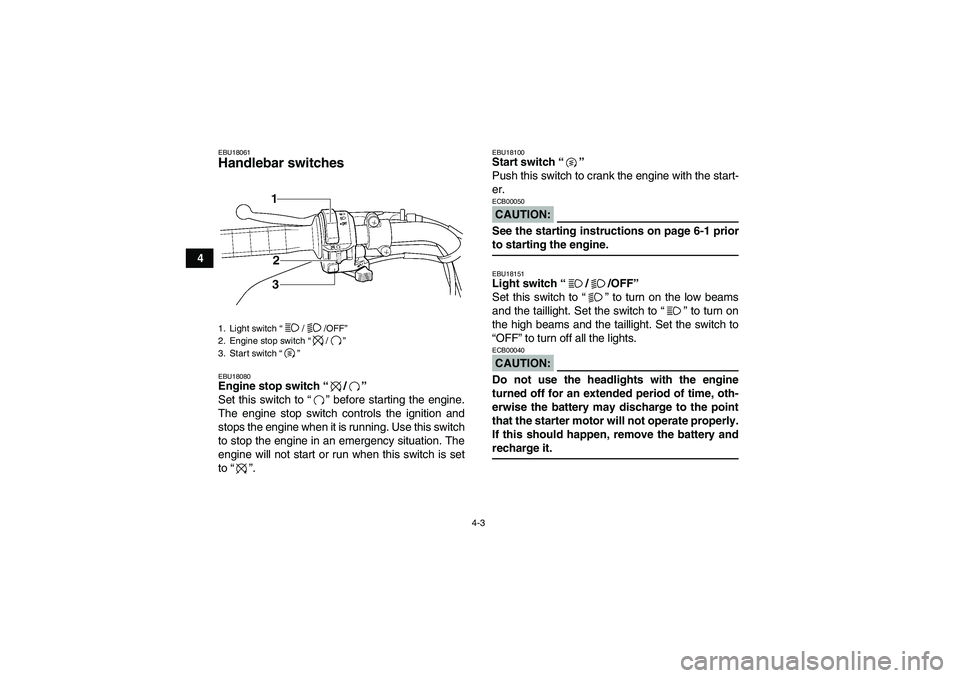
EBU18061Handlebar switches EBU18080Engine stop switch “/”
Set this switch to “” before starting the engine.
The engine stop switch controls the ignition and
stops the engine when it is running. Use this switch
to stop the engine in an emergency situation. The
engine will not start or run when this switch is set
to “”.
EBU18100Start switch “”
Push this switch to crank the engine with the start-
er.CAUTION:ECB00050See the starting instructions on page 6-1 priorto starting the engine.EBU18151Light switch “//OFF”
Set this switch to “” to turn on the low beams
and the taillight. Set the switch to “” to turn on
the high beams and the taillight. Set the switch to
“OFF” to turn off all the lights.CAUTION:ECB00040Do not use the headlights with the engine
turned off for an extended period of time, oth-
erwise the battery may discharge to the point
that the starter motor will not operate properly.
If this should happen, remove the battery andrecharge it.
1. Light switch “/ /OFF”
2. Engine stop switch “/”
3. Start switch “”U3D561E0.book Page 3 Thursday, June 29, 2006 11:03 AM
Page 29 of 124
4-10
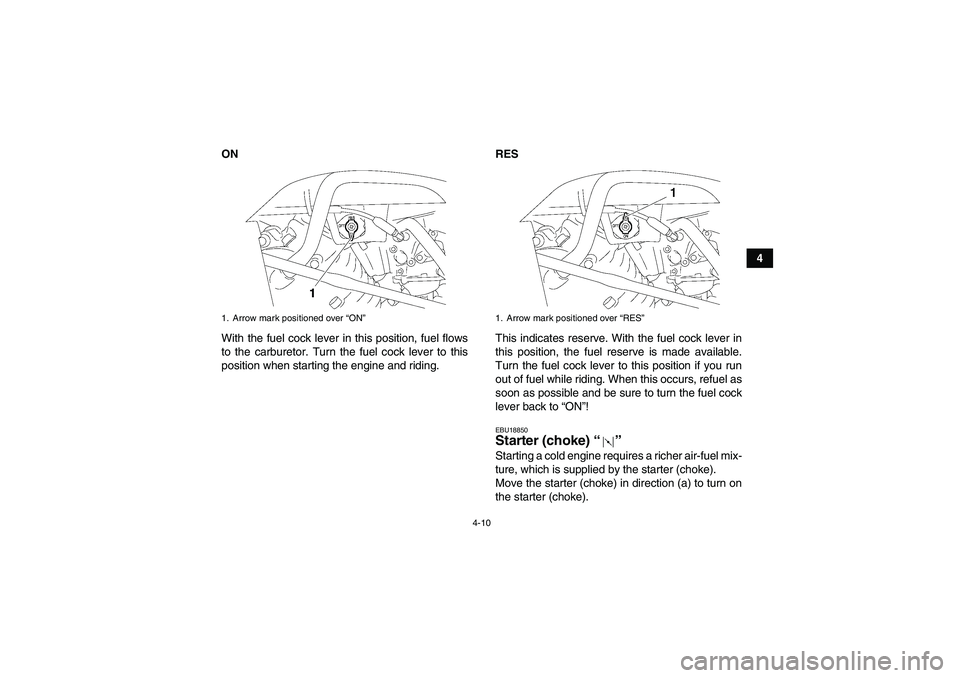
4 ON
With the fuel cock lever in this position, fuel flows
to the carburetor. Turn the fuel cock lever to this
position when starting the engine and riding.RES
This indicates reserve. With the fuel cock lever in
this position, the fuel reserve is made available.
Turn the fuel cock lever to this position if you run
out of fuel while riding. When this occurs, refuel as
soon as possible and be sure to turn the fuel cock
lever back to “ON”!
EBU18850Starter (choke) “” Starting a cold engine requires a richer air-fuel mix-
ture, which is supplied by the starter (choke).
Move the starter (choke) in direction (a) to turn on
the starter (choke).
1. Arrow mark positioned over “ON”
1. Arrow mark positioned over “RES”
U3D561E0.book Page 10 Thursday, June 29, 2006 11:03 AM
Page 30 of 124
4-11
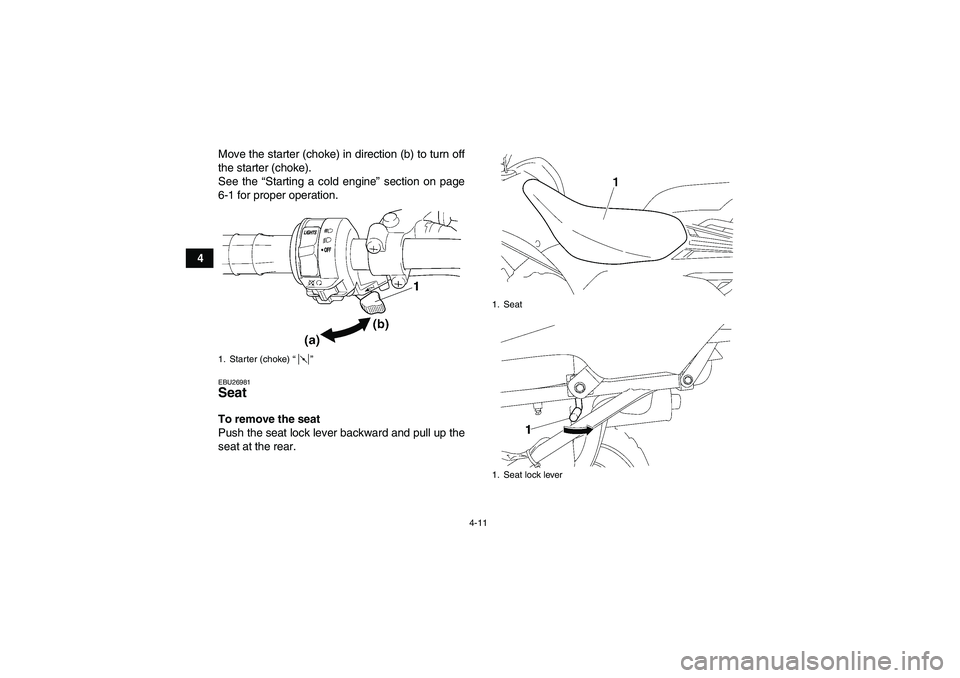
4Move the starter (choke) in direction (b) to turn off
the starter (choke).
See the “Starting a cold engine” section on page
6-1 for proper operation.
EBU26981Seat To remove the seat
Push the seat lock lever backward and pull up the
seat at the rear.1. Starter (choke) “”
1. Seat
1. Seat lock lever
U3D561E0.book Page 11 Thursday, June 29, 2006 11:03 AM
Page 42 of 124
6-2
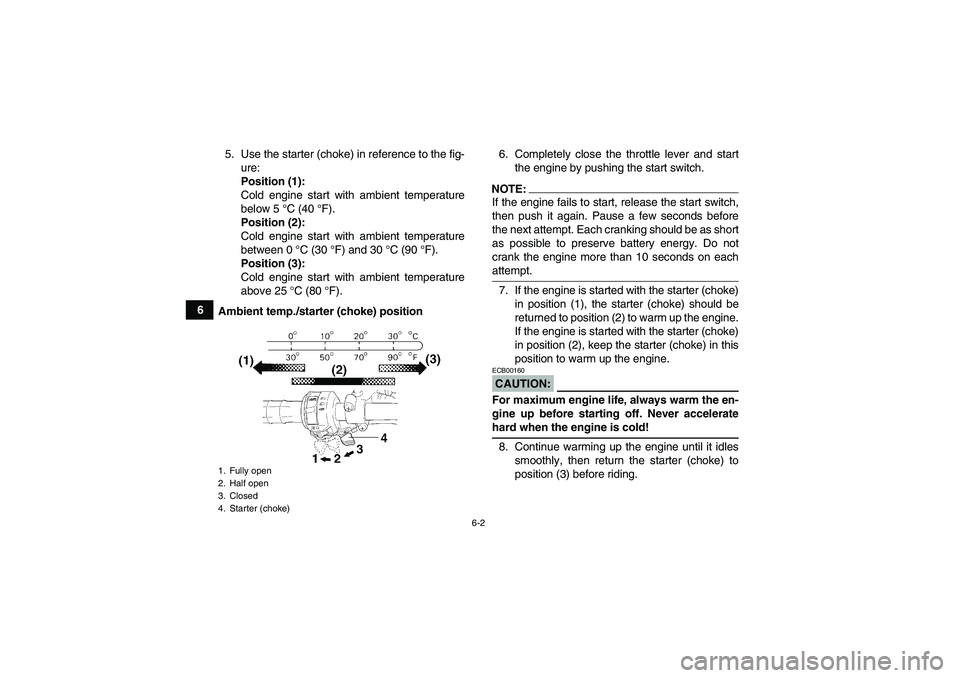
65. Use the starter (choke) in reference to the fig-
ure:
Position (1):
Cold engine start with ambient temperature
below 5 °C (40 °F).
Position (2):
Cold engine start with ambient temperature
between 0 °C (30 °F) and 30 °C (90 °F).
Position (3):
Cold engine start with ambient temperature
above 25 °C (80 °F).
Ambient temp./starter (choke) position6. Completely close the throttle lever and start
the engine by pushing the start switch.
NOTE:If the engine fails to start, release the start switch,
then push it again. Pause a few seconds before
the next attempt. Each cranking should be as short
as possible to preserve battery energy. Do not
crank the engine more than 10 seconds on eachattempt.
7. If the engine is started with the starter (choke)
in position (1), the starter (choke) should be
returned to position (2) to warm up the engine.
If the engine is started with the starter (choke)
in position (2), keep the starter (choke) in this
position to warm up the engine.CAUTION:ECB00160For maximum engine life, always warm the en-
gine up before starting off. Never acceleratehard when the engine is cold!
8. Continue warming up the engine until it idles
smoothly, then return the starter (choke) to
position (3) before riding.
1. Fully open
2. Half open
3. Closed
4. Starter (choke)U3D561E0.book Page 2 Thursday, June 29, 2006 11:03 AM
Page 43 of 124

6-3
6
NOTE:The engine is warm when it responds normally tothe throttle with the starter (choke) turned off.EBU20291Starting a warm engine Follow the same procedure as for starting a cold
engine, with the exception that the starter (choke)
is not required when the engine is warm. Instead,
start the engine with the throttle slightly open.EBU20380Operating the drive select lever and
driving in reverse CAUTION:ECB00170Before shifting, stop the ATV, otherwise thetransmission may be damaged.
Shifting: Forward
1. Bring the ATV to a complete stop.
2. Shift from neutral to forward and vice versa by
moving the drive select lever along the shift
guide.
NOTE:Make sure that the drive select lever is completelyshifted into position.
3. Open the throttle lever gradually.
Shifting: Reverse
1. Bring the ATV to a complete stop.
2. Apply the brake pedal.1. Drive select lever
2. F (Forward)
3. N (Neutral)
4. R (Reverse)
U3D561E0.book Page 3 Thursday, June 29, 2006 11:03 AM
Page 59 of 124
7-12
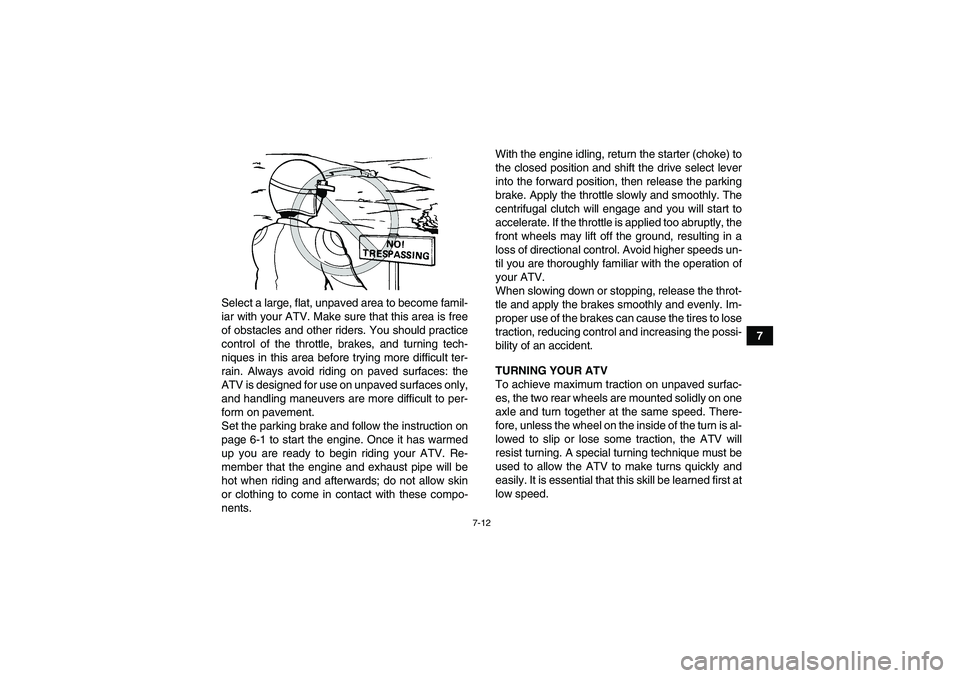
7 Select a large, flat, unpaved area to become famil-
iar with your ATV. Make sure that this area is free
of obstacles and other riders. You should practice
control of the throttle, brakes, and turning tech-
niques in this area before trying more difficult ter-
rain. Always avoid riding on paved surfaces: the
ATV is designed for use on unpaved surfaces only,
and handling maneuvers are more difficult to per-
form on pavement.
Set the parking brake and follow the instruction on
page 6-1 to start the engine. Once it has warmed
up you are ready to begin riding your ATV. Re-
member that the engine and exhaust pipe will be
hot when riding and afterwards; do not allow skin
or clothing to come in contact with these compo-
nents.With the engine idling, return the starter (choke) to
the closed position and shift the drive select lever
into the forward position, then release the parking
brake. Apply the throttle slowly and smoothly. The
centrifugal clutch will engage and you will start to
accelerate. If the throttle is applied too abruptly, the
front wheels may lift off the ground, resulting in a
loss of directional control. Avoid higher speeds un-
til you are thoroughly familiar with the operation of
your ATV.
When slowing down or stopping, release the throt-
tle and apply the brakes smoothly and evenly. Im-
proper use of the brakes can cause the tires to lose
traction, reducing control and increasing the possi-
bility of an accident.
TURNING YOUR ATV
To achieve maximum traction on unpaved surfac-
es, the two rear wheels are mounted solidly on one
axle and turn together at the same speed. There-
fore, unless the wheel on the inside of the turn is al-
lowed to slip or lose some traction, the ATV will
resist turning. A special turning technique must be
used to allow the ATV to make turns quickly and
easily. It is essential that this skill be learned first at
low speed.
U3D561E0.book Page 12 Thursday, June 29, 2006 11:03 AM
Page 76 of 124

8-5
8
17*Steering systemCheck operation and repair or replace if damaged.
Check toe-in and adjust if necessary.√√√√√
18*Engine mountCheck for cracks or other damage, and replace if
necessary.√√√
19*CarburetorCheck starter (choke) operation and correct if nec-
essary.
Check engine idling speed and adjust if neces-
sary.√√√√
20*Crankcase breather
systemCheck breather hose for cracks or other damage,
and replace if necessary.√√√
21 Engine oilChange.
Check ATV for oil leakage, and correct if neces-
sary.√ √√√
22Engine oil filter car-
tridgeReplace.√√√
23*Engine oil strainerClean.√√√
24 Final gear oilChange.
Check ATV for oil leakage, and correct if neces-
sary.√√
25*Moving parts and
cablesLubricate.√√√√
26*Drive select lever
safety system cableCheck operation and adjust or replace if neces-
sary.√√√ NO. ITEMCHECK OR MAINTENANCE
JOBINITIAL EVERY
Whichev-
er comes
firstmonth136612
km
(mi)320
(200)1200
(750)2400
(1500)2400
(1500)4800
(3000)
hours 20 75 150 150 300U3D561E0.book Page 5 Thursday, June 29, 2006 11:03 AM
Page 112 of 124

8-41
8
EBU25751Troubleshooting chart
Check the fuel level in
the fuel tank.1. Fuel
There is enough fuel.
There is no fuel.
Check the compression.
Supply fuel.
The engine does not start.
Check the compression.
Operate the electric starter.2. Compression
There is compression.
There is no compression.
Check the ignition.
Have a Yamaha dealer
check the ATV.
Remove the spark plug
and check the electrodes.3. Ignition
Wipe off with a dry cloth and correct the
spark plug gap, or replace the spark plug.
Have a Yamaha dealer check the ATV.
The engine does not start.
Have a Yamaha dealer
check the ATV.
The engine does not start.
Check the battery.
Operate the electric starter.4. Battery
The engine turns over
quickly.
The engine turns over
slowly.
The battery is good.Check the battery lead connections,
and charge the battery if necessary.
DryWet
Open the throttle halfway and operate
the electric starter.
U3D561E0.book Page 41 Thursday, June 29, 2006 11:03 AM