oil level YAMAHA WR 250F 2003 Notices Demploi (in French)
[x] Cancel search | Manufacturer: YAMAHA, Model Year: 2003, Model line: WR 250F, Model: YAMAHA WR 250F 2003Pages: 860, PDF Size: 35.16 MB
Page 91 of 860
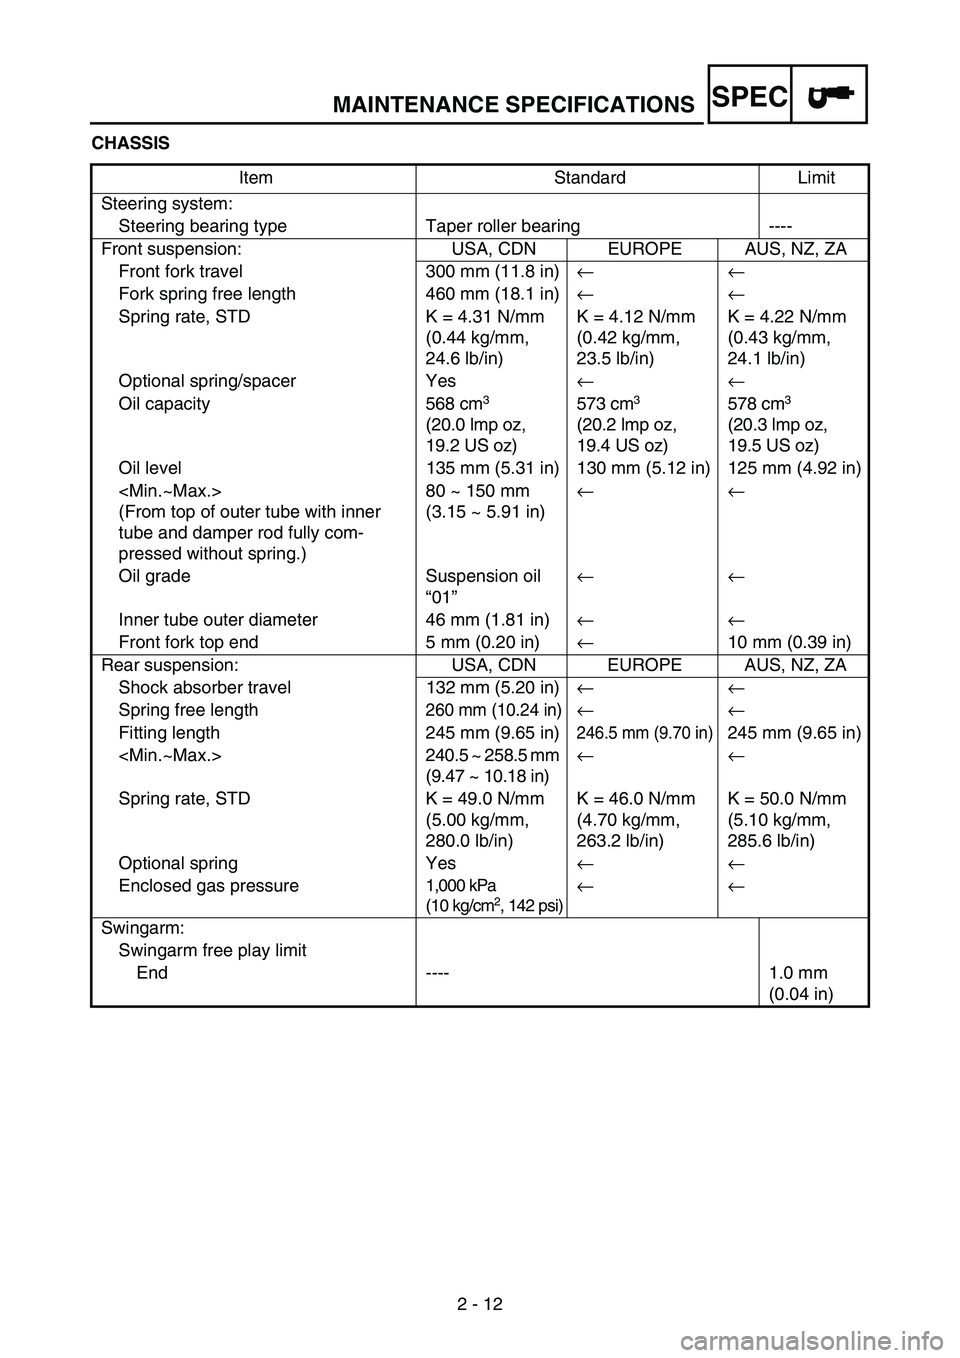
MAINTENANCE SPECIFICATIONS
2 - 12
SPEC
CHASSIS
Item Standard Limit
Steering system:
Steering bearing type Taper roller bearing ----
Front suspension: USA, CDN EUROPE AUS, NZ, ZA
Front fork travel 300 mm (11.8 in)←←
Fork spring free length 460 mm (18.1 in)←←
Spring rate, STD K = 4.31 N/mm
(0.44 kg/mm,
24.6 lb/in)K = 4.12 N/mm
(0.42 kg/mm,
23.5 lb/in)K = 4.22 N/mm
(0.43 kg/mm,
24.1 lb/in)
Optional spring/spacer Yes←←
Oil capacity568 cm
3
(20.0 lmp oz,
19.2 US oz) 573 cm3
(20.2 lmp oz,
19.4 US oz) 578 cm3
(20.3 lmp oz,
19.5 US oz)
Oil level 135 mm (5.31 in) 130 mm (5.12 in) 125 mm (4.92 in)
(From top of outer tube with inner
tube and damper rod fully com-
pressed without spring.)80 ~ 150 mm
(3.15 ~ 5.91 in)←←
Oil grade Suspension oil
“01”←←
Inner tube outer diameter 46 mm (1.81 in)←←
Front fork top end 5 mm (0.20 in)←10 mm (0.39 in)
Rear suspension: USA, CDN EUROPE AUS, NZ, ZA
Shock absorber travel 132 mm (5.20 in)←←
Spring free length
260 mm (10.24 in)←←
Fitting length 245 mm (9.65 in)
246.5 mm (9.70 in)245 mm (9.65 in)
(9.47 ~ 10.18 in)←←
Spring rate, STD K = 49.0 N/mm
(5.00 kg/mm,
280.0 lb/in)K = 46.0 N/mm
(4.70 kg/mm,
263.2 lb/in)K = 50.0 N/mm
(5.10 kg/mm,
285.6 lb/in)
Optional spring Yes←←
Enclosed gas pressure
1,000 kPa
(10 kg/cm2, 142 psi)
←←
Swingarm:
Swingarm free play limit
End ---- 1.0 mm
(0.04 in)
Page 193 of 860
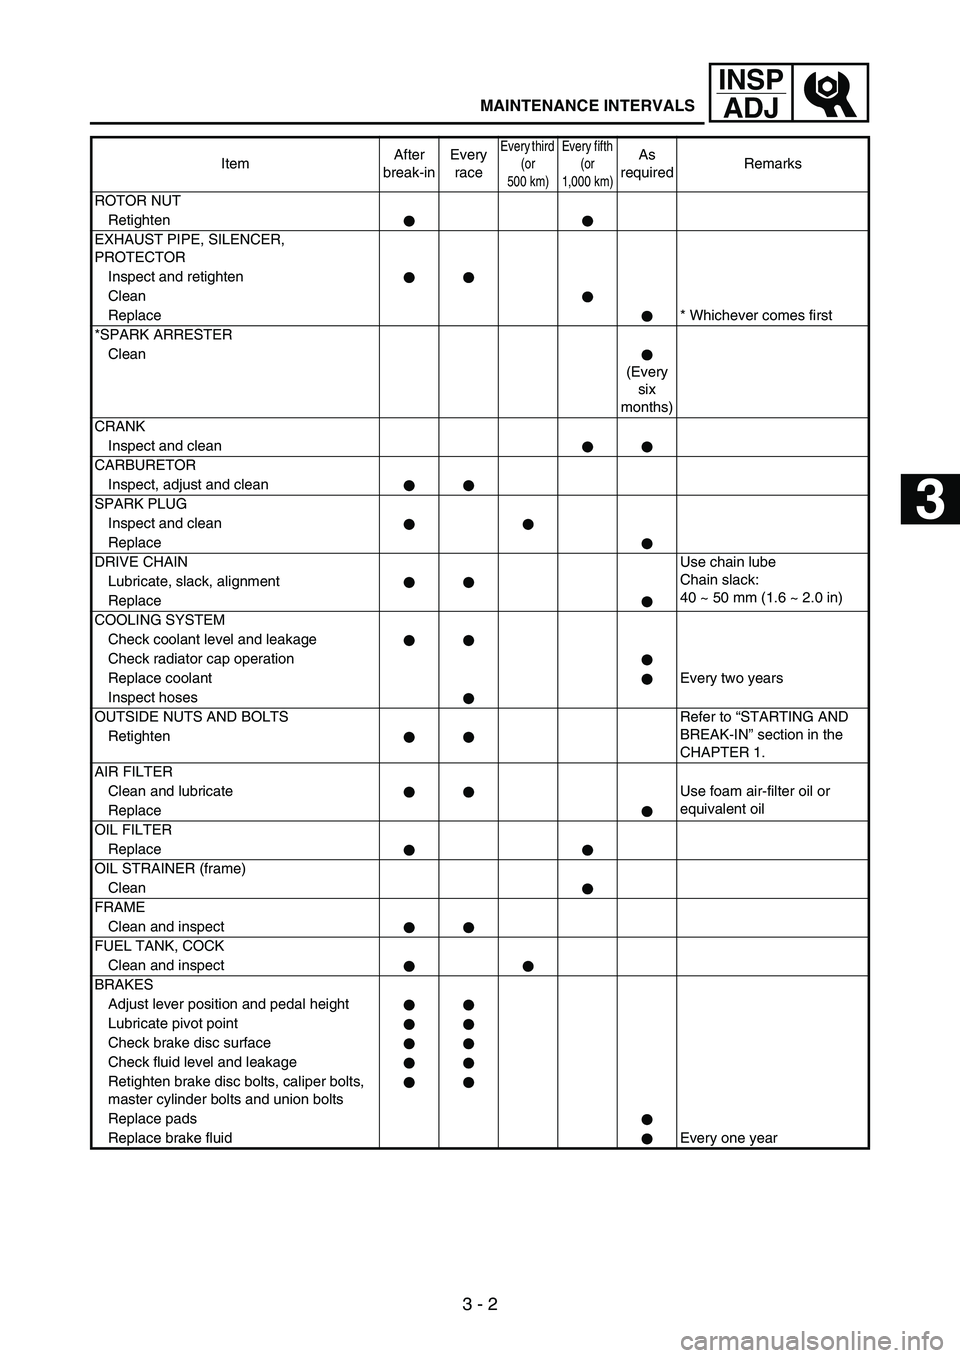
3 - 2
INSP
ADJ
MAINTENANCE INTERVALS
ROTOR NUT
Retighten
EXHAUST PIPE, SILENCER,
PROTECTOR
Inspect and retighten
Clean
Replace* Whichever comes first
*SPARK ARRESTER
Clean
(Every
six
months)
CRANK
Inspect and clean
CARBURETOR
Inspect, adjust and clean
SPARK PLUG
Inspect and clean
Replace
DRIVE CHAINUse chain lube
Chain slack:
40 ~ 50 mm (1.6 ~ 2.0 in) Lubricate, slack, alignment
Replace
COOLING SYSTEM
Check coolant level and leakage
Check radiator cap operation
Replace coolantEvery two years
Inspect hoses
OUTSIDE NUTS AND BOLTS Refer to “STARTING AND
BREAK-IN” section in the
CHAPTER 1. Retighten
AIR FILTER
Clean and lubricate Use foam air-filter oil or
equivalent oil
Replace
OIL FILTER
Replace
OIL STRAINER (frame)
Clean
FRAME
Clean and inspect
FUEL TANK, COCK
Clean and inspect
BRAKES
Adjust lever position and pedal height
Lubricate pivot point
Check brake disc surface
Check fluid level and leakage
Retighten brake disc bolts, caliper bolts,
master cylinder bolts and union bolts
Replace pads
Replace brake fluid Every one yearItemAfter
break-inEvery
race
Every third
(or
500 km)Every fifth
(or
1,000 km)As
requiredRemarks
1
2
3
4
5
6
7
Page 207 of 860
3 - 16
INSP
ADJ
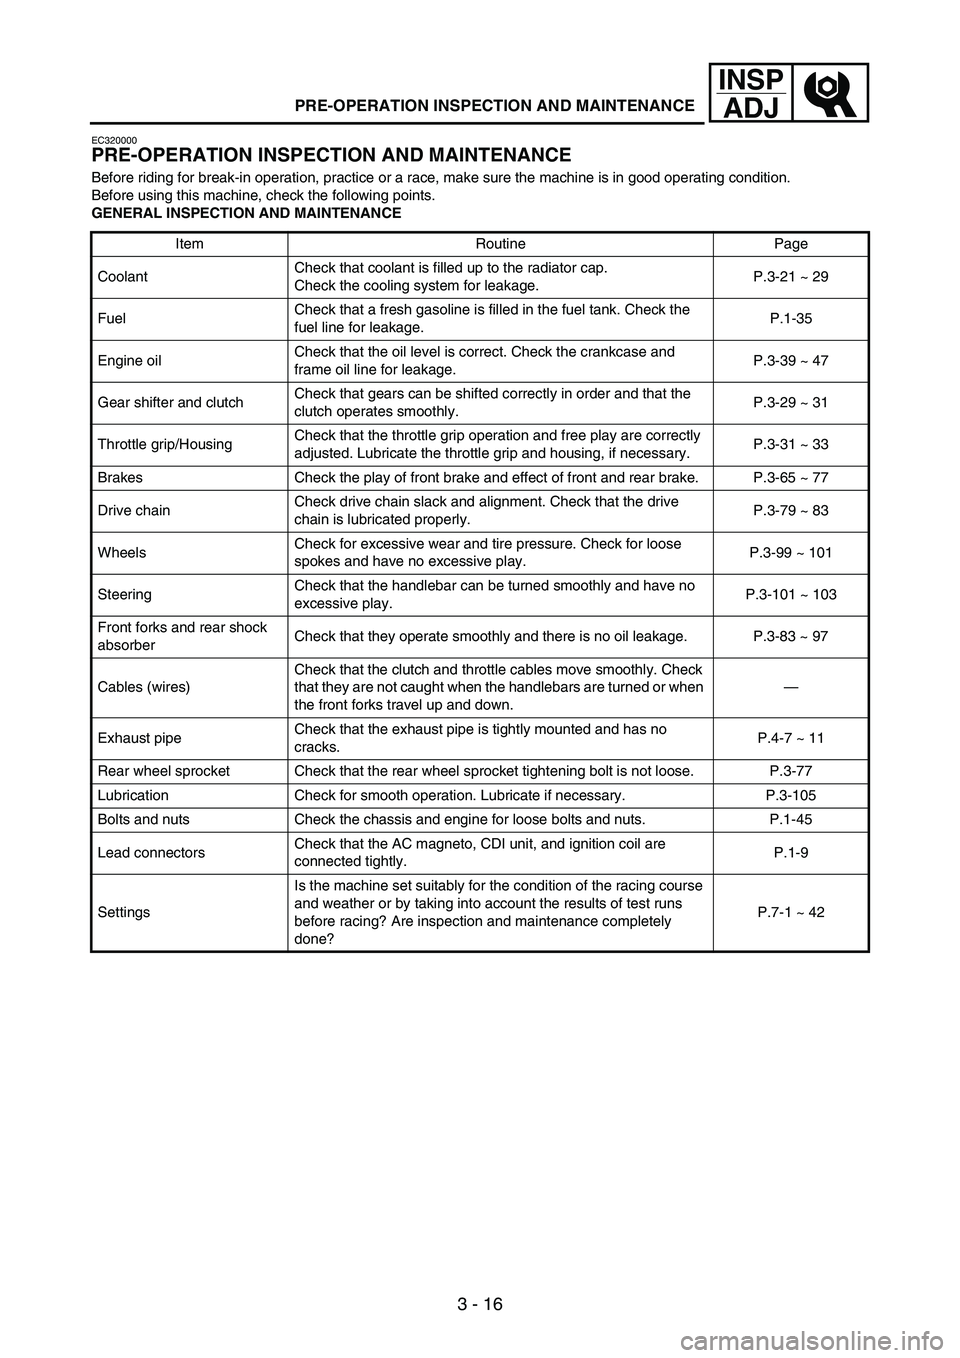
PRE-OPERATION INSPECTION AND MAINTENANCE
EC320000
PRE-OPERATION INSPECTION AND MAINTENANCE
Before riding for break-in operation, practice or a race, make sure the machine is in good operating condition.
Before using this machine, check the following points.
GENERAL INSPECTION AND MAINTENANCE
Item Routine Page
CoolantCheck that coolant is filled up to the radiator cap.
Check the cooling system for leakage.P.3-21 ~ 29
FuelCheck that a fresh gasoline is filled in the fuel tank. Check the
fuel line for leakage.P.1-35
Engine oilCheck that the oil level is correct. Check the crankcase and
frame oil line for leakage.P.3-39 ~ 47
Gear shifter and clutchCheck that gears can be shifted correctly in order and that the
clutch operates smoothly.P.3-29 ~ 31
Throttle grip/HousingCheck that the throttle grip operation and free play are correctly
adjusted. Lubricate the throttle grip and housing, if necessary.P.3-31 ~ 33
Brakes Check the play of front brake and effect of front and rear brake. P.3-65 ~ 77
Drive chainCheck drive chain slack and alignment. Check that the drive
chain is lubricated properly.P.3-79 ~ 83
WheelsCheck for excessive wear and tire pressure. Check for loose
spokes and have no excessive play.P.3-99 ~ 101
SteeringCheck that the handlebar can be turned smoothly and have no
excessive play.P.3-101 ~ 103
Front forks and rear shock
absorberCheck that they operate smoothly and there is no oil leakage. P.3-83 ~ 97
Cables (wires)Check that the clutch and throttle cables move smoothly. Check
that they are not caught when the handlebars are turned or when
the front forks travel up and down.—
Exhaust pipeCheck that the exhaust pipe is tightly mounted and has no
cracks.P.4-7 ~ 11
Rear wheel sprocket Check that the rear wheel sprocket tightening bolt is not loose. P.3-77
Lubrication Check for smooth operation. Lubricate if necessary. P.3-105
Bolts and nuts Check the chassis and engine for loose bolts and nuts. P.1-45
Lead connectorsCheck that the AC magneto, CDI unit, and ignition coil are
connected tightly.P.1-9
SettingsIs the machine set suitably for the condition of the racing course
and weather or by taking into account the results of test runs
before racing? Are inspection and maintenance completely
done?P.7-1 ~ 42
Page 216 of 860
3 - 25
INSP
ADJ
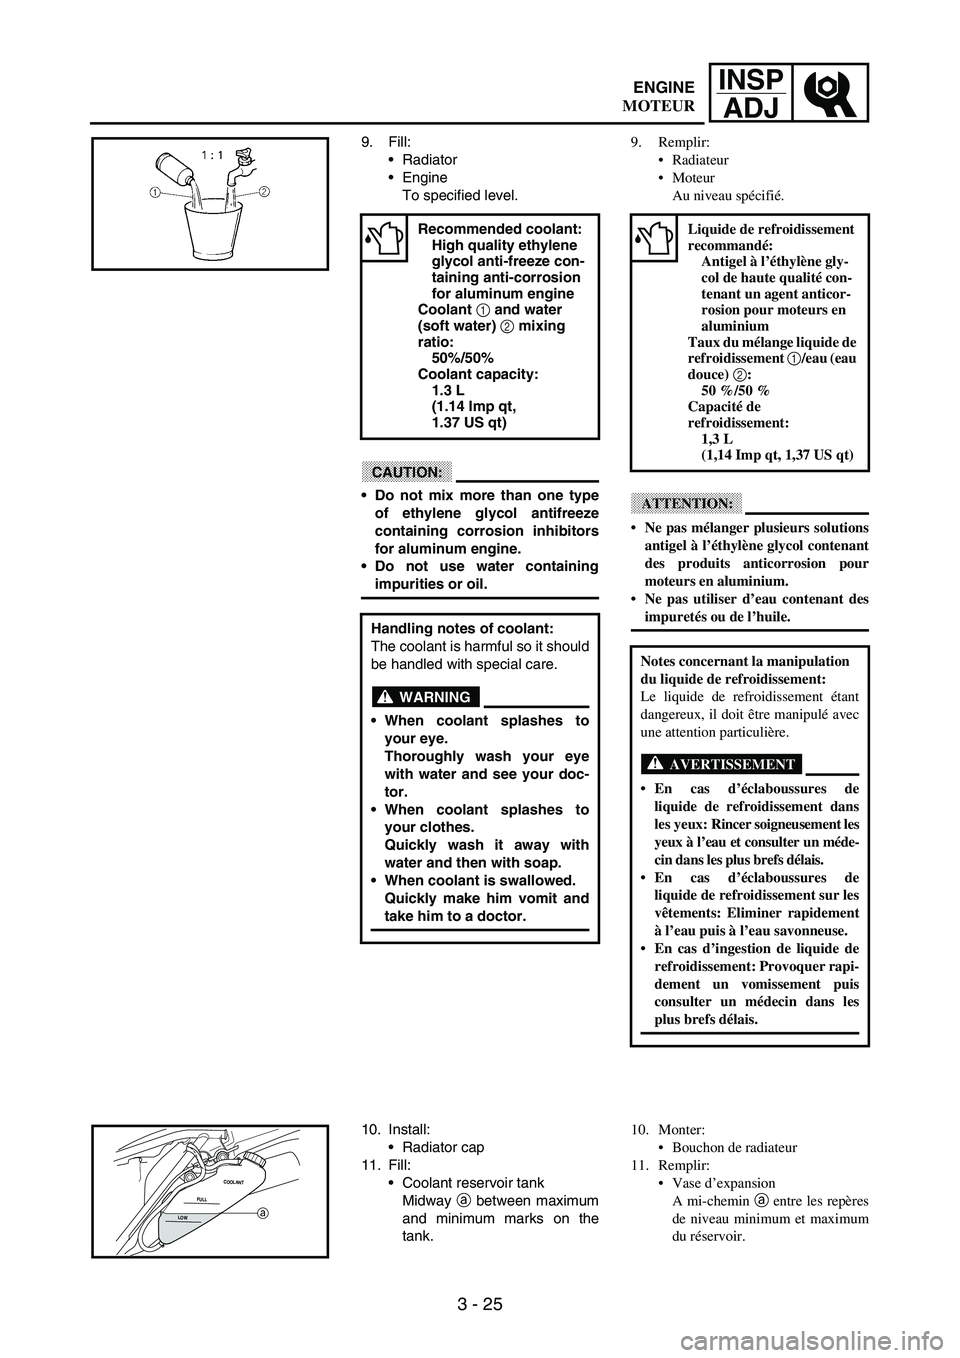
9. Fill:
Radiator
Engine
To specified level.
CAUTION:
Do not mix more than one type
of ethylene glycol antifreeze
containing corrosion inhibitors
for aluminum engine.
Do not use water containing
impurities or oil.
Recommended coolant:
High quality ethylene
glycol anti-freeze con-
taining anti-corrosion
for aluminum engine
Coolant 1 and water
(soft water) 2 mixing
ratio:
50%/50%
Coolant capacity:
1.3 L
(1.14 Imp qt,
1.37 US qt)
Handling notes of coolant:
The coolant is harmful so it should
be handled with special care.
WARNING
When coolant splashes to
your eye.
Thoroughly wash your eye
with water and see your doc-
tor.
When coolant splashes to
your clothes.
Quickly wash it away with
water and then with soap.
When coolant is swallowed.
Quickly make him vomit and
take him to a doctor.
10. Install:
Radiator cap
11. Fill:
Coolant reservoir tank
Midway
a between maximum
and minimum marks on the
tank.
LOWFULLCOOLANTa
9. Remplir:
Radiateur
Moteur
Au niveau spécifié.
ATTENTION:
Ne pas mélanger plusieurs solutions
antigel à l’éthylène glycol contenant
des produits anticorrosion pour
moteurs en aluminium.
Ne pas utiliser d’eau contenant des
impuretés ou de l’huile.
Liquide de refroidissement
recommandé:
Antigel à l’éthylène gly-
col de haute qualité con-
tenant un agent anticor-
rosion pour moteurs en
aluminium
Taux du mélange liquide de
refroidissement 1/eau (eau
douce) 2:
50 %/50 %
Capacité de
refroidissement:
1,3 L
(1,14 Imp qt, 1,37 US qt)
Notes concernant la manipulation
du liquide de refroidissement:
Le liquide de refroidissement étant
dangereux, il doit être manipulé avec
une attention particulière.
AVERTISSEMENT
En cas d’éclaboussures de
liquide de refroidissement dans
les yeux: Rincer soigneusement les
yeux à l’eau et consulter un méde-
cin dans les plus brefs délais.
En cas d’éclaboussures de
liquide de refroidissement sur les
vêtements: Eliminer rapidement
à l’eau puis à l’eau savonneuse.
En cas d’ingestion de liquide de
refroidissement: Provoquer rapi-
dement un vomissement puis
consulter un médecin dans les
plus brefs délais.
10. Monter:
Bouchon de radiateur
11. Remplir:
Vase d’expansion
A mi-chemin a entre les repères
de niveau minimum et maximum
du réservoir.
ENGINE
MOTEUR
Page 230 of 860

3 - 39
INSP
ADJ
ENGINE OIL LEVEL INSPECTION
1. Start the engine, warm it up for
several minutes, and then turn
off the engine and wait for five
minutes.
2. Place the machine on a level
place and hold it up on upright
position by placing the suitable
stand under the engine.
3. Remove:
Oil tank cap
1
1
4. Inspect:
Oil level
Oil level should be between
maximum
a and minimum b
marks.
Oil level is low → Add oil to
proper level.
NOTE:When inspecting the oil level, do not
screw the oil tank cap into the oil
tank. Insert the gauge lightly.
(For USA and CDN)
CAUTION:
Do not add any chemical addi-
tives. Engine oil also lubricates
the clutch and additives could
cause clutch slippage.
Do not allow foreign material to
enter the crankcase.
Recommended oil:
At 5 °C (40 °F) or
higher È Yamalube 4
(20W-40) or SAE 20W-
40 type SG motor oil
(Non-Friction
modified)
At 15 °C (60 °F) or
lower É Yamalube 4
(10W-30) or SAE 10W-
30 type SG motor oil
(Non-Friction modified)
and/or
Yamalube 4-R (15W-50)
(Non-Friction modified)
a
b
CONTROLE DU NIVEAU D’HUILE
MOTEUR
1. Mettre le moteur en marche, le faire
chauffer pendant quelques minutes,
puis le couper et attendre cinq
minutes.
2. Placer le véhicule sur un plan hori-
zontal et le dresser à la verticale en
plaçant un support adéquat sous le
moteur.
3. Déposer:
Bouchon du réservoir d’huile 1
4. Contrôler:
Niveau d’huile
Le niveau d’huile doit se trouver
entre les repères maximum a et
minimum b.
Bas niveau d’huile → Ajouter de
l’huile jusqu’au niveau requis.
N.B.:
Pour mesurer le niveau d’huile, intro-
duire la jauge dans le réservoir en
veillant à ne pas la visser.
(USA et CDN)
ATTENTION:
Ne pas ajouter d’additifs chimiques.
L’huile moteur lubrifie également
l’embrayage et des additifs risquent
de provoquer le patinage de
l’embrayage.
Empêcher toute pénétration de
crasses ou d’objets dans le carter.
Huile recommandée:
Min. 5 °C (40 °F) È:
Yamalube 4 (20W40) ou
SAE 20W-40 de type SG
(Sans additifs anti-
friction)
Max. 15 °C (60 °F) É:
Yamalube 4 (10W-30) ou
SAE 10W-30 de type SG
(Sans additifs anti-
friction)
et/ou
Yamalube 4-R (15W-50)
(Sans additifs anti-
friction)
ENGINE
MOTEUR
Page 232 of 860

3 - 41
INSP
ADJ
(Except for USA and CDN)
CAUTION:
Do not add any chemical addi-
tives or use oils with a grade of
CD a or higher.
Do not use oils labeled
“ENERGY CONSERVING II” b
or higher. Engine oil also lubri-
cates the clutch and additives
could cause clutch slippage.
Do not allow foreign materials to
enter the crankcase.
5. Install:
Oil tank cap
6. Start the engine and let it warm
up for several minutes.
7. Turn off the engine and inspect
the oil level once again.
NOTE:Wait a few minutes until the oil set-
tles before inspecting the oil level.
Recommended oil:
Refer to the following
chart for selection of
oils which are suited
to the atmospheric
temperatures.
Recommended engine
oil classification:
API STANDARD:
API “SG” or higher
grade
(Designed primarily
for motorcycles)
-20
-4-10
140
3010
5020
6830
8640 50
104
122˚CTemp.
˚F
10W-3010W-40
20W-4020W-50
15W-40
a
b
ENGINE OIL REPLACEMENT
1. Start the engine and warm it up
for several minutes, and then
turn off the engine and wait for
five minute.
2. Place the machine on a level
place and hold it on upright posi-
tion by placing the suitable stand
under the engine.
3. Place a suitable container under
the engine.(Excepté USA et CDN)
ATTENTION:
Ne pas ajouter d’additifs chimiques
et ne pas utiliser d’huiles de qualités
CD a ou supérieures.
Ne pas utiliser une huile portant la
désignation “ENERGY CONSER-
VING II” b ou la même désigna-
tion avec un numéro plus élevé.
L’huile de moteur lubrifie
l’embrayage et ces additifs pour-
raient le faire patiner.
Ne pas laisser entrer des corps
étrangers dans le carter.
5. Monter:
Bouchon du réservoir d’huile
6. Mettre le moteur en marche et le
laisser chauffer pendant quelques
minutes.
7. Couper le moteur et vérifier une
nouvelle fois le niveau d’huile.
N.B.:
Attendre quelques minutes que l’huile se
soit stabilisée avant de vérifier son
niveau.
Huile recommandée:
Se référer au tableau
suivant pour choisir
l’huile qui convient à la
température extérieure.
Type d’huile de moteur
recommandé:
STANDARD API:
Qualité API “SG” ou
supérieure
(Huile pour
motocyclettes)
CHANGEMENT DE L’HUILE DE
MOTEUR
1. Mettre le moteur en marche, le faire
chauffer pendant quelques minutes,
puis le couper et attendre cinq
minutes.
2. Placer le véhicule sur un plan hori-
zontal et le dresser à la verticale en
plaçant un support adéquat sous le
moteur.
3. Déposer un récipient adéquat sous
le moteur.
ENGINE
MOTEUR
Page 236 of 860

3 - 45
INSP
ADJ
8. Install:
Copper washer
1
Oil strainer (frame)
2
Oil hose
3
Bolt (oil hose)
4
Oil hose clamp
5
Lower engine bracket
9. Install:
Copper washer
Oil filter element drain bolt
Crankcase oil drain bolt
Frame oil drain bolt
10. Fill:
Engine oil
11. Check:
Oil leakage
12. Install:
Oil tank cap
13. Check:
Engine oil level
T R..70 Nm (7.0 m · kg, 50 ft · lb)
T R..10 Nm (1.0 m · kg, 7.2 ft · lb)
T R..2 Nm (0.2 m · kg, 1.4 ft · lb)
T R..10 Nm (1.0 m · kg, 7.2 ft · lb)
T R..10 Nm (1.0 m · kg, 7.2 ft · lb)
T R..20 Nm (2.0 m · kg, 14 ft · lb)
T R..23 Nm (2.3 m · kg, 17 ft · lb)
Oil quantity:
Total amount:
1.4 L
(1.23 Imp qt,
1.48 US qt)
Periodic oil change:
1.2 L
(1.06 Imp qt,
1.27 US qt)
With oil filter
replacement:
1.3 L
(1.14 Imp qt,
1.37 US qt)
New
New
8. Monter:
Rondelle en cuivre 1
Crépine d’huile (cadre) 2
Durit d’huile 3
Boulon (durit d’huile) 4
Bride de durit d’huile 5
Support inférieur du moteur
9. Monter:
Rondelle en cuivre
Boulon de vidange d’élément de
filtre à huile
Boulon de vidange d’huile de car-
ter
Boulon de vidange d’huile de
cadre
10. Remplir:
Huile moteur
11. Contrôler:
Fuites d’huile
12. Monter:
Bouchon du réservoir d’huile
13. Contrôler:
Niveau de l’huile moteur
T R..70 Nm (7,0 m · kg, 50 ft · lb)
T R..10 Nm (1,0 m · kg, 7,2 ft · lb)
T R..2 Nm (0,2 m · kg, 1,4 ft · lb)
T R..10 Nm (1,0 m · kg, 7,2 ft · lb)
T R..10 Nm (1,0 m · kg, 7,2 ft · lb)
T R..20 Nm (2,0 m · kg, 14 ft · lb)
T R..23 Nm (2,3 m · kg, 17 ft · lb)
Quantité d’huile:
Quantité totale:
1,4 L
(1,23 Imp qt,
1,48 US qt)
Vidange périodique:
1,2 L
(1,06 Imp qt,
1,27 US qt)
Avec changement du
filtre à huile:
1,3 L
(1,14 Imp qt,
1,37 US qt)
New
New
ENGINE
MOTEUR
Page 302 of 860
3 - 111
INSP
ADJ
BATTERY INSPECTION AND
CHARGING
WARNING
Batteries generate explosive
hydrogen gas and contain electro-
lyte which is made of poisonous
and highly caustic sulfuric acid.
Therefore, always follow these
preventive measures:
Wear protective eye gear when
handling or working near batter-
ies.
Charge batteries in a well-venti-
lated area.
Keep batteries away from fire,
sparks or open flames (e.g.,
welding equipment, lighted ciga-
rettes).
DO NOT SMOKE when charging
or handling batteries.
KEEP BATTERIES AND ELEC-
TROLYTE OUT OF REACH OF
CHILDREN.
Avoid bodily contact with elec-
trolyte as it can cause severe
burns or permanent eye injury.
FIRST AID IN CASE OF BODILY
CONTACT:
EXTERNAL
Skin — Wash with water.
Eyes — Flush with water for 15
minutes and get immediate med-
ical attention.
INTERNAL
Drink large quantities of water
or milk followed with milk of
magnesia, beaten egg or vegeta-
ble oil. Get immediate medical
attention.
CAUTION:
Charging time, charging amper-
age and charging voltage for an
MF battery are different from
those of conventional batteries.
The MF battery should be charged
as explained in the charging
method illustrations. If the battery
is overcharged, the electrolyte
level will drop considerably.
Therefore, take special care when
charging the battery.
NOTE:Since MF batteries are sealed, it is
not possible to check the charge
state of the battery by measuring the
specific gravity of the electrolyte.
Therefore, the charge of the battery
has to be checked by measuring the
voltage at the battery terminals. CONTROLE ET RECHARGE DE
LA BATTERIE
AVERTISSEMENT
Les batteries produisent de l’hydro-
gène, qui est un gaz explosif, et elles
contiennent de l’électrolyte, qui est
composé d’acide sulfurique, un pro-
duit toxique et corrosif.
Veiller à toujours prendre les précau-
tions suivantes:
Toujours porter des lunettes de pro-
tection lorsque l’on travaille à
proximité de batteries.
Charger les batteries dans un
endroit bien aéré.
Tenir les batteries à l’écart des
sources de flammes et d’étincelles
(machines à souder, cigarettes, etc.).
NE PAS FUMER en chargeant ou
manipulant des batteries.
TENIR BATTERIES ET ÉLEC-
TROLYTE HORS DE LA POR-
TÉE DES ENFANTS.
Éviter tout contact avec l’électro-
lyte, car il peut gravement brûler la
peau et les yeux.
PREMIERS SOINS EN CAS DE
CONTACT DIRECT:
EXTERNE
Peau — Rincer à l’eau.
Yeux — Rincer à l’eau pendant 15
minutes et consulter un médecin
sans tarder.
INTERNE
Avaler une grande quantité d’eau
ou de lait. Continuer avec du lait de
magnésie, des œufs battus ou de
l’huile végétale. Consulter un méde-
cin sans tarder.
ATTENTION:
La durée, l’intensité et la tension de
charge d’une batterie MF et d’une
batterie classique sont différentes. La
batterie MF doit être rechargée con-
formément à la méthode de charge
illustrée dans ce manuel. Si l’on sur-
charge la batterie, son niveau d’élec-
trolyte diminuera considérablement.
Par conséquent, toujours recharger la
batterie avec beaucoup d’attention.
N.B.:
Comme une batterie MF est scellée, il est
impossible de vérifier son état de charge
en mesurant la densité de l’électrolyte.
Par conséquent, vérifier la charge de la
batterie en mesurant la tension aux cos-
ses de la batterie.
ELECTRICAL
PARTIE ELECTRIQUE
Page 468 of 860
4 - 143
ENGOIL FILTER ELEMENT, WATER PUMP AND RIGHT CRANKCASE COVER
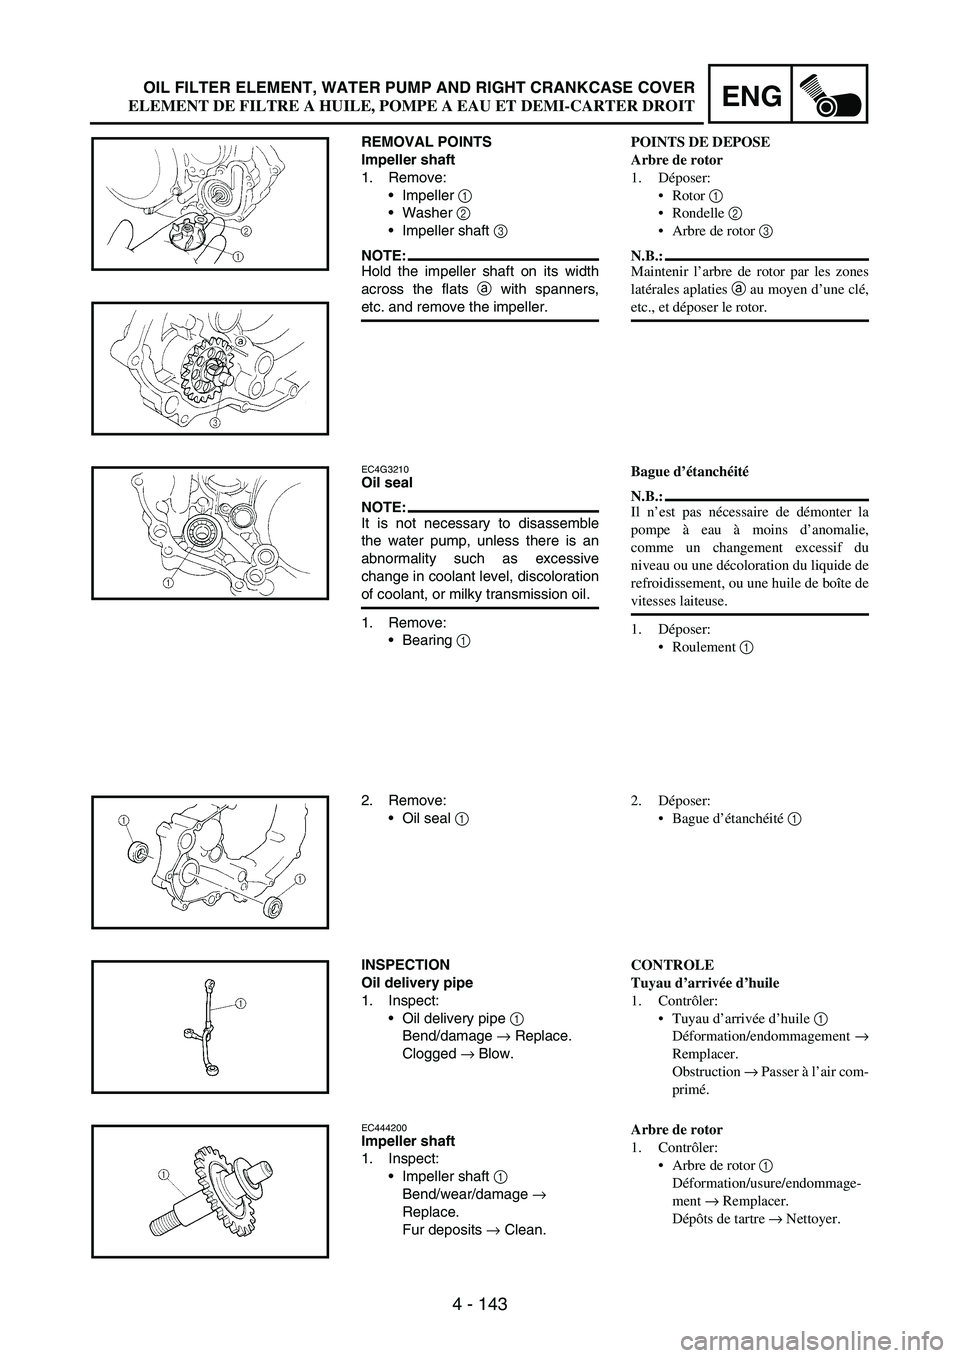
REMOVAL POINTS
Impeller shaft
1. Remove:
Impeller
1
Washer
2
Impeller shaft
3
NOTE:Hold the impeller shaft on its width
across the flats
a with spanners,
etc. and remove the impeller.
EC4G3210Oil seal
NOTE:It is not necessary to disassemble
the water pump, unless there is an
abnormality such as excessive
change in coolant level, discoloration
of coolant, or milky transmission oil.
1. Remove:
Bearing
1
2. Remove:
Oil seal
1
INSPECTION
Oil delivery pipe
1. Inspect:
Oil delivery pipe
1
Bend/damage
→ Replace.
Clogged
→ Blow.
EC444200Impeller shaft
1. Inspect:
Impeller shaft
1
Bend/wear/damage
→
Replace.
Fur deposits
→ Clean.
POINTS DE DEPOSE
Arbre de rotor
1. Déposer:
Rotor 1
Rondelle 2
Arbre de rotor 3
N.B.:
Maintenir l’arbre de rotor par les zones
latérales aplaties a au moyen d’une clé,
etc., et déposer le rotor.
Bague d’étanchéité
N.B.:
Il n’est pas nécessaire de démonter la
pompe à eau à moins d’anomalie,
comme un changement excessif du
niveau ou une décoloration du liquide de
refroidissement, ou une huile de boîte de
vitesses laiteuse.
1. Déposer:
Roulement 1
2. Déposer:
Bague d’étanchéité 1
CONTROLE
Tuyau d’arrivée d’huile
1. Contrôler:
Tuyau d’arrivée d’huile 1
Déformation/endommagement →
Remplacer.
Obstruction → Passer à l’air com-
primé.
Arbre de rotor
1. Contrôler:
Arbre de rotor 1
Déformation/usure/endommage-
ment → Remplacer.
Dépôts de tartre → Nettoyer.
ELEMENT DE FILTRE A HUILE, POMPE A EAU ET DEMI-CARTER DROIT
Page 634 of 860

5 - 57
CHASFRONT BRAKE AND REAR BRAKE
Brake fluid
1. Fill:
Brake fluid
Until the fluid level reaches
“LOWER” level line
a.
WARNING
Use only the designated quality
brake fluid:
otherwise, the rubber seals may
deteriorate, causing leakage and
poor brake performance.
Refill with the same type of
brake fluid;
mixing fluids may result in a
harmful chemical reaction and
lead to poor performance.
Be careful that water does not
enter the master cylinder when
refilling. Water will significantly
lower the boiling point of the
fluid and may result in vapor
lock.
CAUTION:
Brake fluid may erode painted sur-
faces or plastic parts. Always
clean up spilled fluid immediately.
È
Front
É
Rear
Recommended brake
fluid:
DOT #4
È
É
2. Air bleed:
Brake system
Refer to “BRAKE SYSTEM
AIR BLEEDING” section in the
CHAPTER 3.
3. Inspect:
Brake fluid level
Fluid at lower level
→ Fill up.
Refer to “BRAKE FLUID
LEVEL INSPECTION” section
in the CHAPTER 3.Liquide de frein
1. Remplir:
Liquide de frein
Jusqu’à ce que le liquide atteigne
le niveau “LOWER” a.
AVERTISSEMENT
La qualité du liquide de frein utilisé
doit être conforme aux normes spé-
cifiées, sinon les joints en caout-
chouc risquent de se détériorer, ce
qui causera des fuites et un mauvais
fonctionnement du frein.
Toujours utiliser la même marque
de liquide de frein. Le mélange de
liquides de marques différentes ris-
que de provoquer une réaction chi-
mique nuisible au fonctionnement
du frein.
Lorsqu’on ajoute du liquide, faire
attention de ne pas laisser pénétrer
de l’eau dans le maître-cylindre.
L’eau risque d’abaisser fortement le
point d’ébullition et de provoquer
un bouchon de vapeur.
ATTENTION:
Le liquide de frein attaque les surfaces
peintes et le plastique. Si on en ren-
verse, il faut l’essuyer immédiatement.
È
Avant
É
Arrière
Liquide de frein
recommandé:
DOT n°4
2. Purger l’air:
Circuit de freinage
Se reporter à la section “PURGE
DE L’AIR DU SYSTEME DE
FREINAGE” du CHAPITRE 3.
3. Monter:
Niveau de liquide de frein
Niveau du liquide bas → Remet-
tre à niveau.
Se reporter à la section “CON-
TROLE DU NIVEAU DU
LIQUIDE DE FREIN” du CHA-
PITRE 3.
FREIN AVANT ET FREIN ARRIERE