jump YAMAHA WR 250F 2004 Manuale duso (in Italian)
[x] Cancel search | Manufacturer: YAMAHA, Model Year: 2004, Model line: WR 250F, Model: YAMAHA WR 250F 2004Pages: 864, PDF Dimensioni: 22.07 MB
Page 766 of 864
6 - 29
–+ELECELECTRIC STARTING SYSTEM
EC624000COUPLERS AND LEADS
CONNECTION INSPECTION
1. Check:
Couplers and leads connec-
tion
Rust/dust/looseness/short-cir-
cuit
→ Repair or replace.
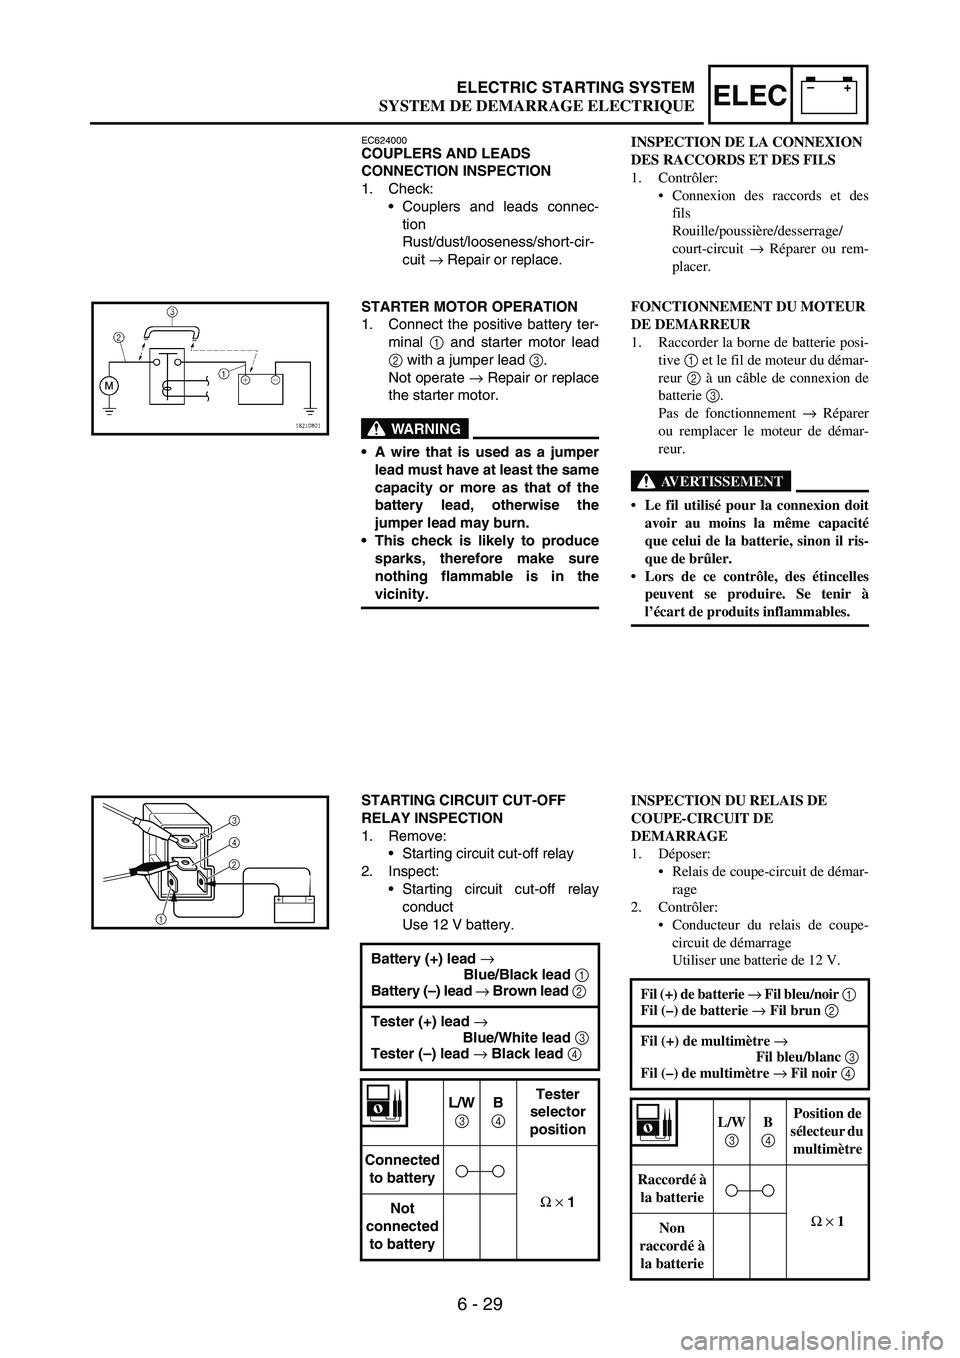
STARTER MOTOR OPERATION
1. Connect the positive battery ter-
minal
1 and starter motor lead
2 with a jumper lead
3.
Not operate
→ Repair or replace
the starter motor.
WARNING
A wire that is used as a jumper
lead must have at least the same
capacity or more as that of the
battery lead, otherwise the
jumper lead may burn.
This check is likely to produce
sparks, therefore make sure
nothing flammable is in the
vicinity.
STARTING CIRCUIT CUT-OFF
RELAY INSPECTION
1. Remove:
Starting circuit cut-off relay
2. Inspect:
Starting circuit cut-off relay
conduct
Use 12 V battery.
Battery (+) lead →
Blue/Black lead 1
Battery (–) lead →
Brown lead 2
Tester (+) lead →
Blue/White lead 3
Tester (–) lead →
Black lead 4
L/W
3
B
4
Tester
selector
position
Connected
to battery
Ω
×
1
Not
connected
to battery
2 4
3
1
INSPECTION DE LA CONNEXION
DES RACCORDS ET DES FILS
1. Contrôler:
Connexion des raccords et des
fils
Rouille/poussière/desserrage/
court-circuit → Réparer ou rem-
placer.
FONCTIONNEMENT DU MOTEUR
DE DEMARREUR
1. Raccorder la borne de batterie posi-
tive 1 et le fil de moteur du démar-
reur 2 à un câble de connexion de
batterie 3.
Pas de fonctionnement → Réparer
ou remplacer le moteur de démar-
reur.
AVERTISSEMENT
Le fil utilisé pour la connexion doit
avoir au moins la même capacité
que celui de la batterie, sinon il ris-
que de brûler.
Lors de ce contrôle, des étincelles
peuvent se produire. Se tenir à
l’écart de produits inflammables.
INSPECTION DU RELAIS DE
COUPE-CIRCUIT DE
DEMARRAGE
1. Déposer:
Relais de coupe-circuit de démar-
rage
2. Contrôler:
Conducteur du relais de coupe-
circuit de démarrage
Utiliser une batterie de 12 V.
Fil (+) de batterie → Fil bleu/noir 1
Fil (–) de batterie → Fil brun 2
Fil (+) de multimètre →
Fil bleu/blanc 3
Fil (–) de multimètre → Fil noir 4
L/W
3 B
4 Position de
sélecteur du
multimètre
Raccordé à
la batterie
Ω × 1
Non
raccordé à
la batterie
SYSTEM DE DEMARRAGE ELECTRIQUE
Page 852 of 864
7 - 41
TUNSETTING
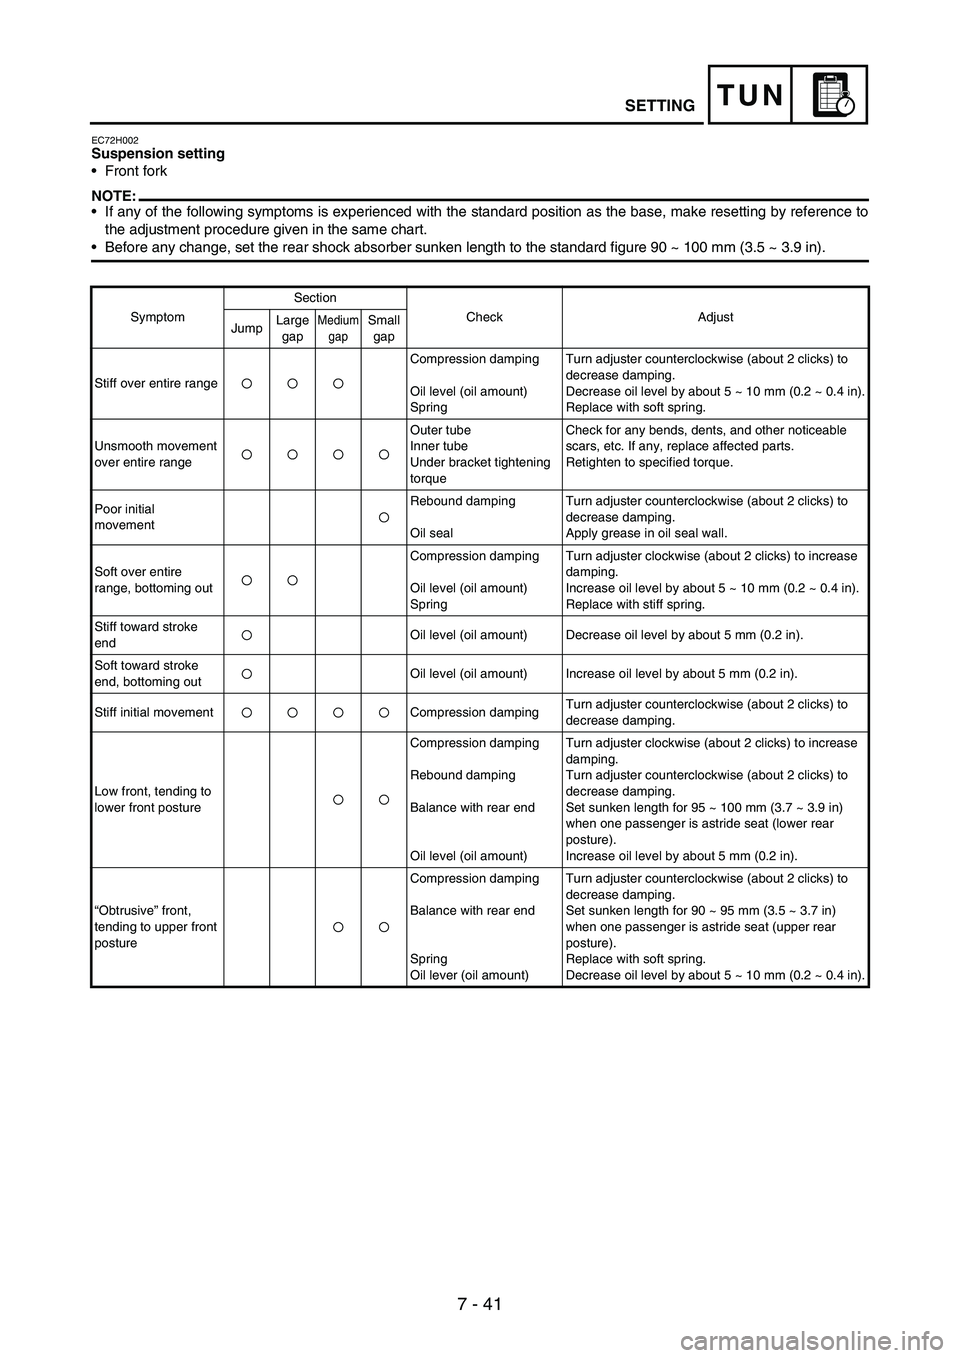
EC72H002Suspension setting
Front fork
NOTE:If any of the following symptoms is experienced with the standard position as the base, make resetting by reference to
the adjustment procedure given in the same chart.
Before any change, set the rear shock absorber sunken length to the standard figure 90 ~ 100 mm (3.5 ~ 3.9 in).
SymptomSection
Check Adjust
JumpLarge
gapMedium
gapSmall
gap
Stiff over entire rangeCompression damping
Oil level (oil amount)
SpringTurn adjuster counterclockwise (about 2 clicks) to
decrease damping.
Decrease oil level by about 5 ~ 10 mm (0.2 ~ 0.4 in).
Replace with soft spring.
Unsmooth movement
over entire rangeOuter tube
Inner tube
Under bracket tightening
torqueCheck for any bends, dents, and other noticeable
scars, etc. If any, replace affected parts.
Retighten to specified torque.
Poor initial
movementRebound damping
Oil sealTurn adjuster counterclockwise (about 2 clicks) to
decrease damping.
Apply grease in oil seal wall.
Soft over entire
range, bottoming outCompression damping
Oil level (oil amount)
SpringTurn adjuster clockwise (about 2 clicks) to increase
damping.
Increase oil level by about 5 ~ 10 mm (0.2 ~ 0.4 in).
Replace with stiff spring.
Stiff toward stroke
endOil level (oil amount) Decrease oil level by about 5 mm (0.2 in).
Soft toward stroke
end, bottoming outOil level (oil amount) Increase oil level by about 5 mm (0.2 in).
Stiff initial movement Compression dampingTurn adjuster counterclockwise (about 2 clicks) to
decrease damping.
Low front, tending to
lower front postureCompression damping
Rebound damping
Balance with rear end
Oil level (oil amount)Turn adjuster clockwise (about 2 clicks) to increase
damping.
Turn adjuster counterclockwise (about 2 clicks) to
decrease damping.
Set sunken length for 95 ~ 100 mm (3.7 ~ 3.9 in)
when one passenger is astride seat (lower rear
posture).
Increase oil level by about 5 mm (0.2 in).
“Obtrusive” front,
tending to upper front
postureCompression damping
Balance with rear end
Spring
Oil lever (oil amount)Turn adjuster counterclockwise (about 2 clicks) to
decrease damping.
Set sunken length for 90 ~ 95 mm (3.5 ~ 3.7 in)
when one passenger is astride seat (upper rear
posture).
Replace with soft spring.
Decrease oil level by about 5 ~ 10 mm (0.2 ~ 0.4 in).
Page 853 of 864
7 - 42
TUNSETTING
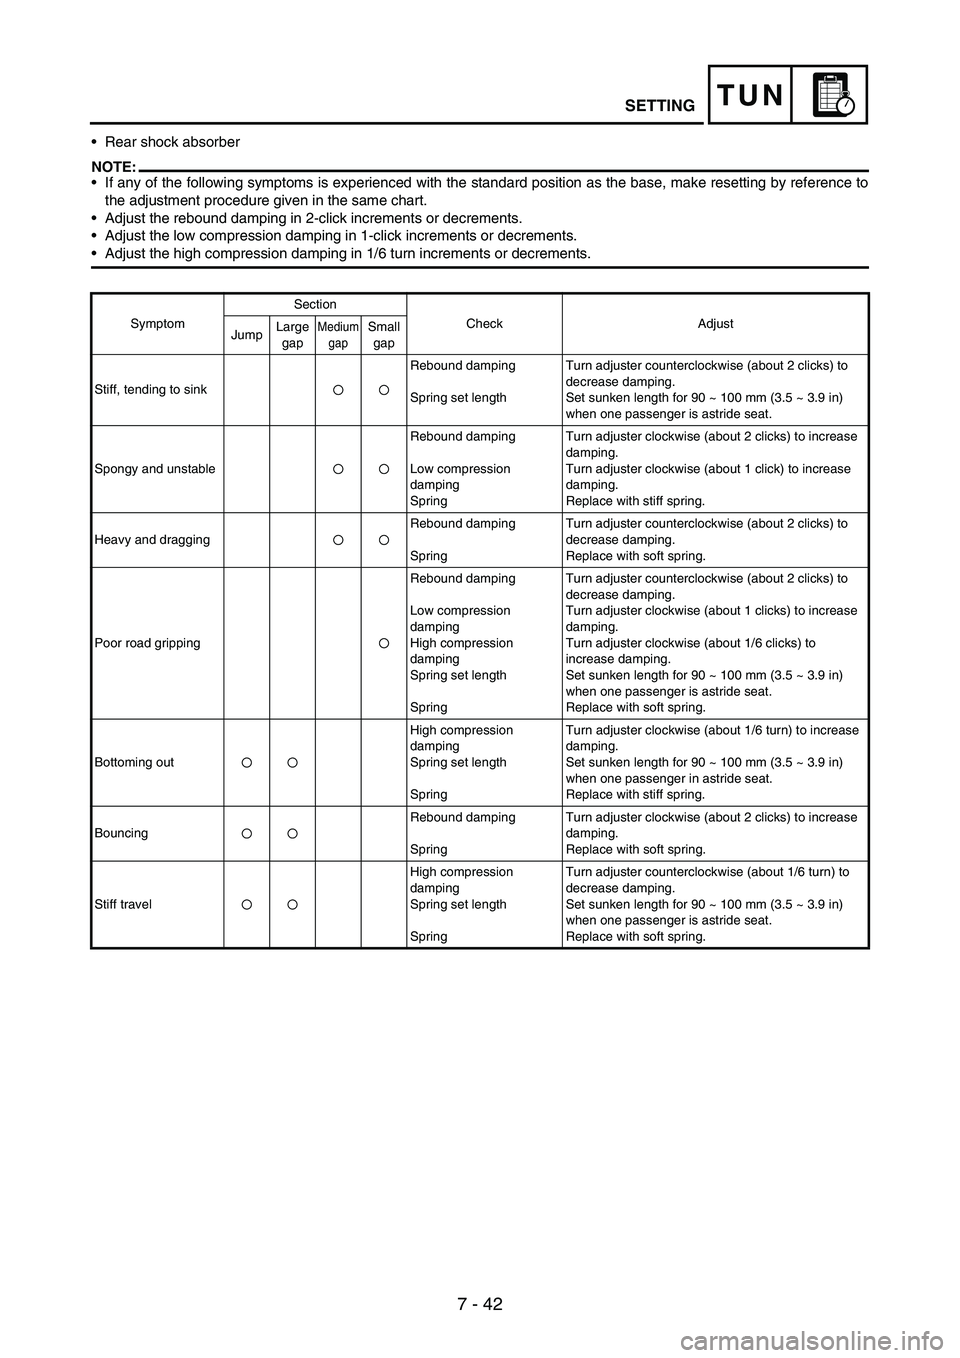
Rear shock absorber
NOTE:If any of the following symptoms is experienced with the standard position as the base, make resetting by reference to
the adjustment procedure given in the same chart.
Adjust the rebound damping in 2-click increments or decrements.
Adjust the low compression damping in 1-click increments or decrements.
Adjust the high compression damping in 1/6 turn increments or decrements.
SymptomSection
Check Adjust
JumpLarge
gapMedium
gapSmall
gap
Stiff, tending to sinkRebound damping
Spring set lengthTurn adjuster counterclockwise (about 2 clicks) to
decrease damping.
Set sunken length for 90 ~ 100 mm (3.5 ~ 3.9 in)
when one passenger is astride seat.
Spongy and unstableRebound damping
Low compression
damping
SpringTurn adjuster clockwise (about 2 clicks) to increase
damping.
Turn adjuster clockwise (about 1 click) to increase
damping.
Replace with stiff spring.
Heavy and draggingRebound damping
SpringTurn adjuster counterclockwise (about 2 clicks) to
decrease damping.
Replace with soft spring.
Poor road grippingRebound damping
Low compression
damping
High compression
damping
Spring set length
SpringTurn adjuster counterclockwise (about 2 clicks) to
decrease damping.
Turn adjuster clockwise (about 1 clicks) to increase
damping.
Turn adjuster clockwise (about 1/6 clicks) to
increase damping.
Set sunken length for 90 ~ 100 mm (3.5 ~ 3.9 in)
when one passenger is astride seat.
Replace with soft spring.
Bottoming outHigh compression
damping
Spring set length
SpringTurn adjuster clockwise (about 1/6 turn) to increase
damping.
Set sunken length for 90 ~ 100 mm (3.5 ~ 3.9 in)
when one passenger in astride seat.
Replace with stiff spring.
BouncingRebound damping
SpringTurn adjuster clockwise (about 2 clicks) to increase
damping.
Replace with soft spring.
Stiff travelHigh compression
damping
Spring set length
SpringTurn adjuster counterclockwise (about 1/6 turn) to
decrease damping.
Set sunken length for 90 ~ 100 mm (3.5 ~ 3.9 in)
when one passenger is astride seat.
Replace with soft spring.