warning YAMAHA WR 250F 2004 Notices Demploi (in French)
[x] Cancel search | Manufacturer: YAMAHA, Model Year: 2004, Model line: WR 250F, Model: YAMAHA WR 250F 2004Pages: 864, PDF Size: 22.07 MB
Page 320 of 864
3 - 129
INSP
ADJ
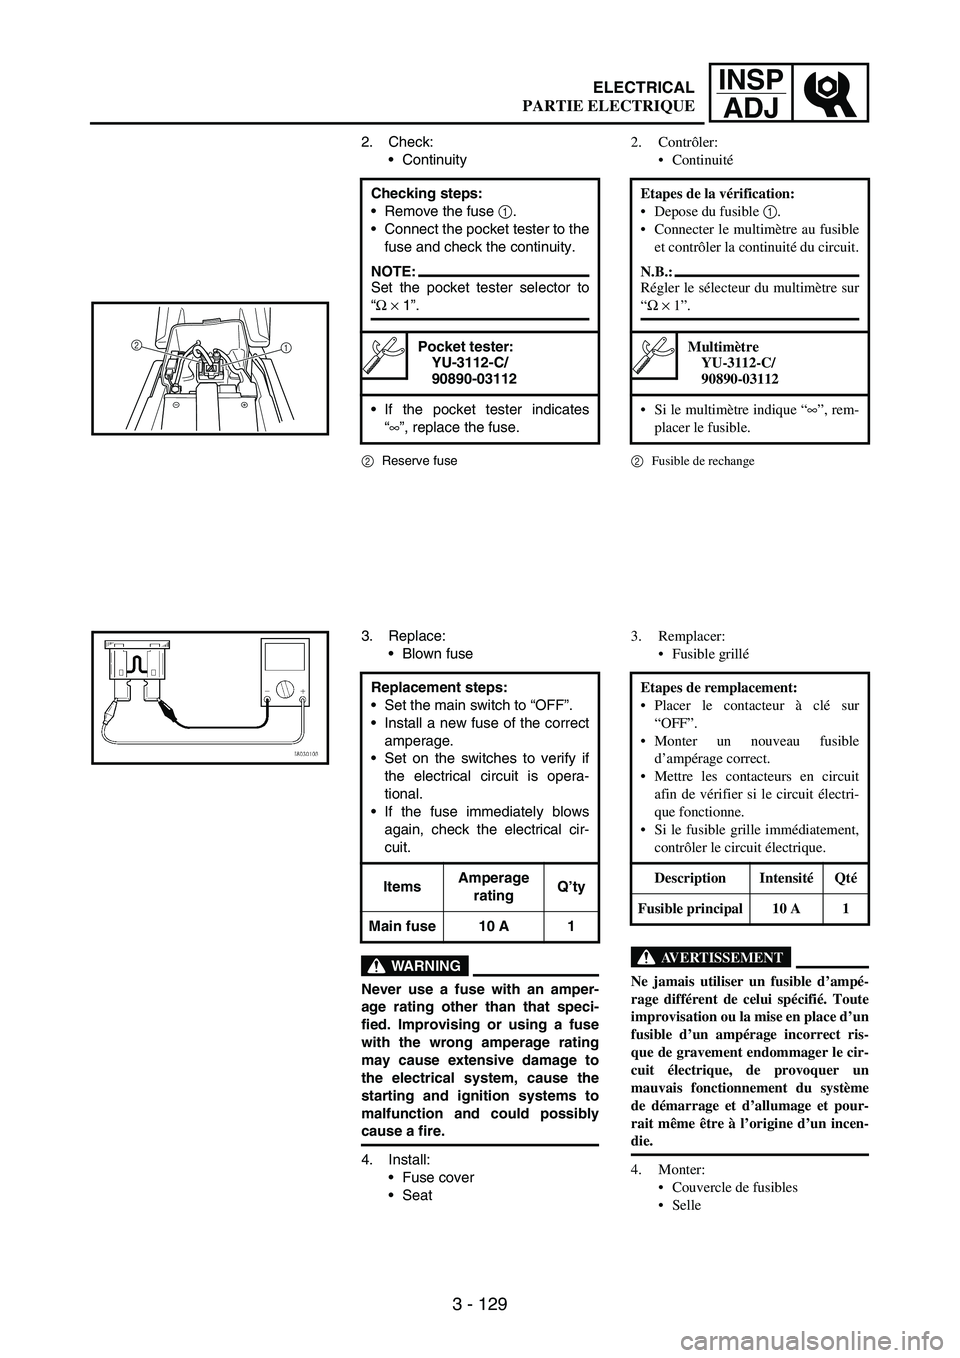
2. Check:
Continuity
2Reserve fuse
Checking steps:
Remove the fuse
1.
Connect the pocket tester to the
fuse and check the continuity.
NOTE:Set the pocket tester selector to
“
Ω
× 1”.
Pocket tester:
YU-3112-C/
90890-03112
If the pocket tester indicates
“
∞”, replace the fuse. 2
1
3. Replace:
Blown fuse
WARNING
Never use a fuse with an amper-
age rating other than that speci-
fied. Improvising or using a fuse
with the wrong amperage rating
may cause extensive damage to
the electrical system, cause the
starting and ignition systems to
malfunction and could possibly
cause a fire.
4. Install:
Fuse cover
Seat Replacement steps:
Set the main switch to “OFF”.
Install a new fuse of the correct
amperage.
Set on the switches to verify if
the electrical circuit is opera-
tional.
If the fuse immediately blows
again, check the electrical cir-
cuit.
ItemsAmperage
ratingQ’ty
Main fuse 10 A 1
2. Contrôler:
Continuité
2
Fusible de rechange
Etapes de la vérification:
Depose du fusible 1
.
Connecter le multimètre au fusible
et contrôler la continuité du circuit.
N.B.:
Régler le sélecteur du multimètre sur
“Ω × 1”.
Multimètre
YU-3112-C/
90890-03112
Si le multimètre indique “∞”, rem-
placer le fusible.
3. Remplacer:
Fusible grillé
AVERTISSEMENT
Ne jamais utiliser un fusible d’ampé-
rage différent de celui spécifié. Toute
improvisation ou la mise en place d’un
fusible d’un ampérage incorrect ris-
que de gravement endommager le cir-
cuit électrique, de provoquer un
mauvais fonctionnement du système
de démarrage et d’allumage et pour-
rait même être à l’origine d’un incen-
die.
4. Monter:
Couvercle de fusibles
Selle Etapes de remplacement:
Placer le contacteur à clé sur
“OFF”.
Monter un nouveau fusible
d’ampérage correct.
Mettre les contacteurs en circuit
afin de vérifier si le circuit électri-
que fonctionne.
Si le fusible grille immédiatement,
contrôler le circuit électrique.
Description IntensitéQté
Fusible principal 10 A 1
ELECTRICAL
PARTIE ELECTRIQUE
Page 322 of 864
3 - 131
INSP
ADJ
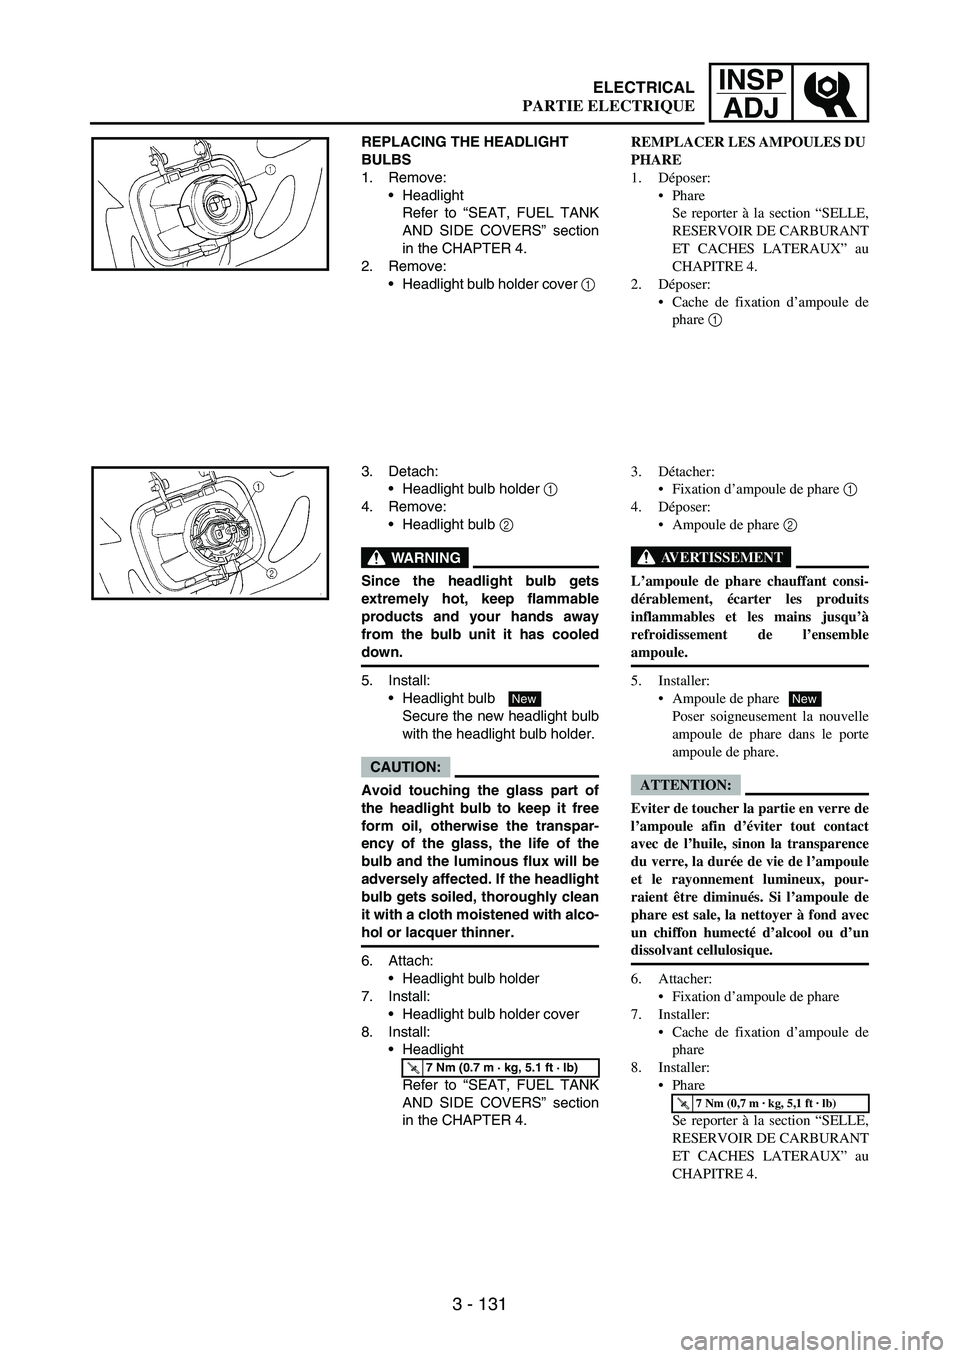
REPLACING THE HEADLIGHT
BULBS
1. Remove:
Headlight
Refer to “SEAT, FUEL TANK
AND SIDE COVERS” section
in the CHAPTER 4.
2. Remove:
Headlight bulb holder cover
1
3. Detach:
Headlight bulb holder
1
4. Remove:
Headlight bulb
2
WARNING
Since the headlight bulb gets
extremely hot, keep flammable
products and your hands away
from the bulb unit it has cooled
down.
5. Install:
Headlight bulb
Secure the new headlight bulb
with the headlight bulb holder.
CAUTION:
Avoid touching the glass part of
the headlight bulb to keep it free
form oil, otherwise the transpar-
ency of the glass, the life of the
bulb and the luminous flux will be
adversely affected. If the headlight
bulb gets soiled, thoroughly clean
it with a cloth moistened with alco-
hol or lacquer thinner.
6. Attach:
Headlight bulb holder
7. Install:
Headlight bulb holder cover
8. Install:
Headlight
Refer to “SEAT, FUEL TANK
AND SIDE COVERS” section
in the CHAPTER 4.
T R..7 Nm (0.7 m · kg, 5.1 ft · lb)
New
REMPLACER LES AMPOULES DU
PHARE
1. Déposer:
Phare
Se reporter à la section “SELLE,
RESERVOIR DE CARBURANT
ET CACHES LATERAUX” au
CHAPITRE 4.
2. Déposer:
Cache de fixation d’ampoule de
phare 1
3. Détacher:
Fixation d’ampoule de phare 1
4. Déposer:
Ampoule de phare 2
AVERTISSEMENT
L’ampoule de phare chauffant consi-
dérablement, écarter les produits
inflammables et les mains jusqu’à
refroidissement de l’ensemble
ampoule.
5. Installer:
Ampoule de phare
Poser soigneusement la nouvelle
ampoule de phare dans le porte
ampoule de phare.
ATTENTION:
Eviter de toucher la partie en verre de
l’ampoule afin d’éviter tout contact
avec de l’huile, sinon la transparence
du verre, la durée de vie de l’ampoule
et le rayonnement lumineux, pour-
raient être diminués. Si l’ampoule de
phare est sale, la nettoyer à fond avec
un chiffon humecté d’alcool ou d’un
dissolvant cellulosique.
6. Attacher:
Fixation d’ampoule de phare
7. Installer:
Cache de fixation d’ampoule de
phare
8. Installer:
Phare
Se reporter à la section “SELLE,
RESERVOIR DE CARBURANT
ET CACHES LATERAUX” au
CHAPITRE 4.
T R..7 Nm (0,7 m · kg, 5,1 ft · lb)
New
ELECTRICAL
PARTIE ELECTRIQUE
Page 342 of 864
4 - 17
ENGRADIATOR
EC456000HANDLING NOTE
WARNING
Do not remove the radiator cap
when the engine and radiator are
hot. Scalding hot fluid and steam
may be blown out under pressure,
which could cause serious injury.
When the engine has cooled, open
the radiator cap by the following
procedure:
Place a thick rag, like a towel, over
the radiator cap, slowly rotate the
cap counterclockwise to the
detent. This procedure allows any
residual pressure to escape. When
the hissing sound has stopped,
press down on the cap while turn-
ing counterclockwise and remove
it.
EC454000INSPECTIONEC444100Radiator
1. Inspect:
Radiator core
1
Obstruction
→ Blow out with
compressed air through rear of
the radiator.
Bent fin
→ Repair/replace.
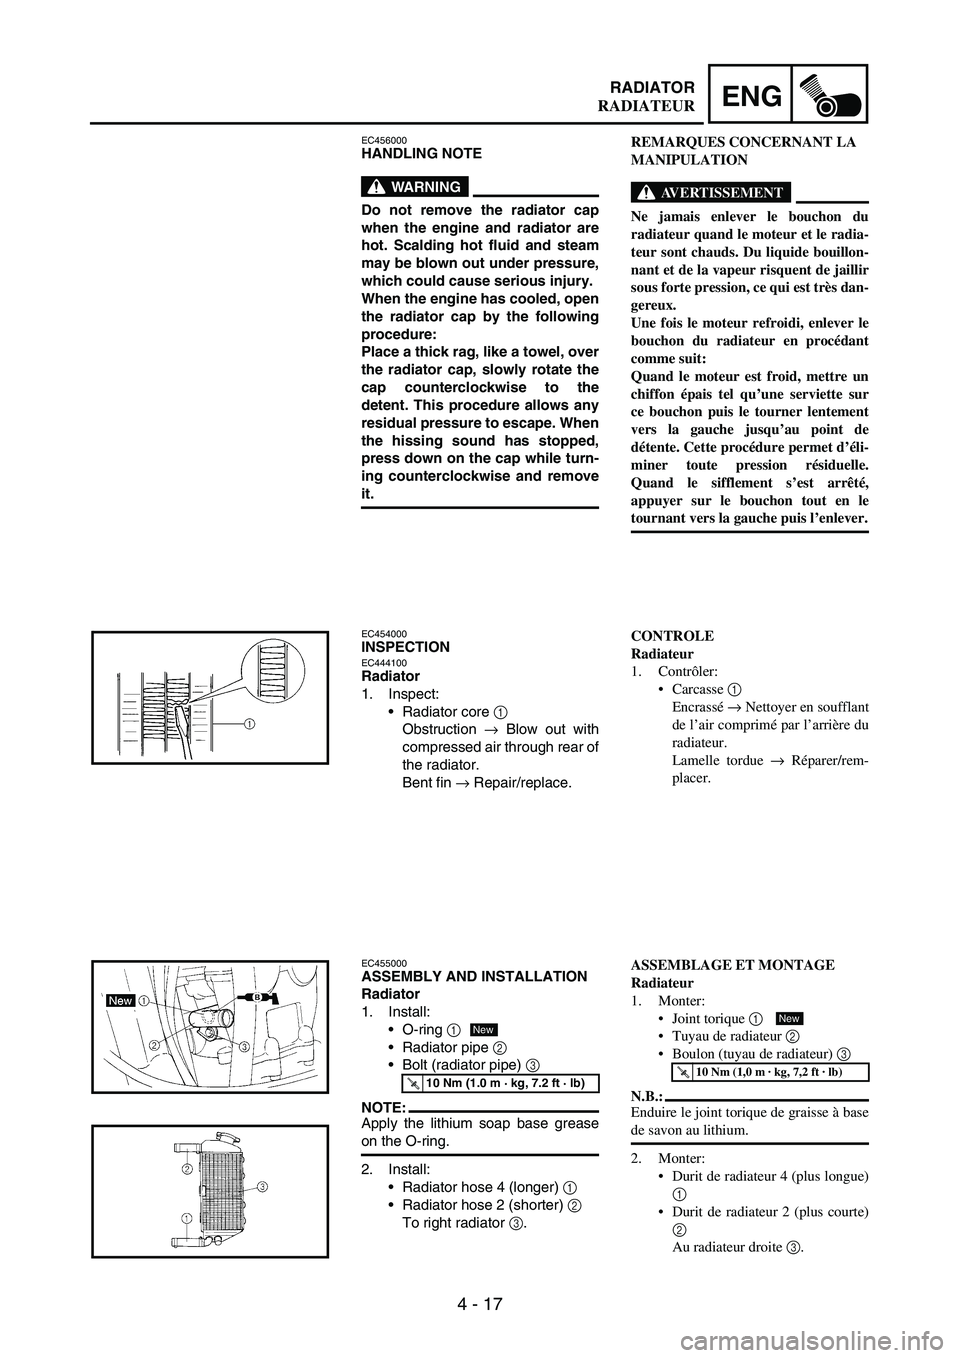
EC455000ASSEMBLY AND INSTALLATION
Radiator
1. Install:
O-ring
1
Radiator pipe
2
Bolt (radiator pipe)
3
NOTE:Apply the lithium soap base grease
on the O-ring.
2. Install:
Radiator hose 4 (longer)
1
Radiator hose 2 (shorter)
2
To right radiator
3.
T R..10 Nm (1.0 m · kg, 7.2 ft · lb)
New
REMARQUES CONCERNANT LA
MANIPULATION
AVERTISSEMENT
Ne jamais enlever le bouchon du
radiateur quand le moteur et le radia-
teur sont chauds. Du liquide bouillon-
nant et de la vapeur risquent de jaillir
sous forte pression, ce qui est très dan-
gereux.
Une fois le moteur refroidi, enlever le
bouchon du radiateur en procédant
comme suit:
Quand le moteur est froid, mettre un
chiffon épais tel qu’une serviette sur
ce bouchon puis le tourner lentement
vers la gauche jusqu’au point de
détente. Cette procédure permet d’éli-
miner toute pression résiduelle.
Quand le sifflement s’est arrêté,
appuyer sur le bouchon tout en le
tournant vers la gauche puis l’enlever.
CONTROLE
Radiateur
1. Contrôler:
Carcasse 1
Encrassé → Nettoyer en soufflant
de l’air comprimé par l’arrière du
radiateur.
Lamelle tordue → Réparer/rem-
placer.
ASSEMBLAGE ET MONTAGE
Radiateur
1. Monter:
Joint torique 1
Tuyau de radiateur 2
Boulon (tuyau de radiateur) 3
N.B.:
Enduire le joint torique de graisse à base
de savon au lithium.
2. Monter:
Durit de radiateur 4 (plus longue)
1
Durit de radiateur 2 (plus courte)
2
Au radiateur droite 3.
T R..10 Nm (1,0 m · kg, 7,2 ft · lb)
New
RADIATEUR
Page 532 of 864
4 - 207
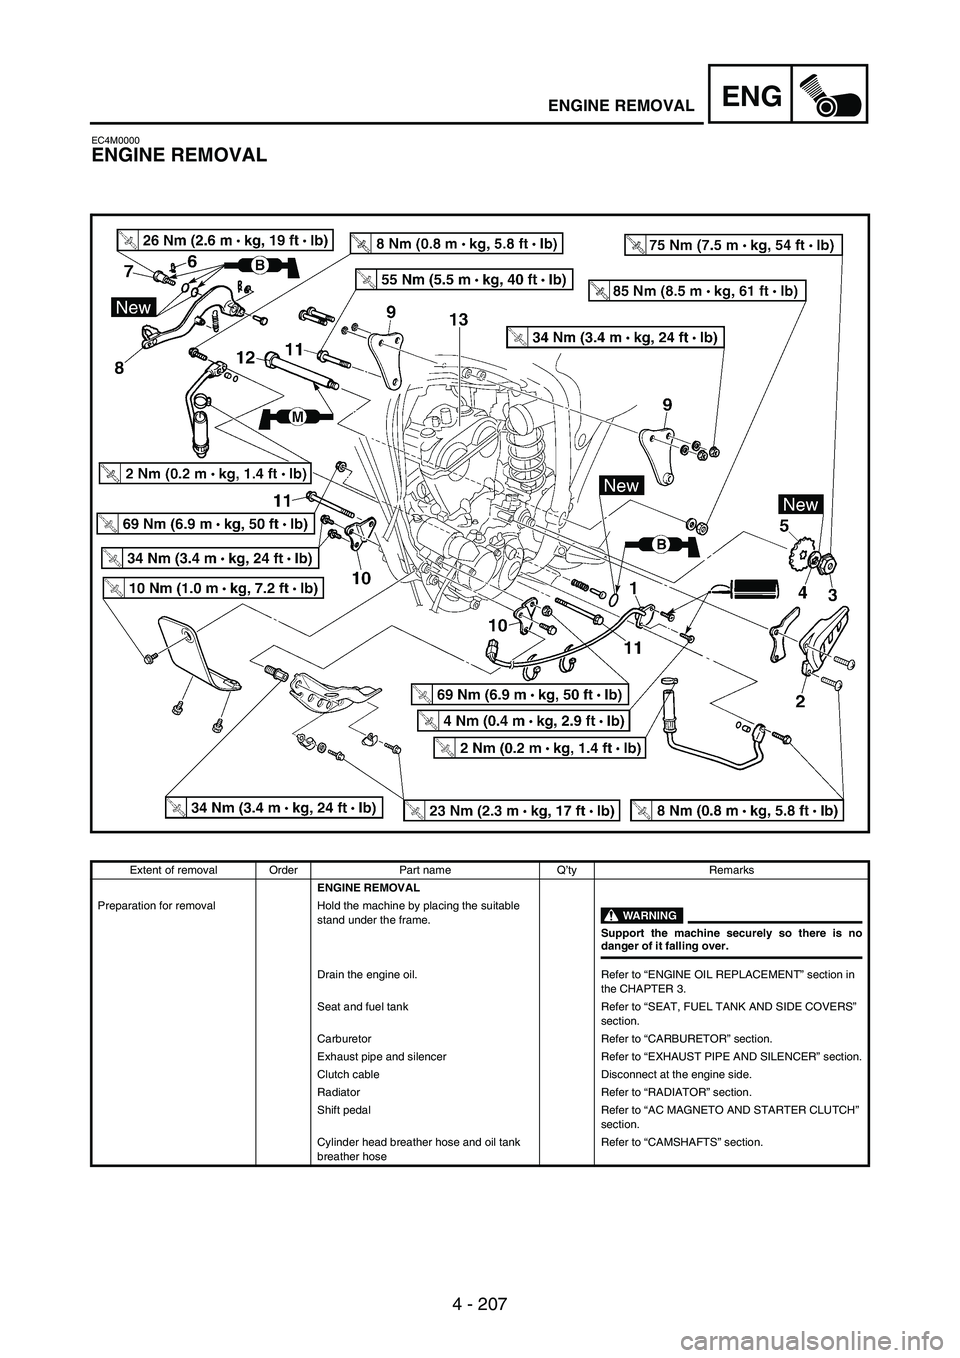
ENGENGINE REMOVAL
EC4M0000
ENGINE REMOVAL
Extent of removal Order Part name Q’ty Remarks
ENGINE REMOVAL
Preparation for removal Hold the machine by placing the suitable
stand under the frame.
WARNING
Support the machine securely so there is nodanger of it falling over.
Drain the engine oil. Refer to “ENGINE OIL REPLACEMENT” section in
the CHAPTER 3.
Seat and fuel tank Refer to “SEAT, FUEL TANK AND SIDE COVERS”
section.
Carburetor Refer to “CARBURETOR” section.
Exhaust pipe and silencer Refer to “EXHAUST PIPE AND SILENCER” section.
Clutch cable Disconnect at the engine side.
Radiator Refer to “RADIATOR” section.
Shift pedal Refer to “AC MAGNETO AND STARTER CLUTCH”
section.
Cylinder head breather hose and oil tank
breather hoseRefer to “CAMSHAFTS” section.
Page 582 of 864
5 - 1
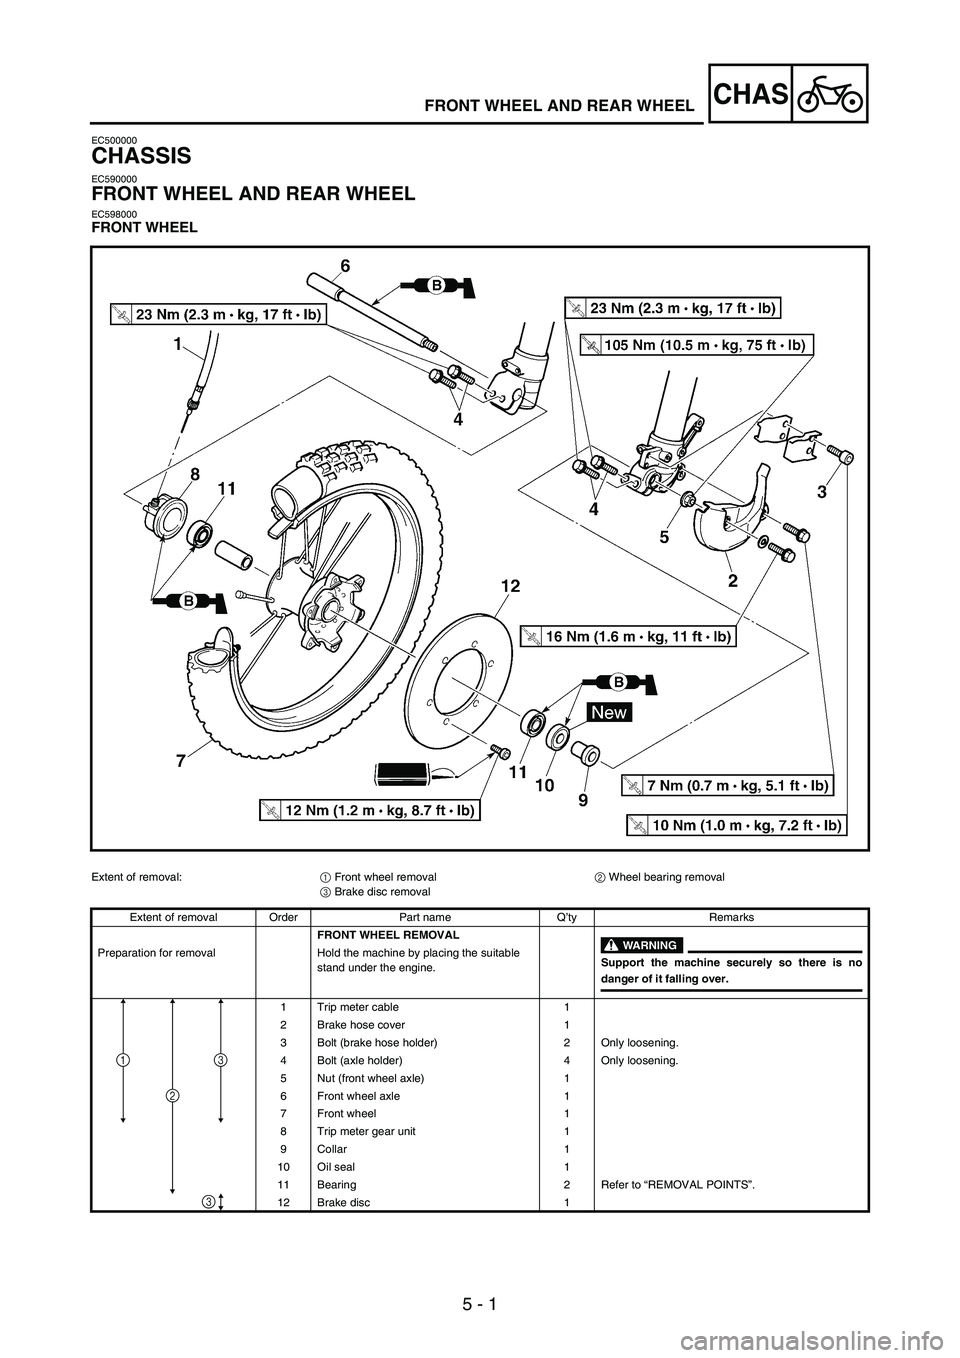
CHASFRONT WHEEL AND REAR WHEEL
EC500000
CHASSIS
EC590000
FRONT WHEEL AND REAR WHEEL
EC598000FRONT WHEEL
Extent of removal:
1 Front wheel removal
2 Wheel bearing removal
3 Brake disc removal
Extent of removal Order Part name Q’ty Remarks
FRONT WHEEL REMOVAL
WARNING
Support the machine securely so there is nodanger of it falling over. Preparation for removal Hold the machine by placing the suitable
stand under the engine.
1 Trip meter cable 1
2 Brake hose cover 1
3 Bolt (brake hose holder) 2 Only loosening.
4 Bolt (axle holder) 4 Only loosening.
5 Nut (front wheel axle) 1
6 Front wheel axle 1
7 Front wheel 1
8 Trip meter gear unit 1
9 Collar 1
10 Oil seal 1
11 Bearing 2 Refer to “REMOVAL POINTS”.
12 Brake disc 1
1
2
3
3
Page 586 of 864
5 - 5
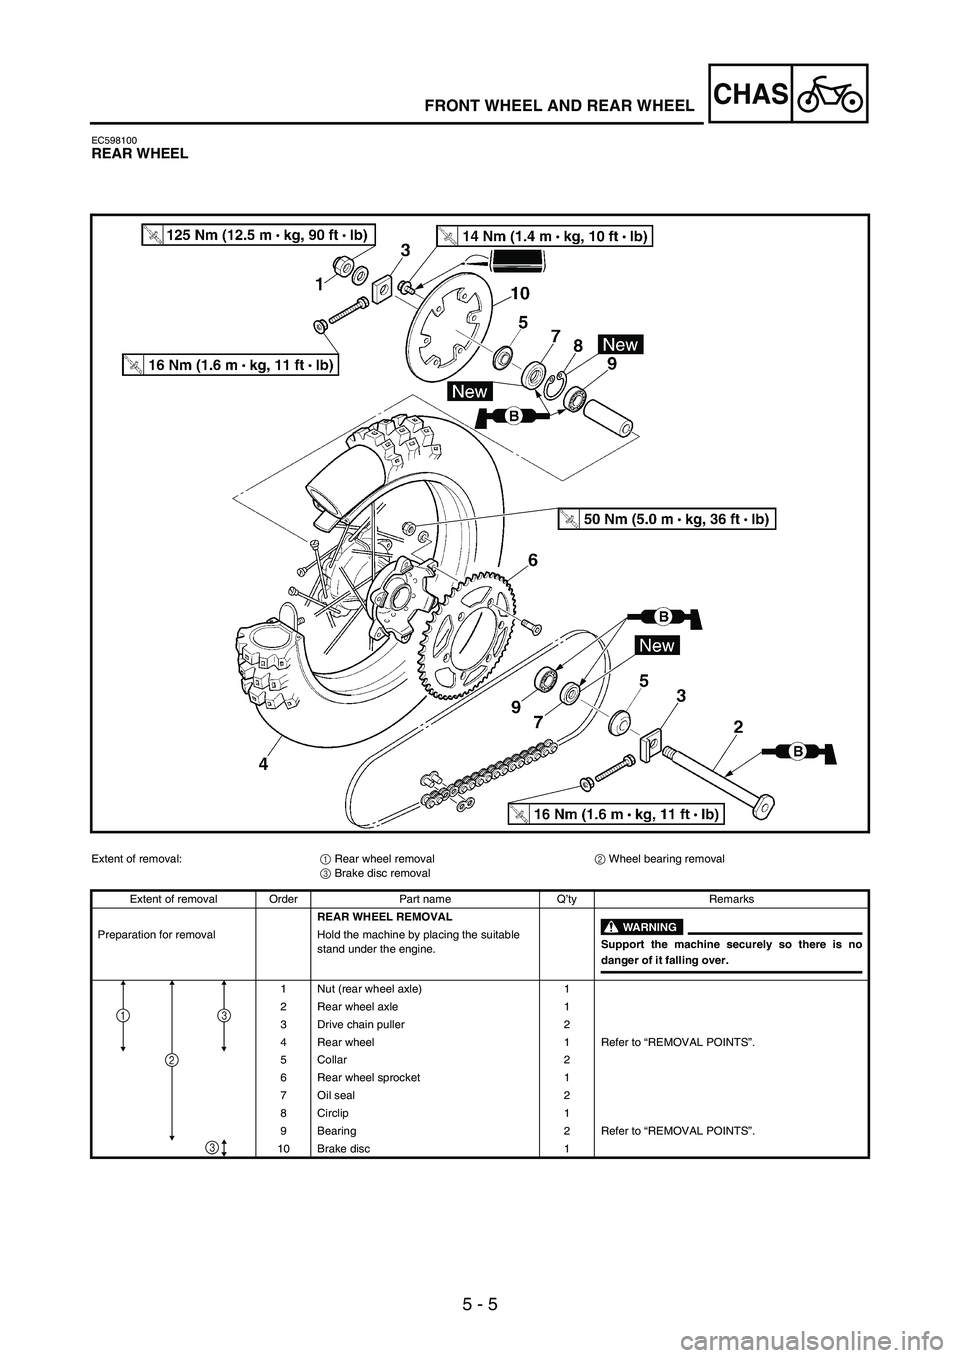
CHASFRONT WHEEL AND REAR WHEEL
EC598100REAR WHEEL
Extent of removal:
1 Rear wheel removal
2 Wheel bearing removal
3 Brake disc removal
Extent of removal Order Part name Q’ty Remarks
REAR WHEEL REMOVAL
WARNING
Support the machine securely so there is nodanger of it falling over. Preparation for removal Hold the machine by placing the suitable
stand under the engine.
1 Nut (rear wheel axle) 1
2 Rear wheel axle 1
3 Drive chain puller 2
4 Rear wheel 1 Refer to “REMOVAL POINTS”.
5 Collar 2
6 Rear wheel sprocket 1
7 Oil seal 2
8 Circlip 1
9 Bearing 2 Refer to “REMOVAL POINTS”.
10 Brake disc 1
1
2
3
3
Page 592 of 864
5 - 11
CHASFRONT WHEEL AND REAR WHEEL
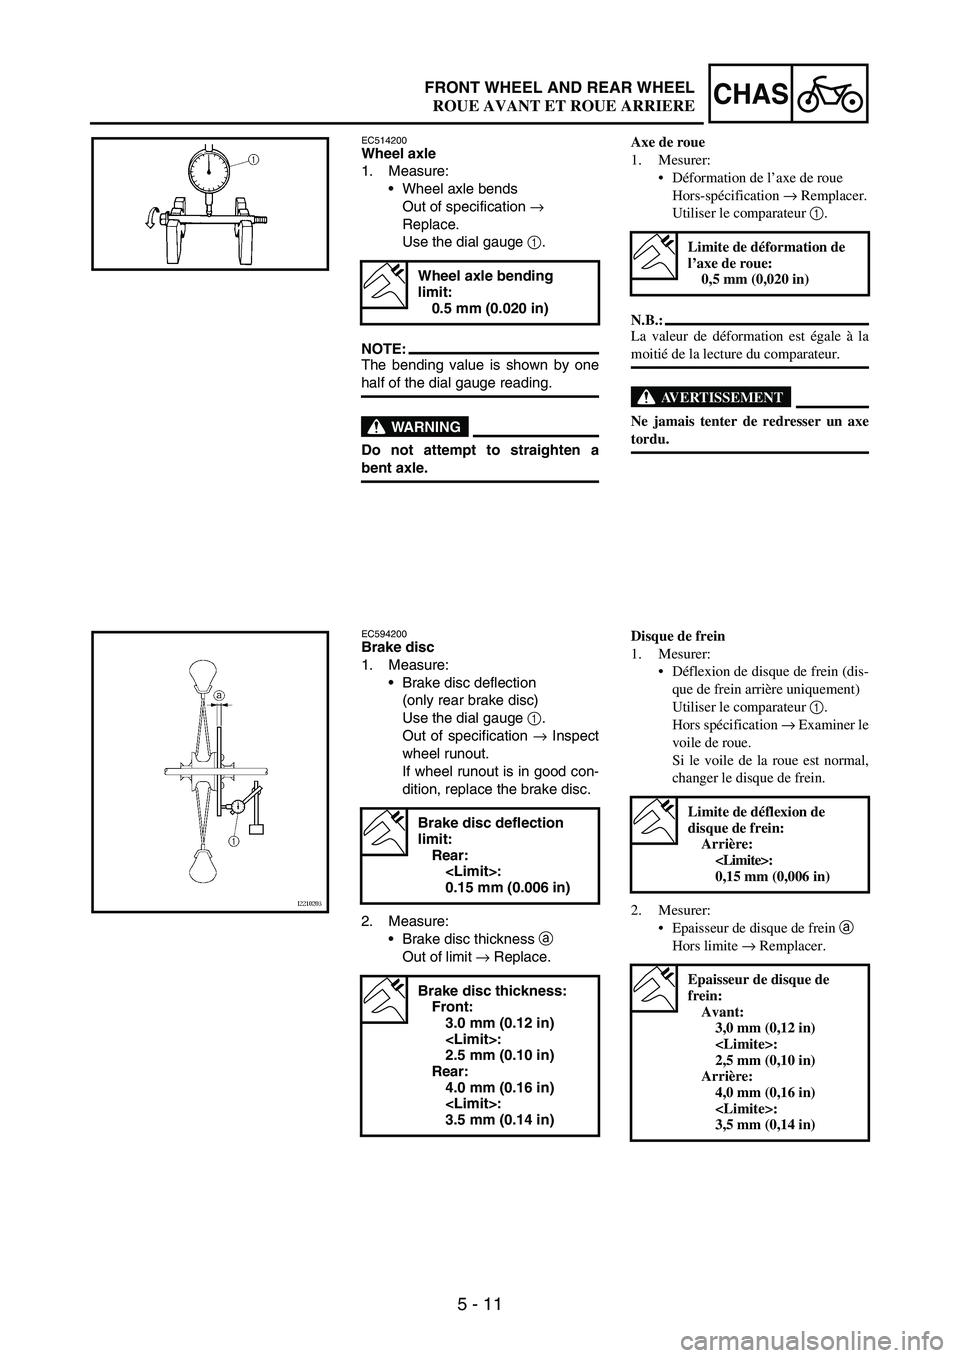
EC514200Wheel axle
1. Measure:
Wheel axle bends
Out of specification
→
Replace.
Use the dial gauge
1.
NOTE:The bending value is shown by one
half of the dial gauge reading.
WARNING
Do not attempt to straighten a
bent axle.
Wheel axle bending
limit:
0.5 mm (0.020 in)
EC594200Brake disc
1. Measure:
Brake disc deflection
(only rear brake disc)
Use the dial gauge
1.
Out of specification
→ Inspect
wheel runout.
If wheel runout is in good con-
dition, replace the brake disc.
2. Measure:
Brake disc thickness
a
Out of limit
→ Replace.
Brake disc deflection
limit:
Rear:
0.15 mm (0.006 in)
Brake disc thickness:
Front:
3.0 mm (0.12 in)
2.5 mm (0.10 in)
Rear:
4.0 mm (0.16 in)
3.5 mm (0.14 in)
Axe de roue
1. Mesurer:
Déformation de l’axe de roue
Hors-spécification → Remplacer.
Utiliser le comparateur 1.
N.B.:
La valeur de déformation est égale à la
moitié de la lecture du comparateur.
AVERTISSEMENT
Ne jamais tenter de redresser un axe
tordu.
Limite de déformation de
l’axe de roue:
0,5 mm (0,020 in)
Disque de frein
1. Mesurer:
Déflexion de disque de frein (dis-
que de frein arrière uniquement)
Utiliser le comparateur 1.
Hors spécification → Examiner le
voile de roue.
Si le voile de la roue est normal,
changer le disque de frein.
2. Mesurer:
Epaisseur de disque de frein a
Hors limite → Remplacer.
Limite de déflexion de
disque de frein:
Arrière:
0,15 mm (0,006 in)
Epaisseur de disque de
frein:
Avant:
3,0 mm (0,12 in)
2,5 mm (0,10 in)
Arrière:
4,0 mm (0,16 in)
3,5 mm (0,14 in)
ROUE AVANT ET ROUE ARRIERE
Page 604 of 864
5 - 23
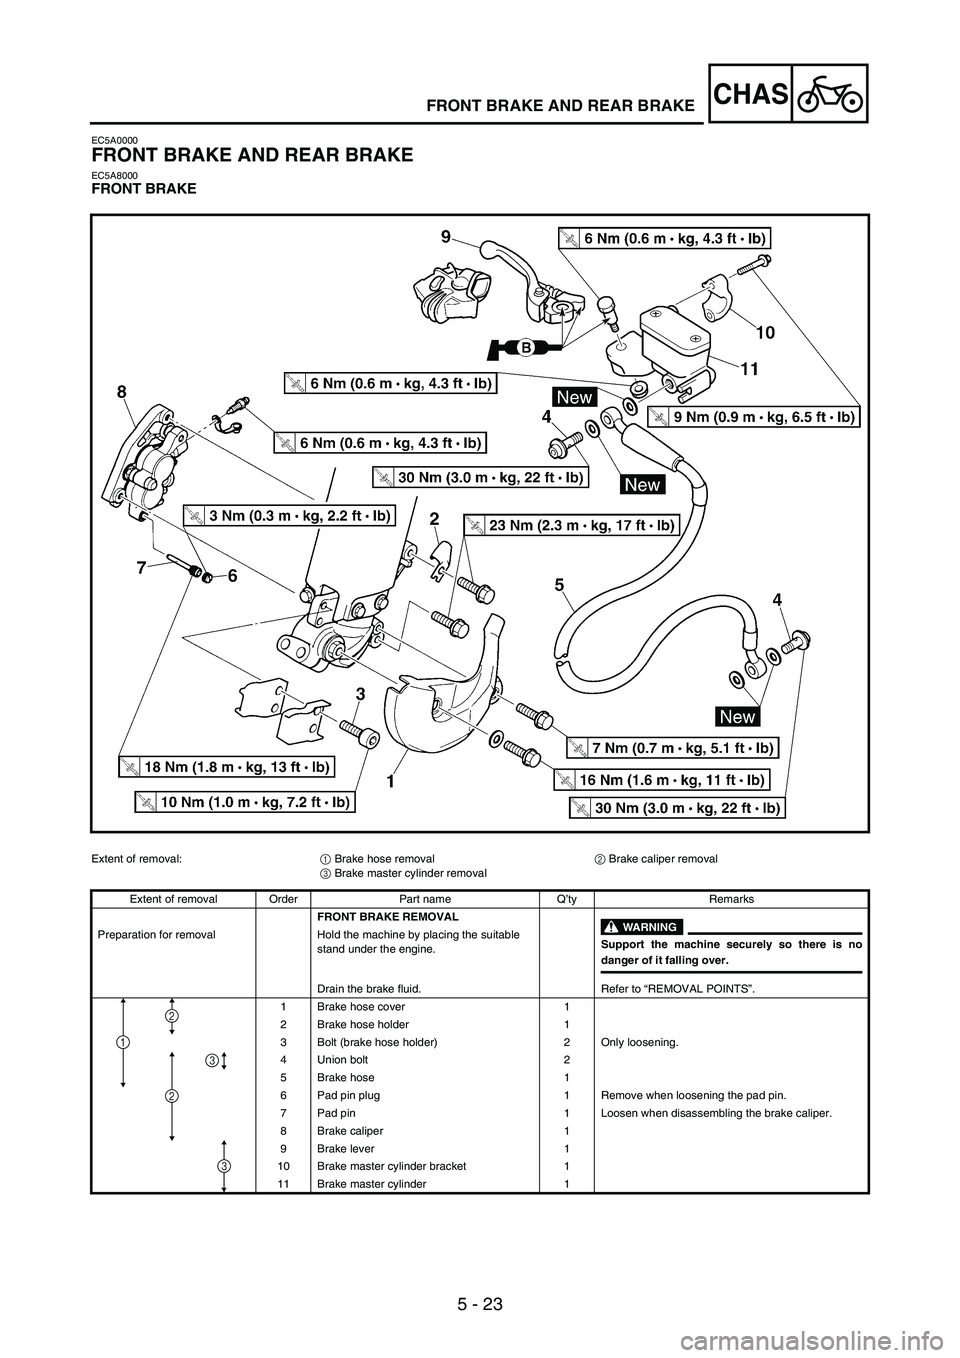
CHASFRONT BRAKE AND REAR BRAKE
EC5A0000
FRONT BRAKE AND REAR BRAKE
EC5A8000FRONT BRAKE
Extent of removal:
1 Brake hose removal
2 Brake caliper removal
3 Brake master cylinder removal
Extent of removal Order Part name Q’ty Remarks
FRONT BRAKE REMOVAL
WARNING
Support the machine securely so there is nodanger of it falling over. Preparation for removal Hold the machine by placing the suitable
stand under the engine.
Drain the brake fluid. Refer to “REMOVAL POINTS”.
1 Brake hose cover 1
2 Brake hose holder 1
3 Bolt (brake hose holder) 2 Only loosening.
4 Union bolt 2
5 Brake hose 1
6 Pad pin plug 1 Remove when loosening the pad pin.
7 Pad pin 1 Loosen when disassembling the brake caliper.
8 Brake caliper 1
9 Brake lever 1
10 Brake master cylinder bracket 1
11 Brake master cylinder 1
1
2
2
3
3
Page 608 of 864
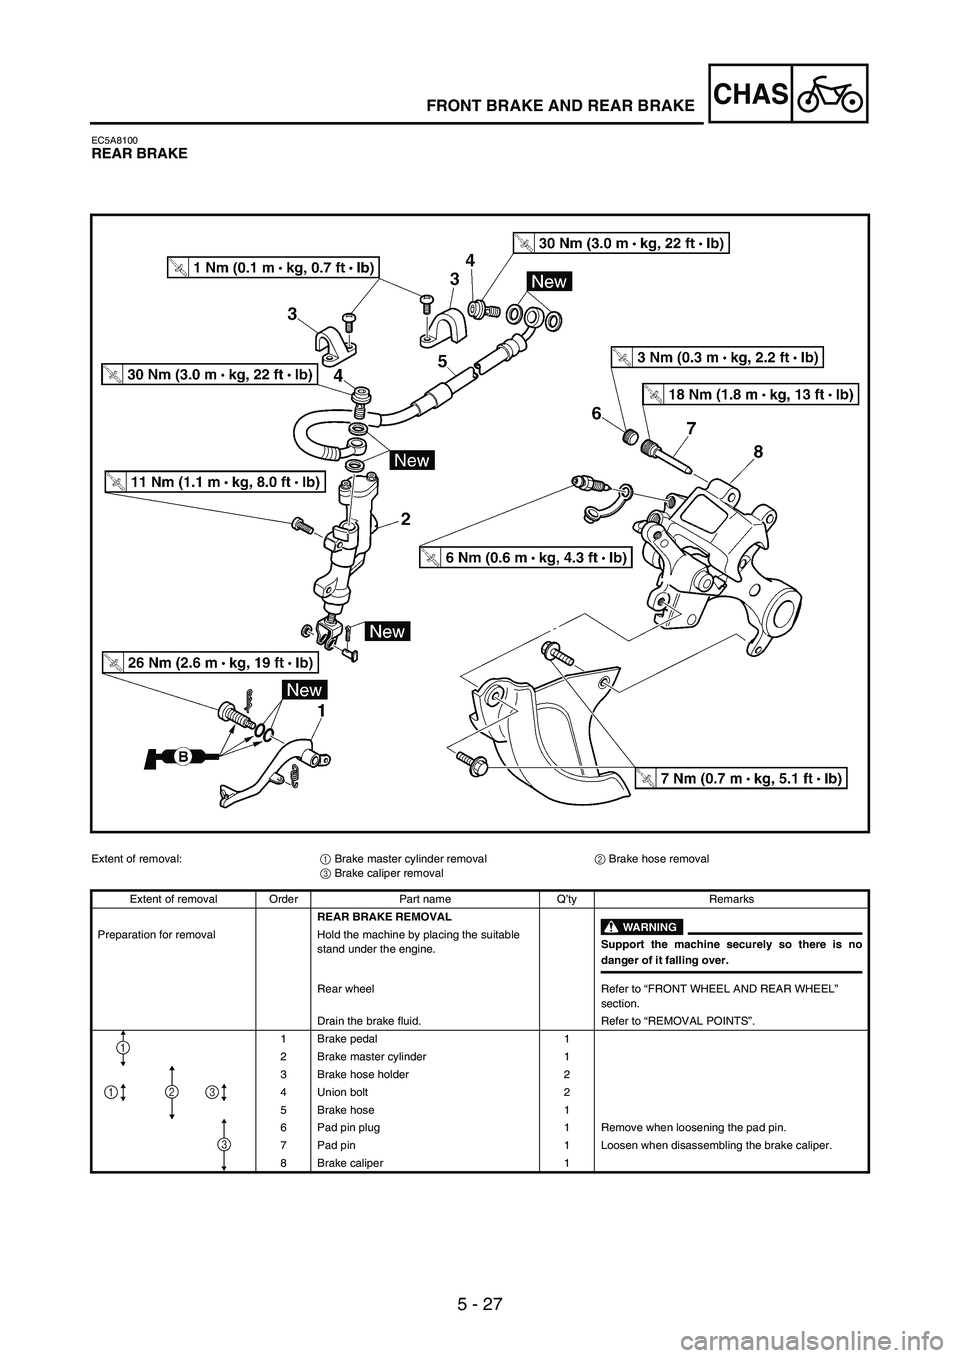
5 - 27
CHASFRONT BRAKE AND REAR BRAKE
EC5A8100REAR BRAKE
Extent of removal:
1 Brake master cylinder removal
2 Brake hose removal
3 Brake caliper removal
Extent of removal Order Part name Q’ty Remarks
REAR BRAKE REMOVAL
WARNING
Support the machine securely so there is nodanger of it falling over. Preparation for removal Hold the machine by placing the suitable
stand under the engine.
Rear wheel Refer to “FRONT WHEEL AND REAR WHEEL”
section.
Drain the brake fluid. Refer to “REMOVAL POINTS”.
1 Brake pedal 1
2 Brake master cylinder 1
3 Brake hose holder 2
4 Union bolt 2
5 Brake hose 1
6 Pad pin plug 1 Remove when loosening the pad pin.
7 Pad pin 1 Loosen when disassembling the brake caliper.
8 Brake caliper 1
1
13
3
2
Page 620 of 864
![YAMAHA WR 250F 2004 Notices Demploi (in French) 5 - 39
CHASFRONT BRAKE AND REAR BRAKE
EC5A3000REMOVAL POINTS
Brake fluid
1. Remove:
[Front]
Brake master cylinder cap
1
[Rear]
Brake master cylinder cap
1
Protector
NOTE:Do not remove the diaph YAMAHA WR 250F 2004 Notices Demploi (in French) 5 - 39
CHASFRONT BRAKE AND REAR BRAKE
EC5A3000REMOVAL POINTS
Brake fluid
1. Remove:
[Front]
Brake master cylinder cap
1
[Rear]
Brake master cylinder cap
1
Protector
NOTE:Do not remove the diaph](/img/51/52336/w960_52336-619.png)
5 - 39
CHASFRONT BRAKE AND REAR BRAKE
EC5A3000REMOVAL POINTS
Brake fluid
1. Remove:
[Front]
Brake master cylinder cap
1
[Rear]
Brake master cylinder cap
1
Protector
NOTE:Do not remove the diaphragm.
ÈFront
ÉRear
È
É
2. Connect the transparent hose
2
to the bleed screw
1 and place a
suitable container under its end.
ÈFront
ÉRear
3. Loosen the bleed screw and
drain the brake fluid while pulling
the lever in or pushing down on
the pedal.
CAUTION:
Do not reuse the drained brake
fluid.
Brake fluid may erode painted
surfaces or plastic parts. Always
clean up spilled fluid immedi-
ately.
É È
Brake caliper piston
1. Remove:
Brake caliper piston
Use compressed air and pro-
ceed carefully.
WARNING
Cover piston with rag and use
extreme caution when expelling
piston from cylinder.
Never attempt to pry out piston.
ÈFront
ÉRear
Caliper piston removal steps:
Insert a piece of rag into the
brake caliper to lock one brake
caliper.
Carefully force the piston out of
the brake caliper cylinder with
compressed air.
È
É
POINTS DE DEPOSE
Liquide de frein
1. Déposer:
[Avant]
Couvercle de maître-cylindre de
frein 1
[Arrière]
Couvercle de maître-cylindre de
frein 1
Protection
N.B.:Ne pas enlever le diaphragme.
È
Avant
É
Arrière
2. Connecter le tuyau transparent 2 à
la vis de purge 1 et placer le réci-
pient approprié sous son extrémité.
È
Avant
É
Arrière
3. Desserrer la vis de purge et purger
le liquide de frein tout en rentrant le
levier ou en appuyant sur la pédale.
ATTENTION:
Ne pas réutiliser le liquide de frein
purgé.
Le liquide de frein attaque les surfa-
ces peintes et le plastique. Si on en
renverse, il faut l’essuyer immédia-
tement.
Piston d’étrier de frein
1. Déposer:
Piston d’étrier de frein
Appliquer de l’air comprimé en
effectuant délicatement cette opé-
ration.
AVERTISSEMENT
Recouvrir le piston d’un morceau
de tissu et faire très attention au
moment ou le piston est éjecté du
cylindre.
Ne jamais chasser le piston hors du
cylindre en faisant levier.
È
Avant
É
Arrière
Etapes de dépose des pistons
d’étrier:
Insérer un morceau de tissu dans
l’étrier pour bloquer un piston.
Chasser prudemment le piston du
cylindre de l’étrier avec de l’air
comprimé.
FREIN AVANT ET FREIN ARRIERE