CD changer YAMAHA WR 250F 2004 User Guide
[x] Cancel search | Manufacturer: YAMAHA, Model Year: 2004, Model line: WR 250F, Model: YAMAHA WR 250F 2004Pages: 864, PDF Size: 22.07 MB
Page 452 of 864
4 - 127
ENGCLUTCH
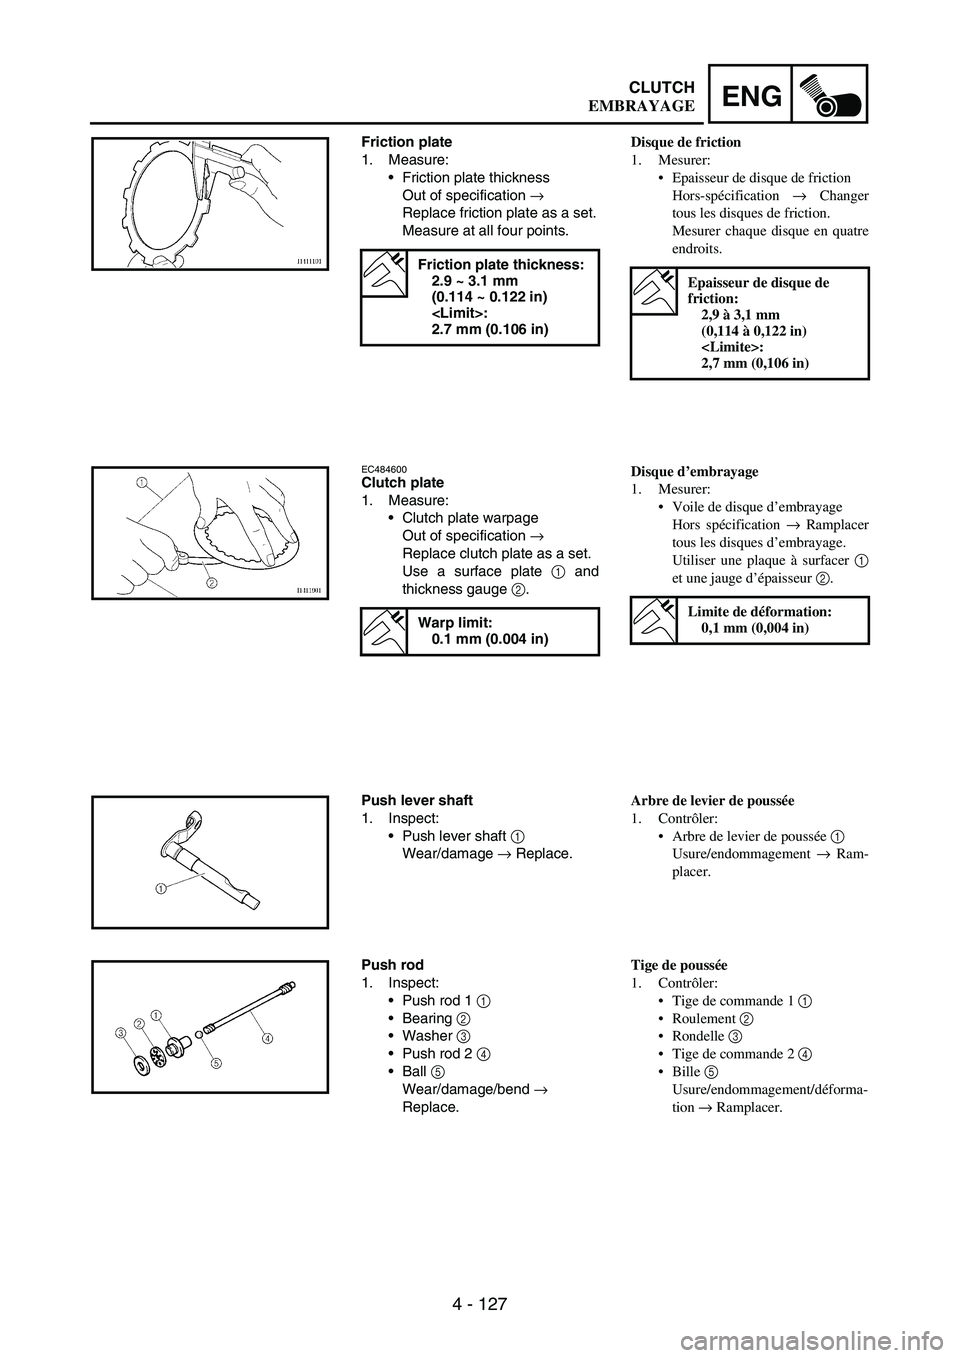
Friction plate
1. Measure:
Friction plate thickness
Out of specification
→
Replace friction plate as a set.
Measure at all four points.
Friction plate thickness:
2.9 ~ 3.1 mm
(0.114 ~ 0.122 in)
2.7 mm (0.106 in)
EC484600Clutch plate
1. Measure:
Clutch plate warpage
Out of specification
→
Replace clutch plate as a set.
Use a surface plate
1 and
thickness gauge
2.
Warp limit:
0.1 mm (0.004 in)
Push lever shaft
1. Inspect:
Push lever shaft
1
Wear/damage
→ Replace.
Push rod
1. Inspect:
Push rod 1
1
Bearing
2
Washer
3
Push rod 2
4
Ball
5
Wear/damage/bend
→
Replace.
Disque de friction
1. Mesurer:
Epaisseur de disque de friction
Hors-spécification → Changer
tous les disques de friction.
Mesurer chaque disque en quatre
endroits.
Epaisseur de disque de
friction:
2,9 à 3,1 mm
(0,114 à 0,122 in)
2,7 mm (0,106 in)
Disque d’embrayage
1. Mesurer:
Voile de disque d’embrayage
Hors spécification → Ramplacer
tous les disques d’embrayage.
Utiliser une plaque à surfacer 1
et une jauge d’épaisseur 2.
Limite de déformation:
0,1 mm (0,004 in)
Arbre de levier de poussée
1. Contrôler:
Arbre de levier de poussée 1
Usure/endommagement → Ram-
placer.
Tige de poussée
1. Contrôler:
Tige de commande 1 1
Roulement 2
Rondelle 3
Tige de commande 2 4
Bille 5
Usure/endommagement/déforma-
tion → Ramplacer.
EMBRAYAGE
Page 520 of 864
4 - 195
ENGAC MAGNETO AND STARTER CLUTCH
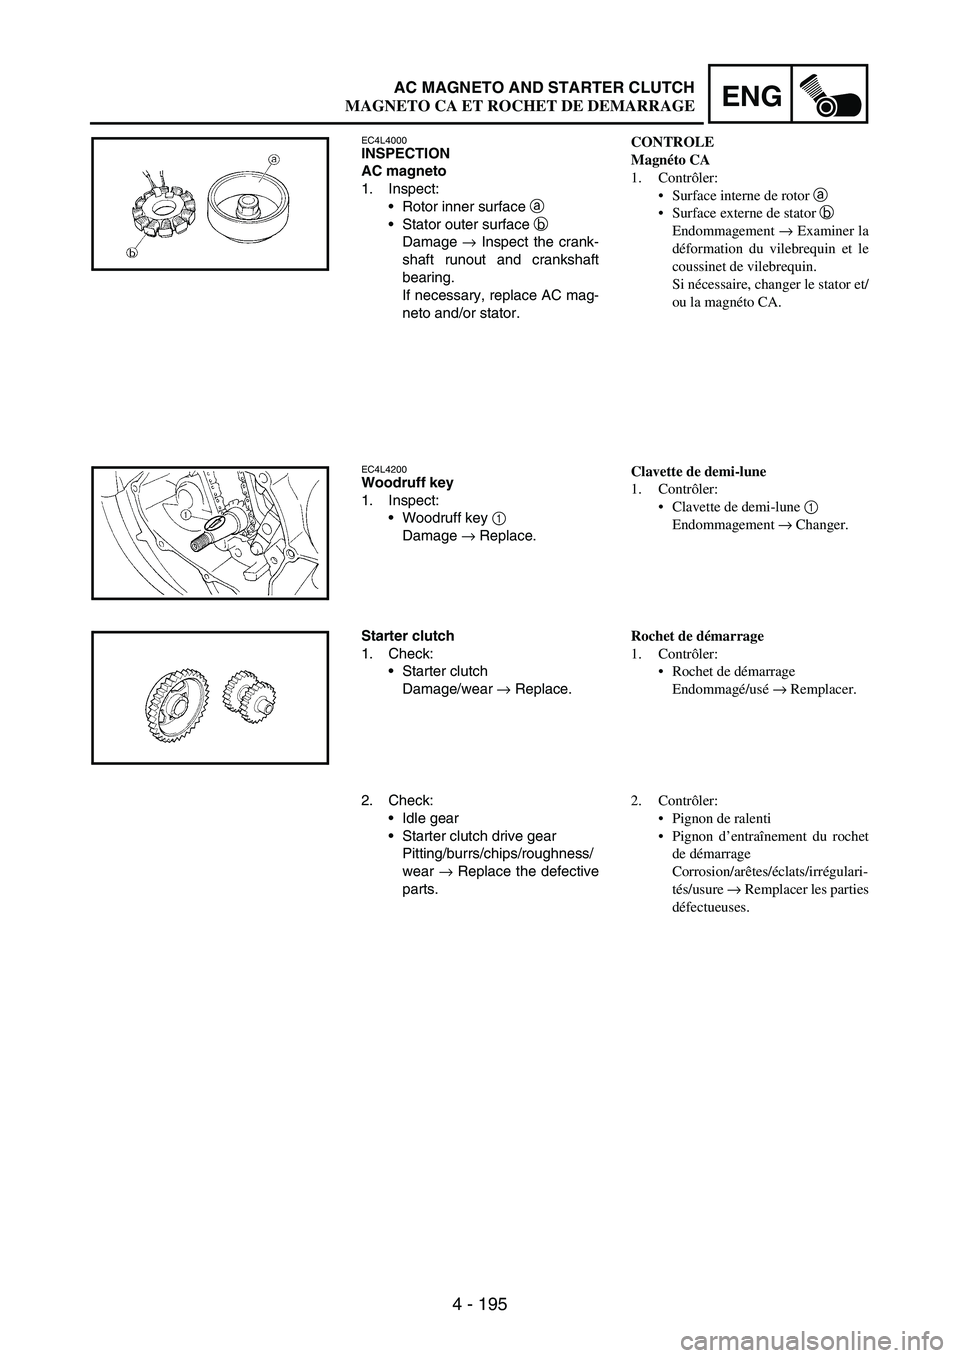
EC4L4000INSPECTION
AC magneto
1. Inspect:
Rotor inner surface
a
Stator outer surface
b
Damage
→ Inspect the crank-
shaft runout and crankshaft
bearing.
If necessary, replace AC mag-
neto and/or stator.
EC4L4200Woodruff key
1. Inspect:
Woodruff key
1
Damage
→ Replace.
Starter clutch
1. Check:
Starter clutch
Damage/wear
→ Replace.
2. Check:
Idle gear
Starter clutch drive gear
Pitting/burrs/chips/roughness/
wear
→ Replace the defective
parts.CONTROLE
Magnéto CA
1. Contrôler:
Surface interne de rotor a
Surface externe de stator b
Endommagement → Examiner la
déformation du vilebrequin et le
coussinet de vilebrequin.
Si nécessaire, changer le stator et/
ou la magnéto CA.
Clavette de demi-lune
1. Contrôler:
Clavette de demi-lune 1
Endommagement → Changer.
Rochet de démarrage
1. Contrôler:
Rochet de démarrage
Endommagé/usé → Remplacer.
2. Contrôler:
Pignon de ralenti
Pignon d’entraînement du rochet
de démarrage
Corrosion/arêtes/éclats/irrégulari-
tés/usure → Remplacer les parties
défectueuses.
MAGNETO CA ET ROCHET DE DEMARRAGE
Page 590 of 864
5 - 9
CHASFRONT WHEEL AND REAR WHEEL
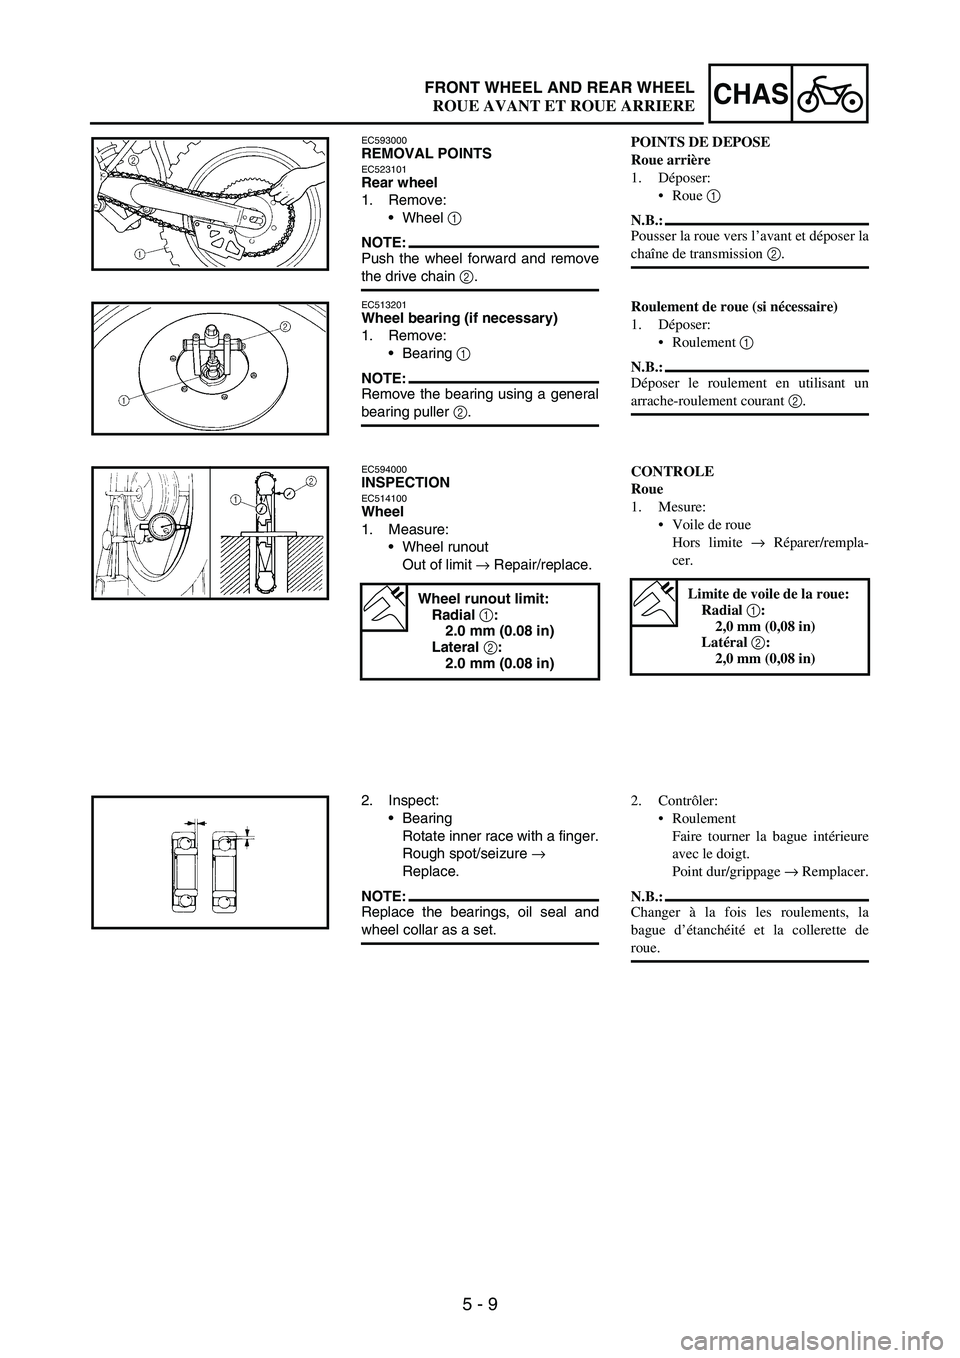
EC593000REMOVAL POINTSEC523101Rear wheel
1. Remove:
Wheel
1
NOTE:Push the wheel forward and remove
the drive chain
2.
EC513201Wheel bearing (if necessary)
1. Remove:
Bearing
1
NOTE:Remove the bearing using a general
bearing puller
2.
EC594000INSPECTIONEC514100Wheel
1. Measure:
Wheel runout
Out of limit
→ Repair/replace.
Wheel runout limit:
Radial 1
:
2.0 mm (0.08 in)
Lateral 2
:
2.0 mm (0.08 in)
2. Inspect:
Bearing
Rotate inner race with a finger.
Rough spot/seizure
→
Replace.
NOTE:Replace the bearings, oil seal and
wheel collar as a set.
POINTS DE DEPOSE
Roue arrière
1. Déposer:
Roue 1
N.B.:
Pousser la roue vers l’avant et déposer la
chaîne de transmission 2.
Roulement de roue (si nécessaire)
1. Déposer:
Roulement 1
N.B.:
Déposer le roulement en utilisant un
arrache-roulement courant 2.
CONTROLE
Roue
1. Mesure:
Voile de roue
Hors limite → Réparer/rempla-
cer.
Limite de voile de la roue:
Radial 1:
2,0 mm (0,08 in)
Latéral 2:
2,0 mm (0,08 in)
2. Contrôler:
Roulement
Faire tourner la bague intérieure
avec le doigt.
Point dur/grippage → Remplacer.
N.B.:
Changer à la fois les roulements, la
bague d’étanchéité et la collerette de
roue.
ROUE AVANT ET ROUE ARRIERE
Page 592 of 864
5 - 11
CHASFRONT WHEEL AND REAR WHEEL
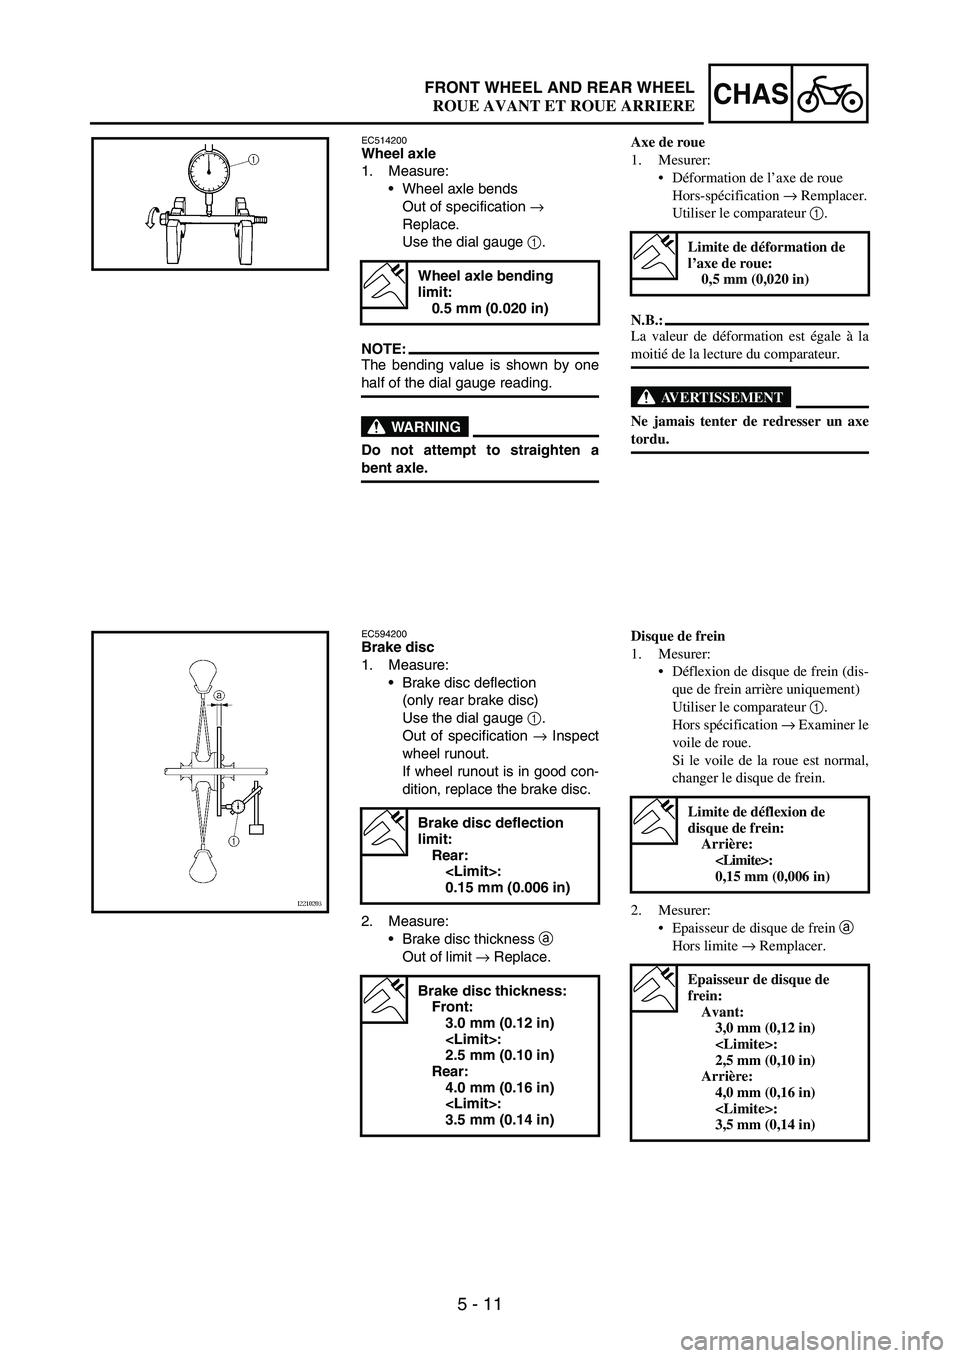
EC514200Wheel axle
1. Measure:
Wheel axle bends
Out of specification
→
Replace.
Use the dial gauge
1.
NOTE:The bending value is shown by one
half of the dial gauge reading.
WARNING
Do not attempt to straighten a
bent axle.
Wheel axle bending
limit:
0.5 mm (0.020 in)
EC594200Brake disc
1. Measure:
Brake disc deflection
(only rear brake disc)
Use the dial gauge
1.
Out of specification
→ Inspect
wheel runout.
If wheel runout is in good con-
dition, replace the brake disc.
2. Measure:
Brake disc thickness
a
Out of limit
→ Replace.
Brake disc deflection
limit:
Rear:
0.15 mm (0.006 in)
Brake disc thickness:
Front:
3.0 mm (0.12 in)
2.5 mm (0.10 in)
Rear:
4.0 mm (0.16 in)
3.5 mm (0.14 in)
Axe de roue
1. Mesurer:
Déformation de l’axe de roue
Hors-spécification → Remplacer.
Utiliser le comparateur 1.
N.B.:
La valeur de déformation est égale à la
moitié de la lecture du comparateur.
AVERTISSEMENT
Ne jamais tenter de redresser un axe
tordu.
Limite de déformation de
l’axe de roue:
0,5 mm (0,020 in)
Disque de frein
1. Mesurer:
Déflexion de disque de frein (dis-
que de frein arrière uniquement)
Utiliser le comparateur 1.
Hors spécification → Examiner le
voile de roue.
Si le voile de la roue est normal,
changer le disque de frein.
2. Mesurer:
Epaisseur de disque de frein a
Hors limite → Remplacer.
Limite de déflexion de
disque de frein:
Arrière:
0,15 mm (0,006 in)
Epaisseur de disque de
frein:
Avant:
3,0 mm (0,12 in)
2,5 mm (0,10 in)
Arrière:
4,0 mm (0,16 in)
3,5 mm (0,14 in)
ROUE AVANT ET ROUE ARRIERE
Page 622 of 864
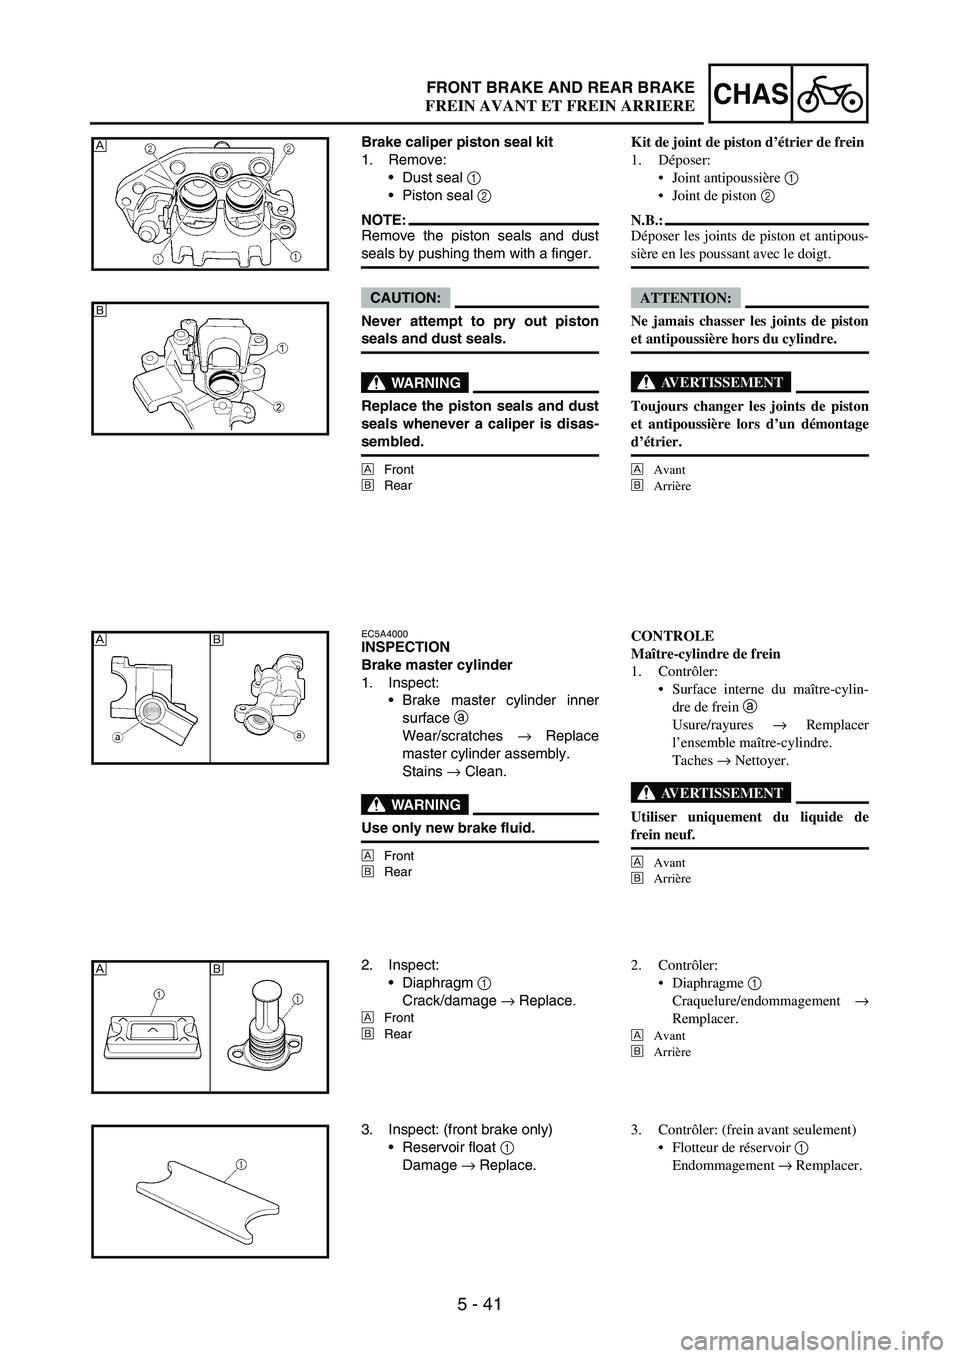
5 - 41
CHASFRONT BRAKE AND REAR BRAKE
Brake caliper piston seal kit
1. Remove:
Dust seal
1
Piston seal
2
NOTE:Remove the piston seals and dust
seals by pushing them with a finger.
CAUTION:
Never attempt to pry out piston
seals and dust seals.
WARNING
Replace the piston seals and dust
seals whenever a caliper is disas-
sembled.
ÈFront
ÉRear
È
É
EC5A4000INSPECTION
Brake master cylinder
1. Inspect:
Brake master cylinder inner
surface
a
Wear/scratches
→ Replace
master cylinder assembly.
Stains
→ Clean.
WARNING
Use only new brake fluid.
ÈFront
ÉRear
É È
2. Inspect:
Diaphragm
1
Crack/damage
→ Replace.
ÈFront
ÉRear
É È
3. Inspect: (front brake only)
Reservoir float
1
Damage
→ Replace.
Kit de joint de piston d’étrier de frein
1. Déposer:
Joint antipoussière 1
Joint de piston 2
N.B.:
Déposer les joints de piston et antipous-
sière en les poussant avec le doigt.
ATTENTION:
Ne jamais chasser les joints de piston
et antipoussière hors du cylindre.
AVERTISSEMENT
Toujours changer les joints de piston
et antipoussière lors d’un démontage
d’étrier.
È
Avant
É
Arrière
CONTROLE
Maître-cylindre de frein
1. Contrôler:
Surface interne du maître-cylin-
dre de frein
a
Usure/rayures → Remplacer
l’ensemble maître-cylindre.
Taches → Nettoyer.
AVERTISSEMENT
Utiliser uniquement du liquide de
frein neuf.
È
Avant
É
Arrière
2. Contrôler:
Diaphragme 1
Craquelure/endommagement →
Remplacer.
È
Avant
É
Arrière
3. Contrôler: (frein avant seulement)
Flotteur de réservoir 1
Endommagement → Remplacer.
FREIN AVANT ET FREIN ARRIERE
Page 624 of 864
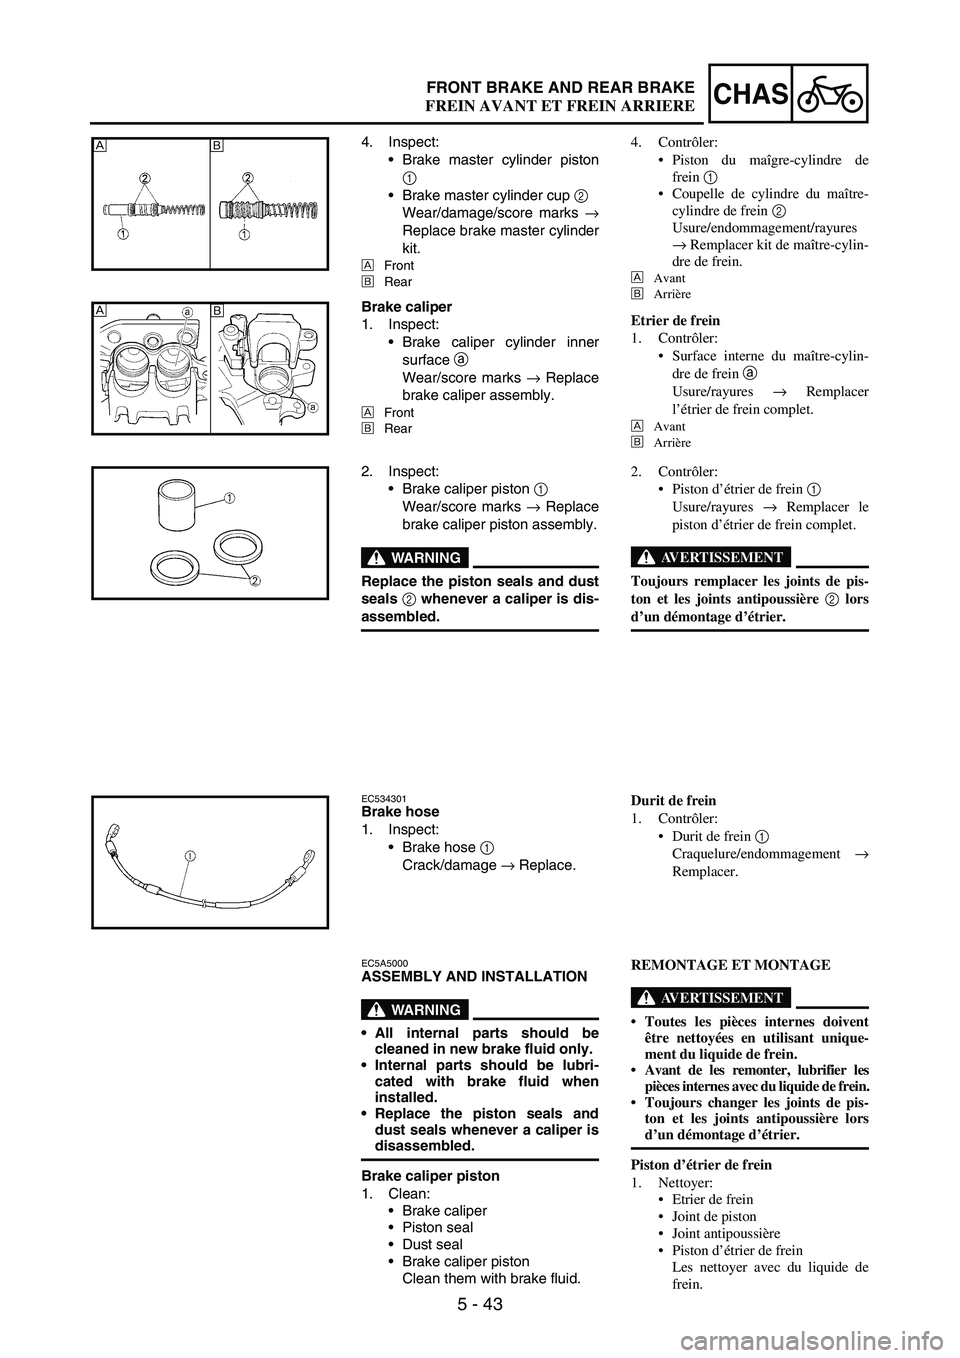
5 - 43
CHASFRONT BRAKE AND REAR BRAKE
4. Inspect:
Brake master cylinder piston
1
Brake master cylinder cup
2
Wear/damage/score marks
→
Replace brake master cylinder
kit.
ÈFront
ÉRear
ÈÉ
Brake caliper
1. Inspect:
Brake caliper cylinder inner
surface
a
Wear/score marks
→ Replace
brake caliper assembly.
ÈFront
ÉRear
É È
2. Inspect:
Brake caliper piston
1
Wear/score marks
→ Replace
brake caliper piston assembly.
WARNING
Replace the piston seals and dust
seals 2
whenever a caliper is dis-
assembled.
EC534301Brake hose
1. Inspect:
Brake hose
1
Crack/damage
→ Replace.
EC5A5000ASSEMBLY AND INSTALLATION
WARNING
All internal parts should be
cleaned in new brake fluid only.
Internal parts should be lubri-
cated with brake fluid when
installed.
Replace the piston seals and
dust seals whenever a caliper is
disassembled.
Brake caliper piston
1. Clean:
Brake caliper
Piston seal
Dust seal
Brake caliper piston
Clean them with brake fluid.4. Contrôler:
Piston du maîgre-cylindre de
frein 1
Coupelle de cylindre du maître-
cylindre de frein 2
Usure/endommagement/rayures
→ Remplacer kit de maître-cylin-
dre de frein.
È
Avant
É
Arrière
Etrier de frein
1. Contrôler:
Surface interne du maître-cylin-
dre de frein
a
Usure/rayures → Remplacer
l’étrier de frein complet.
È
Avant
É
Arrière
2. Contrôler:
Piston d’étrier de frein 1
Usure/rayures → Remplacer le
piston d’étrier de frein complet.
AVERTISSEMENT
Toujours remplacer les joints de pis-
ton et les joints antipoussière 2 lors
d’un démontage d’étrier.
Durit de frein
1. Contrôler:
Durit de frein 1
Craquelure/endommagement →
Remplacer.
REMONTAGE ET MONTAGE
AVERTISSEMENT
Toutes les pièces internes doivent
être nettoyées en utilisant unique-
ment du liquide de frein.
Avant de les remonter, lubrifier les
pièces internes avec du liquide de frein.
Toujours changer les joints de pis-
ton et les joints antipoussière lors
d’un démontage d’étrier.
Piston d’étrier de frein
1. Nettoyer:
Etrier de frein
Joint de piston
Joint antipoussière
Piston d’étrier de frein
Les nettoyer avec du liquide de
frein.
FREIN AVANT ET FREIN ARRIERE
Page 708 of 864
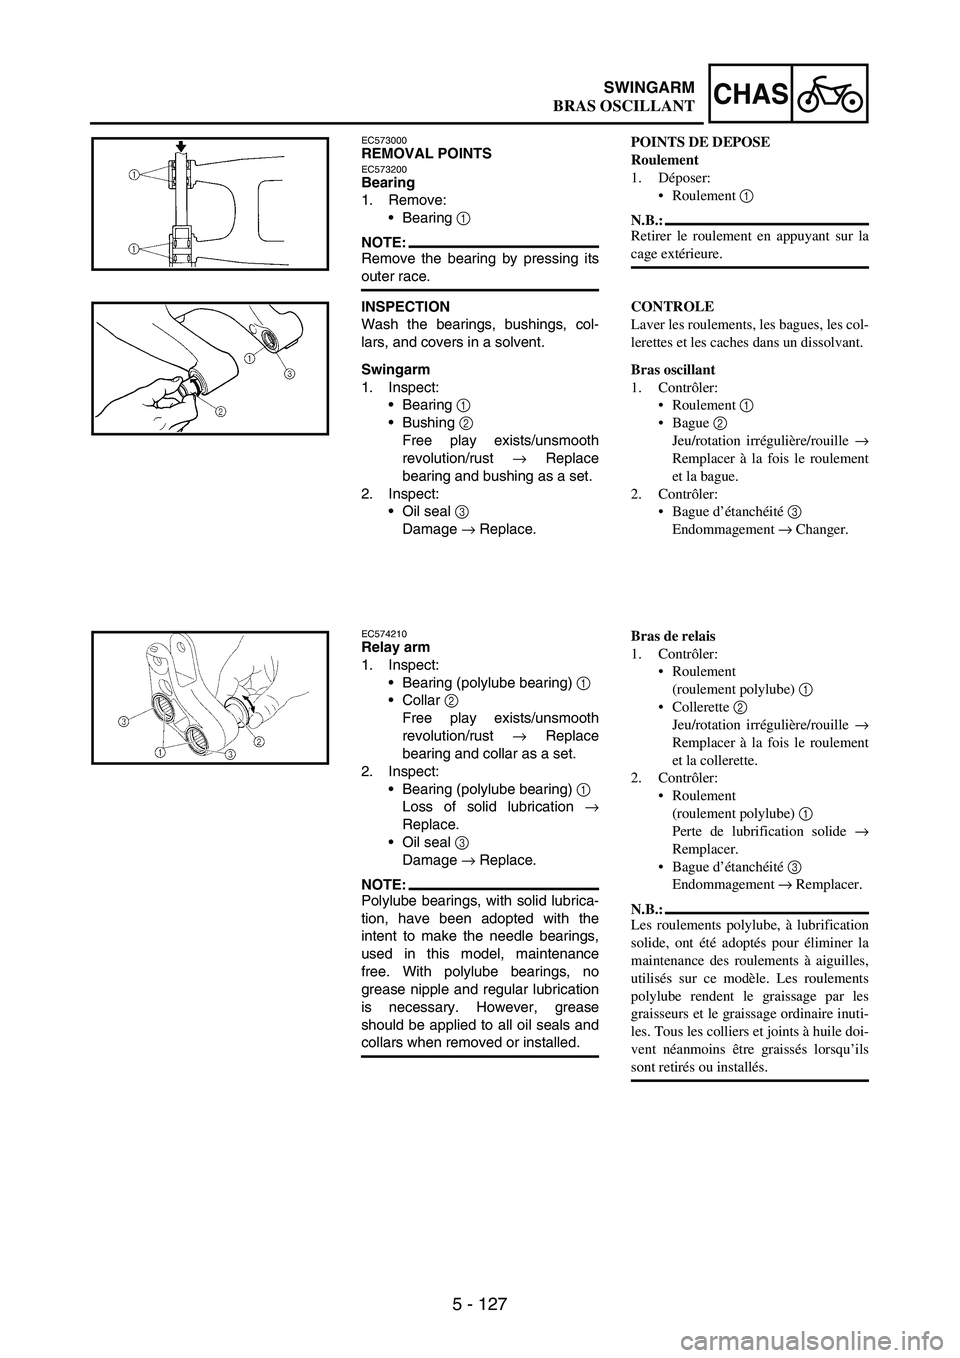
5 - 127
CHASSWINGARM
EC573000REMOVAL POINTSEC573200Bearing
1. Remove:
Bearing
1
NOTE:Remove the bearing by pressing its
outer race.
INSPECTION
Wash the bearings, bushings, col-
lars, and covers in a solvent.
Swingarm
1. Inspect:
Bearing
1
Bushing
2
Free play exists/unsmooth
revolution/rust
→ Replace
bearing and bushing as a set.
2. Inspect:
Oil seal
3
Damage
→ Replace.
EC574210Relay arm
1. Inspect:
Bearing (polylube bearing)
1
Collar
2
Free play exists/unsmooth
revolution/rust
→ Replace
bearing and collar as a set.
2. Inspect:
Bearing (polylube bearing)
1
Loss of solid lubrication
→
Replace.
Oil seal
3
Damage
→ Replace.
NOTE:Polylube bearings, with solid lubrica-
tion, have been adopted with the
intent to make the needle bearings,
used in this model, maintenance
free. With polylube bearings, no
grease nipple and regular lubrication
is necessary. However, grease
should be applied to all oil seals and
collars when removed or installed.
POINTS DE DEPOSE
Roulement
1. Déposer:
Roulement 1
N.B.:
Retirer le roulement en appuyant sur la
cage extérieure.
CONTROLE
Laver les roulements, les bagues, les col-
lerettes et les caches dans un dissolvant.
Bras oscillant
1. Contrôler:
Roulement 1
Bague 2
Jeu/rotation irrégulière/rouille →
Remplacer à la fois le roulement
et la bague.
2. Contrôler:
Bague d’étanchéité 3
Endommagement → Changer.
Bras de relais
1. Contrôler:
Roulement
(roulement polylube) 1
Collerette 2
Jeu/rotation irrégulière/rouille →
Remplacer à la fois le roulement
et la collerette.
2. Contrôler:
Roulement
(roulement polylube) 1
Perte de lubrification solide →
Remplacer.
Bague d’étanchéité 3
Endommagement → Remplacer.
N.B.:
Les roulements polylube, à lubrification
solide, ont été adoptés pour éliminer la
maintenance des roulements à aiguilles,
utilisés sur ce modèle. Les roulements
polylube rendent le graissage par les
graisseurs et le graissage ordinaire inuti-
les. Tous les colliers et joints à huile doi-
vent néanmoins être graissés lorsqu’ils
sont retirés ou installés.
BRAS OSCILLANT
Page 714 of 864
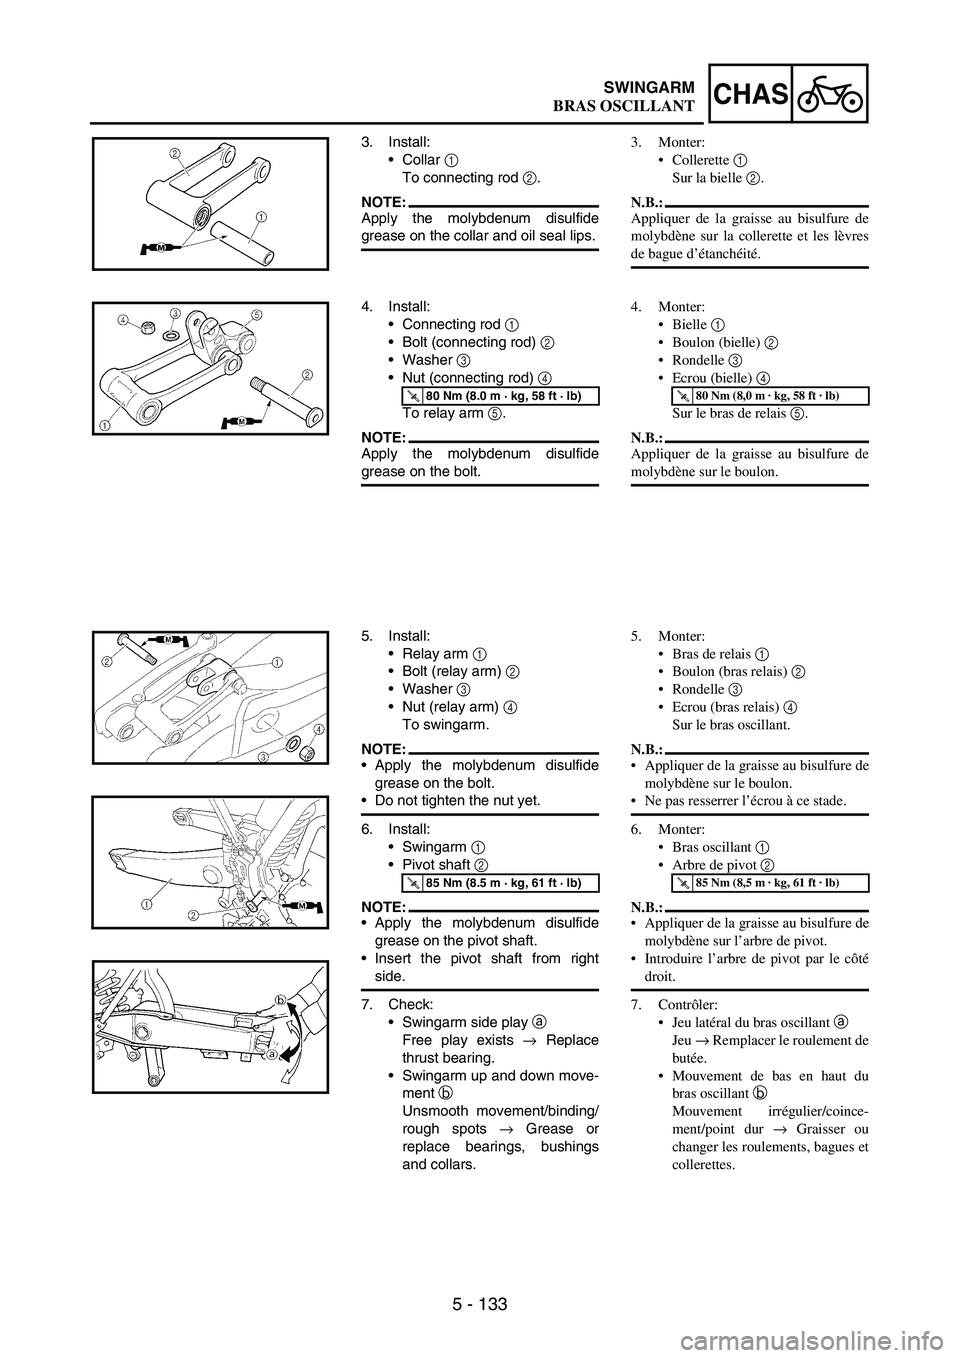
5 - 133
CHASSWINGARM
3. Install:
Collar
1
To connecting rod
2.
NOTE:Apply the molybdenum disulfide
grease on the collar and oil seal lips.
4. Install:
Connecting rod
1
Bolt (connecting rod)
2
Washer
3
Nut (connecting rod)
4
To relay arm
5.
NOTE:Apply the molybdenum disulfide
grease on the bolt.
T R..80 Nm (8.0 m · kg, 58 ft · lb)
5. Install:
Relay arm
1
Bolt (relay arm)
2
Washer
3
Nut (relay arm)
4
To swingarm.
NOTE:Apply the molybdenum disulfide
grease on the bolt.
Do not tighten the nut yet.
6. Install:
Swingarm
1
Pivot shaft
2
NOTE:Apply the molybdenum disulfide
grease on the pivot shaft.
Insert the pivot shaft from right
side.
7. Check:
Swingarm side play
a
Free play exists
→ Replace
thrust bearing.
Swingarm up and down move-
ment
b
Unsmooth movement/binding/
rough spots
→ Grease or
replace bearings, bushings
and collars.
T R..85 Nm (8.5 m · kg, 61 ft · lb)
3. Monter:
Collerette 1
Sur la bielle 2.
N.B.:
Appliquer de la graisse au bisulfure de
molybdène sur la collerette et les lèvres
de bague d’étanchéité.
4. Monter:
Bielle 1
Boulon (bielle) 2
Rondelle 3
Ecrou (bielle) 4
Sur le bras de relais 5.
N.B.:
Appliquer de la graisse au bisulfure de
molybdène sur le boulon.
T R..80 Nm (8,0 m · kg, 58 ft · lb)
5. Monter:
Bras de relais 1
Boulon (bras relais) 2
Rondelle 3
Ecrou (bras relais) 4
Sur le bras oscillant.
N.B.:
Appliquer de la graisse au bisulfure de
molybdène sur le boulon.
Ne pas resserrer l’écrou à ce stade.
6. Monter:
Bras oscillant 1
Arbre de pivot 2
N.B.:
Appliquer de la graisse au bisulfure de
molybdène sur l’arbre de pivot.
Introduire l’arbre de pivot par le côté
droit.
7. Contrôler:
Jeu latéral du bras oscillant a
Jeu → Remplacer le roulement de
butée.
Mouvement de bas en haut du
bras oscillant b
Mouvement irrégulier/coince-
ment/point dur → Graisser ou
changer les roulements, bagues et
collerettes.
T R..85 Nm (8,5 m · kg, 61 ft · lb)
BRAS OSCILLANT
Page 746 of 864
6 - 9
–+ELEC
SYSTEME D’ALLUMAGE
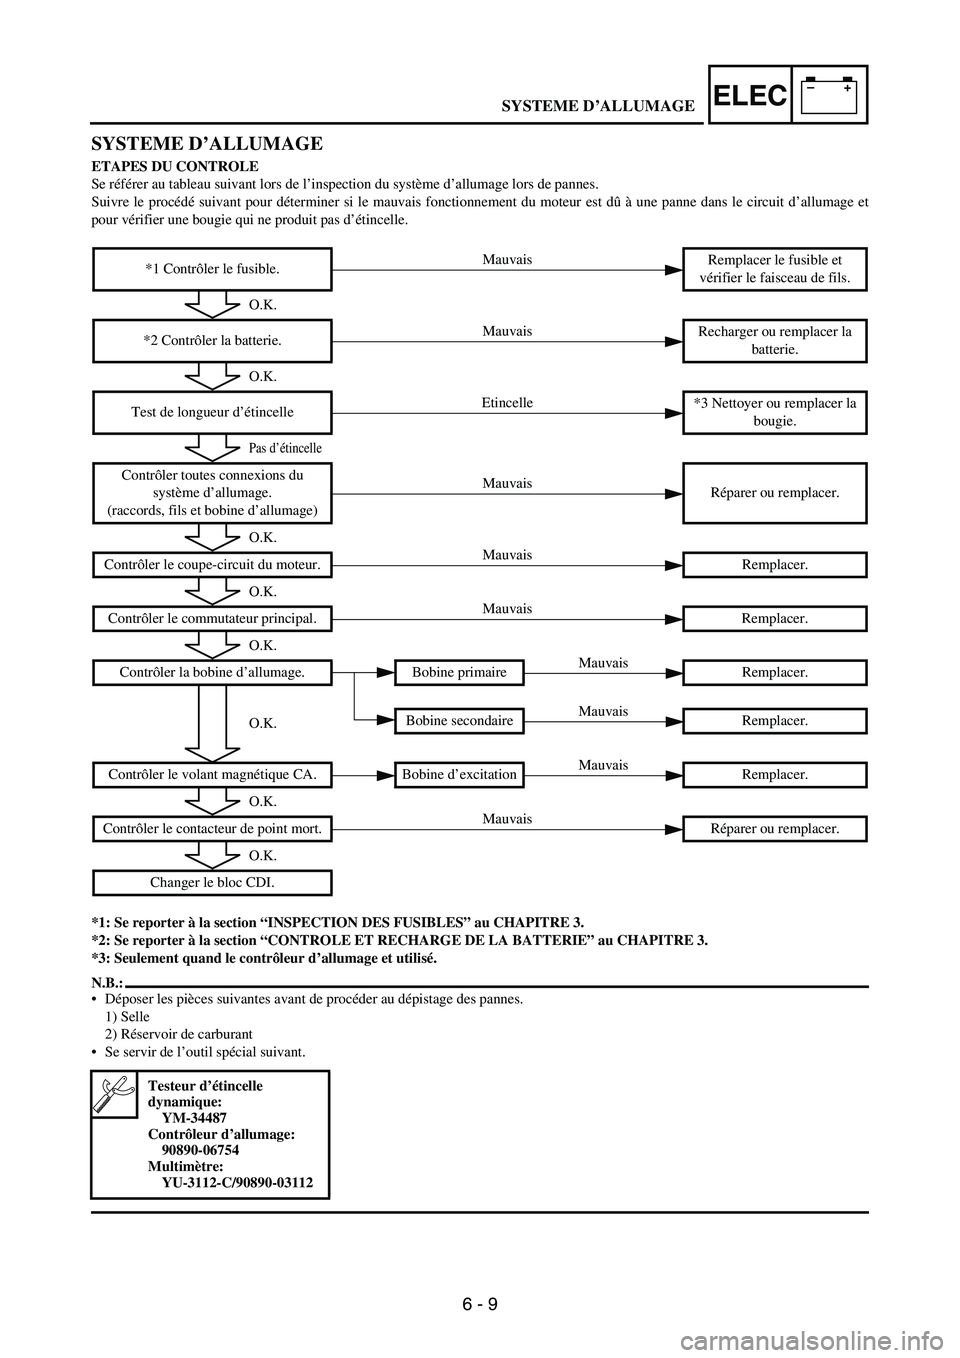
ETAPES DU CONTROLE
Se référer au tableau suivant lors de l’inspection du système d’allumage lors de pannes.
Suivre le procédé suivant pour déterminer si le mauvais fonctionnement du moteur est dû à une panne dans le circuit d’allumage et
pour vérifier une bougie qui ne produit pas d’étincelle.
*1: Se reporter à la section “INSPECTION DES FUSIBLES” au CHAPITRE 3.
*2: Se reporter à la section “CONTROLE ET RECHARGE DE LA BATTERIE” au CHAPITRE 3.
*3: Seulement quand le contrôleur d’allumage et utilisé.
N.B.:
Déposer les pièces suivantes avant de procéder au dépistage des pannes.
1) Selle
2) Réservoir de carburant
Se servir de l’outil spécial suivant.
*1 Contrôler le fusible.Remplacer le fusible et
vérifier le faisceau de fils.
*2 Contrôler la batterie.Recharger ou remplacer la
batterie.
Test de longueur d’étincelle*3 Nettoyer ou remplacer la
bougie.
Contrôler toutes connexions du
système d’allumage.
(raccords, fils et bobine d’allumage)Réparer ou remplacer.
Contrôler le coupe-circuit du moteur. Remplacer.
Contrôler le commutateur principal. Remplacer.
Contrôler la bobine d’allumage. Bobine primaire Remplacer.
Bobine secondaire Remplacer.
Contrôler le volant magnétique CA. Bobine d’excitation Remplacer.
Contrôler le contacteur de point mort. Réparer ou remplacer.
Changer le bloc CDI.
Testeur d’étincelle
dynamique:
YM-34487
Contrôleur d’allumage:
90890-06754
Multimètre:
YU-3112-C/90890-03112
Mauvais
O.K.
Mauvais
O.K.
Etincelle
Pas d’étincelle
Mauvais
O.K.
Mauvais
O.K.
Mauvais
O.K.
Mauvais
O.K.Mauvais
Mauvais
O.K.
Mauvais
O.K.
SYSTEME D’ALLUMAGE
Page 838 of 864
7 - 27
TUNSETTING
EC722011Front fork setting
The front fork setting should be made
depending on the rider’s feeling of an
actual run and the circuit conditions.
The front fork setting includes the fol-
lowing three factors:
1. Setting of air spring characteris-
tics
Change the fork oil level.
2. Setting of spring preload
Change the spring.
Install the adjustment washer.
3. Setting of damping force
Change the compression
damping.
Change the rebound damping.
The spring acts on the load
and the damping force acts on
the cushion travel speed.
EC723001Change in level and
characteristics of fork oil
Damping characteristic near the final
stroke can be changed by changing
the fork oil amount.
CAUTION:
Adjust the oil level in 5 mm (0.2 in)
increments or decrements. Too
low oil level causes the front fork
to produce a noise at full rebound
or the rider to feel some pressure
on his hands or body. Alterna-
tively, too high oil level will
develop unexpectedly early oil
lock with the consequent shorter
front fork travel and deteriorated
performance an characteristics.
Therefore, adjust the front fork
within the specified range.
* For EUROPE, AUS, NZ and ZA
Standard oil level:
125 mm (4.92 in)
* 130 mm (5.12 in)
Extent of adjustment:
80 ~ 150 mm
(3.15 ~ 5.91 in)
From top of outer tube
with inner tube and
damper rod fully
compressed without
spring.
Réglages de la fourche avant
Régler la fourche avant en fonction de la
sensation lors de la conduite ainsi que
des conditions du terrain.
Les trois réglages de la fourche avant
sont les suivants:
1. Réglage de l’amortissement pneu-
matique
Ajuster le niveau de l’huile de
fourche.
2. Réglage de la précontrainte du res-
sort
Changer de type de ressort.
Monter la rondelle d’ajustage.
3. Réglage de l’amortissement
Régler la force de compression.
Régler la force de rebond.
Le ressort a une action sur la
charge et la suspension a une
action sur la vitesse de la course
d’amortissement.
Ajustement du niveau d’huile de
fourche
Les caractéristiques d’amortissement en
fin de course peuvent être modifiées en
changeant la quantité d’huile de fourche.
ATTENTION:
Ajuster le niveau d’huile par incré-
ments ou décréments de 5 mm (0,2 in).
Quand le niveau d’huile est trop bas,
un bruit est produit quand la fourche
est entièrement comprimée ou le con-
ducteur ressent une certaine pression
dans ses mains ou son corps. De
même, un niveau d’huile trop élevé
produira rapidement un bouchon
d’huile, entraînant une réduction de la
course de la fourche et une détériora-
tion des performances et caractéristi-
ques. Il est donc important de régler le
niveau d’huile dans la fourche confor-
mément aux spécifications données.
* EUROPE, AUS, NZ et ZA
Niveau d’huile standard:
125 mm (4,92 in)
* 130 mm (5,12 in)
Plage de réglage:
80 à 150 mm
(3,15 à 5,91 in)
Du haut de tube externe,
tube interne et tige
d’amortisseur
entièrement comprimés
sans ressort.
REGLAG