checking oil YAMAHA WR 250F 2008 User Guide
[x] Cancel search | Manufacturer: YAMAHA, Model Year: 2008, Model line: WR 250F, Model: YAMAHA WR 250F 2008Pages: 224, PDF Size: 13.66 MB
Page 82 of 224
3-27
ELECTRICAL
ELECTRICAL
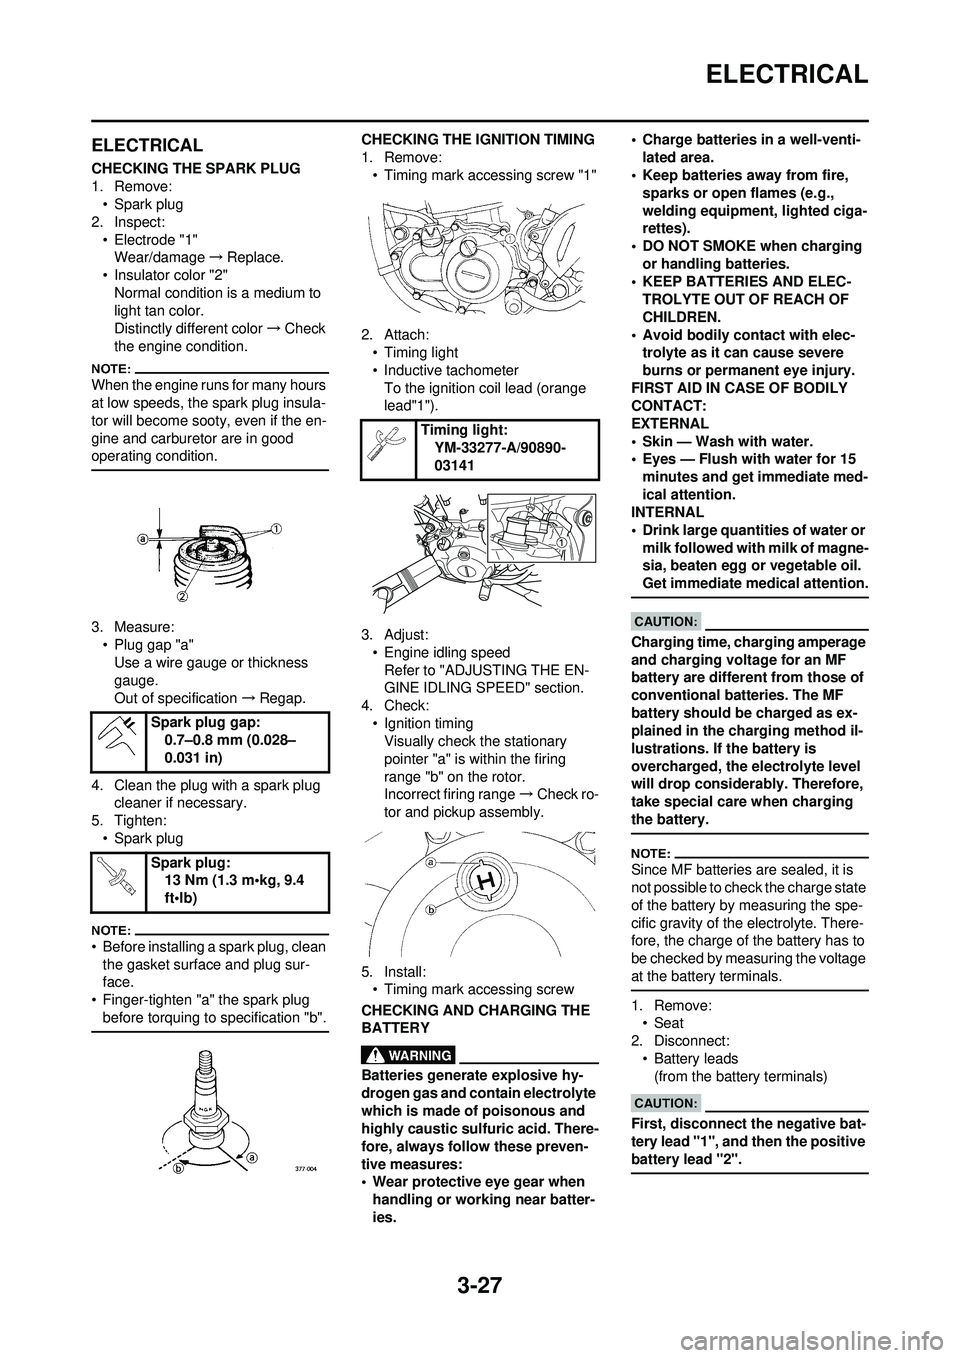
CHECKING THE SPARK PLUG
1. Remove:• Spark plug
2. Inspect:
• Electrode "1"Wear/damage →Replace.
• Insulator color "2"
Normal condition is a medium to
light tan color.
Distinctly different color →Check
the engine condition.
When the engine runs for many hours
at low speeds, the spark plug insula-
tor will become sooty, even if the en-
gine and carburetor are in good
operating condition.
3. Measure: • Plug gap "a"Use a wire gauge or thickness
gauge.
Out of specification →Regap.
4. Clean the plug with a spark plug cleaner if necessary.
5. Tighten: • Spark plug
• Before installing a spark plug, clean the gasket surface and plug sur-
face.
• Finger-tighten "a" the spark plug before torquing to specification "b".
CHECKING THE IGNITION TIMING
1. Remove:• Timing mark accessing screw "1"
2. Attach: • Timing light
• Inductive tachometerTo the ignition coil lead (orange
lead"1").
3. Adjust: • Engine idling speedRefer to "ADJUSTING THE EN-
GINE IDLING SPEED" section.
4. Check: • Ignition timingVisually check the stationary
pointer "a" is within the firing
range "b" on the rotor.
Incorrect firing range →Check ro-
tor and pickup assembly.
5. Install: • Timing mark accessing screw
CHECKING AND CHARGING THE
BATTERY
Batteries generate explosive hy-
drogen gas and contain electrolyte
which is made of poisonous and
highly caustic sulfuric acid. There-
fore, always follow these preven-
tive measures:
• Wear protective eye gear when handling or working near batter-
ies. • Charge batteries
in a well-venti-
lated area.
• Keep batteries away from fire, sparks or open flames (e.g.,
welding equipment, lighted ciga-
rettes).
• DO NOT SMOKE when charging
or handling batteries.
• KEEP BATTERIES AND ELEC- TROLYTE OUT OF REACH OF
CHILDREN.
• Avoid bodily contact with elec- trolyte as it can cause severe
burns or permanent eye injury.
FIRST AID IN CASE OF BODILY
CONTACT:
EXTERNAL
• Skin — Wash with water.
• Eyes — Flush with water for 15
minutes and get immediate med-
ical attention.
INTERNAL
• Drink large quantities of water or milk followed with milk of magne-
sia, beaten egg or vegetable oil.
Get immediate medical attention.
Charging time, charging amperage
and charging voltage for an MF
battery are different from those of
conventional batteries. The MF
battery should be charged as ex-
plained in the charging method il-
lustrations. If the battery is
overcharged, the electrolyte level
will drop considerably. Therefore,
take special care when charging
the battery.
Since MF batteries are sealed, it is
not possible to check the charge state
of the battery by measuring the spe-
cific gravity of the electrolyte. There-
fore, the charge of the battery has to
be checked by measuring the voltage
at the battery terminals.
1. Remove:• Seat
2. Disconnect:
• Battery leads(from the battery terminals)
First, disconnect the negative bat-
tery lead "1", and then the positive
battery lead "2".
Spark plug gap: 0.7–0.8 mm (0.028–
0.031 in)
Spark plug: 13 Nm (1.3 m•kg, 9.4
ft•lb)
Timing light:
YM-33277-A/90890-
03141
Page 86 of 224
3-31
ELECTRICAL
6. Install:•Battery
• Battery band
7. Connect:
• Battery leads(to the battery terminals)
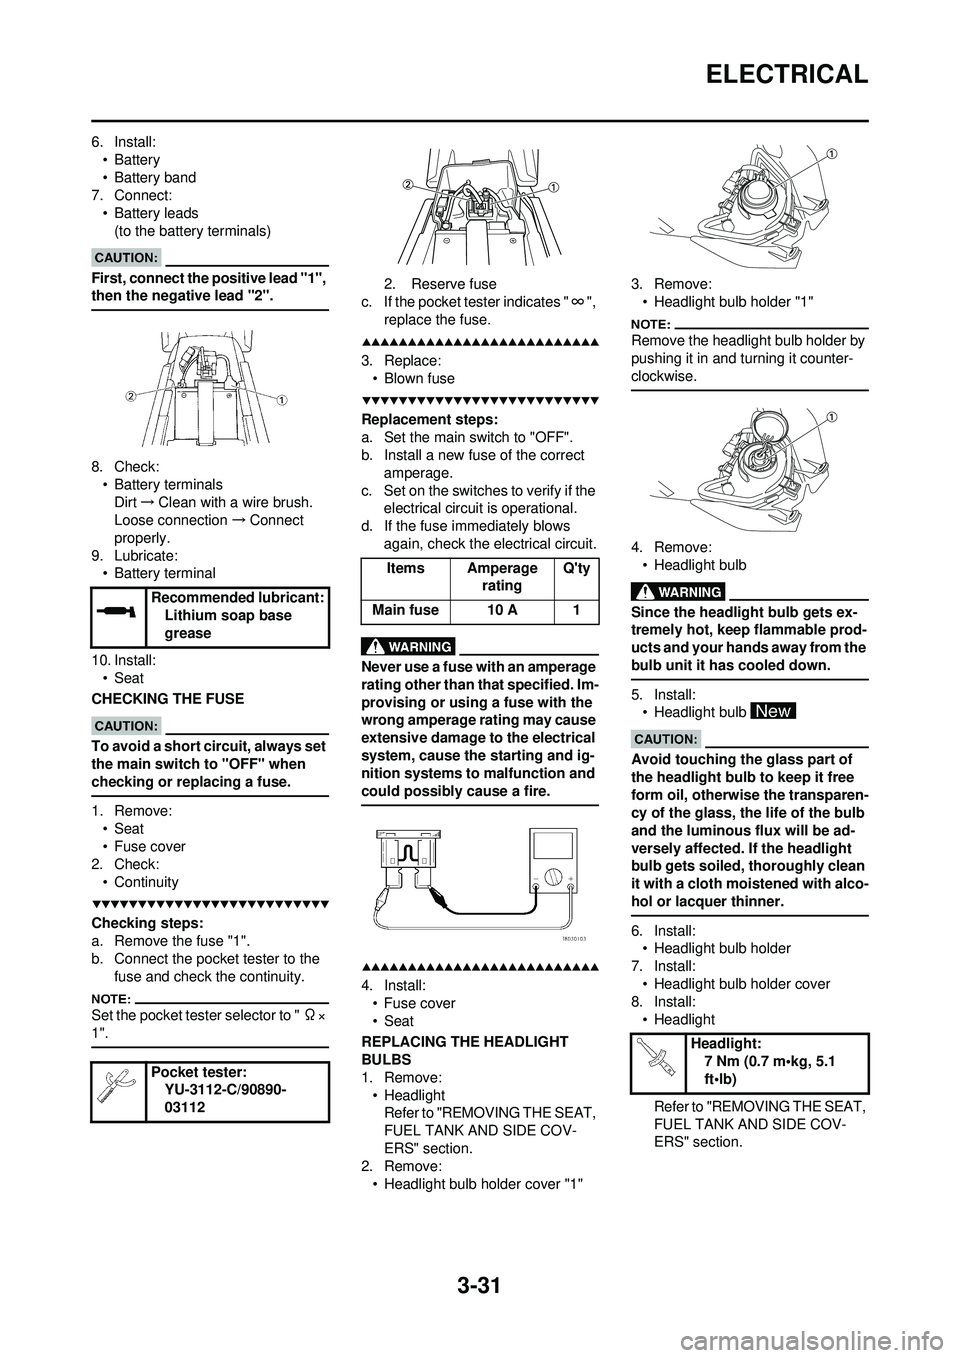
First, connect the positive lead "1",
then the negative lead "2".
8. Check:• Battery terminals
Dirt →Clean with a wire brush.
Loose connection →Connect
properly.
9. Lubricate: • Battery terminal
10. Install: • Seat
CHECKING THE FUSE
To avoid a short circuit, always set
the main switch to "OFF" when
checking or replacing a fuse.
1. Remove: • Seat
• Fuse cover
2. Check:
• Continuity
Checking steps:
a. Remove the fuse "1".
b. Connect the pocket tester to the fuse and check the continuity.
Set the pocket tester selector to " Ω×
1".
2. Reserve fuse
c. If the pocket test er indicates "∞",
replace the fuse.
3. Replace: • Blown fuse
Replacement steps:
a. Set the main switch to "OFF".
b. Install a new fuse of the correct amperage.
c. Set on the switches to verify if the electrical circuit is operational.
d. If the fuse immediately blows again, check the electrical circuit.
Never use a fuse with an amperage
rating other than th at specified. Im-
provising or using a fuse with the
wrong amperage rating may cause
extensive damage to the electrical
system, cause the starting and ig-
nition systems to malfunction and
could possibly cause a fire.
4. Install: • Fuse cover
•Seat
REPLACING THE HEADLIGHT
BULBS
1. Remove: • HeadlightRefer to "REMOVING THE SEAT,
FUEL TANK AND SIDE COV-
ERS" section.
2. Remove:
• Headlight bulb holder cover "1" 3. Remove:
• Headlight bulb holder "1"
Remove the headlight bulb holder by
pushing it in and turning it counter-
clockwise.
4. Remove:• Headlight bulb
Since the headlight bulb gets ex-
tremely hot, keep flammable prod-
ucts and your hands away from the
bulb unit it has cooled down.
5. Install:• Headlight bulb
Avoid touching the glass part of
the headlight bulb to keep it free
form oil, otherwis e the transparen-
cy of the glass, the life of the bulb
and the luminous flux will be ad-
versely affected. If the headlight
bulb gets soiled, thoroughly clean
it with a cloth moistened with alco-
hol or lacquer thinner.
6. Install: • Headlight bulb holder
7. Install:
• Headlight bulb holder cover
8. Install: • Headlight
Refer to "REMOVING THE SEAT,
FUEL TANK AND SIDE COV-
ERS" section.
Recommended lubricant:
Lithium soap base
grease
Pocket tester: YU-3112-C/90890-
03112
Items Amperage ratingQ'ty
Main fuse 10 A 1
Headlight: 7 Nm (0.7 m•kg, 5.1
ft•lb)
Page 113 of 224
5-17
CAMSHAFTS
Measurement steps:
a. Install the camshaft onto the cylin-der head.
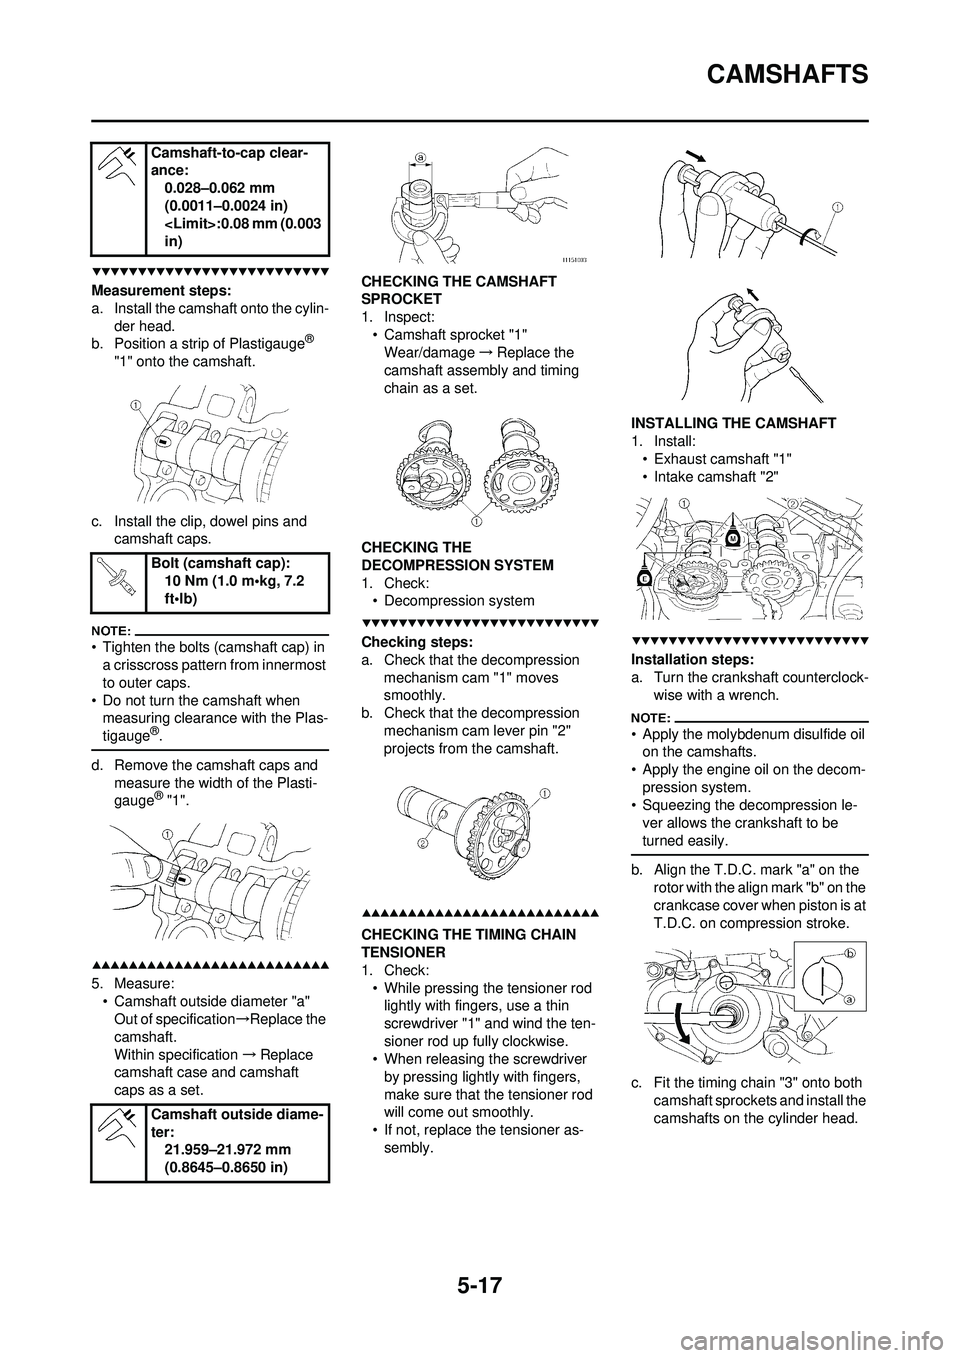
b. Position a strip of Plastigauge
®
"1" onto the camshaft.
c. Install the clip, dowel pins and camshaft caps.
• Tighten the bolts (camshaft cap) in a crisscross pattern from innermost
to outer caps.
• Do not turn the camshaft when measuring clearance with the Plas-
tigauge
®.
d. Remove the camshaft caps and
measure the width of the Plasti-
gauge
® "1".
5. Measure:• Camshaft outside diameter "a"Out of specification →Replace the
camshaft.
Within specification →Replace
camshaft case and camshaft
caps as a set. CHECKING THE CAMSHAFT
SPROCKET
1. Inspect:
• Camshaft sprocket "1"Wear/damage →Replace the
camshaft assemb ly and timing
chain as a set.
CHECKING THE
DECOMPRESSION SYSTEM
1. Check: • Decompression system
Checking steps:
a. Check that the decompression
mechanism cam "1" moves
smoothly.
b. Check that the decompression
mechanism cam lever pin "2"
projects from the camshaft.
CHECKING THE TIMING CHAIN
TENSIONER
1. Check:• While pressing the tensioner rod lightly with fingers, use a thin
screwdriver "1" and wind the ten-
sioner rod up fully clockwise.
• When releasing the screwdriver
by pressing lightly with fingers,
make sure that the tensioner rod
will come out smoothly.
• If not, replace the tensioner as- sembly. INSTALLING THE CAMSHAFT
1. Install:
• Exhaust camshaft "1"
• Intake camshaft "2"
Installation steps:
a. Turn the crankshaft counterclock- wise with a wrench.
• Apply the molybdenum disulfide oil on the camshafts.
• Apply the engine oil on the decom- pression system.
• Squeezing the decompression le-
ver allows the crankshaft to be
turned easily.
b. Align the T.D.C. mark "a" on the rotor with the align mark "b" on the
crankcase cover when piston is at
T.D.C. on compression stroke.
c. Fit the timing chain "3" onto both camshaft sprockets and install the
camshafts on the cylinder head.
Camshaft-to-cap clear-
ance:
0.028–0.062 mm
(0.0011–0.0024 in)
in)
Bolt (camshaft cap): 10 Nm (1.0 m•kg, 7.2
ft•lb)
Camshaft outside diame-
ter: 21.959–21.972 mm
(0.8645–0.8650 in)
Page 116 of 224
5-20
CYLINDER HEAD
CHECKING THE CYLINDER HEAD
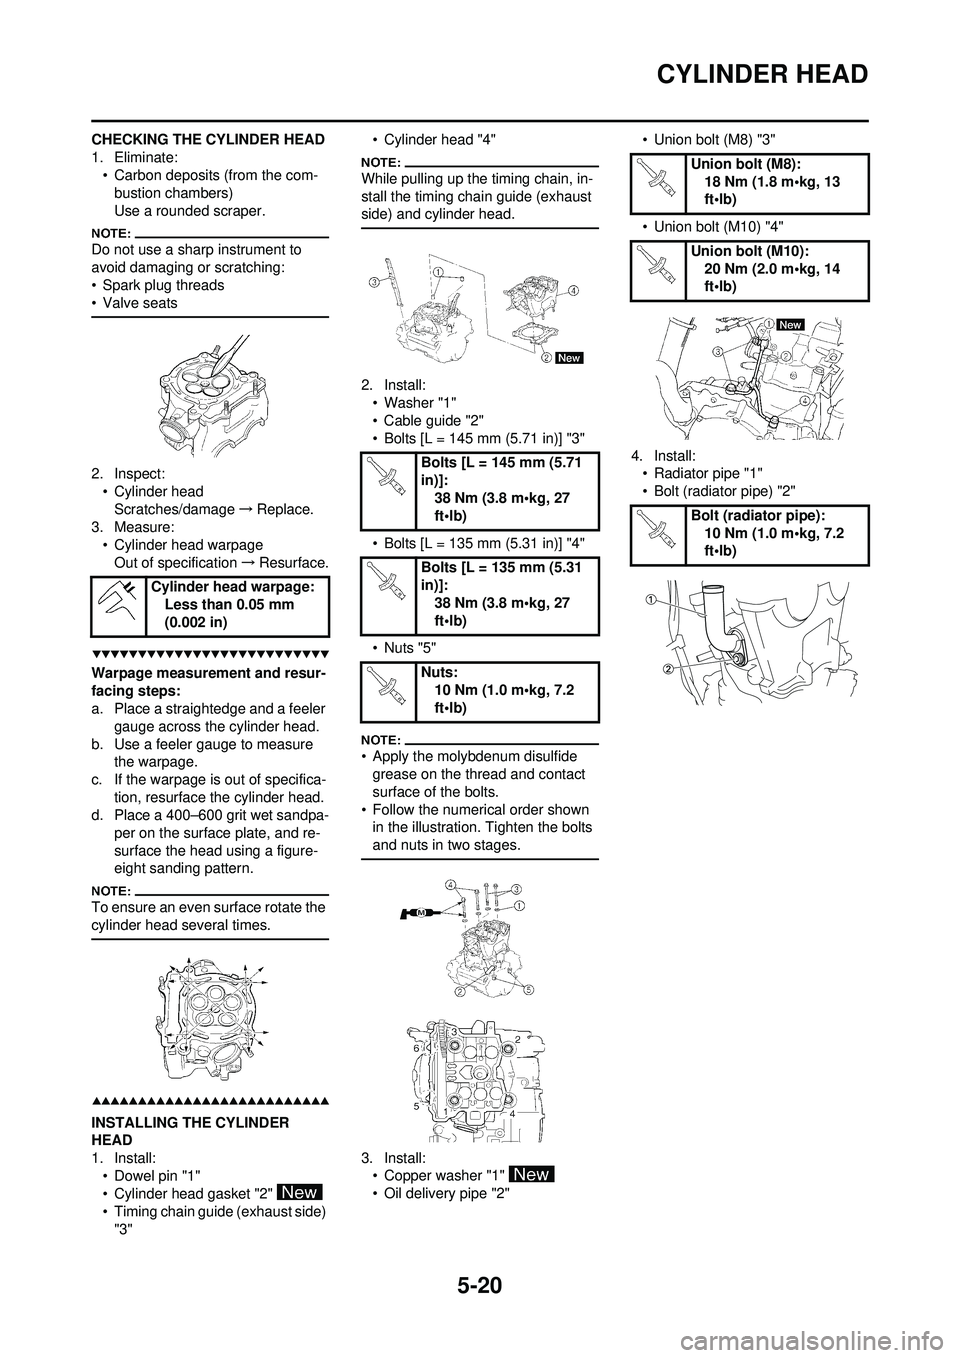
1. Eliminate:• Carbon deposits (from the com-bustion chambers)
Use a rounded scraper.
Do not use a sharp instrument to
avoid damaging or scratching:
• Spark plug threads
• Valve seats
2. Inspect:• Cylinder head
Scratches/damage →Replace.
3. Measure: • Cylinder head warpage
Out of specification →Resurface.
Warpage measurement and resur-
facing steps:
a. Place a straightedge and a feeler
gauge across the cylinder head.
b. Use a feeler gauge to measure the warpage.
c. If the warpage is out of specifica-
tion, resurface the cylinder head.
d. Place a 400–600 grit wet sandpa- per on the surface plate, and re-
surface the head using a figure-
eight sanding pattern.
To ensure an even surface rotate the
cylinder head several times.
INSTALLING THE CYLINDER
HEAD
1. Install:
• Dowel pin "1"
• Cylinder head gasket "2"
• Timing chain guide (exhaust side) "3" • Cylinder head "4"
While pulling up the timing chain, in-
stall the timing chain guide (exhaust
side) and cylinder head.
2. Install:
• Washer "1"
• Cable guide "2"
• Bolts [L = 145 mm (5.71 in)] "3"
• Bolts [L = 135 mm (5.31 in)] "4"
•Nuts "5"
• Apply the molybdenum disulfide grease on the thread and contact
surface of the bolts.
• Follow the numerical order shown in the illustration. Tighten the bolts
and nuts in two stages.
3. Install:• Copper washer "1"
• Oil delivery pipe "2" • Union bolt (M8) "3"
• Union bolt (M10) "4"
4. Install: • Radiator pipe "1"
• Bolt (radiator pipe) "2"
Cylinder head warpage: Less than 0.05 mm
(0.002 in)
Bolts [L = 145 mm (5.71
in)]:38 Nm (3.8 m•kg, 27
ft•lb)
Bolts [L = 135 mm (5.31
in)]: 38 Nm (3.8 m•kg, 27
ft•lb)
Nuts: 10 Nm (1.0 m•kg, 7.2
ft•lb)
Union bolt (M8): 18 Nm (1.8 m•kg, 13
ft•lb)
Union bolt (M10): 20 Nm (2.0 m•kg, 14
ft•lb)
Bolt (radiator pipe): 10 Nm (1.0 m•kg, 7.2
ft•lb)
Page 119 of 224
5-23
VALVES AND VALVE SPRINGS
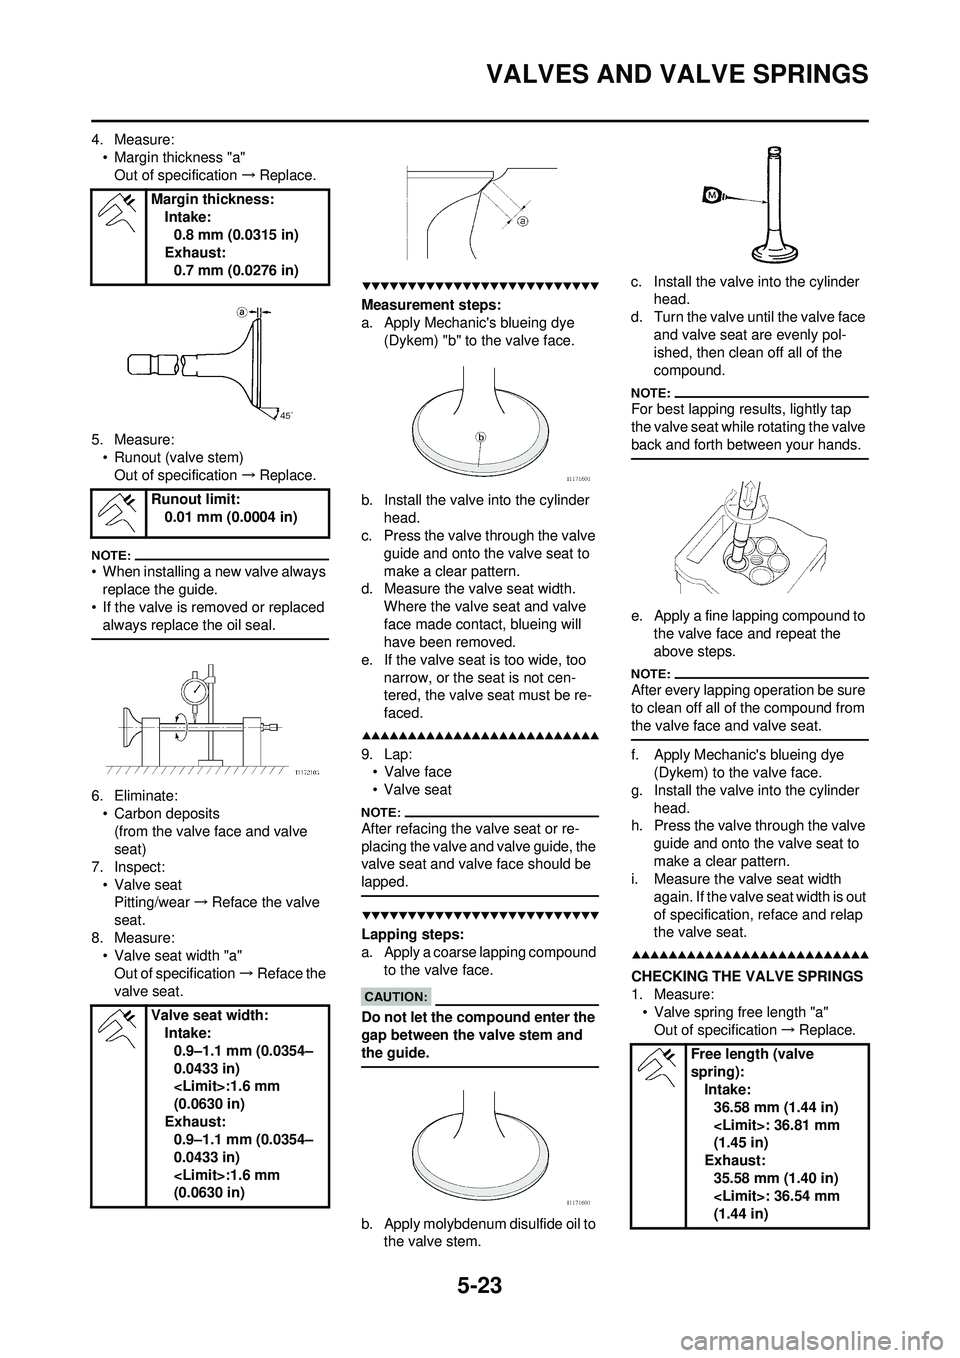
4. Measure:• Margin thickness "a"Out of specification →Replace.
5. Measure: • Runout (valve stem)Out of specification →Replace.
• When installing a new valve always
replace the guide.
• If the valve is removed or replaced
always replace the oil seal.
6. Eliminate:• Carbon deposits(from the valve face and valve
seat)
7. Inspect: • Valve seatPitting/wear →Reface the valve
seat.
8. Measure: • Valve seat width "a"
Out of specification →Reface the
valve seat.
Measurement steps:
a. Apply Mechanic's blueing dye (Dykem) "b" to the valve face.
b. Install the valve into the cylinder head.
c. Press the valve through the valve guide and onto the valve seat to
make a clear pattern.
d. Measure the valve seat width. Where the valve seat and valve
face made contact, blueing will
have been removed.
e. If the valve seat is too wide, too
narrow, or the seat is not cen-
tered, the valve se at must be re-
faced.
9. Lap: • Valve face
• Valve seat
After refacing the valve seat or re-
placing the valve and valve guide, the
valve seat and valve face should be
lapped.
Lapping steps:
a. Apply a coarse lapping compound
to the valve face.
Do not let the co mpound enter the
gap between the valve stem and
the guide.
b. Apply molybdenum disulfide oil to the valve stem. c. Install the valve into the cylinder
head.
d. Turn the valve until the valve face and valve seat are evenly pol-
ished, then clean off all of the
compound.
For best lapping results, lightly tap
the valve seat while rotating the valve
back and forth between your hands.
e. Apply a fine lapping compound to the valve face and repeat the
above steps.
After every lapping operation be sure
to clean off all of the compound from
the valve face and valve seat.
f. Apply Mechanic's blueing dye (Dykem) to the valve face.
g. Install the valve into the cylinder head.
h. Press the valve through the valve
guide and onto the valve seat to
make a clear pattern.
i. Measure the valve seat width
again. If the valve seat width is out
of specification, reface and relap
the valve seat.
CHECKING THE VALVE SPRINGS
1. Measure:• Valve spring free length "a"Out of specification →Replace.
Margin thickness:
Intake:
0.8 mm (0.0315 in)
Exhaust: 0.7 mm (0.0276 in)
Runout limit: 0.01 mm (0.0004 in)
Valve seat width: Intake:
0.9–1.1 mm (0.0354–
0.0433 in)
(0.0630 in)
Exhaust: 0.9–1.1 mm (0.0354–
0.0433 in)
(0.0630 in)
Free length (valve
spring): Intake:36.58 mm (1.44 in)
(1.45 in)
Exhaust:
35.58 mm (1.40 in)
(1.44 in)
Page 120 of 224
5-24
VALVES AND VALVE SPRINGS
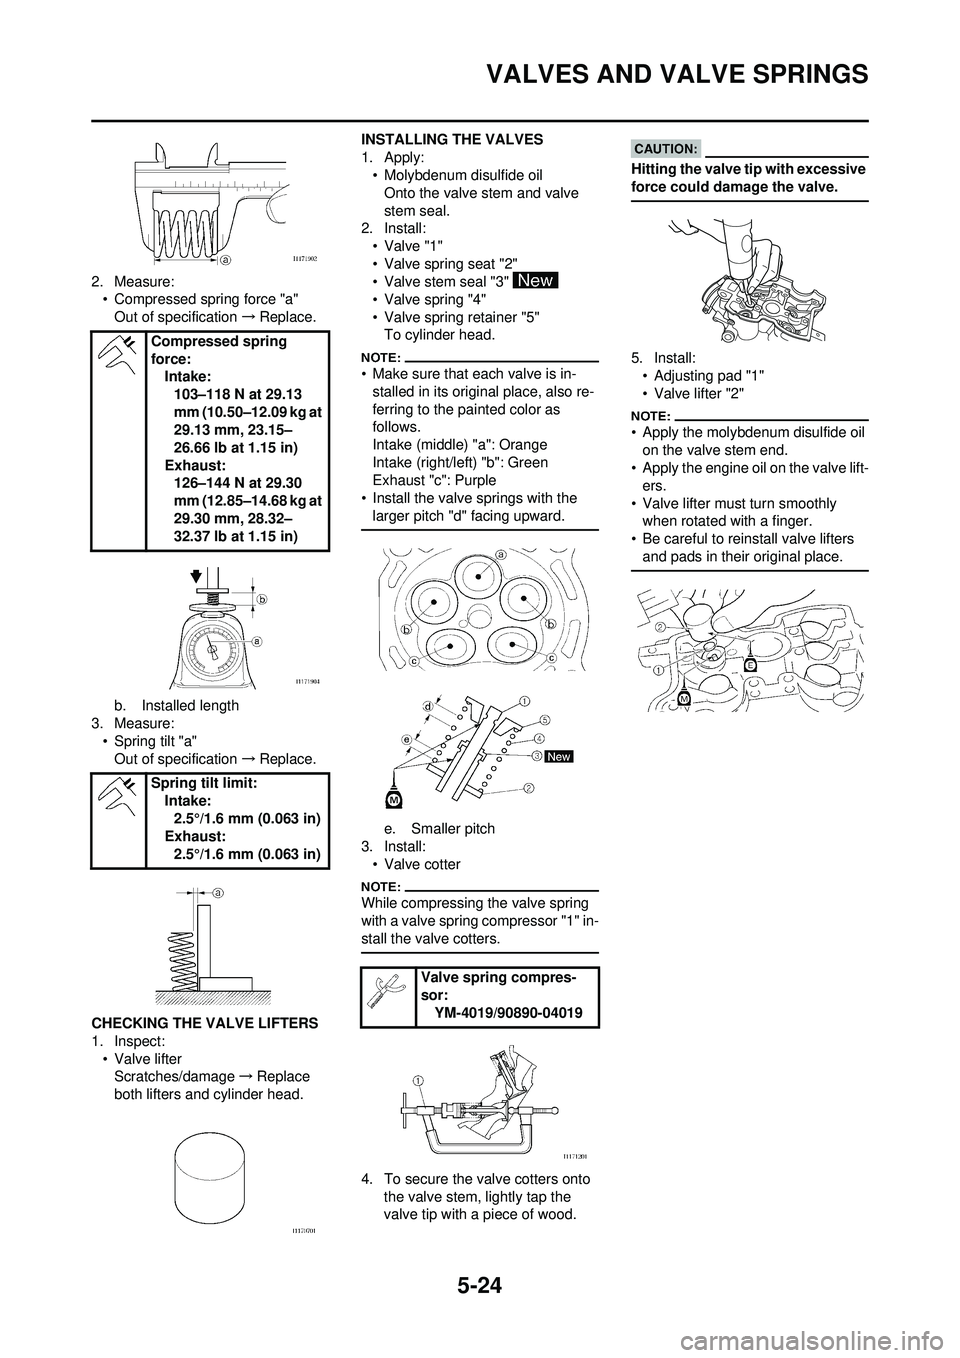
2. Measure:• Compressed spring force "a"
Out of specification →Replace.
b. Installed length
3. Measure: • Spring tilt "a"
Out of specification →Replace.
CHECKING THE VALVE LIFTERS
1. Inspect: • Valve lifterScratches/damage →Replace
both lifters and cylinder head. INSTALLING THE VALVES
1. Apply:
• Molybdenum disulfide oilOnto the valve stem and valve
stem seal.
2. Install: • Valve "1"
• Valve spring seat "2"
• Valve stem seal "3"
• Valve spring "4"
• Valve spring retainer "5"To cylinder head.
• Make sure that each valve is in-stalled in its original place, also re-
ferring to the painted color as
follows.
Intake (middle) "a": Orange
Intake (right/left) "b": Green
Exhaust "c": Purple
• Install the valve springs with the
larger pitch "d" facing upward.
e. Smaller pitch
3. Install:
• Valve cotter
While compressing the valve spring
with a valve spring compressor "1" in-
stall the valve cotters.
4. To secure the va lve cotters onto
the valve stem, lightly tap the
valve tip with a piece of wood.
Hitting the valve tip with excessive
force could damage the valve.
5. Install: • Adjusting pad "1"
• Valve lifter "2"
• Apply the molybdenum disulfide oil
on the valve stem end.
• Apply the engine oil on the valve lift- ers.
• Valve lifter must turn smoothly when rotated with a finger.
• Be careful to reinstall valve lifters and pads in their original place.
Compressed spring
force: Intake:
103–118 N at 29.13
mm (10.50–12.09 kg at
29.13 mm, 23.15–
26.66 lb at 1.15 in)
Exhaust: 126–144 N at 29.30
mm (12.85–14.68 kg at
29.30 mm, 28.32–
32.37 lb at 1.15 in)
Spring tilt limit: Intake:2.5°/1.6 mm (0.063 in)
Exhaust: 2.5°/1.6 mm (0.063 in)
Valve spring compres-
sor:
YM-4019/90890-04019
Page 123 of 224
5-27
CYLINDER AND PISTON
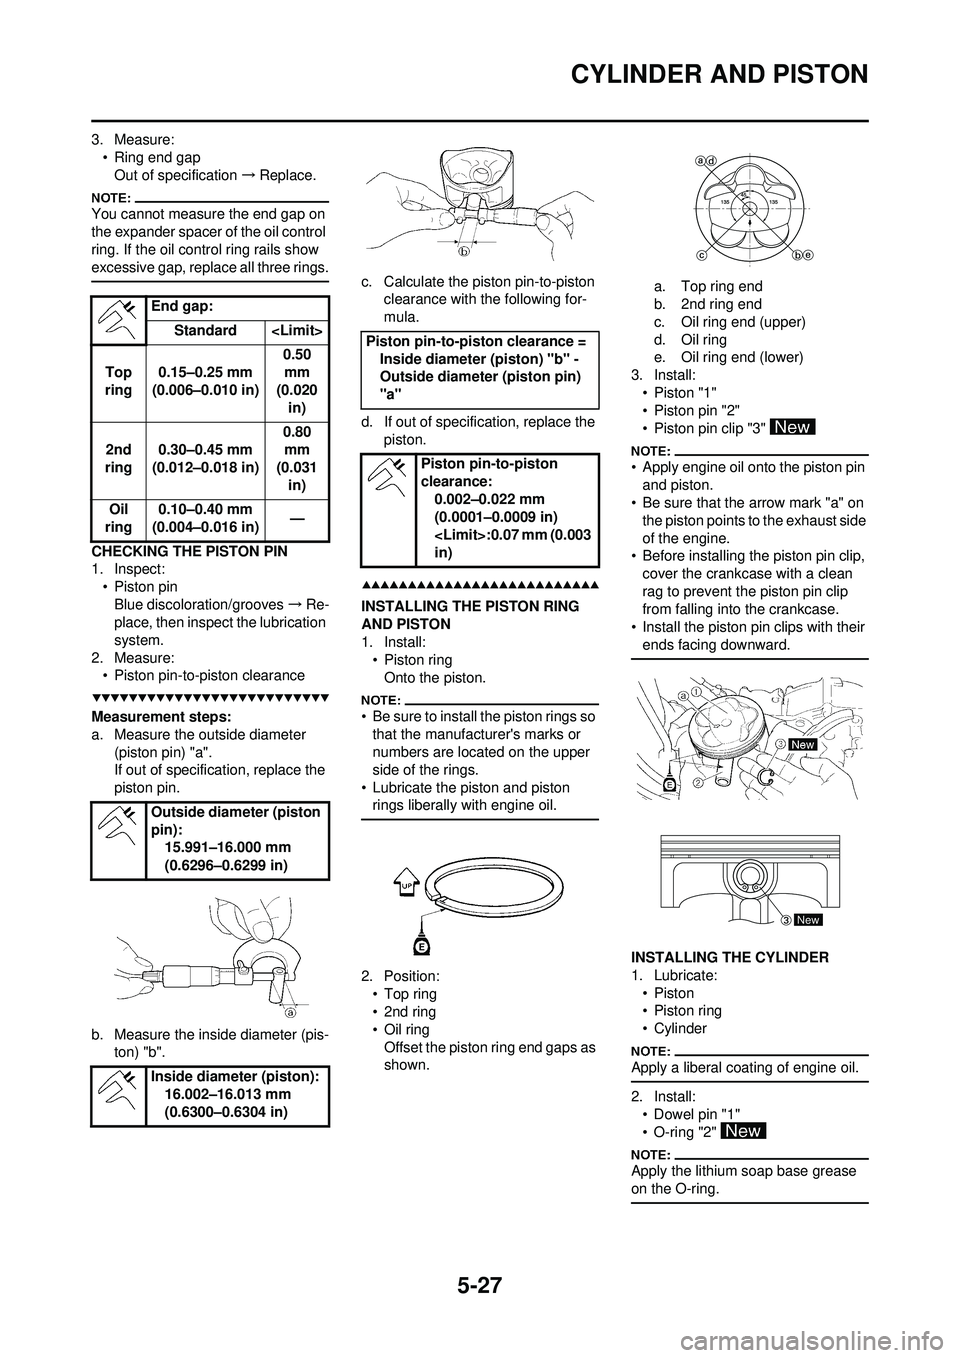
3. Measure:• Ring end gapOut of specification →Replace.
You cannot measure the end gap on
the expander spacer of the oil control
ring. If the oil control ring rails show
excessive gap, replace all three rings.
CHECKING THE PISTON PIN
1. Inspect:
• Piston pinBlue discoloration/grooves →Re-
place, then inspect the lubrication
system.
2. Measure: • Piston pin-to-piston clearance
Measurement steps:
a. Measure the outside diameter (piston pin) "a".
If out of specification, replace the
piston pin.
b. Measure the inside diameter (pis- ton) "b". c. Calculate the piston pin-to-piston
clearance with the following for-
mula.
d. If out of specific ation, replace the
piston.
INSTALLING THE PISTON RING
AND PISTON
1. Install: •Piston ring
Onto the piston.
• Be sure to install the piston rings so that the manufacturer's marks or
numbers are located on the upper
side of the rings.
• Lubricate the piston and piston rings liberally with engine oil.
2. Position:•Top ring
• 2nd ring
• Oil ringOffset the piston ring end gaps as
shown. a. Top ring end
b. 2nd ring end
c. Oil ring end (upper)
d. Oil ring
e. Oil ring end (lower)
3. Install: • Piston "1"
• Piston pin "2"
• Piston pin clip "3"
• Apply engine oil onto the piston pin and piston.
• Be sure that the arrow mark "a" on
the piston points to the exhaust side
of the engine.
• Before installing the piston pin clip,
cover the crankcase with a clean
rag to prevent the piston pin clip
from falling into the crankcase.
• Install the piston pin clips with their ends facing downward.
INSTALLING THE CYLINDER
1. Lubricate:•Piston
• Piston ring
• Cylinder
Apply a liberal coating of engine oil.
2. Install:
• Dowel pin "1"
• O-ring "2"
Apply the lithium soap base grease
on the O-ring.
End gap:
Standard
Top
ring 0.15–0.25 mm
(0.006–0.010 in) 0.50
mm
(0.020
in)
2nd
ring 0.30–0.45 mm
(0.012–0.018 in) 0.80
mm
(0.031
in)
Oil
ring 0.10–0.40 mm
(0.004–0.016 in) —
Outside diameter (piston
pin): 15.991–16.000 mm
(0.6296–0.6299 in)
Inside diameter (piston): 16.002–16.013 mm
(0.6300–0.6304 in)
Piston pin-to-pis ton clearance =
Inside diameter (piston) "b" -
Outside diameter (piston pin)
"a"
Piston pin-to-piston
clearance:0.002–0.022 mm
(0.0001–0.0009 in)
in)
New
Page 127 of 224
5-31
CLUTCH
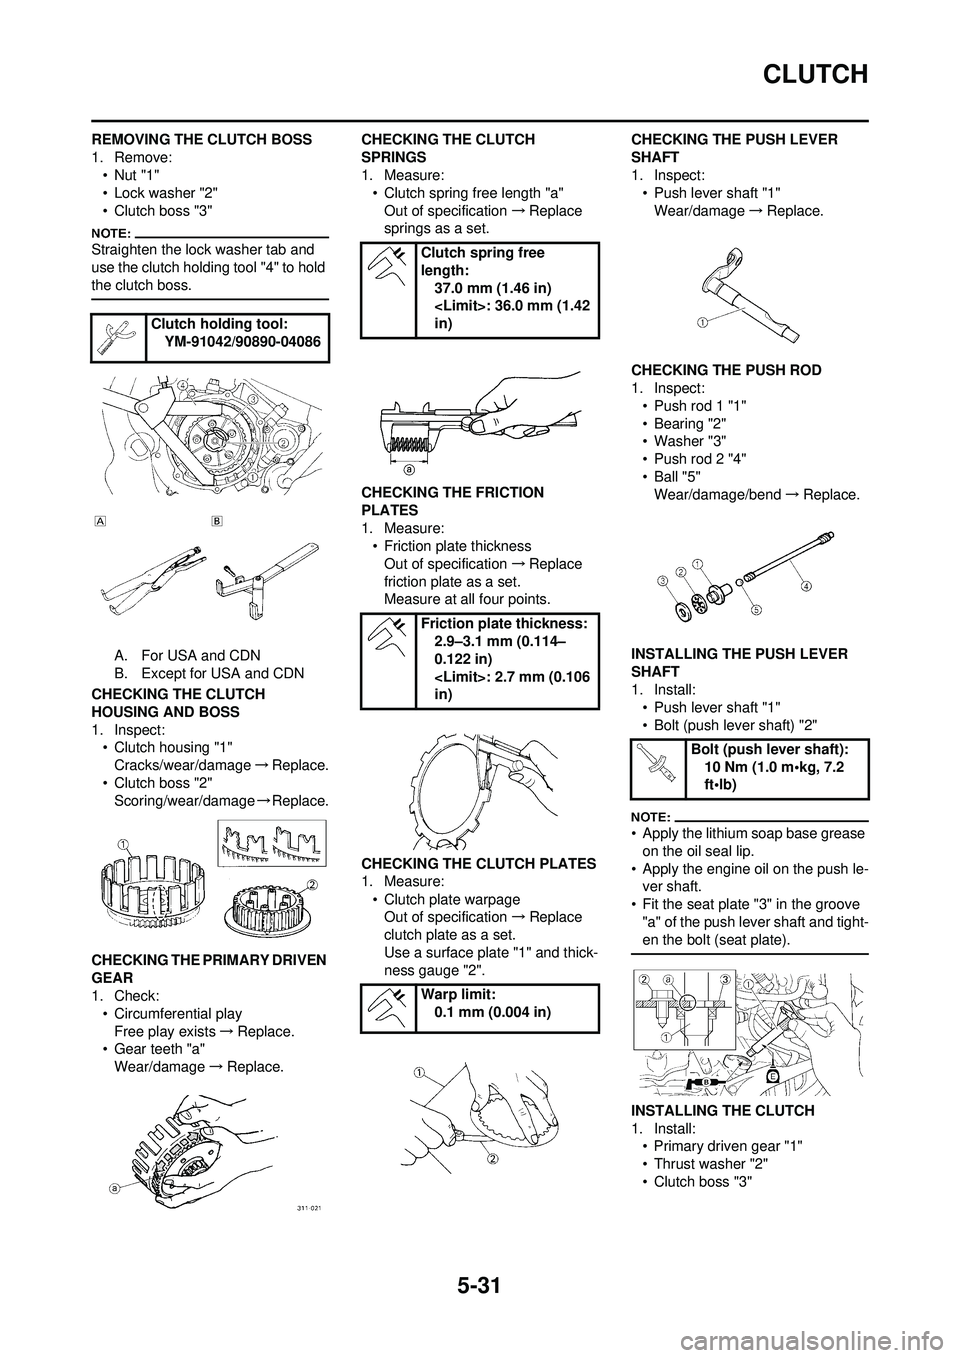
REMOVING THE CLUTCH BOSS
1. Remove:•Nut "1"
• Lock washer "2"
• Clutch boss "3"
Straighten the lock washer tab and
use the clutch holding tool "4" to hold
the clutch boss.
A. For USA and CDN
B. Except for USA and CDN
CHECKING THE CLUTCH
HOUSING AND BOSS
1. Inspect: • Clutch housing "1"
Cracks/wear/damage →Replace.
• Clutch boss "2" Scoring/wear/damage →Replace.
CHECKING THE PRIMARY DRIVEN
GEAR
1. Check: • Circumferential play
Free play exists →Replace.
• Gear teeth "a" Wear/damage →Replace. CHECKING THE CLUTCH
SPRINGS
1. Measure:
• Clutch spring free length "a"
Out of specification →Replace
springs as a set.
CHECKING THE FRICTION
PLATES
1. Measure: • Friction plate thickness
Out of specification →Replace
friction plate as a set.
Measure at all four points.
CHECKING THE CLUTCH PLATES
1. Measure: • Clutch plate warpageOut of specification →Replace
clutch plate as a set.
Use a surface plate "1" and thick-
ness gauge "2". CHECKING THE PUSH LEVER
SHAFT
1. Inspect:
• Push lever shaft "1"
Wear/damage →Replace.
CHECKING THE PUSH ROD
1. Inspect: • Push rod 1 "1"
• Bearing "2"
• Washer "3"
• Push rod 2 "4"
•Ball "5"Wear/damage/bend →Replace.
INSTALLING THE PUSH LEVER
SHAFT
1. Install: • Push lever shaft "1"
• Bolt (push lever shaft) "2"
• Apply the lithium soap base grease
on the oil seal lip.
• Apply the engine oil on the push le- ver shaft.
• Fit the seat plate "3" in the groove "a" of the push lever shaft and tight-
en the bolt (seat plate).
INSTALLING THE CLUTCH
1. Install:• Primary driven gear "1"
• Thrust washer "2"
• Clutch boss "3"
Clutch holding tool:
YM-91042/90890-04086
Clutch spring free
length:
37.0 mm (1.46 in)
in)
Friction plate thickness: 2.9–3.1 mm (0.114–
0.122 in)
in)
Warp limit: 0.1 mm (0.004 in)
Bolt (push lever shaft): 10 Nm (1.0 m•kg, 7.2
ft•lb)
Page 132 of 224
5-36
OIL FILTER ELEMENT AND WATER PUMP
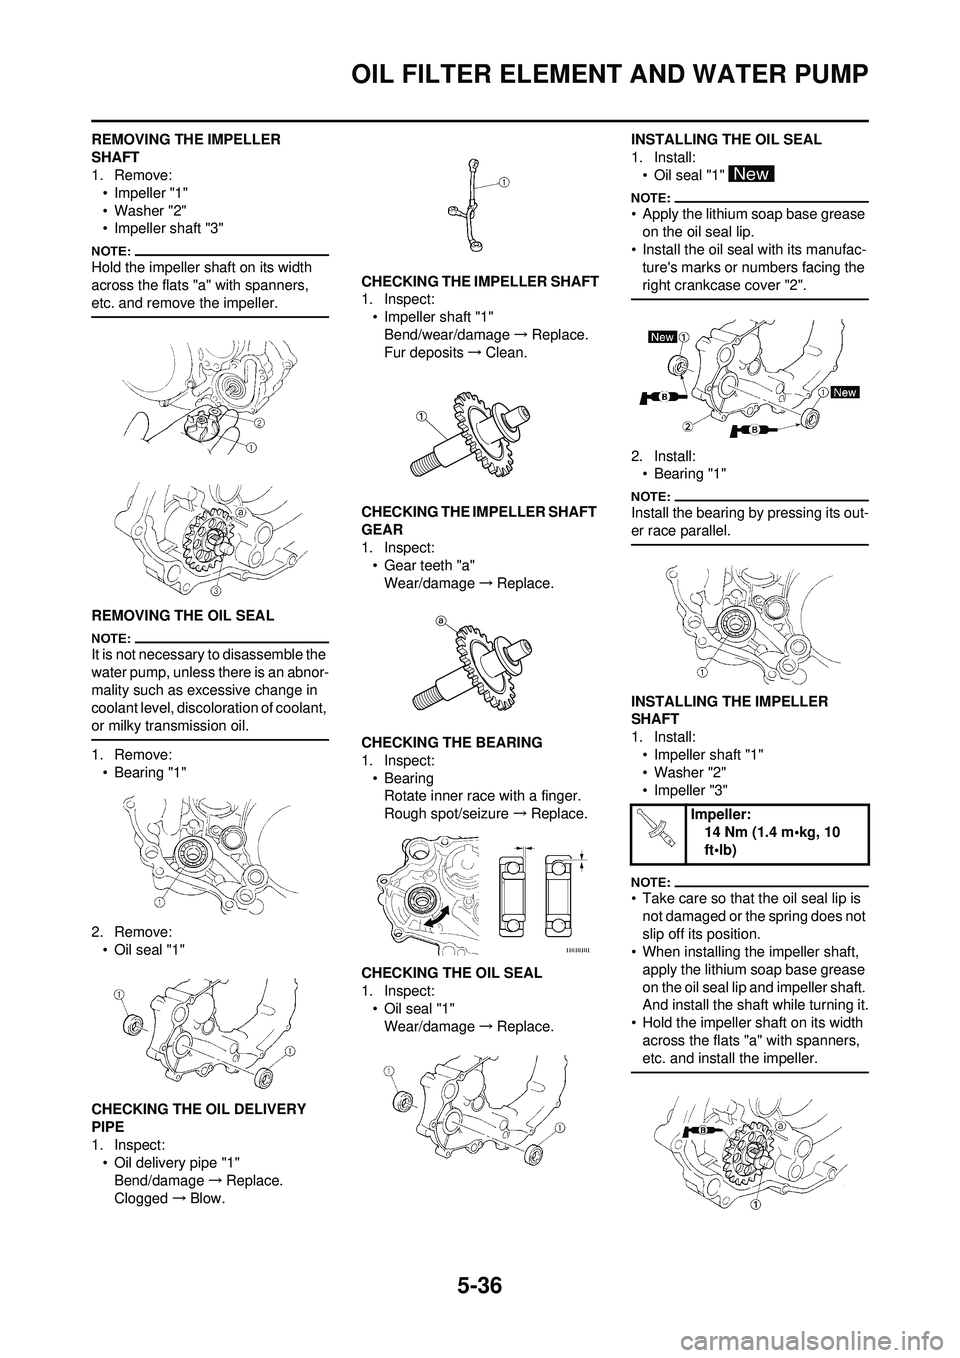
REMOVING THE IMPELLER
SHAFT
1. Remove:• Impeller "1"
• Washer "2"
• Impeller shaft "3"
Hold the impeller shaft on its width
across the flats "a" with spanners,
etc. and remove the impeller.
REMOVING THE OIL SEAL
It is not necessary to disassemble the
water pump, unless there is an abnor-
mality such as excessive change in
coolant level, discoloration of coolant,
or milky transmission oil.
1. Remove:• Bearing "1"
2. Remove: • Oil seal "1"
CHECKING THE OIL DELIVERY
PIPE
1. Inspect: • Oil delivery pipe "1"Bend/damage →Replace.
Clogged →Blow. CHECKING THE IMPELLER SHAFT
1. Inspect:
• Impeller shaft "1"Bend/wear/damage →Replace.
Fur deposits →Clean.
CHECKING THE IMPELLER SHAFT
GEAR
1. Inspect: • Gear teeth "a"Wear/damage →Replace.
CHECKING THE BEARING
1. Inspect: •BearingRotate inner race with a finger.
Rough spot/seizure →Replace.
CHECKING THE OIL SEAL
1. Inspect: • Oil seal "1"Wear/damage →Replace. INSTALLING THE OIL SEAL
1. Install:
• Oil seal "1"
• Apply the lithium soap base grease on the oil seal lip.
• Install the oil seal with its manufac- ture's marks or numbers facing the
right crankcase cover "2".
2. Install:• Bearing "1"
Install the bearing by pressing its out-
er race parallel.
INSTALLING THE IMPELLER
SHAFT
1. Install:• Impeller shaft "1"
• Washer "2"
• Impeller "3"
• Take care so that the oil seal lip is
not damaged or the spring does not
slip off its position.
• When installing the impeller shaft,
apply the lithium soap base grease
on the oil seal lip and impeller shaft.
And install the shaft while turning it.
• Hold the impeller shaft on its width across the flats "a" with spanners,
etc. and install the impeller.
Impeller: 14 Nm (1.4 m•kg, 10
ft•lb)
Page 135 of 224
5-39
BALANCER
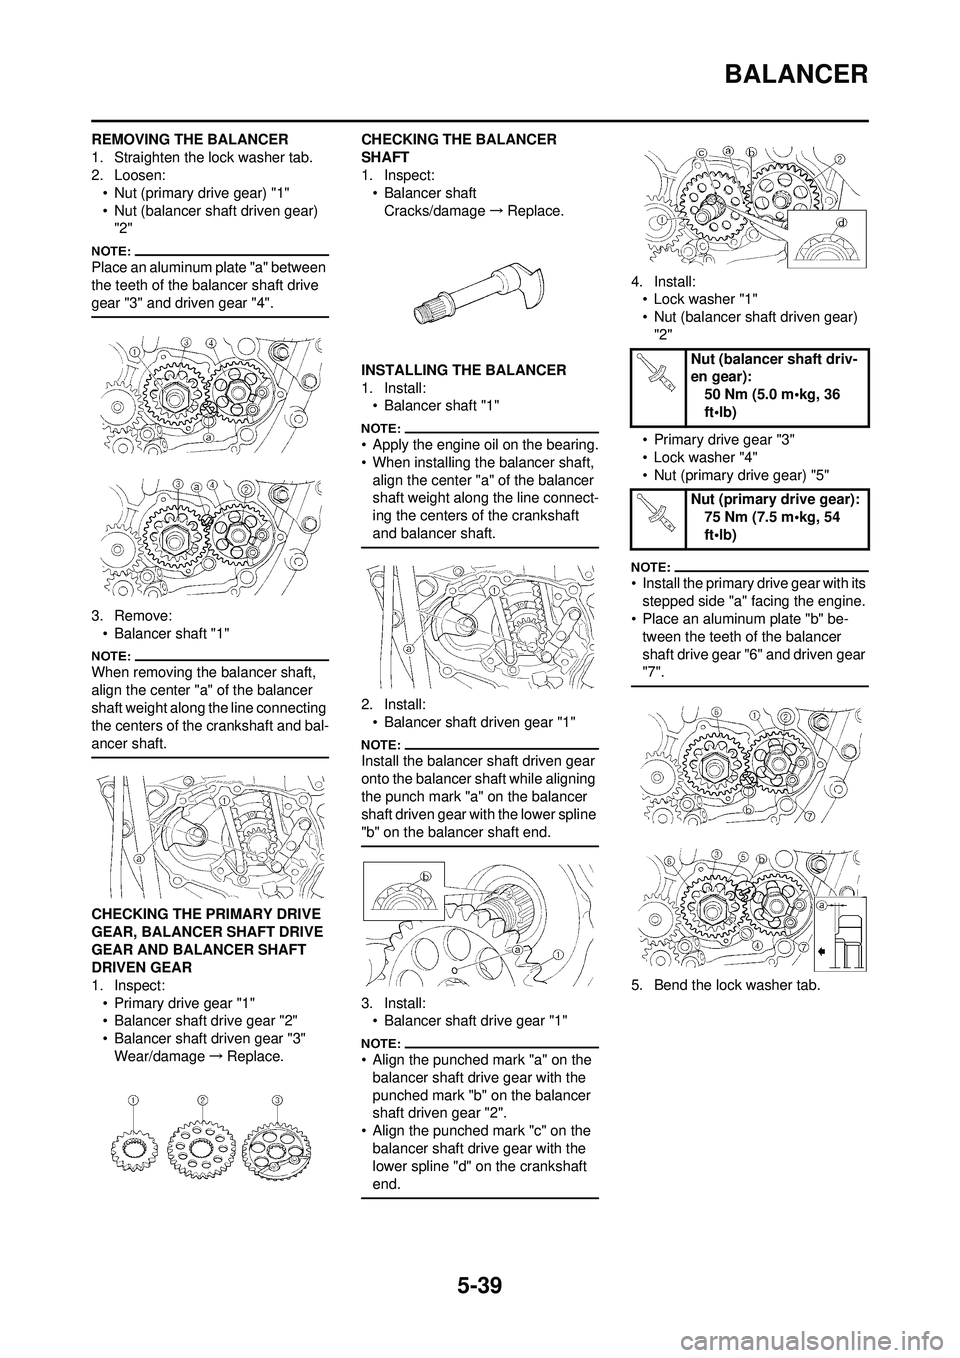
REMOVING THE BALANCER
1. Straighten the lock washer tab.
2. Loosen:• Nut (primary drive gear) "1"
• Nut (balancer shaft driven gear) "2"
Place an aluminum plate "a" between
the teeth of the balancer shaft drive
gear "3" and driven gear "4".
3. Remove:• Balancer shaft "1"
When removing the balancer shaft,
align the center "a" of the balancer
shaft weight along the line connecting
the centers of the crankshaft and bal-
ancer shaft.
CHECKING THE PRIMARY DRIVE
GEAR, BALANCER SHAFT DRIVE
GEAR AND BALANCER SHAFT
DRIVEN GEAR
1. Inspect:
• Primary drive gear "1"
• Balancer shaft drive gear "2"
• Balancer shaft driven gear "3"Wear/damage →Replace. CHECKING THE BALANCER
SHAFT
1. Inspect:
• Balancer shaft
Cracks/damage →Replace.
INSTALLING THE BALANCER
1. Install: • Balancer shaft "1"
• Apply the engine oil on the bearing.
• When installing the balancer shaft, align the center "a" of the balancer
shaft weight along the line connect-
ing the centers of the crankshaft
and balancer shaft.
2. Install:• Balancer shaft driven gear "1"
Install the balancer shaft driven gear
onto the balancer shaft while aligning
the punch mark "a" on the balancer
shaft driven gear with the lower spline
"b" on the balancer shaft end.
3. Install:• Balancer shaft drive gear "1"
• Align the punched mark "a" on the balancer shaft drive gear with the
punched mark "b" on the balancer
shaft driven gear "2".
• Align the punched mark "c" on the
balancer shaft drive gear with the
lower spline "d" on the crankshaft
end.
4. Install:• Lock washer "1"
• Nut (balancer shaft driven gear) "2"
• Primary drive gear "3"
• Lock washer "4"
• Nut (primary drive gear) "5"
• Install the primary drive gear with its stepped side "a" facing the engine.
• Place an aluminum plate "b" be-
tween the teeth of the balancer
shaft drive gear "6" and driven gear
"7".
5. Bend the lock washer tab.
Nut (balancer shaft driv-
en gear): 50 Nm (5.0 m•kg, 36
ft•lb)
Nut (primary drive gear): 75 Nm (7.5 m•kg, 54
ft•lb)