air filter YAMAHA WR 250F 2011 User Guide
[x] Cancel search | Manufacturer: YAMAHA, Model Year: 2011, Model line: WR 250F, Model: YAMAHA WR 250F 2011Pages: 232, PDF Size: 14.29 MB
Page 68 of 232
3-9
ENGINE
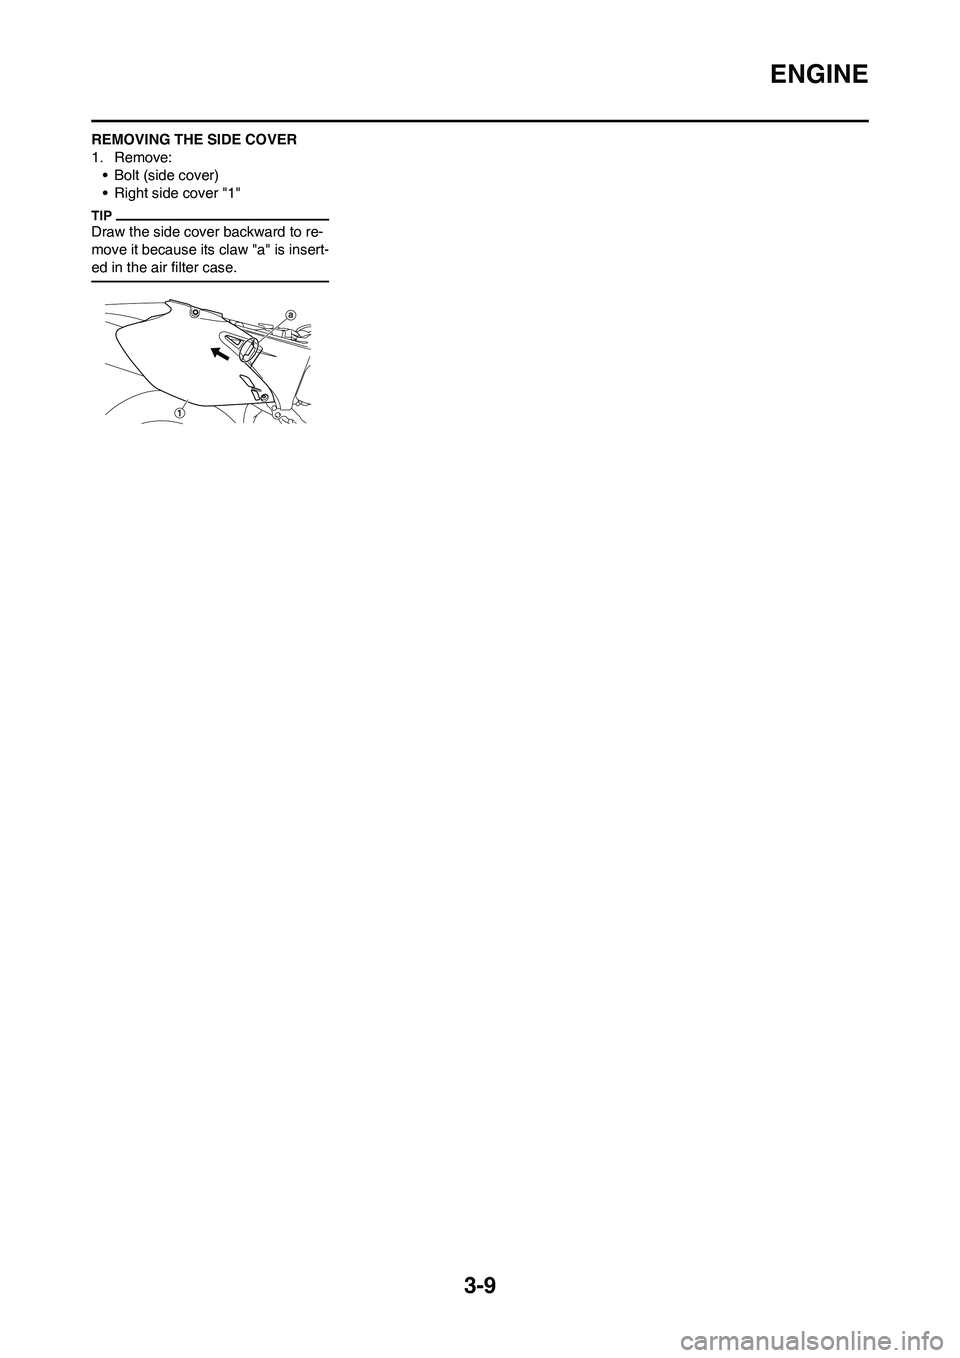
REMOVING THE SIDE COVER
1. Remove:
• Bolt (side cover)
• Right side cover "1"
Draw the side cover backward to re-
move it because its claw "a" is insert-
ed in the air filter case.
Page 72 of 232
3-13
ENGINE
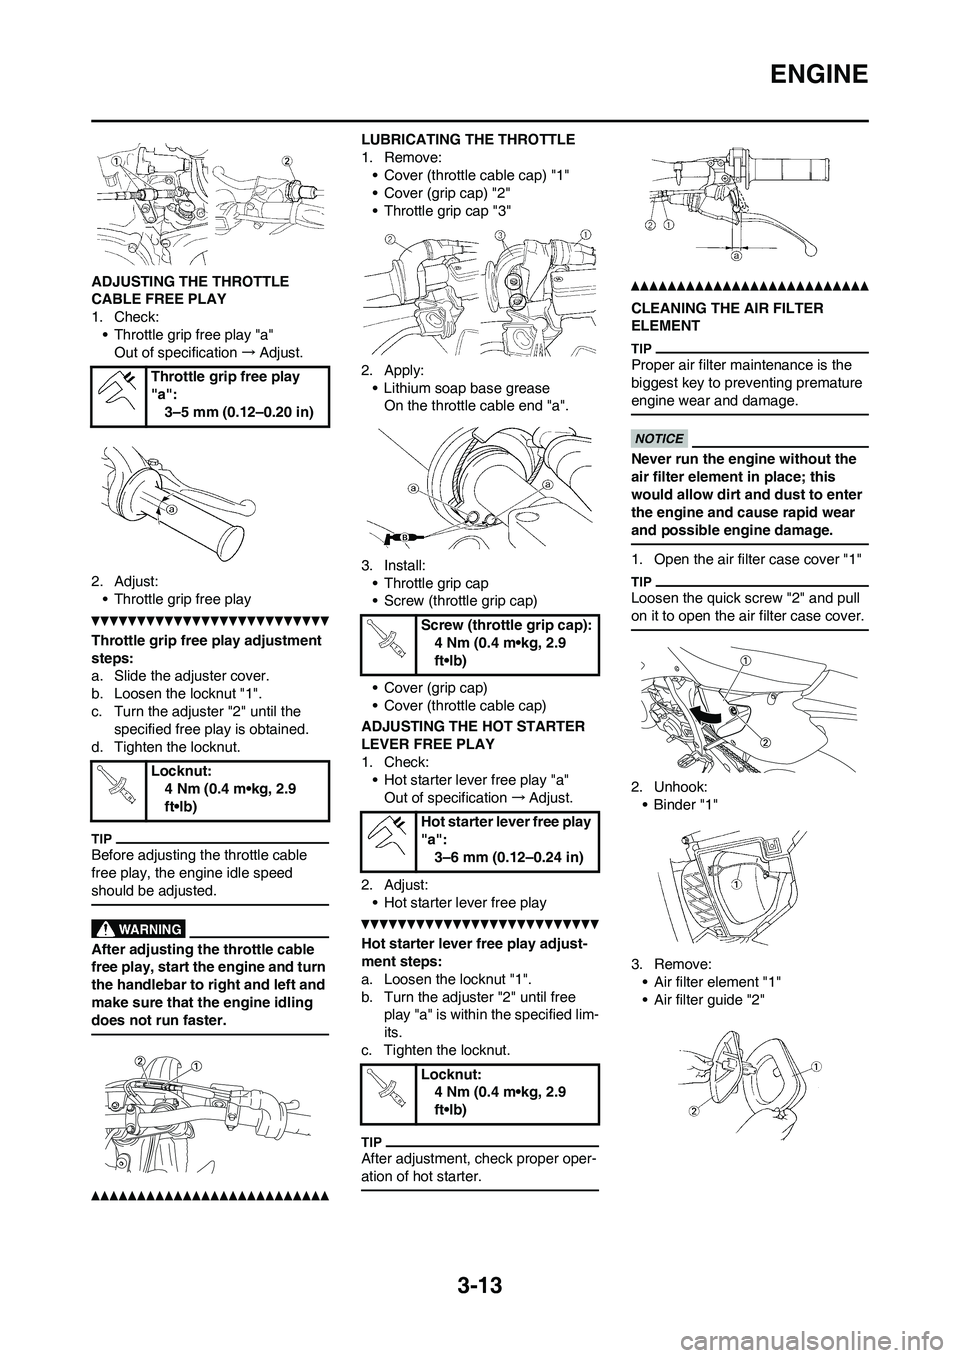
ADJUSTING THE THROTTLE
CABLE FREE PLAY
1. Check:
• Throttle grip free play "a"
Out of specification→Adjust.
2. Adjust:
• Throttle grip free play
Throttle grip free play adjustment
steps:
a. Slide the adjuster cover.
b. Loosen the locknut "1".
c. Turn the adjuster "2" until the
specified free play is obtained.
d. Tighten the locknut.
Before adjusting the throttle cable
free play, the engine idle speed
should be adjusted.
After adjusting the throttle cable
free play, start the engine and turn
the handlebar to right and left and
make sure that the engine idling
does not run faster.
LUBRICATING THE THROTTLE
1. Remove:
• Cover (throttle cable cap) "1"
• Cover (grip cap) "2"
• Throttle grip cap "3"
2. Apply:
• Lithium soap base grease
On the throttle cable end "a".
3. Install:
• Throttle grip cap
• Screw (throttle grip cap)
• Cover (grip cap)
• Cover (throttle cable cap)
ADJUSTING THE HOT STARTER
LEVER FREE PLAY
1. Check:
• Hot starter lever free play "a"
Out of specification→Adjust.
2. Adjust:
• Hot starter lever free play
Hot starter lever free play adjust-
ment steps:
a. Loosen the locknut "1".
b. Turn the adjuster "2" until free
play "a" is within the specified lim-
its.
c. Tighten the locknut.
After adjustment, check proper oper-
ation of hot starter.
CLEANING THE AIR FILTER
ELEMENT
Proper air filter maintenance is the
biggest key to preventing premature
engine wear and damage.
Never run the engine without the
air filter element in place; this
would allow dirt and dust to enter
the engine and cause rapid wear
and possible engine damage.
1. Open the air filter case cover "1"
Loosen the quick screw "2" and pull
on it to open the air filter case cover.
2. Unhook:
•Binder "1"
3. Remove:
• Air filter element "1"
• Air filter guide "2" Throttle grip free play
"a":
3–5 mm (0.12–0.20 in)
Locknut:
4 Nm (0.4 m•kg, 2.9
ft•lb)
Screw (throttle grip cap):
4 Nm (0.4 m•kg, 2.9
ft•lb)
Hot starter lever free play
"a":
3–6 mm (0.12–0.24 in)
Locknut:
4 Nm (0.4 m•kg, 2.9
ft•lb)
Page 73 of 232
3-14
ENGINE
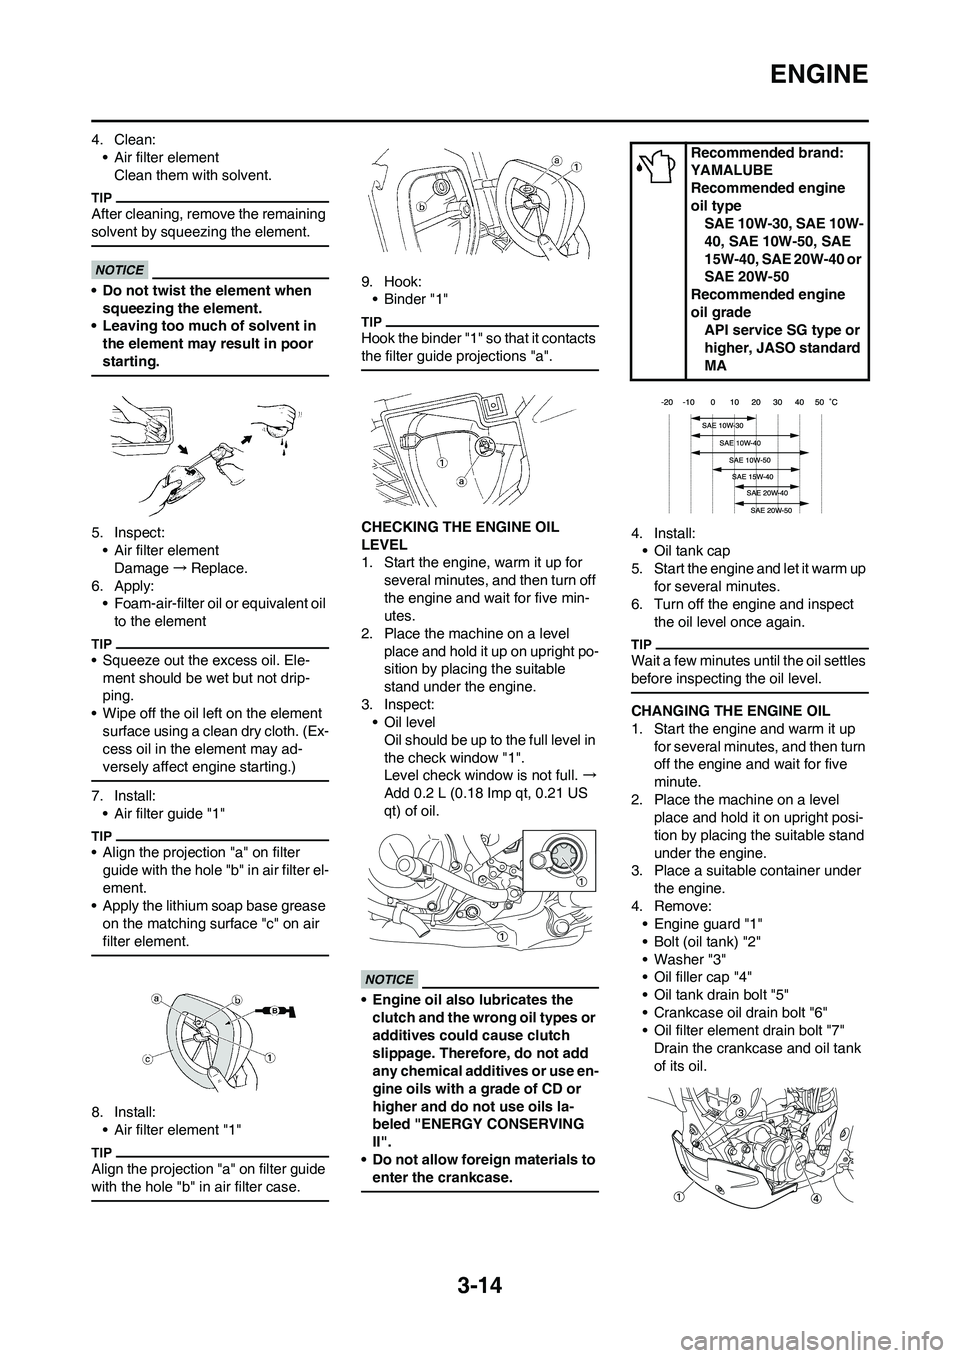
4. Clean:
• Air filter element
Clean them with solvent.
After cleaning, remove the remaining
solvent by squeezing the element.
• Do not twist the element when
squeezing the element.
• Leaving too much of solvent in
the element may result in poor
starting.
5. Inspect:
• Air filter element
Damage→Replace.
6. Apply:
• Foam-air-filter oil or equivalent oil
to the element
• Squeeze out the excess oil. Ele-
ment should be wet but not drip-
ping.
• Wipe off the oil left on the element
surface using a clean dry cloth. (Ex-
cess oil in the element may ad-
versely affect engine starting.)
7. Install:
• Air filter guide "1"
• Align the projection "a" on filter
guide with the hole "b" in air filter el-
ement.
• Apply the lithium soap base grease
on the matching surface "c" on air
filter element.
8. Install:
• Air filter element "1"
Align the projection "a" on filter guide
with the hole "b" in air filter case.
9. Hook:
• Binder "1"
Hook the binder "1" so that it contacts
the filter guide projections "a".
CHECKING THE ENGINE OIL
LEVEL
1. Start the engine, warm it up for
several minutes, and then turn off
the engine and wait for five min-
utes.
2. Place the machine on a level
place and hold it up on upright po-
sition by placing the suitable
stand under the engine.
3. Inspect:
• Oil level
Oil should be up to the full level in
the check window "1".
Level check window is not full. →
Add 0.2 L (0.18 Imp qt, 0.21 US
qt) of oil.
• Engine oil also lubricates the
clutch and the wrong oil types or
additives could cause clutch
slippage. Therefore, do not add
any chemical additives or use en-
gine oils with a grade of CD or
higher and do not use oils la-
beled "ENERGY CONSERVING
II".
• Do not allow foreign materials to
enter the crankcase.
4. Install:
• Oil tank cap
5. Start the engine and let it warm up
for several minutes.
6. Turn off the engine and inspect
the oil level once again.
Wait a few minutes until the oil settles
before inspecting the oil level.
CHANGING THE ENGINE OIL
1. Start the engine and warm it up
for several minutes, and then turn
off the engine and wait for five
minute.
2. Place the machine on a level
place and hold it on upright posi-
tion by placing the suitable stand
under the engine.
3. Place a suitable container under
the engine.
4. Remove:
• Engine guard "1"
• Bolt (oil tank) "2"
• Washer "3"
• Oil filler cap "4"
• Oil tank drain bolt "5"
• Crankcase oil drain bolt "6"
• Oil filter element drain bolt "7"
Drain the crankcase and oil tank
of its oil.
Recommended brand:
YAMALUBE
Recommended engine
oil type
SAE 10W-30, SAE 10W-
40, SAE 10W-50, SAE
15W-40, SAE 20W-40 or
SAE 20W-50
Recommended engine
oil grade
API service SG type or
higher, JASO standard
MA
Page 97 of 232
4-4
ENGINE (Except for Canada)
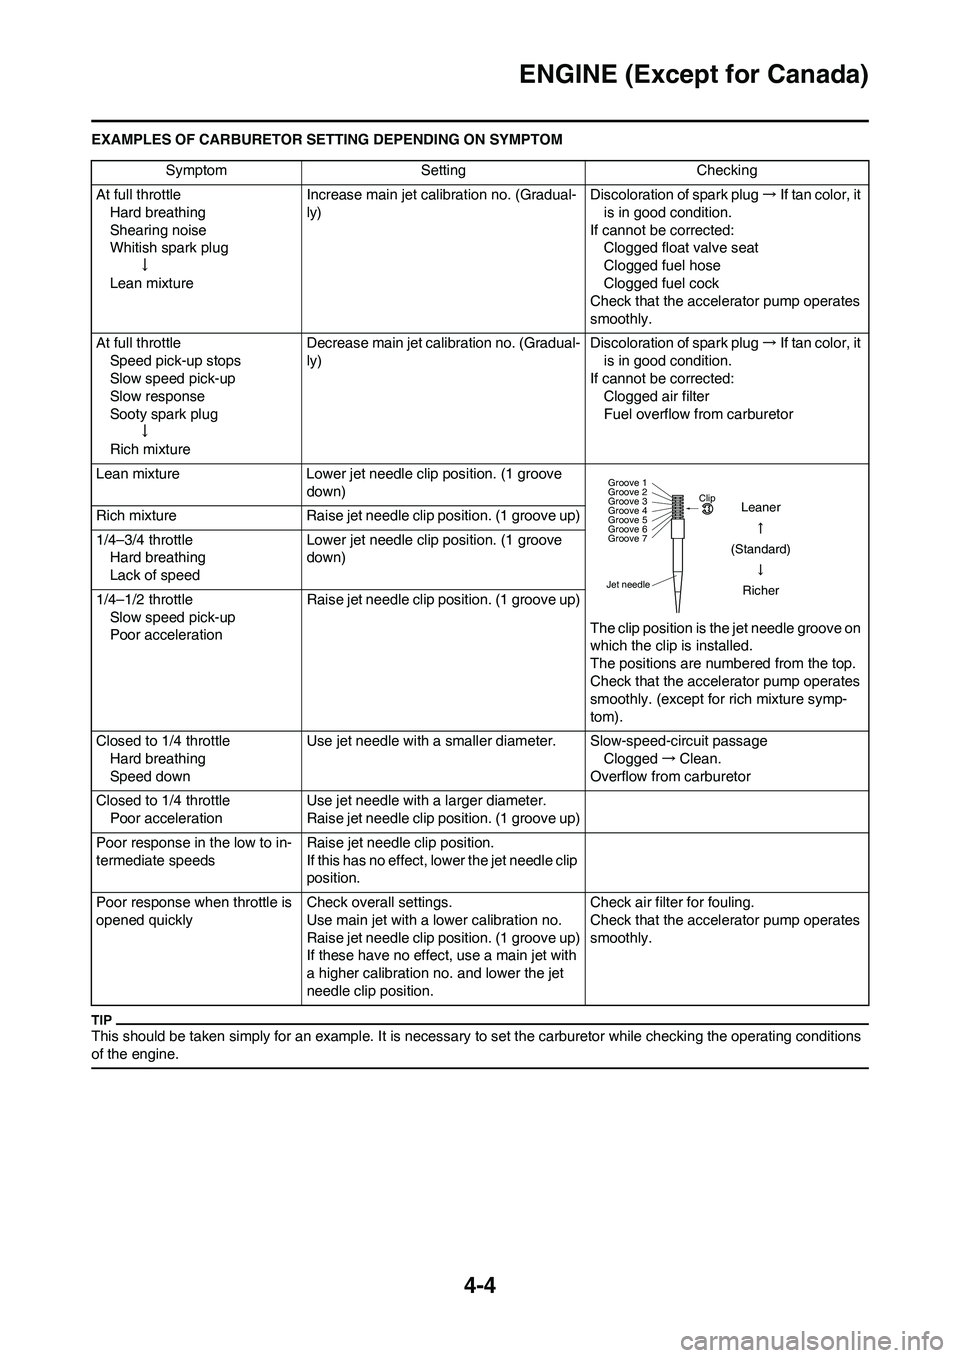
EXAMPLES OF CARBURETOR SETTING DEPENDING ON SYMPTOM
This should be taken simply for an example. It is necessary to set the carburetor while checking the operating conditions
of the engine.
Symptom Setting Checking
At full throttle
Hard breathing
Shearing noise
Whitish spark plug
↓
Lean mixtureIncrease main jet calibration no. (Gradual-
ly)Discoloration of spark plug→If tan color, it
is in good condition.
If cannot be corrected:
Clogged float valve seat
Clogged fuel hose
Clogged fuel cock
Check that the accelerator pump operates
smoothly.
At full throttle
Speed pick-up stops
Slow speed pick-up
Slow response
Sooty spark plug
↓
Rich mixtureDecrease main jet calibration no. (Gradual-
ly)Discoloration of spark plug→If tan color, it
is in good condition.
If cannot be corrected:
Clogged air filter
Fuel overflow from carburetor
Lean mixture Lower jet needle clip position. (1 groove
down)
The clip position is the jet needle groove on
which the clip is installed.
The positions are numbered from the top.
Check that the accelerator pump operates
smoothly. (except for rich mixture symp-
tom). Rich mixture Raise jet needle clip position. (1 groove up)
1/4–3/4 throttle
Hard breathing
Lack of speedLower jet needle clip position. (1 groove
down)
1/4–1/2 throttle
Slow speed pick-up
Poor accelerationRaise jet needle clip position. (1 groove up)
Closed to 1/4 throttle
Hard breathing
Speed downUse jet needle with a smaller diameter. Slow-speed-circuit passage
Clogged→Clean.
Overflow from carburetor
Closed to 1/4 throttle
Poor accelerationUse jet needle with a larger diameter.
Raise jet needle clip position. (1 groove up)
Poor response in the low to in-
termediate speedsRaise jet needle clip position.
If this has no effect, lower the jet needle clip
position.
Poor response when throttle is
opened quicklyCheck overall settings.
Use main jet with a lower calibration no.
Raise jet needle clip position. (1 groove up)
If these have no effect, use a main jet with
a higher calibration no. and lower the jet
needle clip position.Check air filter for fouling.
Check that the accelerator pump operates
smoothly.
Jet needleClip
Groove 7 Groove 6
Groove 5
Groove 4
Groove 3
Groove 2
Groove 1
Leaner
(Standard)
Richer
Page 107 of 232
5-4
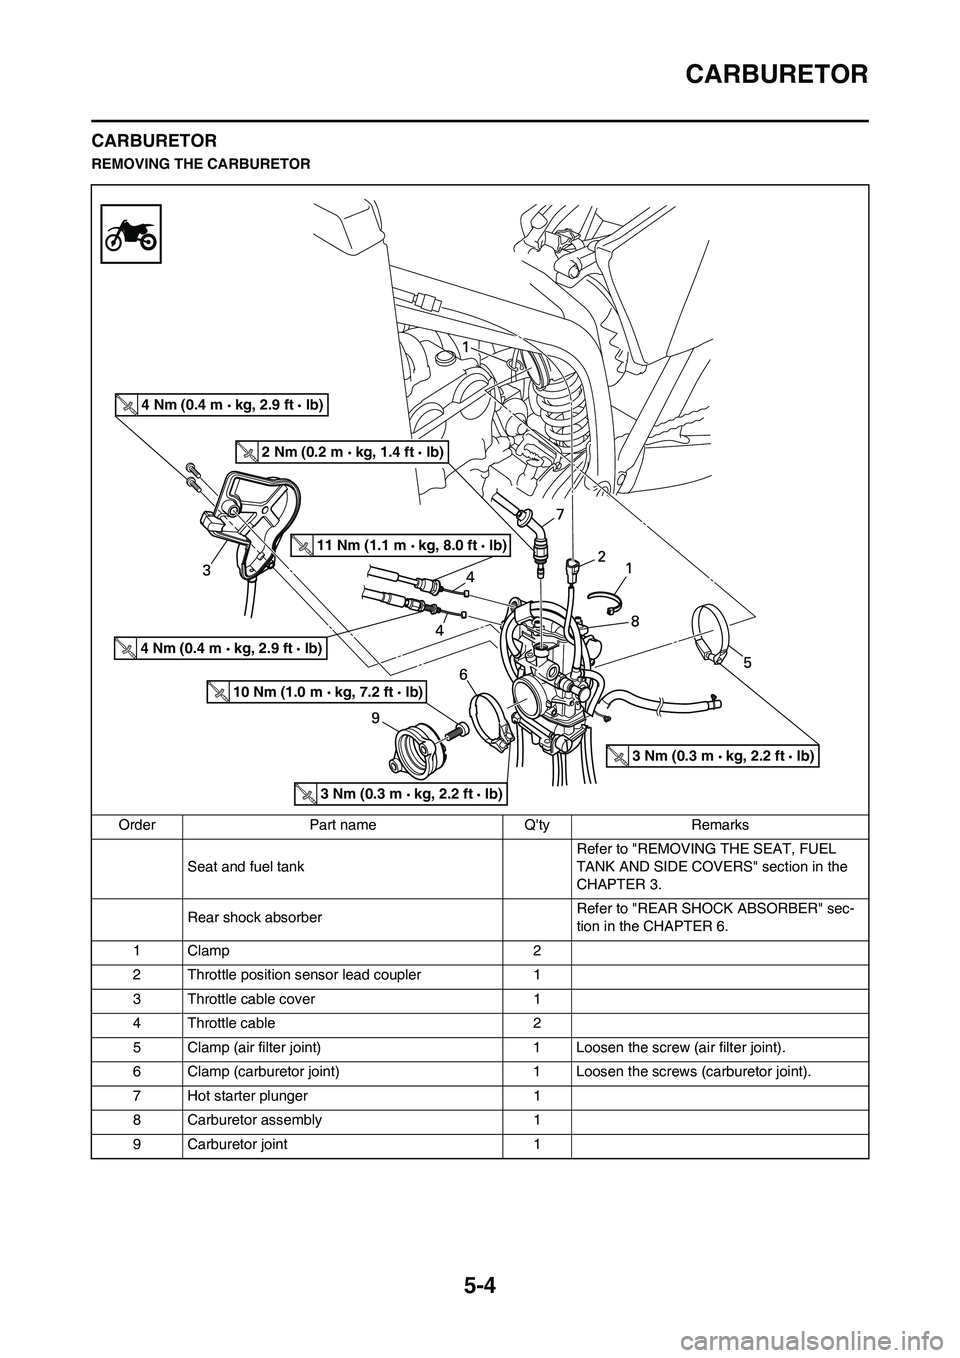
CARBURETOR
CARBURETOR
REMOVING THE CARBURETOR
Order Part name Q'ty Remarks
Seat and fuel tank Refer to "REMOVING THE SEAT, FUEL
TANK AND SIDE COVERS" section in the
CHAPTER 3.
Rear shock absorber Refer to "REAR SHOCK ABSORBER" sec-
tion in the CHAPTER 6.
1Clamp 2
2 Throttle position sensor lead coupler 1
3 Throttle cable cover 1
4 Throttle cable 2
5 Clamp (air filter joint) 1 Loosen the screw (air filter joint).
6 Clamp (carburetor joint) 1 Loosen the screws (carburetor joint).
7 Hot starter plunger 1
8 Carburetor assembly 1
9 Carburetor joint 1
4 Nm (0.4 m kg, 2.9 ft lb)
2 Nm (0.2 m kg, 1.4 ft lb)
11 Nm (1.1 m kg, 8.0 ft lb)
4 Nm (0.4 m kg, 2.9 ft lb)
10 Nm (1.0 m kg, 7.2 ft lb)
3 Nm (0.3 m kg, 2.2 ft lb)
3 Nm (0.3 m kg, 2.2 ft lb)
Page 110 of 232
5-7
CARBURETOR
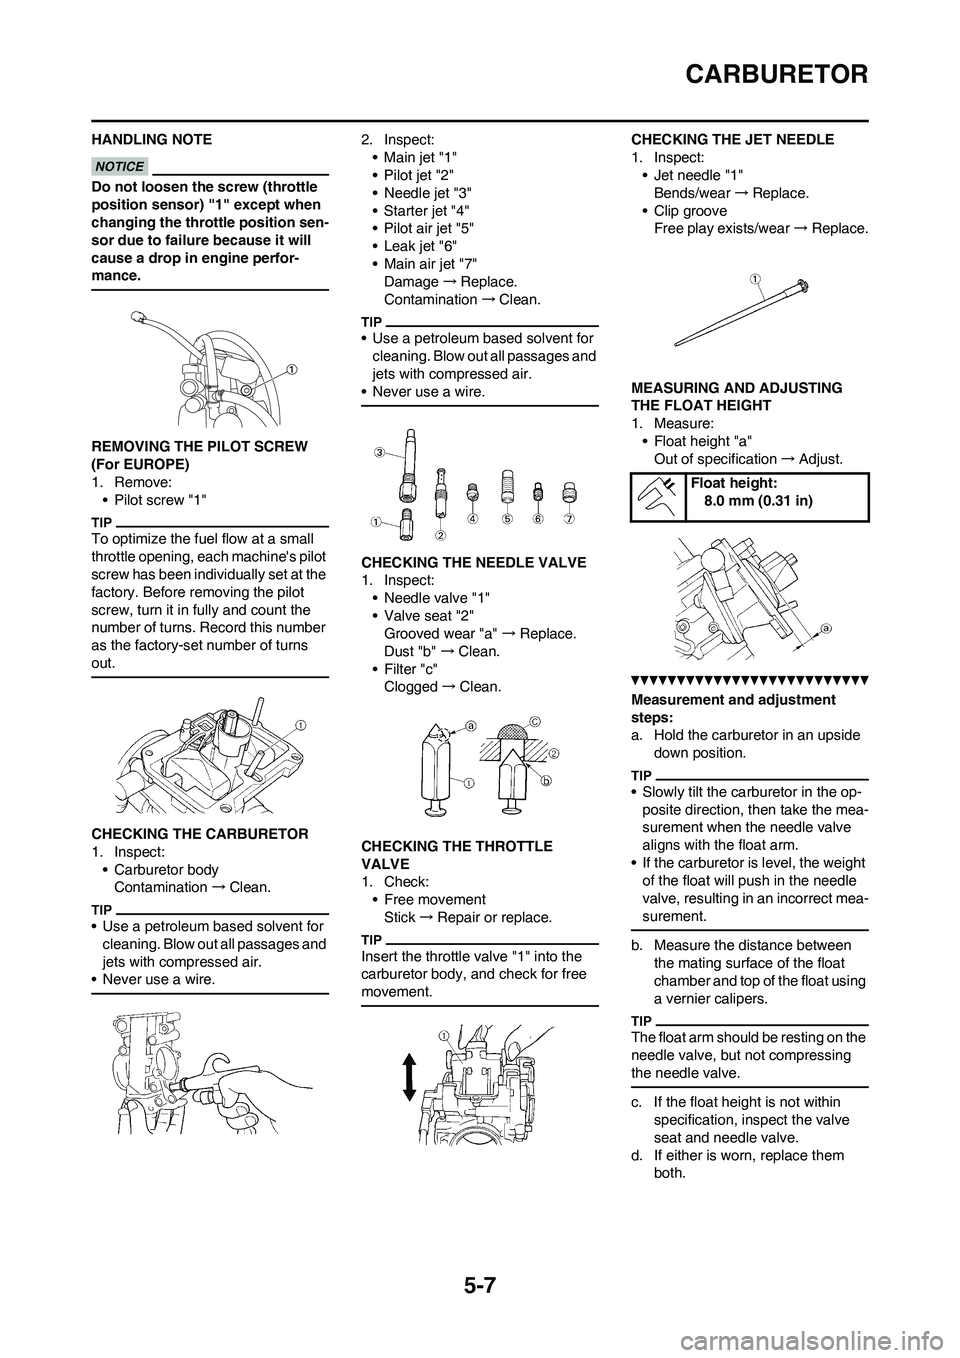
HANDLING NOTE
Do not loosen the screw (throttle
position sensor) "1" except when
changing the throttle position sen-
sor due to failure because it will
cause a drop in engine perfor-
mance.
REMOVING THE PILOT SCREW
(For EUROPE)
1. Remove:
• Pilot screw "1"
To optimize the fuel flow at a small
throttle opening, each machine's pilot
screw has been individually set at the
factory. Before removing the pilot
screw, turn it in fully and count the
number of turns. Record this number
as the factory-set number of turns
out.
CHECKING THE CARBURETOR
1. Inspect:
• Carburetor body
Contamination→Clean.
• Use a petroleum based solvent for
cleaning. Blow out all passages and
jets with compressed air.
• Never use a wire.
2. Inspect:
•Main jet "1"
• Pilot jet "2"
• Needle jet "3"
• Starter jet "4"
•Pilot air jet "5"
• Leak jet "6"
• Main air jet "7"
Damage→Replace.
Contamination→Clean.
• Use a petroleum based solvent for
cleaning. Blow out all passages and
jets with compressed air.
• Never use a wire.
CHECKING THE NEEDLE VALVE
1. Inspect:
• Needle valve "1"
• Valve seat "2"
Grooved wear "a" →Replace.
Dust "b" →Clean.
• Filter "c"
Clogged→Clean.
CHECKING THE THROTTLE
VALVE
1. Check:
• Free movement
Stick→Repair or replace.
Insert the throttle valve "1" into the
carburetor body, and check for free
movement.
CHECKING THE JET NEEDLE
1. Inspect:
• Jet needle "1"
Bends/wear→Replace.
• Clip groove
Free play exists/wear→Replace.
MEASURING AND ADJUSTING
THE FLOAT HEIGHT
1. Measure:
• Float height "a"
Out of specification→Adjust.
Measurement and adjustment
steps:
a. Hold the carburetor in an upside
down position.
• Slowly tilt the carburetor in the op-
posite direction, then take the mea-
surement when the needle valve
aligns with the float arm.
• If the carburetor is level, the weight
of the float will push in the needle
valve, resulting in an incorrect mea-
surement.
b. Measure the distance between
the mating surface of the float
chamber and top of the float using
a vernier calipers.
The float arm should be resting on the
needle valve, but not compressing
the needle valve.
c. If the float height is not within
specification, inspect the valve
seat and needle valve.
d. If either is worn, replace them
both.
Float height:
8.0 mm (0.31 in)
Page 113 of 232
5-10
CARBURETOR
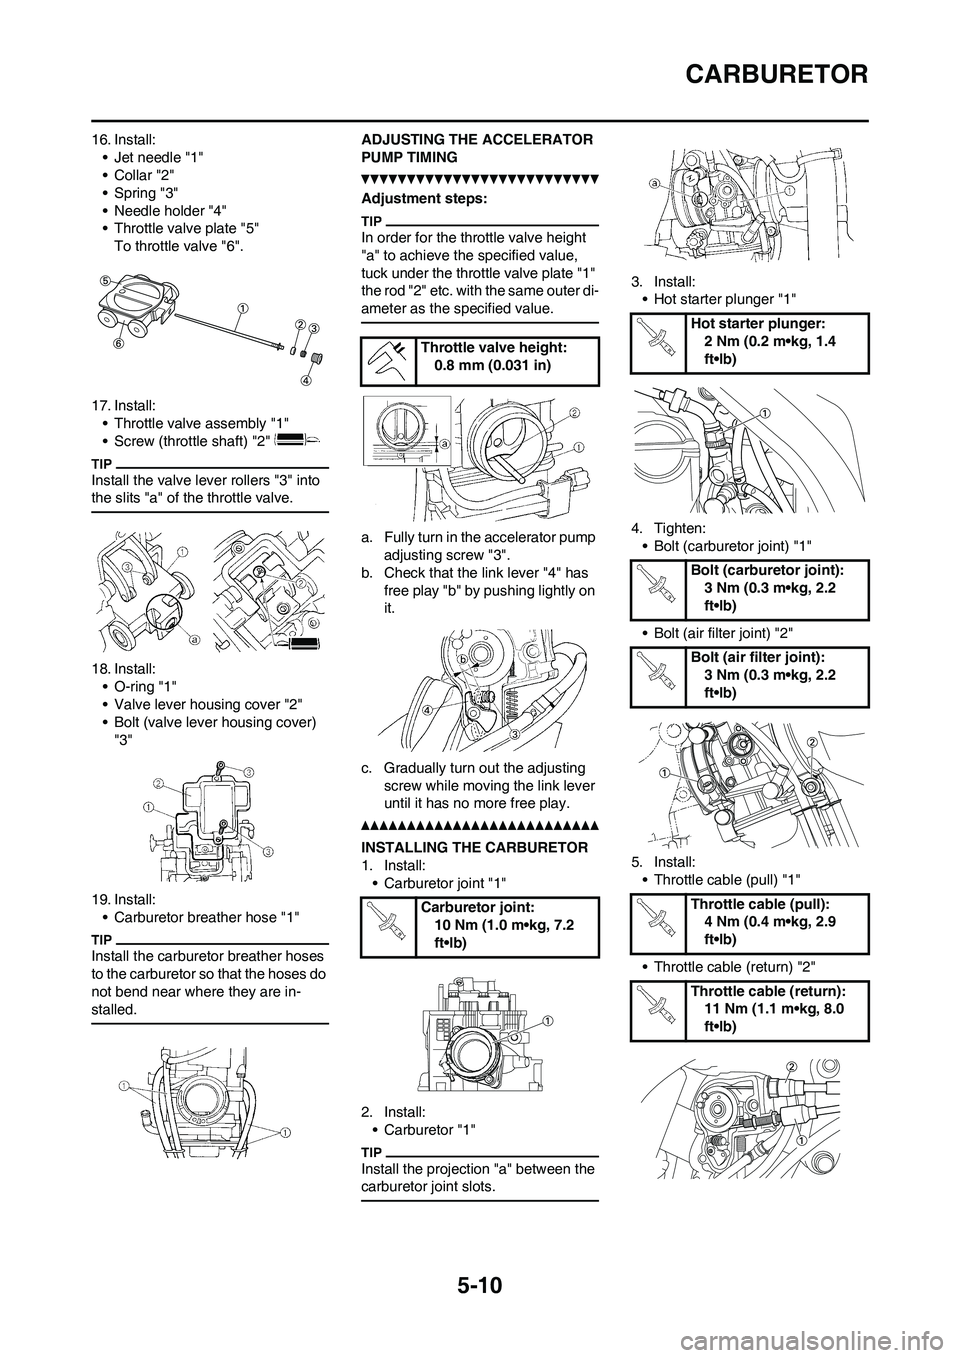
16. Install:
• Jet needle "1"
•Collar "2"
• Spring "3"
• Needle holder "4"
• Throttle valve plate "5"
To throttle valve "6".
17. Install:
• Throttle valve assembly "1"
• Screw (throttle shaft) "2"
Install the valve lever rollers "3" into
the slits "a" of the throttle valve.
18. Install:
• O-ring "1"
• Valve lever housing cover "2"
• Bolt (valve lever housing cover)
"3"
19. Install:
• Carburetor breather hose "1"
Install the carburetor breather hoses
to the carburetor so that the hoses do
not bend near where they are in-
stalled.
ADJUSTING THE ACCELERATOR
PUMP TIMING
Adjustment steps:
In order for the throttle valve height
"a" to achieve the specified value,
tuck under the throttle valve plate "1"
the rod "2" etc. with the same outer di-
ameter as the specified value.
a. Fully turn in the accelerator pump
adjusting screw "3".
b. Check that the link lever "4" has
free play "b" by pushing lightly on
it.
c. Gradually turn out the adjusting
screw while moving the link lever
until it has no more free play.
INSTALLING THE CARBURETOR
1. Install:
• Carburetor joint "1"
2. Install:
• Carburetor "1"
Install the projection "a" between the
carburetor joint slots.
3. Install:
• Hot starter plunger "1"
4. Tighten:
• Bolt (carburetor joint) "1"
• Bolt (air filter joint) "2"
5. Install:
• Throttle cable (pull) "1"
• Throttle cable (return) "2"
Throttle valve height:
0.8 mm (0.031 in)
Carburetor joint:
10 Nm (1.0 m•kg, 7.2
ft•lb)
Hot starter plunger:
2 Nm (0.2 m•kg, 1.4
ft•lb)
Bolt (carburetor joint):
3 Nm (0.3 m•kg, 2.2
ft•lb)
Bolt (air filter joint):
3 Nm (0.3 m•kg, 2.2
ft•lb)
Throttle cable (pull):
4 Nm (0.4 m•kg, 2.9
ft•lb)
Throttle cable (return):
11 Nm (1.1 m•kg, 8.0
ft•lb)
Page 115 of 232
5-12
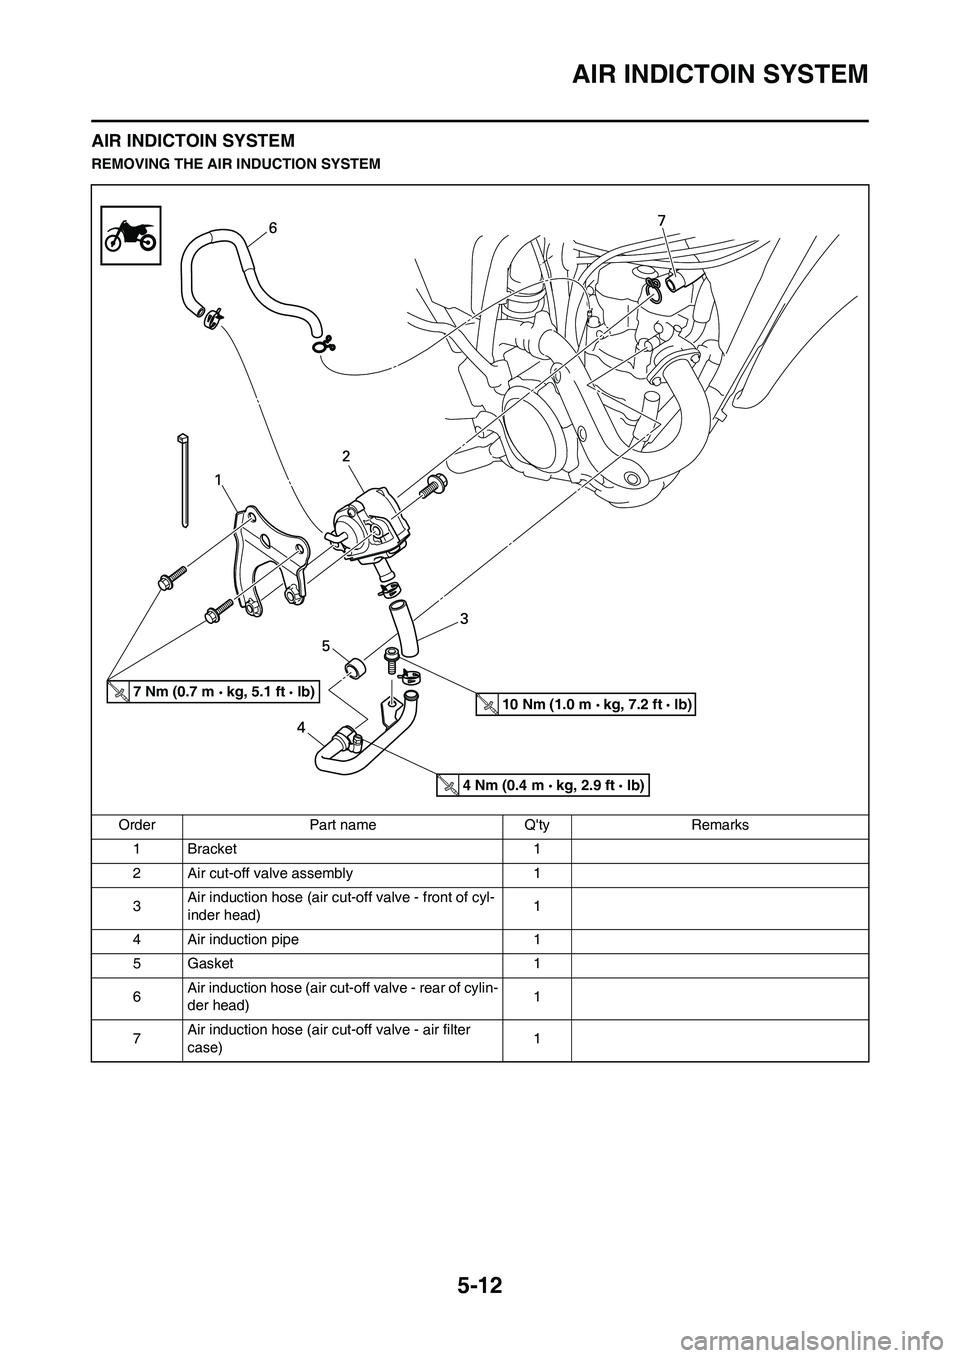
AIR INDICTOIN SYSTEM
AIR INDICTOIN SYSTEM
REMOVING THE AIR INDUCTION SYSTEM
Order Part name Q'ty Remarks
1 Bracket 1
2 Air cut-off valve assembly 1
3Air induction hose (air cut-off valve - front of cyl-
inder head)1
4 Air induction pipe 1
5 Gasket 1
6Air induction hose (air cut-off valve - rear of cylin-
der head)1
7Air induction hose (air cut-off valve - air filter
case)1
7 Nm (0.7 m kg, 5.1 ft lb)10 Nm (1.0 m kg, 7.2 ft lb)
4 Nm (0.4 m kg, 2.9 ft lb)
Page 116 of 232
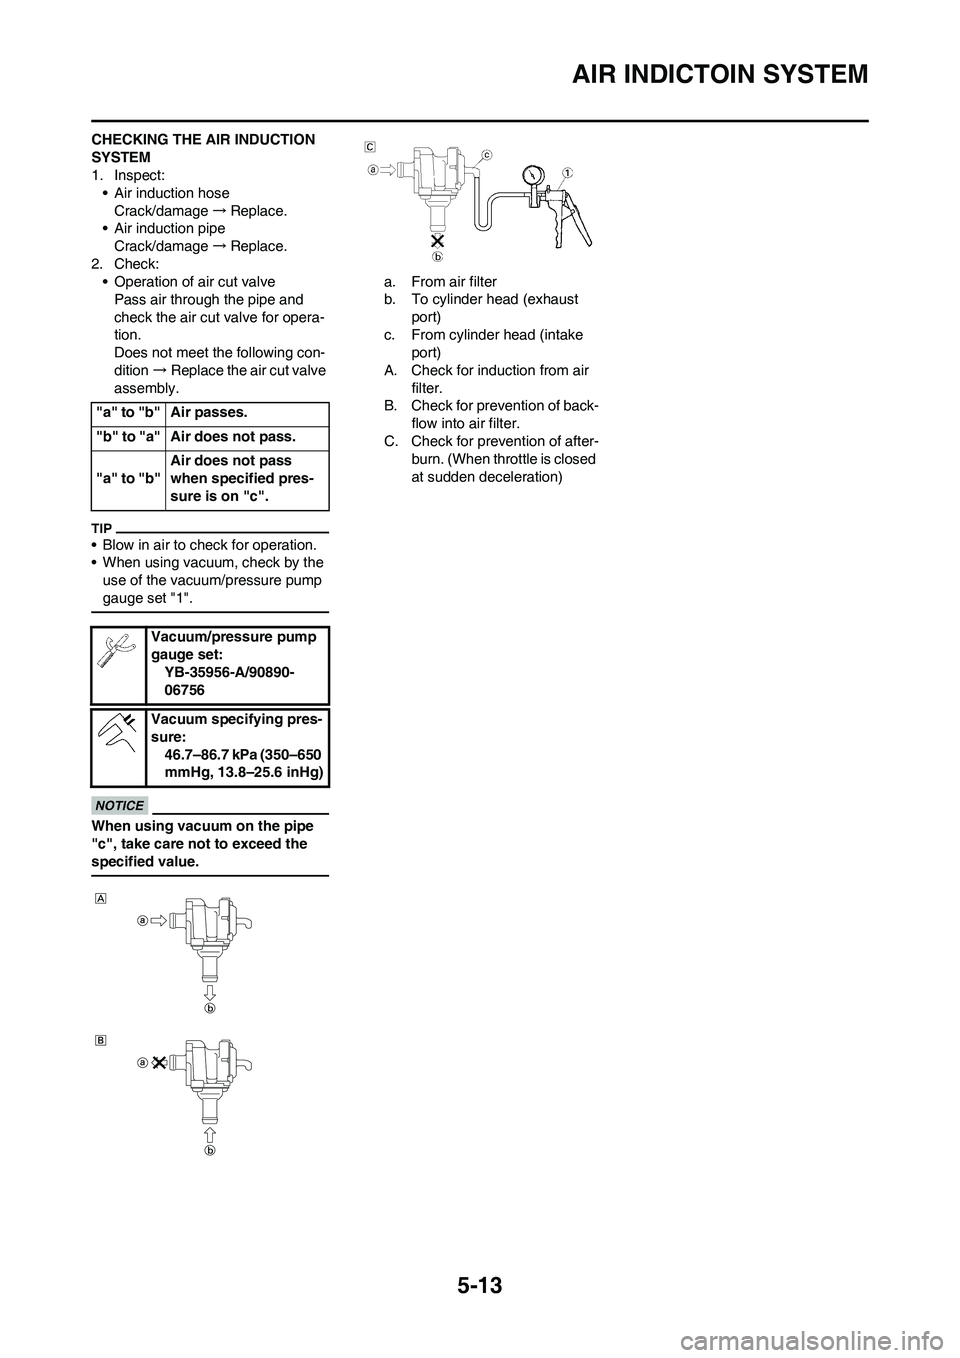
5-13
AIR INDICTOIN SYSTEM
CHECKING THE AIR INDUCTION
SYSTEM
1. Inspect:
• Air induction hose
Crack/damage→Replace.
• Air induction pipe
Crack/damage→Replace.
2. Check:
• Operation of air cut valve
Pass air through the pipe and
check the air cut valve for opera-
tion.
Does not meet the following con-
dition→Replace the air cut valve
assembly.
• Blow in air to check for operation.
• When using vacuum, check by the
use of the vacuum/pressure pump
gauge set "1".
When using vacuum on the pipe
"c", take care not to exceed the
specified value.
a. From air filter
b. To cylinder head (exhaust
port)
c. From cylinder head (intake
port)
A. Check for induction from air
filter.
B. Check for prevention of back-
flow into air filter.
C. Check for prevention of after-
burn. (When throttle is closed
at sudden deceleration) "a" to "b" Air passes.
"b" to "a" Air does not pass.
"a" to "b"Air does not pass
when specified pres-
sure is on "c".
Vacuum/pressure pump
gauge set:
YB-35956-A/90890-
06756
Vacuum specifying pres-
sure:
46.7–86.7 kPa (350–650
mmHg, 13.8–25.6 inHg)
Page 205 of 232
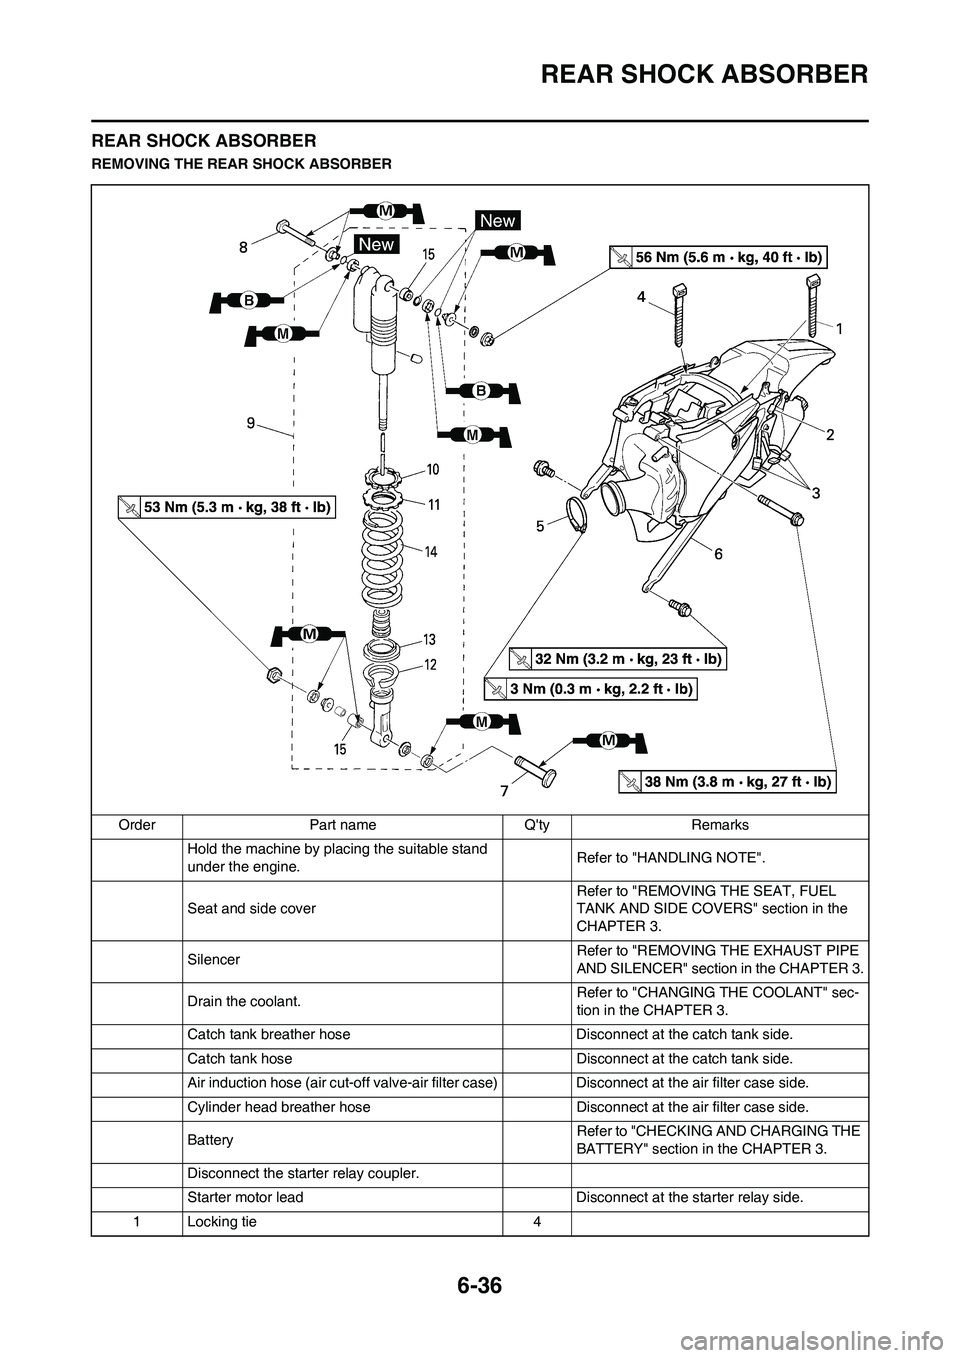
6-36
REAR SHOCK ABSORBER
REAR SHOCK ABSORBER
REMOVING THE REAR SHOCK ABSORBER
Order Part name Q'ty Remarks
Hold the machine by placing the suitable stand
under the engine.Refer to "HANDLING NOTE".
Seat and side cover Refer to "REMOVING THE SEAT, FUEL
TANK AND SIDE COVERS" section in the
CHAPTER 3.
Silencer Refer to "REMOVING THE EXHAUST PIPE
AND SILENCER" section in the CHAPTER 3.
Drain the coolant.Refer to "CHANGING THE COOLANT" sec-
tion in the CHAPTER 3.
Catch tank breather hose Disconnect at the catch tank side.
Catch tank hose Disconnect at the catch tank side.
Air induction hose (air cut-off valve-air filter case) Disconnect at the air filter case side.
Cylinder head breather hose Disconnect at the air filter case side.
BatteryRefer to "CHECKING AND CHARGING THE
BATTERY" section in the CHAPTER 3.
Disconnect the starter relay coupler.
Starter motor lead Disconnect at the starter relay side.
1 Locking tie 4