checking oil YAMAHA WR 250F 2011 Owners Manual
[x] Cancel search | Manufacturer: YAMAHA, Model Year: 2011, Model line: WR 250F, Model: YAMAHA WR 250F 2011Pages: 232, PDF Size: 14.29 MB
Page 10 of 232
CONTENTS
CHAPTER 1
GENERAL INFOR-
MATION
LOCATION OF
IMPORTANT LABELS ..... 1-1
DESCRIPTION ................. 1-5
CONSUMER
INFORMATION................. 1-6
INCLUDED PARTS .......... 1-6
IMPORTANT
INFORMATION................. 1-6
CHECKING OF
CONNECTION .................. 1-7
SPECIAL TOOLS ............. 1-8
CONTROL FUNCTIONS.. 1-12
MULTI-FUNCTION
DISPLAY ........................ 1-13
STARTING AND
BREAK-IN ...................... 1-18
TORQUE-CHECK
POINTS........................... 1-20
CLEANING AND
STORAGE ...................... 1-21
CHAPTER 2
SPECIFICATIONS
GENERAL
SPECIFICATIONS ............ 2-1
MAINTENANCE
SPECIFICATIONS ............ 2-3
TIGHTENING
TORQUES ...................... 2-12
LUBRICATION
DIAGRAMS .................... 2-19
CABLE ROUTING
DIAGRAM ....................... 2-21
CHAPTER 3
REGULAR INSPEC-
TION AND AD-
JUSTMENTS
PERIODIC MAINTENANCE
CHART FOR THE EMISSION
CONTROL SYSTEM (For
Canada) ............................ 3-1
GENERAL MAINTENANCE
AND LUBRICATION CHART
(For Canada) .................... 3-2
MAINTENANCE INTER-
VALS FOR COMPETITION
USE ................................... 3-3
PRE-OPERATION
INSPECTION AND
MAINTENANCE................ 3-7
ENGINE ............................ 3-8
CHASSIS ........................ 3-19
ELECTRICAL ................. 3-29
CHAPTER 4
TUNING
ENGINE
(Except for Canada) ........ 4-1
CHASSIS .......................... 4-5
CHAPTER 5
ENGINE
RADIATOR ....................... 5-1
CARBURETOR................. 5-4
AIR INDICTOIN
SYSTEM ......................... 5-12
CAMSHAFTS.................. 5-14
CYLINDER HEAD........... 5-19
VALVES AND VALVE
SPRINGS ........................ 5-21
CYLINDER AND
PISTON ........................... 5-25
CLUTCH ......................... 5-29OIL FILTER ELEMENT
AND WATER PUMP .......5-34
BALANCER ....................5-39
OIL PUMP .......................5-41
KICK SHAFT AND SHIFT
SHAFT ............................5-44
AC MAGNETO AND
STARTER CLUTCH........5-49
ENGINE REMOVAL........5-54
CRANKCASE AND
CRANKSHAFT ...............5-58
TRANSMISSION,
SHIFT CAM AND
SHIFT FORK ...................5-64
CHAPTER 6
CHASSIS
FRONT WHEEL AND
REAR WHEEL ..................6-1
FRONT BRAKE AND
REAR BRAKE ..................6-6
FRONT FORK .................6-16
HANDLEBAR..................6-23
STEERING ......................6-27
SWINGARM ....................6-31
REAR SHOCK
ABSORBER ....................6-36
CHAPTER 7
ELECTRICAL
ELECTRICAL COMPO-
NENTS AND WIRING
DIAGRAM .........................7-1
IGNITION SYSTEM...........7-3
ELECTRIC STARTING
SYSTEM............................7-5
CHARGING SYSTEM .....7-13
THROTTLE POSITION
SENSOR SYSTEM .........7-15
LIGHTING SYSTEM .......7-18
SIGNALING SYSTEM.....7-20
Page 17 of 232
1-7
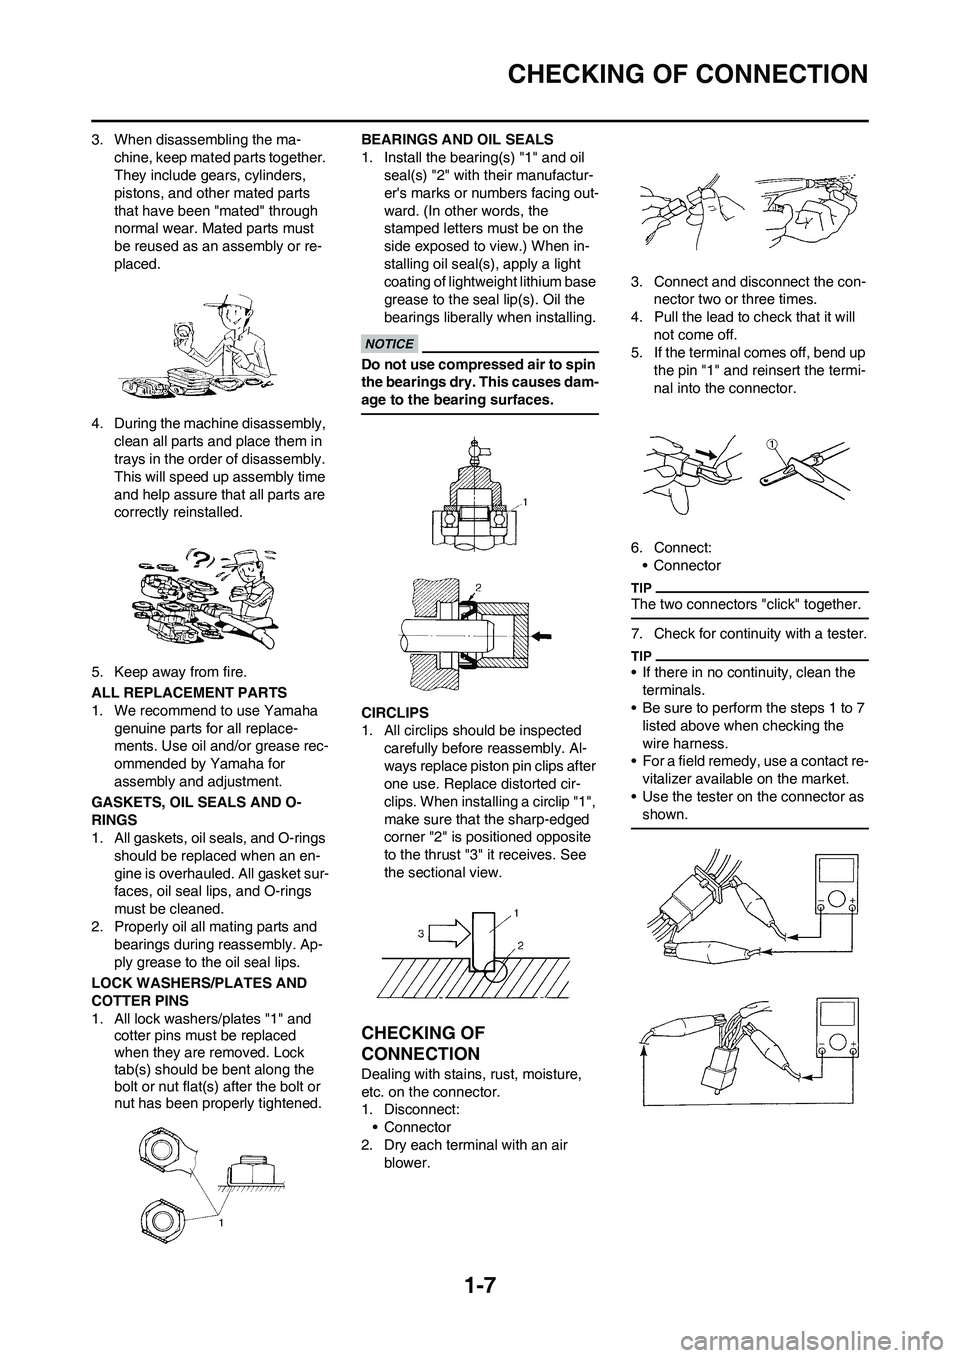
CHECKING OF CONNECTION
3. When disassembling the ma-
chine, keep mated parts together.
They include gears, cylinders,
pistons, and other mated parts
that have been "mated" through
normal wear. Mated parts must
be reused as an assembly or re-
placed.
4. During the machine disassembly,
clean all parts and place them in
trays in the order of disassembly.
This will speed up assembly time
and help assure that all parts are
correctly reinstalled.
5. Keep away from fire.
ALL REPLACEMENT PARTS
1. We recommend to use Yamaha
genuine parts for all replace-
ments. Use oil and/or grease rec-
ommended by Yamaha for
assembly and adjustment.
GASKETS, OIL SEALS AND O-
RINGS
1. All gaskets, oil seals, and O-rings
should be replaced when an en-
gine is overhauled. All gasket sur-
faces, oil seal lips, and O-rings
must be cleaned.
2. Properly oil all mating parts and
bearings during reassembly. Ap-
ply grease to the oil seal lips.
LOCK WASHERS/PLATES AND
COTTER PINS
1. All lock washers/plates "1" and
cotter pins must be replaced
when they are removed. Lock
tab(s) should be bent along the
bolt or nut flat(s) after the bolt or
nut has been properly tightened.BEARINGS AND OIL SEALS
1. Install the bearing(s) "1" and oil
seal(s) "2" with their manufactur-
er's marks or numbers facing out-
ward. (In other words, the
stamped letters must be on the
side exposed to view.) When in-
stalling oil seal(s), apply a light
coating of lightweight lithium base
grease to the seal lip(s). Oil the
bearings liberally when installing.
Do not use compressed air to spin
the bearings dry. This causes dam-
age to the bearing surfaces.
CIRCLIPS
1. All circlips should be inspected
carefully before reassembly. Al-
ways replace piston pin clips after
one use. Replace distorted cir-
clips. When installing a circlip "1",
make sure that the sharp-edged
corner "2" is positioned opposite
to the thrust "3" it receives. See
the sectional view.
CHECKING OF
CONNECTION
Dealing with stains, rust, moisture,
etc. on the connector.
1. Disconnect:
• Connector
2. Dry each terminal with an air
blower.3. Connect and disconnect the con-
nector two or three times.
4. Pull the lead to check that it will
not come off.
5. If the terminal comes off, bend up
the pin "1" and reinsert the termi-
nal into the connector.
6. Connect:
• Connector
The two connectors "click" together.
7. Check for continuity with a tester.
• If there in no continuity, clean the
terminals.
• Be sure to perform the steps 1 to 7
listed above when checking the
wire harness.
• For a field remedy, use a contact re-
vitalizer available on the market.
• Use the tester on the connector as
shown.
Page 71 of 232
3-12
ENGINE
• Do not mix more than one type of
ethylene glycol antifreeze con-
taining corrosion inhibitors for
aluminum engine.
• Do not use water containing im-
purities or oil.
Handling notes of coolant:
The coolant is harmful so it should be
handled with special care.
• When coolant splashes to your
eye.
Thoroughly wash your eye with
water and see your doctor.
• When coolant splashes to your
clothes.
Quickly wash it away with water
and then with soap.
• When coolant is swallowed.
Quickly make him vomit and take
him to a doctor.
9. Install:
• Radiator cap
Start the engine and warm it up
for a several minutes.
10. Check:
• Coolant level
Coolant level low→Add coolant.
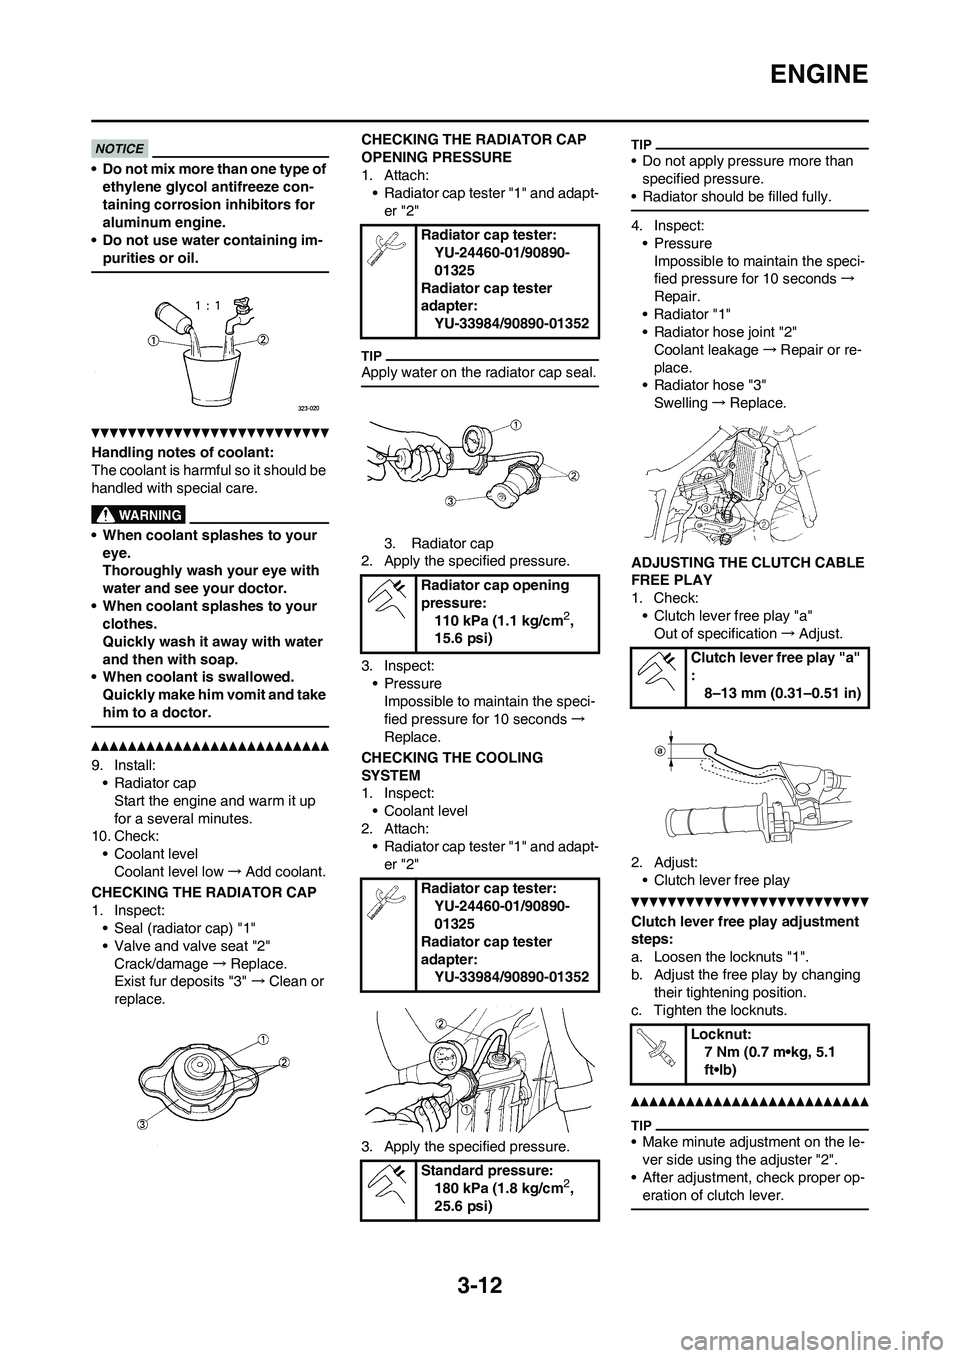
CHECKING THE RADIATOR CAP
1. Inspect:
• Seal (radiator cap) "1"
• Valve and valve seat "2"
Crack/damage→Replace.
Exist fur deposits "3" →Clean or
replace.CHECKING THE RADIATOR CAP
OPENING PRESSURE
1. Attach:
• Radiator cap tester "1" and adapt-
er "2"
Apply water on the radiator cap seal.
3. Radiator cap
2. Apply the specified pressure.
3. Inspect:
•Pressure
Impossible to maintain the speci-
fied pressure for 10 seconds→
Replace.
CHECKING THE COOLING
SYSTEM
1. Inspect:
• Coolant level
2. Attach:
• Radiator cap tester "1" and adapt-
er "2"
3. Apply the specified pressure.
• Do not apply pressure more than
specified pressure.
• Radiator should be filled fully.
4. Inspect:
• Pressure
Impossible to maintain the speci-
fied pressure for 10 seconds→
Repair.
•Radiator "1"
• Radiator hose joint "2"
Coolant leakage→Repair or re-
place.
• Radiator hose "3"
Swelling→Replace.
ADJUSTING THE CLUTCH CABLE
FREE PLAY
1. Check:
• Clutch lever free play "a"
Out of specification→Adjust.
2. Adjust:
• Clutch lever free play
Clutch lever free play adjustment
steps:
a. Loosen the locknuts "1".
b. Adjust the free play by changing
their tightening position.
c. Tighten the locknuts.
• Make minute adjustment on the le-
ver side using the adjuster "2".
• After adjustment, check proper op-
eration of clutch lever.
Radiator cap tester:
YU-24460-01/90890-
01325
Radiator cap tester
adapter:
YU-33984/90890-01352
Radiator cap opening
pressure:
110 kPa (1.1 kg/cm
2,
15.6 psi)
Radiator cap tester:
YU-24460-01/90890-
01325
Radiator cap tester
adapter:
YU-33984/90890-01352
Standard pressure:
180 kPa (1.8 kg/cm
2,
25.6 psi)
Clutch lever free play "a"
:
8–13 mm (0.31–0.51 in)
Locknut:
7 Nm (0.7 m•kg, 5.1
ft•lb)
Page 73 of 232
3-14
ENGINE
4. Clean:
• Air filter element
Clean them with solvent.
After cleaning, remove the remaining
solvent by squeezing the element.
• Do not twist the element when
squeezing the element.
• Leaving too much of solvent in
the element may result in poor
starting.
5. Inspect:
• Air filter element
Damage→Replace.
6. Apply:
• Foam-air-filter oil or equivalent oil
to the element
• Squeeze out the excess oil. Ele-
ment should be wet but not drip-
ping.
• Wipe off the oil left on the element
surface using a clean dry cloth. (Ex-
cess oil in the element may ad-
versely affect engine starting.)
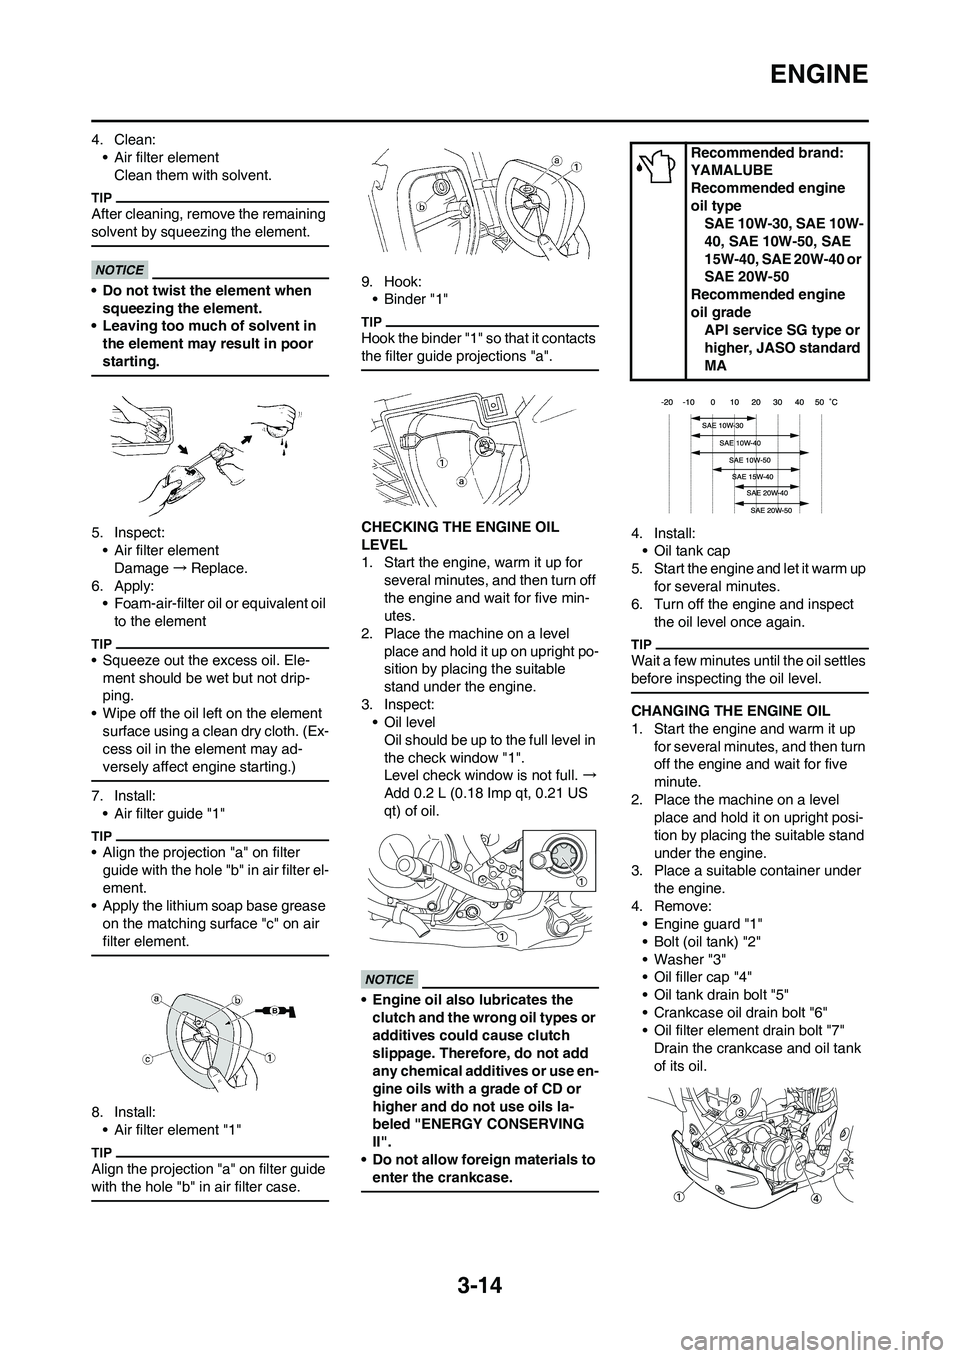
7. Install:
• Air filter guide "1"
• Align the projection "a" on filter
guide with the hole "b" in air filter el-
ement.
• Apply the lithium soap base grease
on the matching surface "c" on air
filter element.
8. Install:
• Air filter element "1"
Align the projection "a" on filter guide
with the hole "b" in air filter case.
9. Hook:
• Binder "1"
Hook the binder "1" so that it contacts
the filter guide projections "a".
CHECKING THE ENGINE OIL
LEVEL
1. Start the engine, warm it up for
several minutes, and then turn off
the engine and wait for five min-
utes.
2. Place the machine on a level
place and hold it up on upright po-
sition by placing the suitable
stand under the engine.
3. Inspect:
• Oil level
Oil should be up to the full level in
the check window "1".
Level check window is not full. →
Add 0.2 L (0.18 Imp qt, 0.21 US
qt) of oil.
• Engine oil also lubricates the
clutch and the wrong oil types or
additives could cause clutch
slippage. Therefore, do not add
any chemical additives or use en-
gine oils with a grade of CD or
higher and do not use oils la-
beled "ENERGY CONSERVING
II".
• Do not allow foreign materials to
enter the crankcase.
4. Install:
• Oil tank cap
5. Start the engine and let it warm up
for several minutes.
6. Turn off the engine and inspect
the oil level once again.
Wait a few minutes until the oil settles
before inspecting the oil level.
CHANGING THE ENGINE OIL
1. Start the engine and warm it up
for several minutes, and then turn
off the engine and wait for five
minute.
2. Place the machine on a level
place and hold it on upright posi-
tion by placing the suitable stand
under the engine.
3. Place a suitable container under
the engine.
4. Remove:
• Engine guard "1"
• Bolt (oil tank) "2"
• Washer "3"
• Oil filler cap "4"
• Oil tank drain bolt "5"
• Crankcase oil drain bolt "6"
• Oil filter element drain bolt "7"
Drain the crankcase and oil tank
of its oil.
Recommended brand:
YAMALUBE
Recommended engine
oil type
SAE 10W-30, SAE 10W-
40, SAE 10W-50, SAE
15W-40, SAE 20W-40 or
SAE 20W-50
Recommended engine
oil grade
API service SG type or
higher, JASO standard
MA
Page 74 of 232
3-15
ENGINE
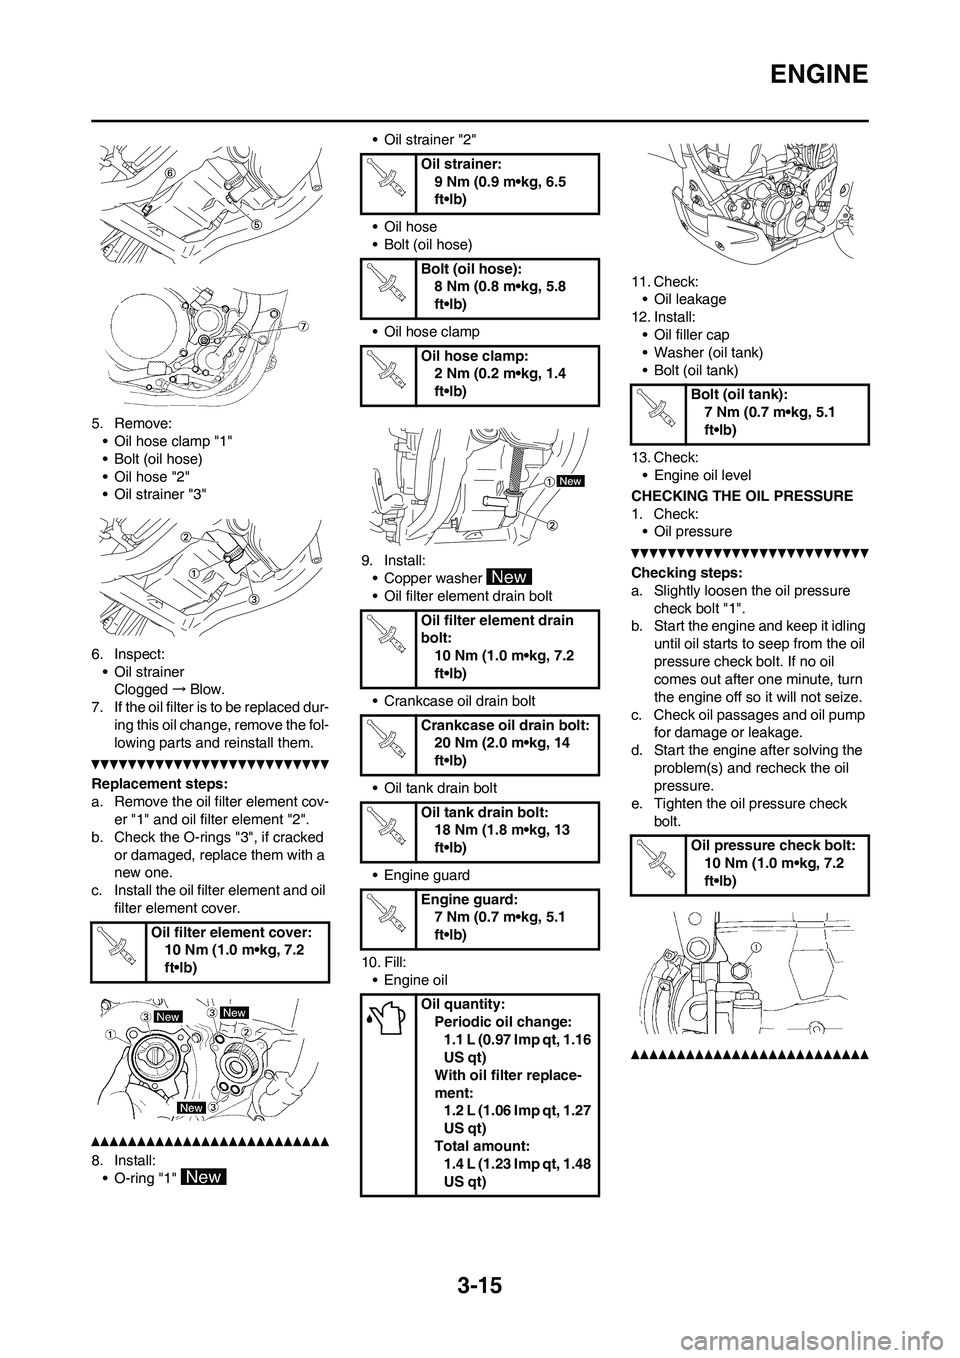
5. Remove:
• Oil hose clamp "1"
• Bolt (oil hose)
• Oil hose "2"
• Oil strainer "3"
6. Inspect:
• Oil strainer
Clogged→Blow.
7. If the oil filter is to be replaced dur-
ing this oil change, remove the fol-
lowing parts and reinstall them.
Replacement steps:
a. Remove the oil filter element cov-
er "1" and oil filter element "2".
b. Check the O-rings "3", if cracked
or damaged, replace them with a
new one.
c. Install the oil filter element and oil
filter element cover.
8. Install:
• O-ring "1" • Oil strainer "2"
• Oil hose
• Bolt (oil hose)
• Oil hose clamp
9. Install:
• Copper washer
• Oil filter element drain bolt
• Crankcase oil drain bolt
• Oil tank drain bolt
• Engine guard
10. Fill:
• Engine oil11. Check:
• Oil leakage
12. Install:
• Oil filler cap
• Washer (oil tank)
• Bolt (oil tank)
13. Check:
• Engine oil level
CHECKING THE OIL PRESSURE
1. Check:
• Oil pressure
Checking steps:
a. Slightly loosen the oil pressure
check bolt "1".
b. Start the engine and keep it idling
until oil starts to seep from the oil
pressure check bolt. If no oil
comes out after one minute, turn
the engine off so it will not seize.
c. Check oil passages and oil pump
for damage or leakage.
d. Start the engine after solving the
problem(s) and recheck the oil
pressure.
e. Tighten the oil pressure check
bolt.
Oil filter element cover:
10 Nm (1.0 m•kg, 7.2
ft•lb)
Oil strainer:
9 Nm (0.9 m•kg, 6.5
ft•lb)
Bolt (oil hose):
8 Nm (0.8 m•kg, 5.8
ft•lb)
Oil hose clamp:
2 Nm (0.2 m•kg, 1.4
ft•lb)
Oil filter element drain
bolt:
10 Nm (1.0 m•kg, 7.2
ft•lb)
Crankcase oil drain bolt:
20 Nm (2.0 m•kg, 14
ft•lb)
Oil tank drain bolt:
18 Nm (1.8 m•kg, 13
ft•lb)
Engine guard:
7 Nm (0.7 m•kg, 5.1
ft•lb)
Oil quantity:
Periodic oil change:
1.1 L (0.97 Imp qt, 1.16
US qt)
With oil filter replace-
ment:
1.2 L (1.06 Imp qt, 1.27
US qt)
Total amount:
1.4 L (1.23 Imp qt, 1.48
US qt)
Bolt (oil tank):
7 Nm (0.7 m•kg, 5.1
ft•lb)
Oil pressure check bolt:
10 Nm (1.0 m•kg, 7.2
ft•lb)
Page 75 of 232
3-16
ENGINE
ADJUSTING THE PILOT SCREW
(For EUROPE)
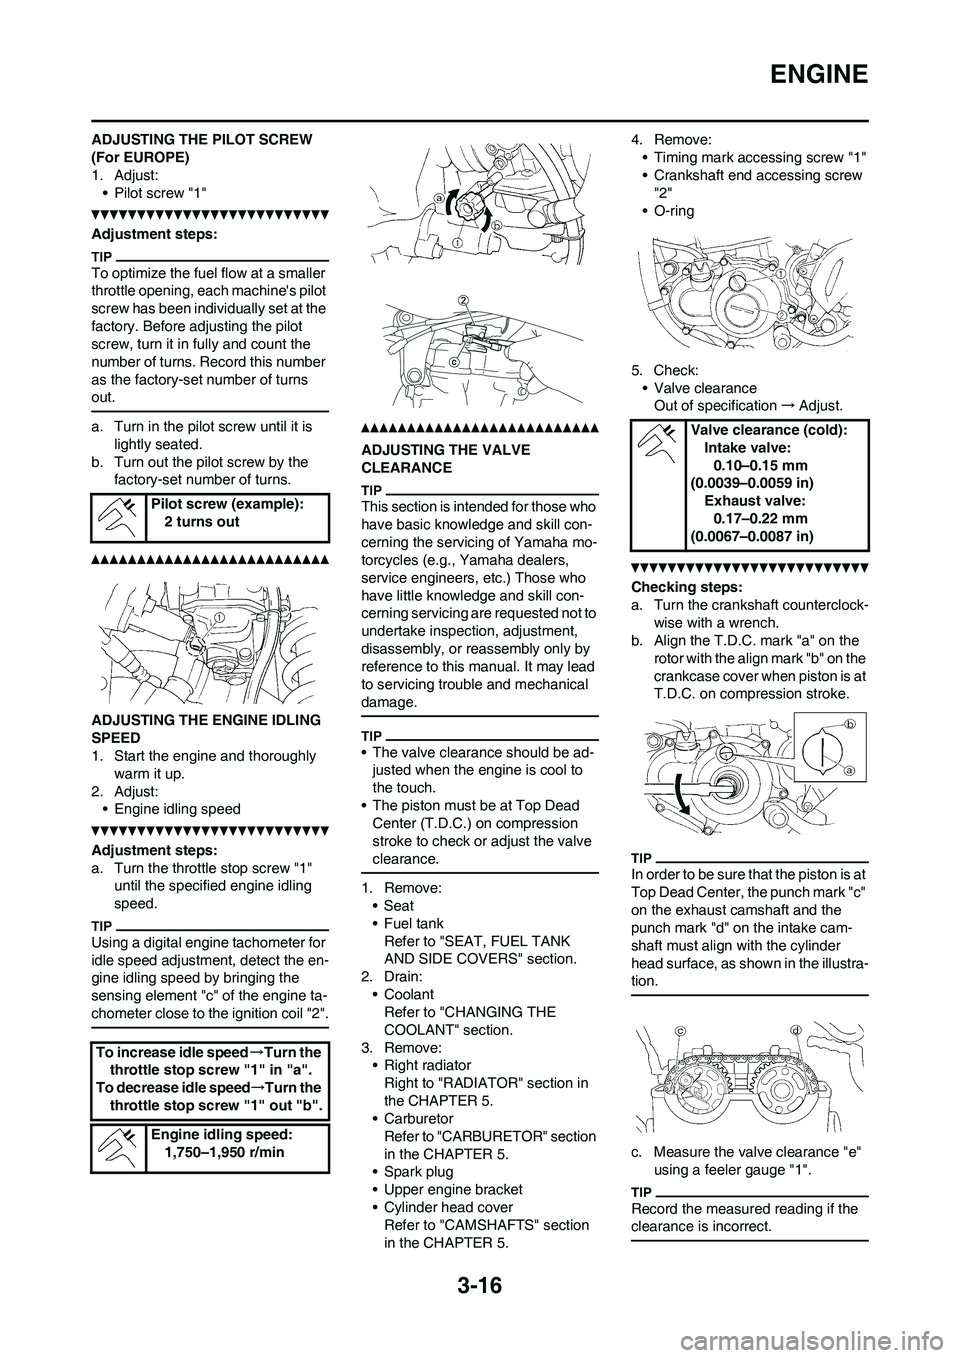
1. Adjust:
• Pilot screw "1"
Adjustment steps:
To optimize the fuel flow at a smaller
throttle opening, each machine's pilot
screw has been individually set at the
factory. Before adjusting the pilot
screw, turn it in fully and count the
number of turns. Record this number
as the factory-set number of turns
out.
a. Turn in the pilot screw until it is
lightly seated.
b. Turn out the pilot screw by the
factory-set number of turns.
ADJUSTING THE ENGINE IDLING
SPEED
1. Start the engine and thoroughly
warm it up.
2. Adjust:
• Engine idling speed
Adjustment steps:
a. Turn the throttle stop screw "1"
until the specified engine idling
speed.
Using a digital engine tachometer for
idle speed adjustment, detect the en-
gine idling speed by bringing the
sensing element "c" of the engine ta-
chometer close to the ignition coil "2".
ADJUSTING THE VALVE
CLEARANCE
This section is intended for those who
have basic knowledge and skill con-
cerning the servicing of Yamaha mo-
torcycles (e.g., Yamaha dealers,
service engineers, etc.) Those who
have little knowledge and skill con-
cerning servicing are requested not to
undertake inspection, adjustment,
disassembly, or reassembly only by
reference to this manual. It may lead
to servicing trouble and mechanical
damage.
• The valve clearance should be ad-
justed when the engine is cool to
the touch.
• The piston must be at Top Dead
Center (T.D.C.) on compression
stroke to check or adjust the valve
clearance.
1. Remove:
•Seat
•Fuel tank
Refer to "SEAT, FUEL TANK
AND SIDE COVERS" section.
2. Drain:
• Coolant
Refer to "CHANGING THE
COOLANT" section.
3. Remove:
• Right radiator
Right to "RADIATOR" section in
the CHAPTER 5.
• Carburetor
Refer to "CARBURETOR" section
in the CHAPTER 5.
• Spark plug
• Upper engine bracket
• Cylinder head cover
Refer to "CAMSHAFTS" section
in the CHAPTER 5.4. Remove:
• Timing mark accessing screw "1"
• Crankshaft end accessing screw
"2"
• O-ring
5. Check:
• Valve clearance
Out of specification→Adjust.
Checking steps:
a. Turn the crankshaft counterclock-
wise with a wrench.
b. Align the T.D.C. mark "a" on the
rotor with the align mark "b" on the
crankcase cover when piston is at
T.D.C. on compression stroke.
In order to be sure that the piston is at
Top Dead Center, the punch mark "c"
on the exhaust camshaft and the
punch mark "d" on the intake cam-
shaft must align with the cylinder
head surface, as shown in the illustra-
tion.
c. Measure the valve clearance "e"
using a feeler gauge "1".
Record the measured reading if the
clearance is incorrect.
Pilot screw (example):
2 turns out
To increase idle speed→Turn the
throttle stop screw "1" in "a".
To decrease idle speed→Turn the
throttle stop screw "1" out "b".
Engine idling speed:
1,750–1,950 r/min
Valve clearance (cold):
Intake valve:
0.10–0.15 mm
(0.0039–0.0059 in)
Exhaust valve:
0.17–0.22 mm
(0.0067–0.0087 in)
Page 82 of 232
3-23
CHASSIS
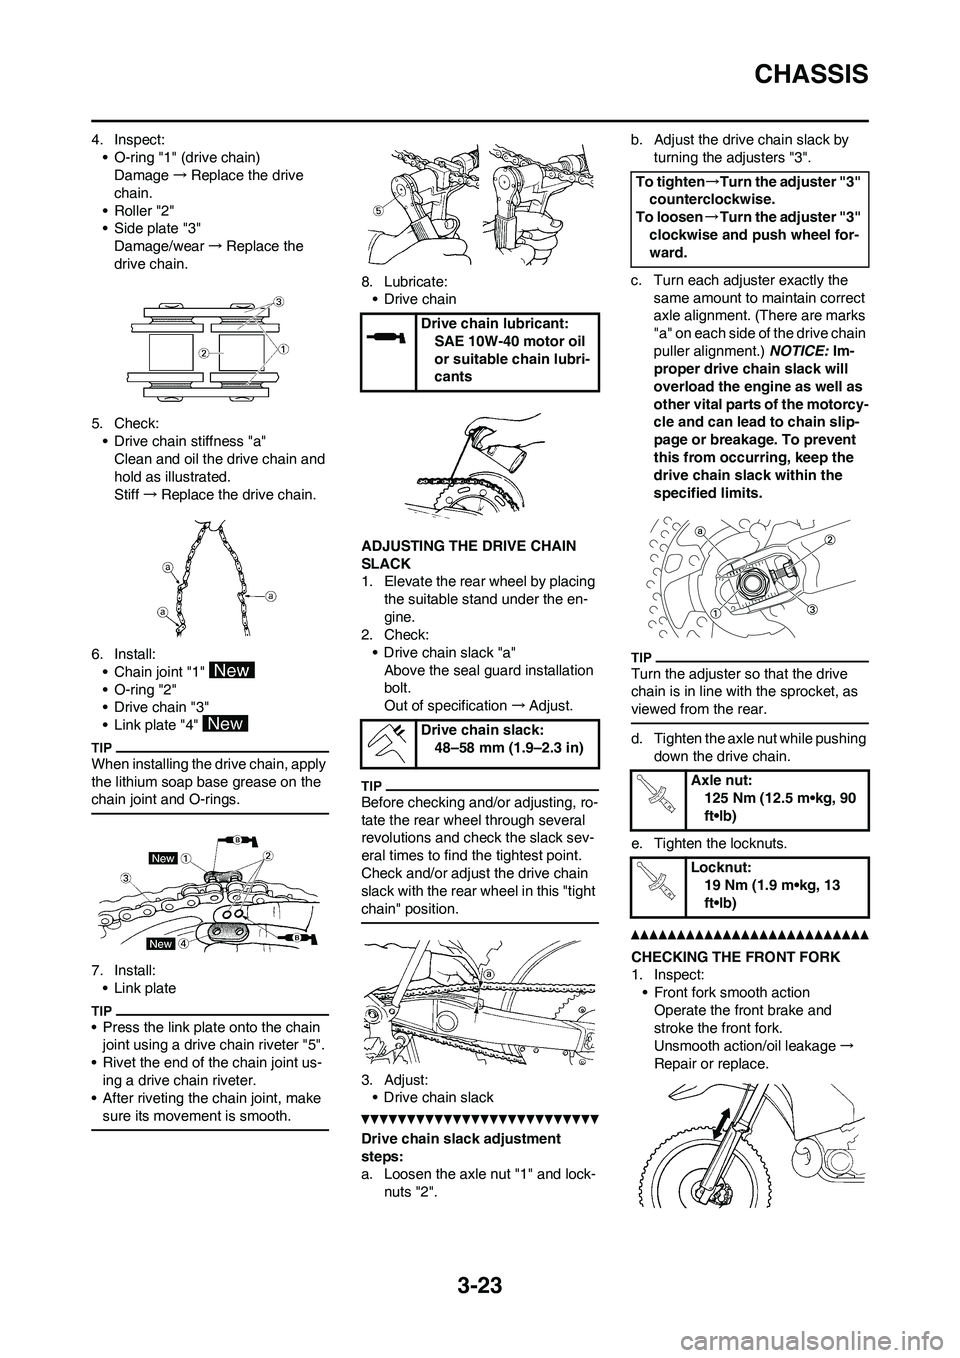
4. Inspect:
• O-ring "1" (drive chain)
Damage→Replace the drive
chain.
•Roller "2"
• Side plate "3"
Damage/wear→Replace the
drive chain.
5. Check:
• Drive chain stiffness "a"
Clean and oil the drive chain and
hold as illustrated.
Stiff→Replace the drive chain.
6. Install:
• Chain joint "1"
• O-ring "2"
• Drive chain "3"
• Link plate "4"
When installing the drive chain, apply
the lithium soap base grease on the
chain joint and O-rings.
7. Install:
• Link plate
• Press the link plate onto the chain
joint using a drive chain riveter "5".
• Rivet the end of the chain joint us-
ing a drive chain riveter.
• After riveting the chain joint, make
sure its movement is smooth.
8. Lubricate:
• Drive chain
ADJUSTING THE DRIVE CHAIN
SLACK
1. Elevate the rear wheel by placing
the suitable stand under the en-
gine.
2. Check:
• Drive chain slack "a"
Above the seal guard installation
bolt.
Out of specification→Adjust.
Before checking and/or adjusting, ro-
tate the rear wheel through several
revolutions and check the slack sev-
eral times to find the tightest point.
Check and/or adjust the drive chain
slack with the rear wheel in this "tight
chain" position.
3. Adjust:
• Drive chain slack
Drive chain slack adjustment
steps:
a. Loosen the axle nut "1" and lock-
nuts "2".b. Adjust the drive chain slack by
turning the adjusters "3".
c. Turn each adjuster exactly the
same amount to maintain correct
axle alignment. (There are marks
"a" on each side of the drive chain
puller alignment.) NOTICE: Im-
proper drive chain slack will
overload the engine as well as
other vital parts of the motorcy-
cle and can lead to chain slip-
page or breakage. To prevent
this from occurring, keep the
drive chain slack within the
specified limits.
Turn the adjuster so that the drive
chain is in line with the sprocket, as
viewed from the rear.
d. Tighten the axle nut while pushing
down the drive chain.
e. Tighten the locknuts.
CHECKING THE FRONT FORK
1. Inspect:
• Front fork smooth action
Operate the front brake and
stroke the front fork.
Unsmooth action/oil leakage→
Repair or replace.
Drive chain lubricant:
SAE 10W-40 motor oil
or suitable chain lubri-
cants
Drive chain slack:
48–58 mm (1.9–2.3 in)
To tighten→Turn the adjuster "3"
counterclockwise.
To loosen→Turn the adjuster "3"
clockwise and push wheel for-
ward.
Axle nut:
125 Nm (12.5 m•kg, 90
ft•lb)
Locknut:
19 Nm (1.9 m•kg, 13
ft•lb)
Page 83 of 232
3-24
CHASSIS
CLEANING THE FRONT FORK OIL
SEAL AND DUST SEAL
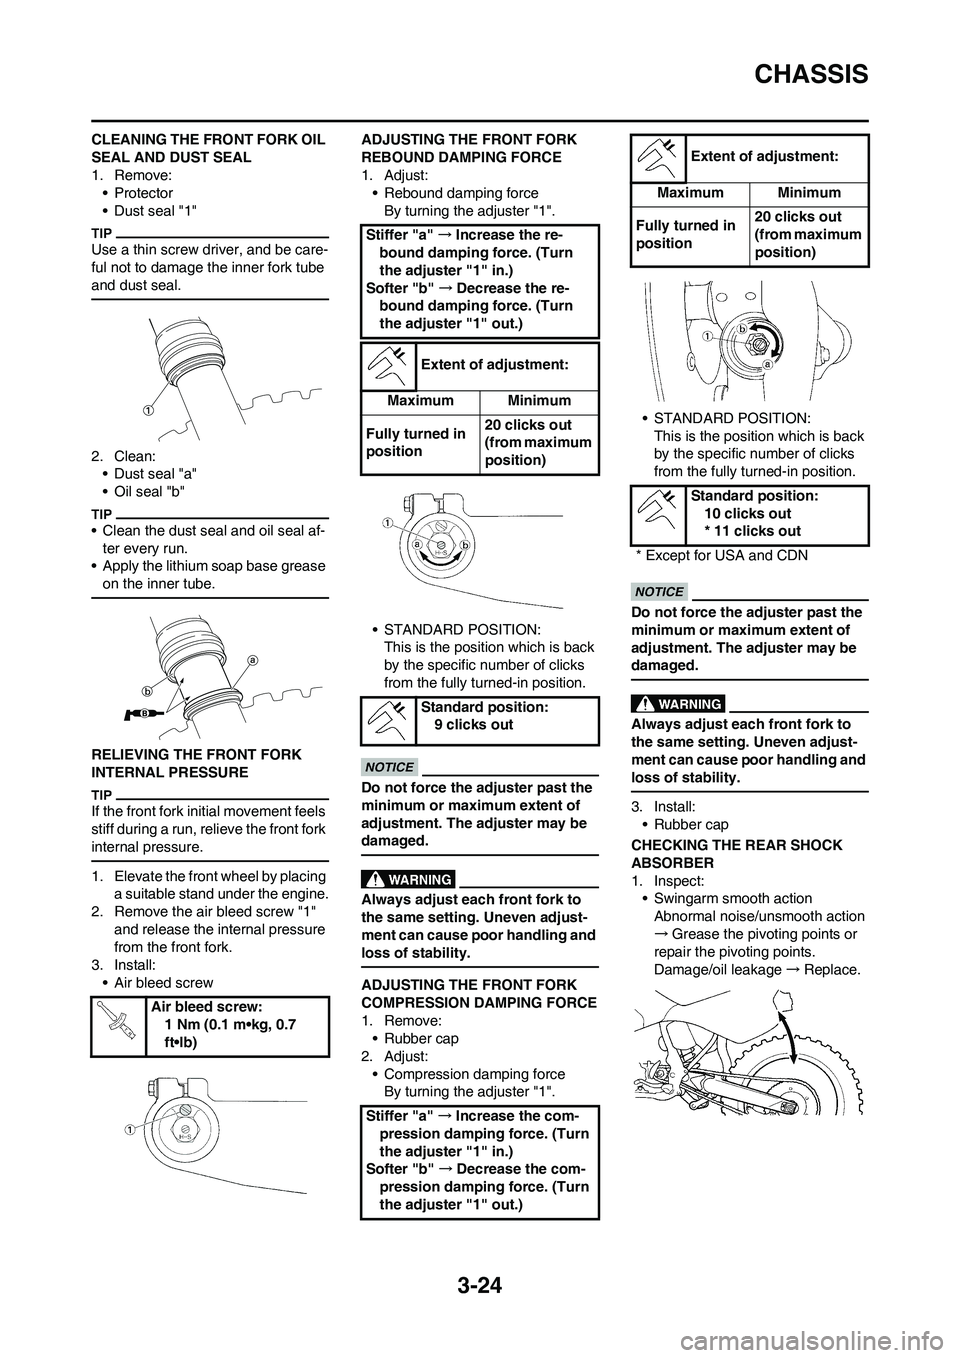
1. Remove:
•Protector
• Dust seal "1"
Use a thin screw driver, and be care-
ful not to damage the inner fork tube
and dust seal.
2. Clean:
• Dust seal "a"
• Oil seal "b"
• Clean the dust seal and oil seal af-
ter every run.
• Apply the lithium soap base grease
on the inner tube.
RELIEVING THE FRONT FORK
INTERNAL PRESSURE
If the front fork initial movement feels
stiff during a run, relieve the front fork
internal pressure.
1. Elevate the front wheel by placing
a suitable stand under the engine.
2. Remove the air bleed screw "1"
and release the internal pressure
from the front fork.
3. Install:
• Air bleed screwADJUSTING THE FRONT FORK
REBOUND DAMPING FORCE
1. Adjust:
• Rebound damping force
By turning the adjuster "1".
• STANDARD POSITION:
This is the position which is back
by the specific number of clicks
from the fully turned-in position.
Do not force the adjuster past the
minimum or maximum extent of
adjustment. The adjuster may be
damaged.
Always adjust each front fork to
the same setting. Uneven adjust-
ment can cause poor handling and
loss of stability.
ADJUSTING THE FRONT FORK
COMPRESSION DAMPING FORCE
1. Remove:
• Rubber cap
2. Adjust:
• Compression damping force
By turning the adjuster "1".• STANDARD POSITION:
This is the position which is back
by the specific number of clicks
from the fully turned-in position.
Do not force the adjuster past the
minimum or maximum extent of
adjustment. The adjuster may be
damaged.
Always adjust each front fork to
the same setting. Uneven adjust-
ment can cause poor handling and
loss of stability.
3. Install:
• Rubber cap
CHECKING THE REAR SHOCK
ABSORBER
1. Inspect:
• Swingarm smooth action
Abnormal noise/unsmooth action
→Grease the pivoting points or
repair the pivoting points.
Damage/oil leakage→Replace.
Air bleed screw:
1 Nm (0.1 m•kg, 0.7
ft•lb)
Stiffer "a" →Increase the re-
bound damping force. (Turn
the adjuster "1" in.)
Softer "b" →Decrease the re-
bound damping force. (Turn
the adjuster "1" out.)
Extent of adjustment:
Maximum Minimum
Fully turned in
position20 clicks out
(from maximum
position)
Standard position:
9 clicks out
Stiffer "a" →Increase the com-
pression damping force. (Turn
the adjuster "1" in.)
Softer "b" →Decrease the com-
pression damping force. (Turn
the adjuster "1" out.)
Extent of adjustment:
Maximum Minimum
Fully turned in
position20 clicks out
(from maximum
position)
Standard position:
10 clicks out
* 11 clicks out
* Except for USA and CDN
Page 88 of 232
3-29
ELECTRICAL
ELECTRICAL
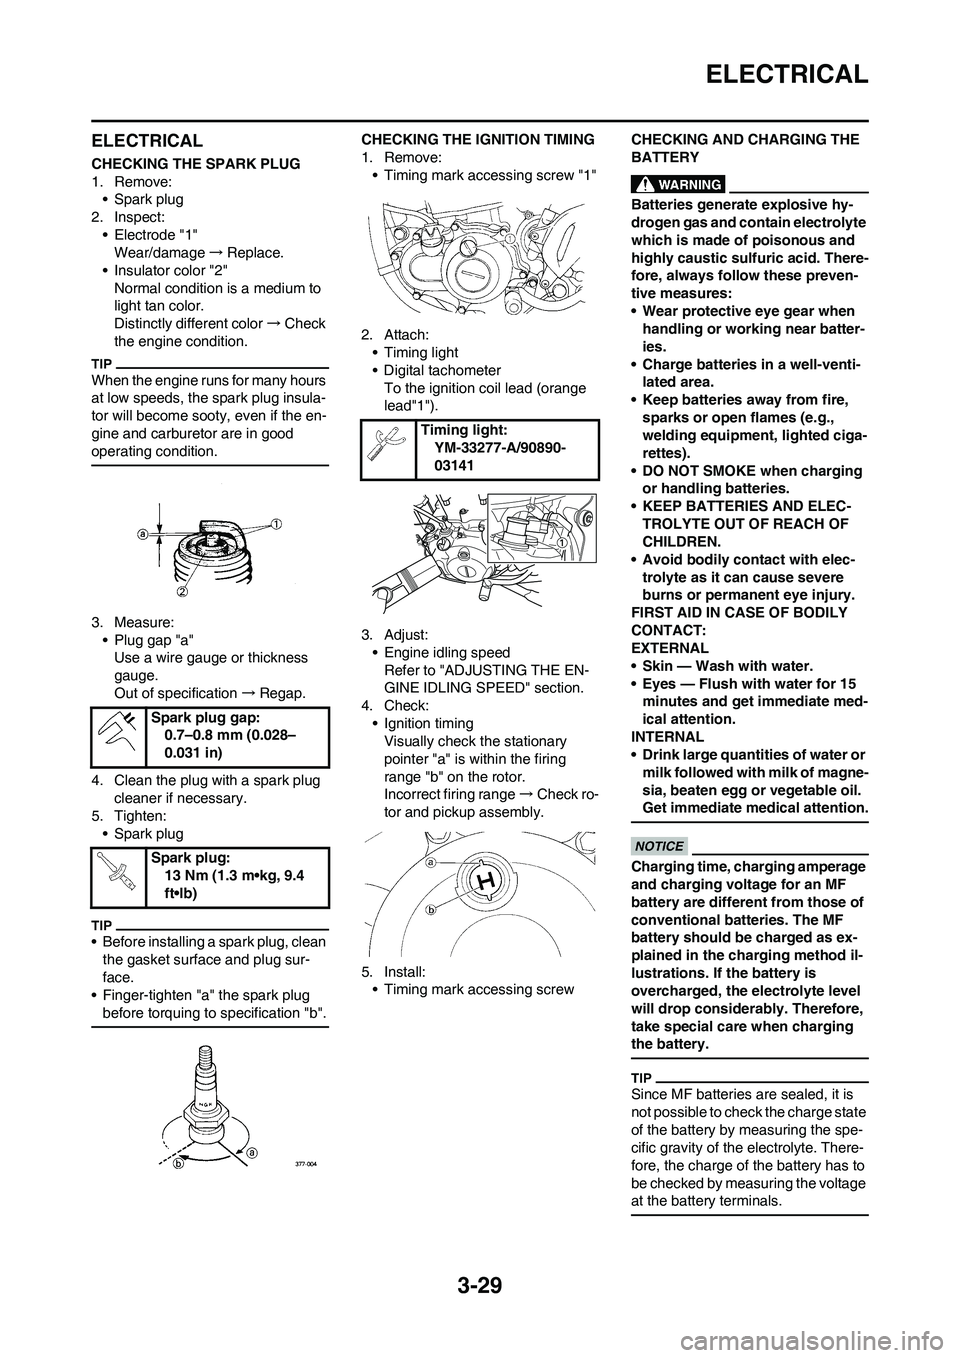
CHECKING THE SPARK PLUG
1. Remove:
• Spark plug
2. Inspect:
• Electrode "1"
Wear/damage→Replace.
• Insulator color "2"
Normal condition is a medium to
light tan color.
Distinctly different color→Check
the engine condition.
When the engine runs for many hours
at low speeds, the spark plug insula-
tor will become sooty, even if the en-
gine and carburetor are in good
operating condition.
3. Measure:
• Plug gap "a"
Use a wire gauge or thickness
gauge.
Out of specification→Regap.
4. Clean the plug with a spark plug
cleaner if necessary.
5. Tighten:
• Spark plug
• Before installing a spark plug, clean
the gasket surface and plug sur-
face.
• Finger-tighten "a" the spark plug
before torquing to specification "b".
CHECKING THE IGNITION TIMING
1. Remove:
• Timing mark accessing screw "1"
2. Attach:
• Timing light
• Digital tachometer
To the ignition coil lead (orange
lead"1").
3. Adjust:
• Engine idling speed
Refer to "ADJUSTING THE EN-
GINE IDLING SPEED" section.
4. Check:
• Ignition timing
Visually check the stationary
pointer "a" is within the firing
range "b" on the rotor.
Incorrect firing range→Check ro-
tor and pickup assembly.
5. Install:
• Timing mark accessing screwCHECKING AND CHARGING THE
BATTERY
Batteries generate explosive hy-
drogen gas and contain electrolyte
which is made of poisonous and
highly caustic sulfuric acid. There-
fore, always follow these preven-
tive measures:
• Wear protective eye gear when
handling or working near batter-
ies.
• Charge batteries in a well-venti-
lated area.
• Keep batteries away from fire,
sparks or open flames (e.g.,
welding equipment, lighted ciga-
rettes).
• DO NOT SMOKE when charging
or handling batteries.
• KEEP BATTERIES AND ELEC-
TROLYTE OUT OF REACH OF
CHILDREN.
• Avoid bodily contact with elec-
trolyte as it can cause severe
burns or permanent eye injury.
FIRST AID IN CASE OF BODILY
CONTACT:
EXTERNAL
• Skin — Wash with water.
• Eyes — Flush with water for 15
minutes and get immediate med-
ical attention.
INTERNAL
• Drink large quantities of water or
milk followed with milk of magne-
sia, beaten egg or vegetable oil.
Get immediate medical attention.
Charging time, charging amperage
and charging voltage for an MF
battery are different from those of
conventional batteries. The MF
battery should be charged as ex-
plained in the charging method il-
lustrations. If the battery is
overcharged, the electrolyte level
will drop considerably. Therefore,
take special care when charging
the battery.
Since MF batteries are sealed, it is
not possible to check the charge state
of the battery by measuring the spe-
cific gravity of the electrolyte. There-
fore, the charge of the battery has to
be checked by measuring the voltage
at the battery terminals.
Spark plug gap:
0.7–0.8 mm (0.028–
0.031 in)
Spark plug:
13 Nm (1.3 m•kg, 9.4
ft•lb)
Timing light:
YM-33277-A/90890-
03141
Page 92 of 232
3-33
ELECTRICAL
6. Install:
•Battery
• Battery band
7. Connect:
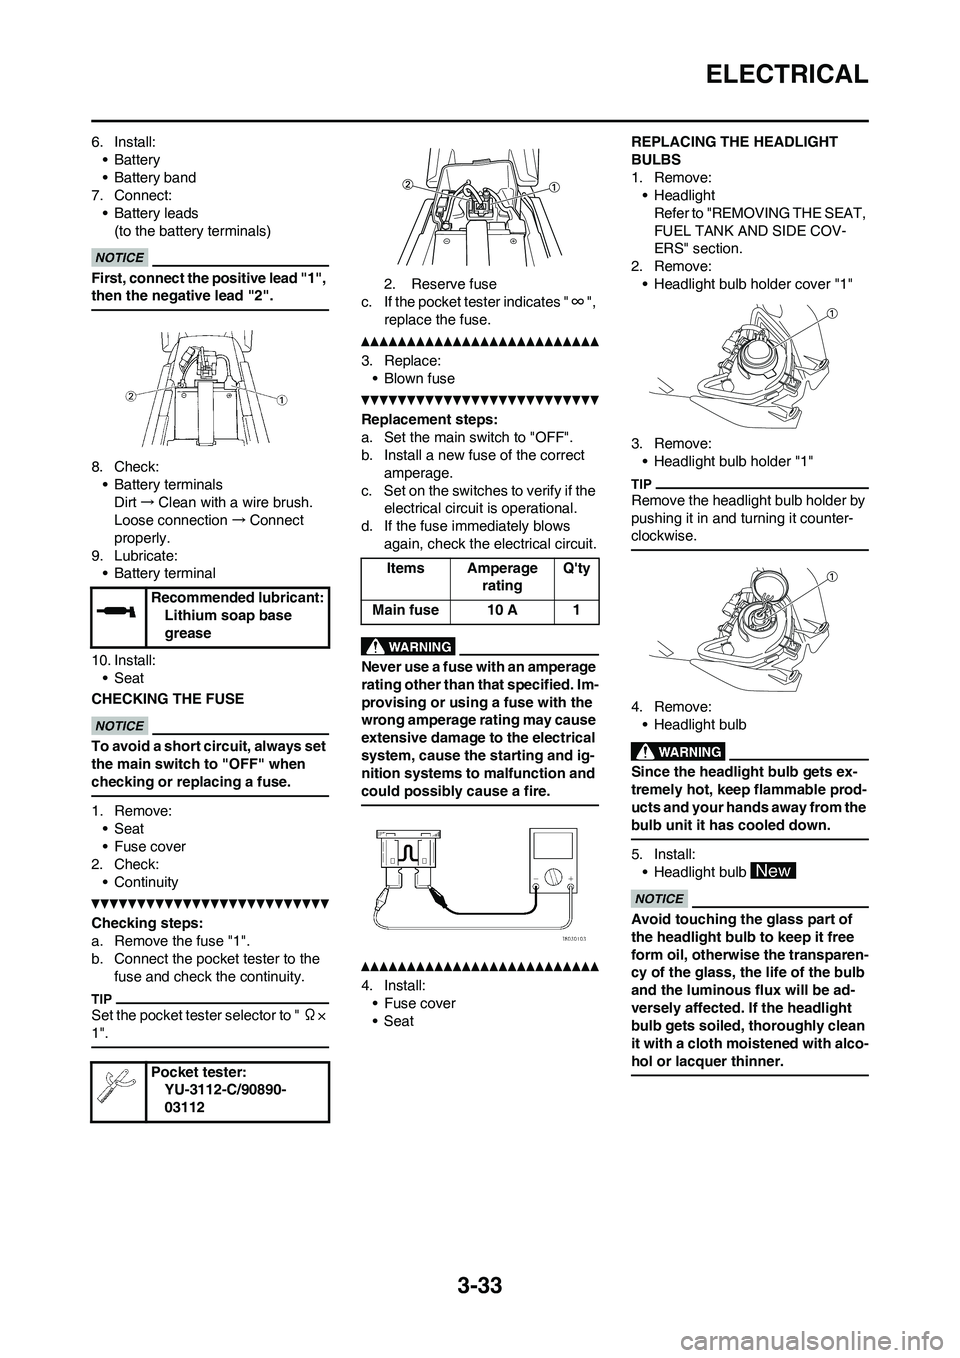
• Battery leads
(to the battery terminals)
First, connect the positive lead "1",
then the negative lead "2".
8. Check:
• Battery terminals
Dirt→Clean with a wire brush.
Loose connection→Connect
properly.
9. Lubricate:
• Battery terminal
10. Install:
• Seat
CHECKING THE FUSE
To avoid a short circuit, always set
the main switch to "OFF" when
checking or replacing a fuse.
1. Remove:
• Seat
• Fuse cover
2. Check:
• Continuity
Checking steps:
a. Remove the fuse "1".
b. Connect the pocket tester to the
fuse and check the continuity.
Set the pocket tester selector to " Ω×
1".
2. Reserve fuse
c. If the pocket tester indicates "∞",
replace the fuse.
3. Replace:
• Blown fuse
Replacement steps:
a. Set the main switch to "OFF".
b. Install a new fuse of the correct
amperage.
c. Set on the switches to verify if the
electrical circuit is operational.
d. If the fuse immediately blows
again, check the electrical circuit.
Never use a fuse with an amperage
rating other than that specified. Im-
provising or using a fuse with the
wrong amperage rating may cause
extensive damage to the electrical
system, cause the starting and ig-
nition systems to malfunction and
could possibly cause a fire.
4. Install:
• Fuse cover
•SeatREPLACING THE HEADLIGHT
BULBS
1. Remove:
• Headlight
Refer to "REMOVING THE SEAT,
FUEL TANK AND SIDE COV-
ERS" section.
2. Remove:
• Headlight bulb holder cover "1"
3. Remove:
• Headlight bulb holder "1"
Remove the headlight bulb holder by
pushing it in and turning it counter-
clockwise.
4. Remove:
• Headlight bulb
Since the headlight bulb gets ex-
tremely hot, keep flammable prod-
ucts and your hands away from the
bulb unit it has cooled down.
5. Install:
• Headlight bulb
Avoid touching the glass part of
the headlight bulb to keep it free
form oil, otherwise the transparen-
cy of the glass, the life of the bulb
and the luminous flux will be ad-
versely affected. If the headlight
bulb gets soiled, thoroughly clean
it with a cloth moistened with alco-
hol or lacquer thinner.
Recommended lubricant:
Lithium soap base
grease
Pocket tester:
YU-3112-C/90890-
03112
Items Amperage
ratingQ'ty
Main fuse 10 A 1