engine YAMAHA WR 250F 2017 Manual Online
[x] Cancel search | Manufacturer: YAMAHA, Model Year: 2017, Model line: WR 250F, Model: YAMAHA WR 250F 2017Pages: 432, PDF Size: 14.14 MB
Page 240 of 432
ENGINE REMOVAL
6-11
4. Tighten:
• Bolt (exhaust pipe 2)
•Clamp
TIP
Tighten while checking that their front and rear
joints are inserted in position.Bolt (exhaust pipe 2)
20 Nm (2.0 m·kgf, 14 ft·lbf)
Clamp
12 Nm (1.2 m·kgf, 8.7 ft·lbf)
T R..
T R..
Page 246 of 432
CAMSHAFT
6-17
EAS2GBB242CHECKING THE DECOMPRESSION SYS-
TEM
1. Check:
• Decompression system
▼▼▼▼▼▼▼▼▼▼▼▼▼▼▼▼▼▼▼▼▼▼▼▼▼▼▼▼▼▼▼▼
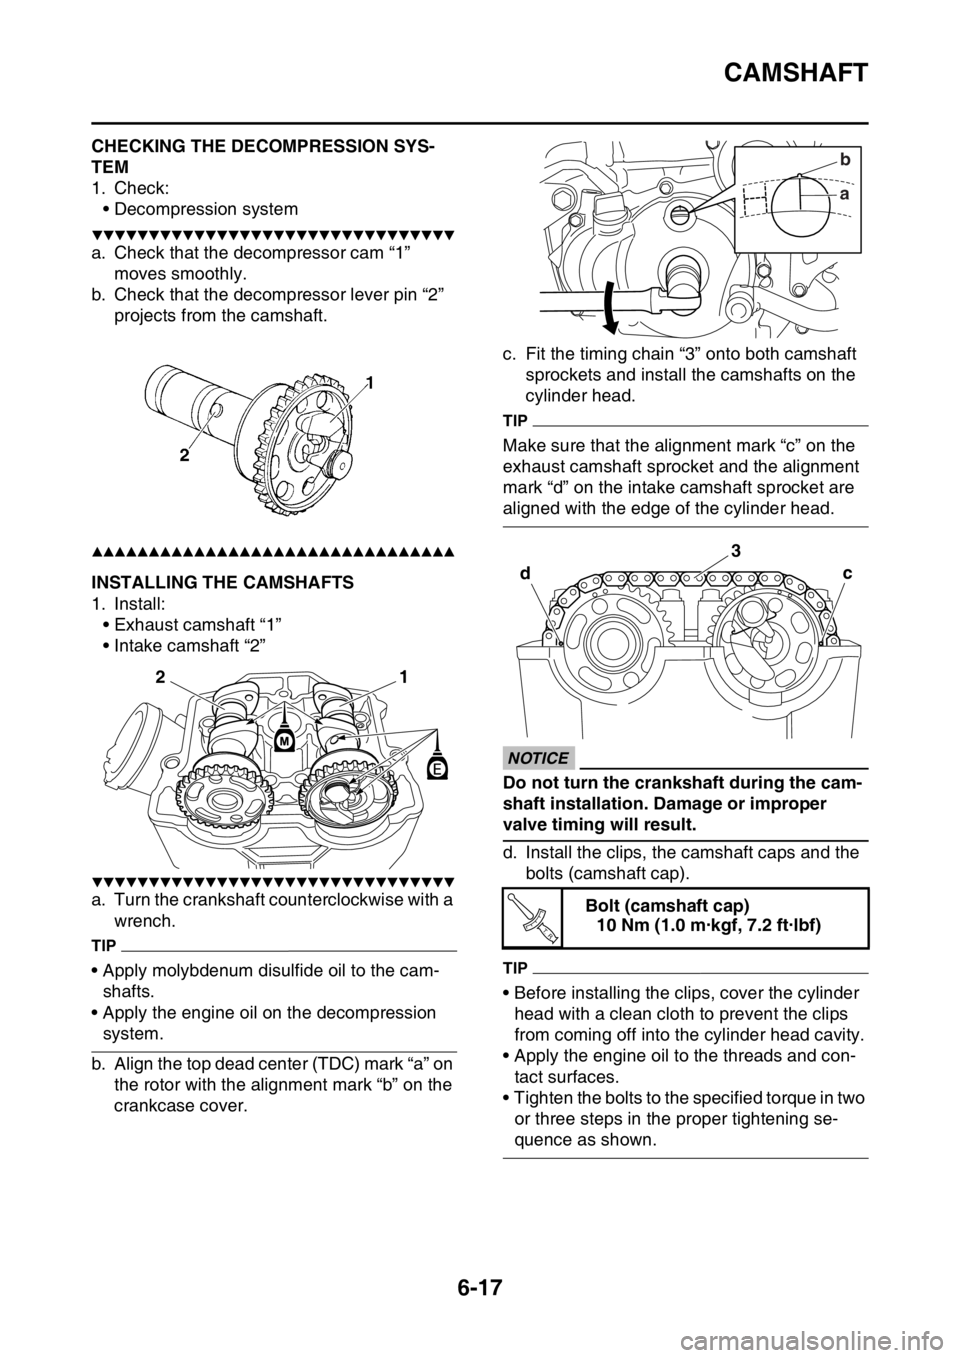
a. Check that the decompressor cam “1”
moves smoothly.
b. Check that the decompressor lever pin “2”
projects from the camshaft.
▲▲▲▲▲▲▲▲▲▲▲▲▲▲▲▲▲▲▲▲▲▲▲▲▲▲▲▲▲▲▲▲
EAS2GBB243INSTALLING THE CAMSHAFTS
1. Install:
• Exhaust camshaft “1”
• Intake camshaft “2”
▼▼▼▼▼▼▼▼▼▼▼▼▼▼▼▼▼▼▼▼▼▼▼▼▼▼▼▼▼▼▼▼
a. Turn the crankshaft counterclockwise with a
wrench.
TIP
• Apply molybdenum disulfide oil to the cam-
shafts.
• Apply the engine oil on the decompression
system.
b. Align the top dead center (TDC) mark “a” on
the rotor with the alignment mark “b” on the
crankcase cover.c. Fit the timing chain “3” onto both camshaft
sprockets and install the camshafts on the
cylinder head.
TIP
Make sure that the alignment mark “c” on the
exhaust camshaft sprocket and the alignment
mark “d” on the intake camshaft sprocket are
aligned with the edge of the cylinder head.
ECA33DD029
NOTICE
Do not turn the crankshaft during the cam-
shaft installation. Damage or improper
valve timing will result.
d. Install the clips, the camshaft caps and the
bolts (camshaft cap).
TIP
• Before installing the clips, cover the cylinder
head with a clean cloth to prevent the clips
from coming off into the cylinder head cavity.
• Apply the engine oil to the threads and con-
tact surfaces.
• Tighten the bolts to the specified torque in two
or three steps in the proper tightening se-
quence as shown.
1
2
Bolt (camshaft cap)
10 Nm (1.0 m·kgf, 7.2 ft·lbf)
ab
dc
3
T R..
Page 249 of 432
CYLINDER HEAD
6-20
EAS2GBB244
CYLINDER HEAD
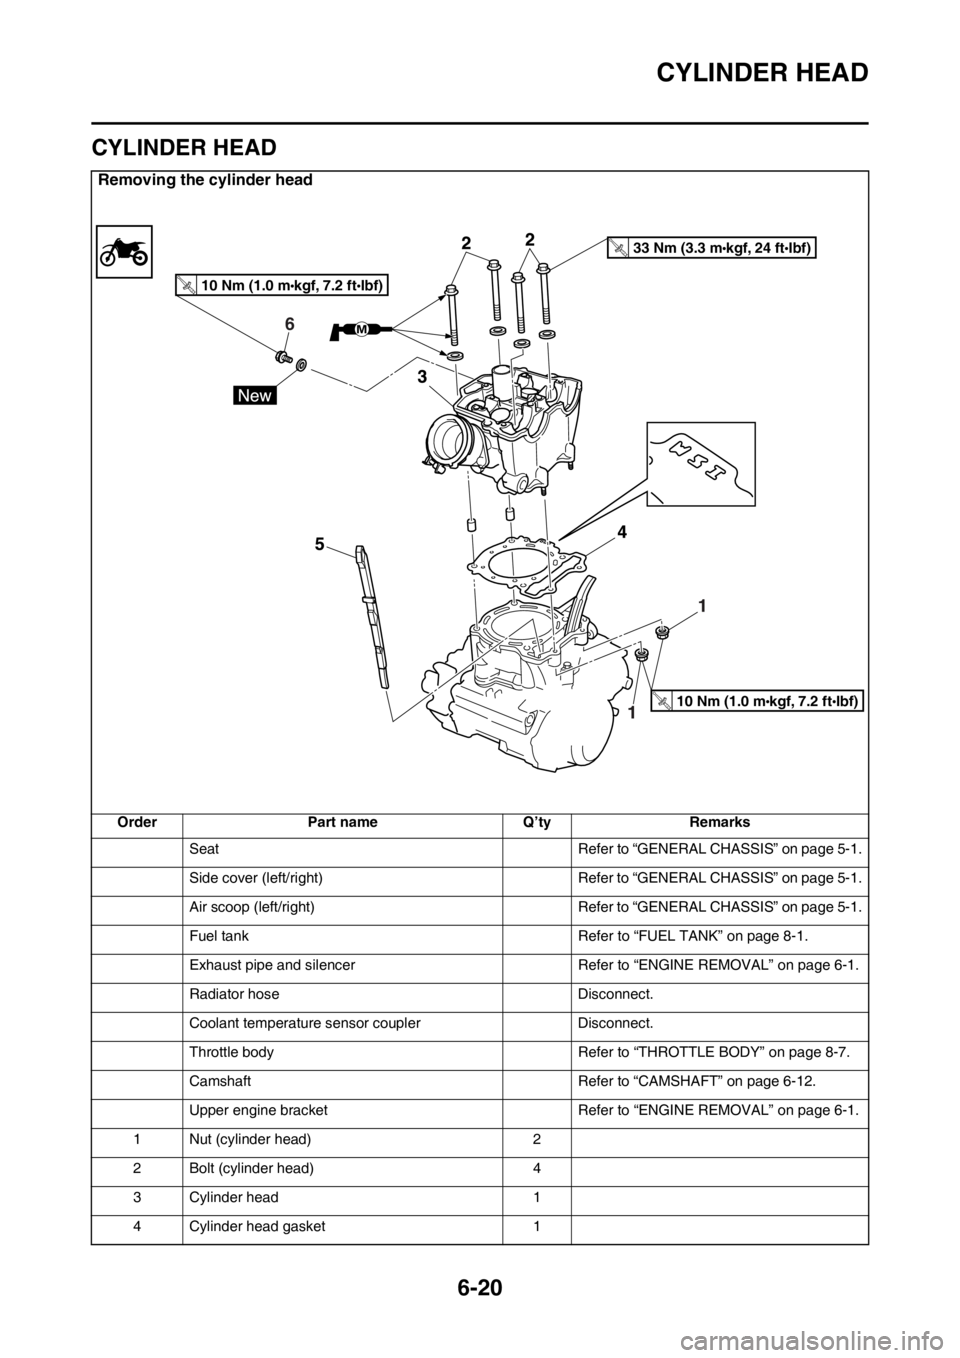
Removing the cylinder head
Order Part name Q’ty Remarks
Seat Refer to “GENERAL CHASSIS” on page 5-1.
Side cover (left/right) Refer to “GENERAL CHASSIS” on page 5-1.
Air scoop (left/right) Refer to “GENERAL CHASSIS” on page 5-1.
Fuel tank Refer to “FUEL TANK” on page 8-1.
Exhaust pipe and silencer Refer to “ENGINE REMOVAL” on page 6-1.
Radiator hose Disconnect.
Coolant temperature sensor coupler Disconnect.
Throttle body Refer to “THROTTLE BODY” on page 8-7.
Camshaft Refer to “CAMSHAFT” on page 6-12.
Upper engine bracket Refer to “ENGINE REMOVAL” on page 6-1.
1 Nut (cylinder head) 2
2 Bolt (cylinder head) 4
3 Cylinder head 1
4 Cylinder head gasket 1
6
10 Nm (1.0 m kgf, 7.2 ft Ibf)T.R.
33 Nm (3.3 m kgf, 24 ft Ibf)T.R.
10 Nm (1.0 m kgf, 7.2 ft Ibf)T.R.
Page 265 of 432
CYLINDER AND PISTON
6-36
TIP
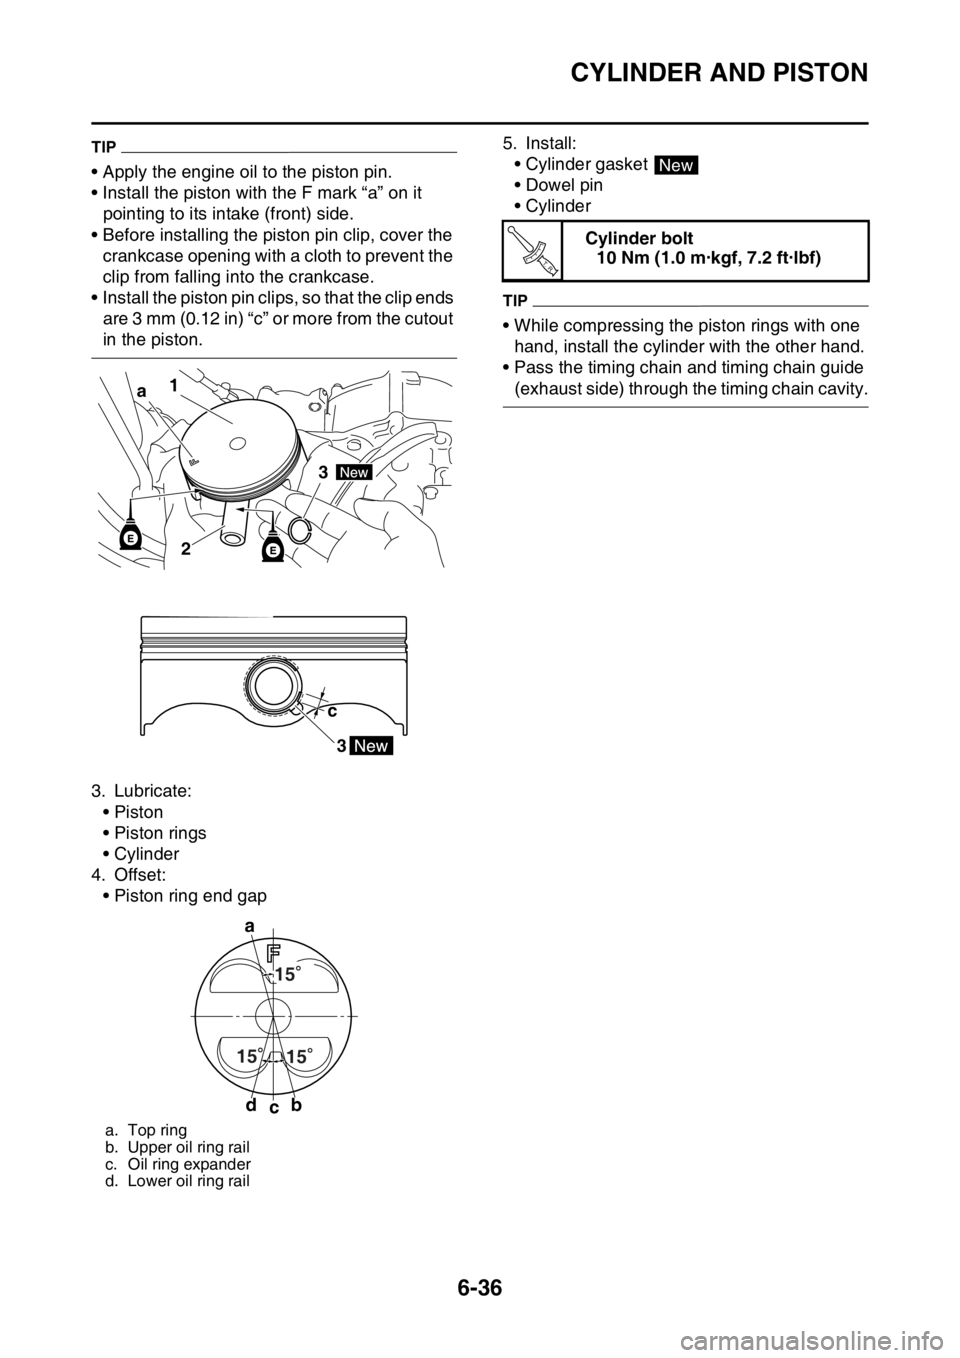
• Apply the engine oil to the piston pin.
• Install the piston with the F mark “a” on it
pointing to its intake (front) side.
• Before installing the piston pin clip, cover the
crankcase opening with a cloth to prevent the
clip from falling into the crankcase.
• Install the piston pin clips, so that the clip ends
are 3 mm (0.12 in) “c” or more from the cutout
in the piston.
3. Lubricate:
•Piston
• Piston rings
• Cylinder
4. Offset:
• Piston ring end gap5. Install:
• Cylinder gasket
• Dowel pin
• Cylinder
TIP
• While compressing the piston rings with one
hand, install the cylinder with the other hand.
• Pass the timing chain and timing chain guide
(exhaust side) through the timing chain cavity.
a. Top ring
b. Upper oil ring rail
c. Oil ring expander
d. Lower oil ring rail
1
3
2 a
3 c
a
db
c15
15
15
Cylinder bolt
10 Nm (1.0 m·kgf, 7.2 ft·lbf)
New
T R..
Page 266 of 432
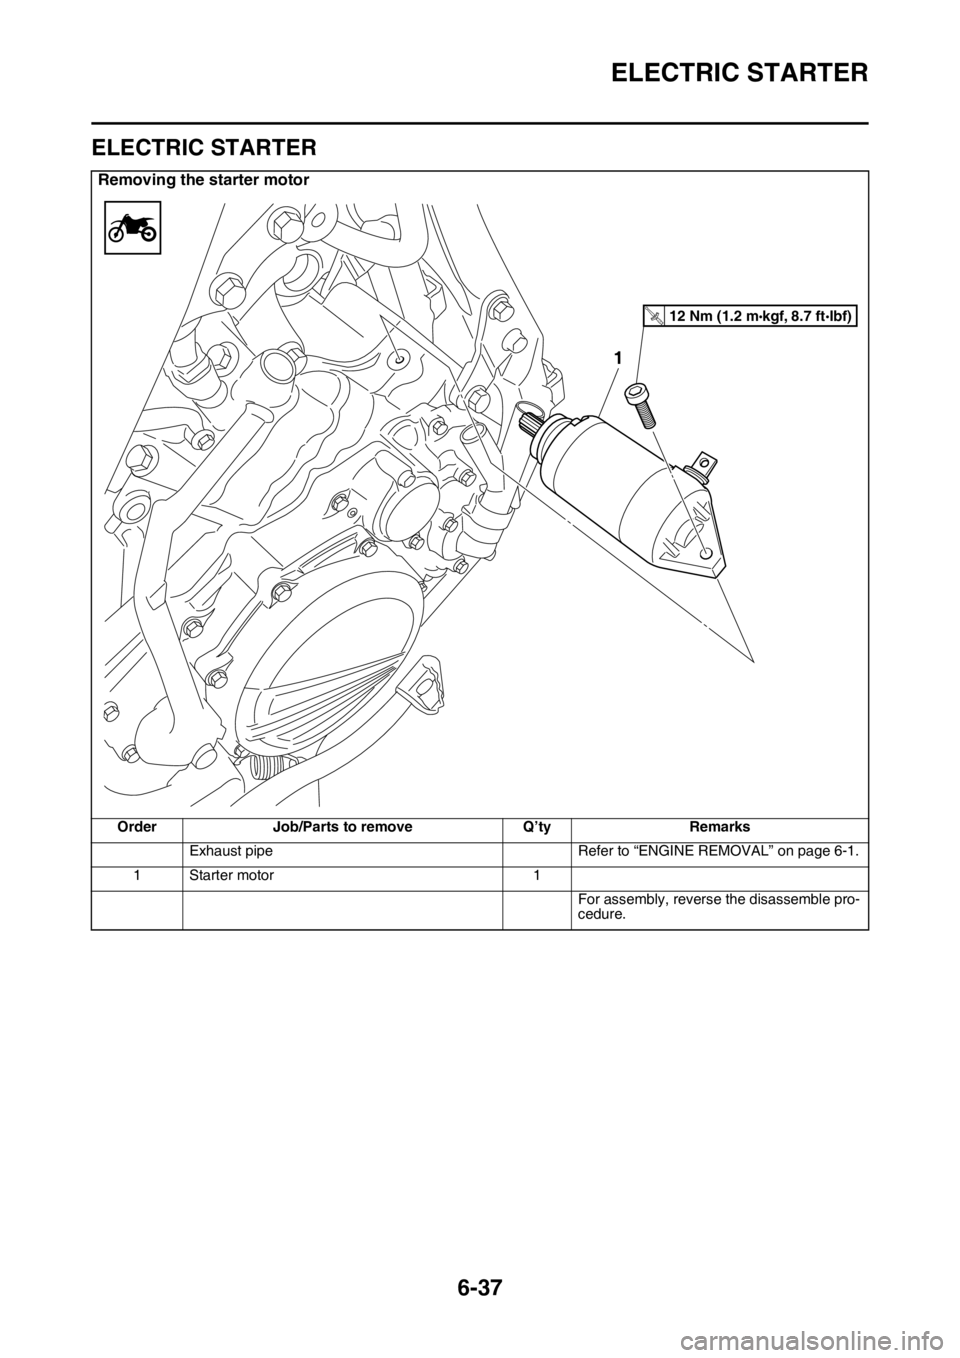
ELECTRIC STARTER
6-37
EAS2GBB262
ELECTRIC STARTER
Removing the starter motor
Order Job/Parts to remove Q’ty Remarks
Exhaust pipe Refer to “ENGINE REMOVAL” on page 6-1.
1 Starter motor 1
For assembly, reverse the disassemble pro-
cedure.
1
12 Nm (1.2 m kgf, 8.7 ft Ibf)T.R.
Page 271 of 432
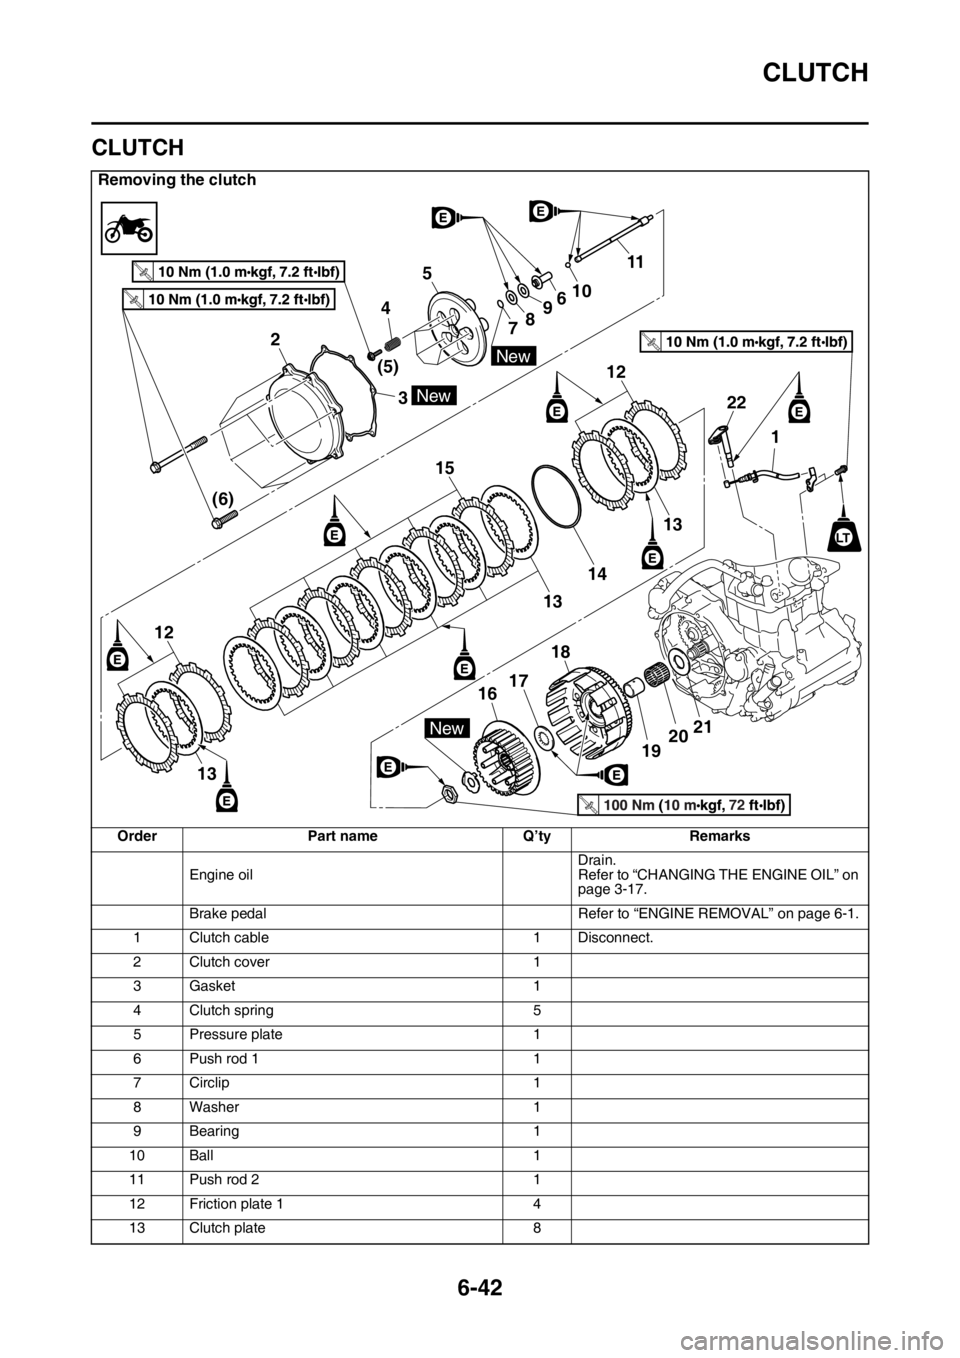
CLUTCH
6-42
EAS2GBB265
CLUTCH
Removing the clutch
Order Part name Q’ty Remarks
Engine oilDrain.
Refer to “CHANGING THE ENGINE OIL” on
page 3-17.
Brake pedal Refer to “ENGINE REMOVAL” on page 6-1.
1 Clutch cable 1 Disconnect.
2 Clutch cover 1
3Gasket 1
4 Clutch spring 5
5 Pressure plate 1
6 Push rod 1 1
7 Circlip 1
8Washer 1
9 Bearing 1
10 Ball 1
11 Push rod 2 1
12 Friction plate 1 4
13 Clutch plate 8
New
New
New
2
3 45
(5)
(6)78961011
12
22
1
15
12
13
13
18
1920 17
16
14
13
T.R.
T.R.
T.R.
T.R.
LT
21
72
Page 273 of 432
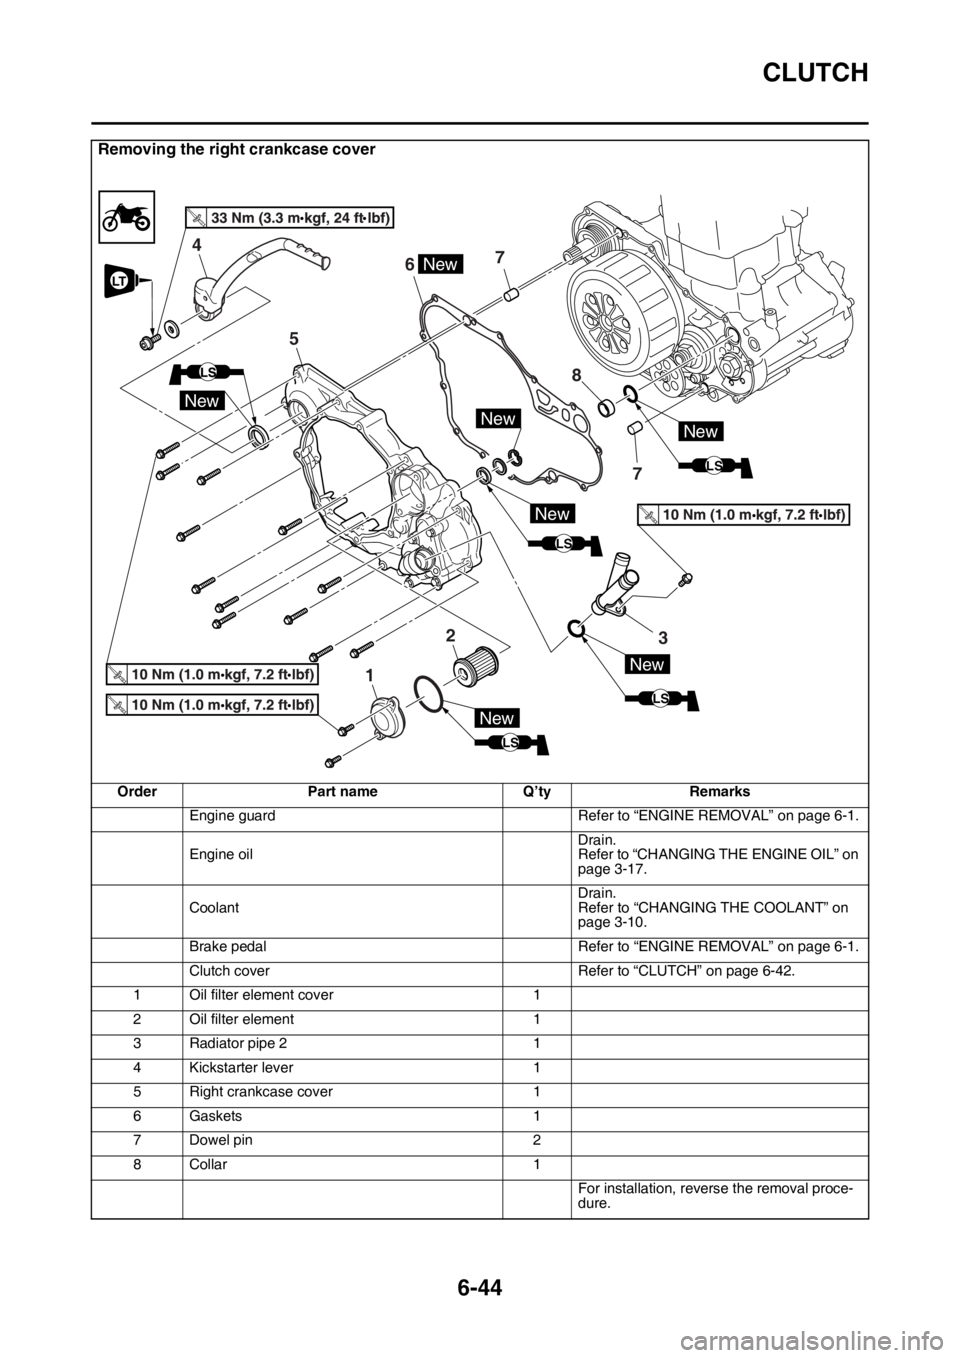
CLUTCH
6-44
Removing the right crankcase cover
Order Part name Q’ty Remarks
Engine guard Refer to “ENGINE REMOVAL” on page 6-1.
Engine oilDrain.
Refer to “CHANGING THE ENGINE OIL” on
page 3-17.
CoolantDrain.
Refer to “CHANGING THE COOLANT” on
page 3-10.
Brake pedal Refer to “ENGINE REMOVAL” on page 6-1.
Clutch cover Refer to “CLUTCH” on page 6-42.
1 Oil filter element cover 1
2 Oil filter element 1
3 Radiator pipe 2 1
4 Kickstarter lever 1
5 Right crankcase cover 1
6 Gaskets 1
7 Dowel pin 2
8Collar 1
For installation, reverse the removal proce-
dure.
T.R.
LS
New
New
67
2
5
4
1
7 8
New
3
LS
New
New
LS
NewNew
LT
LS
Page 276 of 432
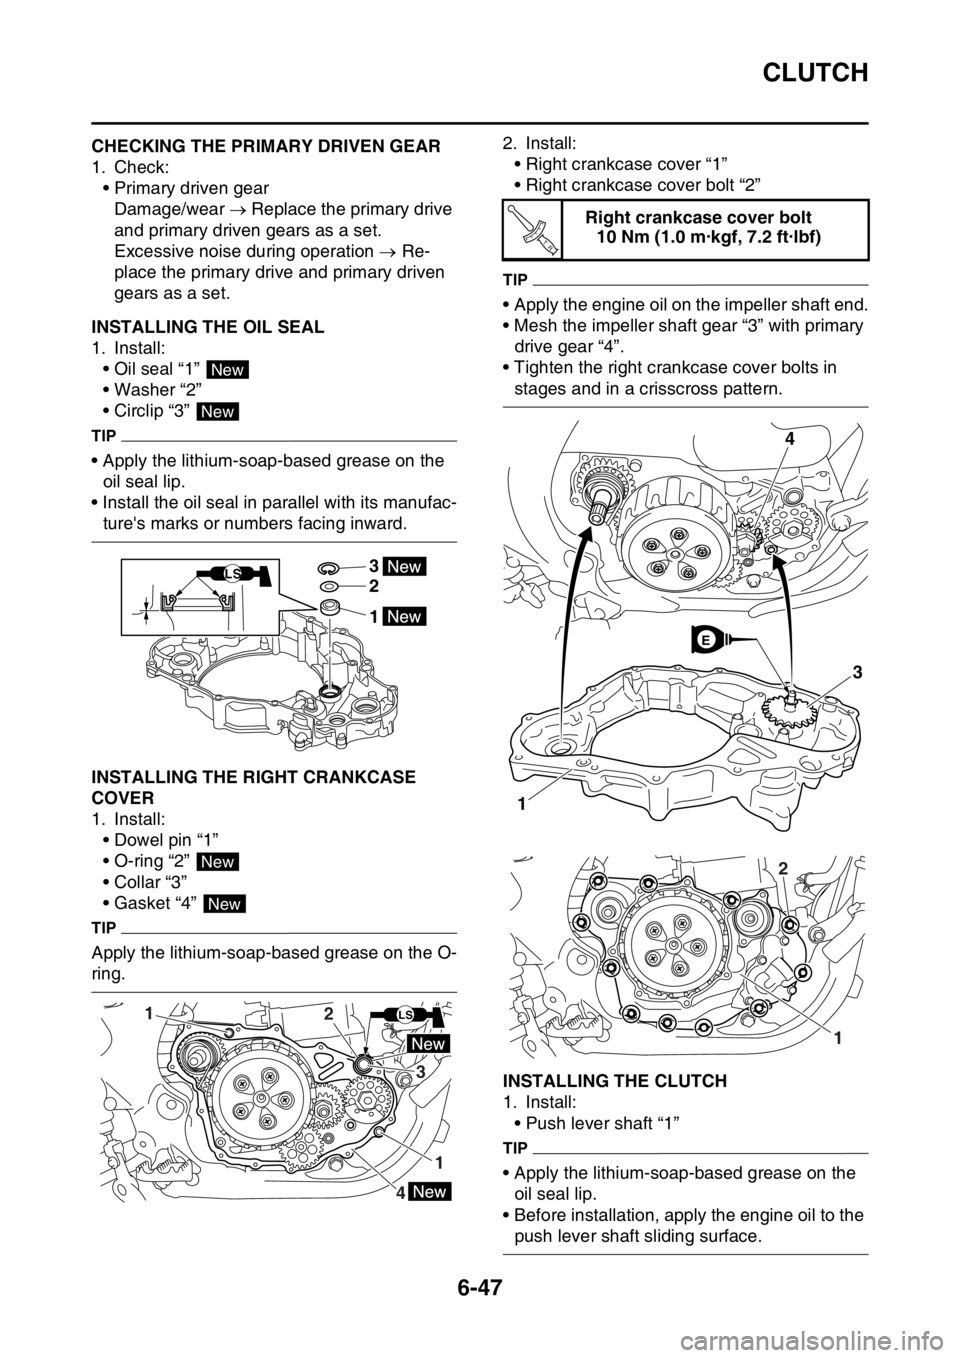
CLUTCH
6-47
EAS2GBB276CHECKING THE PRIMARY DRIVEN GEAR
1. Check:
• Primary driven gear
Damage/wear Replace the primary drive
and primary driven gears as a set.
Excessive noise during operation Re-
place the primary drive and primary driven
gears as a set.
EAS2GBB277INSTALLING THE OIL SEAL
1. Install:
• Oil seal “1”
• Washer “2”
• Circlip “3”
TIP
• Apply the lithium-soap-based grease on the
oil seal lip.
• Install the oil seal in parallel with its manufac-
ture's marks or numbers facing inward.
EAS2GBB278INSTALLING THE RIGHT CRANKCASE
COVER
1. Install:
• Dowel pin “1”
• O-ring “2”
• Collar “3”
• Gasket “4”
TIP
Apply the lithium-soap-based grease on the O-
ring.2. Install:
• Right crankcase cover “1”
• Right crankcase cover bolt “2”
TIP
• Apply the engine oil on the impeller shaft end.
• Mesh the impeller shaft gear “3” with primary
drive gear “4”.
• Tighten the right crankcase cover bolts in
stages and in a crisscross pattern.
EAS2GBB279INSTALLING THE CLUTCH
1. Install:
• Push lever shaft “1”
TIP
• Apply the lithium-soap-based grease on the
oil seal lip.
• Before installation, apply the engine oil to the
push lever shaft sliding surface.
New
New
3
2
1
LS
New
New
1
1
3
2
4
LS
Right crankcase cover bolt
10 Nm (1.0 m·kgf, 7.2 ft·lbf)
T R..
3
1
4
E
1
2
Page 277 of 432
CLUTCH
6-48
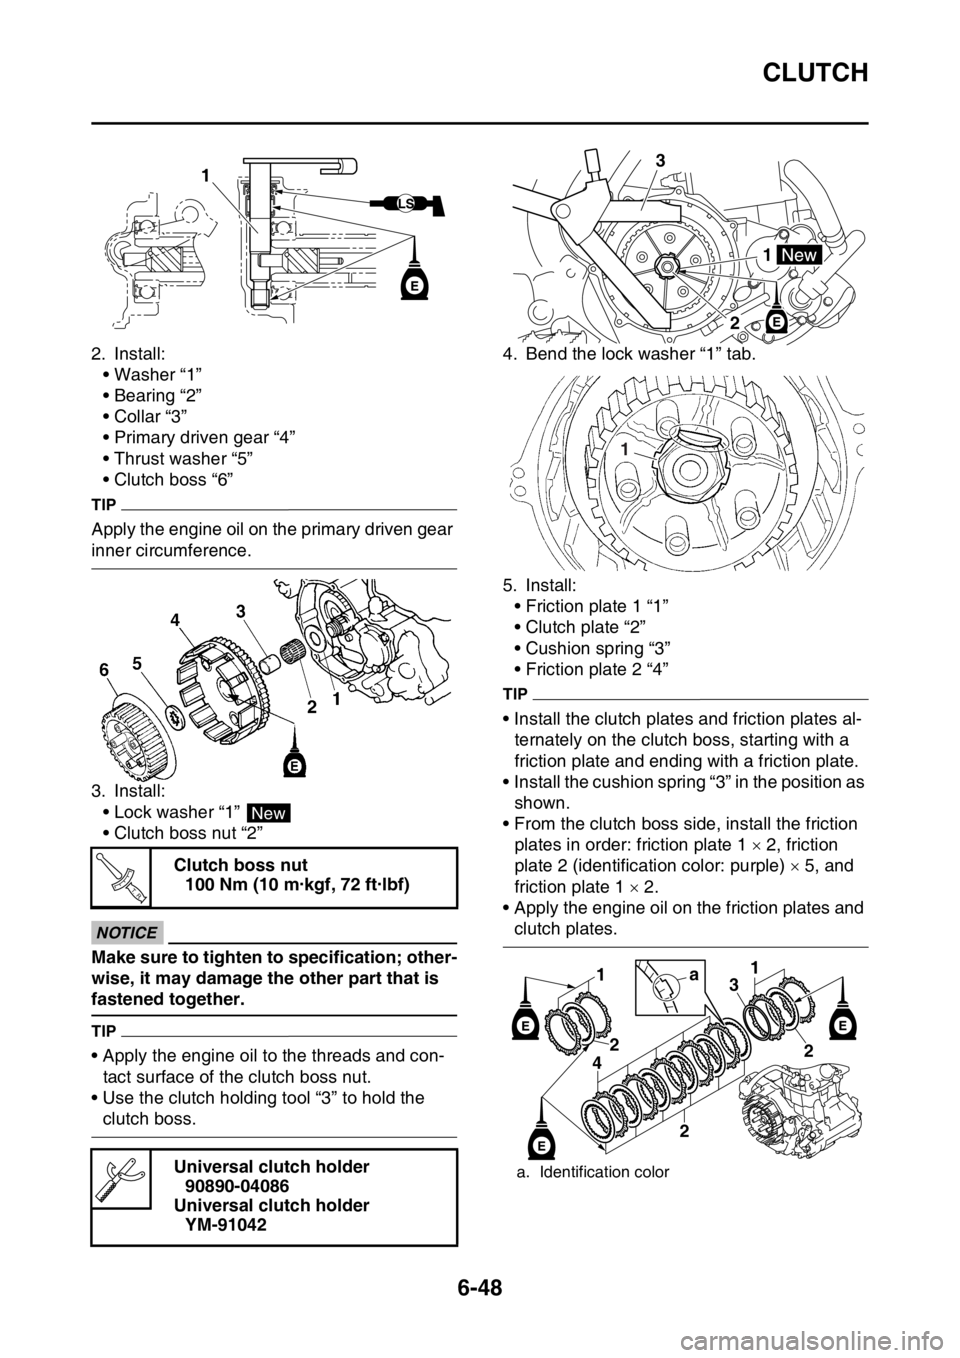
2. Install:
• Washer “1”
• Bearing “2”
• Collar “3”
• Primary driven gear “4”
• Thrust washer “5”
• Clutch boss “6”
TIP
Apply the engine oil on the primary driven gear
inner circumference.
3. Install:
• Lock washer “1”
• Clutch boss nut “2”
ECA
NOTICE
Make sure to tighten to specification; other-
wise, it may damage the other part that is
fastened together.
TIP
• Apply the engine oil to the threads and con-
tact surface of the clutch boss nut.
• Use the clutch holding tool “3” to hold the
clutch boss.4. Bend the lock washer “1” tab.
5. Install:
• Friction plate 1 “1”
• Clutch plate “2”
• Cushion spring “3”
• Friction plate 2 “4”
TIP
• Install the clutch plates and friction plates al-
ternately on the clutch boss, starting with a
friction plate and ending with a friction plate.
• Install the cushion spring “3” in the position as
shown.
• From the clutch boss side, install the friction
plates in order: friction plate 1 2, friction
plate 2 (identification color: purple) 5, and
friction plate 1 2.
• Apply the engine oil on the friction plates and
clutch plates. Clutch boss nut
100 Nm (10 m·kgf, 72 ft·lbf)
Universal clutch holder
90890-04086
Universal clutch holder
YM-91042
1
New
T R..
a. Identification color
3
21
1
1
2
4
2
1
3
2
a
Page 278 of 432
CLUTCH
6-49
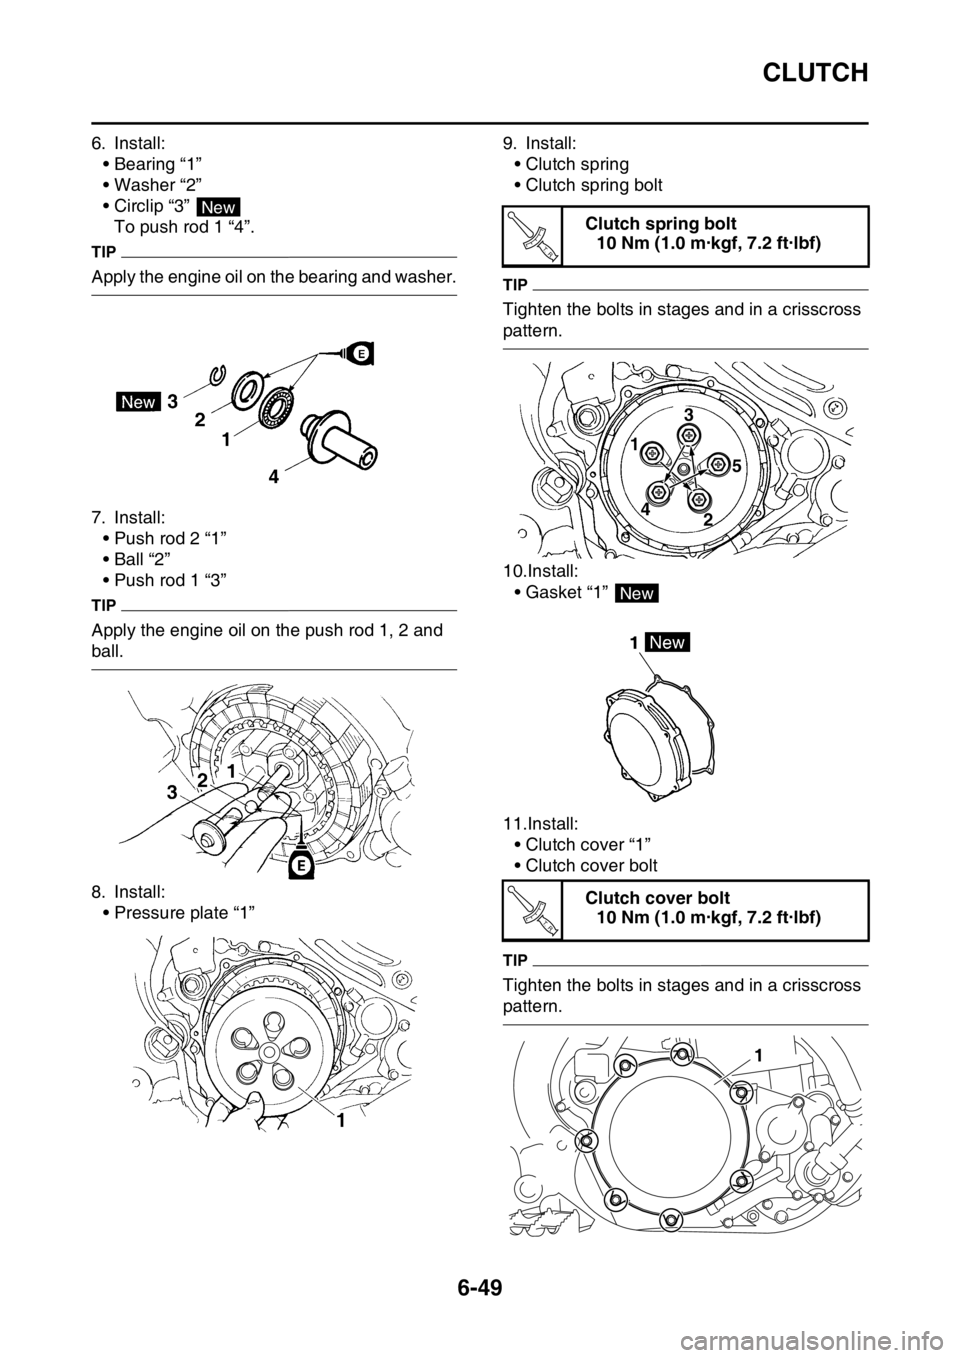
6. Install:
• Bearing “1”
• Washer “2”
• Circlip “3”
To push rod 1 “4”.
TIP
Apply the engine oil on the bearing and washer.
7. Install:
• Push rod 2 “1”
•Ball “2”
• Push rod 1 “3”
TIP
Apply the engine oil on the push rod 1, 2 and
ball.
8. Install:
• Pressure plate “1”9. Install:
• Clutch spring
• Clutch spring bolt
TIP
Tighten the bolts in stages and in a crisscross
pattern.
10.Install:
• Gasket “1”
11.Install:
• Clutch cover “1”
• Clutch cover bolt
TIP
Tighten the bolts in stages and in a crisscross
pattern.
New
Clutch spring bolt
10 Nm (1.0 m·kgf, 7.2 ft·lbf)
Clutch cover bolt
10 Nm (1.0 m·kgf, 7.2 ft·lbf)
T R..
1
2 3
45
New
T R..
1