oil temperature YAMAHA WR 250F 2017 Owners Manual
[x] Cancel search | Manufacturer: YAMAHA, Model Year: 2017, Model line: WR 250F, Model: YAMAHA WR 250F 2017Pages: 432, PDF Size: 14.14 MB
Page 44 of 432

STARTING AND BREAK-IN
1-30
EAS2GBB048
STARTING AND BREAK-IN
EAS2GBB049FUEL
Always use the recommended fuel as stated
below. Also, be sure to use new gasoline the
day of a race.
ECA
NOTICE
Use only unleaded gasoline. The use of
leaded gasoline will cause severe damage
to the engine internal parts such as valves,
piston rings, and exhaust system, etc.
TIP
Your Yamaha engine has been designed to use
premium unleaded gasoline with a pump oc-
tane number [(R+M)/2] of 91 or higher, or a re-
search octane number of 95 or higher. If
knocking (or pinging) occurs, use a gasoline of
a different brand.
EWA
WARNING
• For refueling, be sure to stop the engine
and use enough care not to spill any fuel.
Also be sure to avoid refueling close to a
fire.
• Refuel after the engine, exhaust pipe, etc.
have cooled off.
Gasohol (For USA and Canada)
There are two types of gasohol: gasohol con-
taining ethanol and that containing methanol.
Gasohol containing ethanol can be used if the
ethanol content does not exceed 10%. Gasohol
containing methanol is not recommended by
Yamaha because it can cause damage to the
fuel system or vehicle performance problems.
EAS2GBB050HANDLING NOTEEWA
WARNING
Never start or run the engine in a closed ar-
ea. The exhaust fumes are poisonous; they
can cause loss of consciousness and death
in a very short time. Always operate the ma-
chine in a well-ventilated area.
ECA
NOTICE
• Unlike a two-stroke engine, this engine
cannot be kick started when the throttle is
open because the kickstarter may kick
back. Also, if the throttle is open the air/
fuel mixture may be too lean for the engine
to start.
• Before starting the machine, perform the
checks in the pre-operation check list.
EAS2GBB051AIR FILTER MAINTENANCE
According to “CLEANING THE AIR FILTER
ELEMENT” section in the CHAPTER 3, apply
the Yamaha foam air filter oil or other quality
foam air filter oil to the element. (Excess oil in
the element may adversely affect engine start-
ing.)
EAS2GBB052STARTING A COLD ENGINEECA
NOTICE
For maximum engine life, never accelerate
hard when the engine is cold!
In order for the ignition circuit cut-off system to
enable starting, one of the following conditions
must be met:
• The transmission is in the neutral position.
• The transmission is in gear with the clutch le-
ver pulled.
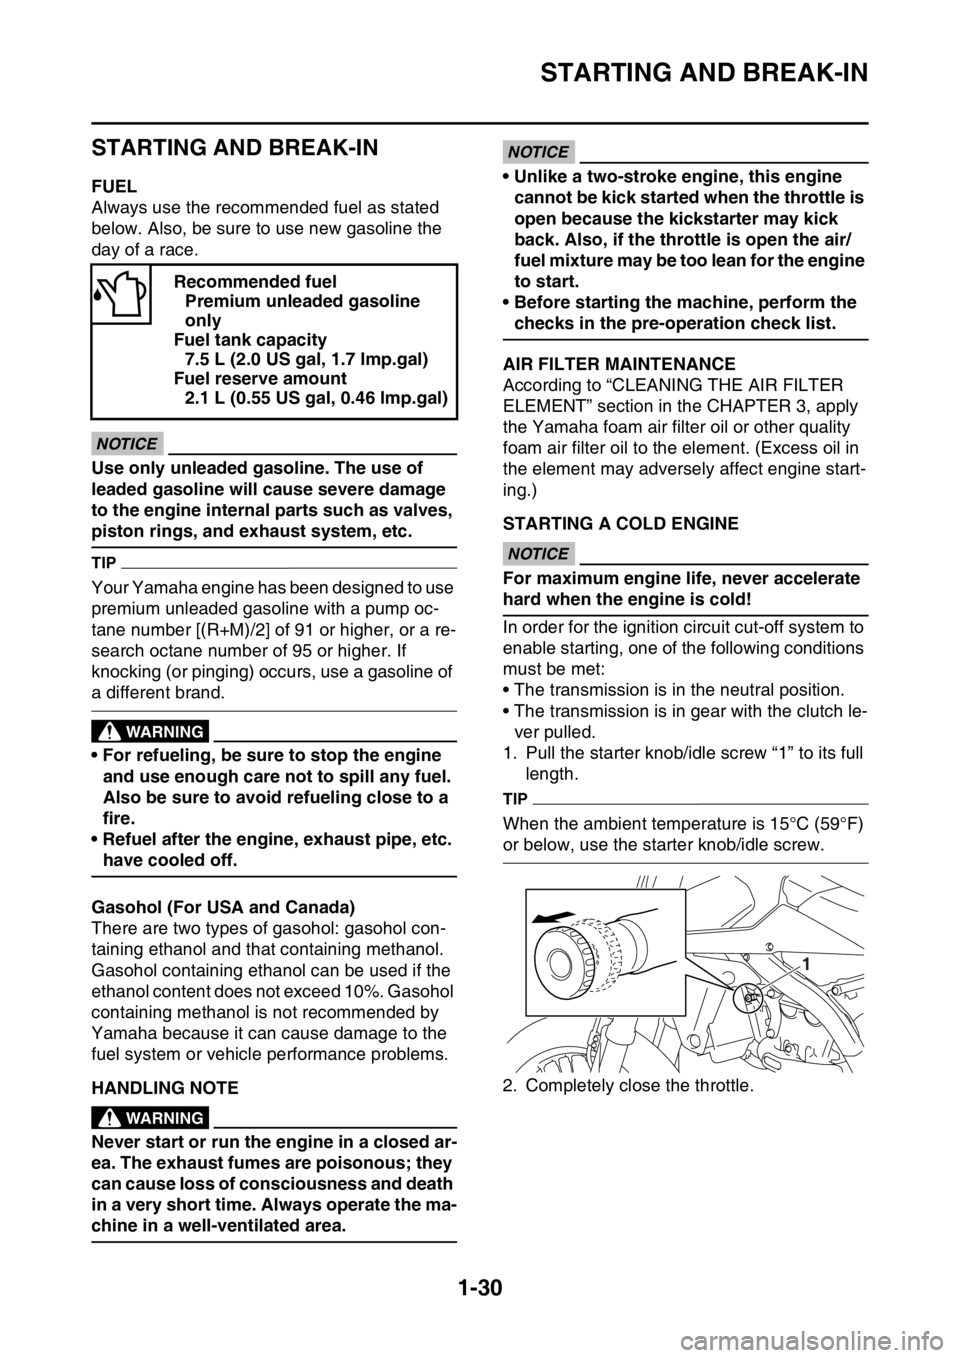
1. Pull the starter knob/idle screw “1” to its full
length.
TIP
When the ambient temperature is 15°C (59°F)
or below, use the starter knob/idle screw.
2. Completely close the throttle. Recommended fuel
Premium unleaded gasoline
only
Fuel tank capacity
7.5 L (2.0 US gal, 1.7 lmp.gal)
Fuel reserve amount
2.1 L (0.55 US gal, 0.46 lmp.gal)
1
Page 59 of 432

ENGINE SPECIFICATIONS
2-6
Throttle body
Type/quantity 30RA-A95R/1
ID mark 2GB1 00
Fuel line pressure (at idle) 300.0–390.0 kPa (3.00–3.90 kgf/cm
2,
43.5–56.6 psi)
Throttle position sensor
Resistance 6.30 k
Output voltage (at idle) 0.48–0.52 V
Fuel injection sensor
Crankshaft position sensor resistance 228–342
Intake air pressure sensor output voltage 3.61–3.67 V at 101.3 kPa (3.61–3.67 V at
1.01 kgf/cm
2, 3.61–3.67 V at 14.7 psi)
Intake air temperature sensor resistance 5400.0–6600.0 at 0 °C (5400.0–6600.0
at 32 °F)
289–391 at 80 °C (289–391 at 176 °F)
Coolant temperature sensor resistance 2512–2777 at 20 °C (2512–2777 at 68 °F)
210–220 at 100 °C (210–220 at 212 °F)
Idling condition
Engine idling speed 1900–2100 r/min
CO% 3.0–4.0 % (USA) (CAN)
Intake vacuum 27.3 kPa (205 mmHg, 8.1 inHg) (USA) (CAN)
Water temperature 70–90 °C (158–194 °F)
Oil temperature 70–80 °C (158–176 °F)
Throttle grip free play 3.0–6.0 mm (0.12–0.24 in)
Page 68 of 432

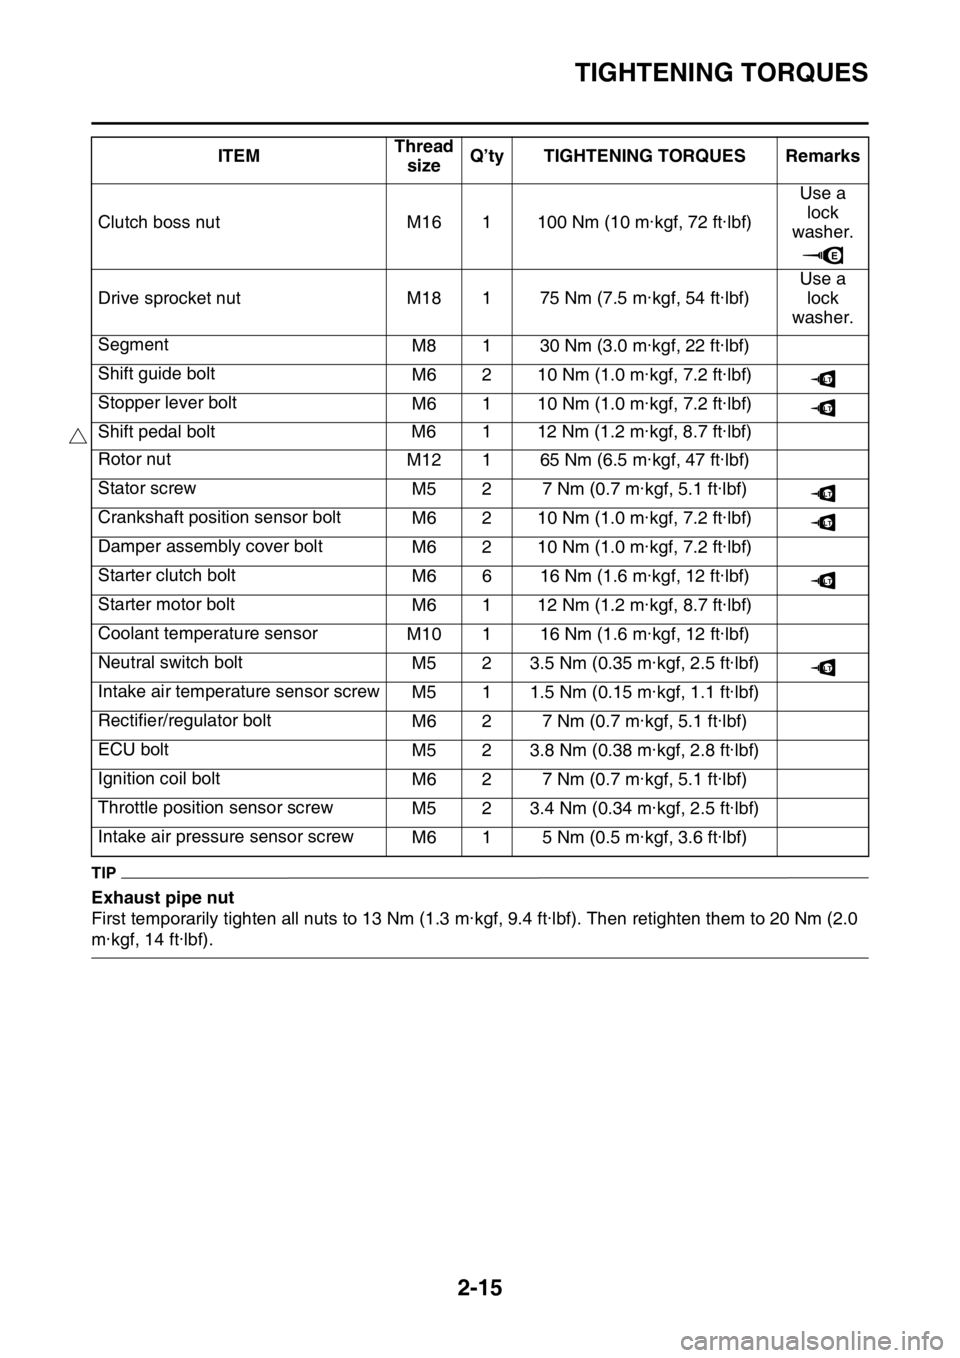
TIGHTENING TORQUES
2-15
TIP
Exhaust pipe nut
First temporarily tighten all nuts to 13 Nm (1.3 m·kgf, 9.4 ft·lbf). Then retighten them to 20 Nm (2.0
m·kgf, 14 ft·lbf).Clutch boss nut M16 1 100 Nm (10 m·kgf, 72 ft·lbf)Use a
lock
washer.
Drive sprocket nut M18 1 75 Nm (7.5 m·kgf, 54 ft·lbf)Use a
lock
washer.
Segment
M8 1 30 Nm (3.0 m·kgf, 22 ft·lbf)
Shift guide bolt
M6 2 10 Nm (1.0 m·kgf, 7.2 ft·lbf)
Stopper lever bolt
M6 1 10 Nm (1.0 m·kgf, 7.2 ft·lbf)
Shift pedal bolt M6 1 12 Nm (1.2 m·kgf, 8.7 ft·lbf)
Rotor nut
M12 1 65 Nm (6.5 m·kgf, 47 ft·lbf)
Stator screw
M5 2 7 Nm (0.7 m·kgf, 5.1 ft·lbf)
Crankshaft position sensor bolt
M6 2 10 Nm (1.0 m·kgf, 7.2 ft·lbf)
Damper assembly cover bolt
M6 2 10 Nm (1.0 m·kgf, 7.2 ft·lbf)
Starter clutch bolt
M6 6 16 Nm (1.6 m·kgf, 12 ft·lbf)
Starter motor bolt
M6 1 12 Nm (1.2 m·kgf, 8.7 ft·lbf)
Coolant temperature sensor
M10 1 16 Nm (1.6 m·kgf, 12 ft·lbf)
Neutral switch bolt
M5 2 3.5 Nm (0.35 m·kgf, 2.5 ft·lbf)
Intake air temperature sensor screw
M5 1 1.5 Nm (0.15 m·kgf, 1.1 ft·lbf)
Rectifier/regulator bolt
M6 2 7 Nm (0.7 m·kgf, 5.1 ft·lbf)
ECU bolt
M5 2 3.8 Nm (0.38 m·kgf, 2.8 ft·lbf)
Ignition coil bolt
M6 2 7 Nm (0.7 m·kgf, 5.1 ft·lbf)
Throttle position sensor screw
M5 2 3.4 Nm (0.34 m·kgf, 2.5 ft·lbf)
Intake air pressure sensor screw
M6 1 5 Nm (0.5 m·kgf, 3.6 ft·lbf) ITEMThread
sizeQ’ty TIGHTENING TORQUES Remarks
E
LT
LT
LT
LT
LT
LT
Page 119 of 432

ENGINE
3-19
1. Start the engine, and warm this up until the
oil has reached the specified temperature.
2. Attach the pocket tester with temperature
probe “1” to the oil drain bolt.
3. Install:
• Digital tachometer
TIP
Get the high tension cord “1” of the ignition coil
pinched in the detector “a” of the digital tachom-
eter.
4. Measure:
• Engine idling speed
Out of specification Regulate.5. Adjust:
• Engine idling speed
▼▼▼▼▼▼▼▼▼▼▼▼▼▼▼▼▼▼▼▼▼▼▼▼▼▼▼▼▼▼▼▼
a. Turn the starter knob/idle screw “1” in the di-
rection of “a” or “b” to make an adjustment.
▲▲▲▲▲▲▲▲▲▲▲▲▲▲▲▲▲▲▲▲▲▲▲▲▲▲▲▲▲▲▲▲
EAS2GBB099ADJUSTING THE VALVE CLEARANCE
TIP
• This section is intended for those who have
basic knowledge and skill concerning the ser-
vicing of Yamaha motorcycles (e.g., Yamaha
dealers, service engineers, etc.). Those who
have little knowledge and skill concerning ser-
vicing are requested not to undertake inspec-
tion, adjustment, disassembly, or reassembly
only by reference to this manual. It may lead
to servicing trouble and mechanical damage.
• Make sure that the valve clearance is
checked or adjusted while the engine is cold
(at room temperature).
• While the valve clearance is checked or ad-
justed, make sure that the piston is positioned
in the top dead center (TDC).
1. Remove:
• Seat
• Side cover (left/right)
• Air scoop (left/right)
Refer to “GENERAL CHASSIS” on page 5-
1.
• Fuel tank
Refer to “FUEL TANK” on page 8-1.
•ECU Oil temperature
70–80 °C (158–176 °F)
Digital tachometer
90890-06760
Digital tachometer
YU-39951-B
Engine idling speed
1900–2100 r/min
1
1 1
a a
Direction “a” Engine idling speed De-
creases.
Direction “b” Engine idling speed In-
creases.
1 b
a
Page 232 of 432

ENGINE REMOVAL
6-3
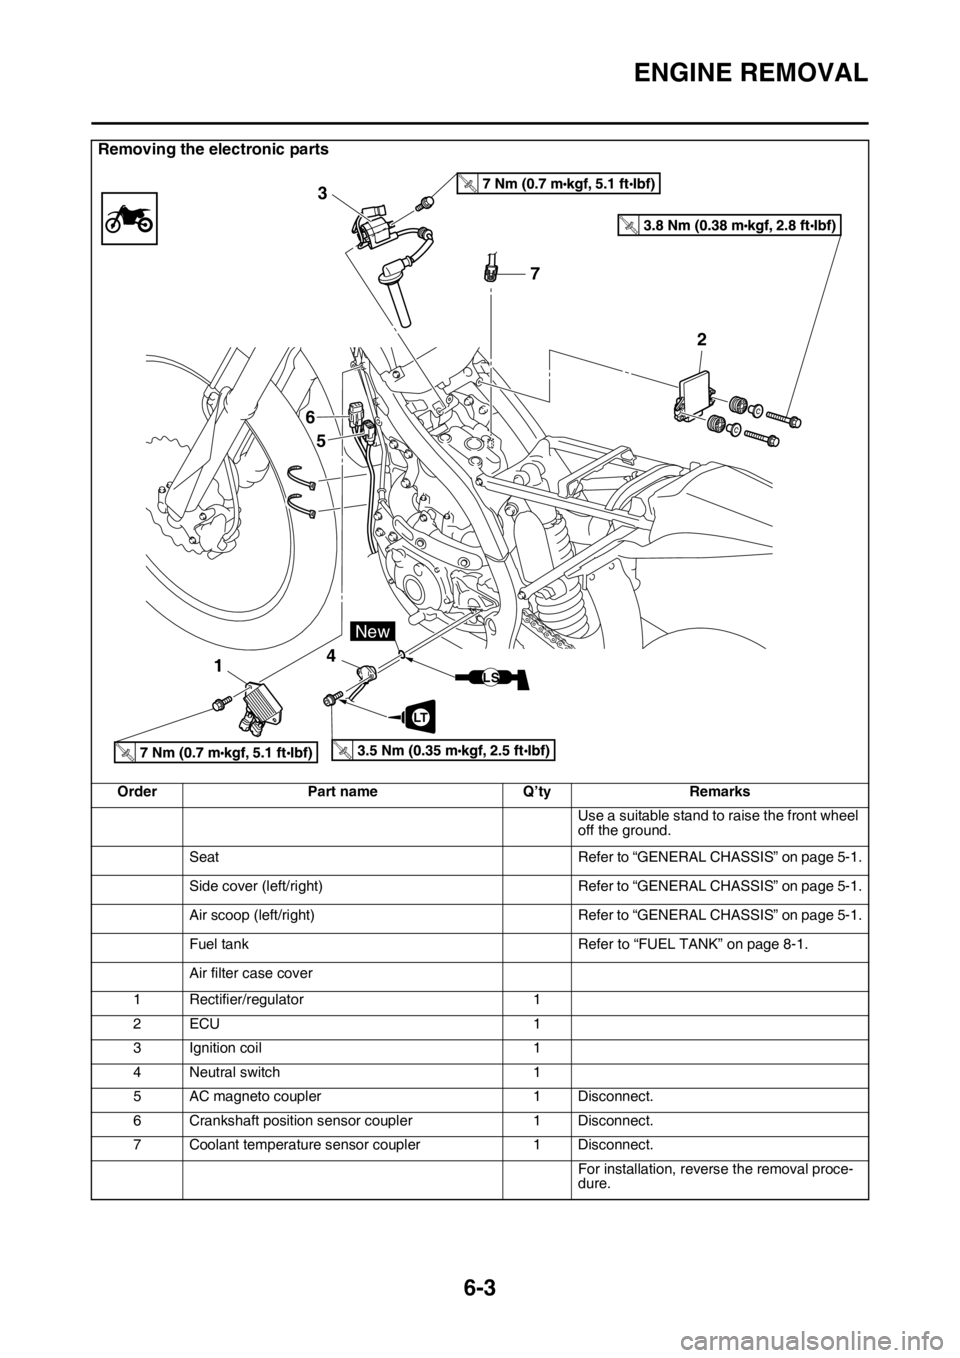
Removing the electronic parts
Order Part name Q’ty Remarks
Use a suitable stand to raise the front wheel
off the ground.
Seat Refer to “GENERAL CHASSIS” on page 5-1.
Side cover (left/right) Refer to “GENERAL CHASSIS” on page 5-1.
Air scoop (left/right) Refer to “GENERAL CHASSIS” on page 5-1.
Fuel tank Refer to “FUEL TANK” on page 8-1.
Air filter case cover
1 Rectifier/regulator 1
2ECU 1
3 Ignition coil 1
4 Neutral switch 1
5 AC magneto coupler 1 Disconnect.
6 Crankshaft position sensor coupler 1 Disconnect.
7 Coolant temperature sensor coupler 1 Disconnect.
For installation, reverse the removal proce-
dure.
T.R.
T.R.
T.R.T.R.
7 3
6
5
142
LT
New
LS
Page 330 of 432

THROTTLE BODY
8-7
EAS2GBB351
THROTTLE BODY
Removing the throttle body
Order Part name Q’ty Remarks
Seat Refer to “GENERAL CHASSIS” on page 5-1.
Side cover (left/right) Refer to “GENERAL CHASSIS” on page 5-1.
Air scoop (left/right) Refer to “GENERAL CHASSIS” on page 5-1.
Fuel tank Refer to “FUEL TANK” on page 8-1.
ECU Refer to “ENGINE REMOVAL” on page 6-1.
Ignition coil Refer to “ENGINE REMOVAL” on page 6-1.
1 Intake air temperature sensor coupler 1 Disconnect.
2 Breather hose 3 1
3 Air filter case 1
4 Fuel injector coupler 1 Disconnect.
5 Intake air pressure sensor coupler 1 Disconnect.
6 Throttle position sensor coupler 1 Disconnect.
7 Throttle cable cover 1
8 Throttle cable 2
3
1
2
7
11
12
10
9
4
8
6
5
3.5 Nm (0.35 m kgf, 2.5 ft Ibf)T.R.
3.5 Nm (0.35 m kgf, 2.5 ft Ibf)T.R.
7 Nm (0.7 m kgf, 5.1 ft Ibf)T.R.
3.0 Nm (0.30 m kgf, 2.2 ft Ibf)T.R.
10 Nm (1.0 m kgf, 7.2 ft Ibf)T.R.
Page 336 of 432

ELECTRICAL COMPONENTS....................................................................... 9-60
CHECKING THE SWITCHES .................................................................. 9-64
CHECKING THE BULBS AND BULB SOCKETS .................................... 9-67
CHECKING THE FUSES ......................................................................... 9-68
CHECKING AND CHARGING THE BATTERY ........................................ 9-69
CHECKING THE RELAYS ....................................................................... 9-72
CHECKING THE DIODE .......................................................................... 9-73
CHECKING THE IGNITION SPARK GAP................................................ 9-73
CHECKING THE SPARK PLUG CAP ...................................................... 9-74
CHECKING THE IGNITION COIL ............................................................ 9-74
CHECKING THE CRANKSHAFT POSITION SENSOR........................... 9-75
CHECKING THE LEAN ANGLE SENSOR............................................... 9-75
CHECKING THE STARTER MOTOR OPERATION ................................ 9-76
CHECKING THE STATOR COIL ............................................................. 9-76
CHECKING THE RECTIFIER/REGULATOR ........................................... 9-76
CHECKING THE SPEED SENSOR ......................................................... 9-77
CHECKING THE FUEL SENDER ............................................................ 9-77
CHECKING THE RESISTER ................................................................... 9-78
CHECKING THE RADIATOR FAN MOTOR ............................................ 9-78
CHECKING THE COOLANT TEMPERATURE SENSOR........................ 9-78
CHECKING THE THROTTLE POSITION SENSOR ................................ 9-79
CHECKING THE THROTTLE POSITION SENSOR INPUT VOLTAGE .. 9-80
CHECKING THE INTAKE AIR PRESSURE SENSOR ............................ 9-80
CHECKING THE INTAKE AIR TEMPERATURE SENSOR ..................... 9-80
CHECKING THE FUEL INJECTOR ......................................................... 9-81
Page 422 of 432

TROUBLESHOOTING
10-3
Cooling system
1. Coolant
• Low coolant level
2. Radiator
• Damaged or leaking radiator
• Faulty radiator cap
• Bent or damaged radiator fin
3. Water pump
• Damaged or faulty water pump
• Damaged hose
• Improperly connected hose
• Damaged pipe
• Improperly connected pipe
Fuel system
1. Throttle body
• Damaged or loose throttle body joint
2. Air filter
• Clogged air filter element
Chassis
1. Brake(s)
• Dragging brake
Electrical system
1. Spark plug
• Incorrect spark plug gap
• Incorrect spark plug heat range
2. Ignition system
• Faulty ECU
• Faulty coolant temperature sensor
EAS2GBB416OVERCOOLING
Cooling system
1. Coolant temperature sensor
• Faulty coolant temperature sensor
EAS2GBB417POOR BRAKING PERFORMANCE
Chassis
1. Brake(s)
• Worn brake pad
• Worn brake disc
• Air in hydraulic brake system
• Leaking brake fluid
• Defective master cylinder kit
• Faulty brake caliper kit
• Faulty brake caliper seal
• Loose union bolt
• Damaged brake hose
• Oil or grease on the brake disc
• Oil or grease on the brake pad
• Incorrect brake fluid level
EAS2GBB418FRONT FORK OIL LEAKING
Chassis
1. Front fork
• Bent, damaged, or rusty inner tube
• Cracked or damaged outer tube
• Improperly installed oil seal
• Damaged oil seal lip
• Incorrect oil level (high)
• Loose damper rod assembly bolt
• Damaged damper rod assembly bolt copper
washer
• Cracked or damaged cap bolt O-ring
EAS2GBB419FAULTY FRONT FORK LEGS
Chassis
1. Front fork
• Bent or damaged inner tube
• Bent or damaged outer tube
• Broken fork spring
• Bent or damaged damper rod
• Incorrect oil viscosity
• Incorrect oil level
EAS2GBB420UNSTABLE HANDLING
Chassis
1. Handlebar
• Bent or improperly installed handlebar
2. Steering head components
• Improperly installed upper bracket
• Improperly installed lower bracket
(improperly tightened ring nut)
• Bent steering stem
• Damaged ball bearing or bearing race
3. Front fork leg (s)
• Uneven oil levels (both front fork legs)
• Unevenly tensioned fork spring (both front
fork legs)
• Broken fork spring
• Bent or damaged inner tube
• Bent or damaged outer tube
4. Swingarm
• Worn bearing or bushing
• Bent or damaged swingarm
5. Rear shock absorber assembly (-ies)
• Faulty rear shock absorber spring
• Leaking oil or gas
6. Tire (s)
• Uneven tire pressures (front and rear)
• Incorrect tire pressure
• Uneven tire wear
Page 424 of 432

LIST OF SELF-DIAGNOSTIC AND FAIL-SAFE ACTIONS
10-5
EAS2GBB424
LIST OF SELF-DIAGNOSTIC AND FAIL-SAFE ACTIONS
LIST OF DIAGNOSTIC CODES
COMMUNICATION ERROR WITH YAMAHA DIAGNOSTIC TOOLFault
codeItem Page
12 Crankshaft position sensor: no normal signals are received from the
crankshaft position sensor.9-36
13 Intake air pressure sensor: open or short circuit detected. 9-37
14 Intake air pressure sensor: hose system malfunction (clogged or de-
tached hose)9-38
15 Throttle position sensor: open or short circuit detected. 9-39
16 Throttle position sensor: stuck throttle position sensor is detected. 9-41
21 Coolant temperature sensor: open or short circuit detected. 9-42
22 Intake air temperature sensor: open or short circuit detected. 9-43
30 Latch up detected. 9-44
33 Ignition coil: open or short circuit detected in the primary lead of the
ignition coil.9-45
39 Injector: open or short circuit detected. 9-47
41 Lean angle sensor: open or short circuit detected. 9-48
43 Fuel system voltage: incorrect voltage supplied to the fuel injector and
fuel pump.9-49
44 EEPROM fault code number: an error is detected while reading or
writing on EEPROM.9-50
46 Charging voltage is abnormal. 9-51
50 Faulty ECU memory. (When this malfunction is detected in the ECU,
the fault code number might not appear on the meter.)9-52
Fault
codeItem Page
Waiting
for con-
nectionNo communication signal is received from the ECU.
9-52
Er-2 Signals from the ECU cannot be received within the specified period
of time.9-53
Er-3 Data from the ECU cannot be received correctly. 9-54
Er-4 Registered data cannot be received from the Yamaha diagnostic tool. 9-55
Page 428 of 432

EAS2GBB426
WIRING DIAGRAM
WR250F/WR250FH 2017
1. Joint connector
2. Joint connector
3. Joint connector
4. AC magneto
5. Rectifier/regulator
6. Headlight relay
7. Main relay
8. Engine ground
9. Battery
10. Frame ground
11. Starter relay
12. Main fuse
13. Starter motor
14. Starter relay diode
15. Indicator light
16. Engine trouble warning light
17. Fuel level warning light
18. Resistor
19. Fuel sender
20. Diode
21. Coupler for connecting option-
al part
22. ECU (engine control unit)
23. Ignition coil
24. Spark plug
25. Injector
26. Fuel pump
27. Radiator fan motor relay
28. Radiator fan motor fuse
29. Radiator fan motor
30. Joint connector
31. Intake air temperature sensor
32. Coolant temperature sensor
33. Throttle position sensor
34. Intake air pressure sensor
35. Lean angle sensor
36. Engine stop switch
37. Neutral switch
38. Diode
39. Starting circuit cut-off relay
40. Clutch switch
41. Start switch
42. Joint connector
43. Taillight
44. Headlight
45. Coupler for connecting option-
al switch
46. Speed sensor
47. Multi-function display
48. Frame ground
49. Ignition coil sub-lead
50. Negative battery lead
EAS2GBB427
COLOR CODE
BBlack
Br Brown
Ch Chocolate
Dg Dark green
G Green
Gy Gray
LBlue
Lg Light green
O Orange
PPink
RRed
Sb Sky blue
WWhite
Y Yellow
B/L Black/Blue
B/O Black/Orange
B/W Black/White
B/Y Black/Yellow
Br/W Brown/White
G/B Green/Black
G/W Green/White
G/Y Green/Yellow
L/B Blue/Black
L/G Blue/Green
L/R Blue/Red
L/W Blue/White
L/Y Blue/Yellow
P/L Pink/Blue
R/B Red/Black
R/L Red/Blue
R/W Red/White
R/Y Red/Yellow
W/B White/Black
Y/B Yellow/Black
Y/G Yellow/Green
Y/R Yellow/Red