engine oil YAMAHA WR 250X 2014 User Guide
[x] Cancel search | Manufacturer: YAMAHA, Model Year: 2014, Model line: WR 250X, Model: YAMAHA WR 250X 2014Pages: 100, PDF Size: 2.65 MB
Page 61 of 100
PERIODIC MAINTENANCE AND ADJUSTMENT
6-19
2
3
4
567
8
9
EAU45323
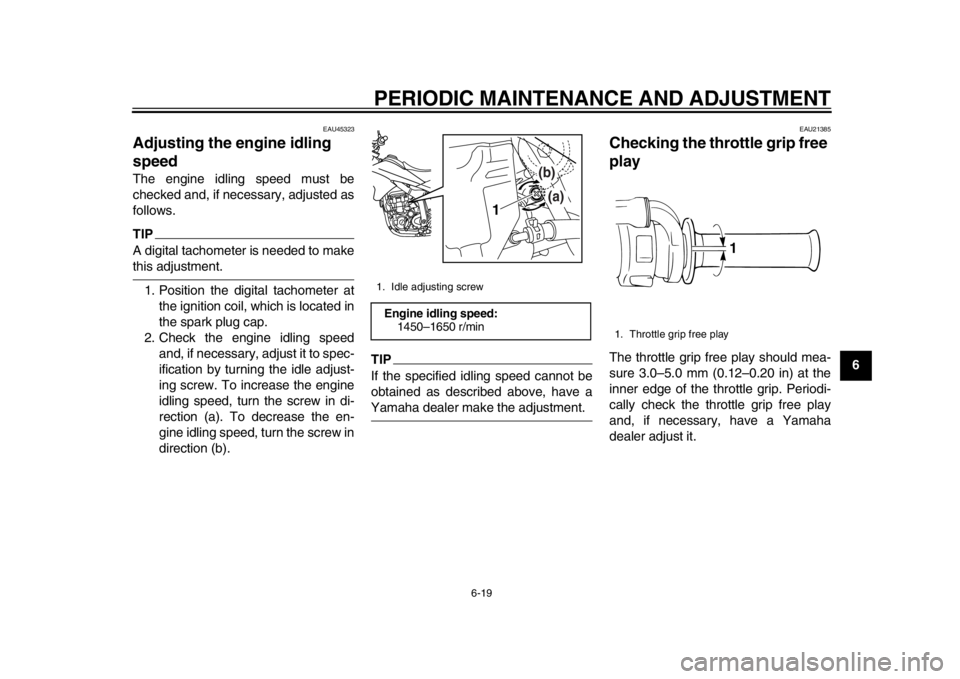
Adjusting the engine idling
speedThe engine idling speed must be
checked and, if necessary, adjusted as
follows.TIPA digital tachometer is needed to makethis adjustment.1. Position the digital tachometer at the ignition coil, which is located in
the spark plug cap.
2. Check the engine idling speed and, if necessary, adjust it to spec-
ification by turning the idle adjust-
ing screw. To increase the engine
idling speed, turn the screw in di-
rection (a). To decrease the en-
gine idling speed, turn the screw in
direction (b).
TIPIf the specified idling speed cannot be
obtained as described above, have aYamaha dealer make the adjustment.
EAU21385
Checking the throttle grip free
playThe throttle grip free play should mea-
sure 3.0–5.0 mm (0.12–0.20 in) at the
inner edge of the throttle grip. Periodi-
cally check the throttle grip free play
and, if necessary, have a Yamaha
dealer adjust it.
1. Idle adjusting screwEngine idling speed:1450–1650 r/min
1
(b)
(a)
1. Throttle grip free play
1
32D-28199-EB.book 19 ページ 2013年7月3日 水曜日 午前11時8分
Page 71 of 100
PERIODIC MAINTENANCE AND ADJUSTMENT
6-29
2
3
4
567
8
9
EAU23026
Cleaning and lubricating the
drive chainThe drive chain must be cleaned and
lubricated at the intervals specified in
the periodic maintenance and lubrica-
tion chart, otherwise it will quickly wear
out, especially when riding in dusty or
wet areas. Service the drive chain as
follows.NOTICE
ECA10584
The drive chain must be lubricated
after washing the motorcycle, ridingin the rain or riding in wet areas.
1. Clean the drive chain with kero- sene and a small soft brush.
NOTICE: To prevent damaging
the O-rings, do not clean the
drive chain with steam cleaners,
high-pressure washers or inap-
propriate solvents.
[ECA11122]
2. Wipe the drive chain dry.
3. Thoroughly lubricate the drive chain with a special O-ring chain
lubricant. NOTICE: Do not use
engine oil or any other lubri-
cants for the drive chain, as they may contain substances that
could damage the O-rings.
[ECA11112]
EAU23098
Checking and lubricating the
cablesThe operation of all control cables and
the condition of the cables should be
checked before each ride, and the ca-
bles and cable ends should be lubricat-
ed if necessary. If a cable is damaged
or does not move smoothly, have a
Yamaha dealer check or replace it.
WARNING! Damage to the outer
housing of cables may result in in-
ternal rusting and cause interfer-
ence with cable movement. Replace
damaged cables as soon as possi-
ble to prevent unsafe condi-
tions.
[EWA10712]
Recommended lubricant:
Yamaha cable lubricant or other suit-
able cable lubricant
32D-28199-EB.book 29 ページ 2013年7月3日 水曜日 午前11時8分
Page 74 of 100
PERIODIC MAINTENANCE AND ADJUSTMENT
6-32
1
2
3
4
56
7
8
9
EAU23273
Checking the front forkThe condition and operation of the front
fork must be checked as follows at the
intervals specified in the periodic main-
tenance and lubrication chart.
To check the condition
Check the inner tubes for scratches,
damage and excessive oil leakage.
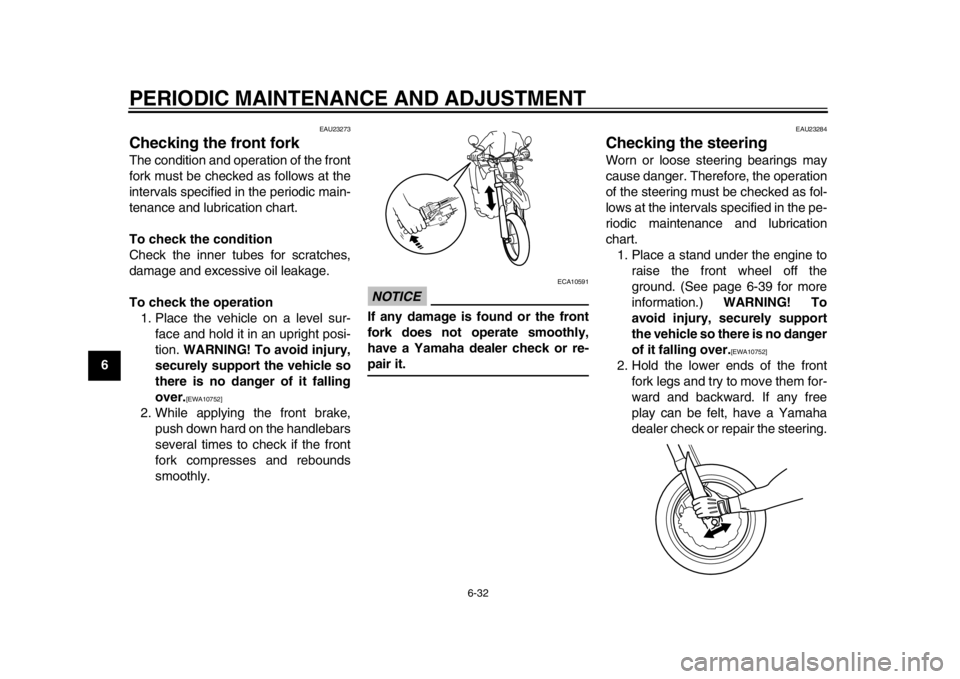
To check the operation1. Place the vehicle on a level sur- face and hold it in an upright posi-
tion. WARNING! To avoid injury,
securely support the vehicle so
there is no danger of it falling
over.
[EWA10752]
2. While applying the front brake, push down hard on the handlebars
several times to check if the front
fork compresses and rebounds
smoothly.
NOTICE
ECA10591
If any damage is found or the front
fork does not operate smoothly,
have a Yamaha dealer check or re-pair it.
EAU23284
Checking the steeringWorn or loose steering bearings may
cause danger. Therefore, the operation
of the steering must be checked as fol-
lows at the intervals specified in the pe-
riodic maintenance and lubrication
chart.1. Place a stand under the engine to raise the front wheel off the
ground. (See page 6-39 for more
information.) WARNING! To
avoid injury, securely support
the vehicle so there is no danger
of it falling over.
[EWA10752]
2. Hold the lower ends of the front fork legs and try to move them for-
ward and backward. If any free
play can be felt, have a Yamaha
dealer check or repair the steering.
32D-28199-EB.book 32 ページ 2013年7月3日 水曜日 午前11時8分
Page 87 of 100
7-1
2
3
4
5
678
9
MOTORCYCLE CARE AND STORAGE
EAU37834
Matte color cautionNOTICE
ECA15193
Some models are equipped with
matte colored finished parts. Be
sure to consult a Yamaha dealer for
advice on what products to use be-
fore cleaning the vehicle. Using a
brush, harsh chemical products or
cleaning compounds when cleaning
these parts will scratch or damage
their surface. Wax also should not
be applied to any matte colored fin-ished parts.
EAU26005
CareWhile the open design of a motorcycle
reveals the attractiveness of the tech-
nology, it also makes it more vulnera-
ble. Rust and corrosion can develop
even if high-quality components are
used. A rusty exhaust pipe may go un-
noticed on a car, however, it detracts
from the overall appearance of a motor-
cycle. Frequent and proper care does
not only comply with the terms of the
warranty, but it will also keep your mo-
torcycle looking good, extend its life
and optimize its performance.
Before cleaning1. Cover the muffler outlet with a plastic bag after the engine has
cooled down.
2. Make sure that all caps and covers as well as all el ectrical couplers
and connectors, including the
spark plug cap, are tightly in-
stalled.
3. Remove extremely stubborn dirt, like oil burnt onto the crankcase,
with a degreasing agent and a
brush, but never apply such prod- ucts onto seals, gaskets, sprock-
ets, the drive chain and wheel
axles. Always rinse the dirt and de-
greaser off with water.
Cleaning
NOTICE
ECA10773
Avoid using strong acidic wheel
cleaners, especially on spoked
wheels. If such products are
used on hard-to-remove dirt, do
not leave the cleaner on the af-
fected area any longer than in-
structed. Also, thoroughly rinse
the area off with water, immedi-
ately dry it, and then apply a cor-
rosion protection spray.
Improper cleaning can damage
plastic parts (such as cowlings,
panels, windshields, headlight
lenses, meter lenses, etc.) and
the mufflers. Use only a soft,
clean cloth or sponge with wa-
ter to clean plastic. However, if
the plastic parts cannot be thor-
oughly cleaned with water, di-
luted mild detergent with water
may be used. Be sure to rinse
32D-28199-EB.book 1 ページ 2013年7月3日 水曜日 午前11時8分
Page 89 of 100
MOTORCYCLE CARE AND STORAGE
7-3
2
3
4
5
678
9
including chrome- and nickel-plat-
ed, surfaces.
5. Use spray oil as a universal clean- er to remove any remaining dirt.
6. Touch up minor paint damage caused by stones, etc.
7. Wax all painted surfaces.
8. Let the motorcycle dry completely before storing or covering it.
WARNING
EWA11132
Contaminants on the brakes or tires
can cause loss of control.
Make sure that there is no oil or
wax on the brakes or tires.
If necessary, clean the brake
discs and brake linings with a
regular brake disc cleaner or ac-
etone, and wash the tires with
warm water and a mild deter-
gent. Before riding at higher
speeds, test the motorcycle’s
braking performance and cor-nering behavior.
NOTICE
ECA10801
Apply spray oil and wax spar-
ingly and make sure to wipe off any excess.
Never apply oil or wax to any
rubber and plastic parts, but
treat them with a suitable care
product.
Avoid using abrasive polishing
compounds as they will wearaway the paint.
TIP
Consult a Yamaha dealer for ad-
vice on what products to use.
Washing, rainy weather or humid
climates can cause the headlight
lens to fog. Turning the headlight
on for a short period of time will
help remove the moisture from thelens.
EAU43203
StorageShort-term
Always store your motorcycle in a cool,
dry place and, if necessary, protect it
against dust with a porous cover. Be
sure the engine and the exhaust sys-
tem are cool before covering the motor-
cycle.NOTICE
ECA10811
Storing the motorcycle in a
poorly ventilated room or cover-
ing it with a tarp, while it is still
wet, will allow water and humid-
ity to seep in and cause rust.
To prevent corrosion, avoid
damp cellars, stables (because
of the presence of ammonia)
and areas where strong chemi-cals are stored.
Long-term
Before storing your motorcycle for sev-
eral months: 1. Follow all the instructions in the “Care” section of this chapter.
32D-28199-EB.book 3 ページ 2013年7月3日 水曜日 午前11時8分
Page 90 of 100
MOTORCYCLE CARE AND STORAGE
7-4
1
2
3
4
5
67
8
92. Fill up the fuel tank and add fuel
stabilizer (if available) to prevent
the fuel tank from rusting and the
fuel from deteriorating.
3. Perform the following steps to pro- tect the cylinder, piston rings, etc.
from corrosion.
a. Remove the spark plug cap and spark plug.
b. Pour a teaspoonful of engine oil into the spark plug bore.
c. Install the spark plug cap onto the spark plug, and then place
the spark plug on the cylinder
head so that the electrodes are
grounded. (This will limit spark-
ing during the next step.)
d. Turn the engine over several times with the starter. (This will
coat the cylinder wall with oil.)
e. Remove the spark plug cap from the spark plug, and then
install the spark plug and the
spark plug cap. WARNING! To
prevent damage or injury
from sparking, make sure to
ground the spark plug elec-
trodes while turning the en-
gine over.
[EWA10952]
4. Lubricate all control cables and the pivoting points of all levers and
pedals as well as of the sidestand/
centerstand.
5. Check and, if necessary, correct the tire air pressure, and then lift
the motorcycle so that both of its
wheels are off the ground. Alterna-
tively, turn the wheels a little every
month in order to prevent the tires
from becoming degraded in one
spot.
6. Cover the muffler outlet with a plastic bag to prevent moisture
from entering it.
7. Remove the battery and fully charge it. Store it in a cool, dry
place and charge it once a month.
Do not store the battery in an ex-
cessively cold or warm place [less
than 0 C (30 F) or more than 30
C (90 F)]. For more information
on storing the battery, see page
6-33.TIPMake any necessary repairs beforestoring the motorcycle.
32D-28199-EB.book 4 ページ 2013年7月3日 水曜日 午前11時8分
Page 91 of 100
8-1
2
3
4
5
6
789
SPECIFICATIONS
EAU5091D
Dimensions:Overall length:2115 mm (83.3 in)
Overall width: 810 mm (31.9 in)
Overall height: 1190 mm (46.9 in)
Seat height:
895 mm (35.2 in)
Wheelbase: 1425 mm (56.1 in)
Ground clearance: 265 mm (10.43 in)
Minimum turning radius:
2300 mm (90.6 in)Weight:Curb weight:136 kg (300 lb)Engine:Engine type:Liquid cooled 4-stroke, DOHC
Cylinder arrangement: Single cylinder
Displacement:
250 cm
3
Bore stroke:
77.0 53.6 mm (3.03 2.11 in)
Compression ratio: 11.80 : 1
Starting system:
Electric starter
Lubrication system: Wet sump
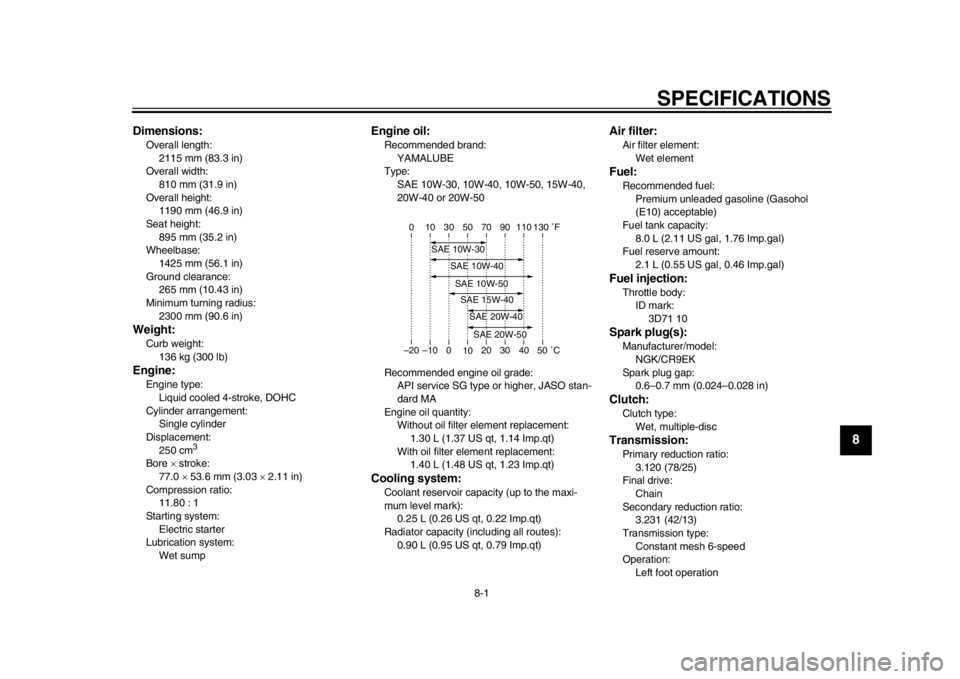
Engine oil:Recommended brand:
YAMALUBE
Type: SAE 10W-30, 10W-40, 10W-50, 15W-40,
20W-40 or 20W-50
Recommended engine oil grade: API service SG type or higher, JASO stan-
dard MA
Engine oil quantity: Without oil filter element replacement:
1.30 L (1.37 US qt, 1.14 Imp.qt)
With oil filter element replacement: 1.40 L (1.48 US qt, 1.23 Imp.qt)Cooling system:Coolant reservoir capacity (up to the maxi-
mum level mark):
0.25 L (0.26 US qt, 0.22 Imp.qt)
Radiator capacity (including all routes):
0.90 L (0.95 US qt, 0.79 Imp.qt)
Air filter:Air filter element:Wet elementFuel:Recommended fuel:Premium unleaded gasoline (Gasohol
(E10) acceptable)
Fuel tank capacity: 8.0 L (2.11 US gal, 1.76 Imp.gal)
Fuel reserve amount:
2.1 L (0.55 US gal, 0.46 Imp.gal)Fuel injection:Throttle body:ID mark:3D71 10Spark plug(s):Manufacturer/model:
NGK/CR9EK
Spark plug gap: 0.6–0.7 mm (0.024–0.028 in)Clutch:Clutch type:
Wet, multiple-discTransmission:Primary reduction ratio:3.120 (78/25)
Final drive:
Chain
Secondary reduction ratio: 3.231 (42/13)
Transmission type: Constant mesh 6-speed
Operation:
Left foot operation
–20 –10 0 1020 30 40 50 �C
10 30 50 70 90 110
0 130 �F
SAE 10W-30
SAE 15W-40SAE 20W-40SAE 20W-50
SAE 10W-40SAE 10W-50
32D-28199-EB.book 1 ページ 2013年7月3日 水曜日 午前11時8分
Page 95 of 100

INDEX
AAir filter element and check hose,
cleaning ................................................. 6-17
Auxiliary light bulb, replacing ................... 6-38BBattery ..................................................... 6-33
Brake and clutch levers, checking and lubricating .............................................. 6-30
Brake fluid, changing ............................... 6-27
Brake fluid level, checking ....................... 6-26
Brake lever .............................................. 3-10
Brake lever free play, adjusting ............... 6-24
Brake light switches ................................. 6-25
Brake pedal ............................................. 3-10
Brake pedal, checking and lubricating ..... 6-31CCables, checking and lubricating ............. 6-29
Care ........................................................... 7-1
Catalytic converter ................................... 3-13
Clutch lever................................................ 3-9
Clutch lever free play, adjusting .............. 6-23
Coolant .................................................... 6-14
Coolant temperature warning light............. 3-2DDimmer switch ........................................... 3-9
Drive chain, cleaning and lubricating ....... 6-29
Drive chain slack ..................................... 6-27EEngine break-in ......................................... 5-3
Engine idling speed ................................. 6-19
Engine oil and oil filter element................ 6-12
Engine stop switch..................................... 3-9
Engine trouble warning light ...................... 3-3
EXUP system .......................................... 3-18
FFront and rear brake pads, checking ...... 6-25
Front fork, adjusting ................................ 3-14
Front fork, bleeding ................................. 3-16
Front fork, checking................................. 6-32
Fuel ......................................................... 3-11
Fuel consumption, tips for reducing .......... 5-3
Fuel level warning light .............................. 3-2
Fuel tank cap........................................... 3-11
Fuses, replacing ...................................... 6-34HHandlebar switches ................................... 3-8
Headlight bulb, replacing......................... 6-35
Helmet holder .......................................... 3-14
High beam indicator light ........................... 3-2
Horn switch ............................................... 3-9IIdentification numbers ............................... 9-1
Ignition circuit cut-off system ................... 3-19
Indicator lights and warning lights ............. 3-2LLicense plate light bulb, replacing ........... 6-38MMain switch/steering lock .......................... 3-1
Maintenance and lubricatio n, periodic....... 6-4
Maintenance, emission control system ..... 6-3
Matte color, caution ................................... 7-1
Model label ................................................ 9-1
Multi-function display................................. 3-3NNeutral indicator light ................................ 3-2PPanels, removing and installing ................ 6-8
Parking ...................................................... 5-4 Part locations .............................................2-1
SSafety information ......................................1-1
Seat ......................................................... 3-13
Shifting .......................................................5-2
Shift pedal ................................................3-10
Shift pedal, checking................................ 6-25
Shock absorber assembly, adjusting .......3-17
Sidestand .................................................3-19
Sidestand, checking and lubricating ........6-31
Spark plug, checking ............................... 6-11
Specifications.............................................8-1
Starting the engine.....................................5-1
Start switch ................................................3-9
Steering, checking ................................... 6-32
Storage ......................................................7-3
Supporting the motorcycle .......................6-39
Swingarm pivots, lubricating .................... 6-31TTail/brake light ......................................... 6-37
Throttle grip and cable, checking and
lubricating ..............................................6-30
Throttle grip free play, checking............... 6-19
Tires ......................................................... 6-20
Tool kit .......................................................6-2
Troubleshooting ....................................... 6-42
Troubleshooting charts ............................6-43
Turn signal indicator light ...........................3-2
Turn signal light bul b, replacing ............... 6-37
Turn signal switch ......................................3-9VValve clearance ....................................... 6-20
Vehicle identificat ion number .....................9-1
32D-28199-EB.book 2 ページ 2013年7月3日 水曜日 午前11時8分