oil pressure YAMAHA WR 426F 2001 User Guide
[x] Cancel search | Manufacturer: YAMAHA, Model Year: 2001, Model line: WR 426F, Model: YAMAHA WR 426F 2001Pages: 762, PDF Size: 62.36 MB
Page 430 of 762
ENG
4 - 48
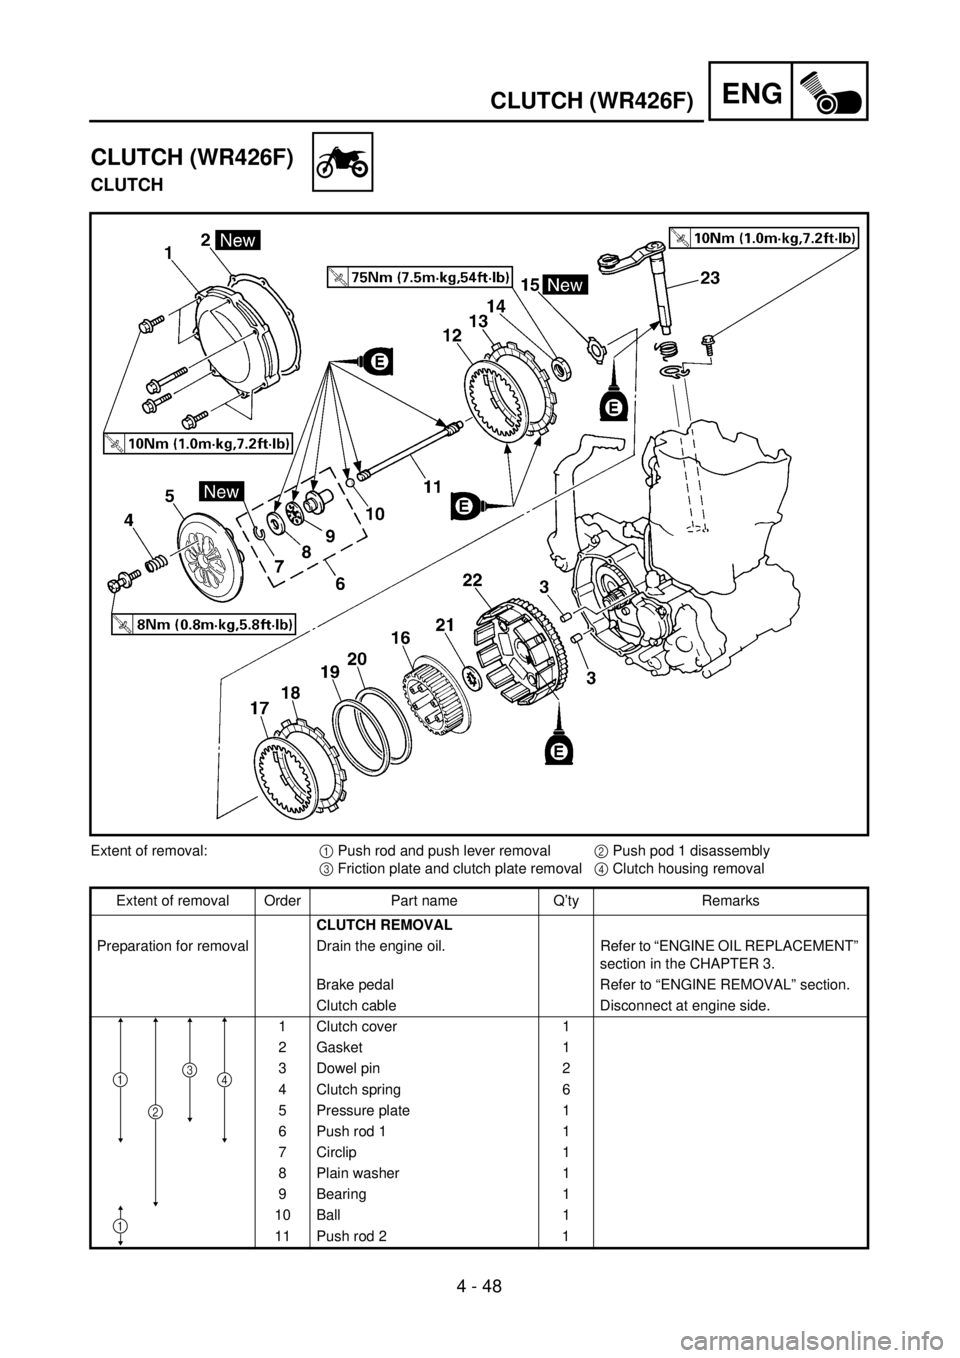
CLUTCH (WR426F)
CLUTCH (WR426F)
CLUTCH
Extent of removal:1 Push rod and push lever removal2 Push pod 1 disassembly
3 Friction plate and clutch plate removal4 Clutch housing removal
Extent of removal Order Part name Q’ty Remarks
CLUTCH REMOVAL
Preparation for removal Drain the engine oil. Refer to “ENGINE OIL REPLACEMENT”
section in the CHAPTER 3.
Brake pedal Refer to “ENGINE REMOVAL” section.
Clutch cable Disconnect at engine side.
1 Clutch cover 1
2 Gasket 1
3 Dowel pin 2
4 Clutch spring 6
5 Pressure plate 1
6 Push rod 1 1
7 Circlip 1
8 Plain washer 1
9 Bearing 1
10 Ball 1
11Push rod 2
1
41
2
3
1
Page 442 of 762

4 - 54
ENGCLUTCH (WR426F)
7. Install:
lPush rod 2 1
lBall 2
lPush rod 1 3
NOTE:
Apply the engine oil on the push rod 1, 2 and
ball.
8. Install:
lPressure plate 1
9. Install:
lClutch spring
lBolt (clutch spring)
NOTE:
Tighten the bolts in stage, using a crisscross
pattern.
T R..8 Nm (0.8 m · kg, 5.8 ft · lb)
10. Install:
lGasket (clutch cover) 1
lDowel pin 2
New
11. Install:
lClutch cover 1
lBolt (clutch cover)
NOTE:
Tighten the bolts in stage, using a crisscross
pattern.
T R..10 Nm (1.0 m · kg, 7.2 ft · lb)
Page 444 of 762
ENG
4 - 55
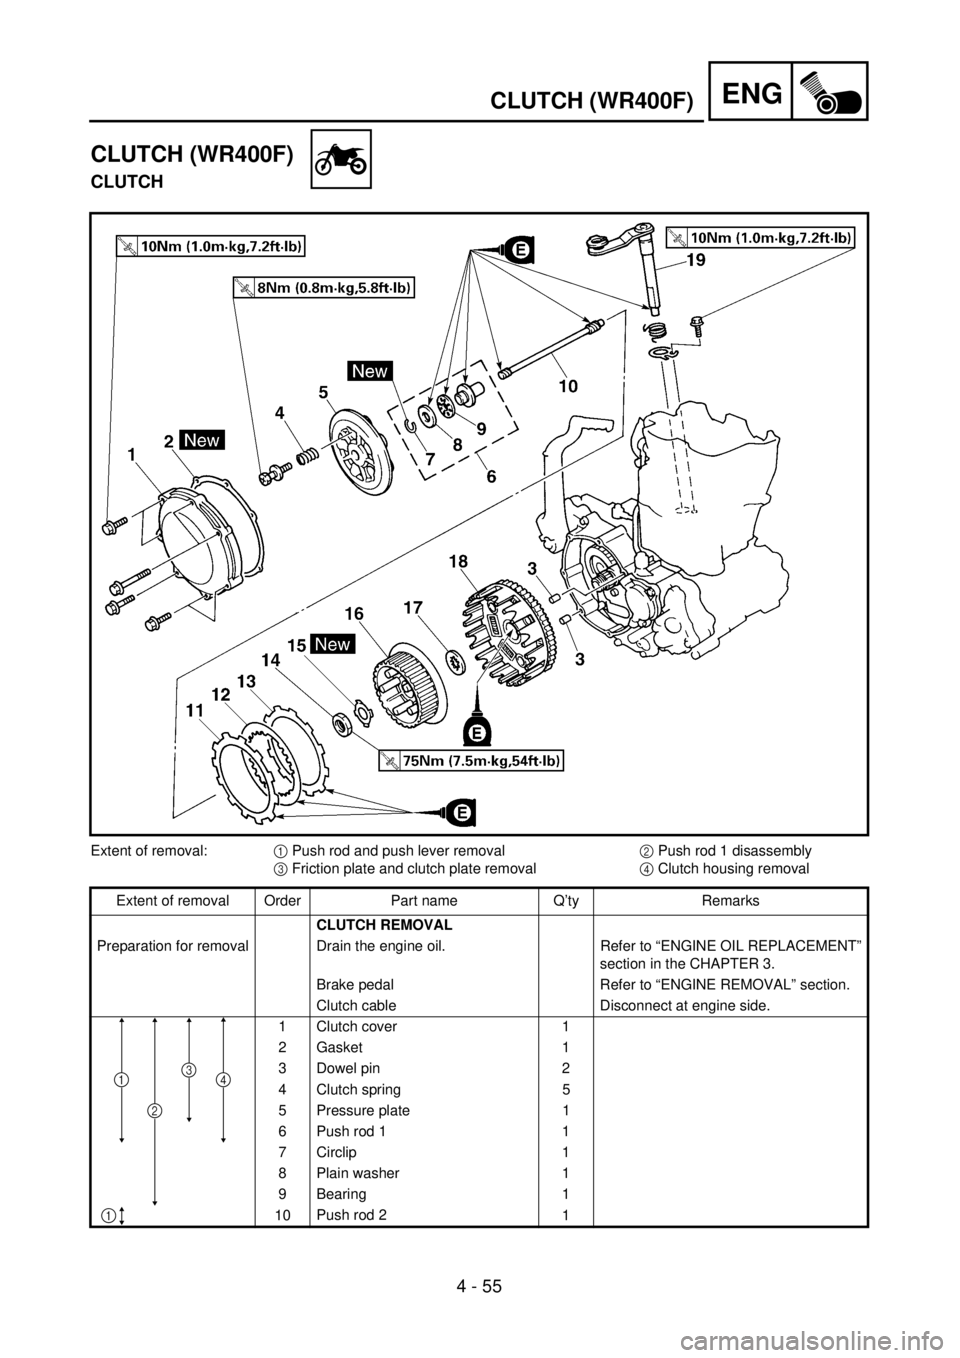
CLUTCH (WR400F)
CLUTCH (WR400F)
CLUTCH
Extent of removal:1 Push rod and push lever removal2 Push rod 1 disassembly
3 Friction plate and clutch plate removal4 Clutch housing removal
Extent of removal Order Part name Q’ty Remarks
CLUTCH REMOVAL
Preparation for removal Drain the engine oil. Refer to “ENGINE OIL REPLACEMENT”
section in the CHAPTER 3.
Brake pedal Refer to “ENGINE REMOVAL” section.
Clutch cable Disconnect at engine side.
1 Clutch cover 1
2 Gasket 1
3 Dowel pin 2
4 Clutch spring 5
5 Pressure plate 1
6 Push rod 1 1
7 Circlip 1
8 Plain washer 1
9 Bearing 1
10Push rod 2
1
4
1
1
2
3
Page 454 of 762
![YAMAHA WR 426F 2001 User Guide 4 - 60
ENGCLUTCH (WR400F)
3. Bend the lock washer 1 tab.
4. Install:
lFriction plate 1 [d = ø112 mm (4.41 in)]
1
lClutch plate 2
lFriction plate 2 [d = ø116 mm (4.57 in)]
3
NOTE:
lInstall the clut](/img/51/52439/w960_52439-453.png "YAMAHA WR 426F 2001 User Guide 4 - 60
ENGCLUTCH (WR400F)
3. Bend the lock washer 1 tab.
4. Install:
lFriction plate 1 [d = ø112 mm (4.41 in)]
1
lClutch plate 2
lFriction plate 2 [d = ø116 mm (4.57 in)]
3
NOTE:
lInstall the clut")
4 - 60
ENGCLUTCH (WR400F)
3. Bend the lock washer 1 tab.
4. Install:
lFriction plate 1 [d = ø112 mm (4.41 in)]
1
lClutch plate 2
lFriction plate 2 [d = ø116 mm (4.57 in)]
3
NOTE:
lInstall the clutch plates and friction plates
alternately on the clutch boss, starting with a
friction plate 1 and ending with a friction plate
2.
lApply the engine oil on the friction plates and
clutch plates.
5. Install:
lBearing 1
lPlain washer 2
lCirclip 3
To push rod 1 4.
NOTE:
Apply the engine oil on the bearing and plain
washer.
6. Install:
lPush rod 2 1
lPush rod 1 2
NOTE:
Apply the engine oil on the push rod 1, 2.
New
7. Install:
lPressure plate 1
NOTE:
Align the much mark a on the pressure plate
with the punched mark b on the clutch boss.
Page 666 of 762
5 - 61
CHAS
EC586000
HANDLING NOTE
WARNING
This shock absorber is provided with a
separate type tank filled with high-pressure
nitrogen gas. To prevent the danger of
explosion, read and understand the follow-
ing information before handling the shock
absorber.
The manufacturer can not be held respon-
sible for property damage or personal
injury that may result from improper han-
dling.
1. Never tamper or attempt to disassem-
ble the cylinder or the tank.
2. Never throw the shock absorber into
an open flame or other high heat. The
shock absorber may explode as a
result of nitrogen gas expansion and/
or damage to the hose.
3. Be careful not to damage any part of
the gas tank. A damaged gas tank will
impair the damping performance or
cause a malfunction.
4. Take care not to scratch the contact
surface of the piston rod with the cylin-
der; or oil could leak out.
5. Never attempt to remove the plug at
the bottom of the nitrogen gas tank. It
is very dangerous to remove the plug.
6. When scrapping the shock absorber,
follow the instructions on disposal.
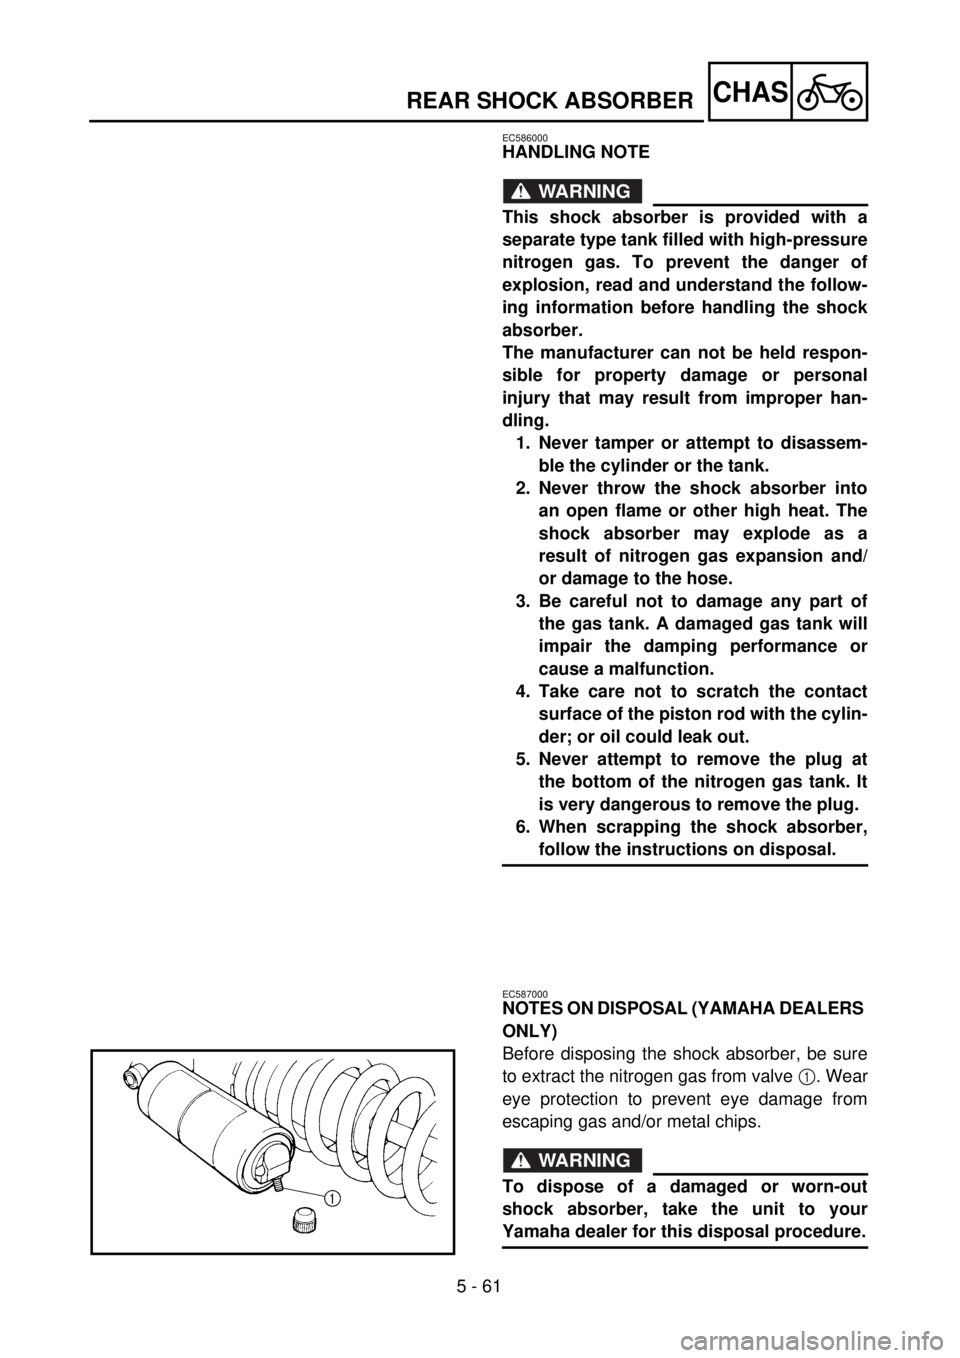
EC587000
NOTES ON DISPOSAL (YAMAHA DEALERS
ONLY)
Before disposing the shock absorber, be sure
to extract the nitrogen gas from valve 1. Wear
eye protection to prevent eye damage from
escaping gas and/or metal chips.
WARNING
To dispose of a damaged or worn-out
shock absorber, take the unit to your
Yamaha dealer for this disposal procedure.
REAR SHOCK ABSORBER