ad blue YAMAHA WR 426F 2001 Owners Manual
[x] Cancel search | Manufacturer: YAMAHA, Model Year: 2001, Model line: WR 426F, Model: YAMAHA WR 426F 2001Pages: 762, PDF Size: 62.36 MB
Page 382 of 762
4 - 24
ENGCAMSHAFTS
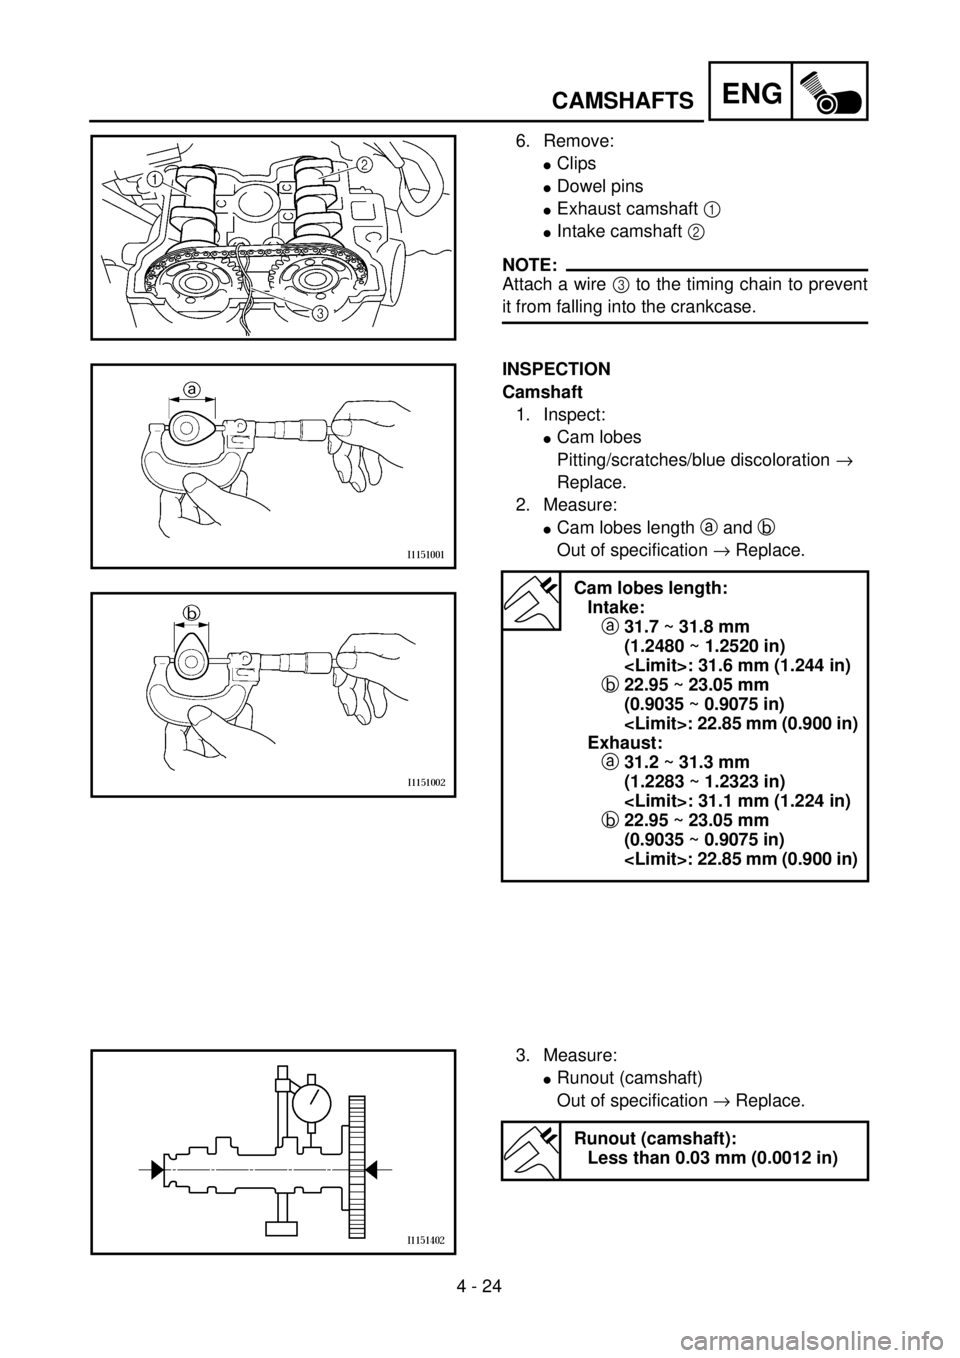
6. Remove:
lClips
lDowel pins
lExhaust camshaft 1
lIntake camshaft 2
NOTE:
Attach a wire 3 to the timing chain to prevent
it from falling into the crankcase.
INSPECTION
Camshaft
1. Inspect:
lCam lobes
Pitting/scratches/blue discoloration ®
Replace.
2. Measure:
lCam lobes length a and b
Out of specification ® Replace.
Cam lobes length:
Intake:
a31.7 ~ 31.8 mm
(1.2480 ~ 1.2520 in)
b22.95 ~ 23.05 mm
(0.9035 ~ 0.9075 in)
Exhaust:
a31.2 ~ 31.3 mm
(1.2283 ~ 1.2323 in)
b22.95 ~ 23.05 mm
(0.9035 ~ 0.9075 in)
3. Measure:
lRunout (camshaft)
Out of specification ® Replace.
Runout (camshaft):
Less than 0.03 mm (0.0012 in)
Page 406 of 762
4 - 36
ENGVALVES AND VALVE SPRINGS
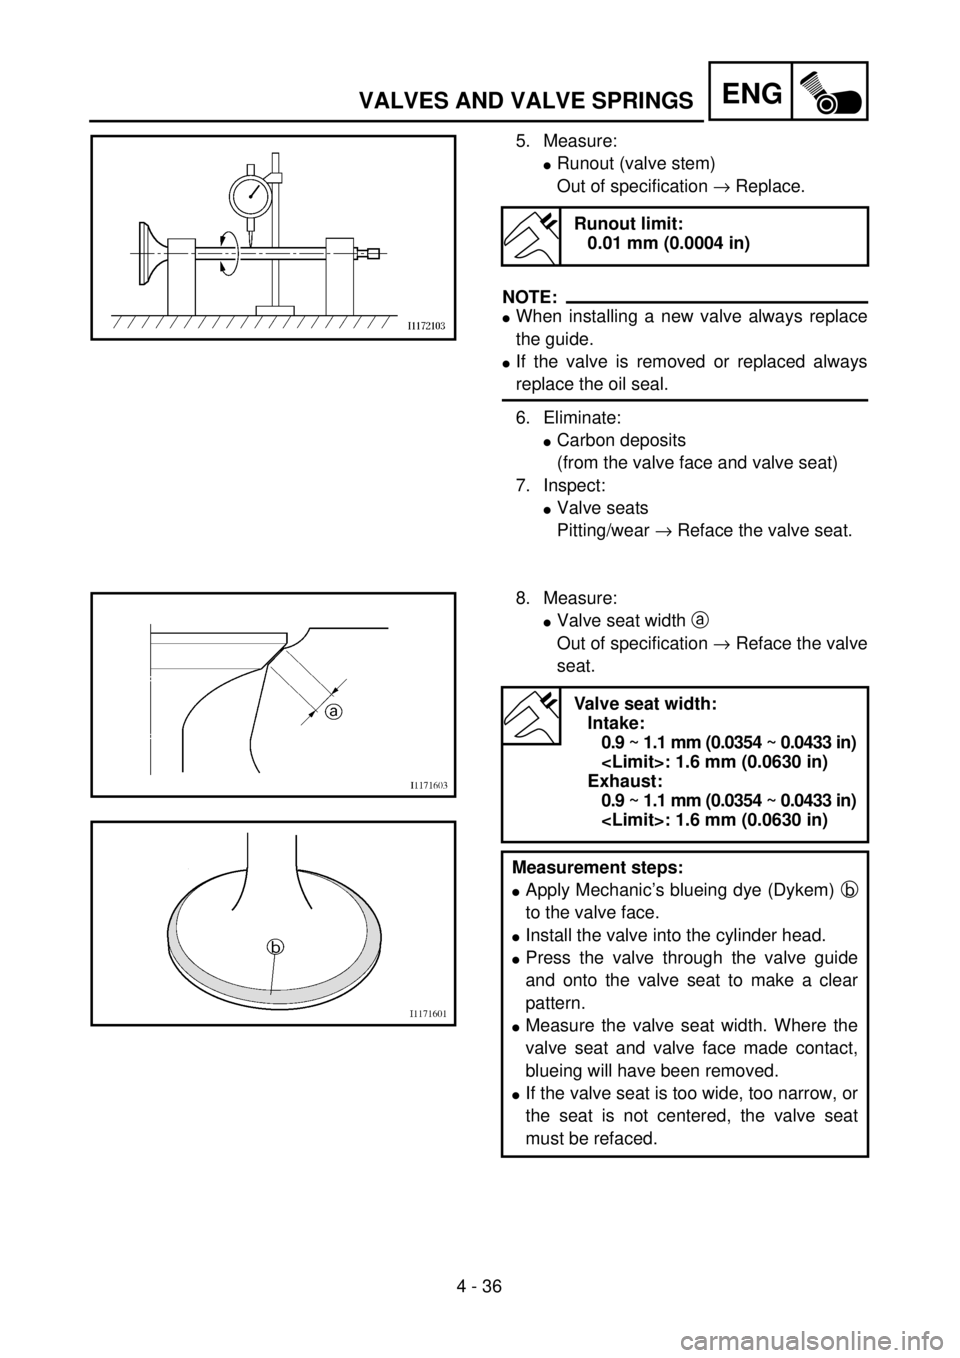
5. Measure:
lRunout (valve stem)
Out of specification ® Replace.
NOTE:
lWhen installing a new valve always replace
the guide.
lIf the valve is removed or replaced always
replace the oil seal.
6. Eliminate:
lCarbon deposits
(from the valve face and valve seat)
7. Inspect:
lValve seats
Pitting/wear ® Reface the valve seat.
Runout limit:
0.01 mm (0.0004 in)
8. Measure:
lValve seat width a
Out of specification ® Reface the valve
seat.
Valve seat width:
Intake:
0.9 ~ 1.1 mm (0.0354 ~ 0.0433 in)
Exhaust:
0.9 ~ 1.1 mm (0.0354 ~ 0.0433 in)
Measurement steps:
lApply Mechanic’s blueing dye (Dykem) b
to the valve face.
lInstall the valve into the cylinder head.
lPress the valve through the valve guide
and onto the valve seat to make a clear
pattern.
lMeasure the valve seat width. Where the
valve seat and valve face made contact,
blueing will have been removed.
lIf the valve seat is too wide, too narrow, or
the seat is not centered, the valve seat
must be refaced.
Page 408 of 762
4 - 37
ENGVALVES AND VALVE SPRINGS
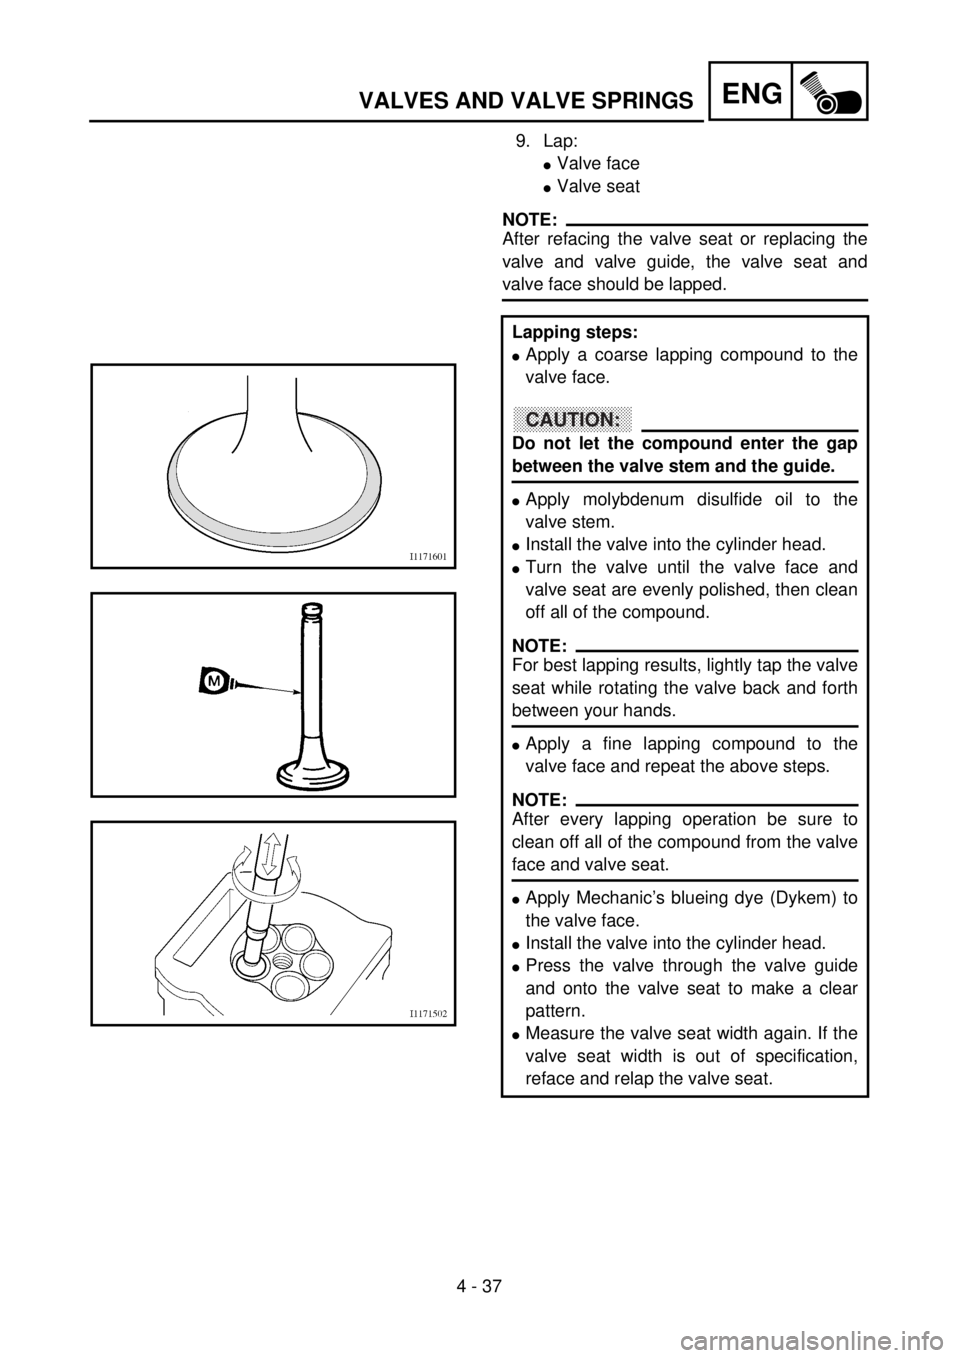
9. Lap:
lValve face
lValve seat
NOTE:
After refacing the valve seat or replacing the
valve and valve guide, the valve seat and
valve face should be lapped.
Lapping steps:
lApply a coarse lapping compound to the
valve face.
CAUTION:
Do not let the compound enter the gap
between the valve stem and the guide.
lApply molybdenum disulfide oil to the
valve stem.
lInstall the valve into the cylinder head.
lTurn the valve until the valve face and
valve seat are evenly polished, then clean
off all of the compound.
NOTE:
For best lapping results, lightly tap the valve
seat while rotating the valve back and forth
between your hands.
lApply a fine lapping compound to the
valve face and repeat the above steps.
NOTE:
After every lapping operation be sure to
clean off all of the compound from the valve
face and valve seat.
lApply Mechanic’s blueing dye (Dykem) to
the valve face.
lInstall the valve into the cylinder head.
lPress the valve through the valve guide
and onto the valve seat to make a clear
pattern.
lMeasure the valve seat width again. If the
valve seat width is out of specification,
reface and relap the valve seat.
Page 412 of 762
4 - 39
ENGVALVES AND VALVE SPRINGS
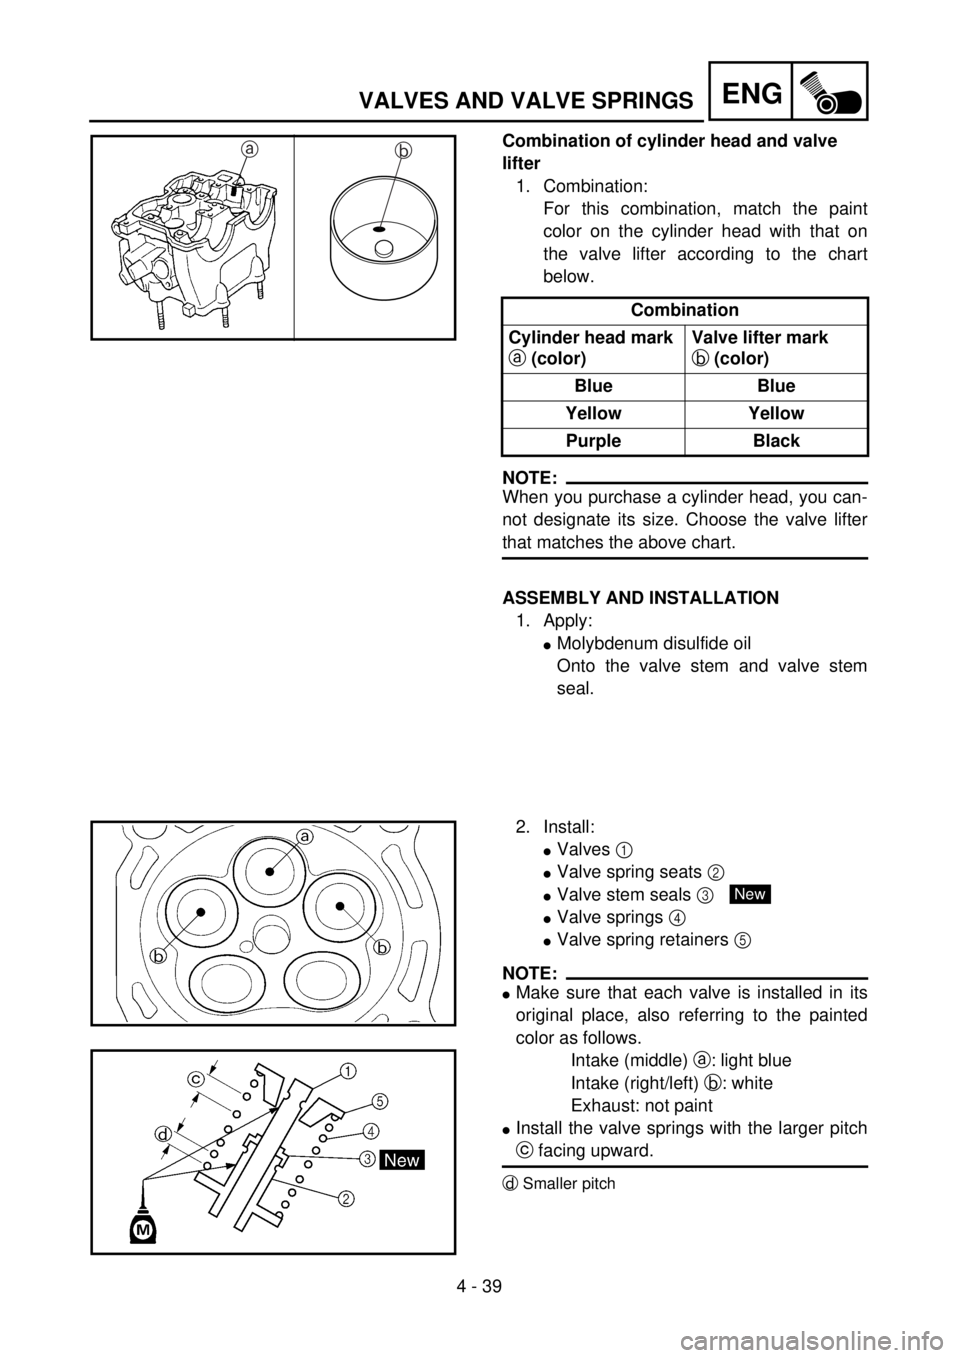
Combination of cylinder head and valve
lifter
1. Combination:
For this combination, match the paint
color on the cylinder head with that on
the valve lifter according to the chart
below.
NOTE:
When you purchase a cylinder head, you can-
not designate its size. Choose the valve lifter
that matches the above chart.Combination
Cylinder head mark
a (color)Valve lifter mark
b (color)
Blue Blue
Yellow Yellow
Purple Black
ab
ASSEMBLY AND INSTALLATION
1. Apply:
lMolybdenum disulfide oil
Onto the valve stem and valve stem
seal.
2. Install:
lValves 1
lValve spring seats 2
lValve stem seals 3
lValve springs 4
lValve spring retainers 5
NOTE:
lMake sure that each valve is installed in its
original place, also referring to the painted
color as follows.
Intake (middle) a: light blue
Intake (right/left) b: white
Exhaust: not paint
lInstall the valve springs with the larger pitch
c facing upward.
dSmaller pitch
New
Page 424 of 762
4 - 45
ENGCYLINDER AND PISTON
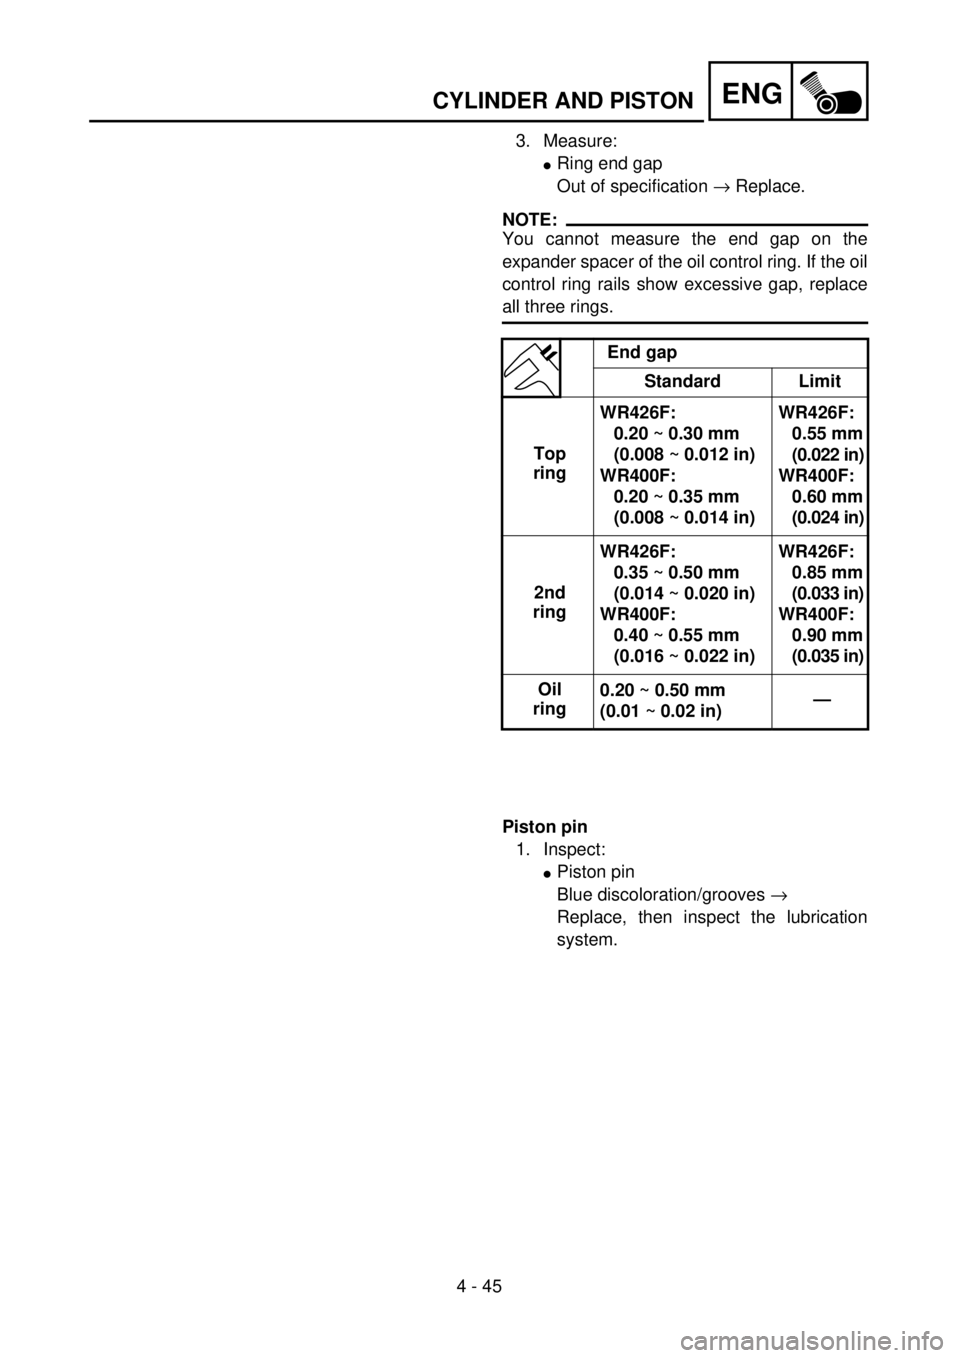
3. Measure:
lRing end gap
Out of specification ® Replace.
NOTE:
You cannot measure the end gap on the
expander spacer of the oil control ring. If the oil
control ring rails show excessive gap, replace
all three rings.
End gap
Standard Limit
Top
ringWR426F:
0.20 ~ 0.30 mm
(0.008 ~ 0.012 in)
WR400F:
0.20 ~ 0.35 mm
(0.008 ~ 0.014 in)WR426F:
0.55 mm
(0.022 in)
WR400F:
0.60 mm
(0.024 in)
2nd
ringWR426F:
0.35 ~ 0.50 mm
(0.014 ~ 0.020 in)
WR400F:
0.40 ~ 0.55 mm
(0.016 ~ 0.022 in)WR426F:
0.85 mm
(0.033 in)
WR400F:
0.90 mm
(0.035 in)
Oil
ring0.20 ~ 0.50 mm
(0.01 ~ 0.02 in)—
Piston pin
1. Inspect:
lPiston pin
Blue discoloration/grooves ®
Replace, then inspect the lubrication
system.
Page 678 of 762

6 - 1
–+ELEC
ELECTRICAL COMPONENTS AND WIRING DIAGRAM
EC600000
ELECTRICAL
EC610000
ELECTRICAL COMPONENTS AND WIRING DIAGRAM
EC611000
ELECTRICAL COMPONENTS
1
Headlight
2
“ENGINE STOP” button
3
Regulator
4
TPS (throttle position sensor)
5
Tail light
6
CDI magneto
7
Neutral switch
8
Ignition coil
9
Spark plug
0
Lights switch
A
CDI unit
COLOR CODE
B ................... Black
Br .................. Brown
G ................... Green
Gy ................. Gray
L .................... Blue
O ................... Orange
P ................... Pink
R ................... Red
EC612000
WIRING DIAGRAM
* Except for USA
B/L
R/WL/W
LY
L
Y
B
1B L
L YBLB Y
YYLB
5LB
YBLB
LB
3
7
4 8
9
W
R Br
G P
BP
B Br
G W
R
O
L B
Y B/LL/WSb
B/L B
Y O
L
A
2
Y
Br
B/WBB/W
Gy
B
PGR
WB
L YL Y
B B/L
SbW
Sb
WL/W
R/WL/WL/WR/WSb
W
O
B
0
6
B/WGyB/WGy
O
L B
Y Sb
B/L*
B/W*
Sb*
Y
BL
B
B/W
Sb .................. Sky blue
W ................... White
Y .................... Yellow
B/L ................. Black/Blue
B/W ............... Black/White
L/W ................ Blue/White
R/W ............... Red/White
6
Page 692 of 762
6 - 6
–+ELECIGNITION SYSTEM
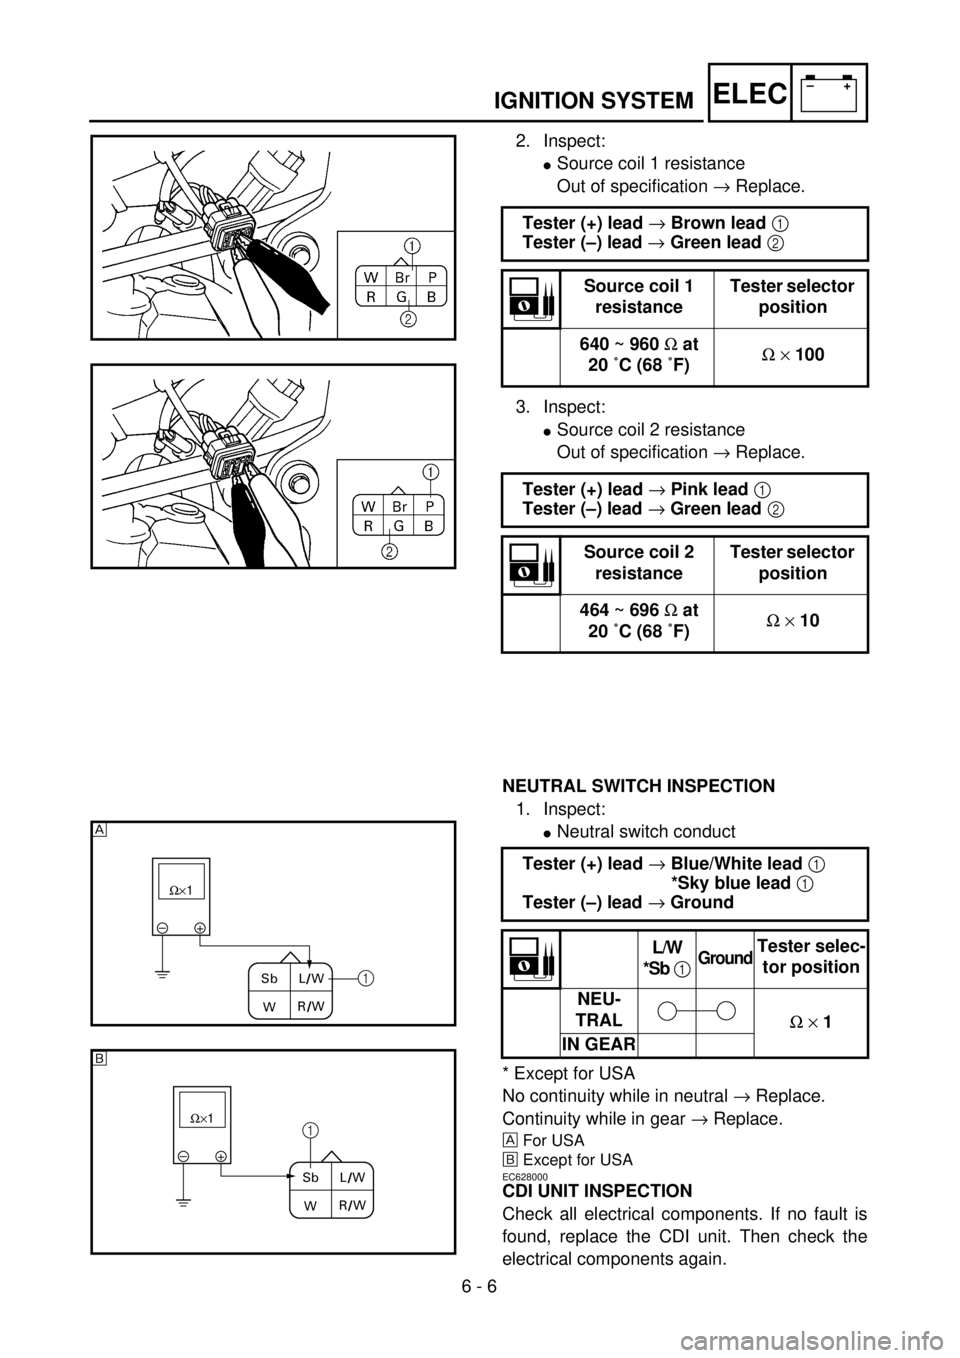
2. Inspect:
lSource coil 1 resistance
Out of specification ® Replace.
3. Inspect:
lSource coil 2 resistance
Out of specification ® Replace. Tester (+) lead ® Brown lead 1
Tester (–) lead ® Green lead 2
Source coil 1
resistanceTester selector
position
640 ~ 960 W at
20 ˚C (68 ˚F)W ´ 100
Tester (+) lead ® Pink lead 1
Tester (–) lead ® Green lead 2
Source coil 2
resistanceTester selector
position
464 ~ 696 W at
20 ˚C (68 ˚F)W ´ 10
NEUTRAL SWITCH INSPECTION
1. Inspect:
lNeutral switch conduct
* Except for USA
No continuity while in neutral ® Replace.
Continuity while in gear ® Replace.
For USA
õExcept for USA
EC628000
CDI UNIT INSPECTION
Check all electrical components. If no fault is
found, replace the CDI unit. Then check the
electrical components again.Tester (+) lead ® Blue/White lead 1
*Sky blue lead 1
Tester (–) lead ® Ground
L/W
*Sb 1GroundTester selec-
tor position
NEU-
TRAL
W ´ 1
IN GEAR
–+ W´1
R/W
W Sb L/W
1
–+ W´1
R/W
W Sb L/W
1
õ
Page 698 of 762

6 - 8
–+ELECTPS (THROTTLE POSITION SENSOR) SYSTEM
EC624000
COUPLERS AND LEADS CONNECTION
INSPECTION
1. Check:
lCouplers and leads connection
Rust/dust/looseness/short-circuit ®
Repair or replace.
TPS COIL INSPECTION
1. Inspect:
lTPS coil resistance
Out of specification ® Replace.
2. Loosen:
lThrottle stop screw
NOTE:
Turn out the throttle stop screw until the throt-
tle shaft is in the full close position.Tester (+) lead ® Blue lead 1
Tester (–) lead ® Black lead 2
TPS coil
resistanceTester selector
position
4 ~ 6 kW at
20 ˚C (68 ˚F)kW ´ 1
3. Inspect:
lTPS coil variable resistance
Check that the resistance in increased
as the throttle grip is moved from the
full close position to the full open posi-
tion.
Out of specification ® Replace.
Tester (+) lead ® Yellow lead 1
Tester (–) lead ® Black lead 2
TPS coil variable
resistanceTester selec-
tor position
Full closedFull opened
kW ´ 1 0 ~ 2 kW at
20 ˚C
(68 ˚F)4 ~ 6 kW at
20 ˚C
(68 ˚F)
Page 702 of 762

6 - 10
–+ELECTPS (THROTTLE POSITION SENSOR) SYSTEM
6. Adjust:
lTPS coil resistance at idle speed
Adjustment steps:
Adjust the angle of the TPS 1 to obtain
the resistance calculated (example: 650 ~
750 W)
Tester (+) lead ® Yellow lead 2
Tester (–) lead ® Black lead 3
7. Tighten:
lScrew (TPS) 1
8. Install:
lTPS coupler
EC694000
TPS INPUT VOLTAGE INSPECTION
1. Disconnect the TPS coupler.
2. Start the engine.
3. Inspect:
lTPS input voltage
Out of specification ® Replace the CDI
unit.
Tester (+) lead ® Blue lead 1
Tester (–) lead ® Black/Blue lead 2
TPS input
voltageTester selector
position
4 ~ 6 V DCV-20
Page 708 of 762

6 - 12
–+ELECLIGHTING SYSTEM
LIGHTS SWITCH INSPECTION
1. Inspect:
lLights switch conduct
No continuity while being ® Replace.
Continuity while being OFF ® Replace. Tester (+) lead ® Yellow lead 1
Tester (–) lead ® Blue lead 2
Y
1L
2Tester selec-
tor position
W ´ 1
OFF
CDI MAGNETO INSPECTION
1. Inspect:
lLighting coil resistance
Out of specification ® Replace.
Tester (+) lead ® Yellow lead 1
Tester (–) lead ® Black lead 2
Lighting coil
resistanceTester selector
position
0.16 ~ 0.24 W at
20 ˚C (68 ˚F)W ´ 1