engine YAMAHA WR 450F 2005 Notices Demploi (in French)
[x] Cancel search | Manufacturer: YAMAHA, Model Year: 2005, Model line: WR 450F, Model: YAMAHA WR 450F 2005Pages: 758, PDF Size: 17.3 MB
Page 500 of 758

4 - 100
ENGCRANKCASE AND CRANKSHAFT
5. Install:
Dowel pin 1
O-ring 2
Crankcase (right)
To crankcase (left).
NOTE:
Fit the crankcase (right) onto the crankcase
(left). Tap lightly on the case with soft ham-
mer.
When installing the crankcase, the connect-
ing rod should be positioned at TDC (top
dead center).
New
6. Tighten:
Hose guide 1
Clutch cable holder 2
Bolt (clutch cable holder)
Bolt (crankcase)
NOTE:
Tighten the crankcase tightening bolts in
stage, using a crisscross pattern.
7. Install:
Oil delivery pipe
O-ring
Bolt (oil delivery pipe 2)
8. Install:
Timing chain
Timing chain guide (rear)
Bolt (timing chain guide)
9. Remove:
Sealant
Forced out on the cylinder mating surface.
10. Apply:
Engine oil
To the crank pin, bearing and oil delivery
hole.
11. Check:
Crankshaft and transmission operation.
Unsmooth operation → Repair.
T R..10 Nm (1.0 m · kg, 7.2 ft · lb)
T R..12 Nm (1.2 m · kg, 8.7 ft · lb)
New
T R..10 Nm (1.0 m · kg, 7.2 ft · lb)
T R..10 Nm (1.0 m · kg, 7.2 ft · lb)
Page 502 of 758

4 - 101
ENGTRANSMISSION, SHIFT CAM AND SHIFT FORK
TRANSMISSION, SHIFT CAM AND SHIFT FORK
TRANSMISSION, SHIFT CAM AND SHIFT FORK
Extent of removal:
1 Shift fork, shift cam, main axle and drive axle removal
Extent of removal Order Part name Q’ty Remarks
TRANSMISSION, SHIFT CAM
AND SHIFT FORK REMOVAL
Preparation for removal Engine Refer to “ENGINE REMOVAL” section.
Separate the crankcase. Refer to “CRANKCASE AND CRANK-
SHAFT” section.
1 Shift fork 1 1
Refer to “REMOVAL POINTS”. 2 Shift fork 2 1
3 Shift fork 3 1
4Shift cam 1
5 Main axle 1
6 Drive axle 1
7 Collar 1
1
Page 510 of 758

4 - 105
ENGTRANSMISSION, SHIFT CAM AND SHIFT FORK
5. Install:
Shift fork 1 (L) 1
Shift fork 2 (C) 2
Shift fork 3 (R) 3
Shift cam 4
To main axle and drive axle.
NOTE:
Apply the molybdenum disulfide oil on the
shift fork grooves.
Mesh the shift fork #1 (L) with the 4th wheel
gear 5 and #3 (R) with the 5th wheel gear 7
on the drive axle.
Mesh the shift fork #2 (C) with the 3rd pinion
gear 6 on the main axle.
6. Install:
Transmission assembly 1
To crankcase (left) 2.
NOTE:
Apply the engine oil on the bearings and guide
bars.
7. Check:
Shifter operation
Transmission operation
Unsmooth operation → Repair.
Page 512 of 758

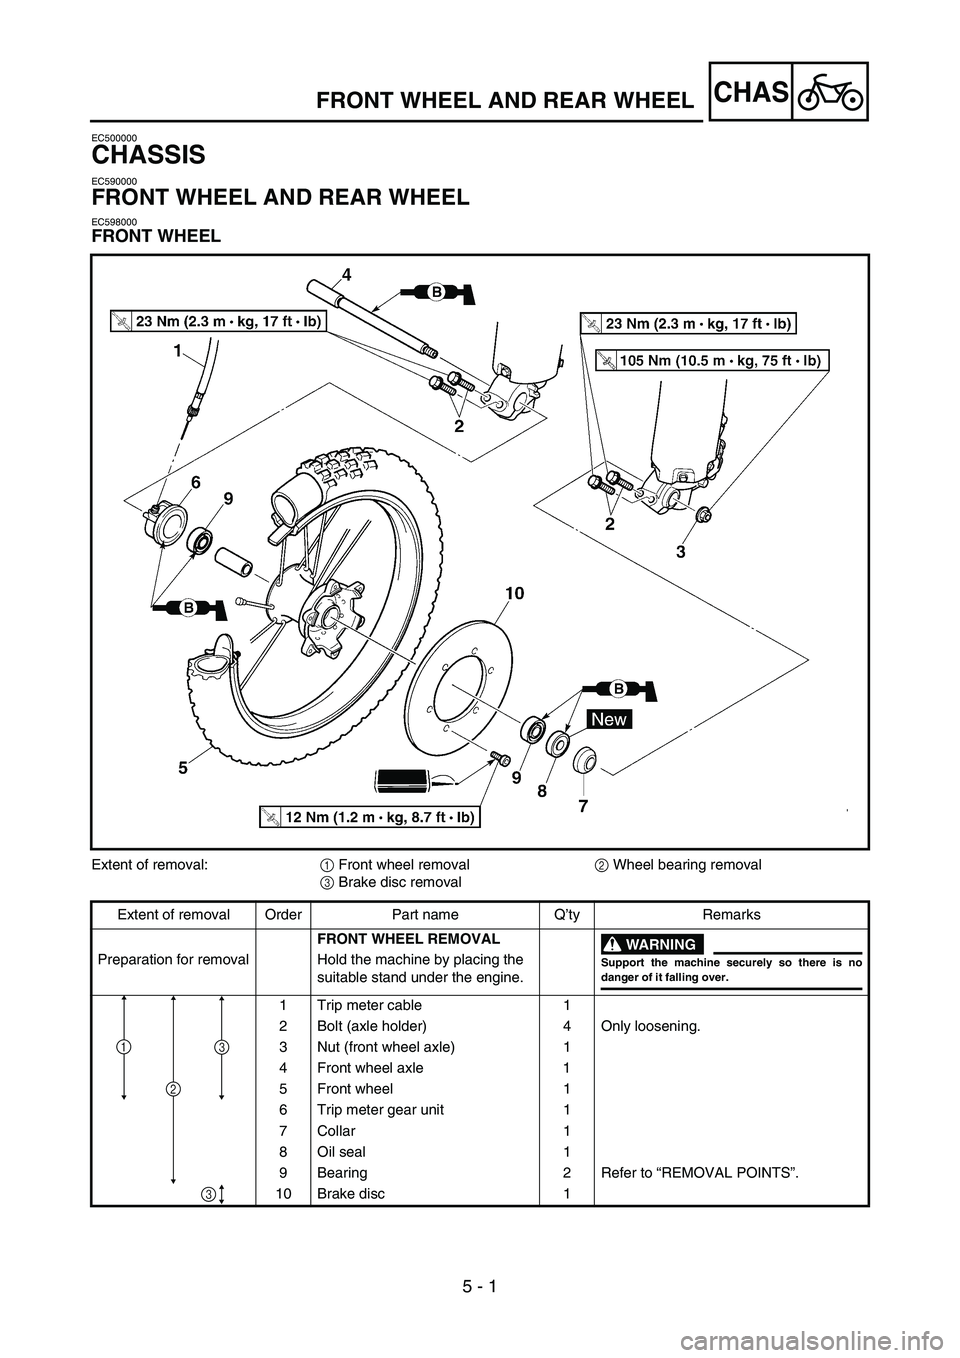
5 - 1
CHAS
EC500000
CHASSIS
EC590000
FRONT WHEEL AND REAR WHEEL
EC598000
FRONT WHEEL
FRONT WHEEL AND REAR WHEEL
Extent of removal:
1 Front wheel removal
2 Wheel bearing removal
3 Brake disc removal
Extent of removal Order Part name Q’ty Remarks
FRONT WHEEL REMOVAL
WARNING
Support the machine securely so there is nodanger of it falling over.
Preparation for removal Hold the machine by placing the
suitable stand under the engine.
1 Trip meter cable 1
2 Bolt (axle holder) 4 Only loosening.
3 Nut (front wheel axle) 1
4 Front wheel axle 1
5 Front wheel 1
6 Trip meter gear unit 1
7 Collar 1
8 Oil seal 1
9 Bearing 2 Refer to “REMOVAL POINTS”.
10 Brake disc 1
2
13
3
Page 514 of 758

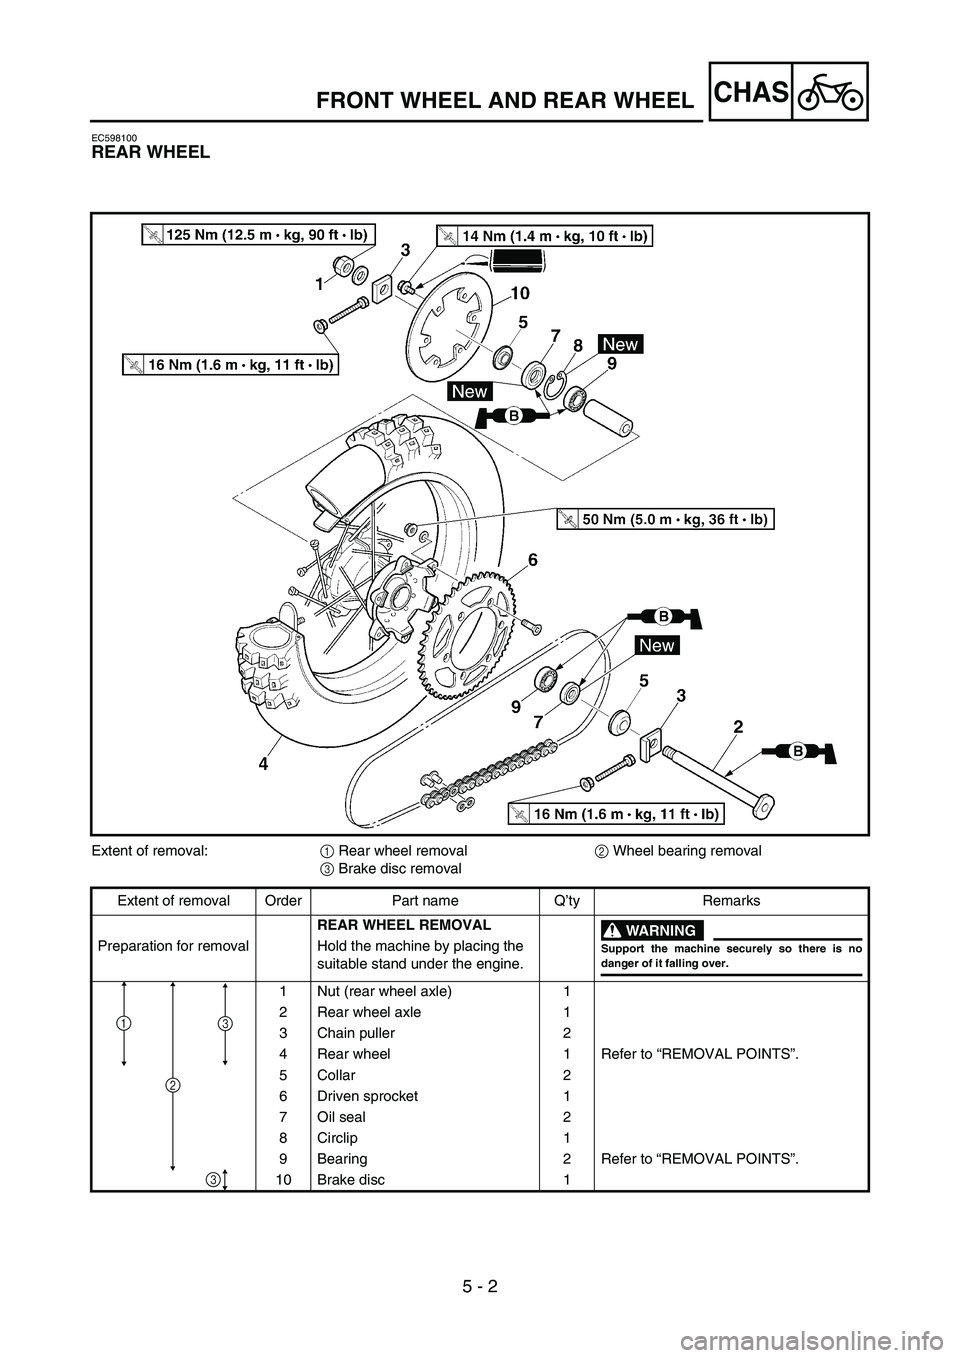
5 - 2
CHAS
EC598100
REAR WHEEL
Extent of removal:
1 Rear wheel removal
2 Wheel bearing removal
3 Brake disc removal
Extent of removal Order Part name Q’ty Remarks
REAR WHEEL REMOVAL
WARNING
Support the machine securely so there is nodanger of it falling over.
Preparation for removal Hold the machine by placing the
suitable stand under the engine.
1 Nut (rear wheel axle) 1
2 Rear wheel axle 1
3 Chain puller 2
4 Rear wheel 1 Refer to “REMOVAL POINTS”.
5 Collar 2
6 Driven sprocket 1
7 Oil seal 2
8 Circlip 1
9 Bearing 2 Refer to “REMOVAL POINTS”.
10 Brake disc 1
3
3
1
2
FRONT WHEEL AND REAR WHEEL
Page 530 of 758

5 - 10
CHASFRONT BRAKE AND REAR BRAKE
EC5A0000
FRONT BRAKE AND REAR BRAKE
EC5A8000
FRONT BRAKE
Extent of removal:
1 Brake hose removal
2 Caliper removal
3 Master cylinder removal
Extent of removal Order Part name Q’ty Remarks
FRONT BRAKE REMOVAL
WARNING
Support the machine securely so there is nodanger of it falling over.
Preparation for removal Hold the machine by placing the
suitable stand under the engine.
Drain the brake fluid. Refer to “REMOVAL POINTS”.
1 Brake hose holder (protector) 2
2 Brake hose holder (caliper) 1
3 Union bolt 2
4 Brake hose 1
5 Pad pin plug 1 Remove when loosening the pad pin.
6 Pad pin 1 Loosen when disassembling the caliper.
7 Caliper 1
8Brake lever 1
9 Master cylinder bracket 1
10 Master cylinder
1
1
2
3
3
2
Page 532 of 758

5 - 11
CHAS
EC5A8100
REAR BRAKE
Extent of removal:
1 Master cylinder removal
2 Brake hose removal
3 Caliper removal
Extent of removal Order Part name Q’ty Remarks
REAR BRAKE REMOVAL
WARNING
Support the machine securely so there is nodanger of it falling over.
Preparation for removal Hold the machine by placing the
suitable stand under the engine.
Rear wheel Refer to “FRONT WHEEL AND REAR
WHEEL” section.
Drain the brake fluid. Refer to “REMOVAL POINTS”.
1 Brake pedal 1
2 Master cylinder 1
3 Brake hose holder 2
4 Union bolt 2
5 Brake hose 1
6 Pad pin plug 1 Remove when loosening the pad pin.
7 Pad pin 1 Loosen when disassembling the caliper.
8 Caliper 1
1
123
3
FRONT BRAKE AND REAR BRAKE
Page 562 of 758

5 - 26
CHASFRONT FORK
EC550000
FRONT FORK
Extent of removal:
1 Front fork removal
Extent of removal Order Part name Q’ty Remarks
FRONT FORK REMOVAL
WARNING
Support the machine securely so there is nodanger of it falling over.
Preparation for removal Hold the machine by placing the
suitable stand under the engine.
Front wheel Refer to “FRONT WHEEL AND REAR
WHEEL” section.
Front caliper Refer to “FRONT BRAKE AND REAR
BRAKE” section.
Headlight
Handlebar Refer to “HANDLEBAR” section.
1 Protector 1
2 Pinch bolt (handle crown) 2 Only loosening.
3 Cap bolt 1 Loosen when disassembling the front fork.
4 Pinch bolt (under bracket) 2 Only loosening.
5 Front fork 1
1
Page 588 of 758

5 - 39
CHAS
EC5B0000
HANDLEBAR
Extent of removal:
1 Handlebar removal
Extent of removal Order Part name Q’ty Remarks
HANDLEBAR REMOVAL
Preparation for removal Headlight
1 Hot starter cable 1 Disconnect at the lever side.
2 Hot starter lever holder 1
3 Clutch cable 1 Disconnect at the lever side.
4 Clutch lever holder 1 Disconnect the clutch switch lead.
5“ENGINE STOP” button 1 Disconnect the “ENGINE STOP” button
lead.
6 Master cylinder 1 Refer to “REMOVAL POINTS”.
7 Start switch 1 Disconnect the start switch lead.
8 Throttle cable cap 1
9 Throttle cable #1 (pulled) 1 Disconnect at the throttle side.
10 Throttle cable #2 (pushed) 1 Disconnect at the throttle side.
11 Grip (right) 1 Refer to “REMOVAL POINTS”.
12 Tube guide 1
13 Cover (grip cap) 1
14 Grip (left) 1 Refer to “REMOVAL POINTS”.
15 Handlebar holder (upper) 2
16 Handlebar 1
1
HANDLEBAR
Page 589 of 758

5 - 39
CHAS
LENKER
Arbeitsumfang:
1 Lenker demontieren
ArbeitsumfangReihen-
folgeBauteil Anz. Bemerkungen
LENKER DEMONTIEREN
Vorbereitungsarbeiten Scheinwerfer
1 Warmstartzug 1 Hebelseitig lösen.
2 Warmstarthebel-Halterung 1
3 Kupplungszug 1 Hebelseitig lösen.
4 Kupplungshebel-Halterung 1 Das Kupplungsschalter-Kabel lösen.
5 Motorstoppschalter “ENGINE STOP”1 Das Motorstoppschalter-Kabel lösen.
6 Hauptbremszylinder 1 Siehe unter “DEMONTAGE-EINZELHEITEN”.
7 Starterschalter 1 Das Starterschalter-Kabel lösen.
8 Gaszug-Abdeckung 1
9 Gasgeberzug 1 1 Gasdrehgriffseitig lösen.
10 Gasnehmerzug 2 1 Gasdrehgriffseitig lösen.
11 Lenkergriff rechts 1 Siehe unter “DEMONTAGE-EINZELHEITEN”.
12 Führung 1
13 Gaszuggehäuse-Abdeckung 1
14 Lenkergriff links 1 Siehe unter “DEMONTAGE-EINZELHEITEN”.
15 Lenker-Halterung (oben) 2
16 Lenker 1
1
GUIDON
Organisation de la dépose:1 Dépose du guidon
Organisation de la dépose Ordre Nom de la pièce QtéRemarques
DEPOSE DU GUIDON
Préparation à la dépose Phare
1Câble de démarrage à chaud 1 Déconnecter du côté levier.
2 Support du levier de démarrage à chaud 1
3Câble d’embrayage 1 Déconnecter du côté levier.
4 Support de levier d’embrayage 1 Déconnecter le fil du contacteur d’embrayage.
5 Bouton “ENGINE STOP”1Débrancher le fil du bouton “ENGINE STOP”.
6Maître-cylindre 1 Se reporter à “POINTS DE DEPOSE”.
7 Contacteur du démarreur 1 Déconnecter le fil du contacteur du démarreur.
8 Couvercle du logement de câble des gaz 1
9Câble des gaz n°1 (tiré)1Déconnecter du côté accélérateur.
10 Câble des gaz n°2 (enfoncé)1Déconnecter du côté accélérateur.
11 Poignée (droite) 1 Se reporter à “POINTS DE DEPOSE”.
12 Guide de tube 1
13 Cache (capuchon de la poignée) 1
14 Poignée (gauche) 1 Se reporter à “POINTS DE DEPOSE”.
15 Support du guidon (supérieur) 2
16 Guidon 1
1
MANILLAR
Extensión del desmontaje:1 Desmontaje del manillar
Extensión del desmontaje Orden Nombre de la pieza Ctd. Observaciones
DESMONTAJE DEL MANILLAR
Preparación para el desmontaje Faro
1 Cable de arranque en caliente 1 Desconéctelo del lado de la maneta.
2 Soporte del mando de arranque en caliente 1
3 Cable de embrague 1 Desconéctelo del lado de la maneta.
4 Soporte de la maneta de embrague 1 Desconecte el cable del interruptor del embrague.
5Botón “ENGINE STOP” (paro del motor) 1 Desconecte el cable del botón “ENGINE STOP”.
6 Bomba de freno 1 Consulte el apartado “PUNTOS DE DESMONTAJE”.
7 Interruptor de arranque 1 Desconecte el cable del interruptor de arranque.
8 Tapa del cable del acelerador 1
9 Cable del acelerador nº 1 (en tracción) 1 Desconéctelo del lado del acelerador.
10 Cable del acelerador nº 2 (empujado) 1 Desconéctelo del lado del acelerador.
11 Puño (derecho) 1 Consulte el apartado “PUNTOS DE DESMONTAJE”.
12 Guía de tubo 1
13 Cubierta (tapa del puño) 1
14 Puño( izquierdo) 1 Consulte el apartado “PUNTOS DE DESMONTAJE”.
15 Soporte del manillar (superior) 2
16 Manillar 1
1
GUIDON
LENKER
MANILLAR