relay YAMAHA WR 450F 2005 Owners Manual
[x] Cancel search | Manufacturer: YAMAHA, Model Year: 2005, Model line: WR 450F, Model: YAMAHA WR 450F 2005Pages: 758, PDF Size: 17.3 MB
Page 91 of 758

SPEC
2 - 16 Part to be tightened Thread size Q’tyTightening torque
Nm m·kg ft·lb
Rear wheel axle and nut M20 × 1.5 1 125 12.5 90
Driven sprocket and wheel hub M8 × 1.25 6 50 5.0 36
Nipple (spoke) — 72 3 0.3 2.2
Disc cover and rear brake caliper M6 × 1.0 2 7 0.7 5.1
Protector and rear brake caliper M6 × 1.0 2 7 0.7 5.1
Chain puller adjust bolt and locknut M8 × 1.25 2 16 1.6 11
Engine mounting:
Engine upper bracket and frame M10 × 1.25 2 55 5.5 40
Engine lower bracket and frame M8 × 1.25 4 34 3.4 24
Engine and engine bracket (front) M10 × 1.25 1 69 6.9 50
Engine and engine bracket (upper) M10 × 1.25 1 52 5.2 37
Engine and frame (lower) M10 × 1.25 1 69 6.9 50
Engine guard (left and right) M8 × 1.25 2 23 2.3 17
Engine skid plate mounting (front) M6 × 1.0 3 10 1.0 7.2
Engine skid plate mounting (rear) M6 × 1.0 3 10 1.0 7.2
Regulator mounting M6 × 1.0 2 7 0.7 5.1
Pivot shaft and nut M16 × 1.5 1 85 8.5 61
Relay arm and swingarm M14 × 1.5 1 80 8.0 58
Relay arm and connecting rod M14 × 1.5 1 80 8.0 58
Connecting rod and frame M14 × 1.5 1 80 8.0 58
Rear shock absorber and frame M10 × 1.25 1 56 5.6 40
Rear shock absorber and relay arm M10 × 1.25 1 53 5.3 38
Rear frame and frame (upper) M8 × 1.25 1 32 3.2 23
Rear frame and frame (lower) M8 × 1.25 2 29 2.9 21
Swingarm and brake hose holder M5 × 0.8 4 1 0.1 0.7
Swingarm and patch M4 × 0.7 4 2 0.2 1.4
Drive chain tensioner mounting (upper) M8 × 1.25 1 19 1.9 13
Drive chain tensioner mounting (lower) M8 × 1.25 1 20 2.0 14
Chain support and swingarm M6 × 1.0 3 7 0.7 5.1
Seal guard and swingarm M5 × 0.8 4 6 0.6 4.3
Fuel tank mounting M6 × 1.0 2 10 1.0 7.2
Fuel tank and fuel cock M6 × 1.0 2 7 0.7 5.1
Fuel tank and seat set bracket M6 × 1.0 1 7 0.7 5.1
Fuel tank and hooking screw (fitting band) M6 × 1.0 1 7 0.7 5.1
Fuel tank and fuel tank bracket M6 × 1.0 4 7 0.7 5.1
Seat mounting M8 × 1.25 2 23 2.3 17
Side cover mounting M6 × 1.0 2 7 0.7 5.1
Air scoop and fuel tank M6 × 1.0 6 7 0.7 5.1
Air scoop and radiator panel (lower) M6 × 1.0 2 6 0.6 4.3
Front fender mounting M6 × 1.0 4 7 0.7 5.1
Rear fender mounting (front) M6 × 1.0 2 7 0.7 5.1
Rear fender mounting (rear) M6 × 1.0 2 11 1.1 8.0
Trip meter mounting M6 × 1.0 2 7 0.7 5.1
MAINTENANCE SPECIFICATIONS
Page 94 of 758

SPEC
2 - 19
NOTE:
Tighten the rotor nut to 65 Nm (6.5 m kg, 47 ft lb), loosen and retighten the rotor nut to 65 Nm
(6.5 m kg, 47 ft lb). Starter relay:
Model/manufacturer 2768090-A/JIDECO ----
Amperage rating 180 A ----
Coil winding resistance 4.2 ~ 4.6 Ω at 20 °C (68 °F) ----
Starting circuit cut-off relay:
Model/manufacturer ACM33221 M06/MATSUSHITA ----
Coil winding resistance 75.69 ~ 92.51 Ω at 20 °C (68 °F) ----
Fuse (amperage × quantity):
Main fuse 10 A × 1 ----
Reserve fuse 10 A × 1 ----
Part to be tightened Thread size Q’tyTightening torque
Nm m·kg ft·lb
Stator M5 × 0.8 2 7 0.7 5.1
Holder (AC magneto lead) M5 × 0.8 2 7 0.7 5.1
Rotor M12 × 1.25 1 Refer to NOTE.
Neutral switch M5 × 0.8 2 4 0.4 2.9
Starter motor M6 × 1.0 2 10 1.0 7.2
Starter relay terminal M6 × 1.0 2 4 0.4 2.9
Pick-up coil M6 × 1.0 2 10 1.0 7.2 Item Standard Limit
MAINTENANCE SPECIFICATIONS
Page 168 of 758

2 - 27
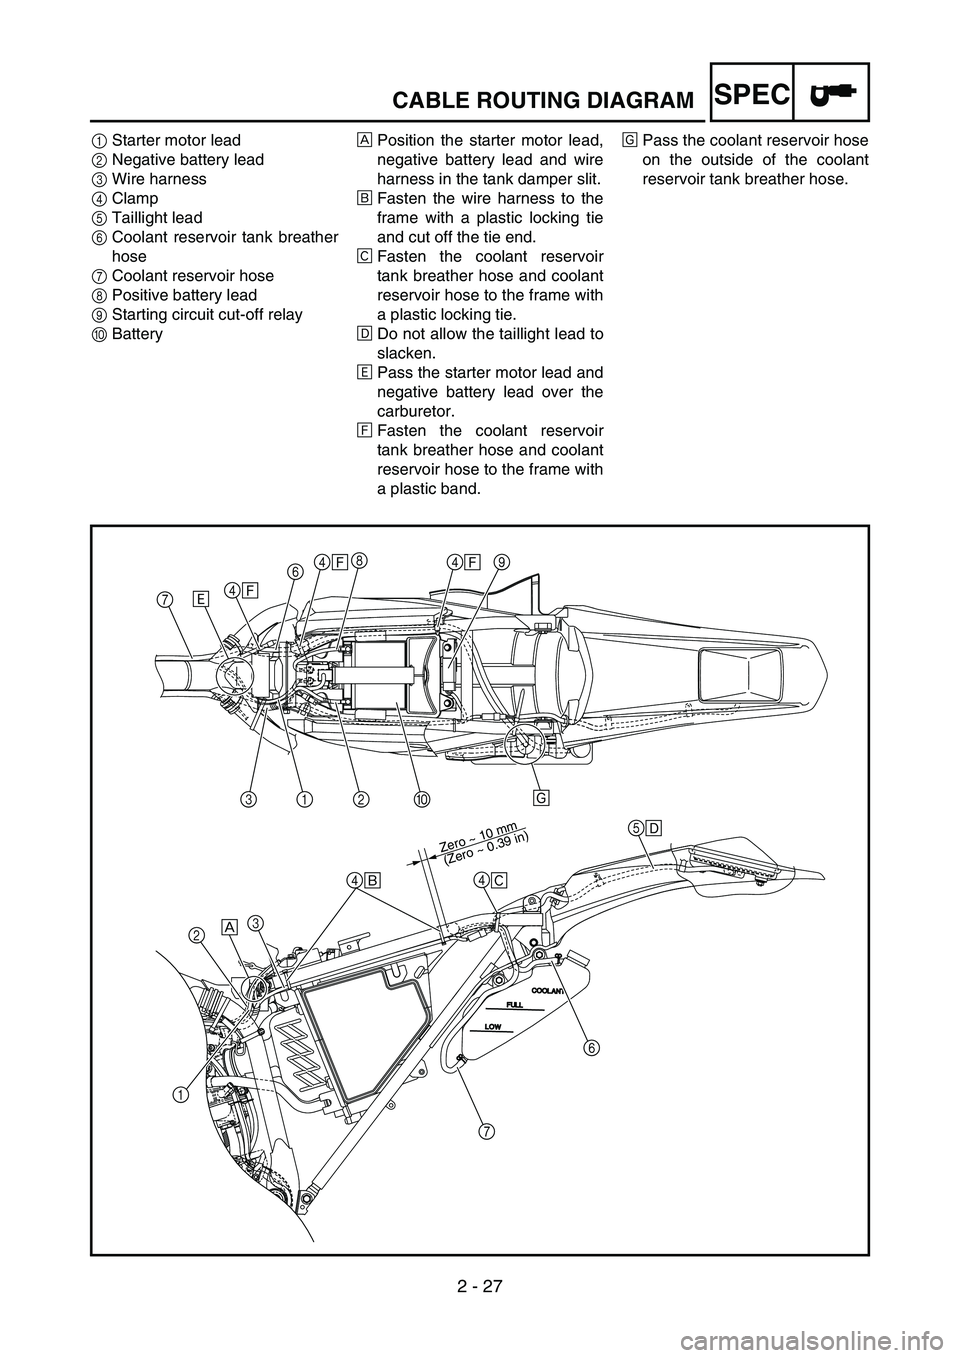
SPECCABLE ROUTING DIAGRAM
1Starter motor lead
2Negative battery lead
3Wire harness
4Clamp
5Taillight lead
6Coolant reservoir tank breather
hose
7Coolant reservoir hose
8Positive battery lead
9Starting circuit cut-off relay
0BatteryÈPosition the starter motor lead,
negative battery lead and wire
harness in the tank damper slit.
ÉFasten the wire harness to the
frame with a plastic locking tie
and cut off the tie end.
ÊFasten the coolant reservoir
tank breather hose and coolant
reservoir hose to the frame with
a plastic locking tie.
ËDo not allow the taillight lead to
slacken.
ÌPass the starter motor lead and
negative battery lead over the
carburetor.
ÍFasten the coolant reservoir
tank breather hose and coolant
reservoir hose to the frame with
a plastic band.ÎPass the coolant reservoir hose
on the outside of the coolant
reservoir tank breather hose.
7Ì4
Í
5
Ë
4
Ê
7
6
È3
2
1
4
É
4
Í4
Í
Î 0
968
213
Zero ~ 10 mm
(Zero ~ 0.39 in)
Page 174 of 758

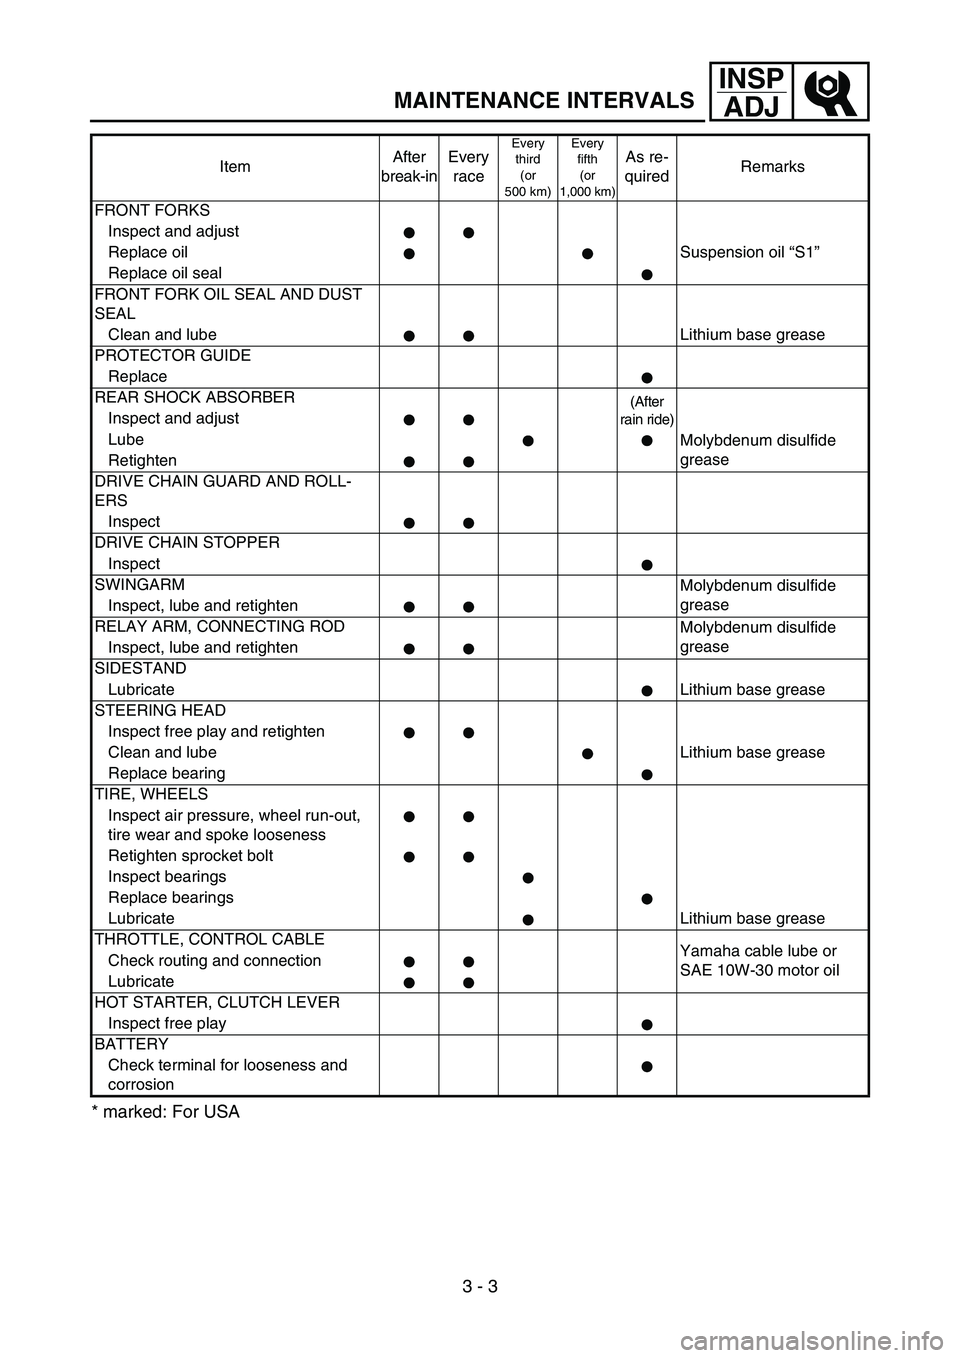
3 - 3
INSP
ADJ
MAINTENANCE INTERVALS
* marked: For USA
FRONT FORKS
Inspect and adjust
Replace oil Suspension oil “S1”
Replace oil seal
FRONT FORK OIL SEAL AND DUST
SEAL
Clean and lube Lithium base grease
PROTECTOR GUIDE
Replace
REAR SHOCK ABSORBER
(After
rain ride)
Inspect and adjust
Lube
Molybdenum disulfide
grease
Retighten
DRIVE CHAIN GUARD AND ROLL-
ERS
Inspect
DRIVE CHAIN STOPPER
Inspect
SWINGARM
Molybdenum disulfide
grease
Inspect, lube and retighten
RELAY ARM, CONNECTING ROD
Molybdenum disulfide
grease
Inspect, lube and retighten
SIDESTAND
Lubricate Lithium base grease
STEERING HEAD
Inspect free play and retighten
Clean and lube Lithium base grease
Replace bearing
TIRE, WHEELS
Inspect air pressure, wheel run-out,
tire wear and spoke looseness
Retighten sprocket bolt
Inspect bearings
Replace bearings
Lubricate Lithium base grease
THROTTLE, CONTROL CABLE
Yamaha cable lube or
SAE 10W-30 motor oil Check routing and connection
Lubricate
HOT STARTER, CLUTCH LEVER
Inspect free play
BATTERY
Check terminal for looseness and
corrosionItemAfter
break-inEvery
race
Every
third
(or
500 km)Every
fifth
(or
1,000 km)As re-
quiredRemarks
Page 614 of 758

5 - 52
CHASSWINGARM
EC570000
SWINGARM
Extent of removal:
1 Swingarm removal
Extent of removal Order Part name Q’ty Remarks
SWINGARM REMOVAL
WARNING
Support the machine securely so there is nodanger of it falling over.
Preparation for removal Hold the machine by placing the
suitable stand under the engine.
Brake hose holder
Refer to “FRONT BRAKE AND REAR
BRAKE” section.
Rear caliper
Bolt (brake pedal) Shift the brake pedal backward.
Drive chain
1 Chain support 1
2 Chain tensioner (lower) 1
3 Bolt (rear shock absorber-relay
arm)1 Hold the swingarm.
4 Bolt (connecting rod) 1
5 Pivot shaft 1
6 Swingarm 1
1
Page 616 of 758

5 - 53
CHASSWINGARM
EC578000
SWINGARM DISASSEMBLY
Extent of removal:
1 Swingarm disassembly
2 Connecting rod removal and disassembly
3 Relay arm removal and disassembly
Extent of removal Order Part name Q’ty Remarks
SWINGARM DISASSEMBLY
1 Cap 2 Refer to “REMOVAL POINTS”.
2 Relay arm 1
3 Connecting rod 1
4 Collar 2
5 Oil seal 2
6 Thrust bearing 2
7 Bush 2
8 Oil seal 8
9 Bearing 10 Refer to “REMOVAL POINTS”.
1
2
32
3
Page 618 of 758

5 - 54
CHASSWINGARM
EC573000
REMOVAL POINTS
Cap
1. Remove:
Cap (left) 1
NOTE:
Remove with a slotted-head screwdriver
inserted under the mark a on the cap (left).
EC573200
Bearing
1. Remove:
Bearing 1
NOTE:
Install the bearing by pressing its outer race.
EC574010
INSPECTION
Wash the bearings, bushes, collars, and cov-
ers in a solvent.
EC574111
Swingarm
1. Inspect:
Bearing 1
Bush 2
Free play exists/unsmooth revolution/rust
→ Replace bearing and bush as a set.
2. Inspect:
Oil seal 3
Damage → Replace.
Relay arm
1. Inspect:
Bearing 1
Collar 2
Free play exists/unsmooth revolution/rust
→ Replace bearing and collar as a set.
2. Inspect:
Oil seal 3
Damage → Replace.
Page 620 of 758

5 - 55
CHASSWINGARM
Connecting rod
1. Inspect:
Bearing 1
Collar 2
Free play exists/unsmooth revolution/rust
→ Replace bearing and collar as a set.
2. Inspect:
Oil seal 3
Damage → Replace.
EC575000
ASSEMBLY AND INSTALLATION
Bearing and oil seal
1. Install:
Bearing 1
Oil seal 2
To swingarm.
NOTE:
Apply the molybdenum disulfide grease on
the bearing when installing.
Install the bearing by pressing it on the side
having the manufacture’s marks or numbers.
First install the outer and then the inner bear-
ings to a specified depth from inside.
Installed depth of bearings:
Outer
a: Zero mm (Zero in)
Inner
b: 8.5 mm (0.33 in)
2. Install:
Bearing 1
Plain washer 2
Oil seal 3
To relay arm.
NOTE:
Apply the molybdenum disulfide grease on
the bearing when installing.
Install the bearing by pressing it on the side
having the manufacture’s marks or numbers.
Apply the molybdenum disulfide grease on
the plain washer.
Installed depth of bearings
a:
Zero mm (Zero in)
Page 622 of 758

5 - 56
CHASSWINGARM
3. Install:
Bearing 1
Oil seal 2
To connecting rod.
NOTE:
Apply the molybdenum disulfide grease on
the bearing when installing.
Install the bearing by pressing it on the side
having the manufacture’s marks or numbers.
Installed depth of bearings
a:
5 mm (0.20 in)
Swingarm
1. Install:
Bush 1
Thrust bearing 2
Oil seal 3
Collar 4
To swingarm 5.
NOTE:
Apply the molybdenum disulfide grease on the
bushes, thrust bearings, oil seal lips and con-
tact surfaces of the collar and thrust bearing.
2. Install:
Collar 1
Washer 2
To relay arm 3.
NOTE:
Apply the molybdenum disulfide grease on the
collars and oil seal lips.
Page 624 of 758

5 - 57
CHASSWINGARM
3. Install:
Collar 1
To connecting rod 2.
NOTE:
Apply the molybdenum disulfide grease on the
collar and oil seal lips.
4. Install:
Connecting rod 1
Bolt (connecting rod) 2
Plain washer 3
Nut (connecting rod) 4
To relay arm 5.
NOTE:
Apply the molybdenum disulfide grease on the
bolt.
T R..80 Nm (8.0 m · kg, 58 ft · lb)
5. Install:
Relay arm 1
Bolt (relay arm) 2
Plain washer 3
Nut (relay arm) 4
To swingarm.
NOTE:
Apply the molybdenum disulfide grease on
the bolt.
Do not tighten the nut yet.