torque YAMAHA WR 450F 2006 User Guide
[x] Cancel search | Manufacturer: YAMAHA, Model Year: 2006, Model line: WR 450F, Model: YAMAHA WR 450F 2006Pages: 786, PDF Size: 22.49 MB
Page 286 of 786
3 - 45
INSP
ADJ
STEERING HEAD INSPECTION AND ADJUSTMENT
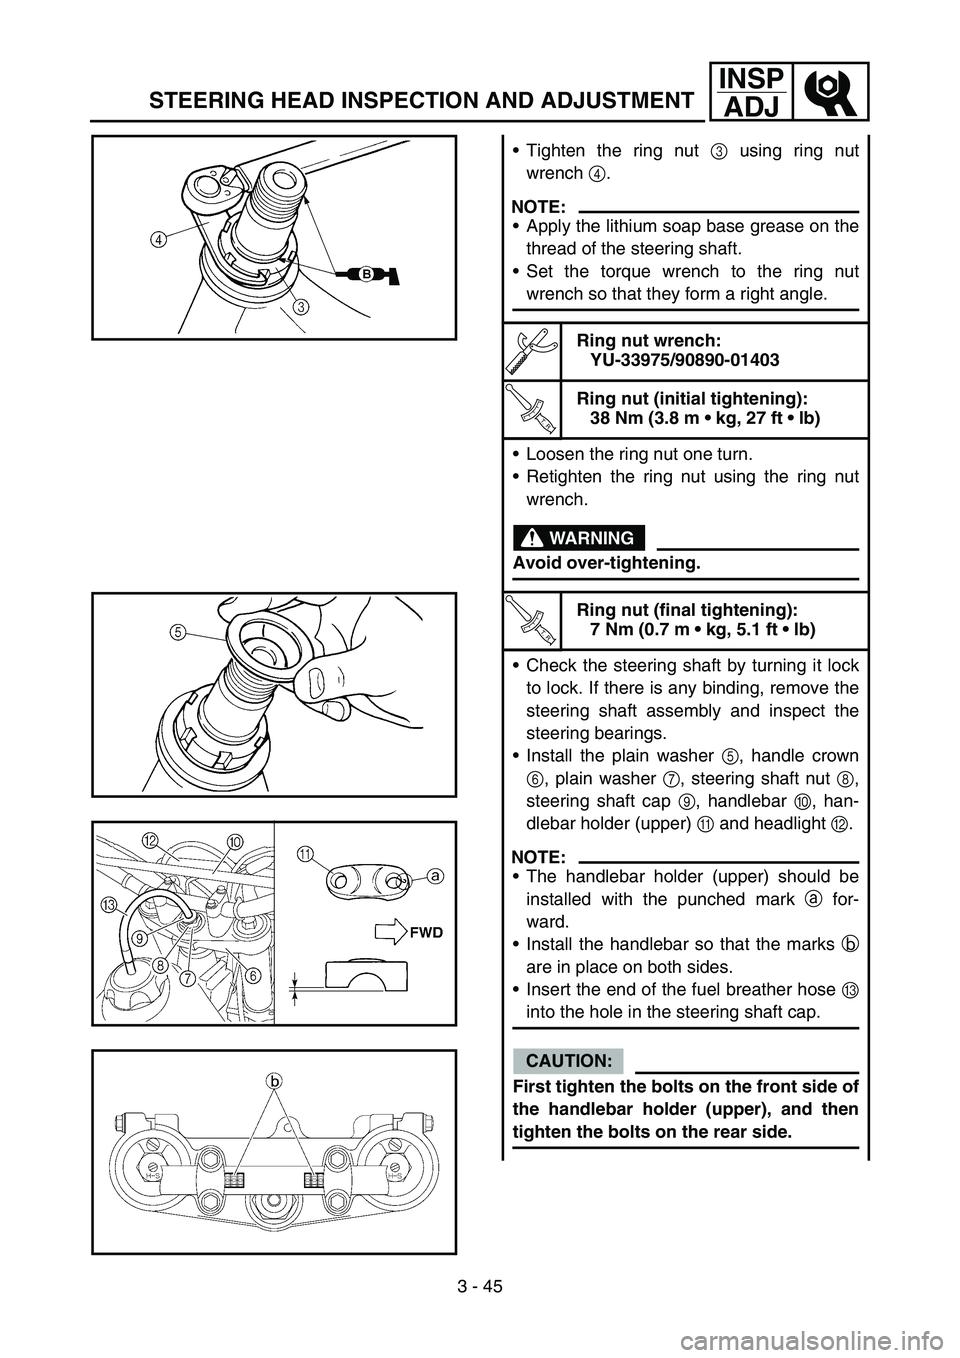
Tighten the ring nut 3 using ring nut
wrench 4.
NOTE:
Apply the lithium soap base grease on the
thread of the steering shaft.
Set the torque wrench to the ring nut
wrench so that they form a right angle.
Ring nut wrench:
YU-33975/90890-01403
T R..
Ring nut (initial tightening):
38 Nm (3.8 m kg, 27 ft lb)
Loosen the ring nut one turn.
Retighten the ring nut using the ring nut
wrench.
WARNING
Avoid over-tightening.
T R..
Ring nut (final tightening):
7 Nm (0.7 m kg, 5.1 ft lb)
Check the steering shaft by turning it lock
to lock. If there is any binding, remove the
steering shaft assembly and inspect the
steering bearings.
Install the plain washer 5, handle crown
6, plain washer 7, steering shaft nut 8,
steering shaft cap 9, handlebar 0, han-
dlebar holder (upper) A and headlight B.
NOTE:
The handlebar holder (upper) should be
installed with the punched mark a for-
ward.
Install the handlebar so that the marks b
are in place on both sides.
Insert the end of the fuel breather hose C
into the hole in the steering shaft cap.
CAUTION:
First tighten the bolts on the front side of
the handlebar holder (upper), and then
tighten the bolts on the rear side.
Page 376 of 786
4 - 30
ENG
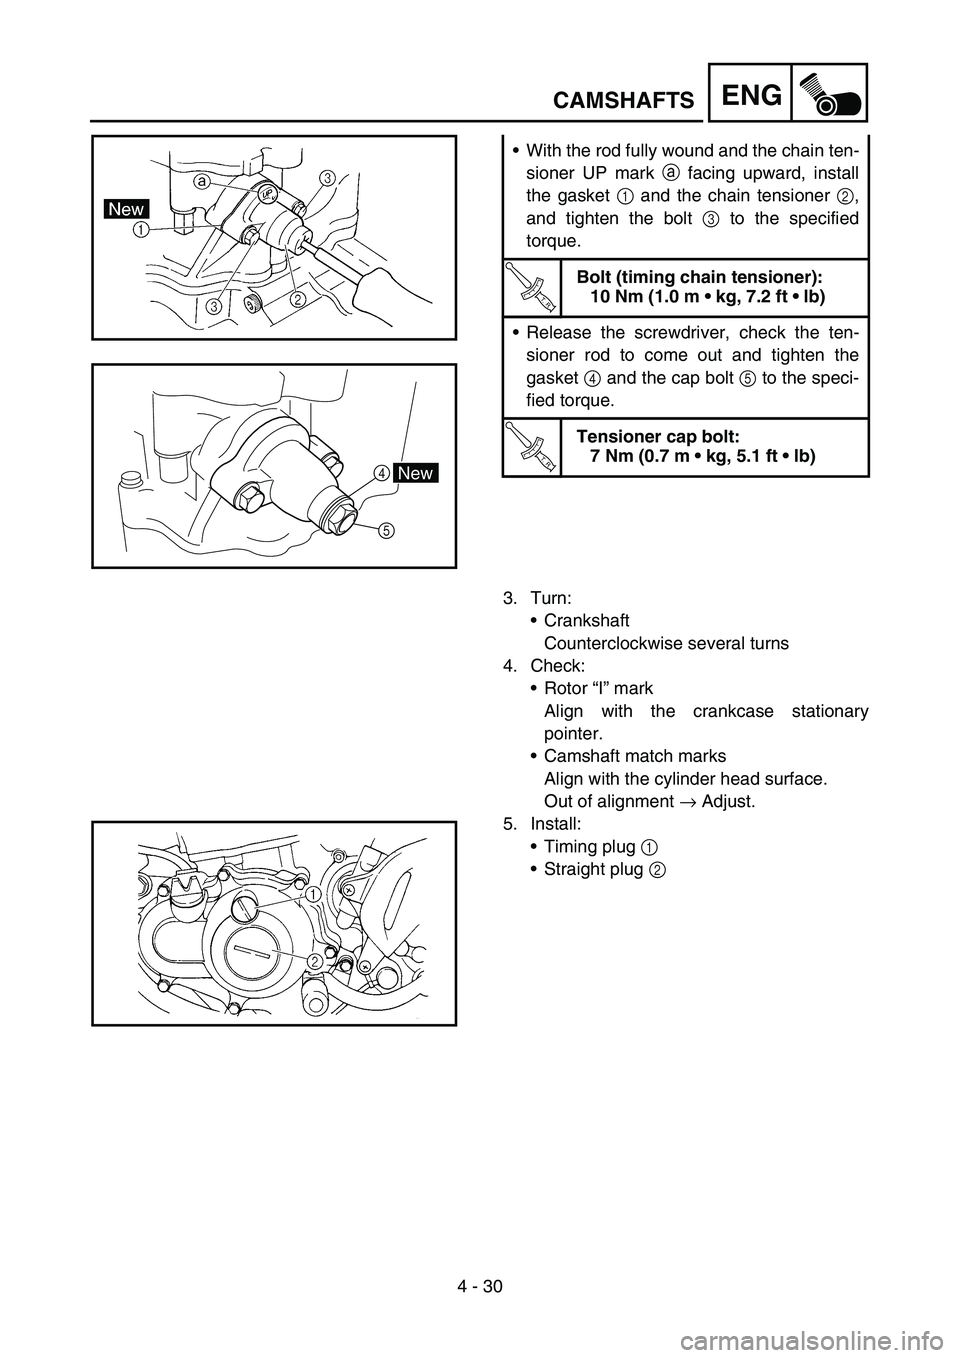
With the rod fully wound and the chain ten-
sioner UP mark a facing upward, install
the gasket 1 and the chain tensioner 2,
and tighten the bolt 3 to the specified
torque.
T R..
Bolt (timing chain tensioner):
10 Nm (1.0 m kg, 7.2 ft lb)
Release the screwdriver, check the ten-
sioner rod to come out and tighten the
gasket 4 and the cap bolt 5 to the speci-
fied torque.
T R..
Tensioner cap bolt:
7 Nm (0.7 m kg, 5.1 ft lb)
5
4New
3. Turn:
Crankshaft
Counterclockwise several turns
4. Check:
Rotor “I” mark
Align with the crankcase stationary
pointer.
Camshaft match marks
Align with the cylinder head surface.
Out of alignment → Adjust.
5. Install:
Timing plug 1
Straight plug 2
CAMSHAFTS
Page 384 of 786
4 - 34
ENGCYLINDER HEAD
ASSEMBLY AND INSTALLATION
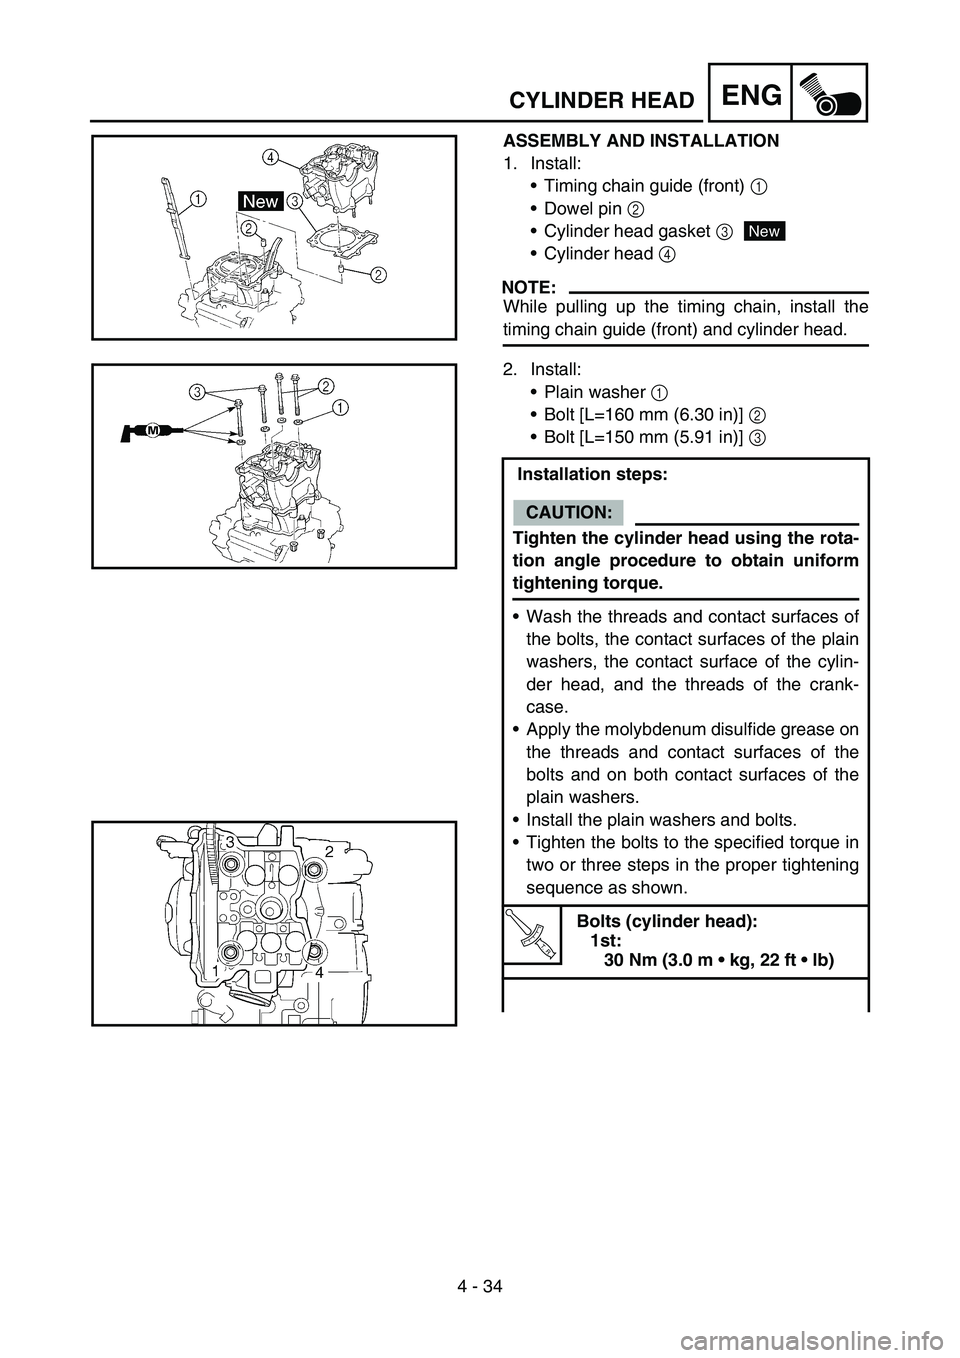
1. Install:
Timing chain guide (front) 1
Dowel pin 2
Cylinder head gasket 3
Cylinder head 4
NOTE:
While pulling up the timing chain, install the
timing chain guide (front) and cylinder head.
New
2. Install:
Plain washer 1
Bolt [L=160 mm (6.30 in)] 2
Bolt [L=150 mm (5.91 in)] 3
Installation steps:
CAUTION:
Tighten the cylinder head using the rota-
tion angle procedure to obtain uniform
tightening torque.
Wash the threads and contact surfaces of
the bolts, the contact surfaces of the plain
washers, the contact surface of the cylin-
der head, and the threads of the crank-
case.
Apply the molybdenum disulfide grease on
the threads and contact surfaces of the
bolts and on both contact surfaces of the
plain washers.
Install the plain washers and bolts.
Tighten the bolts to the specified torque in
two or three steps in the proper tightening
sequence as shown.
T R..
Bolts (cylinder head):
1st:
30 Nm (3.0 m kg, 22 ft lb)
Page 386 of 786
4 - 35
ENG
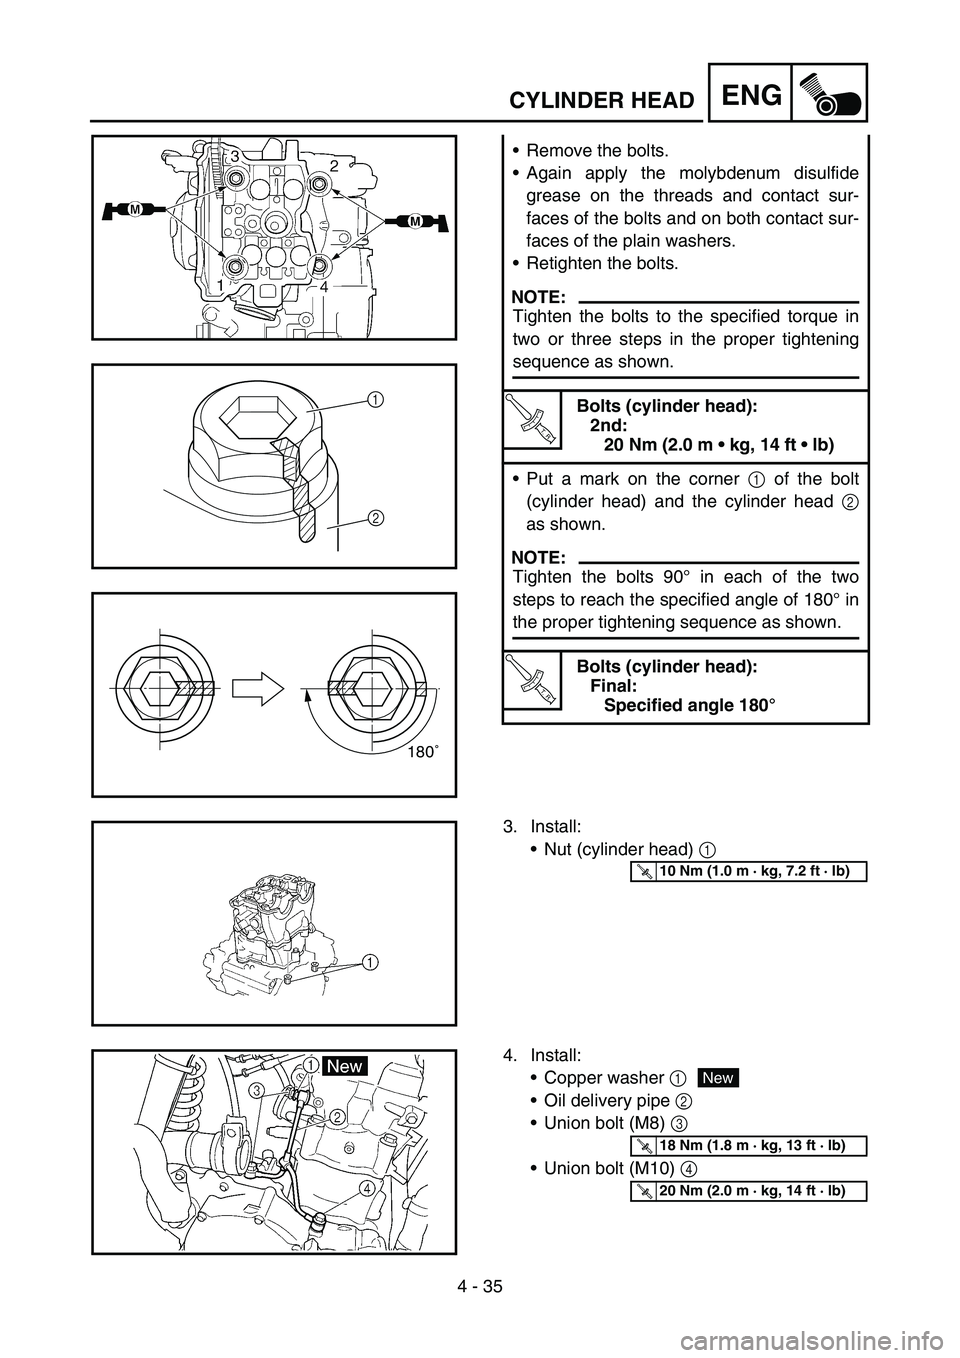
Remove the bolts.
Again apply the molybdenum disulfide
grease on the threads and contact sur-
faces of the bolts and on both contact sur-
faces of the plain washers.
Retighten the bolts.
NOTE:
Tighten the bolts to the specified torque in
two or three steps in the proper tightening
sequence as shown.
T R..
Bolts (cylinder head):
2nd:
20 Nm (2.0 m kg, 14 ft lb)
Put a mark on the corner 1 of the bolt
(cylinder head) and the cylinder head 2
as shown.
NOTE:
Tighten the bolts 90° in each of the two
steps to reach the specified angle of 180° in
the proper tightening sequence as shown.
T R..
Bolts (cylinder head):
Final:
Specified angle 180°
1
2
180˚
3. Install:
Nut (cylinder head) 1
T R..10 Nm (1.0 m · kg, 7.2 ft · lb)
4. Install:
Copper washer 1
Oil delivery pipe 2
Union bolt (M8) 3
Union bolt (M10) 4
New
T R..18 Nm (1.8 m · kg, 13 ft · lb)
T R..20 Nm (2.0 m · kg, 14 ft · lb)
CYLINDER HEAD
Page 474 of 786
4 - 79
ENGAC MAGNETO AND STARTER CLUTCH
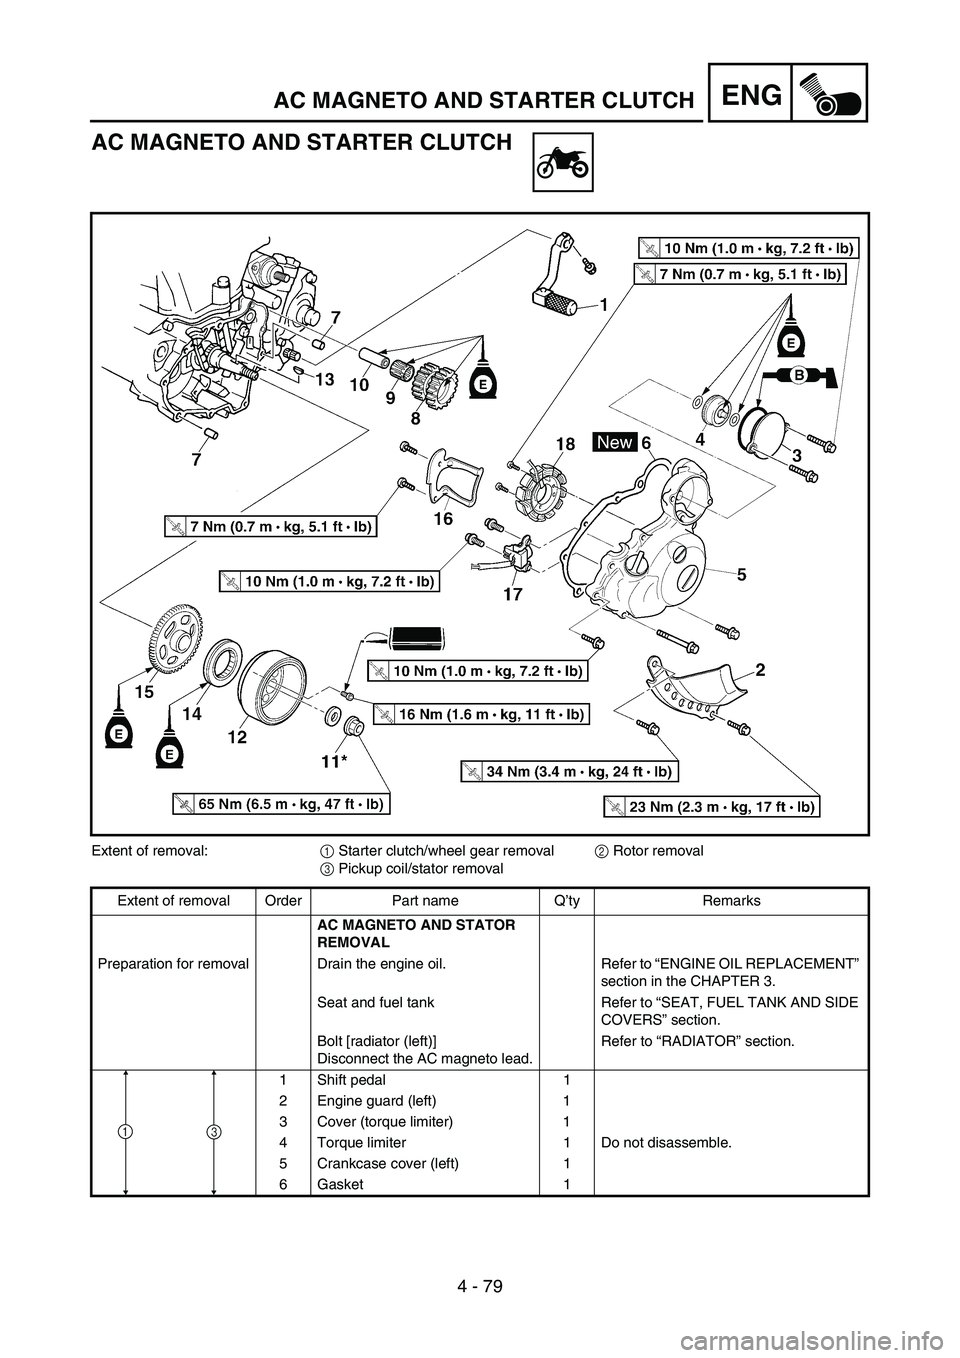
AC MAGNETO AND STARTER CLUTCH
Extent of removal:
1 Starter clutch/wheel gear removal
2 Rotor removal
3 Pickup coil/stator removal
Extent of removal Order Part name Q’ty Remarks
AC MAGNETO AND STATOR
REMOVAL
Preparation for removal Drain the engine oil. Refer to “ENGINE OIL REPLACEMENT”
section in the CHAPTER 3.
Seat and fuel tank Refer to “SEAT, FUEL TANK AND SIDE
COVERS” section.
Bolt [radiator (left)]
Disconnect the AC magneto lead.Refer to “RADIATOR” section.
1 Shift pedal 1
2 Engine guard (left) 1
3 Cover (torque limiter) 1
4 Torque limiter 1 Do not disassemble.
5 Crankcase cover (left) 1
6 Gasket 1
13
Page 480 of 786
4 - 82
ENGAC MAGNETO AND STARTER CLUTCH
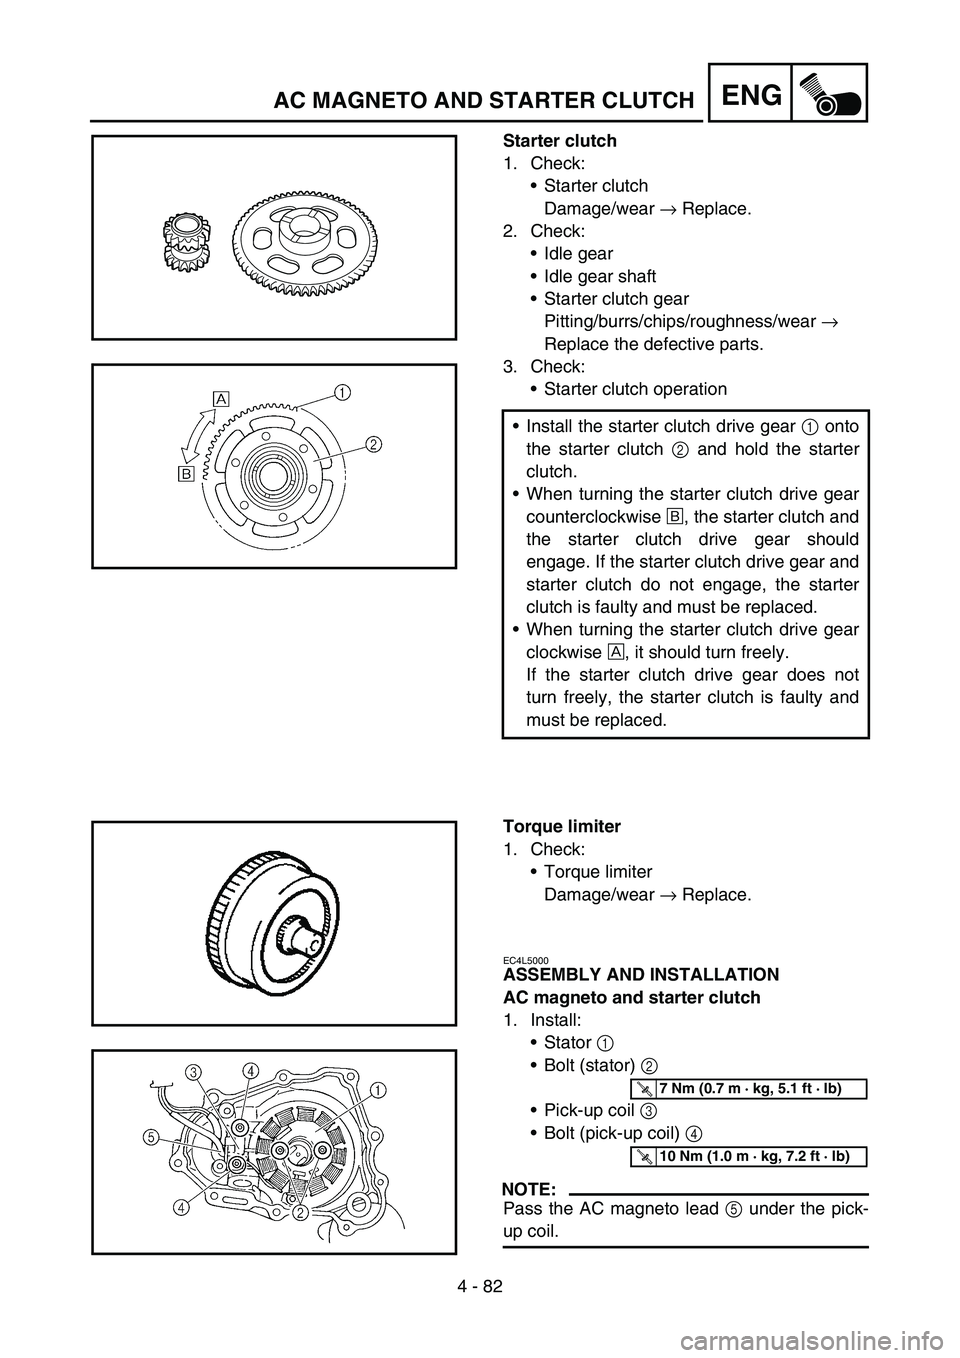
Starter clutch
1. Check:
Starter clutch
Damage/wear → Replace.
2. Check:
Idle gear
Idle gear shaft
Starter clutch gear
Pitting/burrs/chips/roughness/wear →
Replace the defective parts.
3. Check:
Starter clutch operation
Install the starter clutch drive gear 1 onto
the starter clutch 2 and hold the starter
clutch.
When turning the starter clutch drive gear
counterclockwise É, the starter clutch and
the starter clutch drive gear should
engage. If the starter clutch drive gear and
starter clutch do not engage, the starter
clutch is faulty and must be replaced.
When turning the starter clutch drive gear
clockwise È, it should turn freely.
If the starter clutch drive gear does not
turn freely, the starter clutch is faulty and
must be replaced.
Torque limiter
1. Check:
Torque limiter
Damage/wear → Replace.
EC4L5000
ASSEMBLY AND INSTALLATION
AC magneto and starter clutch
1. Install:
Stator 1
Bolt (stator) 2
Pick-up coil 3
Bolt (pick-up coil) 4
NOTE:
Pass the AC magneto lead 5 under the pick-
up coil.
T R..7 Nm (0.7 m · kg, 5.1 ft · lb)
T R..10 Nm (1.0 m · kg, 7.2 ft · lb)
Page 484 of 786

4 - 84
ENG
5. Install:
Bolt (starter clutch) 1
Plain washer (rotor)
Nut (rotor) 2
Use the sheave holder 3.
NOTE:
Tighten the rotor nut to 65 Nm (6.5 m kg,
47 ftlb), loosen and retighten the rotor nut to
65 Nm (6.5 m kg, 47 ft lb).
Sheave holder:
YS-1880-A/90890-01701
1
1
3
2
T R..16 Nm (1.6 m · kg, 11 ft · lb)
T R..65 Nm (6.5 m · kg, 47 ft · lb)
6. Install:
Shaft 1
Bearing 2
Idle gear 2 3
NOTE:
Apply the engine oil on the shaft, bearing and
idle gear inner circumference.
7. Install:
Dowel pin
Gasket [crankcase cover (left)]
Crankcase cover (left) 1
Bolt [crankcase cover (left)]
NOTE:
Tighten the bolts in stage, using a crisscross
pattern.
New
T R..10 Nm (1.0 m · kg, 7.2 ft · lb)
8. Install:
Plain washer
Torque limiter 1
Plain washer
NOTE:
Apply the engine oil to the shaft and plain
washers.1
AC MAGNETO AND STARTER CLUTCH
Page 598 of 786
5 - 36
CHASFRONT FORK
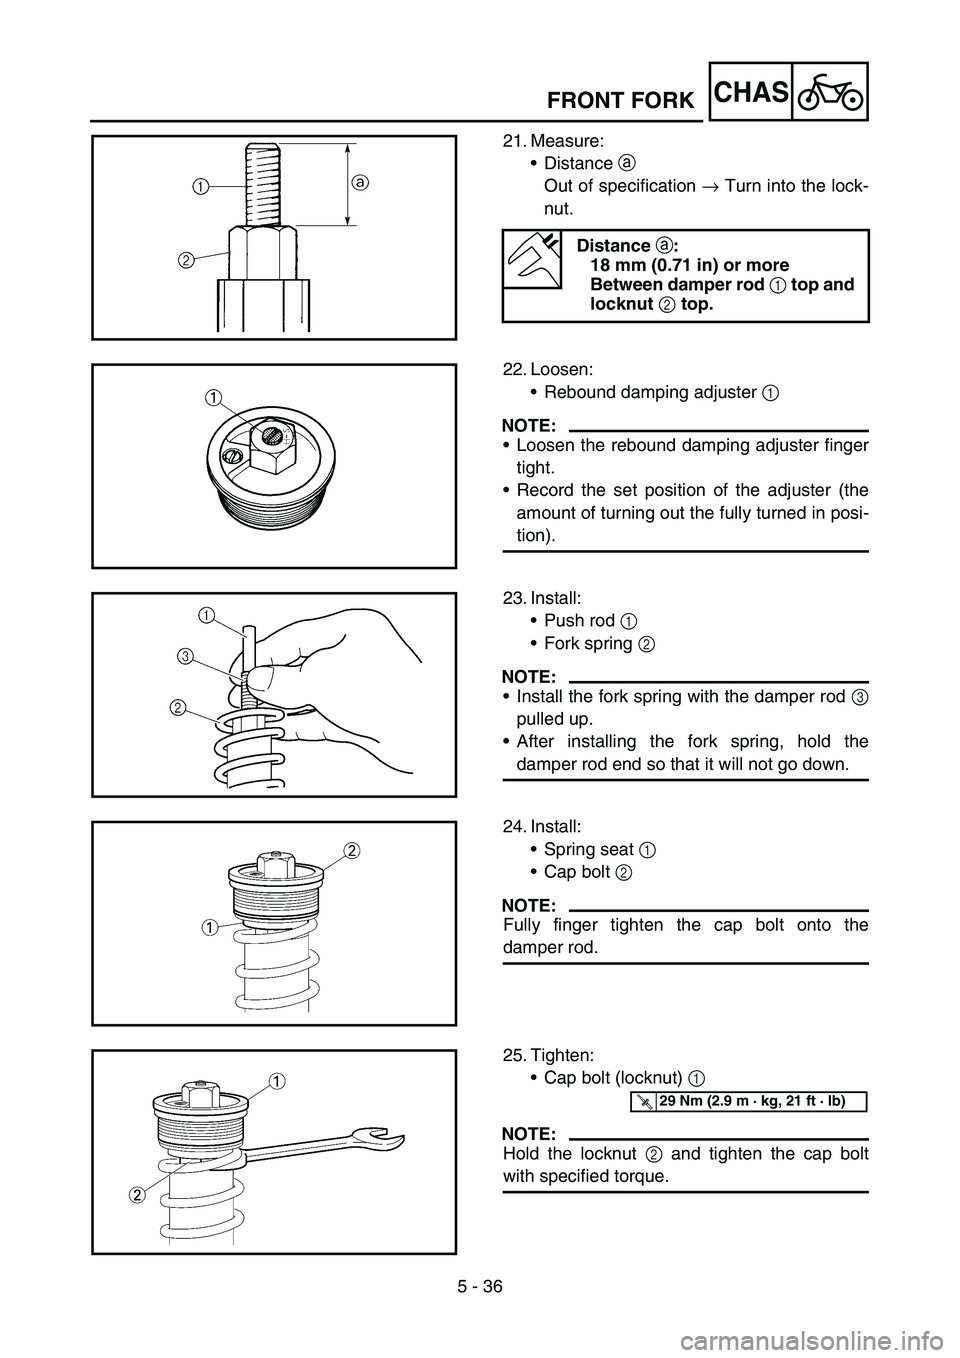
21. Measure:
Distance a
Out of specification → Turn into the lock-
nut.
Distance
a:
18 mm (0.71 in) or more
Between damper rod
1 top and
locknut
2 top.
22. Loosen:
Rebound damping adjuster 1
NOTE:
Loosen the rebound damping adjuster finger
tight.
Record the set position of the adjuster (the
amount of turning out the fully turned in posi-
tion).
23. Install:
Push rod 1
Fork spring 2
NOTE:
Install the fork spring with the damper rod 3
pulled up.
After installing the fork spring, hold the
damper rod end so that it will not go down.
24. Install:
Spring seat 1
Cap bolt 2
NOTE:
Fully finger tighten the cap bolt onto the
damper rod.
25. Tighten:
Cap bolt (locknut) 1
NOTE:
Hold the locknut 2 and tighten the cap bolt
with specified torque.
T R..29 Nm (2.9 m · kg, 21 ft · lb)
Page 600 of 786
5 - 37
CHASFRONT FORK
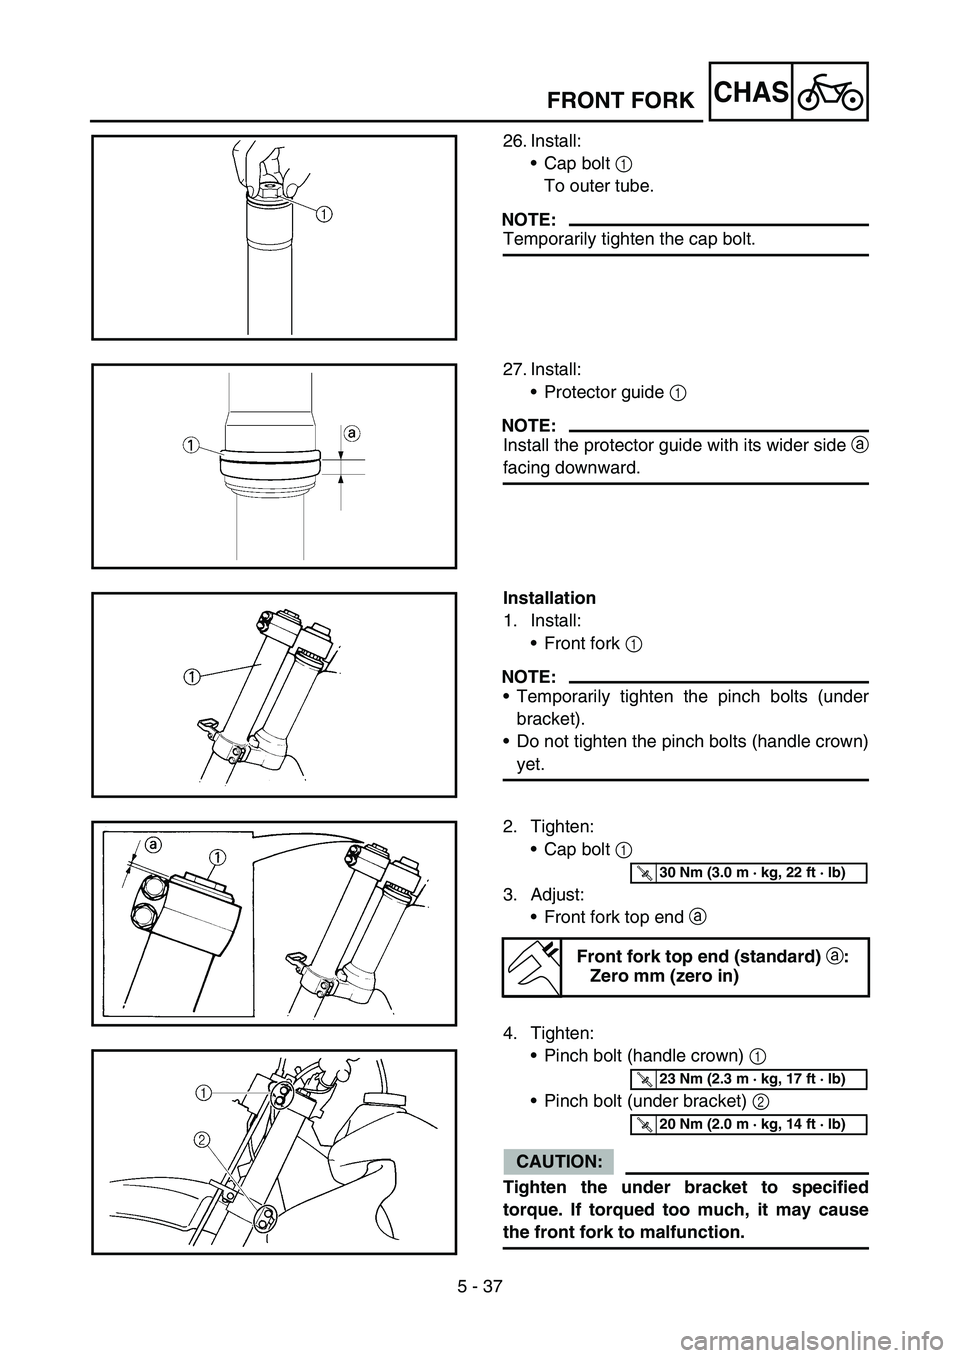
26. Install:
Cap bolt 1
To outer tube.
NOTE:
Temporarily tighten the cap bolt.
27. Install:
Protector guide 1
NOTE:
Install the protector guide with its wider side a
facing downward.
Installation
1. Install:
Front fork 1
NOTE:
Temporarily tighten the pinch bolts (under
bracket).
Do not tighten the pinch bolts (handle crown)
yet.
2. Tighten:
Cap bolt 1
3. Adjust:
Front fork top end a
4. Tighten:
Pinch bolt (handle crown) 1
Pinch bolt (under bracket) 2
CAUTION:
Tighten the under bracket to specified
torque. If torqued too much, it may cause
the front fork to malfunction.
Front fork top end (standard)
a:
Zero mm (zero in)
T R..30 Nm (3.0 m · kg, 22 ft · lb)
T R..23 Nm (2.3 m · kg, 17 ft · lb)
T R..20 Nm (2.0 m · kg, 14 ft · lb)
Page 628 of 786
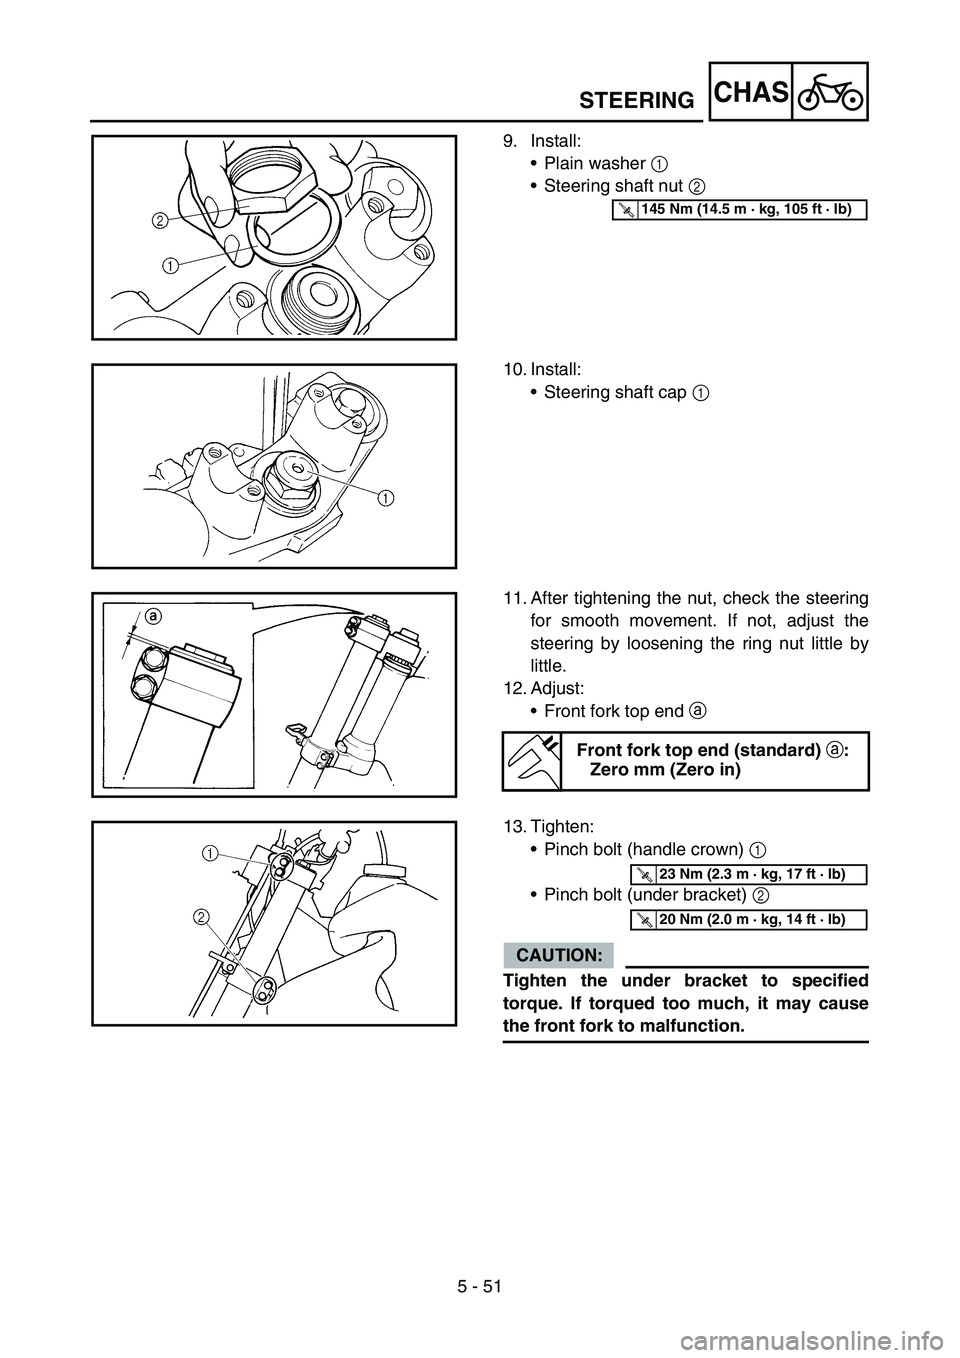
5 - 51
CHASSTEERING
9. Install:
•Plain washer 1
•Steering shaft nut 2
T R..145 Nm (14.5 m · kg, 105 ft · lb)
10. Install:
•Steering shaft cap 1
11. After tightening the nut, check the steering
for smooth movement. If not, adjust the
steering by loosening the ring nut little by
little.
12. Adjust:
•Front fork top end a
Front fork top end (standard)
a:
Zero mm (Zero in)
13. Tighten:
•Pinch bolt (handle crown) 1
•Pinch bolt (under bracket) 2
CAUTION:
Tighten the under bracket to specified
torque. If torqued too much, it may cause
the front fork to malfunction.
T R..23 Nm (2.3 m · kg, 17 ft · lb)
T R..20 Nm (2.0 m · kg, 14 ft · lb)