engine YAMAHA WR 450F 2007 Owners Manual
[x] Cancel search | Manufacturer: YAMAHA, Model Year: 2007, Model line: WR 450F, Model: YAMAHA WR 450F 2007Pages: 794, PDF Size: 21.82 MB
Page 683 of 794

–+ELEC
ZÜNDFUNKENSTRECKE
KONTROLLIEREN
1. Das Zündkabel von der Zünd-
kerze abziehen.
2. Den Stecker von der Zündspule
abziehen.
3. Den Zündfunkenstrecken-Tester
1 (Zündungstester 2), wie in der
Abbildung gezeigt, anschließen.
Zündspule 3
Zündkerze 4
È
USA und CDN
É
Nicht USA und CDN
4. Den Kickstarter betätigen.
5. Die Zündfunkenstrecke kontrol-
lieren.
6. Den Motor starten und dann die
Zündfunkenstrecke vergrößern,
bis es zu Fehlzündungen
kommt. (USA und CDN)
Min. Zündfunkenstrecke:
6,0 mm (0,24 in)
STECKVERBINDER-, KABEL- UND
ZÜNDSPULENANSCHLÜSSE
KONTROLLIEREN
1. Kontrollieren:
Steckverbinder- und Kabelan-
schlüsse
Rostig/staubig/locker/kurzge-
schlossen → Instand setzen,
ggf. erneuern.
Sitz der Zündspule und Zünd-
kerze
Die Zündspule eindrücken, bis
sie die Zündkerzenbohrung im
Zylinderkopfdekkel berührt.
MOTORSTOPPSCHALTER
“ENGINE STOP” KONTROLLIEREN
1. Kontrollieren:
Durchgang des Motorstopp-
schalters “ENGINE STOP”
Kein Durchgang, wenn gedrückt. →
Erneuern.
Durchgang, wenn freigegeben →
Erneuern.
2. Kontrollieren:
Gummiteil
a
Rissig/beschädigt → Erneuern. Messkabel (+) → Schwarz 1
Messkabel (–) → Schwarz 2
B
1 B
2 Messgerät-
Wahlschal-
ter
EIN-
DRÜK-
KEN
Ω × 1
FREI-
GEBEN
TEST DE LA LONGUEUR
D’ETINCELLE
1. Déconnecter la bobine d’allumage
de la bougie.
2. Déposer le capuchon de la bobine
d’allumage.
3. Connecter le testeur dynamique
d’étincelle 1 (contrôleur d’allu-
mage 2) comme indiqué.
Bobine d’allumage 3
Bougie 4
È
USA et CDN
É
Sauf USA et CDN
4. Actionner le kick.
5. Contrôler la longueur d’étincelle
d’allumage.
6. Démarrer le moteur et augmenter la
longueur d’étincelle jusqu’à ce
qu’un raté se produise. (USA et
CDN)
Longueur d’étincelle mini-
mum:
6,0 mm (0,24 in)
CONTROLE DES CONNEXIONS
DES FICHES RAPIDES, DES FILS
ET DE LA BOBINE D’ALLUMAGE
1. Contrôler:
Connexion des fiches rapides et
des fils
Rouille/poussière/jeu/court-cir-
cuit → Réparer ou remplacer.
Bobine d’allumage et bougie en
place
Appuyer sur la bobine d’allu-
mage jusqu’à ce qu’elle soit en
contact étroit avec le trou de bou-
gie du couvre-culasse.
CONTROLE DU BOUTON
“ENGINE STOP”
1. Contrôler:
Continuité du bouton “ENGINE
STOP”
Pas de continuité lorsque enfoncé →
Remplacer.
Continuité lorsque relâché → Rempla-
cer.
2. Contrôler:
Pièce en caoutchouc
a
Déchirures/endommagement →
Remplacer. Fil (+) du multimètre → fil noir 1
Fil (–) du multimètre → fil noir 2
B
1 B
2 Position du
sélecteur du
multimètre
ENFON-
CE
Ω × 1RELA-
CHE
PRUEBA DE LA BUJÍA
1. Desconecte la bobina de encendido
de la bujía.
2. Retire la tapa de la bobina de encen-
dido.
3. Conecte el comprobador dinámico
1 (comprobador de encendido 2)
como se muestra.
Bobina de encendido 3
Bujía 4
È
USA y CDN
É
Excepto USA y CDN
4. Accione el pedal de arranque.
5. Compruebe la distancia entre elec-
trodos de la bujía.
6. Arranque el motor e incremente la
distancia entre electrodos hasta que
el encendido falle (USA y CDN).
Distancia entre electrodos
mínima:
6,0 mm (0,24 in)
COMPROBACIÓN DE LA
CONEXIÓN DE ACOPLADORES,
CABLES Y BOBINA DE ENCENDIDO
1. Comprobar:
Conexión de acopladores y cables
Óxido/polvo/flojas/cortocircuito
→ Reparar o cambiar.
La bobina de encendido y la bujía
tal como están
Empuje la bobina de encendido
hacia adentro hasta que toque el
orificio de la bujía en la tapa de la
culata.
COMPROBACIÓN DEL BOTÓN
“ENGINE STOP”
1. Comprobar:
Conducto del botón “ENGINE
STOP”
No hay continuidad cuando se pulsa →
Cambiar.
Hay continuidad cuando se suelta →
Cambiar.
2. Comprobar:
Pieza de goma
a
Rotura/daños → Cambiar. Cable (+) del comprobador →
Cable negro 1
Cable (–) del comprobador →
Cable negro 2
B
1 B
2 Posición del
selector del
comprobador
EMPU-
JAR
Ω × 1SOL-
TAR
SYSTEME D’ALLUMAGE
ZÜNDSYSTEM
SISTEMA DE ENCENDIDO
6 - 3
Page 688 of 794

6 - 6
–+ELEC
ELECTRIC STARTING SYSTEM
STARTING CIRCUIT CUT-OFF SYSTEM
OPERATION
If the main switch is set to “ON”, the starter
motor can only operate if at least one of the fol-
lowing conditions is met:
•The transmission is in neutral (the neutral
switch is closed).
•The clutch lever is pulled to the handlebar
(the clutch switch is closed).
The starting circuit cut-off relay prevents the
starter motor from operating when neither of
these conditions has been met. In this
instance, the starting circuit cut-off relay is
open so current cannot reach the starter
motor. When at least one of the above condi-
tions has been met the starting circuit cut-off
relay is closed and the engine can be started
by pressing the start switch.
WHEN THE TRANSMISSION IS
IN NEUTRAL
WHEN THE CLUTCH LEVER IS
PULLED TO THE HANDLEBAR
1Battery
2Main fuse
3Main switch
4Starting circuit cut-off relay
5Start switch
6Diode
7Clutch switch
8Neutral switch
9Starter relay
0Starter motor
12
M
3
4
5
8 76 9
0
ELECTRIC STARTING SYSTEM
Page 714 of 794

6 - 17
–+ELECCHARGING SYSTEM
EC624000
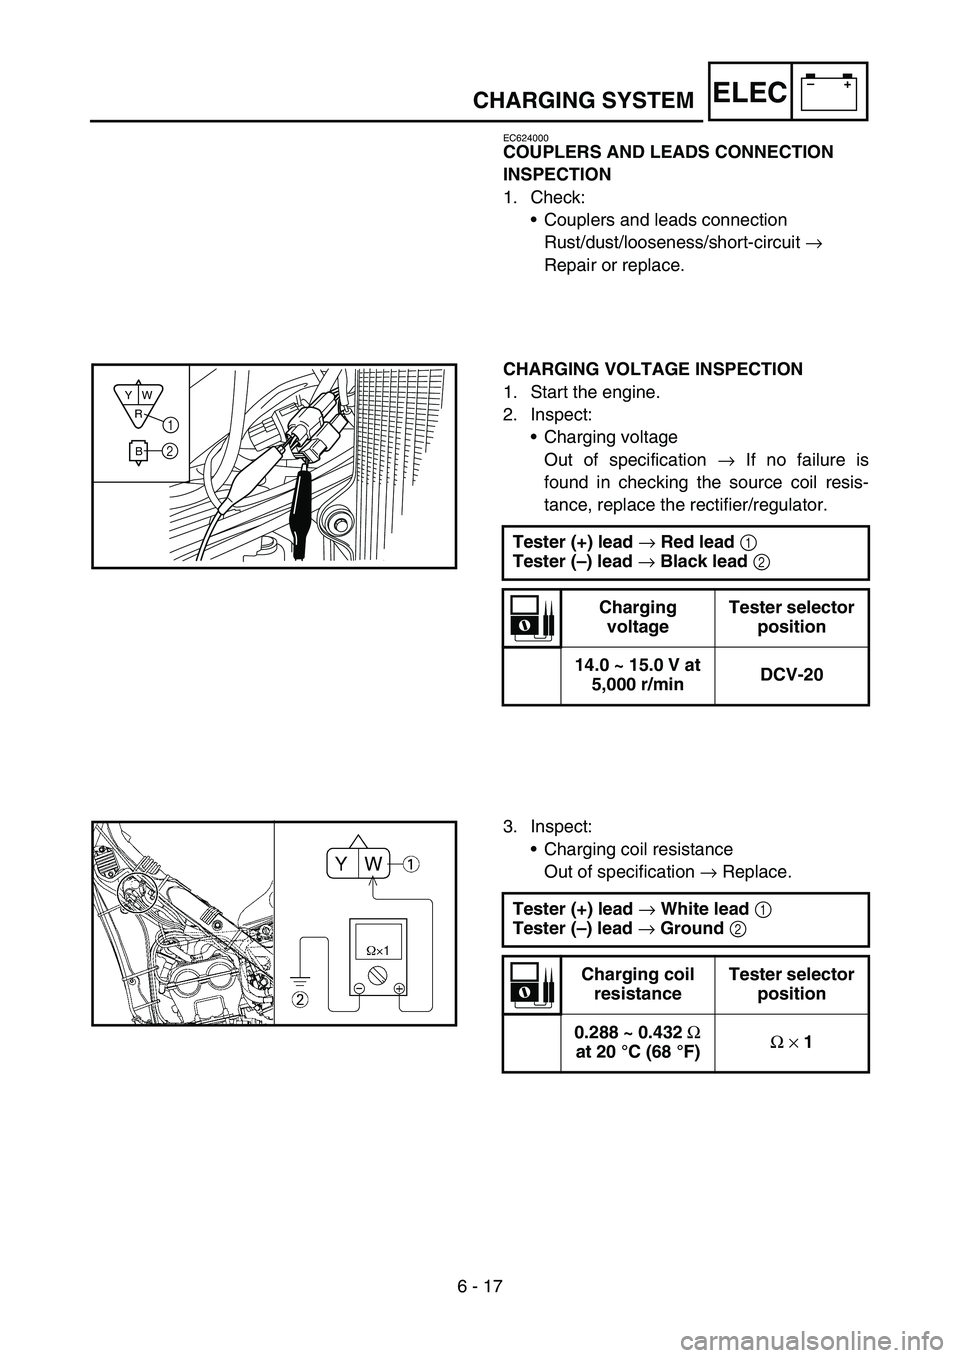
COUPLERS AND LEADS CONNECTION
INSPECTION
1. Check:
•Couplers and leads connection
Rust/dust/looseness/short-circuit →
Repair or replace.
CHARGING VOLTAGE INSPECTION
1. Start the engine.
2. Inspect:
•Charging voltage
Out of specification → If no failure is
found in checking the source coil resis-
tance, replace the rectifier/regulator.
Tester (+) lead
→ Red lead
1
Tester (–) lead
→ Black lead
2
Charging
voltageTester selector
position
14.0 ~ 15.0 V at
5,000 r/minDCV-20
R
BW Y1
2
3. Inspect:
•Charging coil resistance
Out of specification → Replace.
Tester (+) lead
→ White lead
1
Tester (–) lead
→ Ground
2
Charging coil
resistanceTester selector
position
0.288 ~ 0.432
Ω
at 20 °C (68 °F)Ω
× 1
Page 720 of 794

6 - 19
–+ELECTPS (THROTTLE POSITION SENSOR) SYSTEM
HANDLING NOTE
CAUTION:
Do not loosen the screw {TPS (throttle
position sensor)}
1 except when changing
the TPS (throttle position sensor) due to
failure because it will cause a drop in
engine performance.
1
EC624000
COUPLERS AND LEADS CONNECTION
INSPECTION
1. Check:
•Couplers and leads connection
Rust/dust/looseness/short-circuit →
Repair or replace.
TPS COIL INSPECTION
1. Inspect:
•TPS coil resistance
Out of specification → Replace.
2. Loosen:
•Throttle stop screw 1
NOTE:
Turn out the throttle stop screw until the throt-
tle shaft is in the full close position.Tester (+) lead
→ Blue lead
1
Tester (–) lead
→ Black lead
2
TPS coil
resistanceTester selector
position
4 ~ 6 kΩ at
20 °C (68 °F)kΩ × 1
Page 724 of 794

6 - 21
–+ELECTPS (THROTTLE POSITION SENSOR) SYSTEM
6. Adjust:
•Idle speed
Refer to “IDLE SPEED ADJUSTMENT”
section in the CHAPTER 3.
7. Insert the thin electric conductors 2 (lead)
into the TPS coupler 1, as shown, and
connect the tester to them.
CAUTION:
Do not insert the electric conductors
more than required because it may
reduce the waterproof function of the
coupler.
Make sure that a short-circuit does not
develop between the terminals because it
may cause damage to electrical compo-
nents.
8. Start the engine.Tester (+) lead
→ Yellow lead
3
Tester (–) lead
→ Black lead
4
9. Adjust:
•TPS output voltage
Adjustment steps:
Adjust the installation angle of the TPS 1 to
obtain the specified output voltage.
NOTE:
Measure the output voltage accurately with
a digital electronic voltmeter that gives an
easy reading of a small voltage.
TPS output
voltageTester selector
position
0.58 ~ 0.78 V DCV
Page 726 of 794

6 - 22
–+ELECTPS (THROTTLE POSITION SENSOR) SYSTEM
10. Put the aligning marks a on the TPS and
carburetor.
11. Stop the engine.
12. Remove the carburetor.
a
13. Tighten:
•Screw (TPS) 1
NOTE:
Tighten the screw (TPS) using the T25 bit.
14. Install the carburetor.
1
EC694000
TPS INPUT VOLTAGE INSPECTION
1. Disconnect the TPS coupler.
2. Start the engine.
3. Inspect:
•TPS input voltage
Out of specification → Replace the CDI
unit.
Tester (+) lead
→ Blue lead
1
Tester (–) lead
→ Black/Blue lead
2
TPS input
voltageTester selector
position
4 ~ 6 V DCV-20
Page 734 of 794

6 - 25
–+ELEC
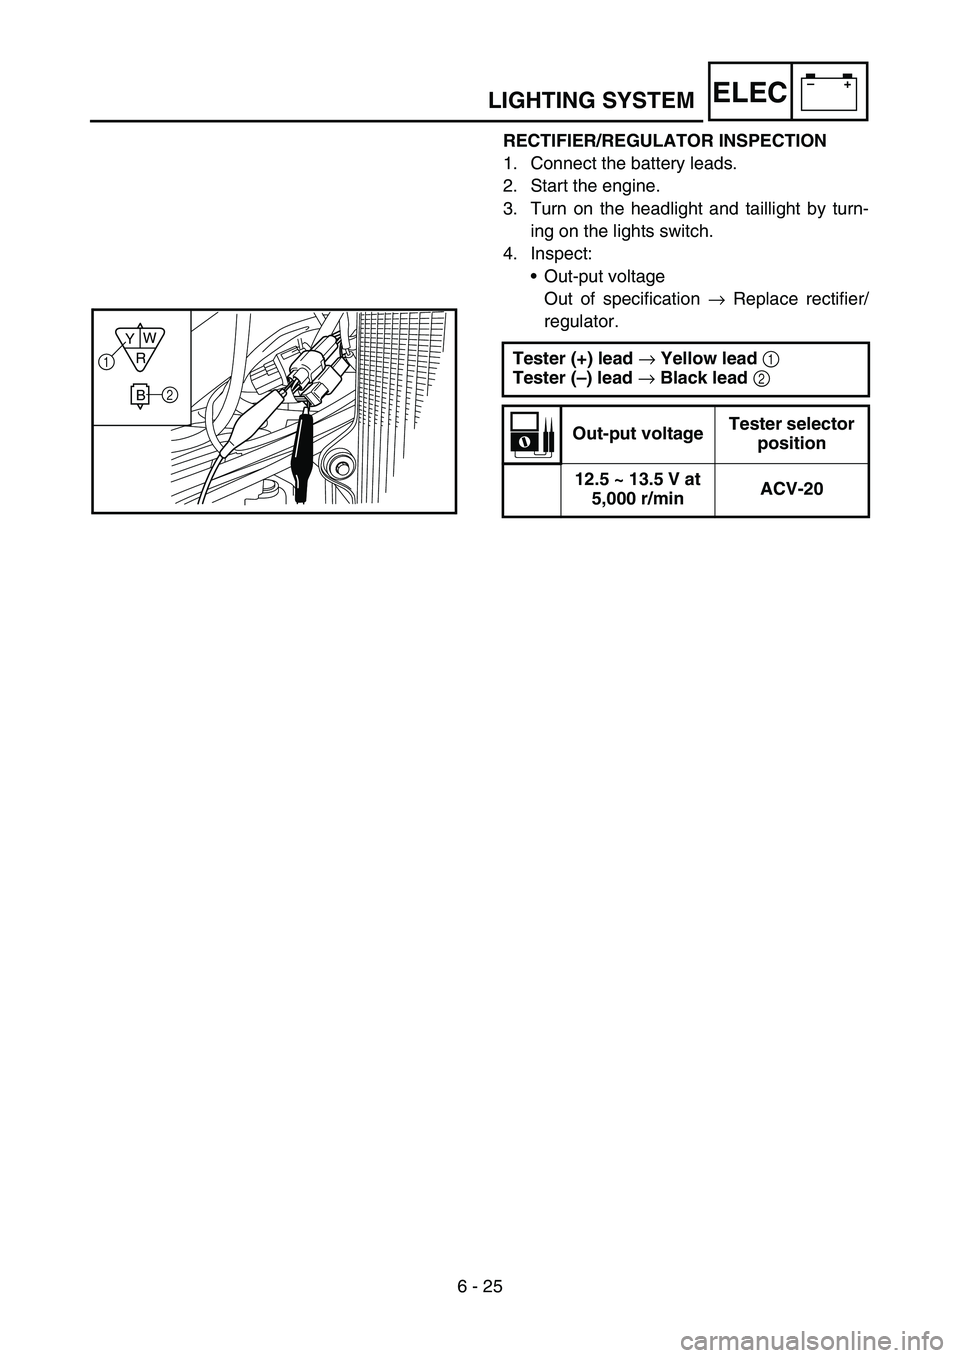
RECTIFIER/REGULATOR INSPECTION
1. Connect the battery leads.
2. Start the engine.
3. Turn on the headlight and taillight by turn-
ing on the lights switch.
4. Inspect:
•Out-put voltage
Out of specification → Replace rectifier/
regulator.
Tester (+) lead → Yellow lead 1
Tester (–) lead → Black lead 2
Out-put voltageTester selector
position
12.5 ~ 13.5 V at
5,000 r/minACV-20
R
BW
Y1
2
LIGHTING SYSTEM
Page 746 of 794

7 - 1
TUN
EC700000
TUNING
EC710000
ENGINE
Carburetor setting
•The air/fuel mixture will vary depending on
atmospheric conditions. Therefore, it is nec-
essary to take into consideration the air pres-
sure, ambient temperature, humidity, etc.,
when adjusting the carburetor.
•Perform a test run to check for proper engine
performance (e.g., throttle response) and
spark plug(-s) discoloration or fouling. Use
these readings to determine the best possi-
ble carburetor setting.
NOTE:
It is recommended to keep a record of all car-
buretor settings and external conditions (e.g.,
atmospheric conditions, track/surface condi-
tions, lap times) to make future carburetor set-
ting easier.
WARNING
The carburetor is a part of the fuel line.
Therefore, be sure to install it in a well-
ventilated area, away from flammable
objects and any sources of fire.
Never look into the carburetor intake.
Flames may shoot out from the pipe if the
engine backfires while it is being started.
Gasoline may be discharged from the
accelerator pump nozzle when the carbu-
retor has been removed.
SETTING
Page 748 of 794

7 - 2
TUN
CAUTION:
The carburetor is extremely sensitive to
foreign matter (dirt, sand, water, etc.).
During installation, do not allow foreign
matter to get into the carburetor.
Always handle the carburetor and its
components carefully. Even slight
scratches, bends or damage to carburetor
parts may prevent the carburetor from
functioning correctly. Carefully perform
all servicing with the appropriate tools
and without applying excessive force.
When the engine is stopped or when
riding at no load, do not open and close
the throttle unnecessarily. Otherwise, too
much fuel may be discharged, starting
may become difficult or the engine may
not run well.
After installing the carburetor, check that
the throttle operates correctly and opens
and closes smoothly.
Atmospheric conditions and carburetor
settings
The air density (i.e., concentration of oxygen
in the air) determines the richness or lean-
ness of the air/fuel mixture. Therefore, refer
to the above table for mixture settings.
That is:
•Higher temperature expands the air with its
resultant reduced density.
•Higher humidity reduces the amount of oxy-
gen in the air by so much of the water vapor
in the same air.
•Lower atmospheric pressure (at a high alti-
tude) reduces the density of the air.
Air temp. HumidityAir
pressure
(altitude)Mixture Setting
High High Low (high) Richer Leaner
Low Low High (low) Leaner Richer
SETTING
Page 752 of 794

7 - 4
TUNSETTING
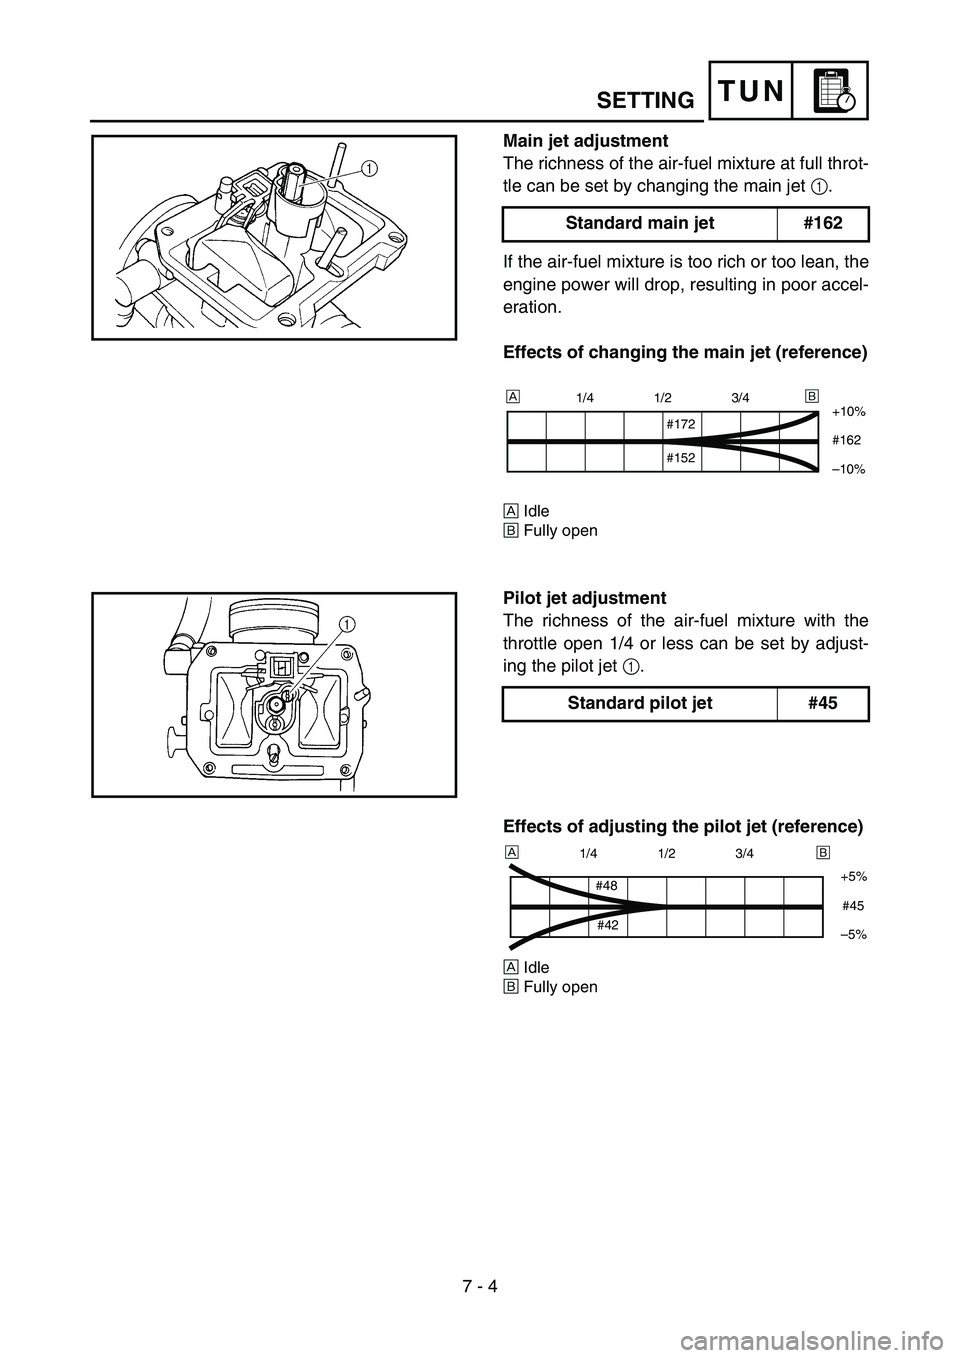
Main jet adjustment
The richness of the air-fuel mixture at full throt-
tle can be set by changing the main jet 1.
If the air-fuel mixture is too rich or too lean, the
engine power will drop, resulting in poor accel-
eration.
Effects of changing the main jet (reference)
ÈIdle
ÉFully open
Standard main jet #162
1/4 1/2 3/4
+10%
#162
–10%
#172
#152
ÈÉ
Pilot jet adjustment
The richness of the air-fuel mixture with the
throttle open 1/4 or less can be set by adjust-
ing the pilot jet 1.
Standard pilot jet #45
Effects of adjusting the pilot jet (reference)
ÈIdle
ÉFully open
1/4 1/2 3/4
+5%
–5%
#48
#42#45
È
É