relay YAMAHA WR 450F 2011 Owners Manual
[x] Cancel search | Manufacturer: YAMAHA, Model Year: 2011, Model line: WR 450F, Model: YAMAHA WR 450F 2011Pages: 230, PDF Size: 13.77 MB
Page 42 of 230
2-11
MAINTENANCE SPECIFICATIONS
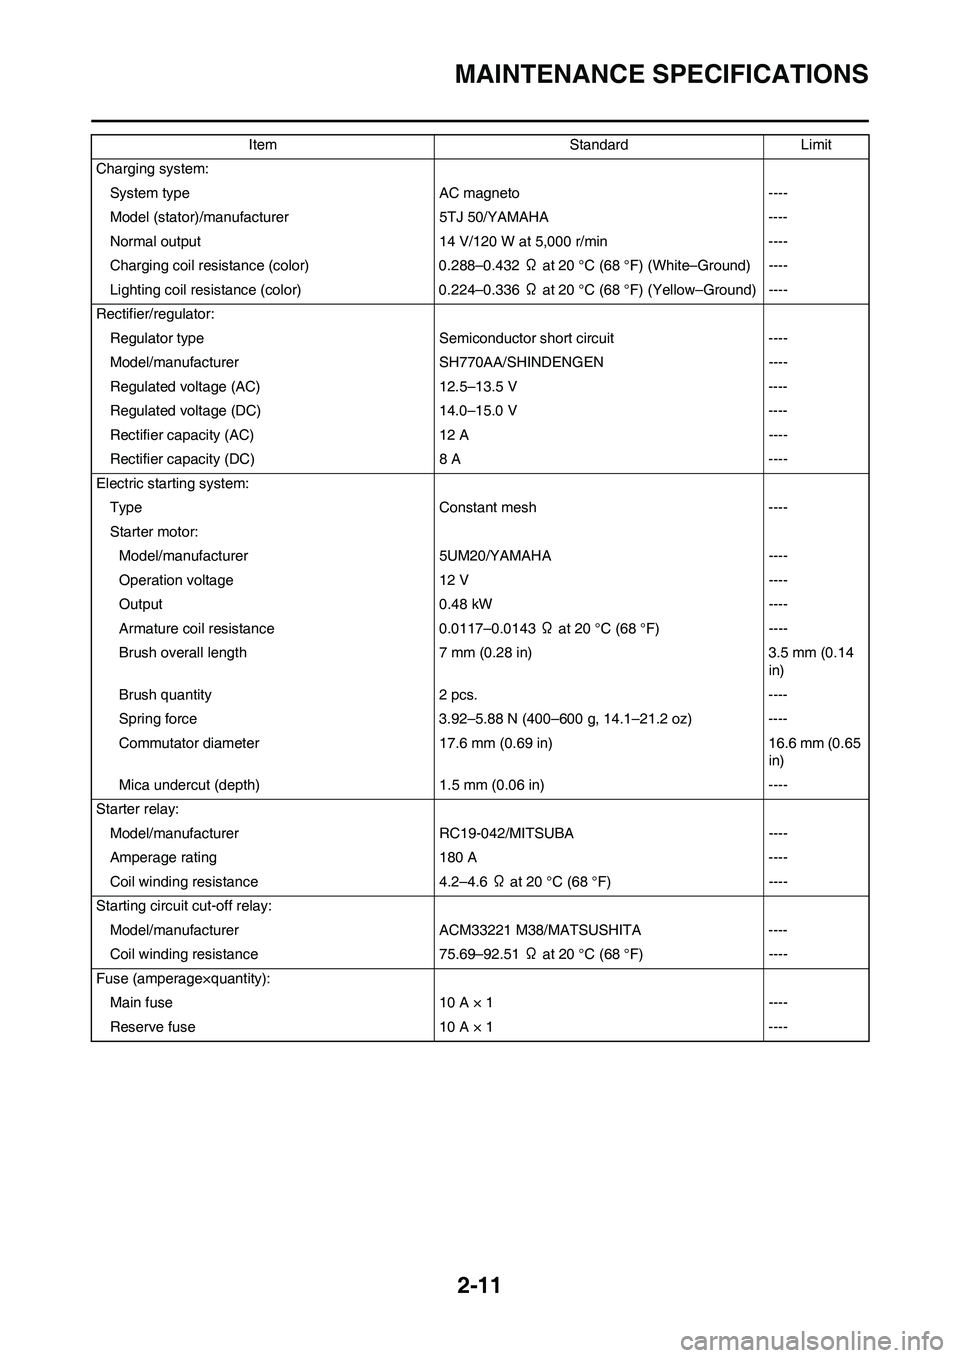
Charging system:
System type AC magneto ----
Model (stator)/manufacturer 5TJ 50/YAMAHA ----
Normal output 14 V/120 W at 5,000 r/min ----
Charging coil resistance (color) 0.288–0.432 Ω at 20 °C (68 °F) (White–Ground) ----
Lighting coil resistance (color) 0.224–0.336 Ω at 20 °C (68 °F) (Yellow–Ground) ----
Rectifier/regulator:
Regulator type Semiconductor short circuit ----
Model/manufacturer SH770AA/SHINDENGEN ----
Regulated voltage (AC) 12.5–13.5 V ----
Regulated voltage (DC) 14.0–15.0 V ----
Rectifier capacity (AC) 12 A ----
Rectifier capacity (DC) 8 A ----
Electric starting system:
Type Constant mesh ----
Starter motor:
Model/manufacturer 5UM20/YAMAHA ----
Operation voltage 12 V ----
Output 0.48 kW ----
Armature coil resistance 0.0117–0.0143 Ω at 20 °C (68 °F) ----
Brush overall length 7 mm (0.28 in) 3.5 mm (0.14
in)
Brush quantity 2 pcs. ----
Spring force 3.92–5.88 N (400–600 g, 14.1–21.2 oz) ----
Commutator diameter 17.6 mm (0.69 in) 16.6 mm (0.65
in)
Mica undercut (depth) 1.5 mm (0.06 in) ----
Starter relay:
Model/manufacturerRC19-042/MITSUBA ----
Amperage rating 180 A ----
Coil winding resistance 4.2–4.6 Ω at 20 °C (68 °F) ----
Starting circuit cut-off relay:
Model/manufacturer ACM33221 M38/MATSUSHITA ----
Coil winding resistance 75.69–92.51 Ω at 20 °C (68 °F) ----
Fuse (amperage×quantity):
Main fuse 10 A × 1 ----
Reserve fuse 10 A × 1 ----Item Standard Limit
Page 46 of 230
2-15
TIGHTENING TORQUES
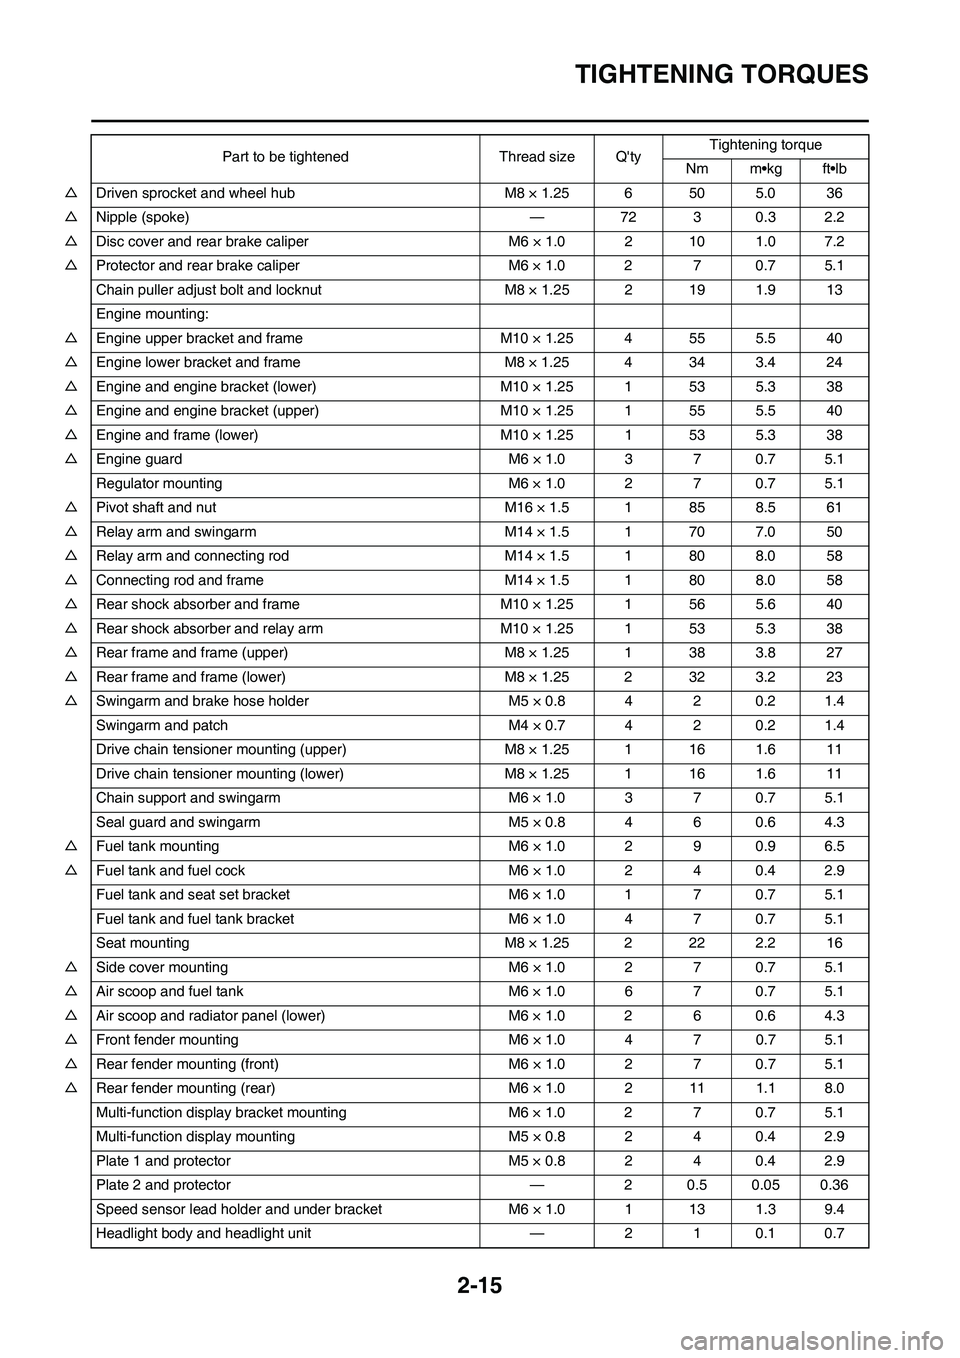
△Driven sprocket and wheel hub M8 × 1.25 6 50 5.0 36
△Nipple (spoke) — 72 3 0.3 2.2
△Disc cover and rear brake caliper M6 × 1.0 2 10 1.0 7.2
△Protector and rear brake caliper M6 × 1.0 2 7 0.7 5.1
Chain puller adjust bolt and locknut M8 × 1.25 2 19 1.9 13
Engine mounting:
△Engine upper bracket and frame M10 × 1.25 4 55 5.5 40
△Engine lower bracket and frame M8 × 1.25 4 34 3.4 24
△Engine and engine bracket (lower) M10 × 1.25 1 53 5.3 38
△Engine and engine bracket (upper) M10 × 1.25 1 55 5.5 40
△Engine and frame (lower) M10 × 1.25 1 53 5.3 38
△Engine guard M6 × 1.0 3 7 0.7 5.1
Regulator mounting M6 × 1.0 2 7 0.7 5.1
△Pivot shaft and nut M16 × 1.5 1 85 8.5 61
△Relay arm and swingarm M14 × 1.5 1 70 7.0 50
△Relay arm and connecting rod M14 × 1.5 1 80 8.0 58
△Connecting rod and frame M14 × 1.5 1 80 8.0 58
△Rear shock absorber and frame M10 × 1.25 1 56 5.6 40
△Rear shock absorber and relay arm M10 × 1.25 1 53 5.3 38
△Rear frame and frame (upper) M8 × 1.25 1 38 3.8 27
△Rear frame and frame (lower) M8 × 1.25 2 32 3.2 23
△Swingarm and brake hose holder M5 × 0.8 4 2 0.2 1.4
Swingarm and patch M4 × 0.7 4 2 0.2 1.4
Drive chain tensioner mounting (upper) M8 × 1.25 1 16 1.6 11
Drive chain tensioner mounting (lower) M8 × 1.25 1 16 1.6 11
Chain support and swingarm M6 × 1.0 3 7 0.7 5.1
Seal guard and swingarm M5 × 0.8 4 6 0.6 4.3
△Fuel tank mounting M6 × 1.0 2 9 0.9 6.5
△Fuel tank and fuel cock M6 × 1.0 2 4 0.4 2.9
Fuel tank and seat set bracket M6 × 1.0 1 7 0.7 5.1
Fuel tank and fuel tank bracket M6 × 1.0 4 7 0.7 5.1
Seat mounting M8 × 1.25 2 22 2.2 16
△Side cover mounting M6 × 1.0 2 7 0.7 5.1
△Air scoop and fuel tank M6 × 1.0 6 7 0.7 5.1
△Air scoop and radiator panel (lower) M6 × 1.0 2 6 0.6 4.3
△Front fender mounting M6 × 1.0 4 7 0.7 5.1
△Rear fender mounting (front) M6 × 1.0 2 7 0.7 5.1
△Rear fender mounting (rear) M6 × 1.0 2 11 1.1 8.0
Multi-function display bracket mounting M6 × 1.0 2 7 0.7 5.1
Multi-function display mounting M5 × 0.8 2 4 0.4 2.9
Plate 1 and protector M5 × 0.8 2 4 0.4 2.9
Plate 2 and protector — 2 0.5 0.05 0.36
Speed sensor lead holder and under bracket M6 × 1.0 1 13 1.3 9.4
Headlight body and headlight unit — 2 1 0.1 0.7Part to be tightened Thread size Q'tyTightening torque
Nm m•kg ft•lb
Page 47 of 230
2-16
TIGHTENING TORQUES
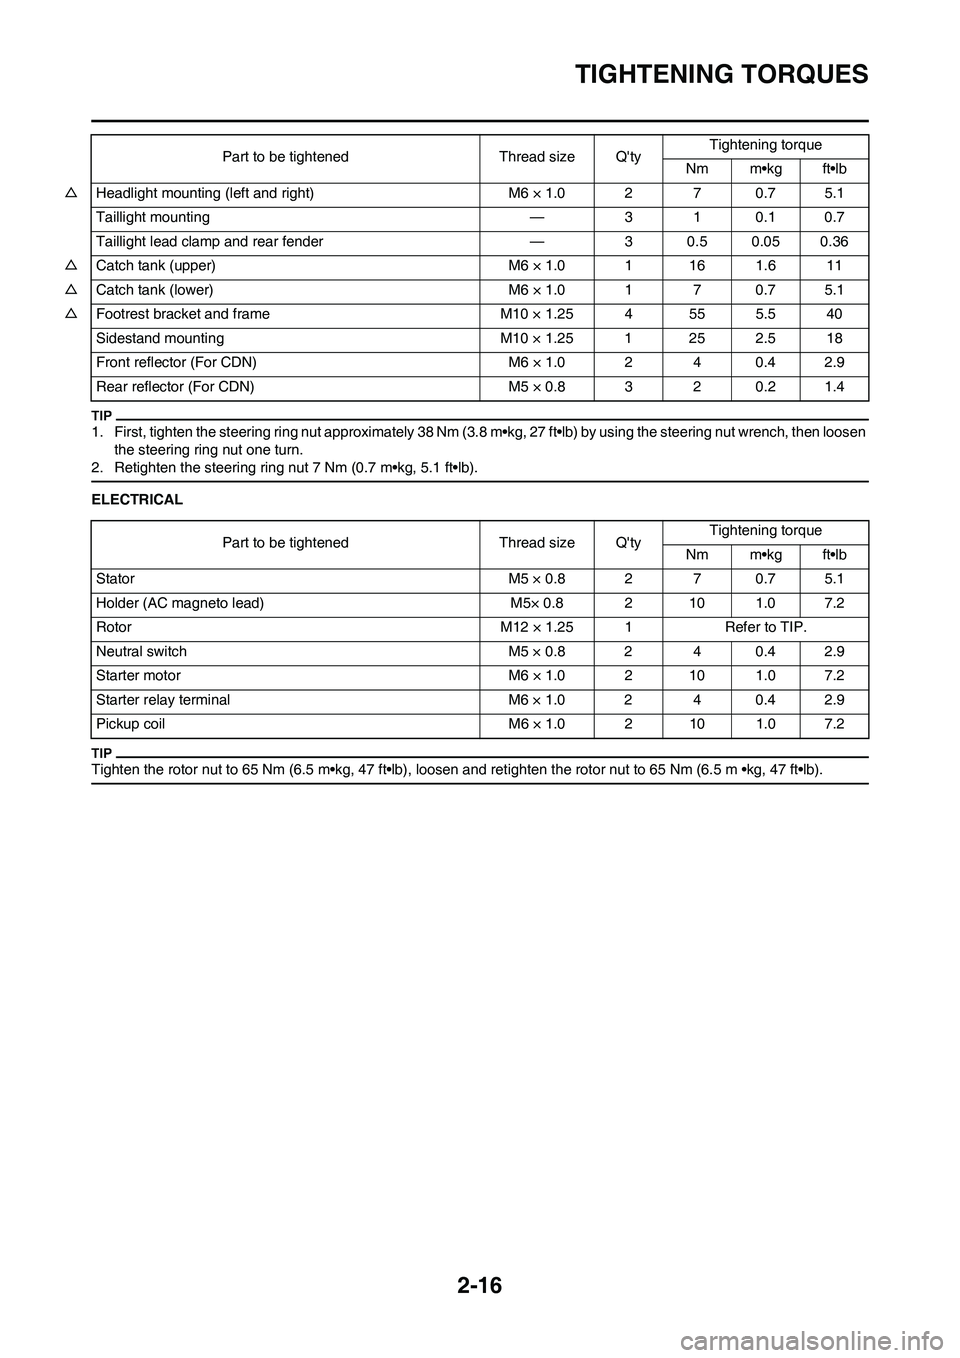
1. First, tighten the steering ring nut approximately 38 Nm (3.8 m•kg, 27 ft•lb) by using the steering nut wrench, then loosen
the steering ring nut one turn.
2. Retighten the steering ring nut 7 Nm (0.7 m•kg, 5.1 ft•lb).
ELECTRICAL
Tighten the rotor nut to 65 Nm (6.5 m•kg, 47 ft•lb), loosen and retighten the rotor nut to 65 Nm (6.5 m •kg, 47 ft•lb).
△Headlight mounting (left and right) M6 × 1.0 2 7 0.7 5.1
Taillight mounting — 3 1 0.1 0.7
Taillight lead clamp and rear fender — 3 0.5 0.05 0.36
△Catch tank (upper) M6 × 1.0 1 16 1.6 11
△Catch tank (lower) M6 × 1.0 1 7 0.7 5.1
△Footrest bracket and frame M10 × 1.25 4 55 5.5 40
Sidestand mounting M10 × 1.25 1 25 2.5 18
Front reflector (For CDN) M6 × 1.0 2 4 0.4 2.9
Rear reflector (For CDN) M5 × 0.8 3 2 0.2 1.4Part to be tightened Thread size Q'tyTightening torque
Nm m•kg ft•lb
Part to be tightened Thread size Q'tyTightening torque
Nm m•kg ft•lb
Stator M5 × 0.8 2 7 0.7 5.1
Holder (AC magneto lead) M5× 0.8 2 10 1.0 7.2
Rotor M12 × 1.25 1 Refer to TIP.
Neutral switch M5 × 0.8 2 4 0.4 2.9
Starter motor M6 × 1.0 2 10 1.0 7.2
Starter relay terminal M6 × 1.0 2 4 0.4 2.9
Pickup coil M6 × 1.0 2 10 1.0 7.2
Page 57 of 230
2-26
CABLE ROUTING DIAGRAM
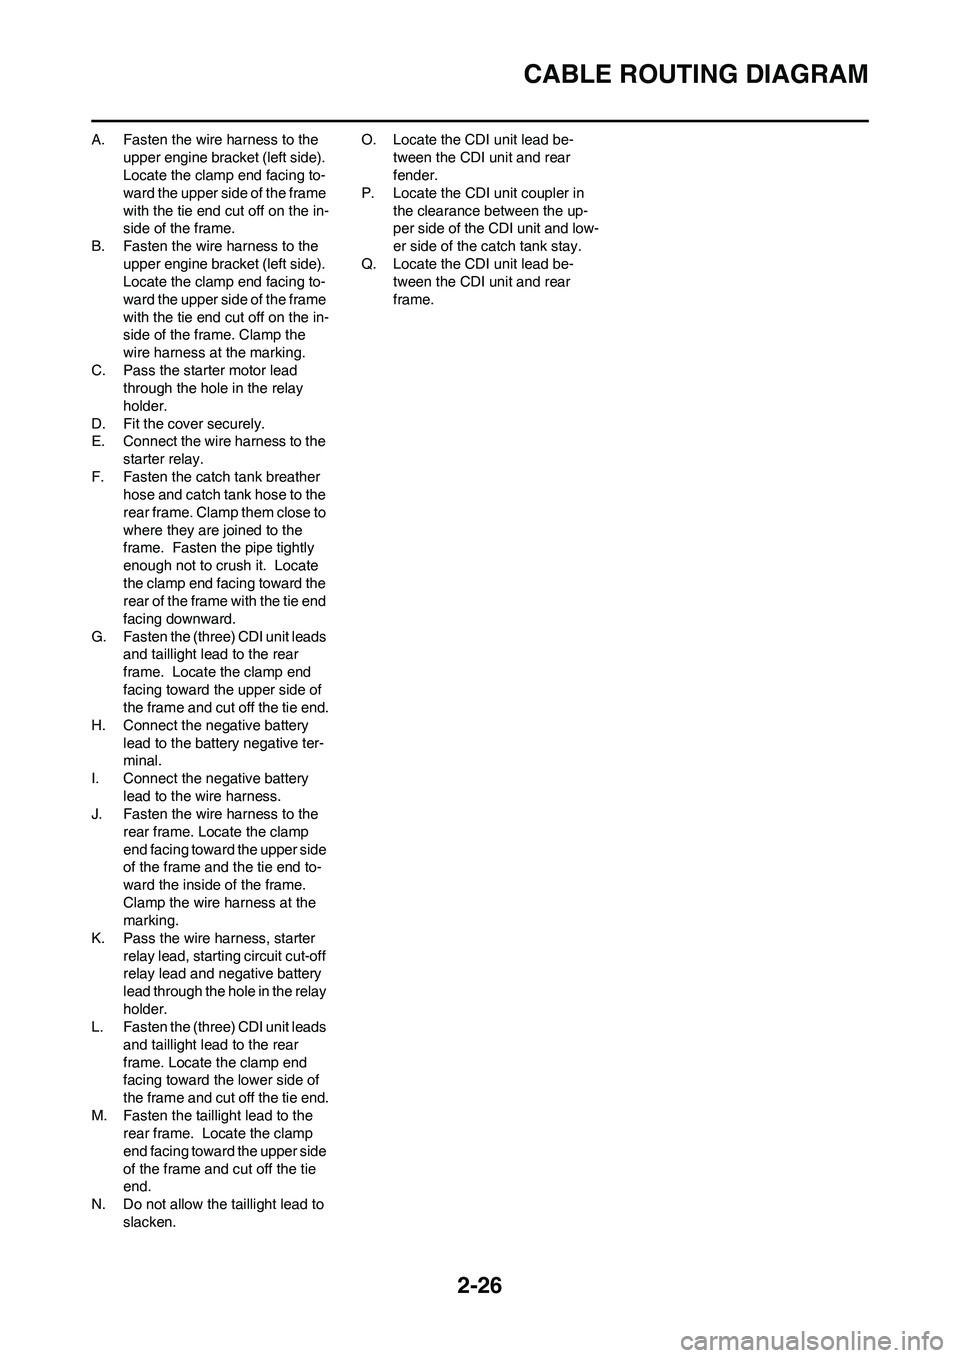
A. Fasten the wire harness to the
upper engine bracket (left side).
Locate the clamp end facing to-
ward the upper side of the frame
with the tie end cut off on the in-
side of the frame.
B. Fasten the wire harness to the
upper engine bracket (left side).
Locate the clamp end facing to-
ward the upper side of the frame
with the tie end cut off on the in-
side of the frame. Clamp the
wire harness at the marking.
C. Pass the starter motor lead
through the hole in the relay
holder.
D. Fit the cover securely.
E. Connect the wire harness to the
starter relay.
F. Fasten the catch tank breather
hose and catch tank hose to the
rear frame. Clamp them close to
where they are joined to the
frame. Fasten the pipe tightly
enough not to crush it. Locate
the clamp end facing toward the
rear of the frame with the tie end
facing downward.
G. Fasten the (three) CDI unit leads
and taillight lead to the rear
frame. Locate the clamp end
facing toward the upper side of
the frame and cut off the tie end.
H. Connect the negative battery
lead to the battery negative ter-
minal.
I. Connect the negative battery
lead to the wire harness.
J. Fasten the wire harness to the
rear frame. Locate the clamp
end facing toward the upper side
of the frame and the tie end to-
ward the inside of the frame.
Clamp the wire harness at the
marking.
K. Pass the wire harness, starter
relay lead, starting circuit cut-off
relay lead and negative battery
lead through the hole in the relay
holder.
L. Fasten the (three) CDI unit leads
and taillight lead to the rear
frame. Locate the clamp end
facing toward the lower side of
the frame and cut off the tie end.
M. Fasten the taillight lead to the
rear frame. Locate the clamp
end facing toward the upper side
of the frame and cut off the tie
end.
N. Do not allow the taillight lead to
slacken.O. Locate the CDI unit lead be-
tween the CDI unit and rear
fender.
P. Locate the CDI unit coupler in
the clearance between the up-
per side of the CDI unit and low-
er side of the catch tank stay.
Q. Locate the CDI unit lead be-
tween the CDI unit and rear
frame.
Page 65 of 230
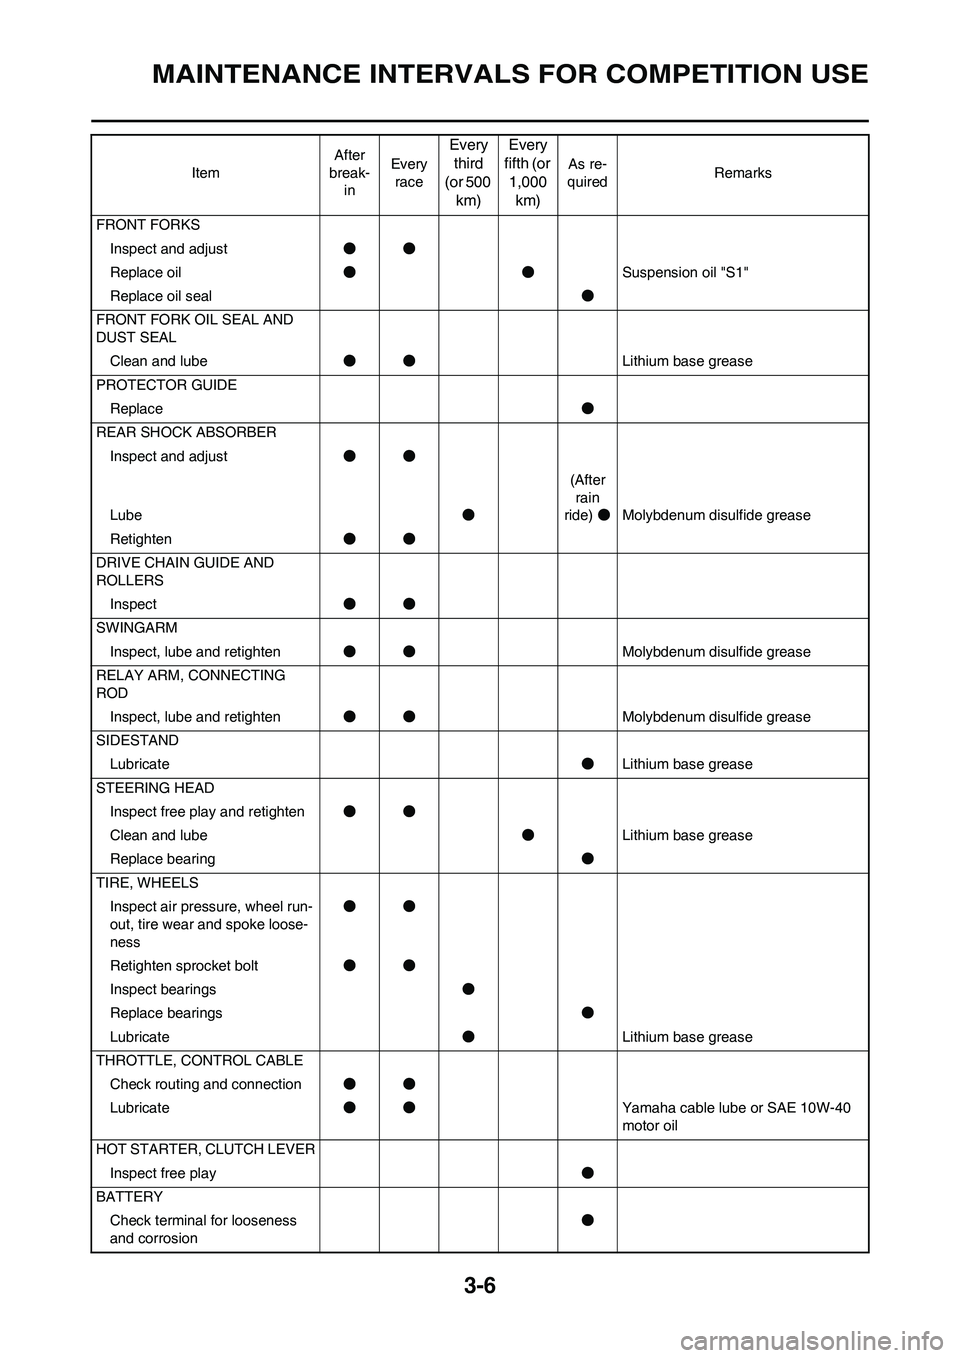
3-6
MAINTENANCE INTERVALS FOR COMPETITION USE
FRONT FORKS
Inspect and adjust●●
Replace oil●●Suspension oil "S1"
Replace oil seal●
FRONT FORK OIL SEAL AND
DUST SEAL
Clean and lube●●Lithium base grease
PROTECTOR GUIDE
Replace●
REAR SHOCK ABSORBER
Inspect and adjust●●
Lube●(After
rain
ride)●Molybdenum disulfide grease
Retighten●●
DRIVE CHAIN GUIDE AND
ROLLERS
Inspect●●
SWINGARM
Inspect, lube and retighten●●Molybdenum disulfide grease
RELAY ARM, CONNECTING
ROD
Inspect, lube and retighten●●Molybdenum disulfide grease
SIDESTAND
Lubricate●Lithium base grease
STEERING HEAD
Inspect free play and retighten●●
Clean and lube●Lithium base grease
Replace bearing●
TIRE, WHEELS
Inspect air pressure, wheel run-
out, tire wear and spoke loose-
ness●●
Retighten sprocket bolt●●
Inspect bearings●
Replace bearings●
Lubricate●Lithium base grease
THROTTLE, CONTROL CABLE
Check routing and connection●●
Lubricate●●Yamaha cable lube or SAE 10W-40
motor oil
HOT STARTER, CLUTCH LEVER
Inspect free play●
BATTERY
Check terminal for looseness
and corrosion● ItemAfter
break-
inEvery
race
Every
third
(or 500
km)Every
fifth (or
1,000
km)
As re-
quiredRemarks
Page 199 of 230
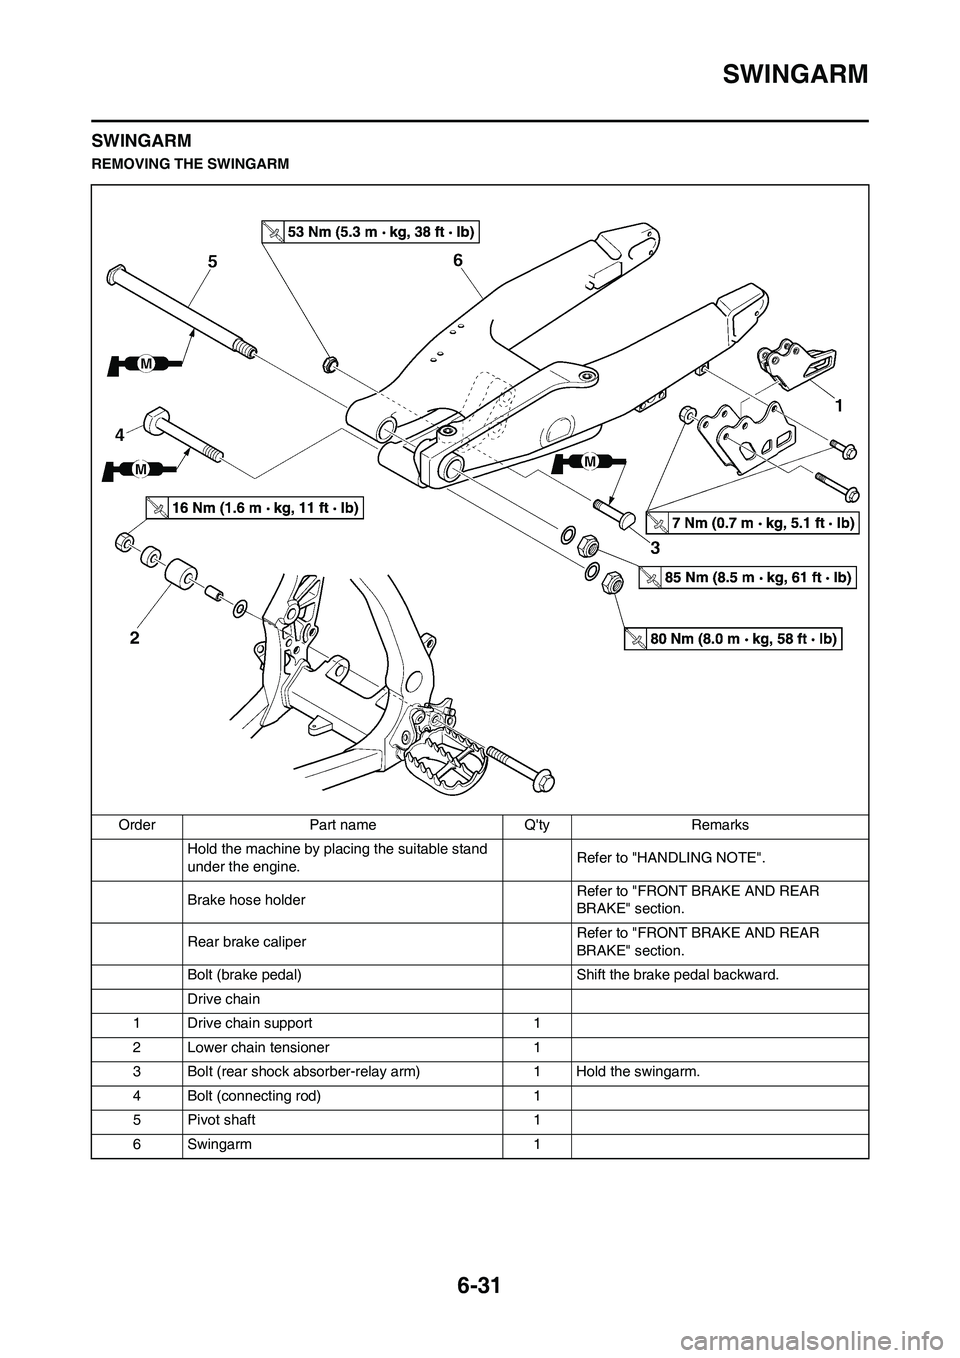
6-31
SWINGARM
SWINGARM
REMOVING THE SWINGARM
Order Part name Q'ty Remarks
Hold the machine by placing the suitable stand
under the engine.Refer to "HANDLING NOTE".
Brake hose holder Refer to "FRONT BRAKE AND REAR
BRAKE" section.
Rear brake caliperRefer to "FRONT BRAKE AND REAR
BRAKE" section.
Bolt (brake pedal) Shift the brake pedal backward.
Drive chain
1 Drive chain support 1
2 Lower chain tensioner 1
3 Bolt (rear shock absorber-relay arm) 1 Hold the swingarm.
4 Bolt (connecting rod) 1
5 Pivot shaft 1
6 Swingarm 1
Page 200 of 230
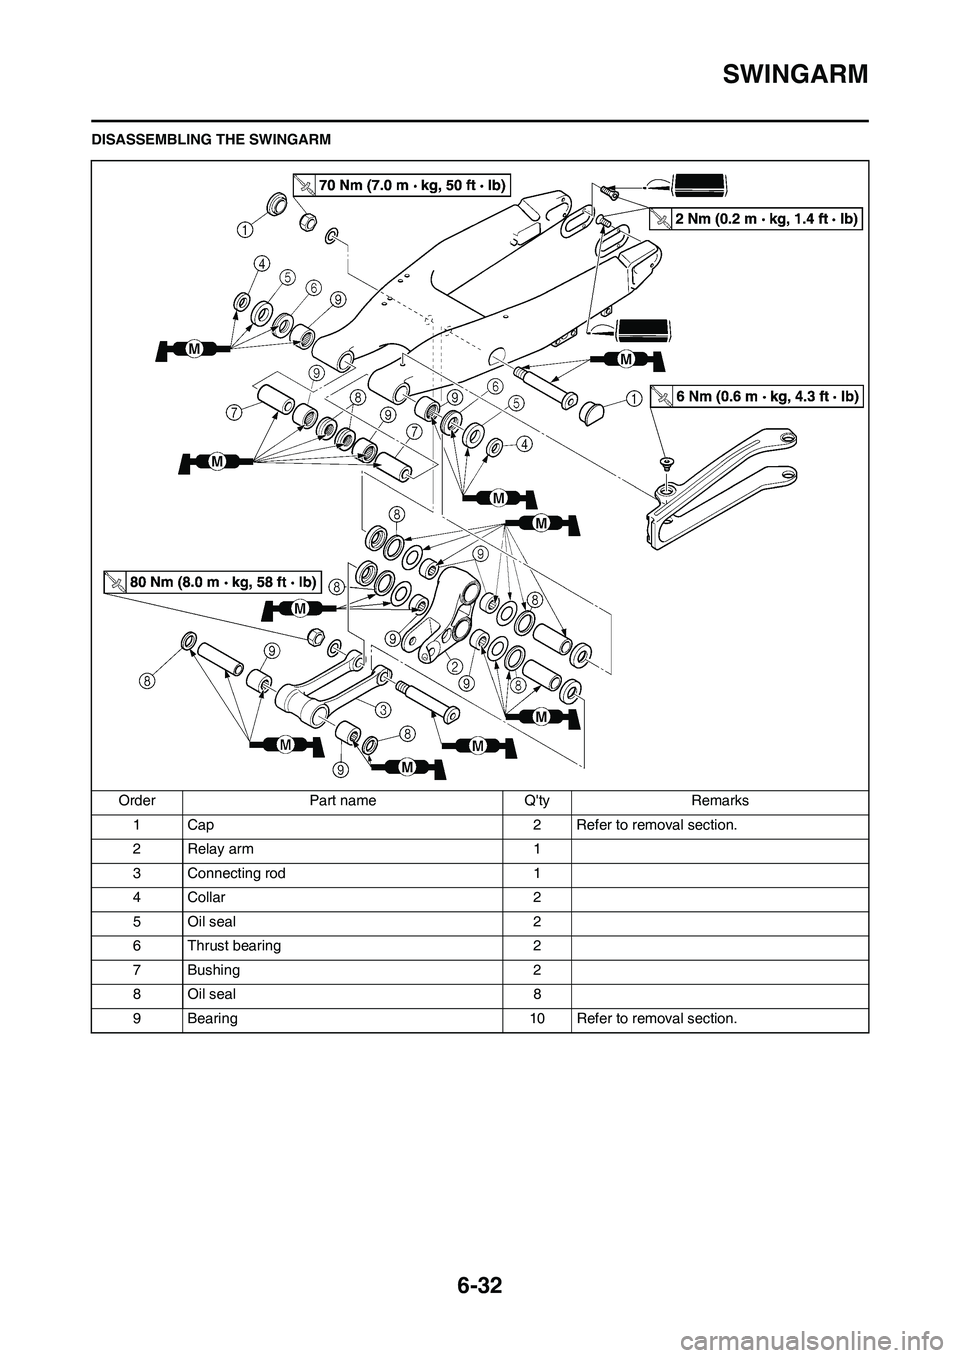
6-32
SWINGARM
DISASSEMBLING THE SWINGARM
Order Part name Q'ty Remarks
1 Cap 2 Refer to removal section.
2 Relay arm 1
3 Connecting rod 1
4 Collar 2
5 Oil seal 2
6 Thrust bearing 2
7 Bushing 2
8 Oil seal 8
9 Bearing 10 Refer to removal section.
Page 201 of 230
6-33
SWINGARM
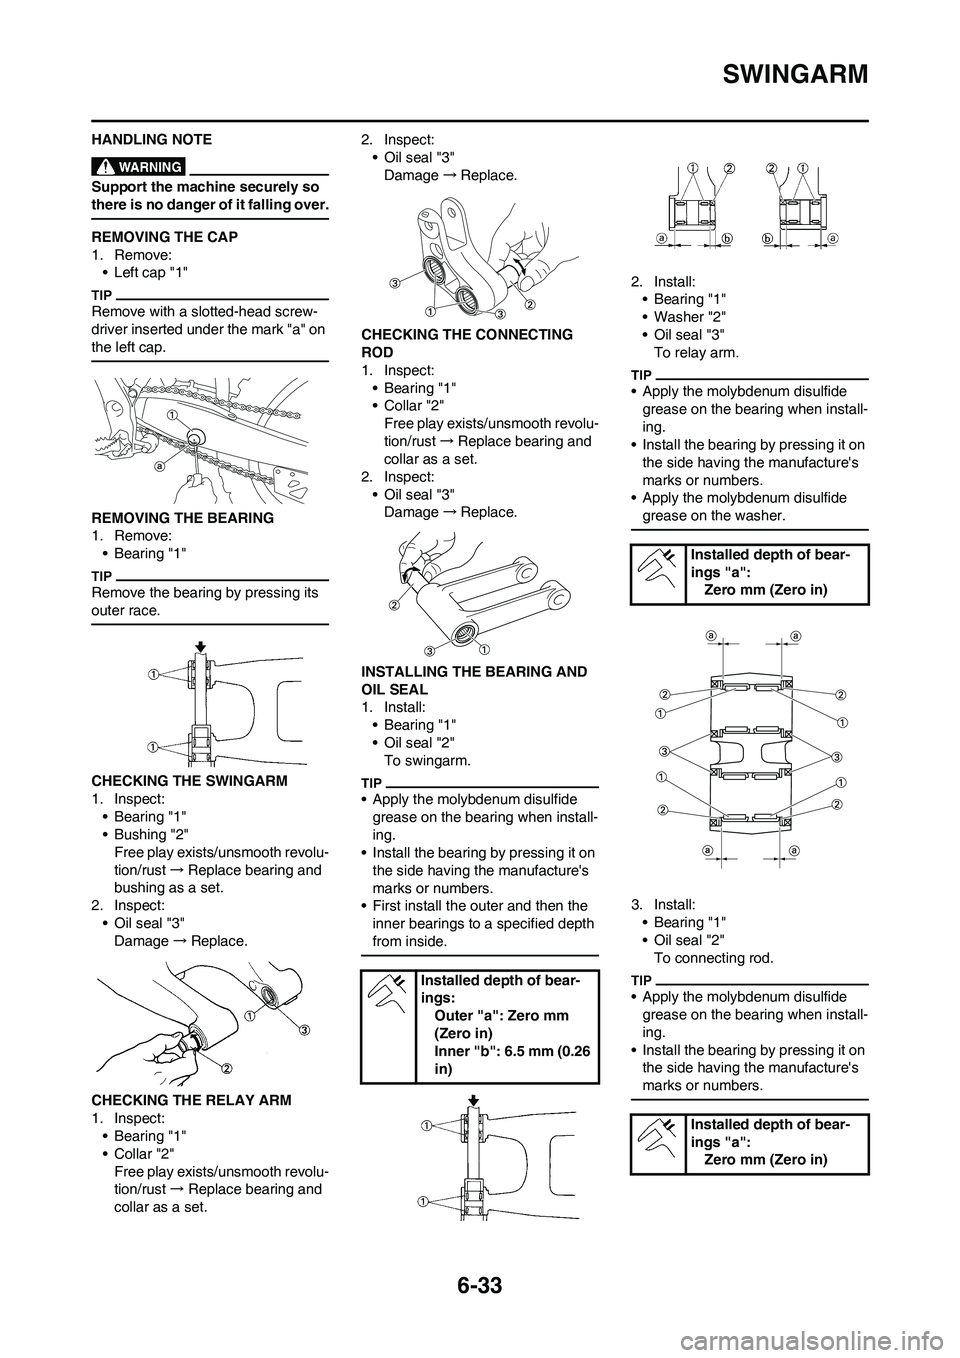
HANDLING NOTE
Support the machine securely so
there is no danger of it falling over.
REMOVING THE CAP
1. Remove:
• Left cap "1"
Remove with a slotted-head screw-
driver inserted under the mark "a" on
the left cap.
REMOVING THE BEARING
1. Remove:
• Bearing "1"
Remove the bearing by pressing its
outer race.
CHECKING THE SWINGARM
1. Inspect:
• Bearing "1"
• Bushing "2"
Free play exists/unsmooth revolu-
tion/rust →Replace bearing and
bushing as a set.
2. Inspect:
• Oil seal "3"
Damage→Replace.
CHECKING THE RELAY ARM
1. Inspect:
• Bearing "1"
•Collar "2"
Free play exists/unsmooth revolu-
tion/rust → Replace bearing and
collar as a set.2. Inspect:
• Oil seal "3"
Damage→Replace.
CHECKING THE CONNECTING
ROD
1. Inspect:
•Bearing "1"
• Collar "2"
Free play exists/unsmooth revolu-
tion/rust →Replace bearing and
collar as a set.
2. Inspect:
• Oil seal "3"
Damage→Replace.
INSTALLING THE BEARING AND
OIL SEAL
1. Install:
•Bearing "1"
• Oil seal "2"
To swingarm.
• Apply the molybdenum disulfide
grease on the bearing when install-
ing.
• Install the bearing by pressing it on
the side having the manufacture's
marks or numbers.
• First install the outer and then the
inner bearings to a specified depth
from inside.
2. Install:
• Bearing "1"
• Washer "2"
• Oil seal "3"
To relay arm.
• Apply the molybdenum disulfide
grease on the bearing when install-
ing.
• Install the bearing by pressing it on
the side having the manufacture's
marks or numbers.
• Apply the molybdenum disulfide
grease on the washer.
3. Install:
• Bearing "1"
• Oil seal "2"
To connecting rod.
• Apply the molybdenum disulfide
grease on the bearing when install-
ing.
• Install the bearing by pressing it on
the side having the manufacture's
marks or numbers.
Installed depth of bear-
ings:
Outer "a": Zero mm
(Zero in)
Inner "b": 6.5 mm (0.26
in)
Installed depth of bear-
ings "a":
Zero mm (Zero in)
Installed depth of bear-
ings "a":
Zero mm (Zero in)
Page 202 of 230
6-34
SWINGARM
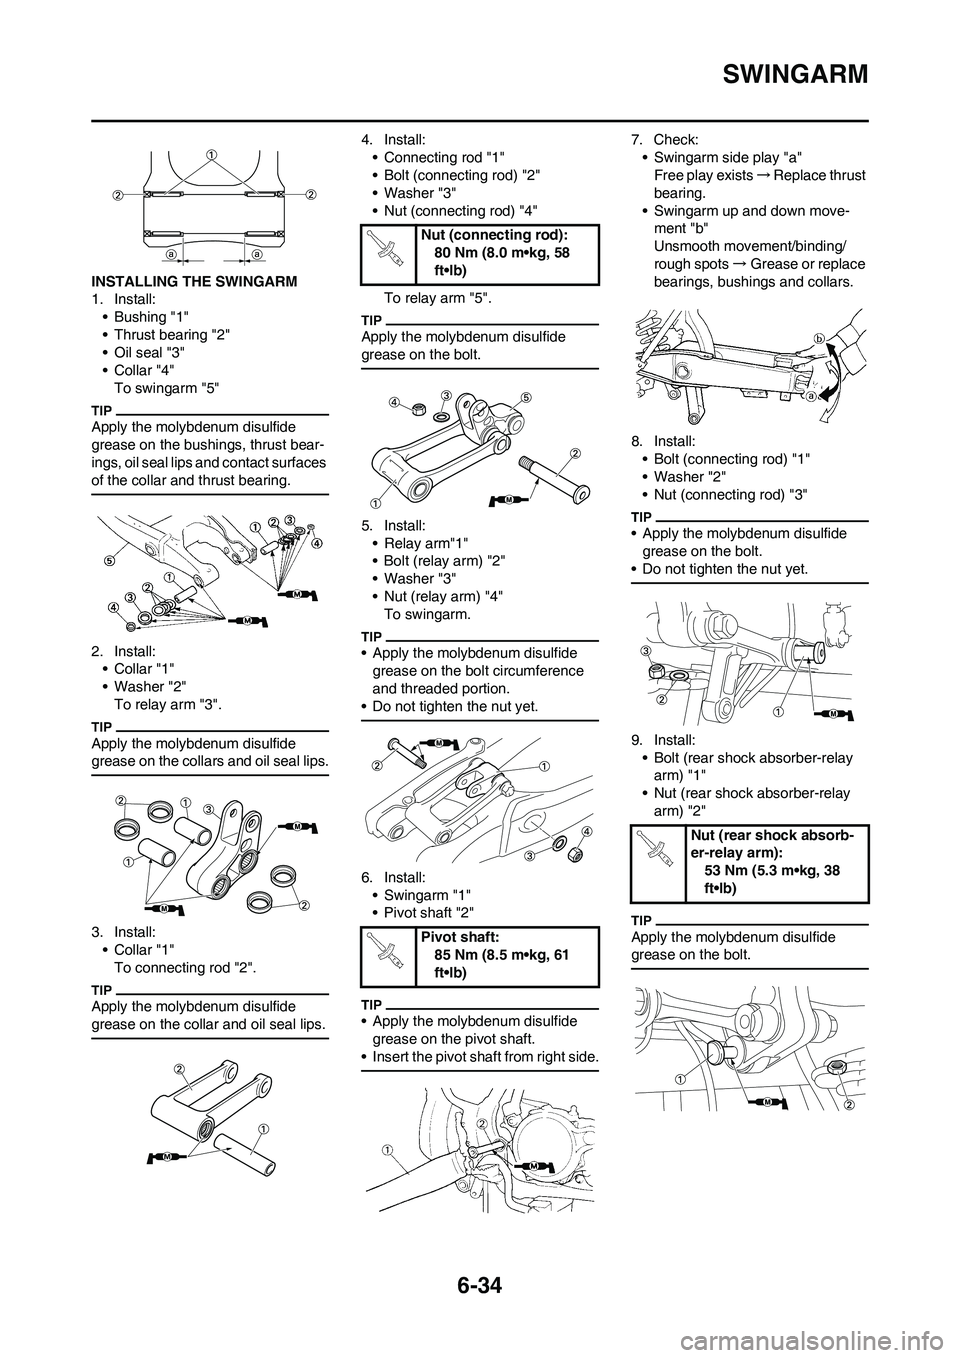
INSTALLING THE SWINGARM
1. Install:
• Bushing "1"
• Thrust bearing "2"
• Oil seal "3"
•Collar "4"
To swingarm "5"
Apply the molybdenum disulfide
grease on the bushings, thrust bear-
ings, oil seal lips and contact surfaces
of the collar and thrust bearing.
2. Install:
•Collar "1"
• Washer "2"
To relay arm "3".
Apply the molybdenum disulfide
grease on the collars and oil seal lips.
3. Install:
•Collar "1"
To connecting rod "2".
Apply the molybdenum disulfide
grease on the collar and oil seal lips.
4. Install:
• Connecting rod "1"
• Bolt (connecting rod) "2"
• Washer "3"
• Nut (connecting rod) "4"
To relay arm "5".
Apply the molybdenum disulfide
grease on the bolt.
5. Install:
• Relay arm"1"
• Bolt (relay arm) "2"
• Washer "3"
• Nut (relay arm) "4"
To swingarm.
• Apply the molybdenum disulfide
grease on the bolt circumference
and threaded portion.
• Do not tighten the nut yet.
6. Install:
• Swingarm "1"
• Pivot shaft "2"
• Apply the molybdenum disulfide
grease on the pivot shaft.
• Insert the pivot shaft from right side.
7. Check:
• Swingarm side play "a"
Free play exists→Replace thrust
bearing.
• Swingarm up and down move-
ment "b"
Unsmooth movement/binding/
rough spots →Grease or replace
bearings, bushings and collars.
8. Install:
• Bolt (connecting rod) "1"
• Washer "2"
• Nut (connecting rod) "3"
• Apply the molybdenum disulfide
grease on the bolt.
• Do not tighten the nut yet.
9. Install:
• Bolt (rear shock absorber-relay
arm) "1"
• Nut (rear shock absorber-relay
arm) "2"
Apply the molybdenum disulfide
grease on the bolt.
Nut (connecting rod):
80 Nm (8.0 m•kg, 58
ft•lb)
Pivot shaft:
85 Nm (8.5 m•kg, 61
ft•lb)
Nut (rear shock absorb-
er-relay arm):
53 Nm (5.3 m•kg, 38
ft•lb)
Page 203 of 230
6-35
SWINGARM
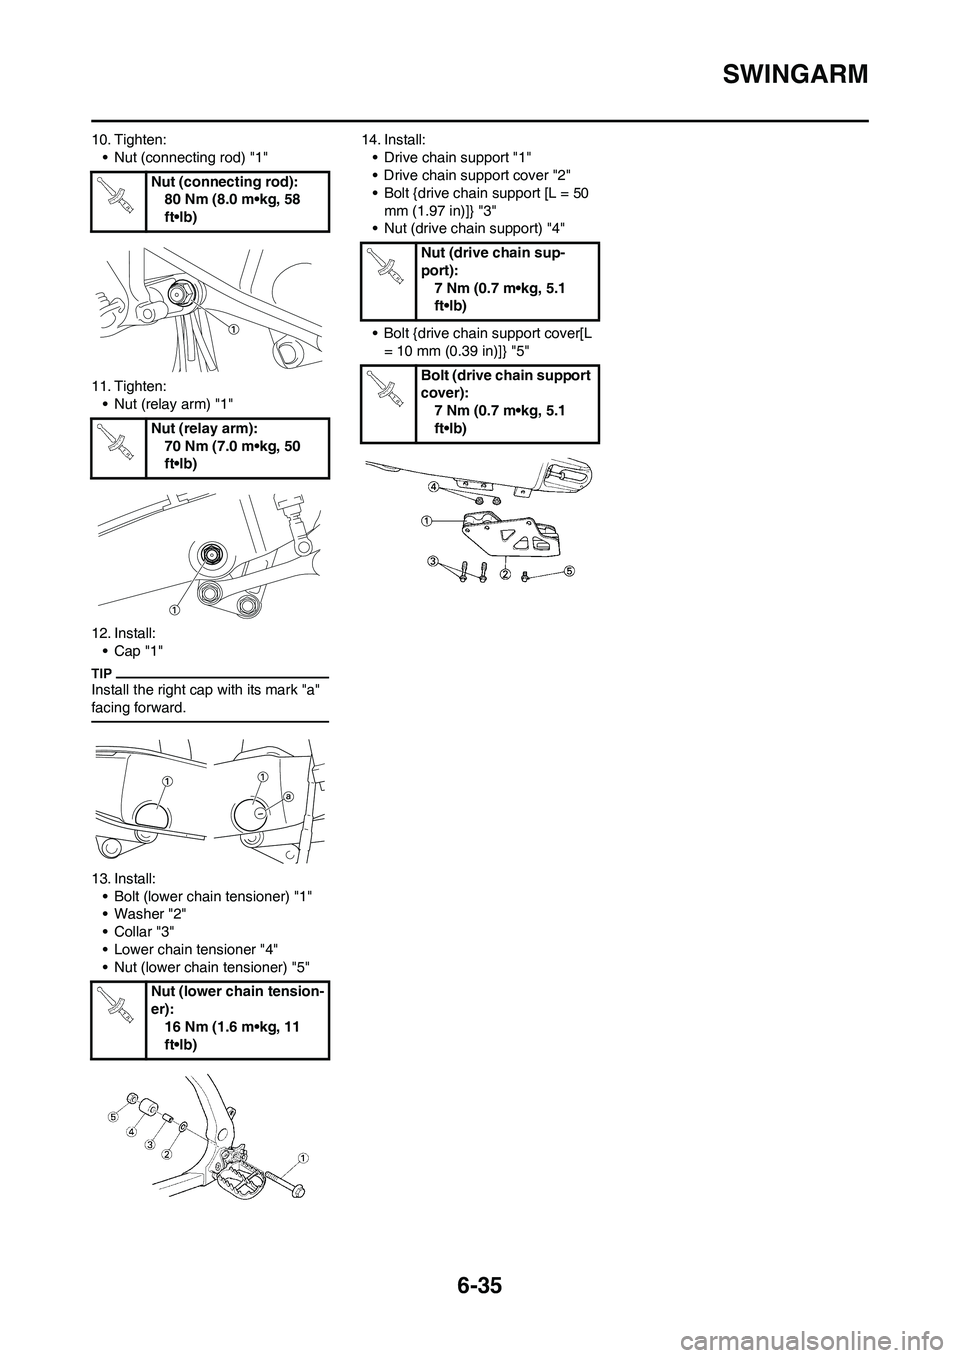
10. Tighten:
• Nut (connecting rod) "1"
11. Tighten:
• Nut (relay arm) "1"
12. Install:
•Cap "1"
Install the right cap with its mark "a"
facing forward.
13. Install:
• Bolt (lower chain tensioner) "1"
• Washer "2"
•Collar "3"
• Lower chain tensioner "4"
• Nut (lower chain tensioner) "5"14. Install:
• Drive chain support "1"
• Drive chain support cover "2"
• Bolt {drive chain support [L = 50
mm (1.97 in)]} "3"
• Nut (drive chain support) "4"
• Bolt {drive chain support cover[L
= 10 mm (0.39 in)]} "5" Nut (connecting rod):
80 Nm (8.0 m•kg, 58
ft•lb)
Nut (relay arm):
70 Nm (7.0 m•kg, 50
ft•lb)
Nut (lower chain tension-
er):
16 Nm (1.6 m•kg, 11
ft•lb)
Nut (drive chain sup-
port):
7 Nm (0.7 m•kg, 5.1
ft•lb)
Bolt (drive chain support
cover):
7 Nm (0.7 m•kg, 5.1
ft•lb)