battery YAMAHA WR 450F 2016 Owners Manual
[x] Cancel search | Manufacturer: YAMAHA, Model Year: 2016, Model line: WR 450F, Model: YAMAHA WR 450F 2016Pages: 426, PDF Size: 10.86 MB
Page 23 of 426
BASIC SERVICE INFORMATION
1-9
EAS2GC1026
BASIC SERVICE INFORMATION
EAS2GC1027ELECTRICAL SYSTEM
Electrical parts handling
ECA
NOTICE
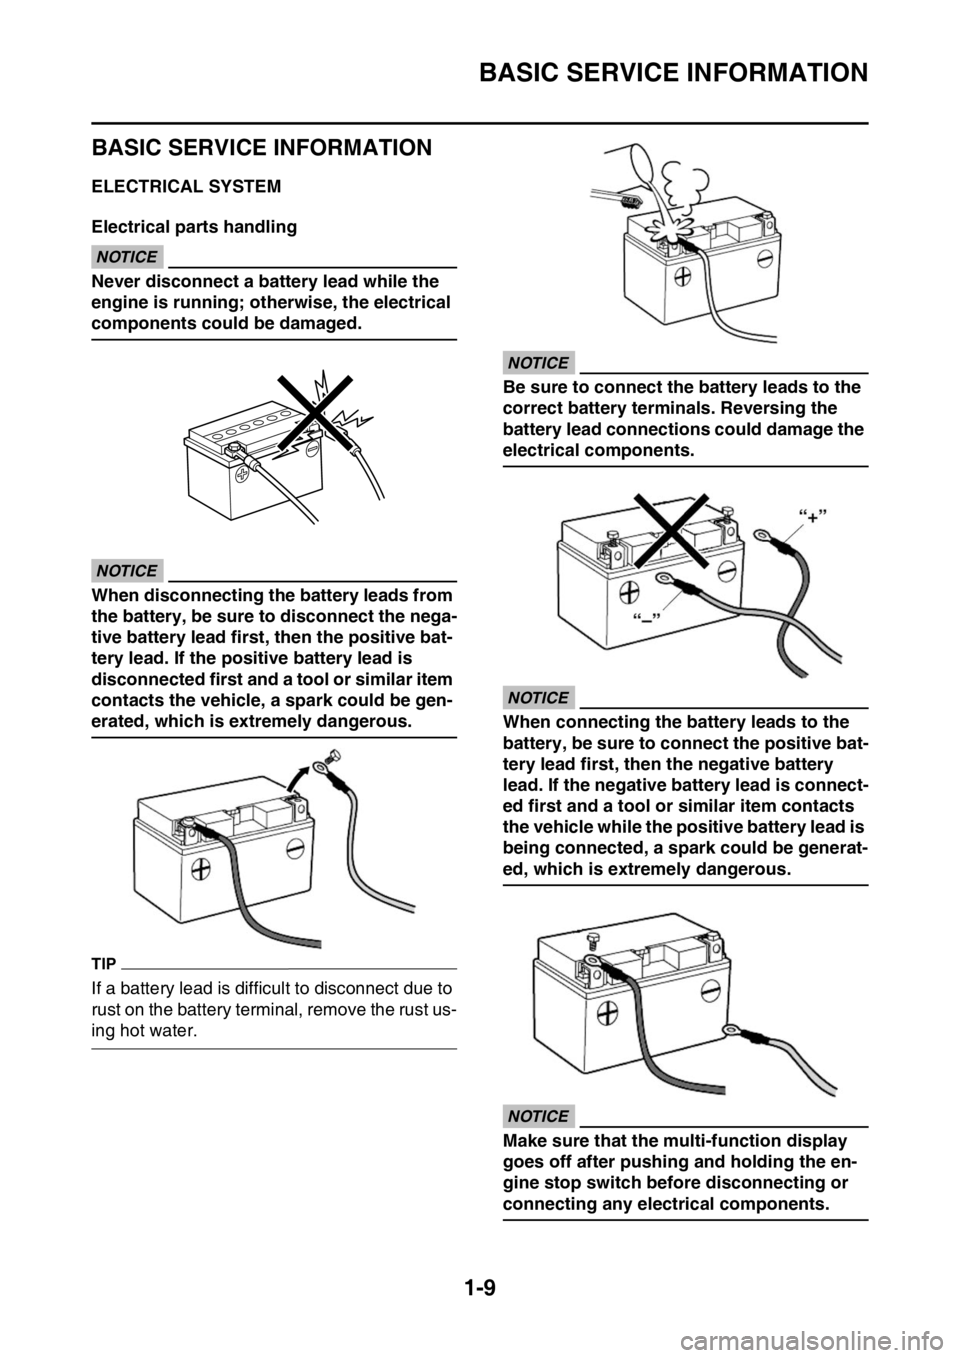
Never disconnect a battery lead while the
engine is running; otherwise, the electrical
components could be damaged.
ECA
NOTICE
When disconnecting the battery leads from
the battery, be sure to disconnect the nega-
tive battery lead first, then the positive bat-
tery lead. If the positive battery lead is
disconnected first and a tool or similar item
contacts the vehicle, a spark could be gen-
erated, which is extremely dangerous.
TIP
If a battery lead is difficult to disconnect due to
rust on the battery terminal, remove the rust us-
ing hot water.
ECA
NOTICE
Be sure to connect the battery leads to the
correct battery terminals. Reversing the
battery lead connections could damage the
electrical components.
ECA
NOTICE
When connecting the battery leads to the
battery, be sure to connect the positive bat-
tery lead first, then the negative battery
lead. If the negative battery lead is connect-
ed first and a tool or similar item contacts
the vehicle while the positive battery lead is
being connected, a spark could be generat-
ed, which is extremely dangerous.
ECA
NOTICE
Make sure that the multi-function display
goes off after pushing and holding the en-
gine stop switch before disconnecting or
connecting any electrical components.
Page 24 of 426
BASIC SERVICE INFORMATION
1-10
ECA
NOTICE
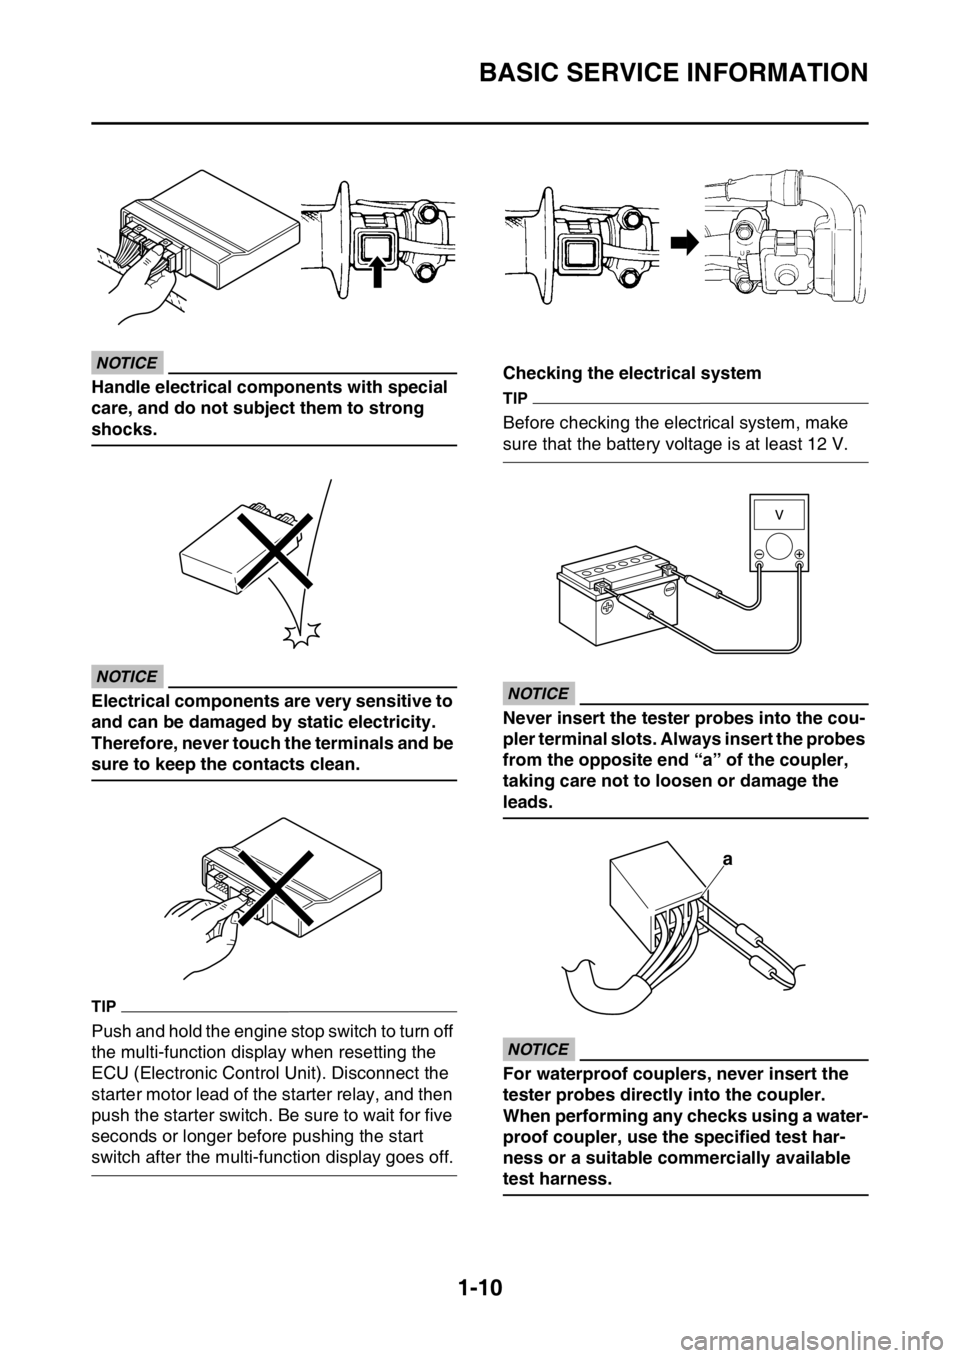
Handle electrical components with special
care, and do not subject them to strong
shocks.
ECA
NOTICE
Electrical components are very sensitive to
and can be damaged by static electricity.
Therefore, never touch the terminals and be
sure to keep the contacts clean.
TIP
Push and hold the engine stop switch to turn off
the multi-function display when resetting the
ECU (Electronic Control Unit). Disconnect the
starter motor lead of the starter relay, and then
push the starter switch. Be sure to wait for five
seconds or longer before pushing the start
switch after the multi-function display goes off.Checking the electrical system
TIP
Before checking the electrical system, make
sure that the battery voltage is at least 12 V.
ECA
NOTICE
Never insert the tester probes into the cou-
pler terminal slots. Always insert the probes
from the opposite end “a” of the coupler,
taking care not to loosen or damage the
leads.
ECA
NOTICE
For waterproof couplers, never insert the
tester probes directly into the coupler.
When performing any checks using a water-
proof coupler, use the specified test har-
ness or a suitable commercially available
test harness.
a
Page 29 of 426
SPECIAL TOOLS
1-15
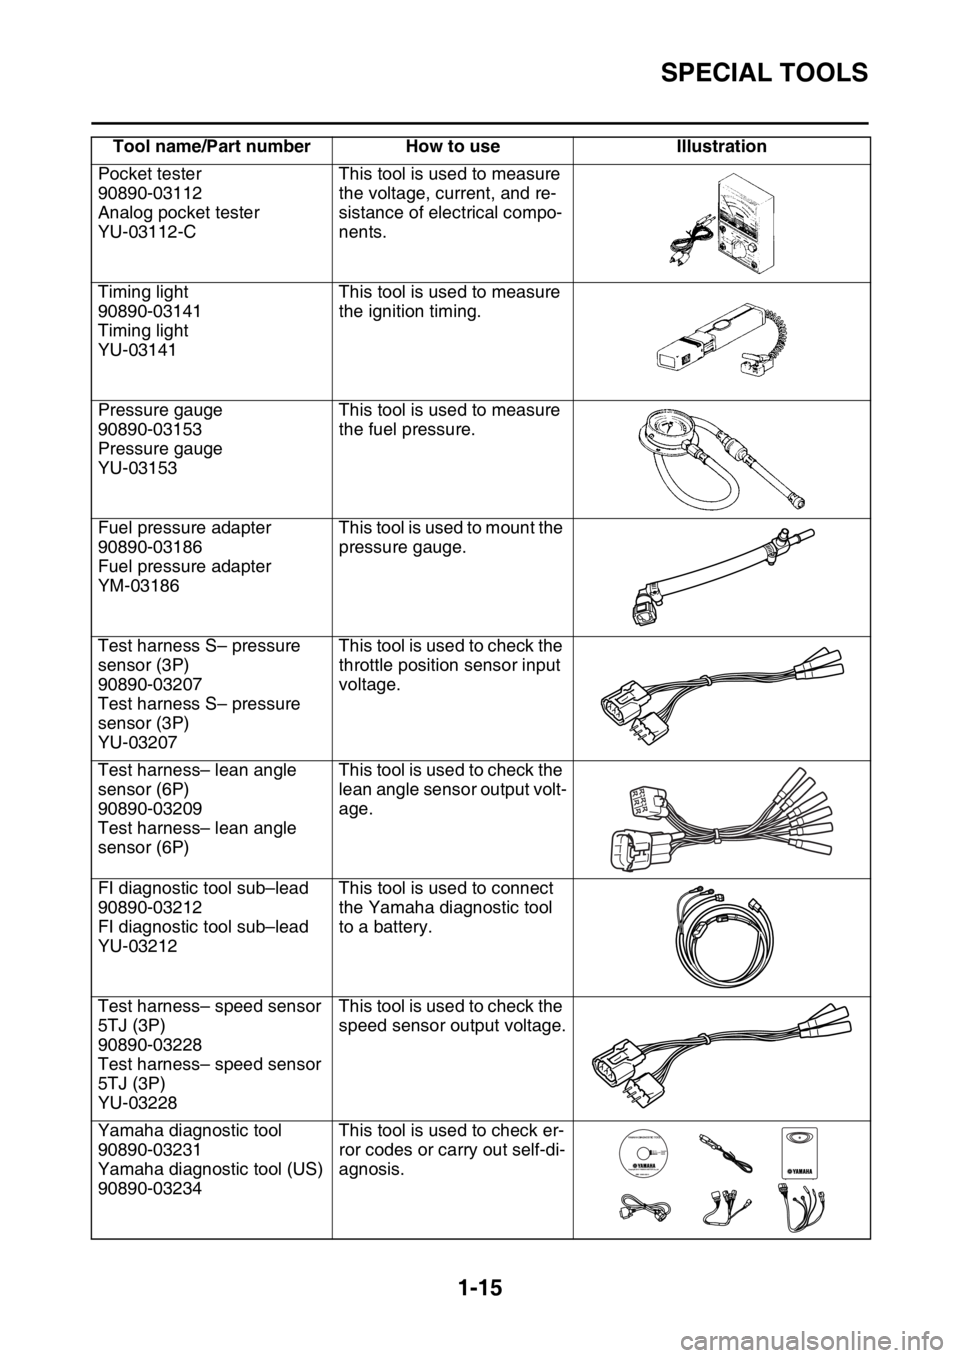
Pocket tester
90890-03112
Analog pocket tester
YU-03112-CThis tool is used to measure
the voltage, current, and re-
sistance of electrical compo-
nents.
Timing light
90890-03141
Timing light
YU-03141 This tool is used to measure
the ignition timing.
Pressure gauge
90890-03153
Pressure gauge
YU-03153 This tool is used to measure
the fuel pressure.
Fuel pressure adapter
90890-03186
Fuel pressure adapter
YM-03186 This tool is used to mount the
pressure gauge.
Test harness S– pressure
sensor (3P)
90890-03207
Test harness S– pressure
sensor (3P)
YU-03207 This tool is used to check the
throttle position sensor input
voltage.
Test harness– lean angle
sensor (6P)
90890-03209
Test harness– lean angle
sensor (6P) This tool is used to check the
lean angle sensor output volt-
age.
FI diagnostic tool sub–lead
90890-03212
FI diagnostic tool sub–lead
YU-03212 This tool is used to connect
the Yamaha diagnostic tool
to a battery.
Test harness– speed sensor
5TJ (3P)
90890-03228
Test harness– speed sensor
5TJ (3P)
YU-03228 This tool is used to check the
speed sensor output voltage.
Yamaha diagnostic tool
90890-03231
Yamaha diagnostic tool (US)
90890-03234 This tool is used to check er-
ror codes or carry out self-di-
agnosis.
Tool name/Part number
How to useIllustration
Page 42 of 426
STARTING AND BREAK-IN
1-28
EAS2GC1048
STARTING AND BREAK-IN
EAS2GC1049FUEL
Always use the recommended fuel as stated
below. Also, be sure to use new gasoline the
day of a race.
ECA
NOTICE
Use only unleaded gasoline. The use of
leaded gasoline will cause severe damage
to the engine internal parts such as valves,
piston rings, and exhaust system, etc.
TIP
Your Yamaha engine has been designed to use
premium unleaded gasoline with a pump oc-
tane number [(R+M)/2] of 91 or higher, or a re-
search octane number of 95 or higher. If
knocking (or pinging) occurs, use a gasoline of
a different brand.
EWA
WARNING
• For refueling, be sure to stop the engine and use enough care not to spill any fuel.
Also be sure to avoid refueling close to a
fire.
• Refuel after the engine, exhaust pipe, etc.
have cooled off.
Gasohol (For USA and Canada)
There are two types of gasohol: gasohol con-
taining ethanol and that containing methanol.
Gasohol containing ethanol can be used if the
ethanol content does not exceed 10%. Gasohol
containing methanol is not recommended by
Yamaha because it can cause damage to the
fuel system or vehicle performance problems.
EAS2GC1050HANDLING NOTEEWA
WARNING
Never start or run the engine in a closed ar-
ea. The exhaust fumes are poisonous; they
can cause loss of consciousness and death
in a very short time. Always operate the ma-
chine in a well-ventilated area.
ECA
NOTICE
• Unlike a two-stroke engine, this engine cannot be kick started when the throttle is
open because the kickstarter may kick
back. Also, if the throttle is open the air/
fuel mixture may be too lean for the engine
to start.
• Before starting the machine, perform the
checks in the pre-operation check list.
EAS2GC1051AIR FILTER MAINTENANCE
According to “CLEANING THE AIR FILTER
ELEMENT” section in the CHAPTER 3, apply
the Yamaha foam air filter oil or other quality
foam air filter oil to the element. (Excess oil in
the element may adversely affect engine start-
ing.)
EAS2GC1052STARTING A COLD ENGINEECA
NOTICE
For maximum engine life, never accelerate
hard when the engine is cold!
In order for the ignition circuit cut-off system to
enable starting, one of the following conditions
must be met:
• The transmission is in the neutral position.
• The transmission is in gear with the clutch le- ver pulled.
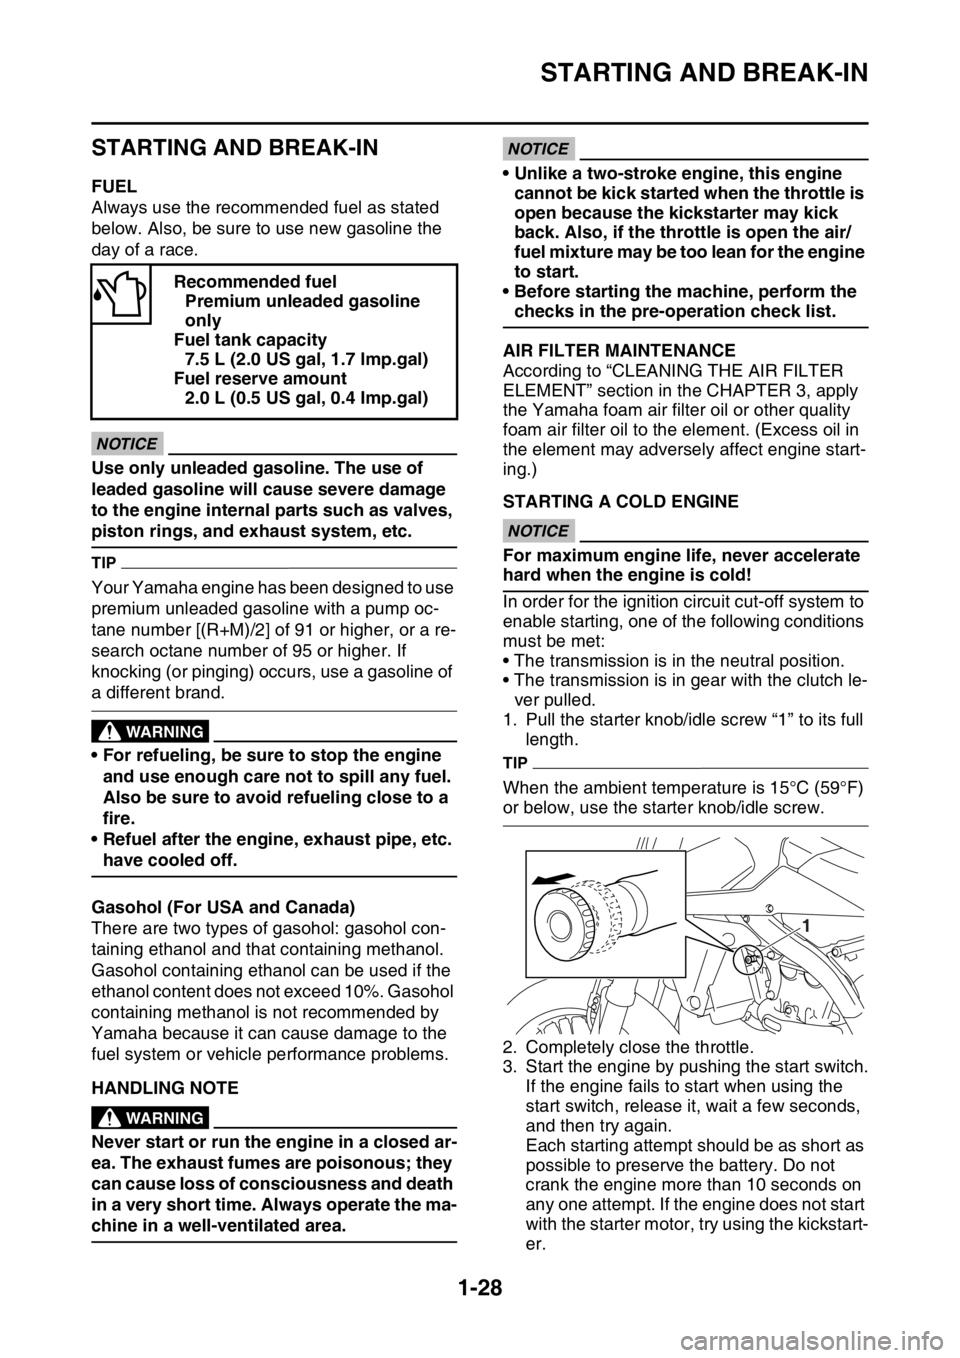
1. Pull the starter knob/idle screw “1” to its full length.
TIP
When the ambient temperature is 15°C (59°F)
or below, use the starter knob/idle screw.
2. Completely close the throttle.
3. Start the engine by pushing the start switch.If the engine fails to start when using the
start switch, release it, wait a few seconds,
and then try again.
Each starting attempt should be as short as
possible to preserve the battery. Do not
crank the engine more than 10 seconds on
any one attempt. If the engine does not start
with the starter motor, try using the kickstart-
er.
Recommended fuel
Premium unleaded gasoline
only
Fuel tank capacity 7.5 L (2.0 US gal, 1.7 lmp.gal)
Fuel reserve amount 2.0 L (0.5 US gal, 0.4 Imp.gal)
1
Page 50 of 426
MOTORCYCLE CARE AND STORAGE
1-36
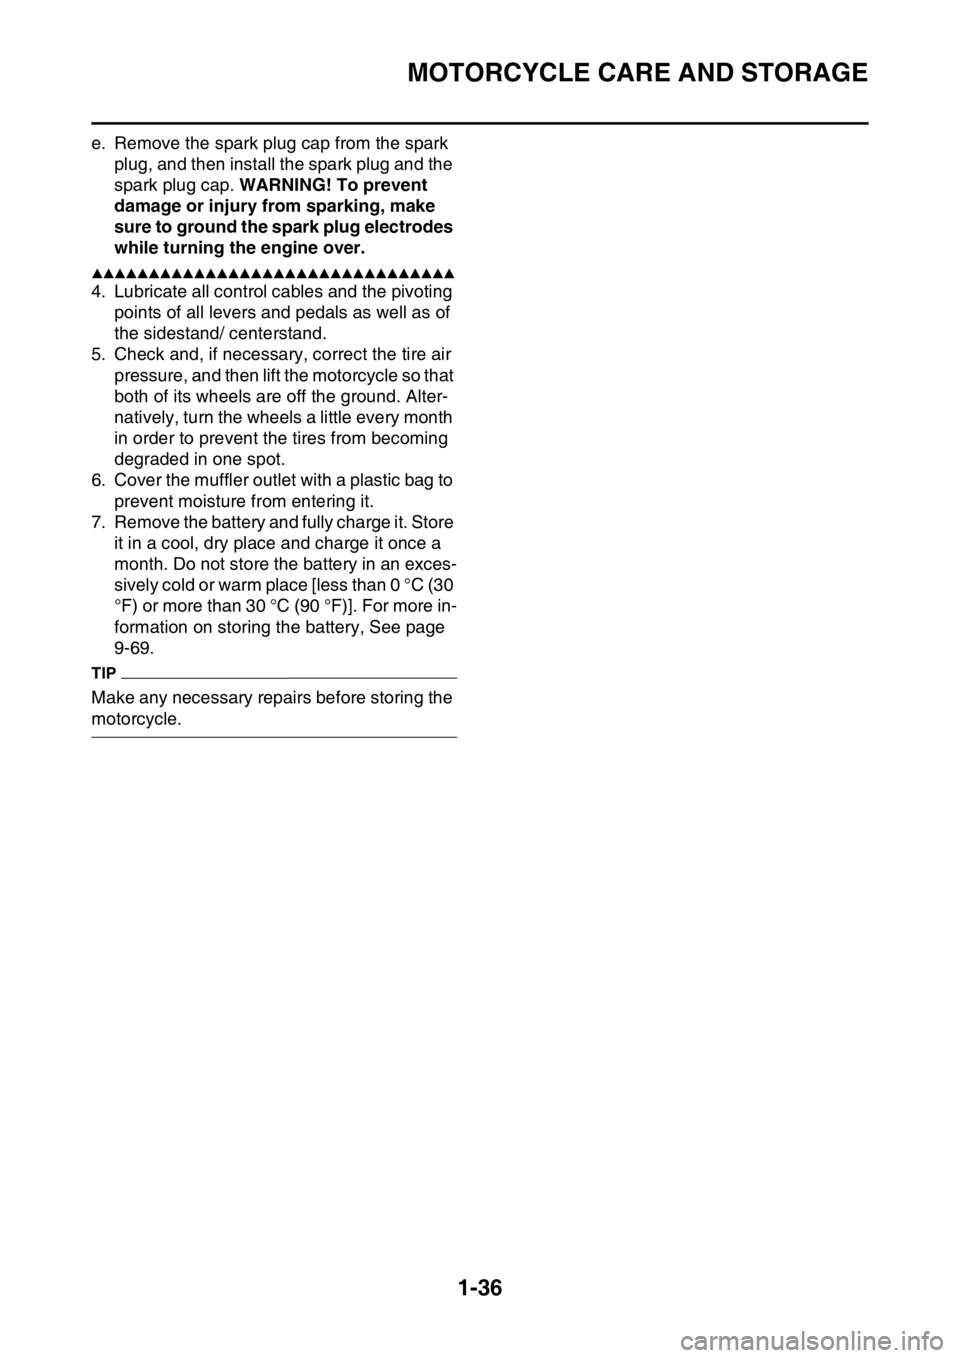
e. Remove the spark plug cap from the spark plug, and then install the spark plug and the
spark plug cap. WARNING! To prevent
damage or injury from sparking, make
sure to ground the spark plug electrodes
while turning the engine over.
▲▲▲▲▲▲▲▲▲▲▲▲▲▲▲▲▲▲▲▲▲▲▲▲▲▲▲▲▲▲▲▲
4. Lubricate all control cables and the pivoting points of all levers and pedals as well as of
the sidestand/ centerstand.
5. Check and, if necessary, correct the tire air
pressure, and then lift the motorcycle so that
both of its wheels are off the ground. Alter-
natively, turn the wheels a little every month
in order to prevent the tires from becoming
degraded in one spot.
6. Cover the muffler outlet with a plastic bag to
prevent moisture from entering it.
7. Remove the battery and fully charge it. Store it in a cool, dry place and charge it once a
month. Do not store the battery in an exces-
sively cold or warm place [less than 0 °C (30
°F) or more than 30 °C (90 °F)]. For more in-
formation on storing the battery, See page
9-69.
TIP
Make any necessary repairs before storing the
motorcycle.
Page 61 of 426

ELECTRICAL SPECIFICATIONS
2-10
EAS2GC1064
ELECTRICAL SPECIFICATIONS
VoltageSystem voltage 12 V
Ignition systemIgnition system TCI
Advancer type Digital
Ignition timing (B.T.D.C.) 10.0 ° at 2000 r/min
Engine control unitModel/manufacturer 2GC0/YAMAHA (USA) (CAN) 2GC1/YAMAHA (EUR) (AUS) (NZL) (ZAF)
Ignition coilMinimum ignition spark gap 6.0 mm (0.24 in)
Primary coil resistance 2.16–2.64
Secondary coil resistance 8.64–12.96 k
Spark plug cap
Resistance 7.50–12.50 k
Lean angle sensor output voltage
Operating angle 45 °
Output voltage up to operating angle 3.7–4.4 V
Output voltage over operating angle 0.4–1.4 V
AC magneto
Standard output 14.0 V, 160 W at 5000 r/min
Stator coil resistance 0.528–0.792 (W–W)
Rectifier/regulator
Regulator type Three-phase
No load regulated voltage 14.1–14.9 V
Rectifier capacity (DC) 35.0 A
BatteryModel YTZ7S (F)
Voltage, capacity 12 V, 6.0 Ah (10HR)
Specific gravity 1.31
Manufacturer GS YUASA
Ten hour rate charging current 0.60 A
Headlight
Bulb type Halogen bulb
Bulb voltage, wattage quantity
Headlight HS1, 35.0 W/35.0 W 1 (Hi)
Tail/brake light LED
Meter lighting EL (Electroluminescent)
Indicator light
Fuel level warning light 12 V, 1.7 W 1
Engine trouble warning light 12 V, 1.7 W 1
Electric starting system
System type Constant mesh
Page 70 of 426
TIGHTENING TORQUES
2-19
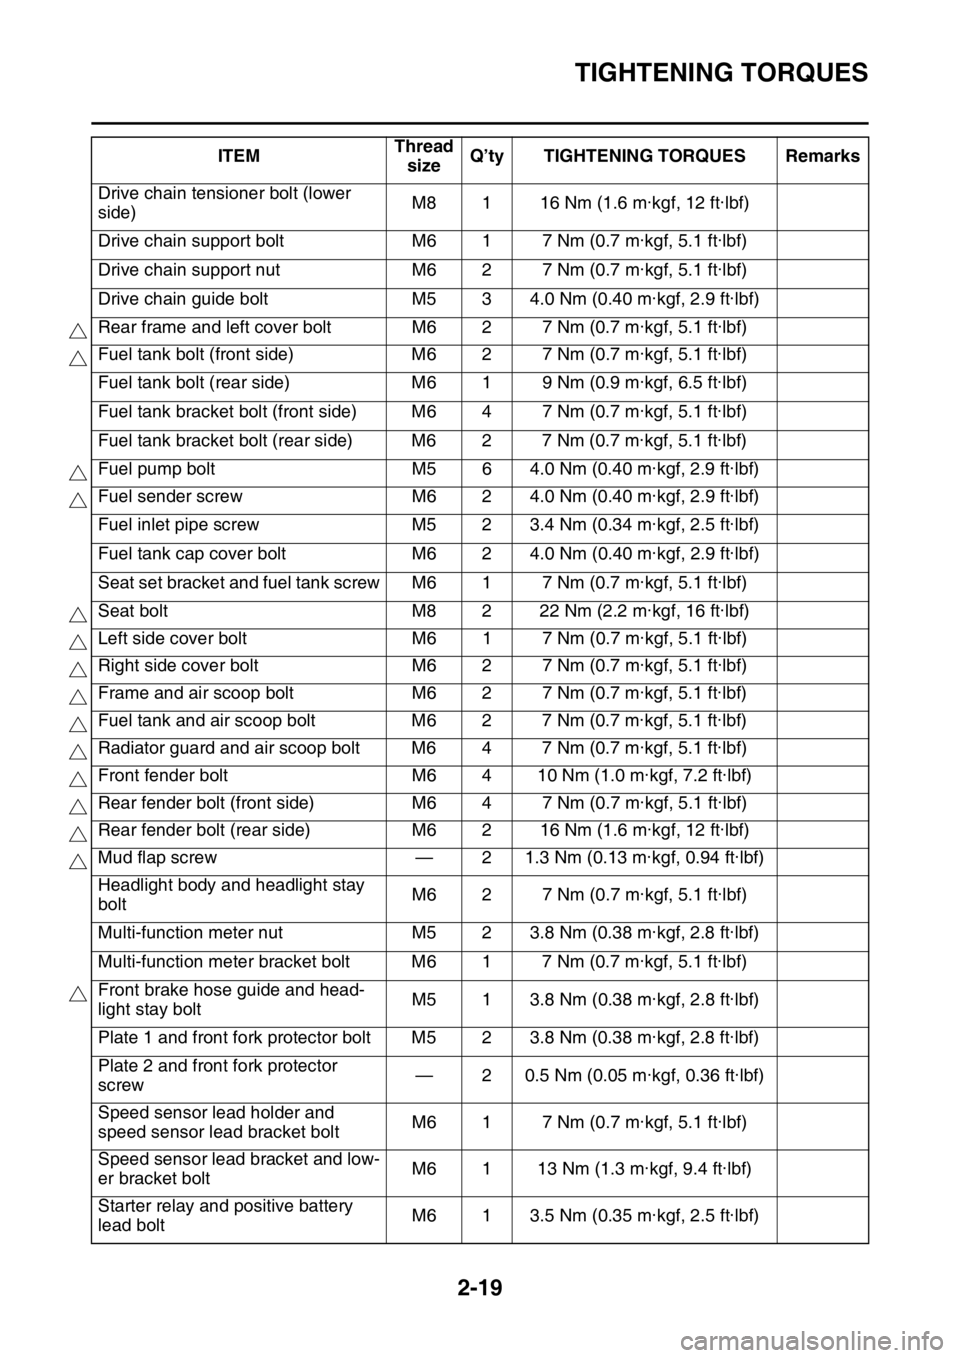
Drive chain tensioner bolt (lower
side)M8 1 16 Nm (1.6 m·kgf, 12 ft·lbf)
Drive chain support bolt M6 1 7 Nm (0.7 m·kgf, 5.1 ft·lbf)
Drive chain support nut M6 2 7 Nm (0.7 m·kgf, 5.1 ft·lbf)
Drive chain guide bolt M5 3 4.0 Nm (0.40 m·kgf, 2.9 ft·lbf)
Rear frame and left cover bolt M6 2 7 Nm (0.7 m·kgf, 5.1 ft·lbf)
Fuel tank bolt (front side) M6 2 7 Nm (0.7 m·kgf, 5.1 ft·lbf)
Fuel tank bolt (rear side) M6 1 9 Nm (0.9 m·kgf, 6.5 ft·lbf)
Fuel tank bracket bolt (front side) M6 4 7 Nm (0.7 m·kgf, 5.1 ft·lbf)
Fuel tank bracket bolt (rear side) M6 2 7 Nm (0.7 m·kgf, 5.1 ft·lbf)
Fuel pump bolt M5 6 4.0 Nm (0.40 m·kgf, 2.9 ft·lbf)
Fuel sender screw M6 2 4.0 Nm (0.40 m·kgf, 2.9 ft·lbf)
Fuel inlet pipe screw M5 2 3.4 Nm (0.34 m·kgf, 2.5 ft·lbf)
Fuel tank cap cover bolt M6 2 4.0 Nm (0.40 m·kgf, 2.9 ft·lbf)
Seat set bracket and fuel tank screw M6 1 7 Nm (0.7 m·kgf, 5.1 ft·lbf)
Seat bolt M8 2 22 Nm (2.2 m·kgf, 16 ft·lbf)
Left side cover bolt M6 1 7 Nm (0.7 m·kgf, 5.1 ft·lbf)
Right side cover bolt M6 2 7 Nm (0.7 m·kgf, 5.1 ft·lbf)
Frame and air scoop bolt M6 2 7 Nm (0.7 m·kgf, 5.1 ft·lbf)
Fuel tank and air scoop bolt M6 2 7 Nm (0.7 m·kgf, 5.1 ft·lbf)
Radiator guard and air scoop bolt M6 4 7 Nm (0.7 m·kgf, 5.1 ft·lbf)
Front fender bolt M6 4 10 Nm (1.0 m·kgf, 7.2 ft·lbf)
Rear fender bolt (front side) M6 4 7 Nm (0.7 m·kgf, 5.1 ft·lbf)
Rear fender bolt (rear side) M6 2 16 Nm (1.6 m·kgf, 12 ft·lbf)
Mud flap screw — 2 1.3 Nm (0.13 m·kgf, 0.94 ft·lbf)
Headlight body and headlight stay
bolt M6 2 7 Nm (0.7 m·kgf, 5.1 ft·lbf)
Multi-function meter nut M5 2 3.8 Nm (0.38 m·kgf, 2.8 ft·lbf)
Multi-function meter bracket bolt M6 1 7 Nm (0.7 m·kgf, 5.1 ft·lbf)
Front brake hose guide and head-
light stay bolt M5 1 3.8 Nm (0.38 m·kgf, 2.8 ft·lbf)
Plate 1 and front fork protector bolt M5 2 3.8 Nm (0.38 m·kgf, 2.8 ft·lbf)
Plate 2 and front fork protector
screw — 2 0.5 Nm (0.05 m·kgf, 0.36 ft·lbf)
Speed sensor lead holder and
speed sensor lead bracket bolt M6 1 7 Nm (0.7 m·kgf, 5.1 ft·lbf)
Speed sensor lead bracket and low-
er bracket bolt M6 1 13 Nm (1.3 m·kgf, 9.4 ft·lbf)
Starter relay and positive battery
lead bolt M6 1 3.5 Nm (0.35 m·kgf, 2.5 ft·lbf)
ITEM
Thread
size Q’ty TIGHTENING TORQUES Remarks
Page 71 of 426
TIGHTENING TORQUES
2-20
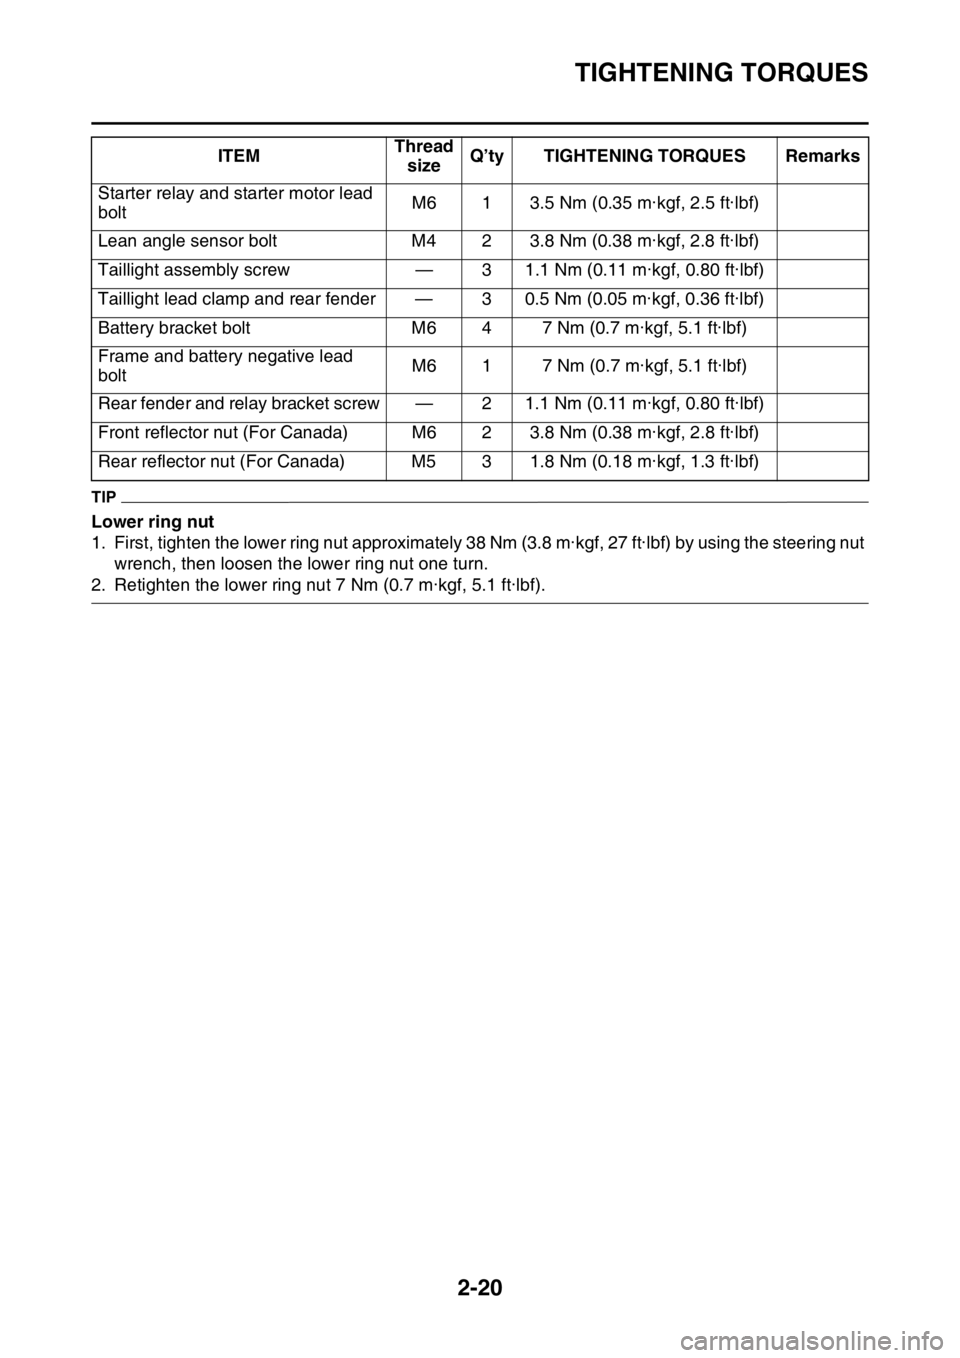
TIP
Lower ring nut
1. First, tighten the lower ring nut approximately 38 Nm (3.8 m·kgf, 27 ft·lbf) by using the steering nut wrench, then loosen the lower ring nut one turn.
2. Retighten the lower ring nut 7 Nm (0.7 m·kgf, 5.1 ft·lbf).Starter relay and starter motor lead
bolt
M6 1 3.5 Nm (0.35 m·kgf, 2.5 ft·lbf)
Lean angle sensor bolt M4 2 3.8 Nm (0.38 m·kgf, 2.8 ft·lbf)
Taillight assembly screw — 3 1.1 Nm (0.11 m·kgf, 0.80 ft·lbf)
Taillight lead clamp and rear fender — 3 0.5 Nm (0.05 m·kgf, 0.36 ft·lbf)
Battery bracket bolt M6 4 7 Nm (0.7 m·kgf, 5.1 ft·lbf)
Frame and battery negative lead
bolt M6 1 7 Nm (0.7 m·kgf, 5.1 ft·lbf)
Rear fender and relay bracket screw — 2 1.1 Nm (0.11 m·kgf, 0.80 ft·lbf)
Front reflector nut (For Canada) M6 2 3.8 Nm (0.38 m·kgf, 2.8 ft·lbf)
Rear reflector nut (For Canada) M5 3 1.8 Nm (0.18 m·kgf, 1.3 ft·lbf) ITEM
Thread
size Q’ty TIGHTENING TORQUES Remarks
Page 91 of 426

CABLE ROUTING DIAGRAM
2-40
1. Battery negative lead
2. Fuel hose
3. Fuel pump coupler
4. Fuel pump lead
5. Resistor
6. Resistor coupler
7. Battery positive lead
8. Lean angle sensor
9. Starter motor lead
10. Radiator fan motor relay (blue tape)
11. Main relay (red tape)
12. Wire harness
13. Ground lead coupler
14. Starter relay coupler
15. Starter relay
16. Cross member
17. Diode
18. Taillight lead
19. Clamp
20. Fuel tank
21. Damper
22. Rear frame
23. Side cover 6
24. Plastic locking tie
A. After connecting the fuel pump coupler, attach the coupler cover.
B. Pass the fuel hose to the front of the battery.
C. Route the resistor lead to the outside of the leads.
D. Connect the battery positive lead to the starter re- lay terminal (in the left side of the vehicle).
E. Insert the protruding end of the wire harness into
the battery bracket hole and holder plate hole.
F. After connecting the negative lead coupler, place it on the right side of the battery.
G. Route the diode under the cross member and place it on top of the rear fender.
H. Secure the two ends of the taillight coupler with the starter motor lead.
I. Route the taillight lead so that it does not slack at
the rear of the vehicle.
J. Clamp the taillight lead and insert the clip into the rear fender. Clamp it so that the lock faces in-
ward, and then cut off the excess end.
K. Lower end of the rear frame
L. Clamp it so that the lock of the plastic locking tie
faces downward, insert the end into the rear
frame and side cover 6, and then cut off the ex-
cess end. After cutting off the excess end, make
sure that the plastic locki ng tie does not protrude
from the lower end of the rear frame.
M. Clamp it so that the lock of the plastic locking tie
faces downward, and then pass the end between
the fuel hose and rear frame.
N. Clamp the wire harness at the position of the white tape.
O. Route the battery positive lead under the cross member.
P. After connecting the battery positive lead in the direction indicated in the illustration, put the cover
on.
Page 98 of 426

ADJUSTING THE REAR SHOCK ABSORBER ASSEMBLY ................... 3-34
CHECKING THE TIRES ........................................................................... 3-36
CHECKING AND TIGHTENING THE SPOKES ....................................... 3-36
CHECKING THE WHEELS ...................................................................... 3-37
CHECKING THE WHEEL BEAR INGS ..................................................... 3-37
CHECKING AND ADJUSTING THE STEERING HEAD .......................... 3-37
CHECKING AND LUBRICATING THE CABLES ..................................... 3-38
LUBRICATING THE LEVERS .................................................................. 3-38
LUBRICATING THE PEDAL .................................................................... 3-38
LUBRICATING THE DRIVE CHAIN ......................................................... 3-39
LUBRICATING THE SIDESTAND............................................................ 3-39
CHECKING THE CHASSIS FASTENERS ............................................... 3-39
ELECTRICAL SYSTEM .................................................................................. 3-40
CHECKING THE SPARK PL UG .............................................................. 3-40
CHECKING THE IGNITION TIMING ........................................................ 3-40
CHECKING AND CHARGING THE BATTERY ........................................ 3-41
REPLACING THE HEADLIGHT BULB..................................................... 3-41