clock YAMAHA XENTER 150 2012 Owners Manual
[x] Cancel search | Manufacturer: YAMAHA, Model Year: 2012, Model line: XENTER 150, Model: YAMAHA XENTER 150 2012Pages: 84, PDF Size: 1.33 MB
Page 19 of 84

1
2
3
4
5
6
7
8
9
3-3
EAU1044E
INSTRUMENT AND CONTROL FUNCTIONS
to the coolant temperature in the
radiator.
● If the engine overheats, see page
6-34 for further instructions.
EAUT1934
Engine trouble warning light “
”
This warning light fl ashes or stays on
if an electrical circuit monitoring the
engine is not working correctly. If this
occurs, have a Yamaha dealer check
the self-diagnosis system.
The electrical circuit of the warning
light can be checked by turning the
key to “ON”. The warning light should
come on for a few seconds, and then
go off.
If the warning light does not come
on initially when the key is turned to
“ON”, or if the warning light remains
on, have a Yamaha dealer check the
electrical circuit.
EAUT3721
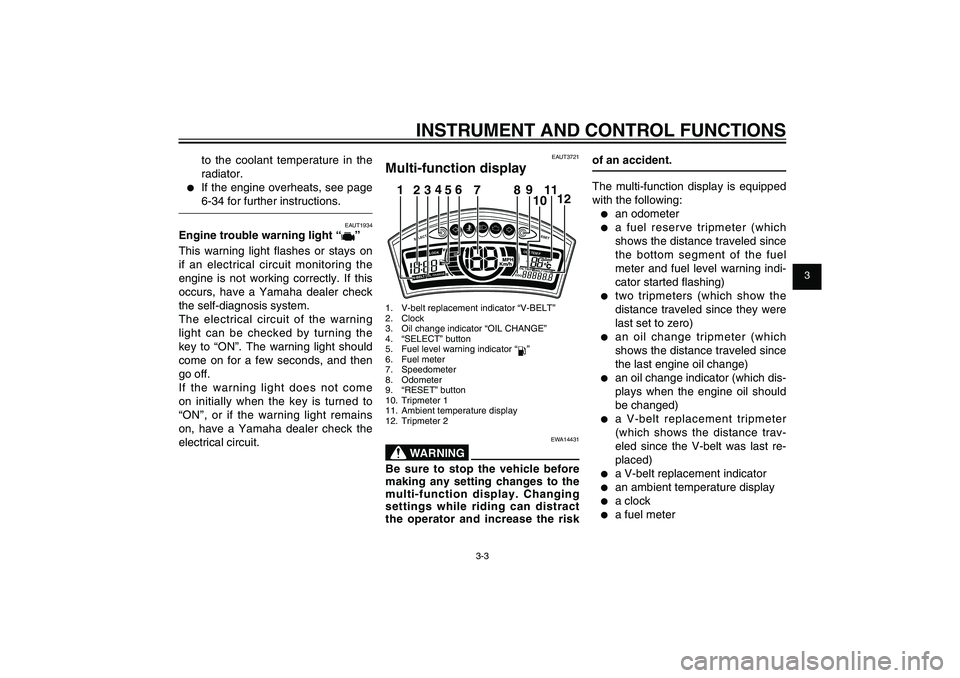
Multi-function display
SELECT
RESET
ODOOIL
TRI P 1 BE
L
T TRIP 2
OIL CHANGECLOOK
OUT TEM
P
12
34
56
789
1012 111. V-belt replacement indicator “V-BELT”
2. Clock
3. Oil change indicator “OIL CHANGE”
4. “SELECT” button
5. Fuel level warning indicator “
”
6. Fuel meter
7. Speedometer
8. Odometer
9. “RESET” button
10. Tripmeter 1
11. Ambient temperature display
12. Tripmeter 2
EWA14431
WARNING
Be sure to stop the vehicle before
making any setting changes to the
multi-function display. Changing
settings while riding can distract
the operator and increase the risk
of an accident.
The multi-function display is equipped
with the following:● an odometer● a fuel reserve tripmeter (which
shows the distance traveled since
the bottom segment of the fuel
meter and fuel level warning indi-
cator started fl ashing)● two tripmeters (which show the
distance traveled since they were
last set to zero)● an oil change tripmeter (which
shows the distance traveled since
the last engine oil change)● an oil change indicator (which dis-
plays when the engine oil should
be changed)● a V-belt replacement tripmeter
(which shows the distance trav-
eled since the V-belt was last re-
placed)● a V-belt replacement indicator● an ambient temperature display● a clock● a fuel meter
52S-F8199-E0_CS.indd 3-352S-F8199-E0_CS.indd 3-3
2011/11/16 13:07:002011/11/16 13:07:00
Process BlackProcess Black
Page 22 of 84

1
2
3
4
5
6
7
8
9
3-6
EAU1044E
INSTRUMENT AND CONTROL FUNCTIONS
below -10 °C, a lower tempera-
ture than -10 °C will not be dis-
played.
● If the ambient temperature climbs
above 40 °C, a higher tempera-
ture than 40 °C will not be dis-
played.● The accuracy of the temperature
reading may be affected when
riding slowly (approximately un-
der 20 km/h (12 mi/h)) or when
stopped at traffi c signals, railroad
crossings, etc.
Clock
To set the clock:
1. Push the “SELECT” button and
“RESET” button together for at
least two seconds.
2. When the hour digits start flash-
ing, push the “RESET” button to
set the hours.
3. Push the “SELECT” button, and
the minute digits will start flash-
ing.
4. Push the “RESET” button to set
the minute digits.
5. Push the “SELECT” button and
then release it to start the clock.
Fuel meter
The fuel meter indicates the amount
of fuel in the fuel tank. The display
segments of the fuel meter disappear
towards “E” (Empty) as the fuel level
decreases. When the bottom segment
of the fuel meter and fuel level warn-
ing indicator “
” starts fl ashing, refuel
as soon as possible. When the key is
turned to “ON”, all of the display seg-
ments of the fuel meter will appear for
a few seconds, and then shows the
actual fuel level.
Brightness control mode
This function allows you to adjust the
brightness of the speedometer panel
to suit the outside lighting conditions.
To set the brightness
1. Turn the key to “OFF”.
2. Push and hold the “SELECT” but-
ton.
3. Turn the key to “ON”, and then re-lease the “SELECT” button after
fi ve seconds.
4. Push the “RESET” button to se-
lect the desired brightness level,
and then turn the key to “OFF”.
52S-F8199-E0_CS.indd 3-652S-F8199-E0_CS.indd 3-6
2011/11/16 13:07:002011/11/16 13:07:00
Process BlackProcess Black
Page 24 of 84

1
2
3
4
5
6
7
8
9
3-8
EAU1044E
INSTRUMENT AND CONTROL FUNCTIONS
EAUS1961
Rear brake lever
1
1. Rear brake leverThe rear brake lever is located on the
left handlebar grip. To apply the rear
brake, pull the lever toward the han-
dlebar grip.
This model is equipped with a unifi ed
brake system.
When pulling the rear brake lever, the
rear brake and a portion of the front
brake are applied. For full braking
performance, apply both brake levers
simultaneously.TIP● As the unified brake system is
mechanical, additional free play
can be felt in the front brake lever
when the rear brake lever is be-
ing pulled.
● The unified brake system does
not function when the front brake
is applied alone.
EAUT3590
Fuel tank cap
1
2
1. Fuel tank cap
2. Match marksTo remove the fuel tank cap
1. Open the seat. (See page 3-11.)
2. Turn the fuel tank cap counter-
clockwise and pull it off.
To install the fuel tank cap
1. Insert the fuel tank cap into the
tank opening and turn it clockwise
until the “�W/�X” marks on the cap
and rubber mat are aligned.
2. Close the seat.
EWA11091
WARNING
Make sure that the fuel tank cap
52S-F8199-E0_CS.indd 3-852S-F8199-E0_CS.indd 3-8
2011/11/16 13:07:002011/11/16 13:07:00
Process BlackProcess Black
Page 27 of 84

1
2
3
4
5
6
7
8
9
3-11
EAU1044E
INSTRUMENT AND CONTROL FUNCTIONS
ECA10701
NOTICEUse only unleaded gasoline. The
use of leaded gasoline will cause
unrepairable damage to the cata-
lytic converter.
EAU13932
Seat
1
1. Turn.To open the seat
1. Place the scooter on the center-
stand.
2. Insert the key into the main
switch, and then turn it counter-
clockwise to “OPEN”.TIPDo not push inward when turning the
key.
3. Fold the seat up.
To close the seat
1. Fold the seat down, and then
push it down to lock it in place.
2. Remove the key from the main
switch if the scooter will be left
unattended.TIPMake sure that the seat is properly se-
cured before riding.
52S-F8199-E0_CS.indd 3-1152S-F8199-E0_CS.indd 3-11
2011/11/16 13:07:002011/11/16 13:07:00
Process BlackProcess Black
Page 66 of 84

1
2
3
4
5
6
7
8
9
6-29
EAU1722A
PERIODIC MAINTENANCE AND ADJUSTMENT
EAU24181
Tail/brake light
1
1. Tail/brake lightThis model is equipped with an LED-
type tail/brake light.
If the tail/brake light does not come
on, have a Yamaha dealer check it.
EAUT3650
Replacing a front turn signal
light bulbIf a front turn signal light burns out, re-
place it as follows.
1. Remove cowling A. (See page
6-7.)
2. Remove the socket (together with
the bulb) by turning it counter-
clockwise.
1
1. Turn signal light bulb socket
3. Unhook the headlight bulb holder,
and then remove the burnt-out
bulb.
4. Place a new headlight bulb into
position, and then secure it with
the bulb holder.
5. Connect the coupler, and then in-
stall the headlight bulb cover.
6. Install the cowling together with
the headlight unit.
7. Have a Yamaha dealer adjust the
headlight beam if necessary.
52S-F8199-E0_CS.indd 6-2952S-F8199-E0_CS.indd 6-29
2011/11/16 13:07:022011/11/16 13:07:02
Process BlackProcess Black
Page 67 of 84

1
2
3
4
5
6
7
8
9
6-30
EAU1722A
PERIODIC MAINTENANCE AND ADJUSTMENT
EAUT3640
Replacing an auxiliary light
bulbIf an auxiliary light bulb burns out, re-
place it as follows.
1. Remove cowling A. (See page
6-7.)
2. Remove the socket (together with
the bulb) by turning it counter-
clockwise.
1
1. Auxiliary light bulb socket
1
1. Auxiliary light bulb3. Remove the burnt out bulb by
pulling it out.
4. Insert a new bulb into the socket.
5. Install the socket (together with
the bulb) by turning it clockwise.
6. Install the cowling.
1
1. Turn signal light bulb3. Remove the burnt out bulb by
pushing it in and turning it coun-
terclockwise.
4. Insert a new bulb into the socket,
push it in, and then turn it clock-
wise until it stops.
ECAU0080
NOTICEIf a turn signal light bulb of differ-
ent wattage than recommended is
used, the turn signal light � ashing
may be affected.
5. Install the socket (together with
the bulb) by turning it clockwise.
6. Install the cowling.
52S-F8199-E0_CS.indd 6-3052S-F8199-E0_CS.indd 6-30
2011/11/16 13:07:022011/11/16 13:07:02
Process BlackProcess Black
Page 68 of 84

1
2
3
4
5
6
7
8
9
6-31
EAU1722A
PERIODIC MAINTENANCE AND ADJUSTMENT
may be affected.
4. Install the lens by installing the
screw.
NOTICE:
Do not over-
tighten the screw, otherwise
the lens may break.
[ECA11191]EAU24330
License plate light
1
1. License plate lightIf the license plate light does not come
on, have a Yamaha dealer check the
electrical circuit or replace the bulb.
EAUT3670
Replacing a rear turn signal
light bulb1. Remove the turn signal lens by
removing the screw.
1
1. Rear turn signal light bulb2. Remove the burnt-out bulb by
pushing it in and turning it coun-
terclockwise.
3. Insert a new bulb into the socket,
push it in, and then turn it clock-
wise until it stops.
ECAU0080
NOTICEIf a turn signal light bulb of differ-
ent wattage than recommended is
used, the turn signal light � ashing
52S-F8199-E0_CS.indd 6-3152S-F8199-E0_CS.indd 6-31
2011/11/16 13:07:022011/11/16 13:07:02
Process BlackProcess Black
Page 71 of 84

1
2
3
4
5
6
7
8
9
6-34
EAU1722A
PERIODIC MAINTENANCE AND ADJUSTMENT
Engine overheating
EWAT1040
WARNING
●
Do not remove the radiator cap when the engine and radiator are hot. Scalding hot � uid and steam may be
blown out under pressure, which could cause serious injury. Be sure to wait until the engine has cooled.
●
Place a thick rag, like a towel, over the radiator cap, and then slowly rotate the cap counterclockwise to the
detent to allow any residual pressure to escape. When the hissing sound has stopped, press down on the
cap while turning it counterclockwise, and then remove the cap.Wait until the
engine has cooled.
Check the coolant level in the
reservoir and radiator.
The coolant level
is OK.The coolant level is low.
Check the cooling system
for leakage.
Have a Yamaha dealer checkand repair the cooling system.Add coolant. (See TIP.)
Start the engine. If the engine overheats again,
have a
Yamaha dealer check
and repair the cooling system.
There is
leakage.
There is
no leakage.
TIPIf coolant is not available, tap water can be temporarily used instead, provided that it is changed to the recommended
coolant as soon as possible.
52S-F8199-E0_CS.indd 6-3452S-F8199-E0_CS.indd 6-34
2011/11/16 13:07:022011/11/16 13:07:02
Process BlackProcess Black