lock YAMAHA XENTER 150 2016 Owners Manual
[x] Cancel search | Manufacturer: YAMAHA, Model Year: 2016, Model line: XENTER 150, Model: YAMAHA XENTER 150 2016Pages: 84, PDF Size: 1.88 MB
Page 6 of 84

Table of contentsSafety information............................ 1-1
Further safe-riding points................. 1-5
Description ........................................ 2-1
Left view .......................................... 2-1
Right view ........................................ 2-2
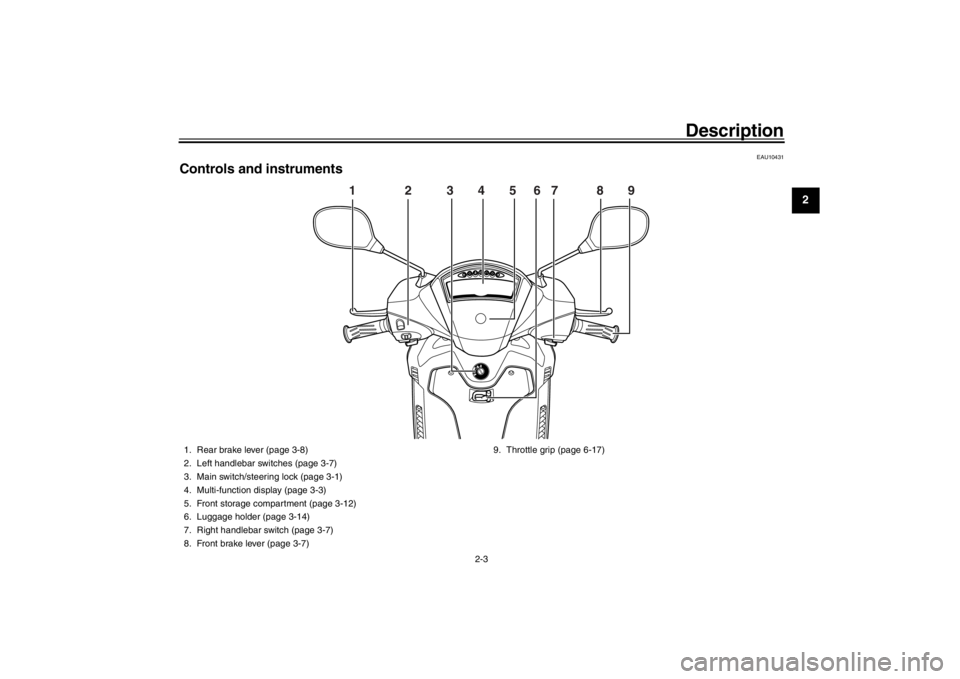
Controls and instrument s................. 2-3
Instrument and co ntrol functions.... 3-1
Main switch/steering lock................. 3-1
Indicator lights and warning lights ... 3-2
Multi-function display ....................... 3-3
Handlebar switches ......................... 3-7
Front brake lever ............................. 3-7
Rear brake lever .............................. 3-8
Fuel tank cap ................................... 3-8
Fuel.................................................. 3-9
Catalytic converter ......................... 3-10
Seat ............................................... 3-11
Passenger footrest ........................ 3-11
Storage compartments .................. 3-12
Shock absorber assembly ............. 3-13
Carrier............................................ 3-14
Luggage holder.............................. 3-14
For your safety – pre-operation
checks ................................................ 4-1
Operation and im portant riding
points ................................................. 5-1
Starting the engine .......................... 5-1 Starting off ....................................... 5-2
Acceleration and deceleration ......... 5-2
Braking ............................................ 5-3
Tips for reducing fuel
consumption ................................ 5-3
Engine break-in ............................... 5-3
Parking ............................................ 5-4
Periodic maintenance and
adjustment ........................................ 6-1
Owner’s tool kit................................ 6-2
Periodic maintenance chart for the emission control system .............. 6-4
General maintenance and lubrication
chart ............................................. 6-5
Removing and installing the cowling and panels ............................. ...... 6-8
Checking the spark plug................ 6-10
Engine oil and oil strainer .............. 6-11
Final transmission oil..................... 6-13
Coolant .......................................... 6-14
Air filter and V-belt case air filter elements .................................... 6-16
Checking the engine idling speed ......................................... 6-17
Checking the throttle grip free play ............................................ 6-17
Valve clearance............................. 6-18
Tires .............................................. 6-18
Cast wheels................................... 6-20 Checking the front brake lever free
play ............................................. 6-20
Adjusting the rear brake lever free play ............................................. 6-20
Checking the front brake pads and
rear brake shoes ....................... 6-21
Checking the brake fluid level ........ 6-22
Changing the brake fluid ............... 6-23
Checking and lubricating the cables ......................................... 6-23
Checking and lubricating the throttle
grip and cable ............................. 6-24
Lubricating the front and rear brake levers .......................................... 6-24
Checking and lubricating the centerstand................................. 6-24
Checking the front fork................... 6-25
Checking the steering .................... 6-26
Checking the wheel bearings......... 6-26
Battery ........................................... 6-26
Replacing the fuses ....................... 6-28
Replacing the headlight bulb ......... 6-28
Replacing an auxiliary light bulb .... 6-29
Tail/brake light ............................... 6-30
Replacing a front turn signal light
bulb............................................. 6-30
Replacing a rear turn signal light bulb............................................. 6-31
License plate light .......................... 6-32
Troubleshooting ........... .................. 6-32
Troubleshooting charts .................. 6-33U52SE1E0 1 ページ 2015年9月16日 水曜日 午後5時27分
Page 15 of 84
Description
2-3
123
4
5
6
7
8
9
10
11
12
EAU10431
Controls and instruments
1 2 3 4 5 6 7 8 \
9
1. Rear brake lever (page 3-8)
2. Left handlebar switches (page 3-7)
3. Main switch/steering lock (page 3-1)
4. Multi-function display (page 3-3)
5. Front storage compartment (page 3-12)
6. Luggage holder (page 3-14)
7. Right handlebar switch (page 3-7)
8. Front brake lever (page 3-7) 9. Throttle grip (page 6-17)
U52SE1E0 3 ページ 2015年9月16日 水曜日 午後5時27分
Page 16 of 84
3-1
1
23
4
5
6
7
8
9
10
11
12
Instrument and control functions
EAU10462
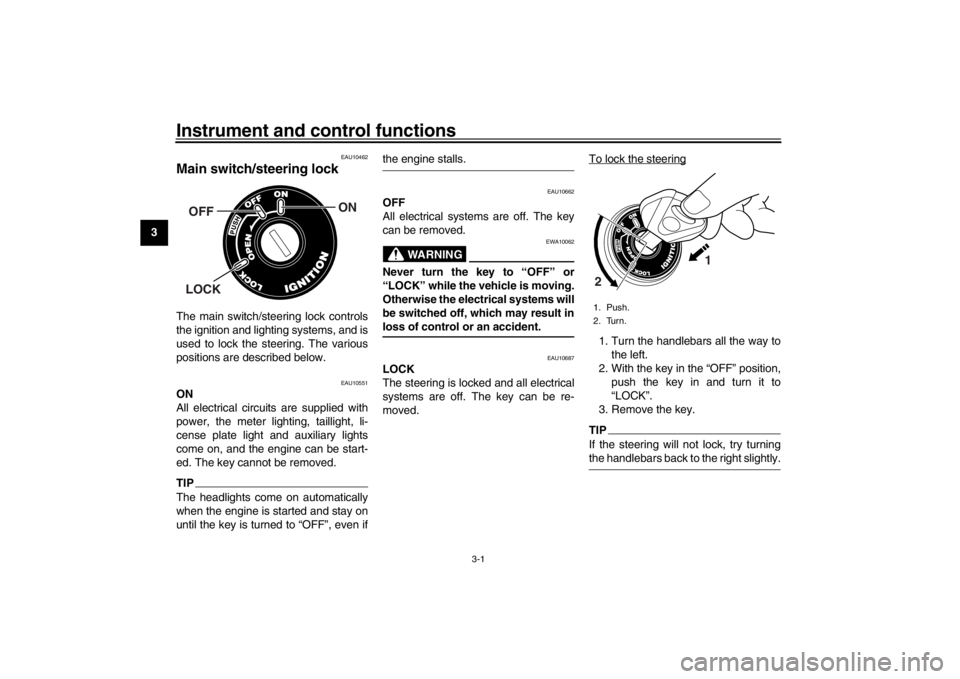
Main switch/steering lockThe main switch/steering lock controls
the ignition and lighting systems, and is
used to lock the steering. The various
positions are described below.
EAU10551
ON
All electrical circui ts are supplied with
power, the meter lighting, taillight, li-
cense plate light and auxiliary lights
come on, and the engine can be start-
ed. The key cannot be removed.TIPThe headlights come on automatically
when the engine is started and stay on
until the key is turned to “OFF”, even if
the engine stalls.
EAU10662
OFF
All electrical systems are off. The key
can be removed.
WARNING
EWA10062
Never turn the key to “OFF” or
“LOCK” while the vehicle is moving.
Otherwise the electrical systems will
be switched off, which may result inloss of control or an accident.
EAU10687
LOCK
The steering is lock ed and all electrical
systems are off. The key can be re-
moved. To lock the steering
1. Turn the handlebars all the way to
the left.
2. With the key in the “OFF” position, push the key in and turn it to
“LOCK”.
3. Remove the key.TIPIf the steering will not lock, try turningthe handlebars back to the right slightly.
ON
OFFLOCK
1. Push.
2. Turn.
1
2
U52SE1E0 1 ページ 2015年9月16日 水曜日 午後5時27分
Page 17 of 84
Instrument and control functions
3-2
1
234
5
6
7
8
9
10
11
12
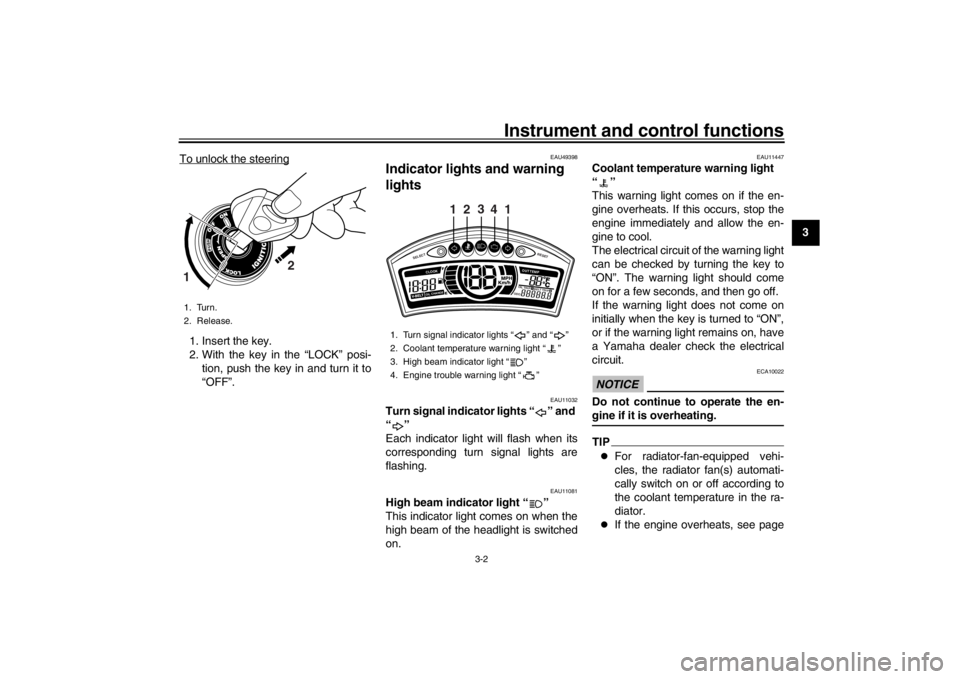
To unlock the steering
1. Insert the key.
2. With the key in the “LOCK” posi-
tion, push the key in and turn it to
“OFF”.
EAU49398
Indicator lights and warning
lights
EAU11032
Turn signal indicator lights “ ” and
“”
Each indicator light will flash when its
corresponding turn signal lights are
flashing.
EAU11081
High beam indicator light “ ”
This indicator light comes on when the
high beam of the headlight is switched
on.
EAU11447
Coolant temperature warning light
“”
This warning light comes on if the en-
gine overheats. If this occurs, stop the
engine immediately and allow the en-
gine to cool.
The electrical circuit of the warning light
can be checked by turning the key to
“ON”. The warning light should come
on for a few seconds, and then go off.
If the warning light does not come on
initially when the key is turned to “ON”,
or if the warning light remains on, have
a Yamaha dealer check the electrical
circuit.NOTICE
ECA10022
Do not continue to operate the en-gine if it is overheating.TIP
For radiator-fan-equipped vehi-
cles, the radiator fan(s) automati-
cally switch on or off according to
the coolant temperature in the ra-
diator.
If the engine overheats, see page
1. Turn.
2. Release.
2
1
1. Turn signal indicator lights “ ” and “ ”
2. Coolant temperature warning light “ ”
3. High beam indicator light “ ”
4. Engine trouble warning light “ ”
SELECT
RESET
ODOOIL TRI P 1 BE LT TRI P 2
OIL CHANGECLOOK
OUT TEM P
3
24
11
U52SE1E0 2 ページ 2015年9月16日 水曜日 午後5時27分
Page 18 of 84
Instrument and control functions
3-3
1
23
4
5
6
7
8
9
10
11
12
6-34 for further instructions.
EAUT1936
Engine trouble warning light “ ”
This warning light flashes or stays on if
an electrical circuit monitoring the en-
gine is not working correctly. If this oc-
curs, have a Yamaha dealer check the
self-diagnosis system.
The electrical circuit of the warning light
can be checked by turning the key to
“ON”. The warning light should come
on for a few seconds, and then go off.
If the warning light does not come on
initially when the key is turned to “ON”,
or if the warning light remains on, have
a Yamaha dealer check the electrical
circuit.
EAUT3725
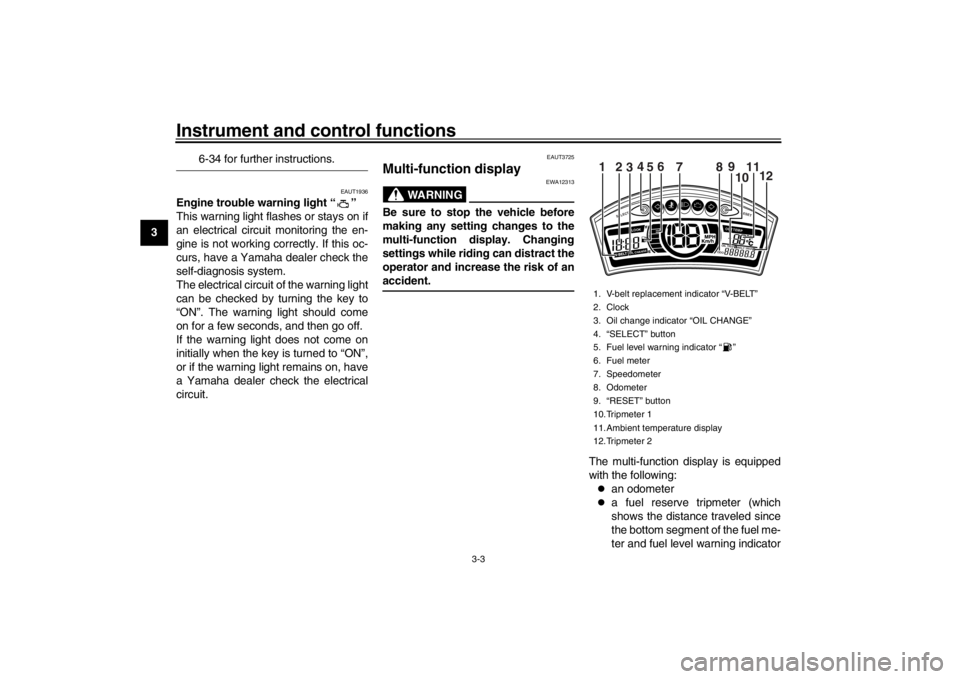
Multi-function display
WARNING
EWA12313
Be sure to stop the vehicle before
making any setting changes to the
multi-function display. Changing
settings while riding can distract the
operator and increase the risk of anaccident.
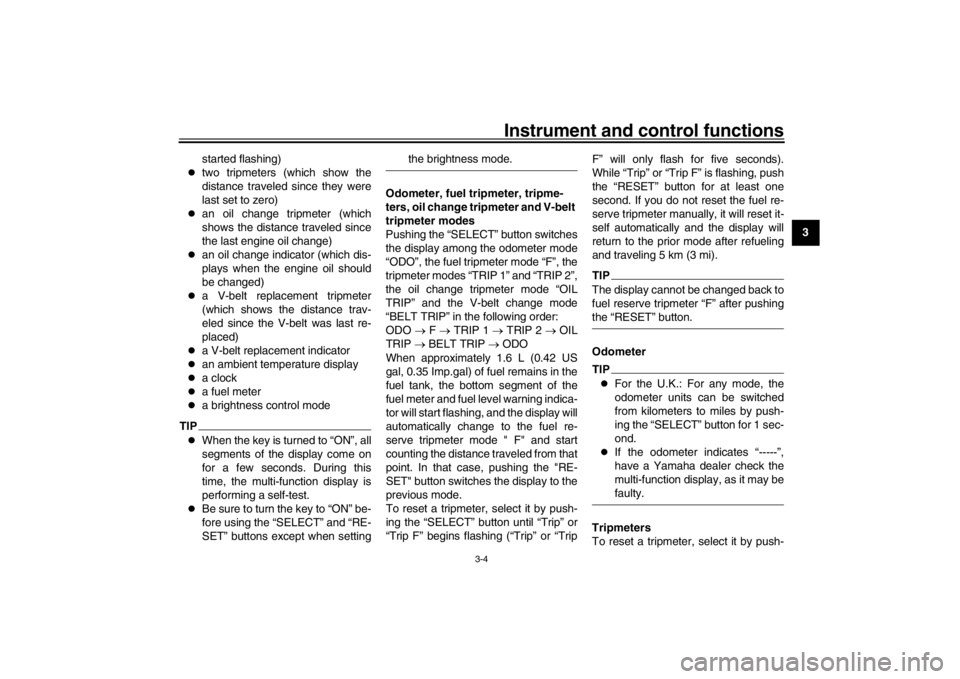
The multi-function display is equipped
with the following:
an odometer
a fuel reserve tripmeter (which
shows the distance traveled since
the bottom segment of the fuel me-
ter and fuel level warning indicator
1. V-belt replacement indicator “V-BELT”
2. Clock
3. Oil change indicator “OIL CHANGE”
4. “SELECT” button
5. Fuel level warning indicator “ ”
6. Fuel meter
7. Speedometer
8. Odometer
9. “RESET” button
10.Tripmeter 1
11.Ambient temperature display
12.Tripmeter 2
SELECT
RESET
ODOOIL
TRI P 1 BE LT TRI P
2
OIL CHANGECLOOK
OUT TEM P
12
34
5 6
78 9
10 12
11
U52SE1E0 3 ページ 2015年9月16日 水曜日 午後5時27分
Page 19 of 84
Instrument and control functions
3-4
1
234
5
6
7
8
9
10
11
12
started flashing)
two tripmeters (which show the
distance traveled since they were
last set to zero)
an oil change tripmeter (which
shows the distance traveled since
the last engine oil change)
an oil change indicator (which dis-
plays when the engine oil should
be changed)
a V-belt replacement tripmeter
(which shows the distance trav-
eled since the V-belt was last re-
placed)
a V-belt replacement indicator
an ambient temperature display
a clock
a fuel meter
a brightness control mode
TIP
When the key is turned to “ON”, all
segments of the display come on
for a few seconds. During this
time, the multi-function display is
performing a self-test.
Be sure to turn the key to “ON” be-
fore using the “SELECT” and “RE-
SET” buttons except when setting
the brightness mode.
Odometer, fuel tripmeter, tripme-
ters, oil change tripmeter and V-belt
tripmeter modes
Pushing the “SELECT” button switches
the display among the odometer mode
“ODO”, the fuel tripmeter mode “F”, the
tripmeter modes “TRIP 1” and “TRIP 2”,
the oil change tripmeter mode “OIL
TRIP” and the V-belt change mode
“BELT TRIP” in the following order:
ODO F TRIP 1 TRIP 2 OIL
TRIP BELT TRIP ODO
When approximately 1.6 L (0.42 US
gal, 0.35 Imp.gal) of fuel remains in the
fuel tank, the bottom segment of the
fuel meter and fuel level warning indica-
tor will start flashing, and the display will
automatically change to the fuel re-
serve tripmeter mode " F" and start
counting the distance traveled from that
point. In that case, pushing the "RE-
SET" button switches the display to the
previous mode.
To reset a tripmeter, select it by push-
ing the “SELECT” button until “Trip” or
“Trip F” begins flashing (“Trip” or “Trip F” will only flash for five seconds).
While “Trip” or “Trip F” is flashing, push
the “RESET” button for at least one
second. If you do not reset the fuel re-
serve tripmeter manually, it will reset it-
self automatically and the display will
return to the prior mode after refueling
and traveling 5 km (3 mi).
TIPThe display cannot be changed back to
fuel reserve tripmeter “F” after pushingthe “RESET” button.
OdometerTIP
For the U.K.: For any mode, the
odometer units can be switched
from kilometers to miles by push-
ing the “SELECT” button for 1 sec-
ond.
If the odometer indicates “-----”,
have a Yamaha dealer check the
multi-function display, as it may befaulty.
Tripmeters
To reset a tripmeter, select it by push-
U52SE1E0 4 ページ 2015年9月16日 水曜日 午後5時27分
Page 21 of 84

Instrument and control functions
3-6
1
234
5
6
7
8
9
10
11
12
TIP
If the ambient temperature falls be-
low –10 C, a lower temperature
than –10 C will not be displayed.
If the ambient temperature climbs
above 40 C, a higher temperature
than 40 C will not be displayed.
The accuracy of the temperature
reading may be affected when rid-
ing slowly (approximately under 20
km/h (12 mi/h)) or when stopped at
traffic signals, railroad crossings,etc.
Clock
To set the clock:
1. Push the “SELECT” button and “RESET” button together for at
least two seconds.
2. When the hour digits start flashing, push the “RESET” button to set the
hours.
3. Push the “SELECT” button, and the minute digits will start flashing.
4. Push the “RESET” button to set the minute digits.
5. Push the “SELECT” button and then release it to start the clock.
Fuel meter
The fuel meter indicates the amount of
fuel in the fuel tank. The display seg-
ments of the fuel meter disappear to-
wards “E” (Empty) as the fuel level
decreases. When the bottom segment
of the fuel meter and fuel level warning
indicator “*” starts flashing, refuel as
soon as possible. When the key is
turned to “ON”, all of the display seg-
ments of the fuel meter will appear for a
few seconds, and then shows the actu-
al fuel level.
Brightness control mode
This function allows you to adjust the
brightness of the speedometer panel to
suit the outside lighting conditions.
To set the brightness
1. Turn the key to “OFF”.
2. Push and hold the “SELECT” but- ton.
3. Turn the key to “ON”, and then re- lease the “SELECT” button after
five seconds. The display will
change to brightness control mode.
4. Push the “RESET” button to select the desired brightness level in the
following order: BL-01 BL-02
BL-03 BL-04 BL-05
BL-01.
5. Turn the key to “OFF”.
U52SE1E0 6 ページ 2015年9月16日 水曜日 午後5時27分
Page 23 of 84
Instrument and control functions
3-8
1
234
5
6
7
8
9
10
11
12
EAUS1963
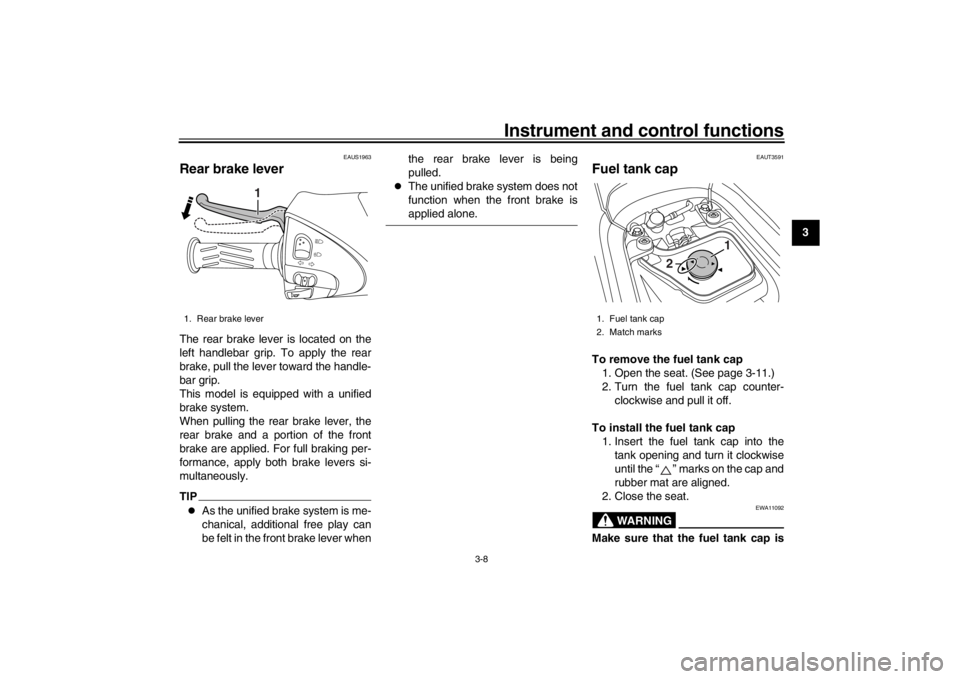
Rear brake leverThe rear brake lever is located on the
left handlebar grip. To apply the rear
brake, pull the lever toward the handle-
bar grip.
This model is equipped with a unified
brake system.
When pulling the rear brake lever, the
rear brake and a portion of the front
brake are applied. For full braking per-
formance, apply both brake levers si-
multaneously.TIP
As the unified brake system is me-
chanical, additional free play can
be felt in the front brake lever when the rear brake lever is being
pulled.
The unified brake system does not
function when the front brake isapplied alone.
EAUT3591
Fuel tank capTo remove the fuel tank cap
1. Open the seat. (See page 3-11.)
2. Turn the fuel tank cap counter- clockwise and pull it off.
To install the fuel tank cap 1. Insert the fuel tank cap into the tank opening and turn it clockwise
until the “ ” marks on the cap and
rubber mat are aligned.
2. Close the seat.
WARNING
EWA11092
Make sure that the fuel tank cap is
1. Rear brake lever
1
1. Fuel tank cap
2. Match marks
1
2
U52SE1E0 8 ページ 2015年9月16日 水曜日 午後5時27分
Page 26 of 84

Instrument and control functions
3-11
1
23
4
5
6
7
8
9
10
11
12
EAU13933
SeatTo open the seat 1. Place the scooter on the center- stand.
2. Insert the key into the main switch, and then turn it counterclockwise
to “OPEN”.TIPDo not push inward when turning thekey.
3. Fold the seat up.
To close the seat 1. Fold the seat down, and then push it down to lock it in place. 2. Remove the key from the main
switch if the scooter will be left un-
attended.
TIPMake sure that the seat is properly se-cured before riding.
EAUT3711
Passenger footrestTo use the passenger footrest, pull it
out as shown.
To retract the passenger footrest, push
it back to original position.
1. Turn.
1
1. Passenger footrest
1
U52SE1E0 11 ページ 2015年9月16日 水曜日 午後5時27分
Page 57 of 84
Periodic maintenance and adjustment6-22
1
2
3
4
567
8
9
10
11
12
set.
EAU32346
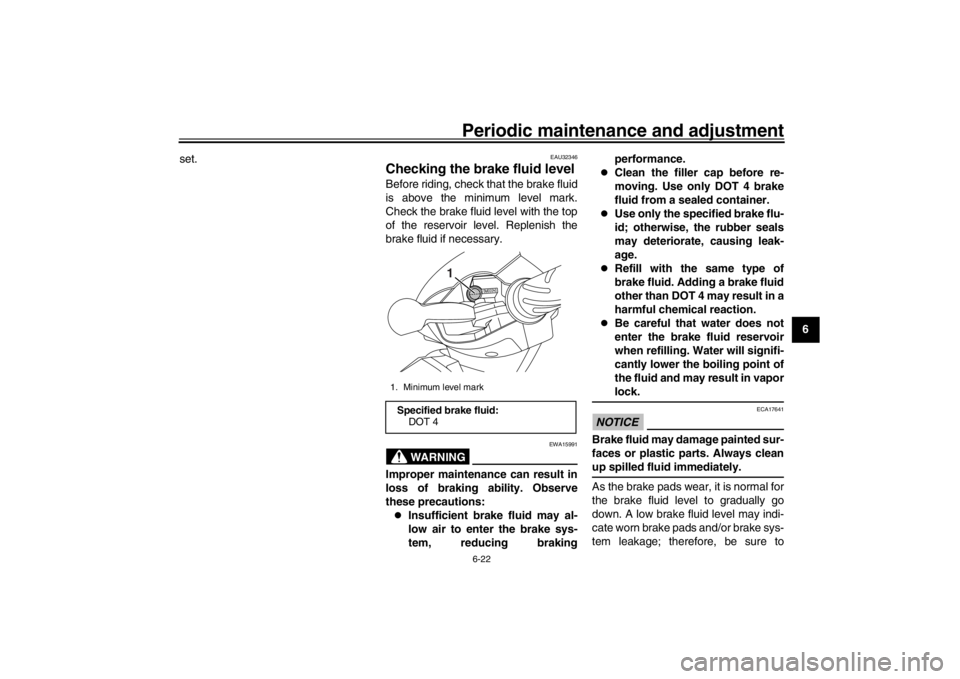
Checking the brake fluid levelBefore riding, check that the brake fluid
is above the minimum level mark.
Check the brake fluid level with the top
of the reservoir level. Replenish the
brake fluid if necessary.
WARNING
EWA15991
Improper maintenance can result in
loss of braking ability. Observe
these precautions:
Insufficient brake fluid may al-
low air to enter the brake sys-
tem, reducing braking performance.
Clean the filler cap before re-
moving. Use only DOT 4 brake
fluid from a sealed container.
Use only the specified brake flu-
id; otherwise, the rubber seals
may deteriorate, causing leak-
age.
Refill with the same type of
brake fluid. Adding a brake fluid
other than DOT 4 may result in a
harmful chemical reaction.
Be careful that water does not
enter the brake fluid reservoir
when refilling. Water will signifi-
cantly lower the boiling point of
the fluid and may result in vaporlock.
NOTICE
ECA17641
Brake fluid may damage painted sur-
faces or plastic parts. Always cleanup spilled fluid immediately.
As the brake pads wear, it is normal for
the brake fluid level to gradually go
down. A low brake fluid level may indi-
cate worn brake pads and/or brake sys-
tem leakage; therefore, be sure to
1. Minimum level markSpecified brake fluid:
DOT 4
1
U52SE1E0 22 ページ 2015年9月16日 水曜日 午後5時27分