steering wheel adjustment YAMAHA XENTER 150 2016 Owners Manual
[x] Cancel search | Manufacturer: YAMAHA, Model Year: 2016, Model line: XENTER 150, Model: YAMAHA XENTER 150 2016Pages: 84, PDF Size: 1.88 MB
Page 6 of 84

Table of contentsSafety information............................ 1-1
Further safe-riding points................. 1-5
Description ........................................ 2-1
Left view .......................................... 2-1
Right view ........................................ 2-2
Controls and instrument s................. 2-3
Instrument and co ntrol functions.... 3-1
Main switch/steering lock................. 3-1
Indicator lights and warning lights ... 3-2
Multi-function display ....................... 3-3
Handlebar switches ......................... 3-7
Front brake lever ............................. 3-7
Rear brake lever .............................. 3-8
Fuel tank cap ................................... 3-8
Fuel.................................................. 3-9
Catalytic converter ......................... 3-10
Seat ............................................... 3-11
Passenger footrest ........................ 3-11
Storage compartments .................. 3-12
Shock absorber assembly ............. 3-13
Carrier............................................ 3-14
Luggage holder.............................. 3-14
For your safety – pre-operation
checks ................................................ 4-1
Operation and im portant riding
points ................................................. 5-1
Starting the engine .......................... 5-1 Starting off ....................................... 5-2
Acceleration and deceleration ......... 5-2
Braking ............................................ 5-3
Tips for reducing fuel
consumption ................................ 5-3
Engine break-in ............................... 5-3
Parking ............................................ 5-4
Periodic maintenance and
adjustment ........................................ 6-1
Owner’s tool kit................................ 6-2
Periodic maintenance chart for the emission control system .............. 6-4
General maintenance and lubrication
chart ............................................. 6-5
Removing and installing the cowling and panels ............................. ...... 6-8
Checking the spark plug................ 6-10
Engine oil and oil strainer .............. 6-11
Final transmission oil..................... 6-13
Coolant .......................................... 6-14
Air filter and V-belt case air filter elements .................................... 6-16
Checking the engine idling speed ......................................... 6-17
Checking the throttle grip free play ............................................ 6-17
Valve clearance............................. 6-18
Tires .............................................. 6-18
Cast wheels................................... 6-20 Checking the front brake lever free
play ............................................. 6-20
Adjusting the rear brake lever free play ............................................. 6-20
Checking the front brake pads and
rear brake shoes ....................... 6-21
Checking the brake fluid level ........ 6-22
Changing the brake fluid ............... 6-23
Checking and lubricating the cables ......................................... 6-23
Checking and lubricating the throttle
grip and cable ............................. 6-24
Lubricating the front and rear brake levers .......................................... 6-24
Checking and lubricating the centerstand................................. 6-24
Checking the front fork................... 6-25
Checking the steering .................... 6-26
Checking the wheel bearings......... 6-26
Battery ........................................... 6-26
Replacing the fuses ....................... 6-28
Replacing the headlight bulb ......... 6-28
Replacing an auxiliary light bulb .... 6-29
Tail/brake light ............................... 6-30
Replacing a front turn signal light
bulb............................................. 6-30
Replacing a rear turn signal light bulb............................................. 6-31
License plate light .......................... 6-32
Troubleshooting ........... .................. 6-32
Troubleshooting charts .................. 6-33U52SE1E0 1 ページ 2015年9月16日 水曜日 午後5時27分
Page 40 of 84

Periodic maintenance and adjustment
6-5
1
2
3
4
56
7
8
9
10
11
12
EAU1771A
General maintenance and lubrication chartNO. ITEM CHECK OR MAINTENANCE JOB ODOMETER READING
ANNUAL
CHECK
1000 km
(600 mi) 6000 km
(3500 mi) 12000 km
(7000 mi) 18000 km
(10500 mi) 24000 km
(14000 mi)
1 Air filter element
2 Air filter check hose Clean.
3 V-belt case air filter
element Clean.
4 * Front brake Check operation, fluid level and
vehicle for fluid leakage.
Replace brake pads. Whenever worn to the limit
5 * Rear brake Check operation and adjust brake
lever free play.
Replace brake shoes. Whenever worn to the limit
6 * Brake hose Check for cracks or damage.
Check for correct routing and
clamping.
Replace. Every 4 years
7 * Wheels Check runout and for damage.
8 *Tires Check tread depth and for
damage.
Replace if necessary.
Check air pressure.
Correct if necessary.
9 * Wheel bearings Check bearings for looseness or
damage.
10 * Steering bearings Check bearing play and steering
for roughness.
Lubricate with lithium-soap-based grease. Every 50000 km (30000 mi)
11 * Chassis fasteners Make sure that all nuts, bolts and
screws are properly tightened.
U52SE1E0 5 ページ 2015年9月16日 水曜日 午後5時27分
Page 61 of 84

Periodic maintenance and adjustment6-26
1
2
3
4
567
8
9
10
11
12
EAU45512
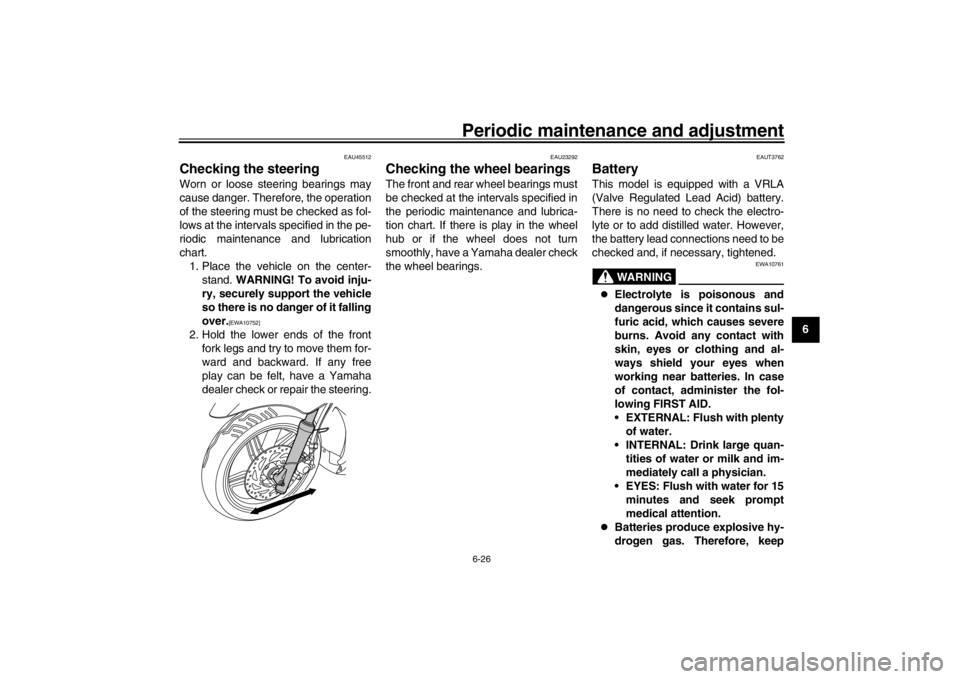
Checking the steeringWorn or loose steering bearings may
cause danger. Therefore, the operation
of the steering must be checked as fol-
lows at the intervals specified in the pe-
riodic maintenance and lubrication
chart. 1. Place the vehicle on the center- stand. WARNING! To avoid inju-
ry, securely support the vehicle
so there is no danger of it falling
over.
[EWA10752]
2. Hold the lower ends of the front fork legs and try to move them for-
ward and backward. If any free
play can be felt, have a Yamaha
dealer check or repair the steering.
EAU23292
Checking the w heel bearingsThe front and rear wheel bearings must
be checked at the intervals specified in
the periodic maintenance and lubrica-
tion chart. If there is play in the wheel
hub or if the wheel does not turn
smoothly, have a Yamaha dealer check
the wheel bearings.
EAUT3762
BatteryThis model is equipped with a VRLA
(Valve Regulated Lead Acid) battery.
There is no need to check the electro-
lyte or to add distilled water. However,
the battery lead connections need to be
checked and, if necessary, tightened.
WARNING
EWA10761
Electrolyte is poisonous and
dangerous since it contains sul-
furic acid, which causes severe
burns. Avoid any contact with
skin, eyes or clothing and al-
ways shield your eyes when
working near batteries. In case
of contact, administer the fol-
lowing FIRST AID.
EXTERNAL: Flush with plenty
of water.
INTERNAL: Drink large quan- tities of water or milk and im-
mediately call a physician.
EYES: Flush with water for 15
minutes and seek prompt
medical attention.
Batteries produce explosive hy-
drogen gas. Therefore, keep
U52SE1E0 26 ページ 2015年9月16日 水曜日 午後5時27分