seat adjustment YAMAHA XJ6-N 2012 Owners Manual
[x] Cancel search | Manufacturer: YAMAHA, Model Year: 2012, Model line: XJ6-N, Model: YAMAHA XJ6-N 2012Pages: 104, PDF Size: 2.86 MB
Page 6 of 104

TABLE OF CONTENTSSAFETY INFORMATION ..................1-1
DESCRIPTION ..................................2-1
Left view ..........................................2-1
Right view ........................................2-2
Controls and instruments.................2-3
INSTRUMENT AND CONTROL
FUNCTIONS .......................................3-1
Immobilizer system .........................3-1
Main switch/steering lock ................3-2
Indicator lights and warning lights ............................................3-4
Multi-function meter unit .................3-8
Handlebar switches ......................3-11
Clutch lever ...................................3-13
Shift pedal .....................................3-13
Brake lever ...................................3-13
Brake pedal ..................................3-14
ABS (for ABS models) ..................3-14
Fuel tank cap ................................3-15
Fuel ...............................................3-16
Fuel tank breather hose and
overflow hose ............................3-17
Catalytic converter ........................3-17
Seat ..............................................3-18
Helmet holder ...............................3-18
Storage compartment ...................3-19
Handlebar position ........................3-20
Adjusting the shock absorber assembly ...................................3-20 Sidestand ..................................... 3-21
Ignition circuit cut-off system ........ 3-22
FOR YOUR SAFETY –
PRE-OPERATION CHECKS ............. 4-1
OPERATION AND IMPORTANT
RIDING POINTS ................................. 5-1
Starting the engine ......................... 5-1
Shifting ........................................... 5-2
Tips for reducing fuel consumption ............................... 5-3
Engine break-in .............................. 5-3
Parking ........................................... 5-4
PERIODIC MAINTENANCE AND
ADJUSTMENT ................................... 6-1
Owner’s tool kit ............................... 6-2
Periodic maintenance chart for the emission control system ....... 6-3
General maintenance and lubrication chart .......................... 6-4
Removing and installing
the cowling and panels ............... 6-8
Checking the spark plugs ............... 6-9
Engine oil and oil filter cartridge ... 6-10
Coolant ......................................... 6-13
Replacing the air filter element ..... 6-17
Adjusting the engine idling speed ........................................ 6-18 Checking the throttle grip free
play ........................................... 6-19
Valve clearance ........................... 6-19
Tires ............................................. 6-19
Cast wheels ................................. 6-22
Adjusting the clutch lever free play ........................................... 6-22
Checking the brake lever free
play ........................................... 6-23
Brake light switches (for ABS models) ...................... 6-24
Brake light switches (for non-ABS models) ............... 6-24
Checking the front and
rear brake pads ........................ 6-24
Checking the brake fluid level ...... 6-25
Changing the brake fluid .............. 6-26
Drive chain slack .......................... 6-27
Cleaning and lubricating the drive chain .......................... 6-28
Checking and lubricating the cables ................................. 6-29
Checking and lubricating
the throttle grip and cable ......... 6-29
Checking and lubricating the brake and shift pedals ........ 6-29
Checking and lubricating the brake and clutch levers ...... 6-30
Checking and lubricating
the sidestand ............................ 6-31U20SE3E0.book Page 1 Monday, April 23, 2012 10:47 AM
Page 47 of 104
PERIODIC MAINTENANCE AND ADJUSTMENT
6-2
6
EAU39691
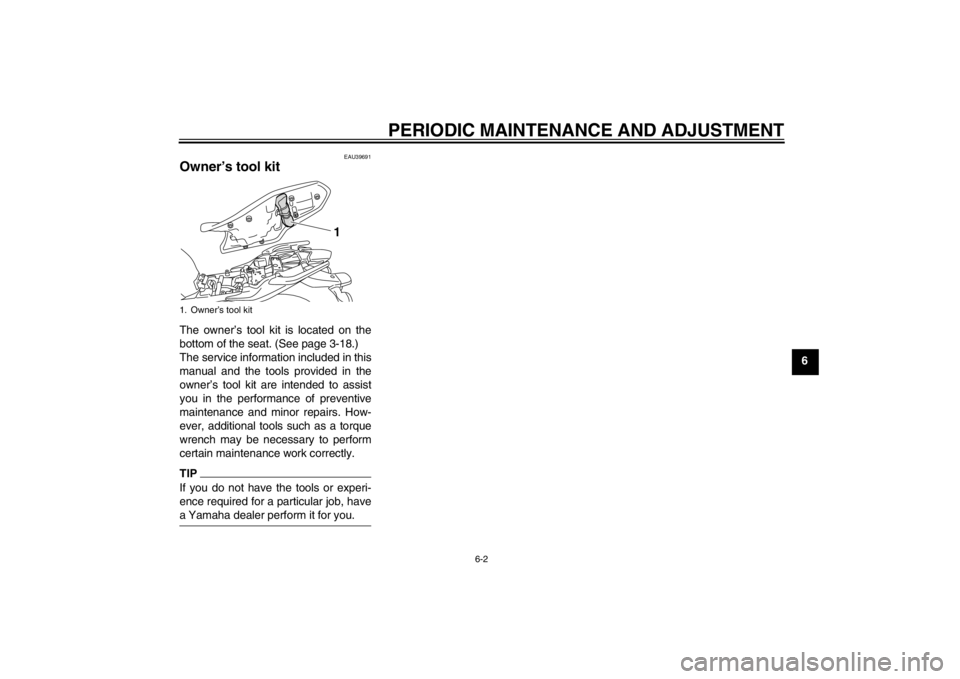
Owner’s tool kit The owner’s tool kit is located on the
bottom of the seat. (See page 3-18.)
The service information included in this
manual and the tools provided in the
owner’s tool kit are intended to assist
you in the performance of preventive
maintenance and minor repairs. How-
ever, additional tools such as a torque
wrench may be necessary to perform
certain maintenance work correctly.TIPIf you do not have the tools or experi-
ence required for a particular job, have
a Yamaha dealer perform it for you.1. Owner’s tool kit
1
U20SE3E0.book Page 2 Monday, April 23, 2012 10:47 AM
Page 57 of 104
PERIODIC MAINTENANCE AND ADJUSTMENT
6-12
6
TIPAn oil filter wrench is available at a
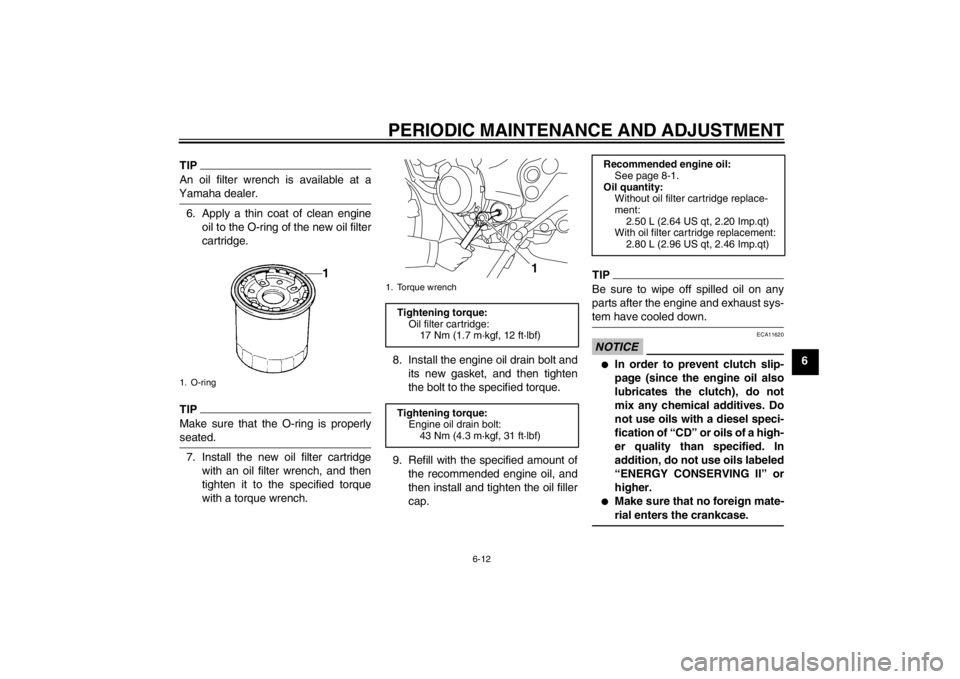
Yamaha dealer.6. Apply a thin coat of clean engine oil to the O-ring of the new oil filter
cartridge.TIPMake sure that the O-ring is properly
seated.7. Install the new oil filter cartridgewith an oil filter wrench, and then
tighten it to the specified torque
with a torque wrench. 8. Install the engine oil drain bolt and
its new gasket, and then tighten
the bolt to the specified torque.
9. Refill with the specified amount of the recommended engine oil, and
then install and tighten the oil filler
cap.
TIPBe sure to wipe off spilled oil on any
parts after the engine and exhaust sys-
tem have cooled down.NOTICE
ECA11620
●
In order to prevent clutch slip-
page (since the engine oil also
lubricates the clutch), do not
mix any chemical additives. Do
not use oils with a diesel speci-
fication of “CD” or oils of a high-
er quality than specified. In
addition, do not use oils labeled
“ENERGY CONSERVING II” or
higher.
●
Make sure that no foreign mate-
rial enters the crankcase.
1. O-ring
1. Torque wrench
Tightening torque:Oil filter cartridge:17 Nm (1.7 m·kgf, 12 ft·lbf)
Tightening torque: Engine oil drain bolt:
43 Nm (4.3 m·kgf, 31 ft·lbf)
1
Recommended engine oil:See page 8-1.
Oil quantity: Without oil filter cartridge replace-
ment: 2.50 L (2.64 US qt, 2.20 Imp.qt)
With oil filter cartridge replacement:
2.80 L (2.96 US qt, 2.46 Imp.qt)
U20SE3E0.book Page 12 Monday, April 23, 2012 10:47 AM
Page 62 of 104
PERIODIC MAINTENANCE AND ADJUSTMENT
6-17
6
EAU34425
Replacing the air filter element The air filter element should be re-
placed at the intervals specified in the
periodic maintenance and lubrication
chart. Replace the air filter element
more frequently if you are riding in un-
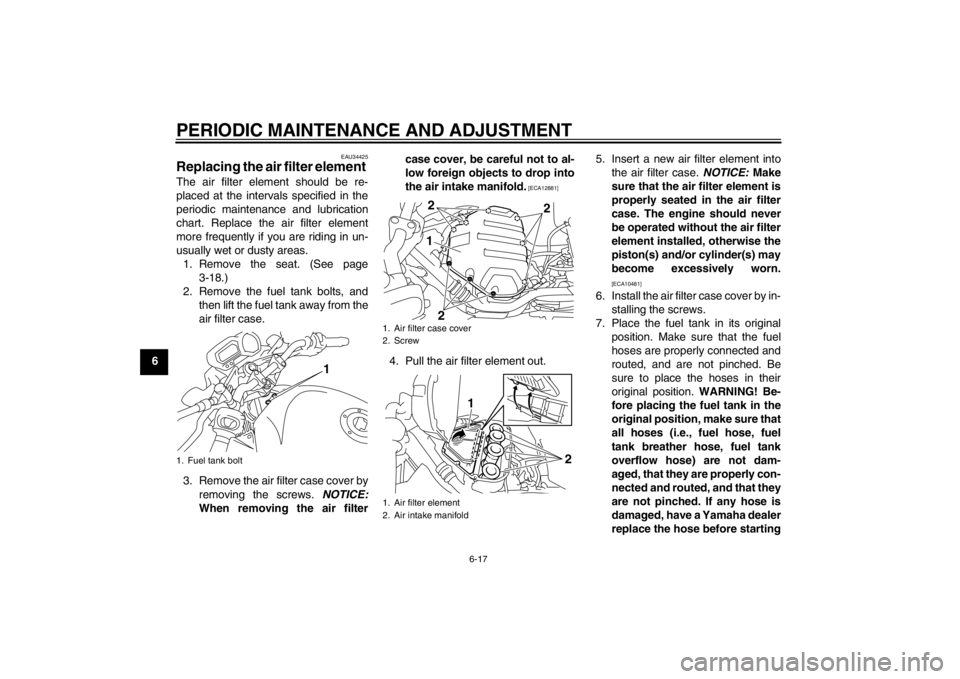
usually wet or dusty areas.1. Remove the seat. (See page 3-18.)
2. Remove the fuel tank bolts, and then lift the fuel tank away from the
air filter case.
3. Remove the air filter case cover by removing the screws. NOTICE:
When removing the air filter case cover, be careful not to al-
low foreign objects to drop into
the air intake manifold.
[ECA12881]
4. Pull the air filter element out.
5. Insert a new air filter element into
the air filter case. NOTICE: Make
sure that the air filter element is
properly seated in the air filter
case. The engine should never
be operated without the air filter
element installed, otherwise the
piston(s) and/or cylinder(s) may
become excessively worn.
[ECA10481]
6. Install the air filter case cover by in- stalling the screws.
7. Place the fuel tank in its original position. Make sure that the fuel
hoses are properly connected and
routed, and are not pinched. Be
sure to place the hoses in their
original position. WARNING! Be-
fore placing the fuel tank in the
original position, make sure that
all hoses (i.e., fuel hose, fuel
tank breather hose, fuel tank
overflow hose) are not dam-
aged, that they are properly con-
nected and routed, and that they
are not pinched. If any hose is
damaged, have a Yamaha dealer
replace the hose before starting
1. Fuel tank bolt
1
1. Air filter case cover
2. Screw
1. Air filter element
2. Air intake manifold
12
2
2
2
1
U20SE3E0.book Page 17 Monday, April 23, 2012 10:47 AM
Page 63 of 104
![YAMAHA XJ6-N 2012 Owners Manual PERIODIC MAINTENANCE AND ADJUSTMENT
6-18
6
the engine, otherwise fuel may
leak, creating a fire hazard.
[EWA12463]
8. Install the fuel tank bolts.
9. Install the seat.
EAU34301
Adjusting the engine id YAMAHA XJ6-N 2012 Owners Manual PERIODIC MAINTENANCE AND ADJUSTMENT
6-18
6
the engine, otherwise fuel may
leak, creating a fire hazard.
[EWA12463]
8. Install the fuel tank bolts.
9. Install the seat.
EAU34301
Adjusting the engine id](/img/51/52587/w960_52587-62.png)
PERIODIC MAINTENANCE AND ADJUSTMENT
6-18
6
the engine, otherwise fuel may
leak, creating a fire hazard.
[EWA12463]
8. Install the fuel tank bolts.
9. Install the seat.
EAU34301
Adjusting the engine idling
speed The engine idling speed must be
checked and, if necessary, adjusted as
follows at the intervals specified in the
periodic maintenance and lubrication
chart.
The engine should be warm before
making this adjustment.
Check the engine idling speed and, if
necessary, adjust it to specification by
turning the idle adjusting screw. To in-
crease the engine idling speed, turn the
screw in direction (a). To decrease the
engine idling speed, turn the screw in
direction (b).
TIPIf the specified idling speed cannot be
obtained as described above, have a
Yamaha dealer make the adjustment.
1. Hose
1. Original position (paint mark)
1
1
1. Idle adjusting screw
1
(a)
(b)
Engine idling speed: 1250–1350 r/min
U20SE3E0.book Page 18 Monday, April 23, 2012 10:47 AM
Page 78 of 104
PERIODIC MAINTENANCE AND ADJUSTMENT
6-33
6
EAU50290
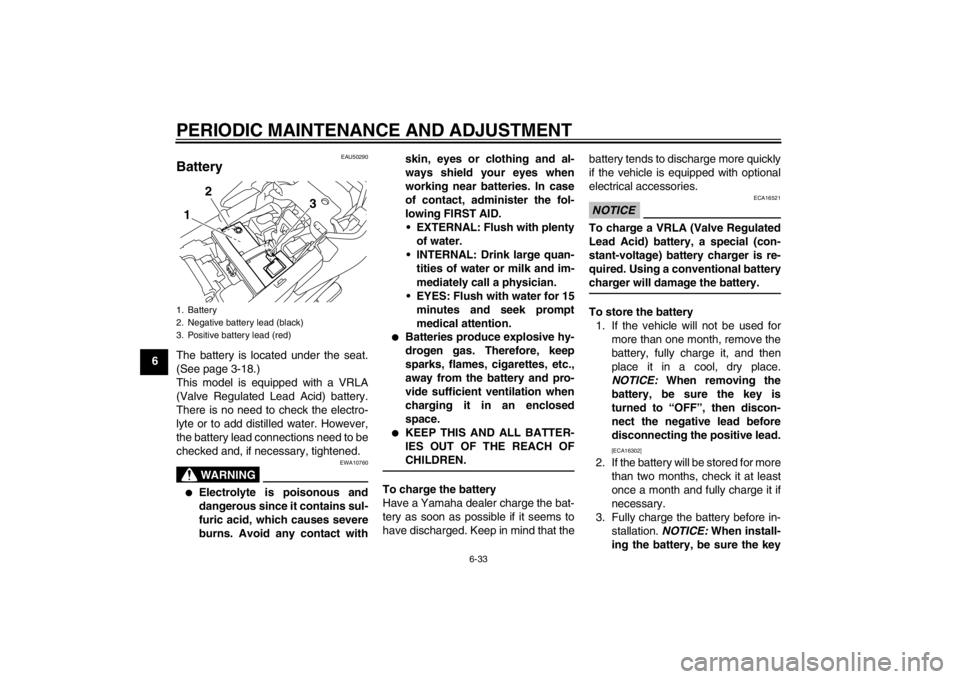
Battery The battery is located under the seat.
(See page 3-18.)
This model is equipped with a VRLA
(Valve Regulated Lead Acid) battery.
There is no need to check the electro-
lyte or to add distilled water. However,
the battery lead connections need to be
checked and, if necessary, tightened.
WARNING
EWA10760
●
Electrolyte is poisonous and
dangerous since it contains sul-
furic acid, which causes severe
burns. Avoid any contact withskin, eyes or clothing and al-
ways shield your eyes when
working near batteries. In case
of contact, administer the fol-
lowing FIRST AID.
EXTERNAL: Flush with plenty of water.
INTERNAL: Drink large quan- tities of water or milk and im-
mediately call a physician.
EYES: Flush with water for 15 minutes and seek prompt
medical attention.
●
Batteries produce explosive hy-
drogen gas. Therefore, keep
sparks, flames, cigarettes, etc.,
away from the battery and pro-
vide sufficient ventilation when
charging it in an enclosed
space.
●
KEEP THIS AND ALL BATTER-
IES OUT OF THE REACH OF
CHILDREN.
To charge the battery
Have a Yamaha dealer charge the bat-
tery as soon as possible if it seems to
have discharged. Keep in mind that the battery tends to discharge more quickly
if the vehicle is equipped with optional
electrical accessories.
NOTICE
ECA16521
To charge a VRLA (Valve Regulated
Lead Acid) battery, a special (con-
stant-voltage) battery charger is re-
quired. Using a conventional battery
charger will damage the battery.To store the battery
1. If the vehicle will not be used for more than one month, remove the
battery, fully charge it, and then
place it in a cool, dry place.
NOTICE: When removing the
battery, be sure the key is
turned to “OFF”, then discon-
nect the negative lead before
disconnecting the positive lead.
[ECA16302]
2. If the battery will be stored for more than two months, check it at least
once a month and fully charge it if
necessary.
3. Fully charge the battery before in- stallation. NOTICE: When install-
ing the battery, be sure the key
1. Battery
2. Negative battery lead (black)
3. Positive battery lead (red)1 2
3
U20SE3E0.book Page 33 Monday, April 23, 2012 10:47 AM
Page 79 of 104
![YAMAHA XJ6-N 2012 Owners Manual PERIODIC MAINTENANCE AND ADJUSTMENT
6-34
6
is turned to “OFF”, then con-
nect the positive lead before
connecting the negative lead.
[ECA16840]
4. After installation, make sure that
the battery le YAMAHA XJ6-N 2012 Owners Manual PERIODIC MAINTENANCE AND ADJUSTMENT
6-34
6
is turned to “OFF”, then con-
nect the positive lead before
connecting the negative lead.
[ECA16840]
4. After installation, make sure that
the battery le](/img/51/52587/w960_52587-78.png)
PERIODIC MAINTENANCE AND ADJUSTMENT
6-34
6
is turned to “OFF”, then con-
nect the positive lead before
connecting the negative lead.
[ECA16840]
4. After installation, make sure that
the battery leads are properly con-
nected to the battery terminals.NOTICE
ECA16530
Always keep the battery charged.
Storing a discharged battery can
cause permanent battery damage.
EAU47172
Replacing the fuses The main fuse and the fuse boxes,
which contain the fuses for the individu-
al circuits, are located under the seat.
(See page 3-18.)TIPTo access the main fuse, remove the
starter relay cover as shown.XJ6N XJ6N1. Starter relay cover
2. Main fuse
3. Spare main fuse
4. Fuse box
2
4
3
1
1. Taillight fuse
2. Spare fuse
3. Headlight fuse
4. Ignition fuse
5. Signaling system fuse
6. Backup fuse (for clock and immobilizer sys-
tem)
7. Fuel injection system fuse
8. Radiator fan fuse
1 2
3
4
5
6
7
8
U20SE3E0.book Page 34 Monday, April 23, 2012 10:47 AM
Page 83 of 104
PERIODIC MAINTENANCE AND ADJUSTMENT
6-38
6
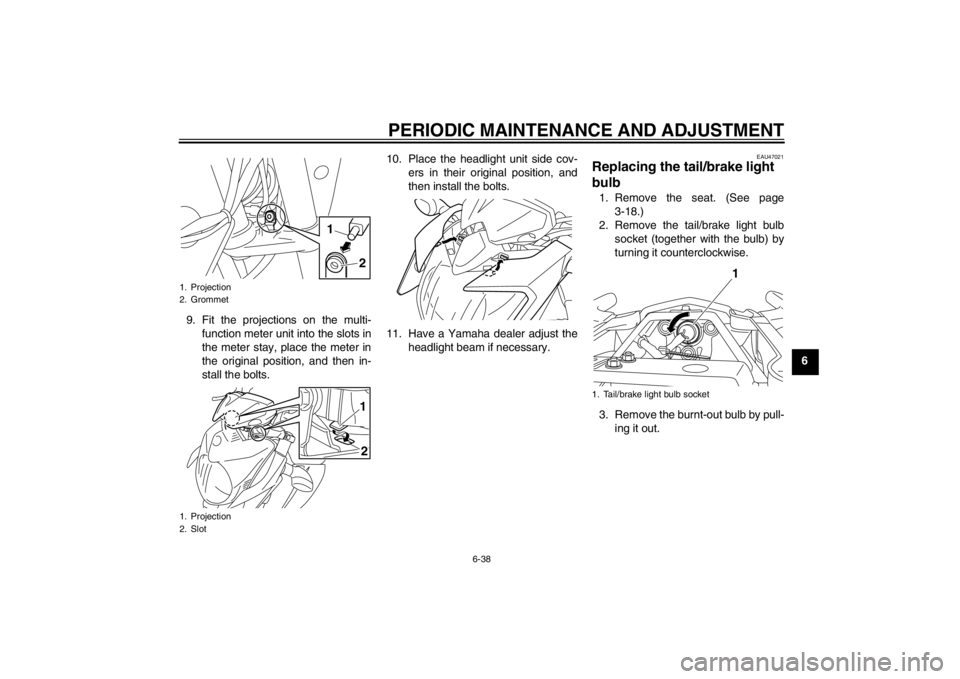
9. Fit the projections on the multi-
function meter unit into the slots in
the meter stay, place the meter in
the original position, and then in-
stall the bolts. 10. Place the headlight unit side cov-
ers in their original position, and
then install the bolts.
11. Have a Yamaha dealer adjust the headlight beam if necessary.
EAU47021
Replacing the tail/brake light
bulb 1. Remove the seat. (See page3-18.)
2. Remove the tail/brake light bulb socket (together with the bulb) by
turning it counterclockwise.
3. Remove the burnt-out bulb by pull- ing it out.
1. Projection
2. Grommet
1. Projection
2. Slot
2
1
12
1. Tail/brake light bulb socket
1
U20SE3E0.book Page 38 Monday, April 23, 2012 10:47 AM
Page 84 of 104
PERIODIC MAINTENANCE AND ADJUSTMENT
6-39
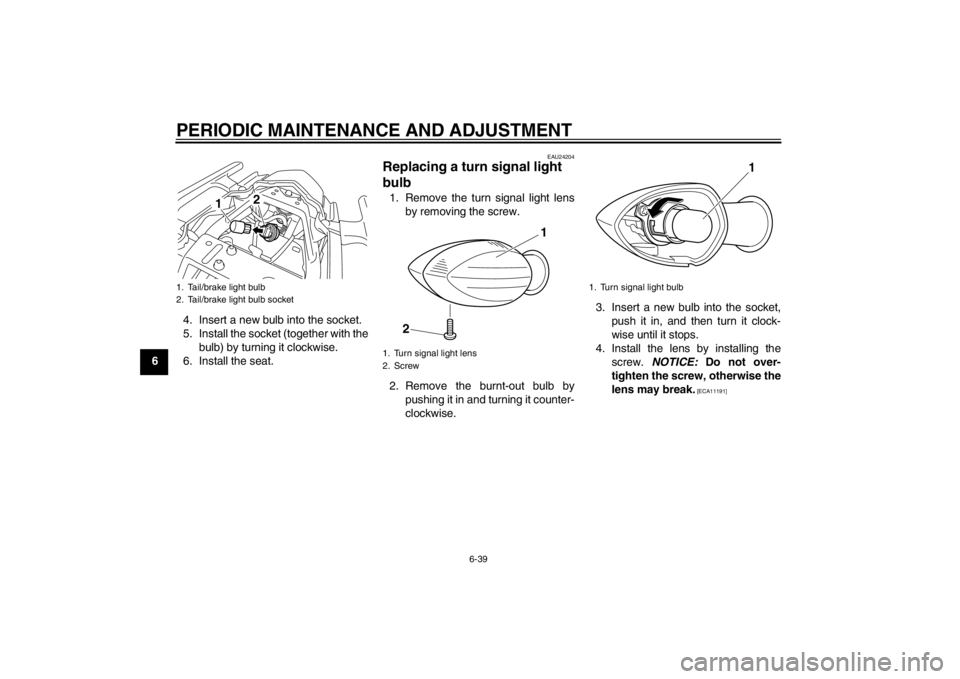
64. Insert a new bulb into the socket.
5. Install the socket (together with the
bulb) by turning it clockwise.
6. Install the seat.
EAU24204
Replacing a turn signal light
bulb 1. Remove the turn signal light lens by removing the screw.
2. Remove the burnt-out bulb by pushing it in and turning it counter-
clockwise. 3. Insert a new bulb into the socket,
push it in, and then turn it clock-
wise until it stops.
4. Install the lens by installing the screw. NOTICE: Do not over-
tighten the screw, otherwise the
lens may break.
[ECA11191]
1. Tail/brake light bulb
2. Tail/brake light bulb socket
2
1
1. Turn signal light lens
2. Screw
1
2
1. Turn signal light bulb
1
U20SE3E0.book Page 39 Monday, April 23, 2012 10:47 AM