brake light YAMAHA XJ6-S 2014 Owners Manual
[x] Cancel search | Manufacturer: YAMAHA, Model Year: 2014, Model line: XJ6-S, Model: YAMAHA XJ6-S 2014Pages: 104, PDF Size: 2.84 MB
Page 6 of 104

TABLE OF CONTENTSSAFETY INFORMATION.................. 1-1
DESCRIPTION .................................. 2-1
Left view ......................................... 2-1
Right view ....................................... 2-2
Controls and instruments ............... 2-3
INSTRUMENT AND CONTROL
FUNCTIONS ...................................... 3-1
Immobilizer system......................... 3-1
Main switch/steering lock............... 3-2
Indicator lights and warning lights............................................ 3-4
Multi-function meter unit ................ 3-8
Handlebar switches ...................... 3-11
Clutch lever .................................. 3-13
Shift pedal .................................... 3-13
Brake lever.................................... 3-13
Brake pedal .................................. 3-14
ABS (for ABS models) .................. 3-14
Fuel tank cap ................................ 3-15
Fuel ............................................... 3-16
Fuel tank breather hose and
overflow hose ............................ 3-17
Catalytic converter ....................... 3-17
Seat .............................................. 3-18
Helmet holder ............................... 3-19
Storage compartment .................. 3-19
Handlebar position ....................... 3-20
Rear view mirrors.......................... 3-20 Adjusting the shock absorber
assembly.................................... 3-21
Sidestand ...................................... 3-22
Ignition circuit cut-off system ....... 3-22
FOR YOUR SAFETY –
PRE-OPERATION CHECKS ............. 4-1
OPERATION AND IMPORTANT
RIDING POINTS ................................ 5-1
Starting the engine .......................... 5-1
Shifting ............................................ 5-2
Tips for reducing fuel consumption ................................ 5-3
Engine break-in ............................... 5-3
Parking ............................................ 5-4
PERIODIC MAINTENANCE AND
ADJUSTMENT ................................... 6-1
Owner’s tool kit ............................... 6-2
Periodic maintenance chart for the
emission control system .............. 6-3
General maintenance and
lubrication chart ........................... 6-4
Removing and installing cowlings and panels ................................... 6-8
Checking the spark plugs ............. 6-10
Engine oil and oil filter cartridge.... 6-11
Coolant.......................................... 6-14
Replacing the air filter element ..... 6-18 Adjusting the engine idling
speed ........................................ 6-19
Checking the throttle grip free play ............................................ 6-20
Valve clearance............................. 6-20
Tires .............................................. 6-20
Cast wheels .................................. 6-23
Adjusting the clutch lever free
play ............................................ 6-23
Checking the brake lever free play ............................................ 6-24
Brake light switches ..................... 6-25
Checking the front and rear brake pads .......................................... 6-26
Checking the brake fluid level ...... 6-26
Changing the brake fluid .............. 6-28
Drive chain slack........................... 6-28
Cleaning and lubricating the drive chain.......................................... 6-29
Checking and lubricating the
cables ........................................ 6-30
Checking and lubricating the throttle grip and cable ............... 6-30
Checking and lubricating the brake and shift pedals............... 6-31
Checking and lubricating the
brake and clutch levers ............. 6-31
Checking and lubricating the centerstand and sidestand........ 6-32
Lubricating the swingarm pivots......................................... 6-33U36CE4E0.book Page 1 Tuesday, July 2, 2013 3:47 PM
Page 7 of 104

TABLE OF CONTENTS
Checking the front fork..................6-33
Checking the steering ...................6-34
Checking the wheel bearings ........6-34
Battery ...........................................6-34
Replacing the fuses .......................6-36
Replacing the headlight bulb.........6-38
Replacing the tail/brake light bulb ............................................6-39
Replacing a turn signal light bulb ............................................6-39
Replacing the license plate light
bulb ............................................6-40
Auxiliary light bulb .........................6-41
Front wheel (for non-ABS models).................6-41
Rear wheel (for non-ABS models).................6-42
Troubleshooting ............................6-44
Troubleshooting charts .................6-45
MOTORCYCLE CARE AND
STORAGE ..........................................7-1
Matte color caution .........................7-1
Care .................................................7-1
Storage ............................................7-4
SPECIFICATIONS ..............................8-1
CONSUMER INFORMATION ............9-1
Identification numbers .....................9-1
U36CE4E0.book Page 2 Tuesday, July 2, 2013 3:47 PM
Page 14 of 104
DESCRIPTION
2-2
2
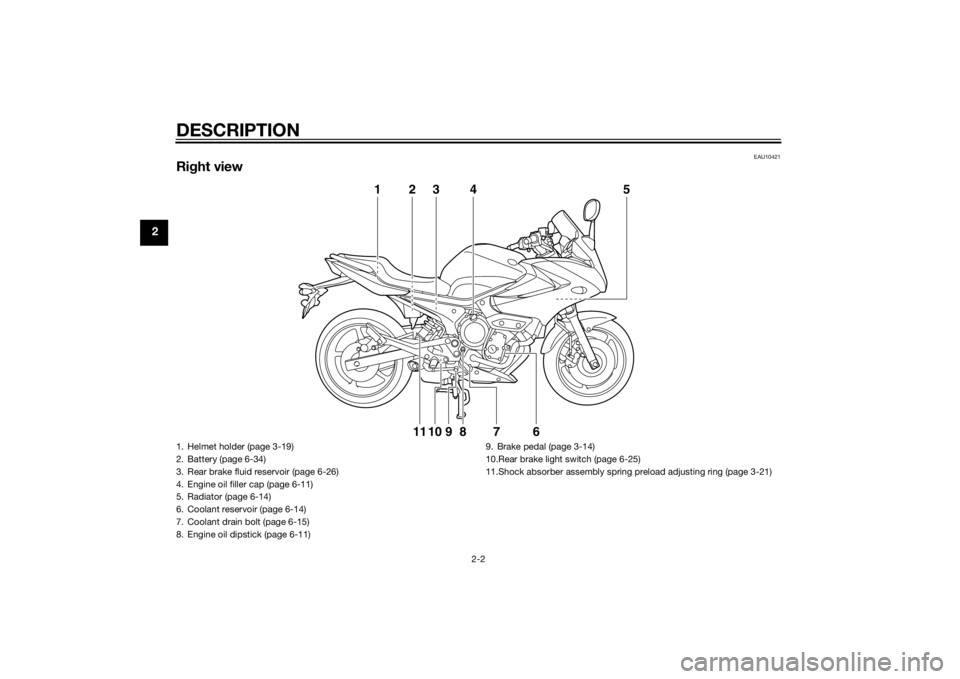
EAU10421
Right view
123 4 5
6789
1011
1. Helmet holder (page 3-19)
2. Battery (page 6-34)
3. Rear brake fluid reservoir (page 6-26)
4. Engine oil filler cap (page 6-11)
5. Radiator (page 6-14)
6. Coolant reservoir (page 6-14)
7. Coolant drain bolt (page 6-15)
8. Engine oil dipstick (page 6-11) 9. Brake pedal (page 3-14)
10.Rear brake light switch (page 6-25)
11.Shock absorber assembly spring preload adjusting ring (page 3-21)U36CE4E0.book Page 2 Tuesday, July 2, 2013 3:47 PM
Page 19 of 104
INSTRUMENT AND CONTROL FUNCTIONS
3-4
3
EAU49394
Indicator lig hts and warning
lig hts
EAU11021
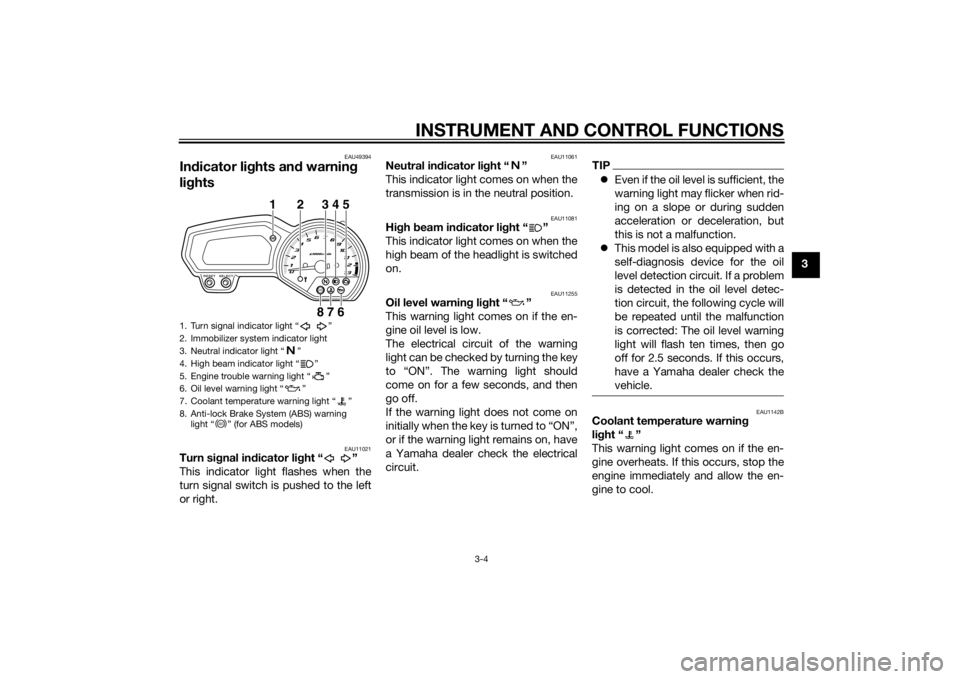
Turn si gnal in dicator li ght “ ”
This indicator light flashes when the
turn signal switch is pushed to the left
or right.
EAU11061
Neutral in dicator li ght “ ”
This indicator light comes on when the
transmission is in the neutral position.
EAU11081
Hi gh beam in dicator li ght “ ”
This indicator light comes on when the
high beam of the headlight is switched
on.
EAU11255
Oil level warnin g lig ht “ ”
This warning light comes on if the en-
gine oil level is low.
The electrical circuit of the warning
light can be checked by turning the key
to “ON”. The warning light should
come on for a few seconds, and then
go off.
If the warning light does not come on
initially when the key is turned to “ON”,
or if the warning light remains on, have
a Yamaha dealer check the electrical
circuit.
TIP Even if the oil level is sufficient, the
warning light may flicker when rid-
ing on a slope or during sudden
acceleration or deceleration, but
this is not a malfunction.
This model is also equipped with a
self-diagnosis device for the oil
level detection circuit. If a problem
is detected in the oil level detec-
tion circuit, the following cycle will
be repeated until the malfunction
is corrected: The oil level warning
light will flash ten times, then go
off for 2.5 seconds. If this occurs,
have a Yamaha dealer check the
vehicle.
EAU1142B
Coolant temperature warnin g
li g ht “ ”
This warning light comes on if the en-
gine overheats. If this occurs, stop the
engine immediately and allow the en-
gine to cool.
1. Turn signal indicator light “ ”
2. Immobilizer system indicator light
3. Neutral indicator light “ ”
4. High beam indicator light “ ”
5. Engine trouble warning light “ ”
6. Oil level warning light “ ”
7. Coolant temperature warning light “ ”
8. Anti-lock Brake System (ABS) warning light “ ” (for ABS models)
ABS
1 2 345
76
8
ABS
U36CE4E0.book Page 4 Tuesday, July 2, 2013 3:47 PM
Page 22 of 104
INSTRUMENT AND CONTROL FUNCTIONS
3-7
3
EAU11535
Engine trou ble warnin g lig ht “ ”
This warning light comes on or flashes
if a problem is detected in the electrical
circuit monitoring the engine. If this oc-
curs, have a Yamaha dealer check the
self-diagnosis system. (See page 3-10
for an explanation of the self-diagnosis
device.)
The electrical circuit of the warning
light can be checked by turning the key
to “ON”. The warning light should
come on for a few seconds, and then
go off.
If the warning light does not come on
initially when the key is turned to “ON”,
or if the warning light remains on, have
a Yamaha dealer check the electrical
circuit.
EAU51781
ABS warnin g li ght “ ” (for ABS
mo dels)
In normal operation, the ABS warning
light comes on when the key is turned
to “ON”, and goes off after traveling at
a speed of 10 km/h (6 mi/h) or higher.
If the ABS warning light: does not come on when the key is
turned to “ON”
comes on or flashes while riding
does not go off after traveling at a
speed of 10 km/h (6 mi/h) or high-
er
The ABS may not work correctly. If any
of the above occurs, have a Yamaha
dealer check the system as soon as
possible. (See page 3-14 for an expla-
nation of the ABS.)
WARNING
EWA16041
If the ABS warnin g li ght does not g o
off after travelin g at a speed of 10
km/h (6 mi/h) or hi gher, or if the
warnin g li ght comes on or flashes
while ri din g, the brake system re-
verts to conventional brakin g. If ei-
ther of the ab ove occurs, or if the
warnin g li ght does not come on at
all, use extra caution to avoi d possi-
b le wheel lock d uring emer gency
b rakin g. Have a Yamaha d ealer
check the brake system an d electri-
cal circuits as soon as possi ble.
TIPIf the start switch is pushed while the
engine is running, the ABS warning
light will come on, but this is not a mal-
function.
EAU38625
Immo bilizer system in dicator li ght
The electrical circuit of the indicator
light can be checked by turning the key
to “ON”. The indicator light should
come on for a few seconds, and then
go off.
If the indicator light does not come on
initially when the key is turned to “ON”,
or if the indicator light remains on, have
a Yamaha dealer check the electrical
circuit.
When the key is turned to “OFF” and
30 seconds have passed, the indicator
light will start flashing indicating the im-
mobilizer system is enabled. After 24
hours have passed, the indicator light
will stop flashing, however the immobi-
lizer system is still enabled.
The self-diagnosis device also detects
problems in the immobilizer system
circuits. (See page 3-10 for an expla-
nation of the self-diagnosis device.)
ABS
U36CE4E0.book Page 7 Tuesday, July 2, 2013 3:47 PM
Page 29 of 104
INSTRUMENT AND CONTROL FUNCTIONS
3-14
3
EAU12942
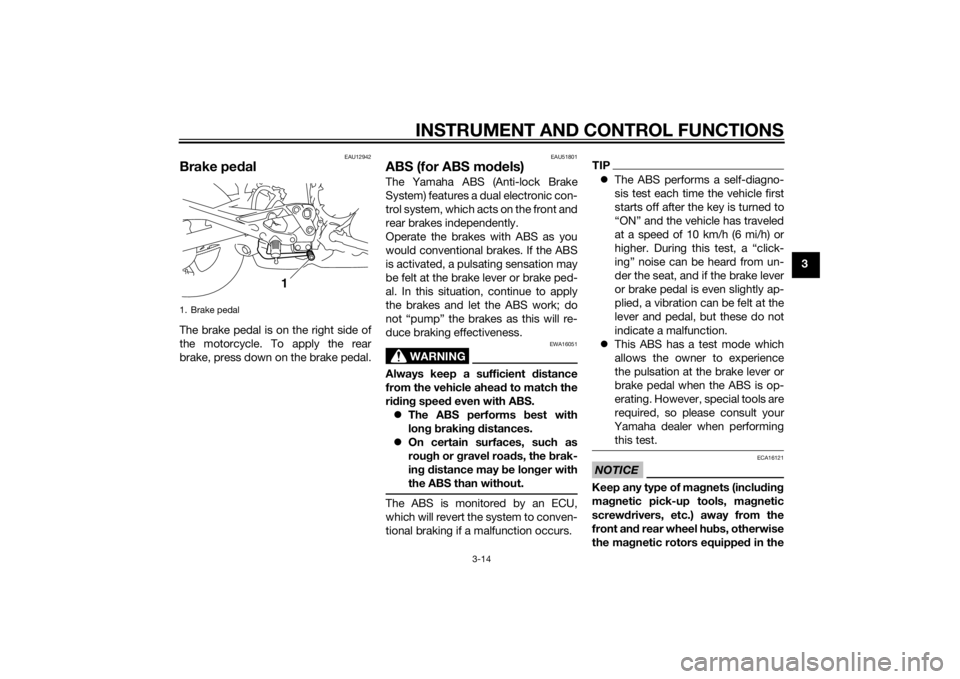
Brake pedalThe brake pedal is on the right side of
the motorcycle. To apply the rear
brake, press down on the brake pedal.
EAU51801
ABS (for ABS mo dels)The Yamaha ABS (Anti-lock Brake
System) features a dual electronic con-
trol system, which acts on the front and
rear brakes independently.
Operate the brakes with ABS as you
would conventional brakes. If the ABS
is activated, a pulsating sensation may
be felt at the brake lever or brake ped-
al. In this situation, continue to apply
the brakes and let the ABS work; do
not “pump” the brakes as this will re-
duce braking effectiveness.
WARNING
EWA16051
Always keep a sufficient d istance
from the vehicle ahea d to match the
ri din g speed even with ABS.
The ABS performs best with
lon g b rakin g d istances.
On certain surfaces, such as
rou gh or g ravel roa ds, the b rak-
in g d istance may be lon ger with
the ABS than without.The ABS is monitored by an ECU,
which will revert the system to conven-
tional braking if a malfunction occurs.
TIP The ABS performs a self-diagno-
sis test each time the vehicle first
starts off after the key is turned to
“ON” and the vehicle has traveled
at a speed of 10 km/h (6 mi/h) or
higher. During this test, a “click-
ing” noise can be heard from un-
der the seat, and if the brake lever
or brake pedal is even slightly ap-
plied, a vibration can be felt at the
lever and pedal, but these do not
indicate a malfunction.
This ABS has a test mode which
allows the owner to experience
the pulsation at the brake lever or
brake pedal when the ABS is op-
erating. However, special tools are
required, so please consult your
Yamaha dealer when performing this test.NOTICE
ECA16121
Keep any type of mag nets (including
ma gnetic pick-up tools, mag netic
screw drivers, etc.) away from the
front an d rear wheel hu bs, otherwise
the ma gnetic rotors equippe d in the
1. Brake pedal
1
U36CE4E0.book Page 14 Tuesday, July 2, 2013 3:47 PM
Page 70 of 104
PERIODIC MAINTENANCE AND ADJUSTMENT
6-25
6b
rakin g performance, which may re-
sult in loss of control and an acci-
d ent.
EAU57070
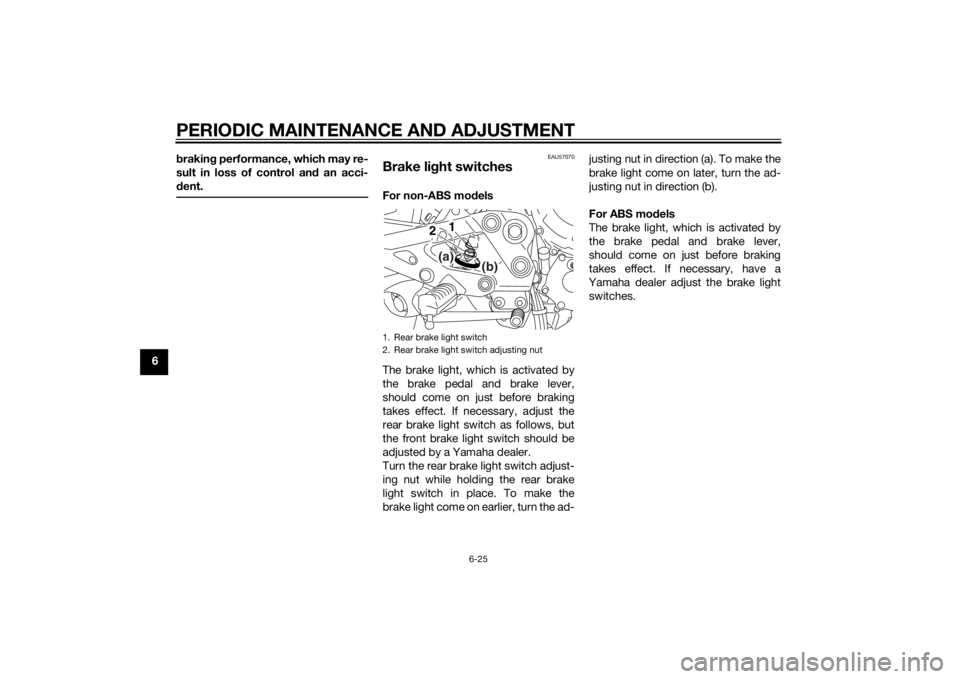
Brake li ght switchesFor non-ABS mo dels
The brake light, which is activated by
the brake pedal and brake lever,
should come on just before braking
takes effect. If necessary, adjust the
rear brake light switch as follows, but
the front brake light switch should be
adjusted by a Yamaha dealer.
Turn the rear brake light switch adjust-
ing nut while holding the rear brake
light switch in place. To make the
brake light come on earlier, turn the ad- justing nut in direction (a). To make the
brake light come on later, turn the ad-
justing nut in direction (b).
For ABS mo
dels
The brake light, which is activated by
the brake pedal and brake lever,
should come on just before braking
takes effect. If necessary, have a
Yamaha dealer adjust the brake light switches.1. Rear brake light switch
2. Rear brake light switch adjusting nut
1
2(a)
(b)
U36CE4E0.book Page 25 Tuesday, July 2, 2013 3:47 PM
Page 84 of 104
PERIODIC MAINTENANCE AND ADJUSTMENT
6-39
6
EAU47022
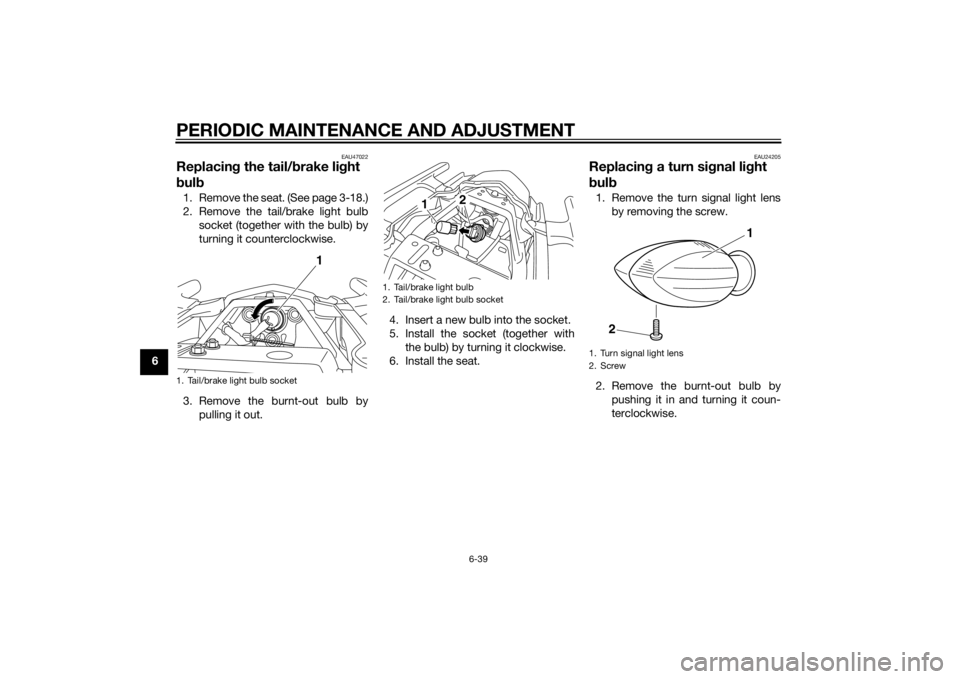
Replacing the tail/ brake li ght
b ul b1. Remove the seat. (See page 3-18.)
2. Remove the tail/brake light bulb
socket (together with the bulb) by
turning it counterclockwise.
3. Remove the burnt-out bulb by pulling it out. 4. Insert a new bulb into the socket.
5. Install the socket (together with
the bulb) by turning it clockwise.
6. Install the seat.
EAU24205
Replacin g a turn si gnal li ght
b ul b1. Remove the turn signal light lens
by removing the screw.
2. Remove the burnt-out bulb by pushing it in and turning it coun-
terclockwise.
1. Tail/brake light bulb socket
1
1. Tail/brake light bulb
2. Tail/brake light bulb socket
2
1
1. Turn signal light lens
2. Screw
1
2
U36CE4E0.book Page 39 Tuesday, July 2, 2013 3:47 PM
Page 86 of 104
PERIODIC MAINTENANCE AND ADJUSTMENT
6-41
6
EAU39021
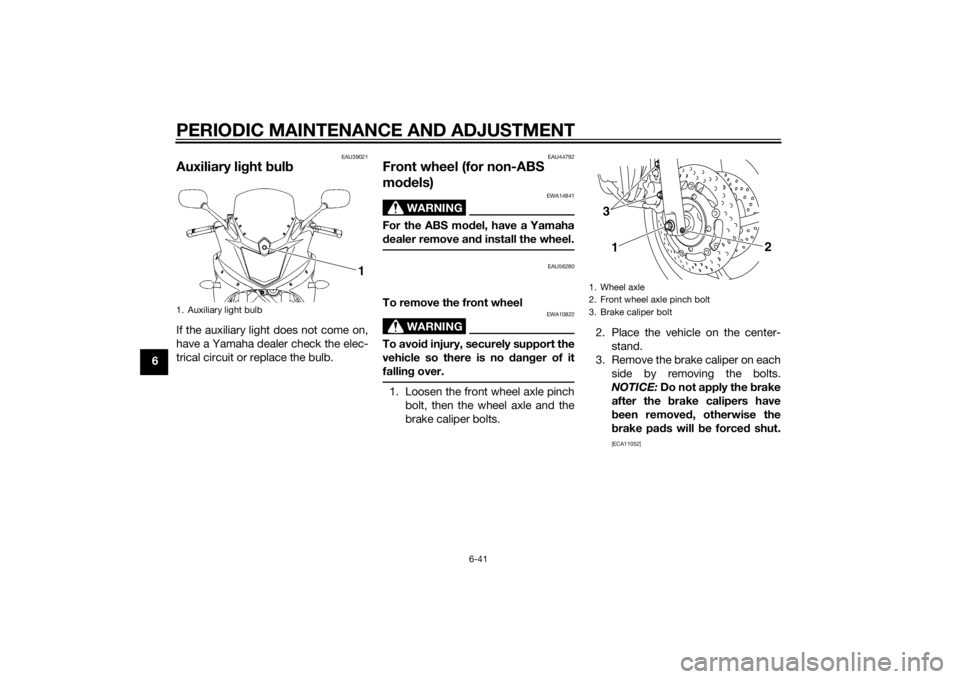
Auxiliary light bul bIf the auxiliary light does not come on,
have a Yamaha dealer check the elec-
trical circuit or replace the bulb.
EAU44792
Front wheel (for non-ABS
mo dels)
WARNING
EWA14841
For the ABS mo del, have a Yamaha
d ealer remove an d install the wheel.
EAU56280
To remove the front wheel
WARNING
EWA10822
To avoi d injury, securely support the
vehicle so there is no dan ger of it
fallin g over.1. Loosen the front wheel axle pinch
bolt, then the wheel axle and the
brake caliper bolts. 2. Place the vehicle on the center-
stand.
3. Remove the brake caliper on each side by removing the bolts.
NOTICE: Do not apply the b rake
after the brake calipers have
b een removed , otherwise the
b rake pa ds will b e forced shut.
[ECA11052]
1. Auxiliary light bulb
1
1. Wheel axle
2. Front wheel axle pinch bolt
3. Brake caliper bolt
13
2
U36CE4E0.book Page 41 Tuesday, July 2, 2013 3:47 PM
Page 88 of 104
PERIODIC MAINTENANCE AND ADJUSTMENT
6-43
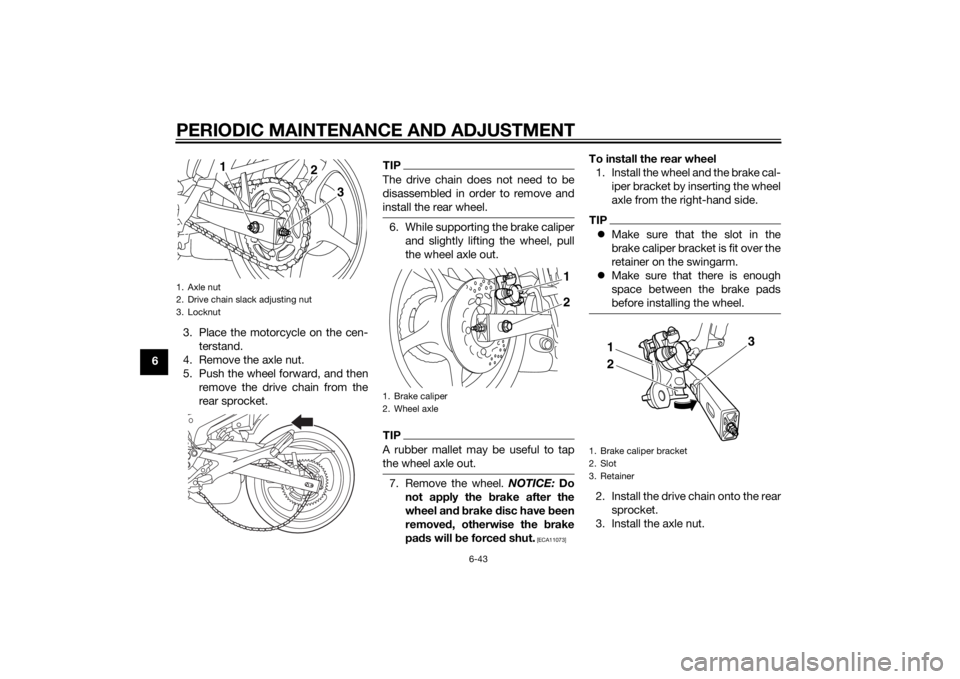
63. Place the motorcycle on the cen-
terstand.
4. Remove the axle nut.
5. Push the wheel forward, and then remove the drive chain from the
rear sprocket.
TIPThe drive chain does not need to be
disassembled in order to remove and
install the rear wheel.6. While supporting the brake caliperand slightly lifting the wheel, pull
the wheel axle out.TIPA rubber mallet may be useful to tap
the wheel axle out.7. Remove the wheel. NOTICE: Do
not apply the b rake after the
wheel an d b rake disc have b een
remove d, otherwise the brake
pa ds will be force d shut.
[ECA11073]
To install the rear wheel
1. Install the wheel and the brake cal- iper bracket by inserting the wheel
axle from the right-hand side.TIPMake sure that the slot in the
brake caliper bracket is fit over the
retainer on the swingarm.
Make sure that there is enough
space between the brake pads
before installing the wheel.2. Install the drive chain onto the rear
sprocket.
3. Install the axle nut.
1. Axle nut
2. Drive chain slack adjusting nut
3. Locknut
1
3
2
1. Brake caliper
2. Wheel axle
1
2
1. Brake caliper bracket
2. Slot
3. Retainer
2 31
U36CE4E0.book Page 43 Tuesday, July 2, 2013 3:47 PM