seat adjustment YAMAHA XJ6F 2013 Owners Manual
[x] Cancel search | Manufacturer: YAMAHA, Model Year: 2013, Model line: XJ6F, Model: YAMAHA XJ6F 2013Pages: 106, PDF Size: 2.84 MB
Page 6 of 106

TABLE OF CONTENTSSAFETY INFORMATION.................. 1-1
DESCRIPTION .................................. 2-1
Left view ......................................... 2-1
Right view ....................................... 2-2
Controls and instruments ............... 2-3
INSTRUMENT AND CONTROL
FUNCTIONS ...................................... 3-1
Immobilizer system......................... 3-1
Main switch/steering lock............... 3-2
Indicator lights and warning lights............................................ 3-4
Multi-function meter unit ................ 3-8
Handlebar switches ...................... 3-12
Clutch lever .................................. 3-13
Shift pedal .................................... 3-13
Brake lever.................................... 3-14
Brake pedal .................................. 3-14
ABS (for ABS models) .................. 3-14
Fuel tank cap ................................ 3-15
Fuel ............................................... 3-16
Fuel tank breather hose and
overflow hose ............................ 3-17
Catalytic converter ....................... 3-18
Seat .............................................. 3-18
Helmet holder ............................... 3-19
Storage compartment .................. 3-20
Handlebar position ...................... 3-20
Rear view mirrors.......................... 3-21 Adjusting the shock absorber
assembly.................................... 3-21
Sidestand ...................................... 3-22
Ignition circuit cut-off system ....... 3-23
FOR YOUR SAFETY –
PRE-OPERATION CHECKS ............. 4-1
OPERATION AND IMPORTANT
RIDING POINTS ................................ 5-1
Starting the engine .......................... 5-1
Shifting ............................................ 5-2
Tips for reducing fuel consumption ................................ 5-3
Engine break-in ............................... 5-3
Parking ............................................ 5-4
PERIODIC MAINTENANCE AND
ADJUSTMENT ................................... 6-1
Owner’s tool kit ............................... 6-2
Periodic maintenance chart for the
emission control system .............. 6-3
General maintenance and
lubrication chart ........................... 6-4
Removing and installing cowlings and panels ................................... 6-8
Checking the spark plugs ............. 6-11
Engine oil and oil filter cartridge.... 6-12
Coolant.......................................... 6-15
Replacing the air filter element ..... 6-18 Adjusting the engine idling
speed ........................................ 6-19
Checking the throttle grip free play ............................................ 6-20
Valve clearance............................. 6-20
Tires .............................................. 6-20
Cast wheels .................................. 6-23
Adjusting the clutch lever free
play ............................................ 6-23
Checking the brake lever free play ............................................ 6-24
Brake light switches ..................... 6-25
Checking the front and rear brake pads .......................................... 6-25
Checking the brake fluid level ...... 6-26
Changing the brake fluid .............. 6-27
Drive chain slack........................... 6-28
Cleaning and lubricating the drive chain.......................................... 6-29
Checking and lubricating the
cables ........................................ 6-30
Checking and lubricating the throttle grip and cable ............... 6-30
Checking and lubricating the brake and shift pedals............... 6-30
Checking and lubricating the
brake and clutch levers ............. 6-31
Checking and lubricating the centerstand and sidestand........ 6-32
Lubricating the swingarm pivots......................................... 6-32U1CWE4E0.book Page 1 Wednesday, August 6, 2014 2:59 PM
Page 48 of 106
PERIODIC MAINTENANCE AND ADJUSTMENT
6-2
6
EAU39692
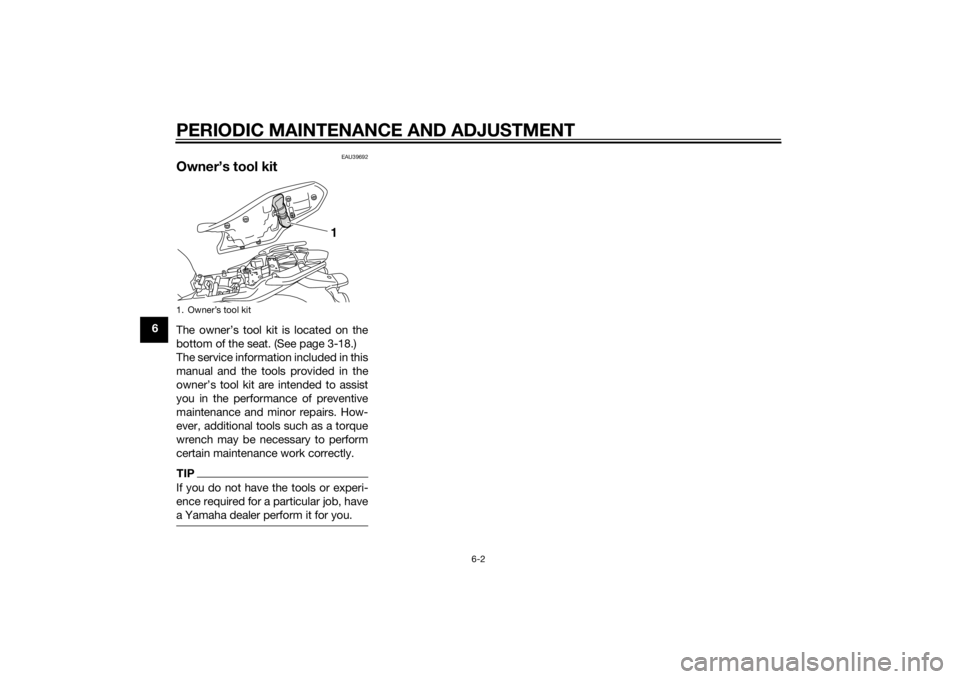
Owner’s tool kitThe owner’s tool kit is located on the
bottom of the seat. (See page 3-18.)
The service information included in this
manual and the tools provided in the
owner’s tool kit are intended to assist
you in the performance of preventive
maintenance and minor repairs. How-
ever, additional tools such as a torque
wrench may be necessary to perform
certain maintenance work correctly.TIPIf you do not have the tools or experi-
ence required for a particular job, have
a Yamaha dealer perform it for you.1. Owner’s tool kit
1
U1CWE4E0.book Page 2 Wednesday, August 6, 2014 2:59 PM
Page 59 of 106
PERIODIC MAINTENANCE AND ADJUSTMENT
6-13
6
6. Insert and tighten the engine oil
dipstick, and then install and tight-
en the oil filler cap.
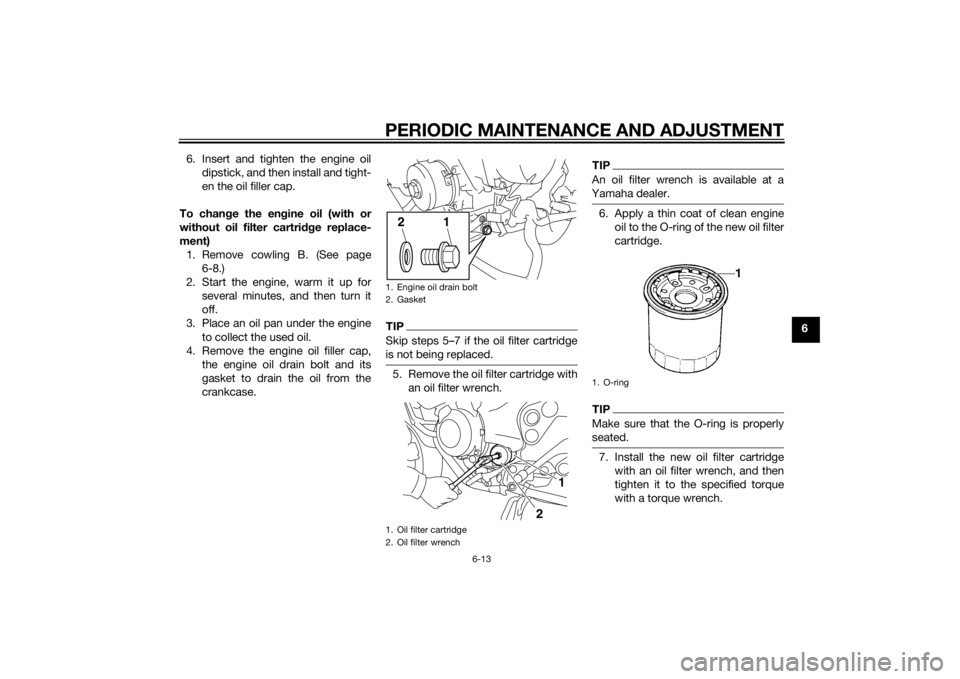
To chan ge the en gine oil (with or
without oil filter cartri dge replace-
ment) 1. Remove cowling B. (See page 6-8.)
2. Start the engine, warm it up for several minutes, and then turn it
off.
3. Place an oil pan under the engine to collect the used oil.
4. Remove the engine oil filler cap, the engine oil drain bolt and its
gasket to drain the oil from the
crankcase.
TIPSkip steps 5–7 if the oil filter cartridge
is not being replaced.5. Remove the oil filter cartridge withan oil filter wrench.
TIPAn oil filter wrench is available at a
Yamaha dealer.6. Apply a thin coat of clean engineoil to the O-ring of the new oil filter
cartridge.TIPMake sure that the O-ring is properly
seated.7. Install the new oil filter cartridgewith an oil filter wrench, and then
tighten it to the specified torque
with a torque wrench.
1. Engine oil drain bolt
2. Gasket
1. Oil filter cartridge
2. Oil filter wrench
1
2
1
2
1. O-ring
U1CWE4E0.book Page 13 Wednesday, August 6, 2014 2:59 PM
Page 64 of 106
PERIODIC MAINTENANCE AND ADJUSTMENT
6-18
6
EAU32888
Replacing the air filter ele-
mentThe air filter element should be re-
placed at the intervals specified in the
periodic maintenance and lubrication
chart. Replace the air filter element
more frequently if you are riding in un-
usually wet or dusty areas.
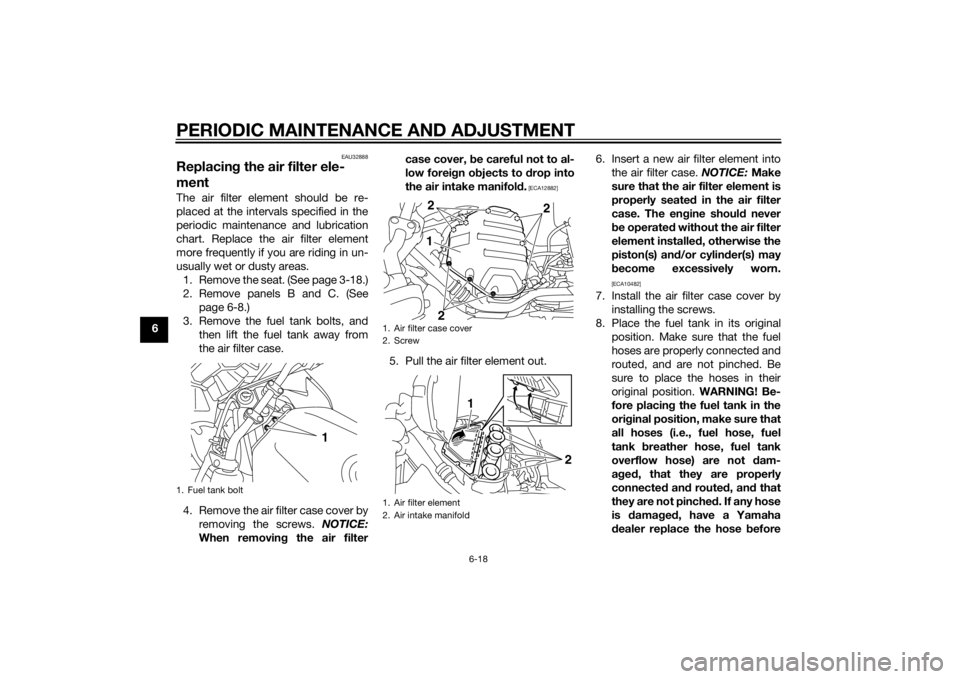
1. Remove the seat. (See page 3-18.)
2. Remove panels B and C. (See page 6-8.)
3. Remove the fuel tank bolts, and then lift the fuel tank away from
the air filter case.
4. Remove the air filter case cover by removing the screws. NOTICE:
When removin g the air filter case cover,
be careful not to al-
low forei gn o bjects to d rop into
the air intake manifol d.
[ECA12882]
5. Pull the air filter element out. 6. Insert a new air filter element into
the air filter case. NOTICE: Make
sure that the air filter element is
properly seate d in the air filter
case. The en gine shoul d never
b e operated without the air filter
element installe d, otherwise the
piston(s) an d/or cylin der(s) may
b ecome excessively worn.
[ECA10482]
7. Install the air filter case cover by
installing the screws.
8. Place the fuel tank in its original position. Make sure that the fuel
hoses are properly connected and
routed, and are not pinched. Be
sure to place the hoses in their
original position. WARNING! Be-
fore placin g the fuel tank in the
ori ginal position, make sure that
all hoses (i.e., fuel hose, fuel
tank breather hose, fuel tank
overflow hose) are not dam-
a g ed , that they are properly
connected and route d, an d that
they are not pinche d. If any hose
is damag ed , have a Yamaha
d ealer replace the hose before
1. Fuel tank bolt
1
1. Air filter case cover
2. Screw
1. Air filter element
2. Air intake manifold
12
2
2
2
1
U1CWE4E0.book Page 18 Wednesday, August 6, 2014 2:59 PM
Page 65 of 106
![YAMAHA XJ6F 2013 Owners Manual PERIODIC MAINTENANCE AND ADJUSTMENT
6-19
6
startin
g the en gine, otherwise
fuel may leak, creatin g a fire
hazar d.
[EWA12464]
9. Install the fuel tank bolts.
10. Install the panels.
11. Install the YAMAHA XJ6F 2013 Owners Manual PERIODIC MAINTENANCE AND ADJUSTMENT
6-19
6
startin
g the en gine, otherwise
fuel may leak, creatin g a fire
hazar d.
[EWA12464]
9. Install the fuel tank bolts.
10. Install the panels.
11. Install the](/img/51/52647/w960_52647-64.png)
PERIODIC MAINTENANCE AND ADJUSTMENT
6-19
6
startin
g the en gine, otherwise
fuel may leak, creatin g a fire
hazar d.
[EWA12464]
9. Install the fuel tank bolts.
10. Install the panels.
11. Install the seat.
EAU34302
A djustin g the en gine i dlin g
spee dThe engine idling speed must be
checked and, if necessary, adjusted as
follows at the intervals specified in the
periodic maintenance and lubrication
chart.
The engine should be warm before
making this adjustment.
Check the engine idling speed and, if
necessary, adjust it to specification by
turning the idle adjusting screw. To in-
crease the engine idling speed, turn
the screw in direction (a). To decrease
the engine idling speed, turn the screw
in direction (b).
TIPIf the specified idling speed cannot be
obtained as described above, have a
Yamaha dealer make the adjustment.
1. Hose
1. Original position (paint mark)
1
1
1. Idle adjusting screw
1
(a)
(b)
En gine i dlin g spee d:
1250–1350 r/min
U1CWE4E0.book Page 19 Wednesday, August 6, 2014 2:59 PM
Page 80 of 106
PERIODIC MAINTENANCE AND ADJUSTMENT
6-34
6
EAU23292
Checking the wheel b earingsThe front and rear wheel bearings must
be checked at the intervals specified in
the periodic maintenance and lubrica-
tion chart. If there is play in the wheel
hub or if the wheel does not turn
smoothly, have a Yamaha dealer
check the wheel bearings.
EAU50291
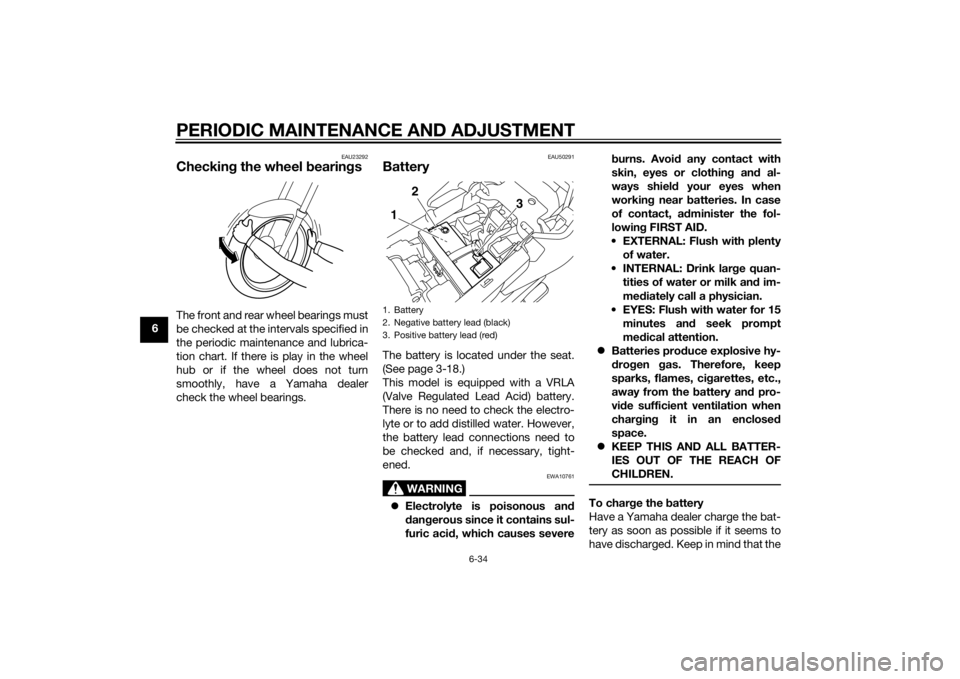
BatteryThe battery is located under the seat.
(See page 3-18.)
This model is equipped with a VRLA
(Valve Regulated Lead Acid) battery.
There is no need to check the electro-
lyte or to add distilled water. However,
the battery lead connections need to
be checked and, if necessary, tight-
ened.
WARNING
EWA10761
Electrolyte is poisonous an d
d an gerous since it contains sul-
furic aci d, which causes severe b
urns. Avoi d any contact with
skin, eyes or clothin g an d al-
ways shiel d your eyes when
workin g near b atteries. In case
of contact, ad minister the fol-
lowin g FIRST AID.
EXTERNAL: Flush with plenty of water.
INTERNAL: Drink lar ge quan-
tities of water or milk an d im-
me diately call a physician.
EYES: Flush with water for 15 minutes an d seek prompt
me dical attention.
Batteries pro duce explosive hy-
d ro gen gas. Therefore, keep
sparks, flames, ci garettes, etc.,
away from the battery an d pro-
vi de sufficient ventilation when
char gin g it in an enclose d
space.
KEEP THIS AND ALL BATTER-
IES OUT OF THE REACH OF
CHILDREN.
To char ge the battery
Have a Yamaha dealer charge the bat-
tery as soon as possible if it seems to
ha v e di s c ha r g e d. Ke e p in m in d t ha t t he
1. Battery
2. Negative battery lead (black)
3. Positive battery lead (red)1 2
3
U1CWE4E0.book Page 34 Wednesday, August 6, 2014 2:59 PM
Page 81 of 106
PERIODIC MAINTENANCE AND ADJUSTMENT
6-35
6
battery tends to discharge more quick-
ly if the vehicle is equipped with op-
tional electrical accessories.
NOTICE
ECA16522
To char
ge a VRLA (Valve Re gulate d
Lea d Aci d) battery, a special (con-
stant-volta ge) battery char ger is re-
quire d. Usin g a conventional b attery
char ger will damag e the battery.To store the battery
1. If the vehicle will not be used for more than one month, remove the
battery, fully charge it, and then
place it in a cool, dry place.
NOTICE: When removin g the
b attery, be sure the key is
turne d to “OFF”, then discon-
nect the neg ative lead b efore
d isconnectin g the positive lea d.
[ECA16303]
2. If the battery will be stored for
more than two months, check it at
least once a month and fully
charge it if necessary.
3. Fully charge the battery before in- stallation. NOTICE: When install-
in g the b attery, be sure the key is turne
d to “OFF”, then connect
the positive lea d before con-
nectin g the ne gative lead .
[ECA16841]
4. After installation, make sure that
the battery leads are properly con-
nected to the battery terminals.NOTICE
ECA16531
Always keep the b attery charged .
Storin g a dischar ged battery can
cause permanent b attery damag e.
EAU47173
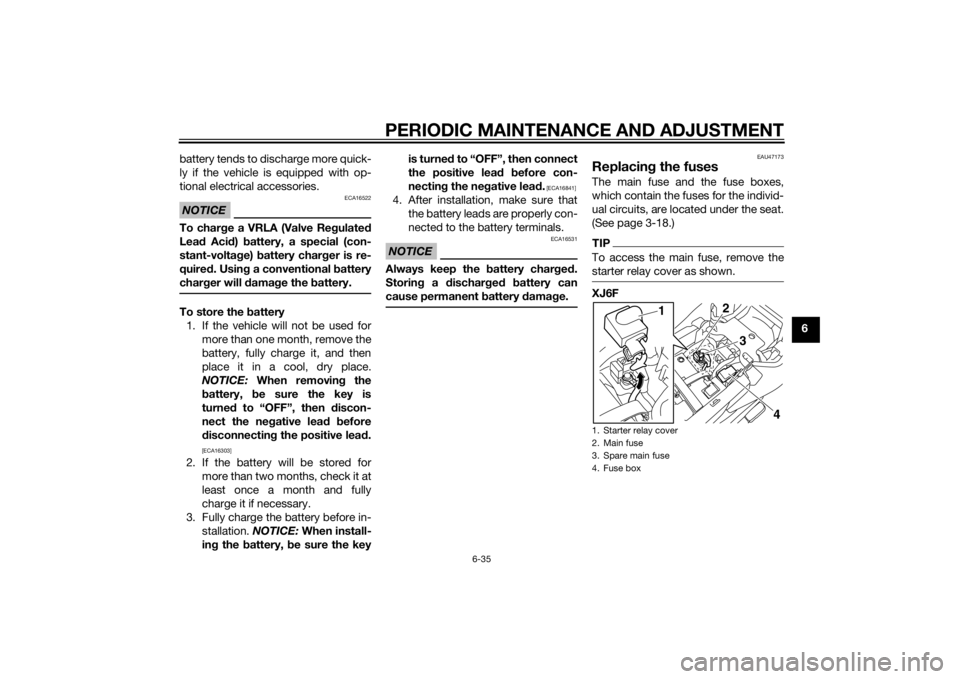
Replacin g the fusesThe main fuse and the fuse boxes,
which contain the fuses for the individ-
ual circuits, are located under the seat.
(See page 3-18.)TIPTo access the main fuse, remove the
starter relay cover as shown.XJ6F1. Starter relay cover
2. Main fuse
3. Spare main fuse
4. Fuse box
2
4
3
1
U1CWE4E0.book Page 35 Wednesday, August 6, 2014 2:59 PM
Page 85 of 106
PERIODIC MAINTENANCE AND ADJUSTMENT
6-39
6
EAU47022
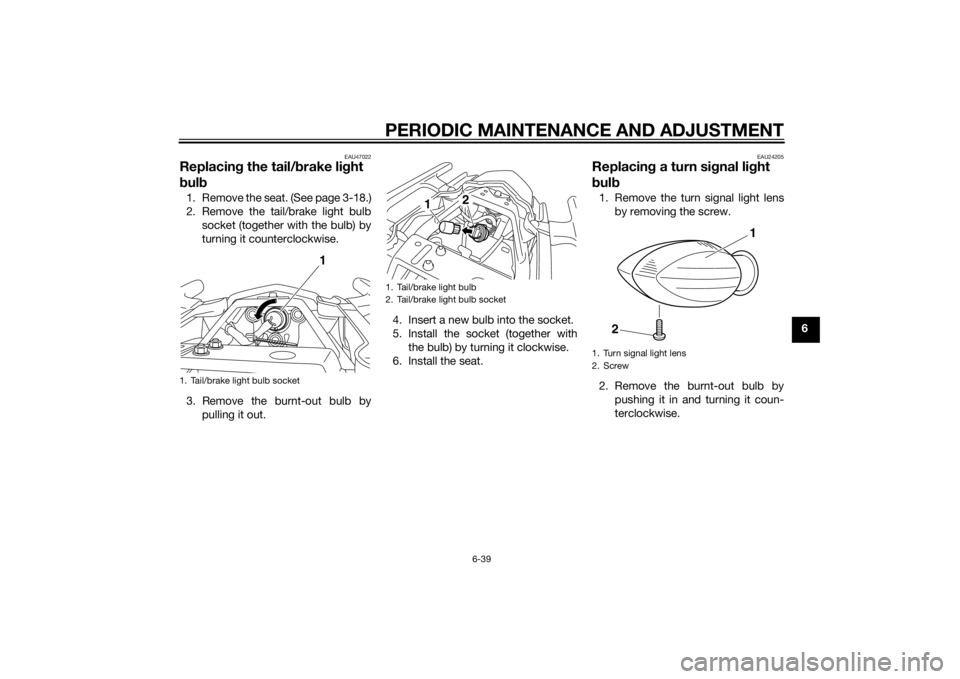
Replacing the tail/ brake li ght
b ul b1. Remove the seat. (See page 3-18.)
2. Remove the tail/brake light bulb
socket (together with the bulb) by
turning it counterclockwise.
3. Remove the burnt-out bulb by pulling it out. 4. Insert a new bulb into the socket.
5. Install the socket (together with
the bulb) by turning it clockwise.
6. Install the seat.
EAU24205
Replacin g a turn sig nal light
b ul b1. Remove the turn signal light lens
by removing the screw.
2. Remove the burnt-out bulb by pushing it in and turning it coun-
terclockwise.
1. Tail/brake light bulb socket
1
1. Tail/brake light bulb
2. Tail/brake light bulb socket
2
1
1. Turn signal light lens
2. Screw
1
2
U1CWE4E0.book Page 39 Wednesday, August 6, 2014 2:59 PM