brake YAMAHA XJ900S 2000 Owners Manual
[x] Cancel search | Manufacturer: YAMAHA, Model Year: 2000, Model line: XJ900S, Model: YAMAHA XJ900S 2000Pages: 97, PDF Size: 2.08 MB
Page 12 of 97
DESCRIPTION
2-2
2
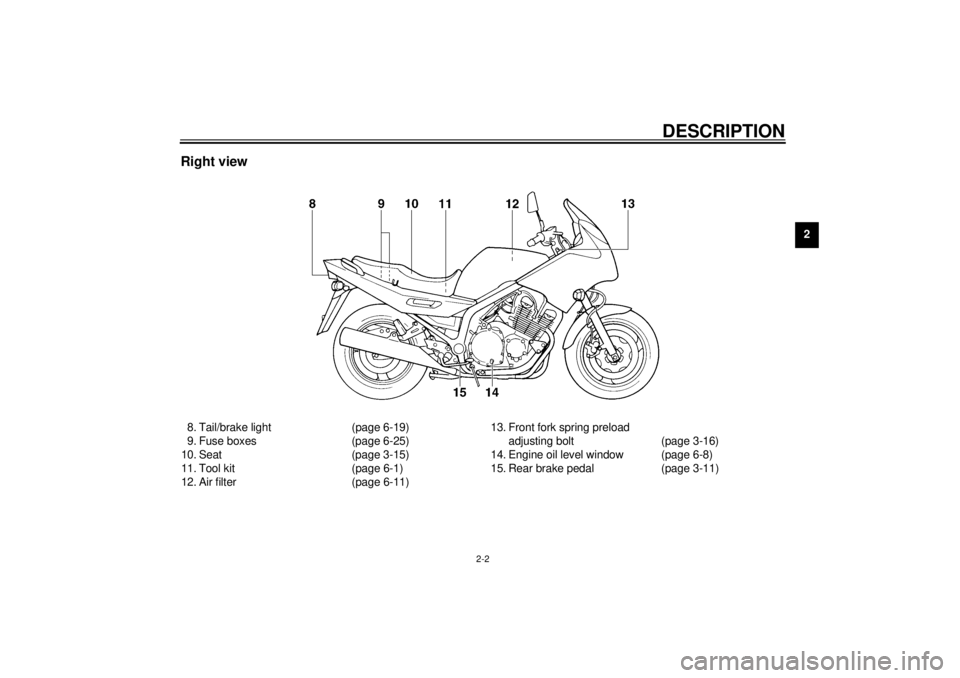
Right view8. Tail/brake light (page 6-19)
9. Fuse boxes (page 6-25)
10. Seat (page 3-15)
11. Tool kit (page 6-1)
12. Air filter (page 6-11)13. Front fork spring preload
adjusting bolt (page 3-16)
14. Engine oil level window (page 6-8)
15. Rear brake pedal (page 3-11)
Page 13 of 97
DESCRIPTION
2-3
2
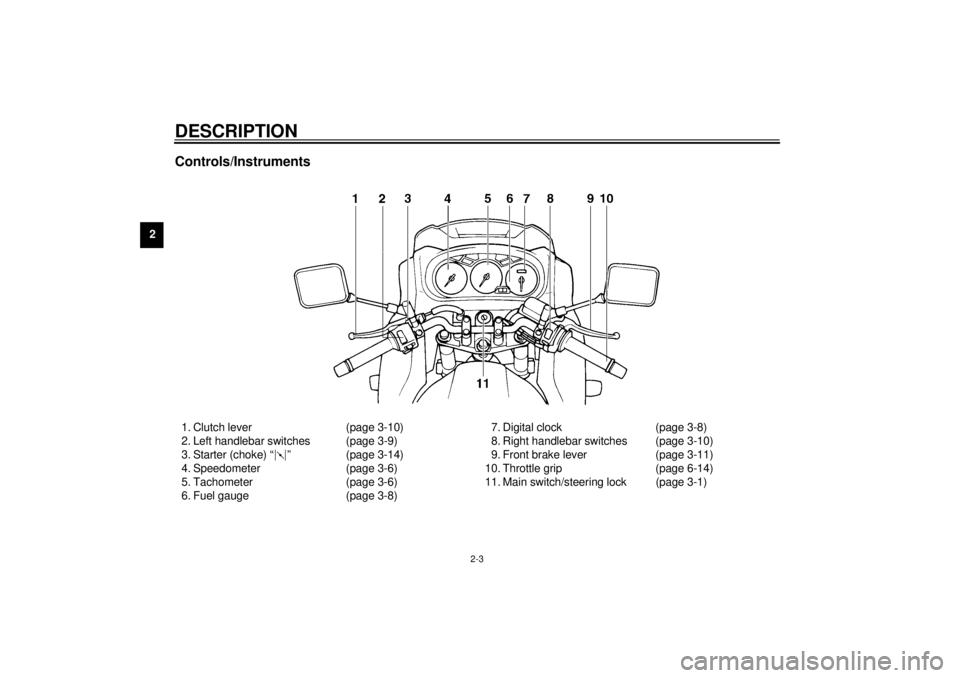
Controls/Instruments1. Clutch lever (page 3-10)
2. Left handlebar switches (page 3-9)
3. Starter (choke) “ ” (page 3-14)
4. Speedometer (page 3-6)
5. Tachometer (page 3-6)
6. Fuel gauge (page 3-8)7. Digital clock (page 3-8)
8. Right handlebar switches (page 3-10)
9. Front brake lever (page 3-11)
10. Throttle grip (page 6-14)
11. Main switch/steering lock (page 3-1)
Page 14 of 97
3
INSTRUMENT AND CONTROL FUNCTIONS
Main switch/steering lock ...................................... 3-1
Indicator lights ...................................................... 3-3
Oil level indicator circuit check .............................. 3-4
Fuel indicator circuit check ................................... 3-5
Speedometer ........................................................ 3-6
Tachometer ........................................................... 3-6
Diagnosis device................................................... 3-7
Antitheft alarm (optional) ...................................... 3-7
Fuel gauge ............................................................ 3-8
Digital clock........................................................... 3-8
Handlebar switches .............................................. 3-9
Clutch lever ......................................................... 3-10
Shift pedal ........................................................... 3-11Front brake lever ................................................ 3-11
Rear brake pedal................................................ 3-11
Fuel tank cap ..................................................... 3-12
Fuel .................................................................... 3-13
Fuel tank breather hose (for Germany only) ...... 3-14
Starter (choke) “ ” ........................................... 3-14
Seat.................................................................... 3-15
Helmet holder..................................................... 3-15
Storage compartment ........................................ 3-16
Front fork adjustment ......................................... 3-16
Rear shock absorber adjustment ....................... 3-17
Sidestand ........................................................... 3-18
Sidestand/clutch switch operation check............ 3-18
Page 25 of 97
INSTRUMENT AND CONTROL FUNCTIONS
3-11
3
EAU00157
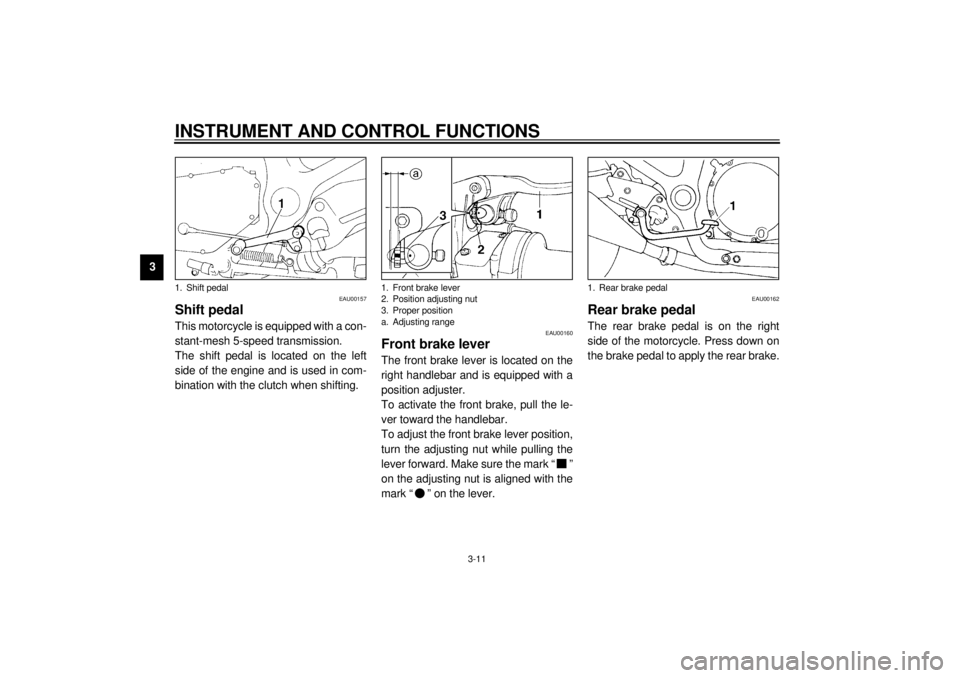
Shift pedalThis motorcycle is equipped with a con-
stant-mesh 5-speed transmission.
The shift pedal is located on the left
side of the engine and is used in com-
bination with the clutch when shifting.
EAU00160
Front brake leverThe front brake lever is located on the
right handlebar and is equipped with a
position adjuster.
To activate the front brake, pull the le-
ver toward the handlebar.
To adjust the front brake lever position,
turn the adjusting nut while pulling the
lever forward. Make sure the mark “ ”
on the adjusting nut is aligned with the
mark “ ” on the lever.
EAU00162
Rear brake pedalThe rear brake pedal is on the right
side of the motorcycle. Press down on
the brake pedal to apply the rear brake.
1. Shift pedal
1. Front brake lever
2. Position adjusting nut
3. Proper position
a. Adjusting range
1. Rear brake pedal
Page 35 of 97
4-1
4
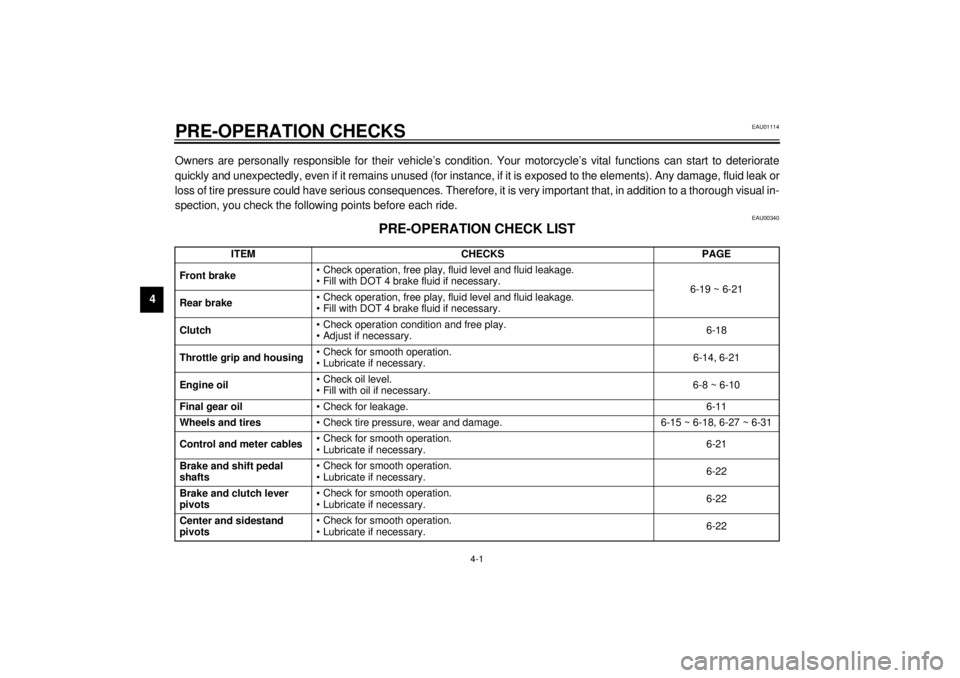
EAU01114
4-PRE-OPERATION CHECKSOwners are personally responsible for their vehicle’s condition. Your motorcycle’s vital functions can start to deteriorate
quickly and unexpectedly, even if it remains unused (for instance, if it is exposed to the elements). Any damage, fluid leak or
loss of tire pressure could have serious consequences. Therefore, it is very important that, in addition to a thorough visual in-
spection, you check the following points before each ride.
EAU00340
PRE-OPERATION CHECK LIST
ITEM CHECKS PAGE
Front brake• Check operation, free play, fluid level and fluid leakage.
• Fill with DOT 4 brake fluid if necessary.
6-19 ~ 6-21
Rear brake• Check operation, free play, fluid level and fluid leakage.
• Fill with DOT 4 brake fluid if necessary.
Clutch• Check operation condition and free play.
• Adjust if necessary.6-18
Throttle grip and housing• Check for smooth operation.
• Lubricate if necessary.6-14, 6-21
Engine oil• Check oil level.
• Fill with oil if necessary.6-8 ~ 6-10
Final gear oil• Check for leakage. 6-11
Wheels and tires• Check tire pressure, wear and damage. 6-15 ~ 6-18, 6-27 ~ 6-31
Control and meter cables• Check for smooth operation.
• Lubricate if necessary.6-21
Brake and shift pedal
shafts• Check for smooth operation.
• Lubricate if necessary.6-22
Brake and clutch lever
pivots• Check for smooth operation.
• Lubricate if necessary.6-22
Center and sidestand
pivots• Check for smooth operation.
• Lubricate if necessary.6-22
Page 46 of 97
6
PERIODIC MAINTENANCE AND MINOR REPAIR
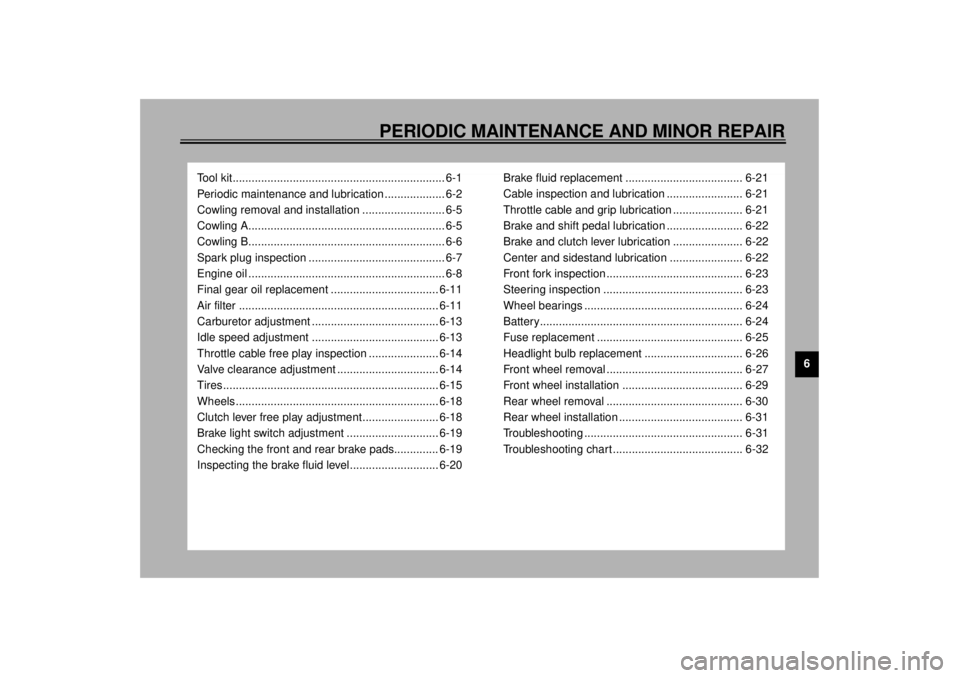
Tool kit................................................................... 6-1
Periodic maintenance and lubrication ................... 6-2
Cowling removal and installation .......................... 6-5
Cowling A.............................................................. 6-5
Cowling B.............................................................. 6-6
Spark plug inspection ........................................... 6-7
Engine oil .............................................................. 6-8
Final gear oil replacement .................................. 6-11
Air filter ............................................................... 6-11
Carburetor adjustment ........................................ 6-13
Idle speed adjustment ........................................ 6-13
Throttle cable free play inspection ...................... 6-14
Valve clearance adjustment ................................ 6-14
Tires .................................................................... 6-15
Wheels ................................................................ 6-18
Clutch lever free play adjustment........................ 6-18
Brake light switch adjustment ............................. 6-19
Checking the front and rear brake pads.............. 6-19
Inspecting the brake fluid level............................ 6-20Brake fluid replacement ..................................... 6-21
Cable inspection and lubrication ........................ 6-21
Throttle cable and grip lubrication ...................... 6-21
Brake and shift pedal lubrication ........................ 6-22
Brake and clutch lever lubrication ...................... 6-22
Center and sidestand lubrication ....................... 6-22
Front fork inspection ........................................... 6-23
Steering inspection ............................................ 6-23
Wheel bearings .................................................. 6-24
Battery................................................................ 6-24
Fuse replacement .............................................. 6-25
Headlight bulb replacement ............................... 6-26
Front wheel removal ........................................... 6-27
Front wheel installation ...................................... 6-29
Rear wheel removal ........................................... 6-30
Rear wheel installation ....................................... 6-31
Troubleshooting .................................................. 6-31
Troubleshooting chart ......................................... 6-32
Page 48 of 97
PERIODIC MAINTENANCE AND MINOR REPAIR
6-2
6
EAU00473
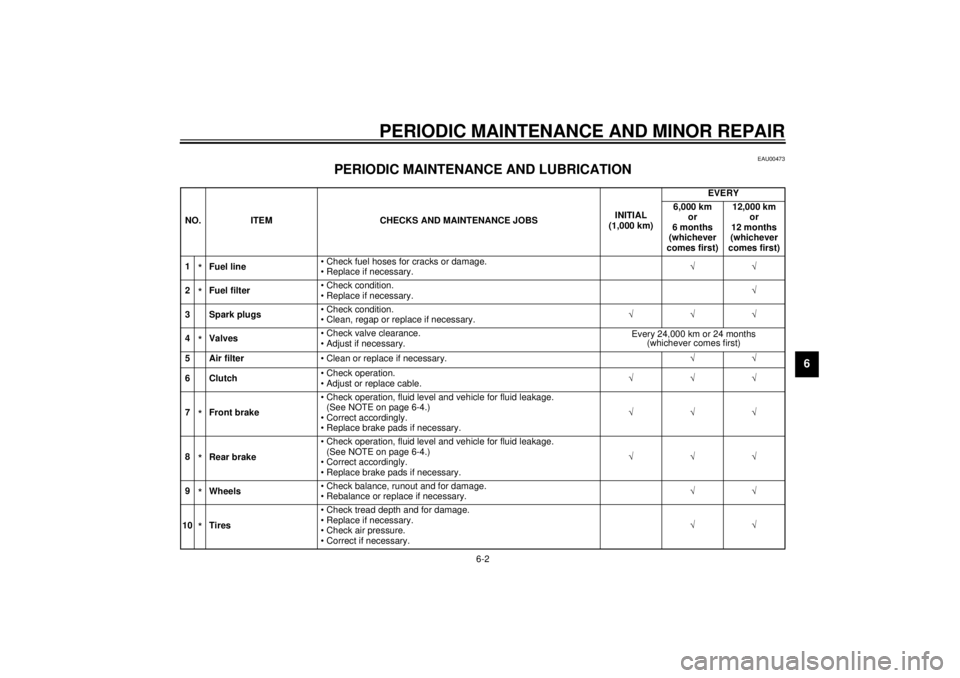
PERIODIC MAINTENANCE AND LUBRICATION
CP-01ENO. ITEM CHECKS AND MAINTENANCE JOBSINITIAL
(1,000 km)EVERY
6,000 km
or
6 months
(whichever
comes first)12,000 km
or
12 months
(whichever
comes first)
1
*Fuel line• Check fuel hoses for cracks or damage.
• Replace if necessary.ÖÖ
2*Fuel filter• Check condition.
• Replace if necessary.Ö
3 Spark plugs• Check condition.
• Clean, regap or replace if necessary.ÖÖÖ
4*Valves• Check valve clearance.
• Adjust if necessary.Every 24,000 km or 24 months
(whichever comes first)
5 Air filter• Clean or replace if necessary.ÖÖ
6Clutch• Check operation.
• Adjust or replace cable.ÖÖÖ
7*Front brake• Check operation, fluid level and vehicle for fluid leakage.
(See NOTE on page 6-4.)
• Correct accordingly.
• Replace brake pads if necessary.ÖÖÖ
8*Rear brake• Check operation, fluid level and vehicle for fluid leakage.
(See NOTE on page 6-4.)
• Correct accordingly.
• Replace brake pads if necessary.ÖÖÖ
9*Wheels• Check balance, runout and for damage.
• Rebalance or replace if necessary.ÖÖ
10*Tires• Check tread depth and for damage.
• Replace if necessary.
• Check air pressure.
• Correct if necessary.ÖÖ
Page 50 of 97
PERIODIC MAINTENANCE AND MINOR REPAIR
6-4
6
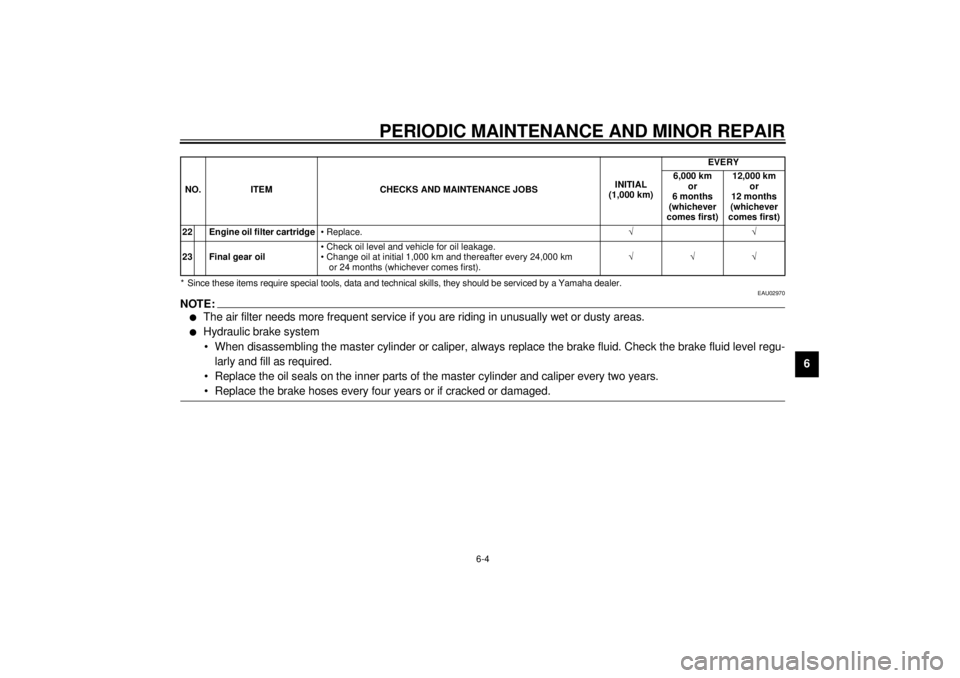
* Since these items require special tools, data and technical skills, they should be serviced by a Yamaha dealer.
EAU02970
NOTE:@ l
The air filter needs more frequent service if you are riding in unusually wet or dusty areas.
l
Hydraulic brake system
• When disassembling the master cylinder or caliper, always replace the brake fluid. Check the brake fluid level regu-
larly and fill as required.
• Replace the oil seals on the inner parts of the master cylinder and caliper every two years.
• Replace the brake hoses every four years or if cracked or damaged.
@22 Engine oil filter cartridge• Replace.ÖÖ
23 Final gear oil• Check oil level and vehicle for oil leakage.
• Change oil at initial 1,000 km and thereafter every 24,000 km
or 24 months (whichever comes first).ÖÖÖ NO. ITEM CHECKS AND MAINTENANCE JOBSINITIAL
(1,000 km)EVERY
6,000 km
or
6 months
(whichever
comes first)12,000 km
or
12 months
(whichever
comes first)
Page 62 of 97
PERIODIC MAINTENANCE AND MINOR REPAIR
6-16
6 Tire inspection
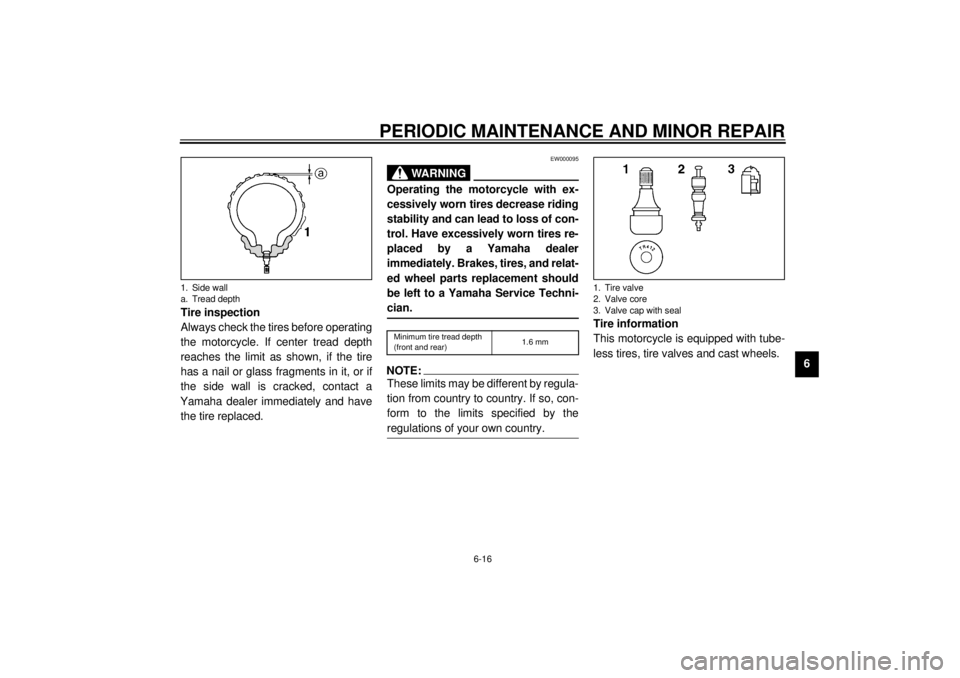
Always check the tires before operating
the motorcycle. If center tread depth
reaches the limit as shown, if the tire
has a nail or glass fragments in it, or if
the side wall is cracked, contact a
Yamaha dealer immediately and have
the tire replaced.
EW000095
WARNING
@ Operating the motorcycle with ex-
cessively worn tires decrease riding
stability and can lead to loss of con-
trol. Have excessively worn tires re-
placed by a Yamaha dealer
immediately. Brakes, tires, and relat-
ed wheel parts replacement should
be left to a Yamaha Service Techni-
cian. @CE-26ENOTE:@ These limits may be different by regula-
tion from country to country. If so, con-
form to the limits specified by the
regulations of your own country. @
Tire information
This motorcycle is equipped with tube-
less tires, tire valves and cast wheels.
1. Side wall
a. Tread depth
Minimum tire tread depth
(front and rear)1.6 mm
1. Tire valve
2. Valve core
3. Valve cap with seal
Page 65 of 97
PERIODIC MAINTENANCE AND MINOR REPAIR
6-19
6
EAU00713
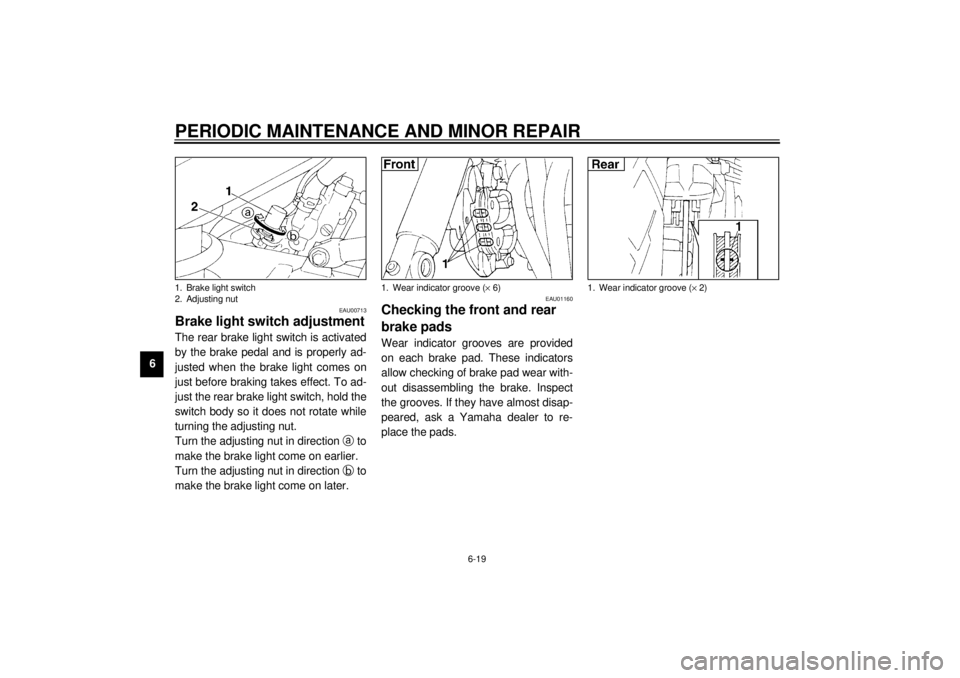
Brake light switch adjustmentThe rear brake light switch is activated
by the brake pedal and is properly ad-
justed when the brake light comes on
just before braking takes effect. To ad-
just the rear brake light switch, hold the
switch body so it does not rotate while
turning the adjusting nut.
Turn the adjusting nut in direction
a to
make the brake light come on earlier.
Turn the adjusting nut in direction
b to
make the brake light come on later.
EAU01160
Checking the front and rear
brake padsWear indicator grooves are provided
on each brake pad. These indicators
allow checking of brake pad wear with-
out disassembling the brake. Inspect
the grooves. If they have almost disap-
peared, ask a Yamaha dealer to re-
place the pads.
1. Brake light switch
2. Adjusting nut
1. Wear indicator groove (´ 6)
1. Wear indicator groove (´ 2)