turn signal YAMAHA XJR 1300 2002 Owners Manual
[x] Cancel search | Manufacturer: YAMAHA, Model Year: 2002, Model line: XJR 1300, Model: YAMAHA XJR 1300 2002Pages: 102, PDF Size: 5.87 MB
Page 17 of 102

INSTRUMENT AND CONTROL FUNCTIONS
3-2
3
EAU04356
(Parking)
The steering is locked, the taillight and
auxiliary light are on, and the hazard
light can be turned on, but all other
electrical systems are off. The key can
be removed.
The steering must be locked before the
key can be turned to “”.
ECA00043
CAUTION:_ Do not use the parking position for
an extended length of time, other-
wise the battery may discharge. _
EAU03034
Indicator and warning lights
EAU04121
Turn signal indicator lights “”
and “”
The corresponding indicator light flash-
es when the turn signal switch is
pushed to the left or right.
EAU00063
High beam indicator light “”
This indicator light comes on when the
high beam of the headlight is switched
on.
EAU00061
Neutral indicator light “”
This indicator light comes on when the
transmission is in the neutral position.
EAU03201
Oil level warning light “”
This warning light comes on when the
engine oil level is low.
The electrical circuit of the warning light
can be checked according to the fol-
lowing procedure.
1. Set the engine stop switch to “”
and turn the key to “ON”.
2. Shift the transmission into the neu-
tral position or pull the clutch lever.
3. Push the start switch. If the warn-
ing light does not come on while
pushing the start switch, have a
Yamaha dealer check the electri-
cal circuit.NOTE:_ Even if the oil level is sufficient, the
warning light may flicker when riding on
a slope or during sudden acceleration
or deceleration, but this is not a mal-
function. _
1. Left turn signal indicator light “”
2. High beam indicator light “”
3. Neutral indicator light “”
4. Right turn signal indicator light “”
5. Oil level warning light “”
E_5ea.book Page 2 Tuesday, October 2, 2001 3:54 PM
Page 19 of 102

INSTRUMENT AND CONTROL FUNCTIONS
3-4
3
EAU00109
Anti-theft alarm (optional) This motorcycle can be equipped with
an optional anti-theft alarm by a
Yamaha dealer. Contact a Yamaha
dealer for more information.
EAU00118
Handlebar switches
EAU00120
Pass switch “PASS”
Press this switch to flash the headlight.
EAU03888
Dimmer switch “/”
Set this switch to “” for the high
beam and to “” for the low beam.
EAU03826
Hazard switch “”
With the key in the “ON” or “” posi-
tion, use this switch to turn on the haz-
ard light (simultaneous flashing of all
turn signal lights).
The hazard light is used in case of an
emergency or to warn other drivers
when your motorcycle is stopped
where it might be a traffic hazard.
EC000006
CAUTION:_ Do not use the hazard light for an ex-
tended length of time, otherwise the
battery may discharge. _
EAU03889
Turn signal switch “/”
To signal a right-hand turn, push this
switch to “”. To signal a left-hand
turn, push this switch to “”. When
released, the switch returns to the cen-
ter position. To cancel the turn signal
lights, push the switch in after it has re-
turned to the center position.
EAU00129
Horn switch “”
Press this switch to sound the horn.
1. Pass switch “PASS”
2. Dimmer switch “/”
3. Hazard switch “”
4. Turn signal switch “/”
5. Horn switch “”
E_5ea.book Page 4 Tuesday, October 2, 2001 3:54 PM
Page 45 of 102

6
PERIODIC MAINTENANCE AND MINOR REPAIR
Owner’s tool kit .................................................... 6-1
Periodic maintenance and lubrication chart ......... 6-2
Removing and installing the panel ....................... 6-5
Checking the spark plugs .................................... 6-6
Engine oil and oil filter element ............................ 6-7
Cleaning the air filter element ............................ 6-11
Adjusting the carburetors ................................... 6-12
Adjusting the engine idling speed ...................... 6-13
Adjusting the throttle cable free play .................. 6-13
Adjusting the valve clearance ............................ 6-14
Tires ................................................................... 6-14
Cast wheels ....................................................... 6-17
Adjusting the brake pedal position ..................... 6-17
Rear brake light switch adjustment .................... 6-18
Checking the front and rear brake pads ............. 6-19
Checking the brake and clutch fluid levels ......... 6-19
Changing the brake and clutch fluids ................. 6-21
Drive chain slack ................................................ 6-21
Lubricating the drive chain ................................. 6-23
Checking and lubricating the cables .................. 6-23Checking and lubricating the throttle
grip and cable ................................................. 6-24
Checking and lubricating the brake and
shift pedals ...................................................... 6-24
Checking and lubricating the brake and
clutch levers .................................................... 6-24
Checking and lubricating the centerstand and
sidestand ......................................................... 6-25
Checking the front fork ...................................... 6-25
Checking the steering ....................................... 6-26
Checking the wheel bearings ............................ 6-27
Battery ............................................................... 6-27
Replacing the fuses .......................................... 6-29
Replacing the headlight bulb ............................. 6-29
Replacing a tail/brake light bulb ........................ 6-31
Replacing a turn signal light bulb ...................... 6-31
Front wheel ....................................................... 6-32
Rear wheel ........................................................ 6-34
Troubleshooting ................................................. 6-36
Troubleshooting chart ........................................ 6-37
E_5ea.book Page 1 Tuesday, October 2, 2001 3:54 PM
Page 74 of 102

PERIODIC MAINTENANCE AND MINOR REPAIR
6-29
6
EAU04410*
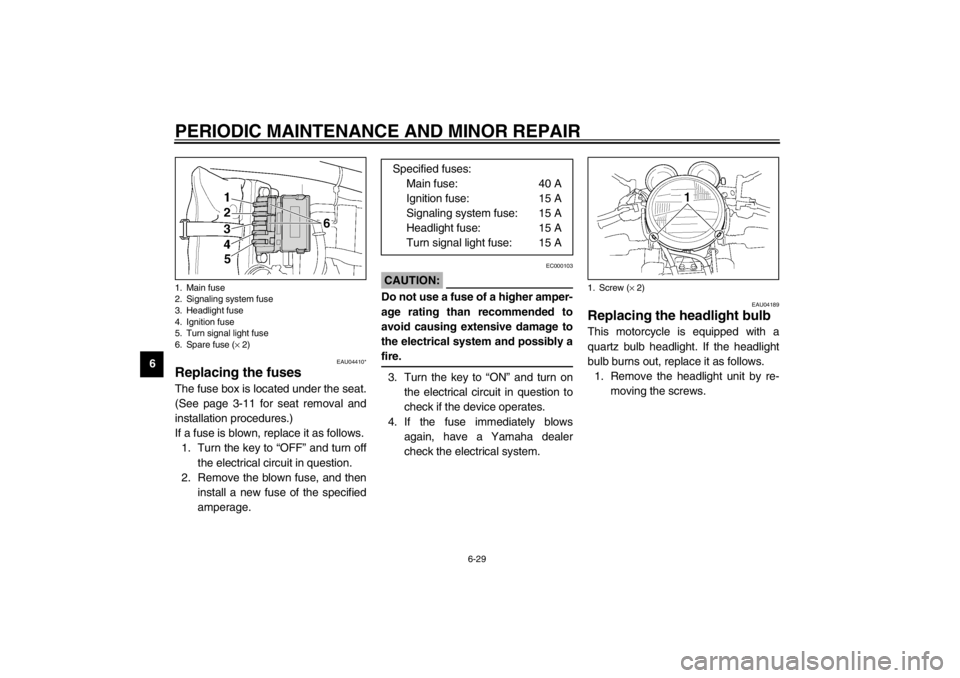
Replacing the fuses The fuse box is located under the seat.
(See page 3-11 for seat removal and
installation procedures.)
If a fuse is blown, replace it as follows.
1. Turn the key to “OFF” and turn off
the electrical circuit in question.
2. Remove the blown fuse, and then
install a new fuse of the specified
amperage.
EC000103
CAUTION:_ Do not use a fuse of a higher amper-
age rating than recommended to
avoid causing extensive damage to
the electrical system and possibly a
fire. _3. Turn the key to “ON” and turn on
the electrical circuit in question to
check if the device operates.
4. If the fuse immediately blows
again, have a Yamaha dealer
check the electrical system.
EAU04189
Replacing the headlight bulb This motorcycle is equipped with a
quartz bulb headlight. If the headlight
bulb burns out, replace it as follows.
1. Remove the headlight unit by re-
moving the screws.
1. Main fuse
2. Signaling system fuse
3. Headlight fuse
4. Ignition fuse
5. Turn signal light fuse
6. Spare fuse (× 2)
Specified fuses:
Main fuse: 40 A
Ignition fuse: 15 A
Signaling system fuse: 15 A
Headlight fuse: 15 A
Turn signal light fuse: 15 A
1. Screw (× 2)
E_5ea.book Page 29 Tuesday, October 2, 2001 3:54 PM
Page 76 of 102

PERIODIC MAINTENANCE AND MINOR REPAIR
6-31
6
EAU04411
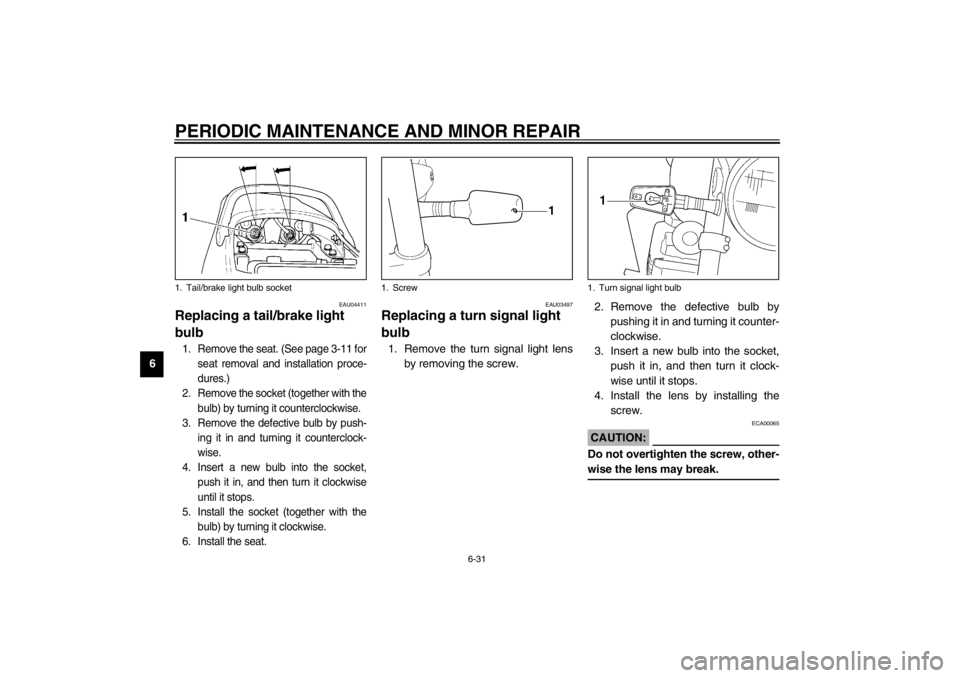
Replacing a tail/brake light
bulb 1. Remove the seat. (See page 3-11 for
seat removal and installation proce-
dures.)
2. Remove the socket (together with the
bulb) by turning it counterclockwise.
3. Remove the defective bulb by push-
ing it in and turning it counterclock-
wise.
4. Insert a new bulb into the socket,
push it in, and then turn it clockwise
until it stops.
5. Install the socket (together with the
bulb) by turning it clockwise.
6. Install the seat.
EAU03497
Replacing a turn signal light
bulb 1. Remove the turn signal light lens
by removing the screw.2. Remove the defective bulb by
pushing it in and turning it counter-
clockwise.
3. Insert a new bulb into the socket,
push it in, and then turn it clock-
wise until it stops.
4. Install the lens by installing the
screw.
ECA00065
CAUTION:_ Do not overtighten the screw, other-
wise the lens may break. _
1. Tail/brake light bulb socket
1. Screw
1. Turn signal light bulb
E_5ea.book Page 31 Tuesday, October 2, 2001 3:54 PM
Page 93 of 102

SPECIFICATIONS
8-4
8
Battery
Model GT14B-4
Voltage, capacity 12 V, 12 Ah
Headlight typeQuar tz bulb (halogen)
Bulb voltage, wattage × quantity
Headlight 12 V, 60/55 W × 1
Tail/brake light 12 V, 5/21 W × 2
Auxiliary light 12 V, 4 W × 1
Turn signal light 12 V, 21 W × 4
Meter lighting 12 V, 1.7 W × 4
Neutral indicator light 12 V, 1.7 W × 1
High beam indicator light 12 V, 3.4 W × 1
Oil level warning light 12 V, 1.7 W × 1
Turn signal indicator light 12 V, 1.7 W × 2
Fuses
Main fuse 40 A
Headlight fuse 15 A
Signaling system fuse 15 A
Ignition fuse 15 A
Turn signal light fuse 15 A
E_5ea.book Page 4 Tuesday, October 2, 2001 3:54 PM
Page 99 of 102

INDEX
Starter (choke) lever .............................. 3-11
Starting a cold engine .............................. 5-1
Starting a warm engine ............................ 5-2
Start switch .............................................. 3-5
Steering, checking ................................. 6-26
Storage.................................................... 7-4
Storage compartment ............................ 3-13TTachometer ............................................. 3-3
Tail/brake light bulb, replacing ............... 6-31
Throttle cable free play, adjusting .......... 6-13
Throttle grip and cable, checking and
lubricating............................................ 6-24
Tires ...................................................... 6-14
Tool kit..................................................... 6-1
Troubleshooting..................................... 6-36
Troubleshooting chart ............................ 6-37
Turn signal indicator lights ....................... 3-2
Turn signal light bulb, replacing ............. 6-31
Turn signal switch .................................... 3-4VValve clearance, adjusting ..................... 6-14
Vehicle identification number ................... 9-1WWheel bearings, checking...................... 6-27
Wheel (front).......................................... 6-32
Installing........................................... 6-33
Removing .......................................... 6-32
Wheel (rear) .......................................... 6-34
Installing........................................... 6-35
Removing......................................... 6-34
Wheels .................................................. 6-17
E_5ea.book Page 2 Tuesday, October 2, 2001 3:54 PM