low oil pressure YAMAHA XJR 1300 2013 Owners Manual
[x] Cancel search | Manufacturer: YAMAHA, Model Year: 2013, Model line: XJR 1300, Model: YAMAHA XJR 1300 2013Pages: 98, PDF Size: 2.34 MB
Page 67 of 98

PERIODIC MAINTENANCE AND ADJUSTMENT
6-21
6
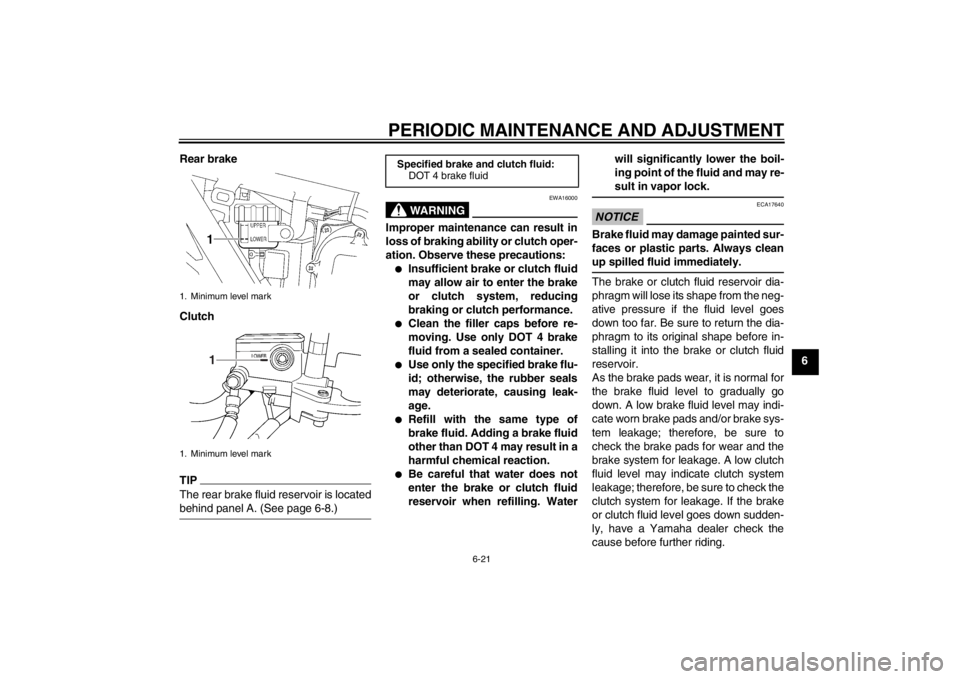
Rear brake
Clutch
TIPThe rear brake fluid reservoir is located
behind panel A. (See page 6-8.)
WARNING
EWA16000
Improper maintenance can result in
loss of braking ability or clutch oper-
ation. Observe these precautions:●
Insufficient brake or clutch fluid
may allow air to enter the brake
or clutch system, reducing
braking or clutch performance.
●
Clean the filler caps before re-
moving. Use only DOT 4 brake
fluid from a sealed container.
●
Use only the specified brake flu-
id; otherwise, the rubber seals
may deteriorate, causing leak-
age.
●
Refill with the same type of
brake fluid. Adding a brake fluid
other than DOT 4 may result in a
harmful chemical reaction.
●
Be careful that water does not
enter the brake or clutch fluid
reservoir when refilling. Water will significantly lower the boil-
ing point of the fluid and may re-
sult in vapor lock.
NOTICE
ECA17640
Brake fluid may damage painted sur-
faces or plastic parts. Always clean
up spilled fluid immediately.The brake or clutch fluid reservoir dia-
phragm will lose its shape from the neg-
ative pressure if the fluid level goes
down too far. Be sure to return the dia-
phragm to its original shape before in-
stalling it into the brake or clutch fluid
reservoir.
As the brake pads wear, it is normal for
the brake fluid level to gradually go
down. A low brake fluid level may indi-
cate worn brake pads and/or brake sys-
tem leakage; therefore, be sure to
check the brake pads for wear and the
brake system for leakage. A low clutch
fluid level may indicate clutch system
leakage; therefore, be sure to check the
clutch system for leakage. If the brake
or clutch fluid level goes down sudden-
ly, have a Yamaha dealer check the
cause before further riding.
1. Minimum level mark
1. Minimum level mark
1
Specified brake and clutch fluid:
DOT 4 brake fluid
U5WME9E0.book Page 21 Friday, December 7, 2012 3:50 PM
Page 69 of 98

PERIODIC MAINTENANCE AND ADJUSTMENT
6-23
6
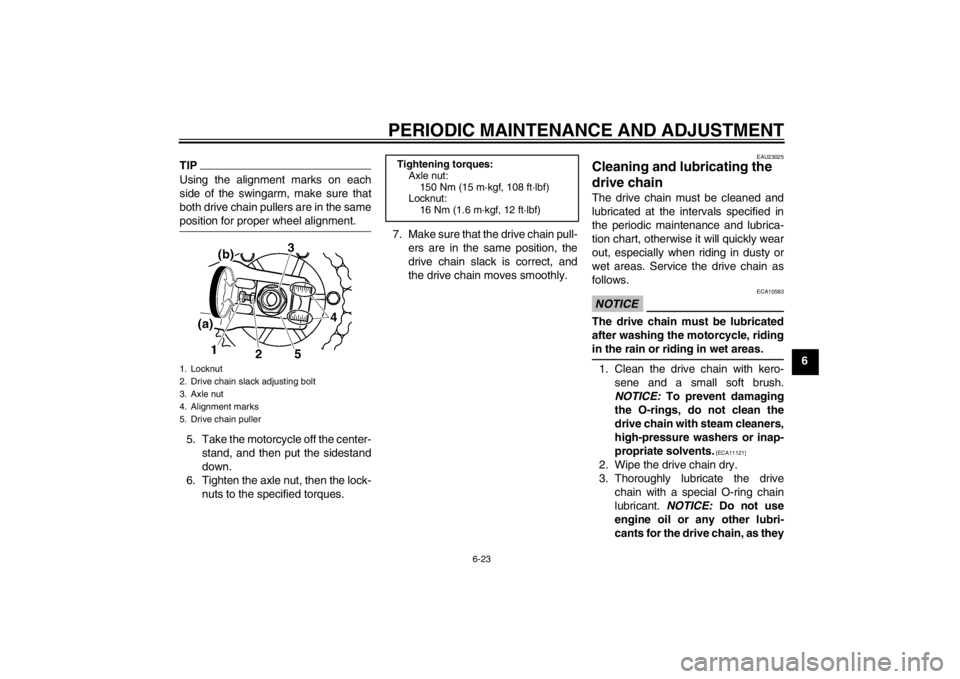
TIPUsing the alignment marks on each
side of the swingarm, make sure that
both drive chain pullers are in the same
position for proper wheel alignment.5. Take the motorcycle off the center-stand, and then put the sidestand
down.
6. Tighten the axle nut, then the lock- nuts to the specified torques. 7. Make sure that the drive chain pull-
ers are in the same position, the
drive chain slack is correct, and
the drive chain moves smoothly.
EAU23025
Cleaning and l ubricating the
drive chain The drive chain must be cleaned and
lubricated at the intervals specified in
the periodic maintenance and lubrica-
tion chart, otherwise it will quickly wear
out, especially when riding in dusty or
wet areas. Service the drive chain as
follows.NOTICE
ECA10583
The drive chain must be lubricated
after washing the motorcycle, riding
in the rain or riding in wet areas.1. Clean the drive chain with kero-
sene and a small soft brush.
NOTICE: To prevent damaging
the O-rings, do not clean the
drive chain with steam cleaners,
high-pressure washers or inap-
propriate solvents.
[ECA11121]
2. Wipe the drive chain dry.
3. Thoroughly lubricate the drive chain with a special O-ring chain
lubricant. NOTICE: Do not use
engine oil or any other lubri-
cants for the drive chain, as they
1. Locknut
2. Drive chain slack adjusting bolt
3. Axle nut
4. Alignment marks
5. Drive chain puller
Tightening torques: Axle nut:
150 Nm (15 m·kgf, 108 ft·lbf)
Locknut:
16 Nm (1.6 m·kgf, 12 ft·lbf)
U5WME9E0.book Page 23 Friday, December 7, 2012 3:50 PM
Page 89 of 98

MOTORCYCLE CARE AND STORAGE
7-4
7
2. Fill up the fuel tank and add fuel
stabilizer (if available) to prevent
the fuel tank from rusting and the
fuel from deteriorating.
3. Perform the following steps to pro- tect the cylinders, piston rings, etc.
from corrosion.a. Remove the spark plug caps and spark plugs.
b. Pour a teaspoonful of engine oil into each spark plug bore.
c. Install the spark plug caps onto the spark plugs, and then place
the spark plugs on the cylinder
head so that the electrodes are
grounded. (This will limit spark-
ing during the next step.)
d. Turn the engine over several times with the starter. (This will
coat the cylinder walls with oil.)
WARNING! To prevent dam- age or injury from sparking,
make sure to ground the
spark plug electrodes while
turning the engine over.
[EWA10951]
e. Remove the spark plug caps from the spark plugs, and then
install the spark plugs and the
spark plug caps.
4. Lubricate all control cables and the pivoting points of all levers and
pedals as well as of the side-
stand/centerstand.
5. Check and, if necessary, correct the tire air pressure, and then lift
the motorcycle so that both of its
wheels are off the ground. Alterna-
tively, turn the wheels a little every
month in order to prevent the tires
from becoming degraded in one
spot.
6. Cover the muffler outlet with a plastic bag to prevent moisture
from entering it.
7. Remove the battery and fully charge it. Store it in a cool, dry
place and charge it once a month.
Do not store the battery in an ex-
cessively cold or warm place [less
than 0 °C (30 °F) or more than 30
°C (90 °F)]. For more information
on storing the battery, see page
6-28.
TIPMake any necessary repairs before
storing the motorcycle.
U5WME9E0.book Page 4 Friday, December 7, 2012 3:50 PM