bulb YAMAHA XJR 1300 2015 Owners Manual
[x] Cancel search | Manufacturer: YAMAHA, Model Year: 2015, Model line: XJR 1300, Model: YAMAHA XJR 1300 2015Pages: 98, PDF Size: 2.6 MB
Page 7 of 98

TABLE OF CONTENTS
Replacing the fuses .......................6-29
Replacing the headlight bulb.........6-30
Replacing the auxiliary light bulb ............................................6-32
Tail/brake light ...............................6-33
Replacing a turn signal light
bulb ............................................6-33
Replacing a license plate light
bulb ............................................6-34
Supporting the motorcycle............6-35
Front wheel....................................6-36
Rear wheel.....................................6-37
Troubleshooting ............................6-39
Troubleshooting chart ...................6-40
MOTORCYCLE CARE AND
STORAGE ..........................................7-1
Matte color caution .........................7-1
Care .................................................7-1
Storage ............................................7-3
SPECIFICATIONS ..............................8-1
CONSUMER INFORMATION ............9-1
Identification numbers .....................9-1
INDEX ...............................................10-1
U2PNE0E0.book Page 2 Tuesday, September 16, 2014 4:15 PM
Page 75 of 98
PERIODIC MAINTENANCE AND ADJUSTMENT
6-30
6
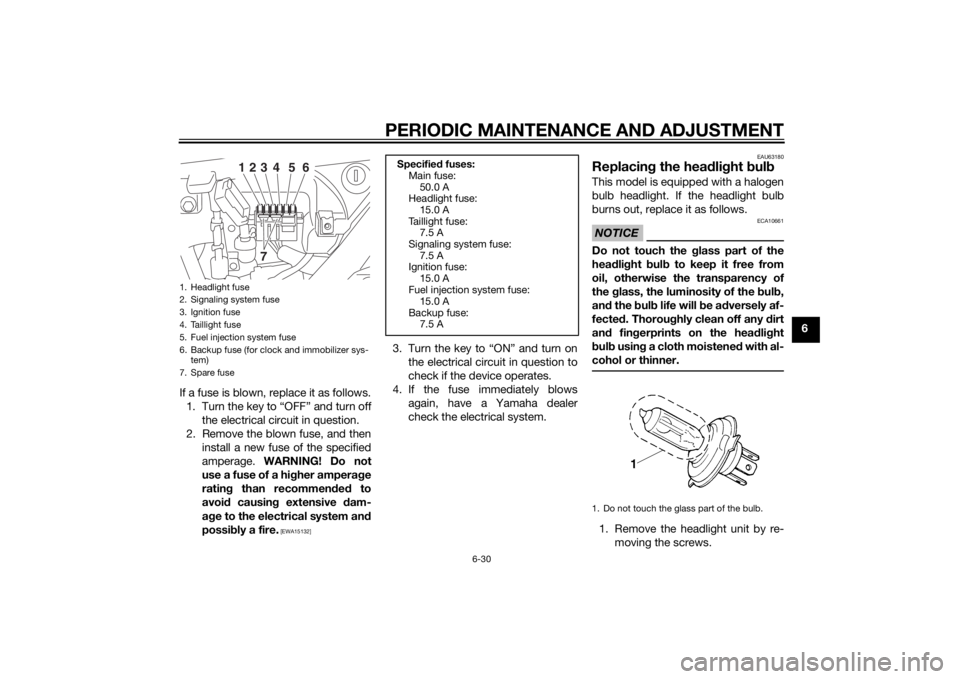
If a fuse is blown, replace it as follows. 1. Turn the key to “OFF” and turn off the electrical circuit in question.
2. Remove the blown fuse, and then install a new fuse of the specified
amperage. WARNING! Do not
use a fuse of a hi gher ampera ge
ratin g than recommen ded to
avoi d causin g extensive dam-
a g e to the electrical system an d
possi bly a fire.
[EWA15132]
3. Turn the key to “ON” and turn on
the electrical circuit in question to
check if the device operates.
4. If the fuse immediately blows again, have a Yamaha dealer
check the electrical system.
EAU63180
Replacin g the hea dlig ht bul bThis model is equipped with a halogen
bulb headlight. If the headlight bulb
burns out, replace it as follows.NOTICE
ECA10661
Do not touch the glass part of the
hea dlig ht bul b to keep it free from
oil, otherwise the transparency of
the glass, the luminosity of the bul b,
an d the b ulb life will b e adversely af-
fected . Thorou ghly clean off any d irt
an d fin gerprints on the head light
b ul b using a cloth moistened with al-
cohol or thinner.1. Remove the headlight unit by re- moving the screws.
1. Headlight fuse
2. Signaling system fuse
3. Ignition fuse
4. Taillight fuse
5. Fuel injection system fuse
6. Backup fuse (for clock and immobilizer sys-tem)
7. Spare fuse
123
4
5
6
7
Specified fuses:
Main fuse:
50.0 A
Headlight fuse:
15.0 A
Taillight fuse: 7.5 A
Signaling system fuse: 7.5 A
Ignition fuse:
15.0 A
Fuel injection system fuse: 15.0 A
Backup fuse: 7.5 A
1. Do not touch the glass part of the bulb.
U2PNE0E0.book Page 30 Tuesda y, September 16, 2014 4:15 PM
Page 76 of 98
PERIODIC MAINTENANCE AND ADJUSTMENT
6-31
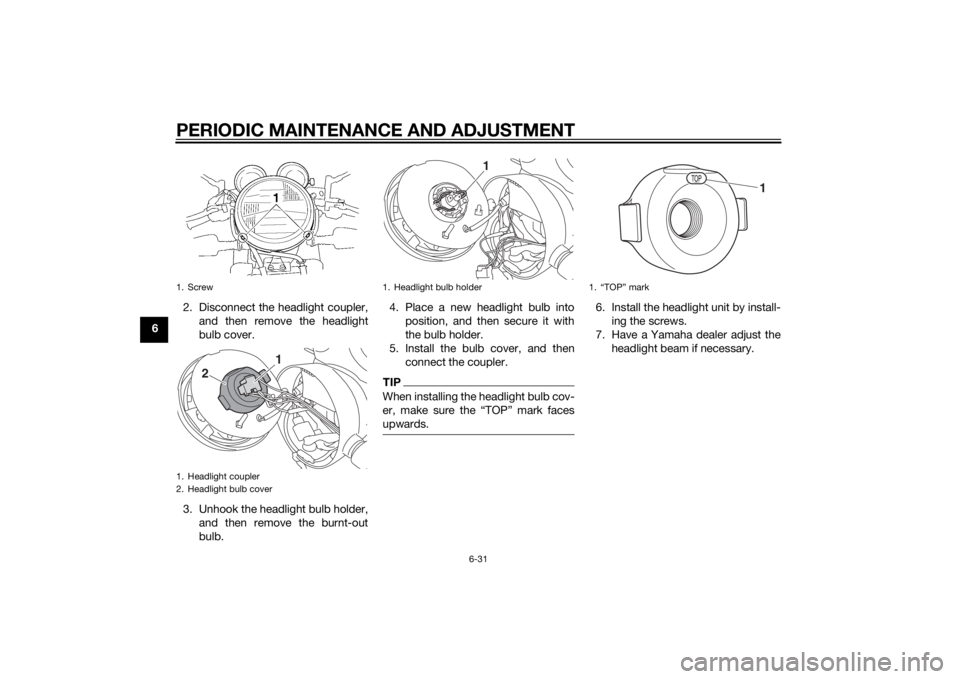
62. Disconnect the headlight coupler,
and then remove the headlight
bulb cover.
3. Unhook the headlight bulb holder, and then remove the burnt-out
bulb. 4. Place a new headlight bulb into
position, and then secure it with
the bulb holder.
5. Install the bulb cover, and then connect the coupler.
TIPWhen installing the headlight bulb cov-
er, make sure the “TOP” mark faces
upwards.
6. Install the headlight unit by install-ing the screws.
7. Have a Yamaha dealer adjust the headlight beam if necessary.
1. Screw
1. Headlight coupler
2. Headlight bulb cover
2
1
1. Headlight bulb holder
1
1. “TOP” mark
1
U2PNE0E0.book Page 31 Tuesda y, September 16, 2014 4:15 PM
Page 77 of 98
PERIODIC MAINTENANCE AND ADJUSTMENT
6-32
6
EAU65440
Replacing the auxiliary li ght
b ul bIf the auxiliary light bulb burns out, re-
place it as follows.
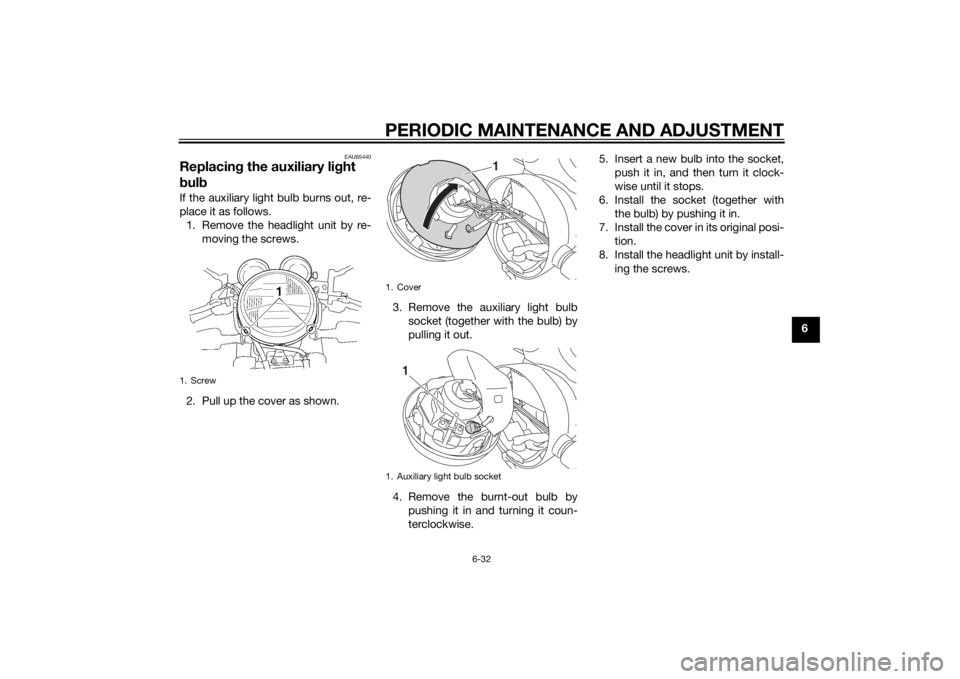
1. Remove the headlight unit by re- moving the screws.
2. Pull up the cover as shown. 3. Remove the auxiliary light bulb
socket (together with the bulb) by
pulling it out.
4. Remove the burnt-out bulb by pushing it in and turning it coun-
terclockwise. 5. Insert a new bulb into the socket,
push it in, and then turn it clock-
wise until it stops.
6. Install the socket (together with the bulb) by pushing it in.
7. Install the cover in its original posi- tion.
8. Install the headlight unit by install- ing the screws.1. Screw
1. Cover
1. Auxiliary light bulb socket
1
1
U2PNE0E0.book Page 32 Tuesda y, September 16, 2014 4:15 PM
Page 78 of 98
PERIODIC MAINTENANCE AND ADJUSTMENT
6-33
6
EAU24182
Tail/brake li ghtThis model is equipped with an LED-
type tail/brake light.
If the tail/brake light does not come on,
have a Yamaha dealer check it.
EAU24205
Replacin g a turn si gnal li ght
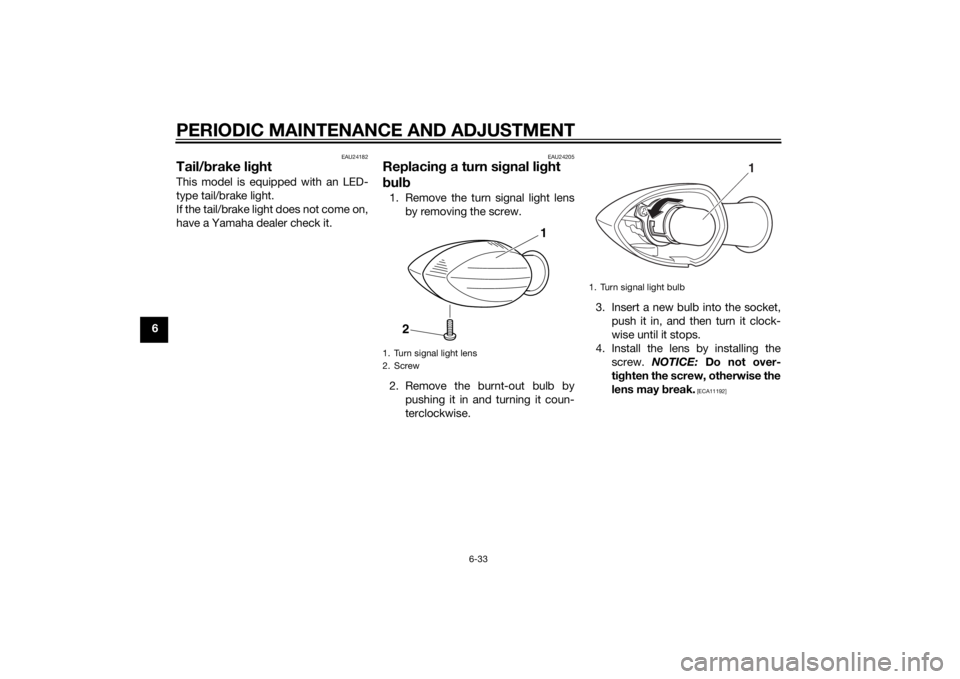
b ul b1. Remove the turn signal light lens
by removing the screw.
2. Remove the burnt-out bulb by pushing it in and turning it coun-
terclockwise. 3. Insert a new bulb into the socket,
push it in, and then turn it clock-
wise until it stops.
4. Install the lens by installing the screw. NOTICE: Do not over-
ti g hten the screw, otherwise the
lens may break.
[ECA11192]
1. Turn signal light lens
2. Screw
1
2
1. Turn signal light bulb
1
U2PNE0E0.book Page 33 Tuesda y, September 16, 2014 4:15 PM
Page 79 of 98
PERIODIC MAINTENANCE AND ADJUSTMENT
6-34
6
EAU65451
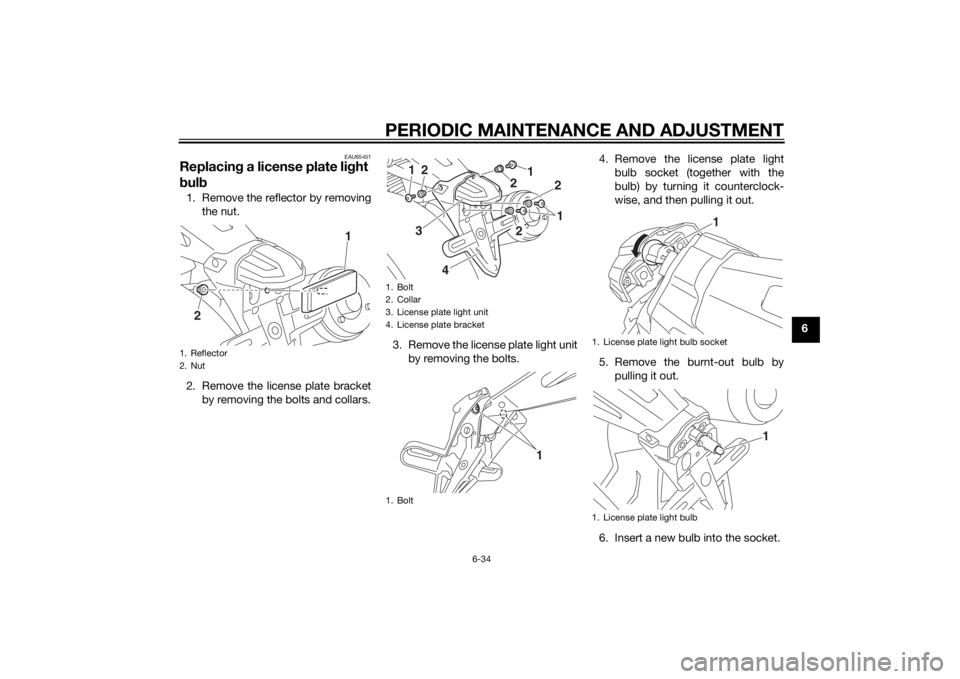
Replacing a license plate li ght
b ul b1. Remove the reflector by removing
the nut.
2. Remove the license plate bracket by removing the bolts and collars. 3. Remove the license plate light unit
by removing the bolts. 4. Remove the license plate light
bulb socket (together with the
bulb) by turning it counterclock-
wise, and then pulling it out.
5. Remove the burnt-out bulb by pulling it out.
6. Insert a new bulb into the socket.1. Reflector
2. Nut
2
1
1. Bolt
2. Collar
3. License plate light unit
4. License plate bracket
1. Bolt
1
2
2
12
3
4
2
11
1. License plate light bulb socket
1. License plate light bulb
1
1
U2PNE0E0.book Page 34 Tuesda y, September 16, 2014 4:15 PM
Page 80 of 98
PERIODIC MAINTENANCE AND ADJUSTMENT
6-35
67. Install the socket (together with
the bulb) by pushing it in, and then
turn it clockwise until it stops.
8. Install the license plate light unit by installing the bolts.
9. Install the license plate bracket by installing the collars and bolts.
10. Install the reflector by installing the nut.
EAU24351
Supportin g the motorcycleSince this model is not equipped with a
centerstand, follow these precautions
when removing the front and rear
wheel or performing other mainte-
nance requiring the motorcycle to
stand upright. Check that the motorcy-
cle is in a stable and level position be-
fore starting any maintenance. A
strong wooden box can be placed un-
der the engine for added stability.
To service the front wheel
1. Stabilize the rear of the motorcy- cle by using a motorcycle stand
or, if an additional motorcycle
stand is not available, by placing a
jack under the frame in front of the
rear wheel.
2. Raise the front wheel off the ground by using a motorcycle
stand.
To service the rear wheel
Raise the rear wheel off the ground by
using a motorcycle stand or, if a motor-
cycle stand is not available, by placing a jack either under each side of the
frame in front of the rear wheel or under
each side of the swingarm.
U2PNE0E0.book Page 35 Tuesda
y, September 16, 2014 4:15 PM
Page 91 of 98

SPECIFICATIONS
8-2
8
5th:1.115 (29/26)
Chassis:Frame type:
Double cradle
Caster angle: 24.70 °
Trail: 92 mm (3.6 in)Front tire:Type:Tubeless
Size: 120/70 ZR17M/C (58W)
Manufacturer/model:
DUNLOP/D252F LRear tire:Type: Tubeless
Size:
180/55 ZR17M/C (73W)
Manufacturer/model: DUNLOP/D252 LLoa din g:Maximum load:
210 kg (463 lb)
(Total weight of rider, passenger, cargo
and accessories)Tire air pressure (measure d on col d
tires):Loading condition:
0–90 kg (0–198 lb)
Front:250 kPa (2.50 kgf/cm², 36 psi) Rear:
250 kPa (2.50 kgf/cm², 36 psi)
Loading condition: 90–210 kg (198–463 lb)
Front:
250 kPa (2.50 kgf/cm², 36 psi)
Rear: 290 kPa (2.90 kgf/cm², 42 psi)
High-speed riding: Front:250 kPa (2.50 kgf/cm², 36 psi)
Rear: 290 kPa (2.90 kgf/cm², 42 psi)
Front wheel:Wheel type:Cast wheel
Rim size: 17M/C x MT3.50Rear wheel:Wheel type:Cast wheel
Rim size: 17M/C x MT5.50Front brake:Type:
Dual disc brake
Operation: Right hand operation
Specified brake fluid:
DOT 4Rear brake:Type:
Single disc brake Operation:
Right foot operation
Specified brake fluid: DOT 4
Front suspension:Type:Telescopic fork
Spring/shock absorber type: Coil spring/oil damper
Wheel travel:
130 mm (5.1 in)Rear suspension:Type:Swingarm
Spring/shock absorber type:
Coil spring/gas-oil damper
Wheel travel: 110 mm (4.3 in)Electrical system:Ignition system:
TCI
Charging system: AC generatorBattery:Model:
YTZ14S
Voltage, capacity: 12 V, 11.2 AhHea dlig ht:Bulb type:
Halogen bulbBul b volta ge, watta ge × quantity:Headlight:
12 V, 60.0 W/55.0 W × 1
U2PNE0E0.book Page 2 Tuesday, September 16, 2014 4:15 PM
Page 95 of 98

10-1
10
INDEX
AAir filter element and check hose, replacing and cleaning ....................... 6-13
Auxiliary light bulb, replacing ............... 6-32BBattery .................................................. 6-28
Brake and clutch fluid levels, checking ............................................. 6-20
Brake and clutch fluids , changing ........ 6-21
Brake and clutch levers, checking and lubricating........................................... 6-25
Brake and shift pedals, checking and
lubricating........................................... 6-24
Brake lever............................................ 3-11
Brake lever free play, checking ............ 6-18
Brake light switches ............................. 6-19
Brake pedal .......................................... 3-12CCables, checking and lubricating ......... 6-24
Care ........................................................ 7-1
Catalytic converters.............................. 3-15
Clutch lever.................................. 3-10, 6-18DDimmer switch........................................ 3-9
Drive chain, cleaning and lubricating ... 6-23
Drive chain slack .................................. 6-22EEngine break-in ...................................... 5-3
Engine oil and oil filter element............. 6-10
Engine serial number .............................. 9-1
Engine stop switch ............................... 3-10
Engine trouble warning light ................... 3-4
EXUP system ........................................ 3-21
FFront and rear brake pads, checking ... 6-19
Front fork, adjusting ............................. 3-16
Front fork, checking ............................. 6-26
Fuel ...................................................... 3-13
Fuel consumption, tips for reducing ...... 5-3
Fuel tank breather hose and overflow
hose ................................................... 3-14
Fuel tank cap........................................ 3-12
Fuses, replacing ................................... 6-29HHandlebar switches ............................... 3-9
Hazard switch ...................................... 3-10
Headlight bulb, replacing ..................... 6-30
High beam indicator light ....................... 3-4
Horn switch .......................................... 3-10IIdentification numbers ........................... 9-1
Ignition circuit cut-off system .............. 3-22
Immobilizer system ................................ 3-1
Immobilizer system indicator light ......... 3-5
Indicator lights and warning lights ......... 3-4LLicense plate light bulb, replacing ....... 6-34
Luggage strap holders ......................... 3-21MMain switch/steering lock ...................... 3-2
Maintenance and lubrication, periodic... 6-4
Maintenance, emission control system ................................................. 6-3
Matte color, caution ............................... 7-1
Model label............................................. 9-1
Multi-function display............................. 3-6
NNeutral indicator light ............................. 3-4OOil level warning light .............................. 3-4PPanels, removing and installing .............. 6-8
Parking.................................................... 5-4
Part locations.......................................... 2-1
Pass switch............................................. 3-9SSafety information................................... 1-1
Seat....................................................... 3-15
Shifting.................................................... 5-2
Shift pedal............................................. 3-11
Shock absorber assemblies, adjusting ............................................. 3-18
Sidestand.............................................. 3-21
Sidestand, checking and lubricating .... 6-26
Spark plugs, checking ............................ 6-9
Specifications ......................................... 8-1
Speedometer .......................................... 3-5
Starting the engine ................................. 5-1
Start switch ........................................... 3-10
Steering, checking ................................ 6-27
Storage ................................................... 7-3
Supporting the motorcycle ................... 6-35
Swingarm pivots, lubricating ................ 6-26TTachometer............................................. 3-5
Tail/brake light ...................................... 6-33
Throttle grip and cable, checking and lubricating ........................................... 6-24
Throttle grip free play, checking ........... 6-15
Tires ...................................................... 6-15
U2PNE0E0.book Page 1 Tuesday, September 16, 2014 4:15 PM
Page 96 of 98
INDEX
10-2
10
Tool kit .................................................... 6-2
Troubleshooting .................................... 6-39
Troubleshooting chart........................... 6-40
Turn signal indicator lights ...................... 3-4
Turn signal light bulb, replacing............ 6-33
Turn signal switch ................................... 3-9VValve clearance..................................... 6-15
Vehicle identification number ................. 9-1WWheel bearings, checking..................... 6-28
Wheel (front).......................................... 6-36
Wheel (rear) ........................................... 6-37
Wheels .................................................. 6-18
U2PNE0E0.book Page 2 Tuesday, September 16, 2014 4:15 PM