clock YAMAHA XMAX 125 2018 Owners Manual
[x] Cancel search | Manufacturer: YAMAHA, Model Year: 2018, Model line: XMAX 125, Model: YAMAHA XMAX 125 2018Pages: 114, PDF Size: 8.24 MB
Page 29 of 114
Instrument and control functions
4-3
4
EAU63551
Tachometer
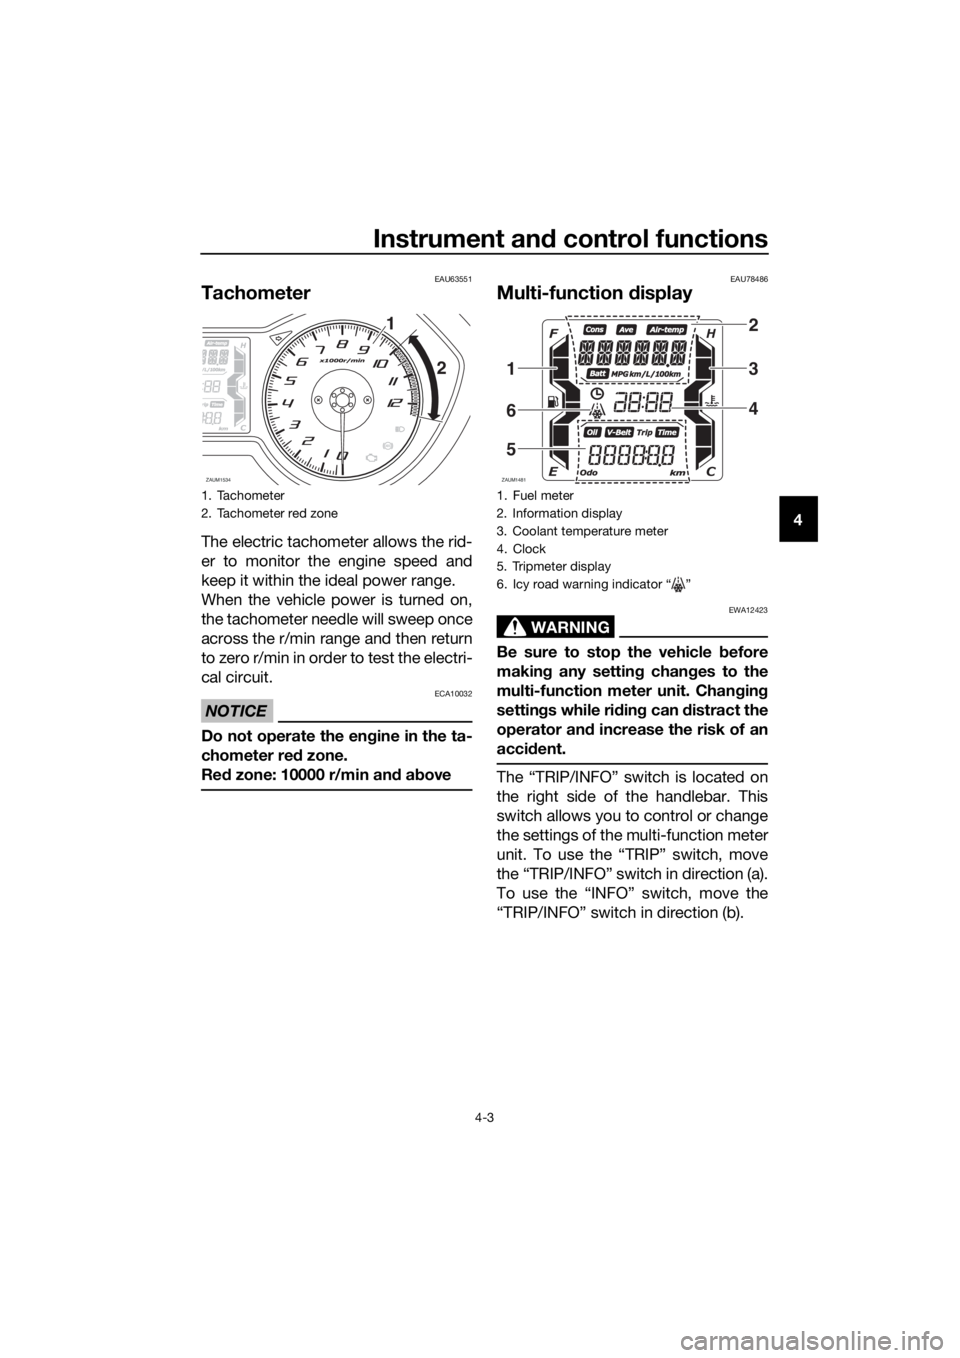
The electric tachometer allows the rid-
er to monitor the engine speed and
keep it within the ideal power range.
When the vehicle power is turned on,
the tachometer needle will sweep once
across the r/min range and then return
to zero r/min in order to test the electri-
cal circuit.
NOTICE
ECA10032
Do not operate the engine in the ta-
chometer red zone.
Red zone: 10000 r/min and above
EAU78486
Multi-function display
WARNING
EWA12423
Be sure to stop the vehicle before
making any setting changes to the
multi-function meter unit. Changing
settings while riding can distract the
operator and increase the risk of an
accident.
The “TRIP/INFO” switch is located on
the right side of the handlebar. This
switch allows you to control or change
the settings of the multi-function meter
unit. To use the “TRIP” switch, move
the “TRIP/INFO” switch in direction (a).
To use the “INFO” switch, move the
“TRIP/INFO” switch in direction (b).
1. Tachometer
2. Tachometer red zone
ZAUM1534
1
2
1. Fuel meter
2. Information display
3. Coolant temperature meter
4. Clock
5. Tripmeter display
6. Icy road warning indicator Ž
ZAUM1481
2
3
4
1
6
5
UBL2E0E0.book Page 3 Friday, June 23, 2017 9:30 AM
Page 30 of 114
Instrument and control functions
4-4
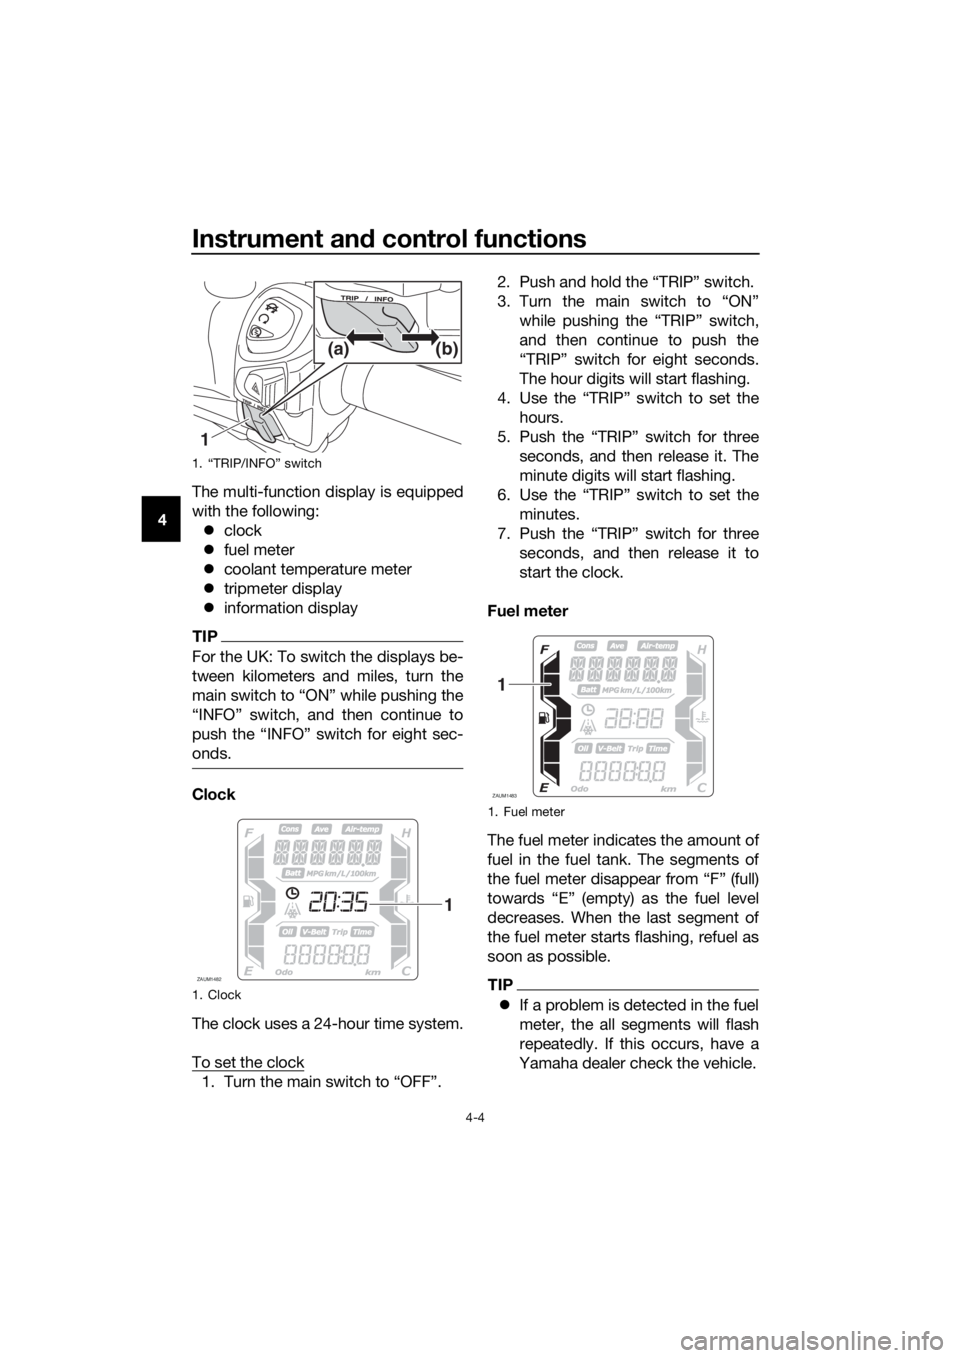
4The multi-function display is equipped
with the following:
clock
fuel meter
coolant temperature meter
tripmeter display
information display
TIP
For the UK: To switch the displays be-
tween kilometers and miles, turn the
onds.
Clock
The clock uses a 24-hour time system.
To set the clock
1. Turn the main switch to “OFF”.2. Push and hold the “TRIP” switch.
3. Turn the main switch to “ON”
while pushing the “TRIP” switch,
and then continue to push the
“TRIP” switch for eight seconds.
The hour digits will start flashing.
4. Use the “TRIP” switch to set the
hours.
5. Push the “TRIP” switch for three
seconds, and then release it. The
minute digits will start flashing.
6. Use the “TRIP” switch to set the
minutes.
7. Push the “TRIP” switch for three
seconds, and then release it to
start the clock.
Fuel meter
The fuel meter indicates the amount of
fuel in the fuel tank. The segments of
the fuel meter disappear from “F” (full)
towards “E” (empty) as the fuel level
decreases. When the last segment of
the fuel meter starts flashing, refuel as
soon as possible.
TIP
If a problem is detected in the fuel
meter, the all segments will flash
repeatedly. If this occurs, have a
Yamaha dealer check the vehicle.
1. “TRIP/INFO” switch
1. Clock
1(b) (a)
ZAUM1482
1
1. Fuel meter
ZAUM1483
1
UBL2E0E0.book Page 4 Friday, June 23, 2017 9:30 AM
Page 43 of 114
Instrument and control functions
4-17
4
EAU78502
Fuel tank cap
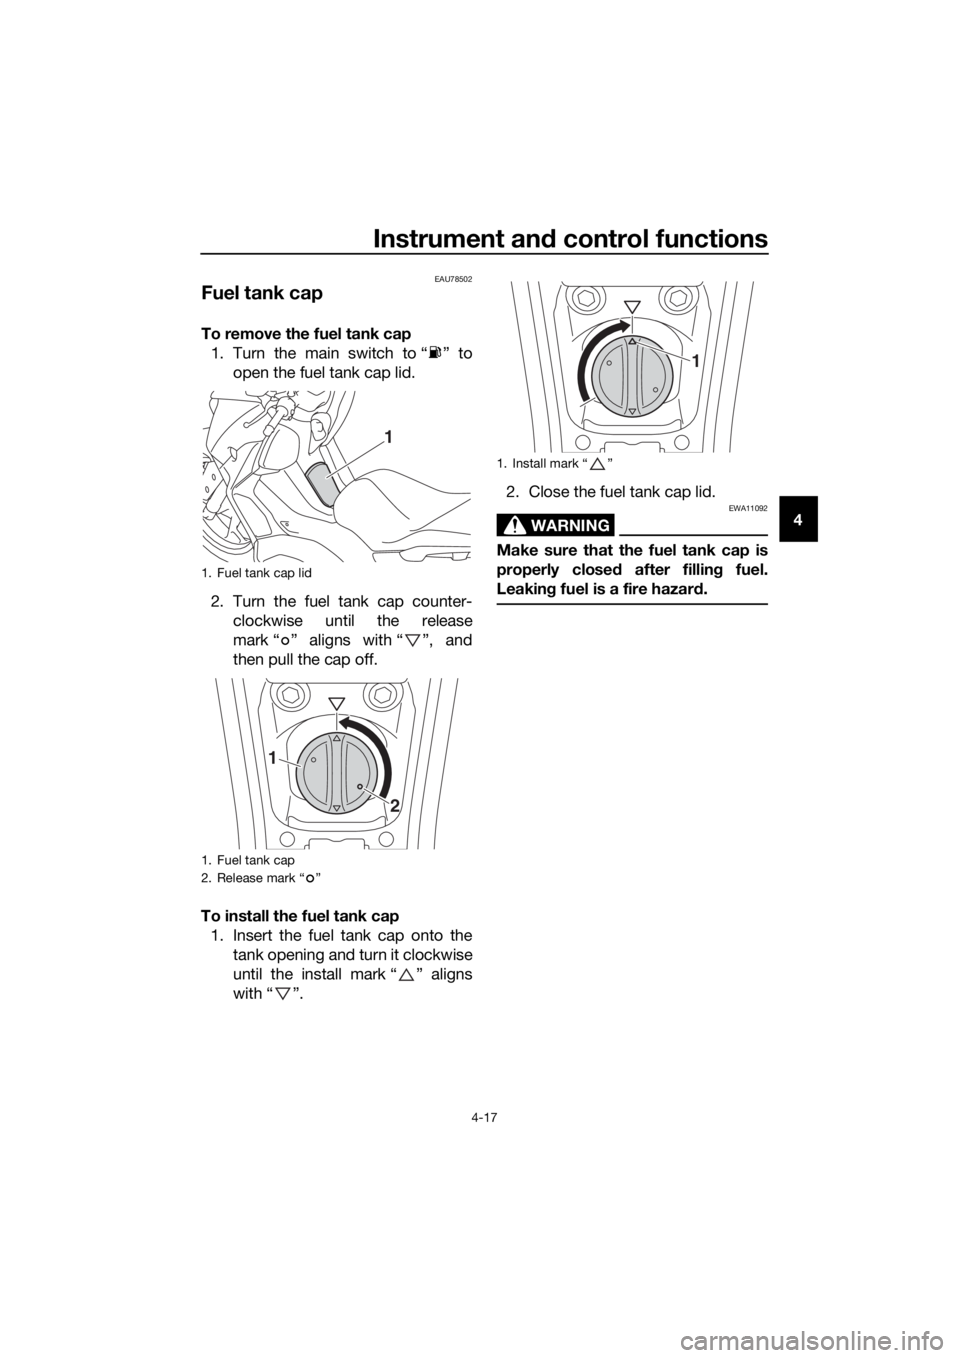
To remove the fuel tank cap
1. Turn the main switch to “ ” to
open the fuel tank cap lid.
2. Turn the fuel tank cap counter-
clockwise until the release
mark “ ” aligns with “ ”, and
then pull the cap off.
To install the fuel tank cap
1. Insert the fuel tank cap onto the
tank opening and turn it clockwise
until the install mark “ ” aligns
with “ ”.2. Close the fuel tank cap lid.
WARNING
EWA11092
Make sure that the fuel tank cap is
properly closed after filling fuel.
Leaking fuel is a fire hazard.
1. Fuel tank cap lid
1. Fuel tank cap
2. Release mark “ ”
1
1
2
1. Install mark Ž
1
UBL2E0E0.book Page 17 Friday, June 23, 2017 9:30 AM
Page 47 of 114
Instrument and control functions
4-21
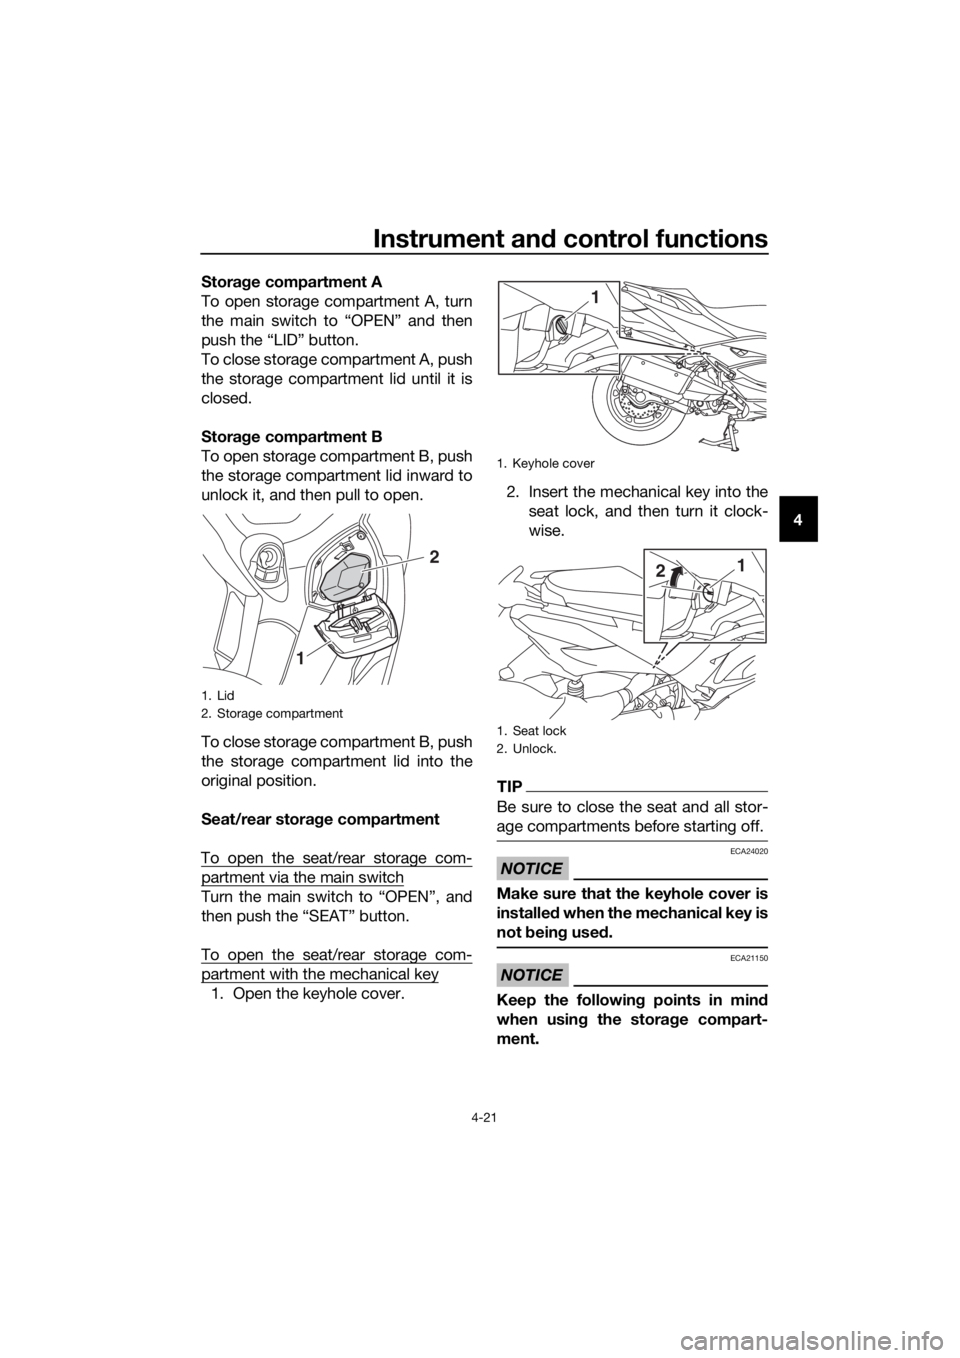
4 Storage compartment A
To open storage compartment A, turn
the main switch to “OPEN” and then
push the “LID” button.
To close storage compartment A, push
the storage compartment lid until it is
closed.
Storage compartment B
To open storage compartment B, push
the storage compartment lid inward to
unlock it, and then pull to open.
To close storage compartment B, push
the storage compartment lid into the
original position.
Seat/rear storage compartment
To open the seat/rear storage com-
partment via the main switch
Turn the main switch to “OPEN”, and
then push the “SEAT” button.
To open the seat/rear storage com-
partment with the mechanical key
1. Open the keyhole cover.2. Insert the mechanical key into the
seat lock, and then turn it clock-
wise.
TIP
Be sure to close the seat and all stor-
age compartments before starting off.
NOTICE
ECA24020
Make sure that the keyhole cover is
installed when the mechanical key is
not being used.
NOTICE
ECA21150
Keep the following points in mind
when using the storage compart-
ment.
1. Lid
2. Storage compartment
12
1. Keyhole cover
1. Seat lock
2. Unlock.
1
1
2
UBL2E0E0.book Page 21 Friday, June 23, 2017 9:30 AM
Page 97 of 114
Periodic maintenance and adjustment
7-34
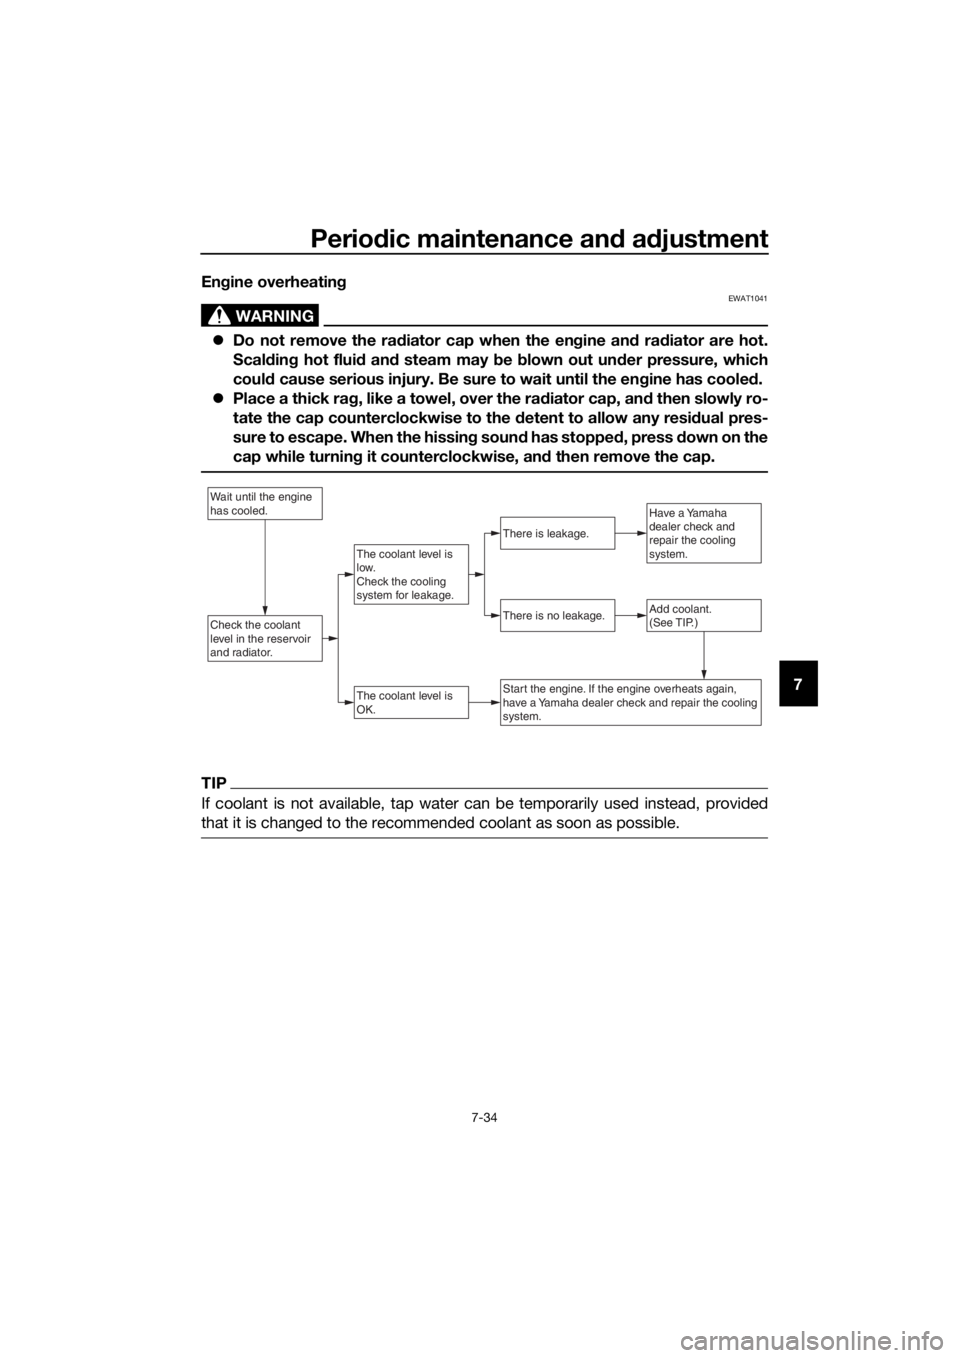
7 Engine overheating
WARNING
EWAT1041
Do not remove the radiator cap when the engine and radiator are hot.
Scalding hot fluid and steam may be blown out under pressure, which
could cause serious injury. Be sure to wait until the engine has cooled.
Place a thick rag, like a towel, over the radiator cap, and then slowly ro-
tate the cap counterclockwise to the detent to allow any residual pres-
sure to escape. When the hissing sound has stopped, press down on the
cap while turning it counterclockwise, and then remove the cap.
TIP
If coolant is not available, tap water can be temporarily used instead, provided
that it is changed to the recommended coolant as soon as possible.
Wait until the engine
has cooled.
Check the coolant
level in the reservoir
and radiator.Add coolant.
(See TIP.)
The coolant level is
OK.
There is no leakage.
There is leakage.
The coolant level is
low.
Check the cooling
system for leakage.
Have a Yamaha
dealer check and
repair the cooling
system.
Start the engine. If the engine overheats again,
have a Yamaha dealer check and repair the cooling
system.
UBL2E0E0.book Page 34 Friday, June 23, 2017 9:30 AM