key battery YAMAHA XMAX 300 2021 Owners Manual
[x] Cancel search | Manufacturer: YAMAHA, Model Year: 2021, Model line: XMAX 300, Model: YAMAHA XMAX 300 2021Pages: 114, PDF Size: 4.65 MB
Page 6 of 114

Table of contentsSafety information ............................ 1-1
Further safe-riding points ............... 1-5
Description ....................................... 2-1
Left view ......................................... 2-1
Right view ....................................... 2-2
Controls and instruments ............... 2-3
Smart key system ........................... 3-1
Smart key system ........................... 3-1
Operating range of the smart key system......................................... 3-2
Handling of the smart key and mechanical keys ......................... 3-3
Smart key ....................................... 3-5
Replacing the smart key battery..... 3-6
Main switch .................................... 3-8
Instrument an d control functions ... 4-1
Indicator lights and warning
lights............................................ 4-1
Speedometer .................................. 4-3
Tachometer .................................... 4-3
Multi-function display ..................... 4-4
Handlebar switches ...................... 4-12
Front brake lever .......................... 4-13
Rear brake lever ........................... 4-14
Anti-lock brake system (ABS)....... 4-14
Traction control system ................ 4-15
Fuel tank cap ................................ 4-17
Fuel ............................................... 4-18 Fuel tank overflow hose ................ 4-19
Catalytic converter ........................ 4-20
Storage compartments ................. 4-20
Windshield .................................... 4-22
Handlebar position ....................... 4-24
Adjusting the shock absorber
assemblies ................................. 4-25
Auxiliary DC jack .......................... 4-25
Sidestand ...................................... 4-26
Ignition circuit cut-off system ....... 4-27
For your safety – pre-operation
checks ............................................... 5-1
Operation an d important ri din g
points ................................................. 6-1
Engine break-in ............................... 6-1
Starting the engine .......................... 6-2
Starting off ...................................... 6-3
Acceleration and deceleration ........ 6-3
Braking ............................................ 6-3
Tips for reducing fuel consumption ................................ 6-4
Parking ............................................ 6-4
Perio dic maintenance an d
a d justment ........................................ 7-1
Tool kit ............................................ 7-2
Periodic maintenance charts .......... 7-3
Periodic maintenance chart for the emission control system .............. 7-3 General maintenance and
lubrication chart .......................... 7-4
Removing and installing the panel............................................ 7-8
Checking the spark plug................. 7-9
Canister ........................................ 7-10
Engine oil and oil filter element..... 7-10
Final transmission oil .................... 7-13
Coolant ......................................... 7-14
Air filter and V-belt case air filter elements .................................... 7-15
Checking the throttle grip free play ............................................ 7-19
Valve clearance............................. 7-20
Tires .............................................. 7-20
Cast wheels .................................. 7-22
Checking the front and rear brake
lever free play ............................ 7-22
Checking the front and rear brake pads .......................................... 7-23
Checking the brake fluid level ...... 7-23
Changing the brake fluid .............. 7-25
Checking the V-belt ...................... 7-25
Checking and lubricating the cables ........................................ 7-25
Checking and lubricating the
throttle grip and cable ............... 7-26
Lubricating the front and rear brake levers ............................... 7-26
Checking and lubricating the centerstand and sidestand........ 7-27UBBAE0E0.book Page 1 Thursday, September 24, 2020 3:19 PM
Page 18 of 114

Smart key system
3-2
3
You are carryin g or usin g com-
munication equipment such as
ra dios or mo bile phones in
close proximity of the smart key
The smart key is in contact with
or covere d b y a metallic o bject
Other vehicles equippe d with a
smart key system are near by
In such situations, move the smart
key to another location an d perform
the operation ag ain. If it still does
not work, operate the vehicle in
emer gency mo de. (See pag e 7-37.)
TIPTo preserve vehicle battery power, the
smart key system turns off approxi-
mately 9 days after the vehicle was last
used (the answer-back function is dis-
abled). In this situation, simply push
the main switch knob to turn the smart
key system back on.
EAUM3960
Operating ran ge of the smart
key systemThe operating range of the smart key
system is about 80 cm (31.5 in) from
the antenna.
TIP As the smart key system uses
weak radio waves, the operating
range may be affected by the sur-
rounding environment.
When the battery of the smart key
is discharged, the smart key may
not work or its operating range
may become very small.
If the smart key is turned off, the
vehicle will not recognize the
smart key even if it is within oper-
ating range. If the smart key sys-
tem does not operate, see page
3-5 and confirm that the smart key
is turned on.
Placing the smart key in the front
or rear storage compartment may
block communication between
the smart key and the vehicle. If
the rear storage compartment is
locked with the smart key inside,
the smart key system may be dis-
abled. The smart key should al-
ways be carried with you.
1. Vehicle mounted antennaZAUM1516
1
ZAUM1517
1
UBBAE0E0.book Page 2 Thursday, September 24, 2020 3:19 PM
Page 19 of 114

Smart key system
3-3
3
When leaving the vehicle, make
sure you lock the steering and
take the smart key with you. It is
recommended that you turn the
smart key off.
WARNING
EWA17952
The smart key shoul d b e carried
with you. Do not store it on the
vehicle.
When the smart key is within
operatin g ran ge, exercise due
care because other people not
carryin g the smart key can start
the en gine an d operate the vehi-
cle.
EAU78624
Han dlin g of the smart key an d
mechanical keys
WARNING
EWA17952
The smart key shoul d b e carrie d
with you. Do not store it on the
vehicle.
When the smart key is within
operatin g ran ge, exercise due
care because other people not
carryin g the smart key can start
the en gine an d operate the vehi-
cle.Included with the vehicle is one smart
key, two mechanical keys, and one
identification number card.
If the vehicle battery is discharged, the
mechanical key can be used to open
the seat. Carry one mechanical key
in a ddition to the smart key.
If the smart key is lost or the smart key
battery has discharged, the identifica-
tion number can be used to operate
the vehicle in emergency mode. (See
page 7-37.) Write down the i dentifi-
cation num ber in case of emer gen-
cy.
If the smart key is lost and the smart
key system identification number is un-
known, the entire smart key system will
1. Smart key
2. Mechanical key
1. Identification number card
2. Identification number
1
2
868588
1
2
UBBAE0E0.book Page 3 Thursday, September 24, 2020 3:19 PM
Page 20 of 114

Smart key system
3-4
3need to be replaced at considerable
cost.
Keep the i dentification num ber
car d in a safe place.
NOTICE
ECA21573
The smart key has precision elec-
tronic components. O bserve the fol-
lowin g precautions to prevent
possi ble malfunction or damag e.
Do not place or store the smart
key in a storag e compartment.
The smart key may b e damag ed
from roa d vi brations or exces-
sive heat.
Do not drop, ben d, or su bject
the smart key to stron g impacts.
Do not su bmer ge the smart key
in water or other liqui ds.
Do not place heavy items or ex-
cessive stress on the smart key.
Do not leave the smart key in a
place expose d to direct sun-
li g ht, hi gh temperature or hi gh
humi dity.
Do not g rind or attempt to mo d-
ify the smart key.
Keep the smart key away from
stron g ma gnetic fiel ds an d
ma gnetic o bjects such as key
hol ders, TVs, an d com
puters.
Keep the smart key away from
electric me dical equipment.
Do not allow oils, polishin g
a g ents, fuel, or any stron g
chemicals to come in contact
with the smart key. The smart
key body may become discol-
ore d or cracke d.
TIP The smart key battery life is ap-
proximately two years, but this
may vary according to operating
conditions.
Replace the smart key battery
when the smart key system indi-
cator light flashes for 20 seconds
when the vehicle is turned on, or
when the smart key indicator light
does not come on when the smart
key button is pushed. (See page
3-6.) After changing the smart key
battery, if the smart key system still does not operate, check the
vehicle battery and then have a
Yamaha dealer check the vehicle.
If the smart key continually re-
ceives radio waves, the smart key
battery will discharge quickly. (For
example, when placed in the vicin-
ity of electrical products such as
televisions, radios, or computers.)
You can register up to six smart
keys for the same vehicle. See a
Yamaha dealer regarding spare
smart keys.
If a smart key is lost, contact a
Yamaha dealer immediately to
prevent the vehicle from being
stolen.
UBBAE0E0.book Page 4 Thursday, September 24, 2020 3:19 PM
Page 22 of 114
Smart key system
3-6
32. Turn the main switch to “OFF”,
and then push the main switch
knob once.
3. Within 9 seconds of pushing the knob, push and hold the knob
again for 5 seconds.
4. When the beeper sounds, the set- ting is complete.
If the beeper: Sounds twice: The beeper is
turned off.
Sounds once: The beeper is
turned on.
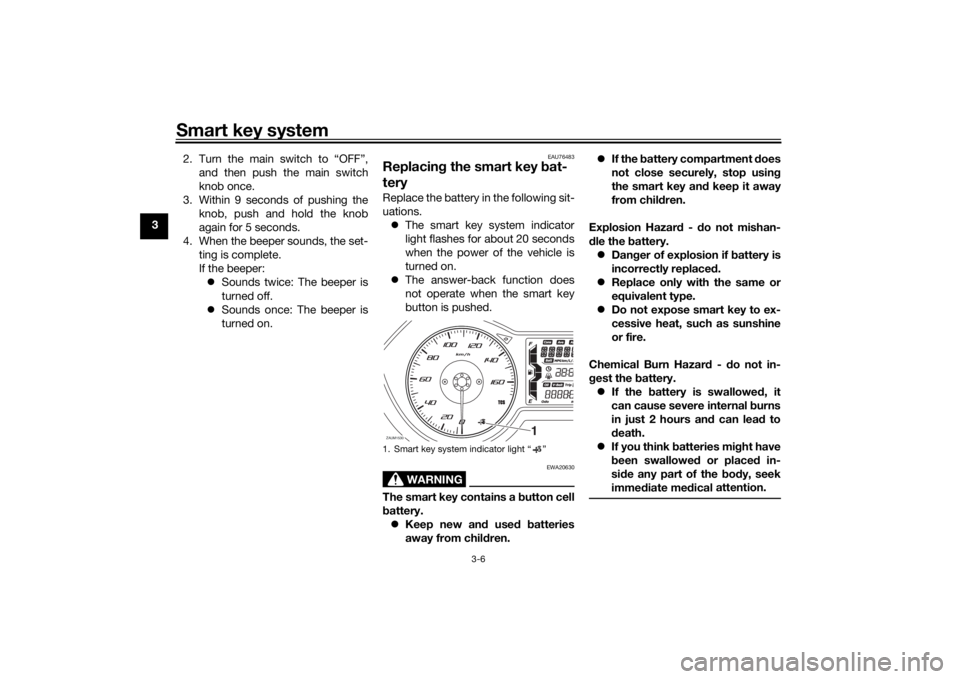
EAU76483
Replacin g the smart key bat-
teryReplace the battery in the following sit-
uations.
The smart key system indicator
light flashes for about 20 seconds
when the power of the vehicle is
turned on.
The answer-back function does
not operate when the smart key
button is pushed.
WARNING
EWA20630
The smart key contains a button cell
b attery.
Keep new an d use d b atteries
away from chil dren.
If the b attery compartment does
not close securely, stop usin g
the smart key an d keep it away
from chil dren.
Explosion Hazar d - d o not mishan-
d le the battery.
Dan ger of explosion if battery is
incorrectly replace d.
Replace only with the same or
equivalent type.
Do not expose smart key to ex-
cessive heat, such as sunshine
or fire.
Chemical Burn Hazar d - d o not in-
g est the battery.
If the battery is swallowed , it
can cause severe internal burns
in just 2 hours an d can lead to
d eath.
If you think batteries mi ght have
b een swallowed or placed in-
si de any part of the body, seek
imme diate me dical
attention.
1. Smart key system indicator light “ ”ZAUM1530
1
UBBAE0E0.book Page 6 Thursday, September 24, 2020 3:19 PM
Page 23 of 114
Smart key system
3-7
3
NOTICE
ECA15785
Use a cloth when openin g the
smart key case with a screw-
d river. Direct contact with hard
o bjects may damag e or scratch
the smart key.
Take precautions to prevent the
waterproof seal from bein g
d amag ed or contaminated by
d irt.
Do not touch the internal cir-
cuits an d terminals. This may
cause malfunctions.
Do not apply excessive force to
the smart key when replacin g
the battery.
Make sure the battery is in-
stalle d correctly. Confirm the di-
rection of the positive “+” sid e
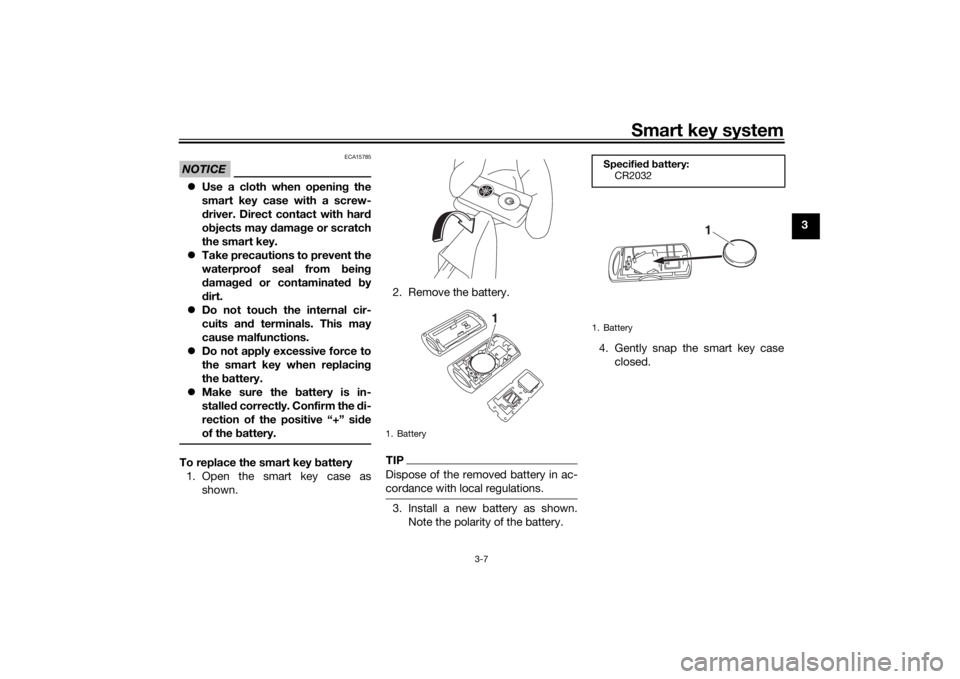
of the battery.To replace the smart key battery
1. Open the smart key case as shown. 2. Remove the battery.
TIPDispose of the removed battery in ac-
cordance with local regulations.3. Install a new battery as shown.
Note the polarity of the battery. 4. Gently snap the smart key case
closed.1. Battery
1
Specified b attery:
CR2032
1. Battery
1
UBBAE0E0.book Page 7 Thursday, September 24, 2020 3:19 PM
Page 25 of 114
Smart key system
3-9
3
TIPIf the vehicle battery voltage is
low, the turn signal lights will not
flash.
See “Emergency mode” on page
7-37 for information on turning the
vehicle power on without the
smart key.
EAU76510
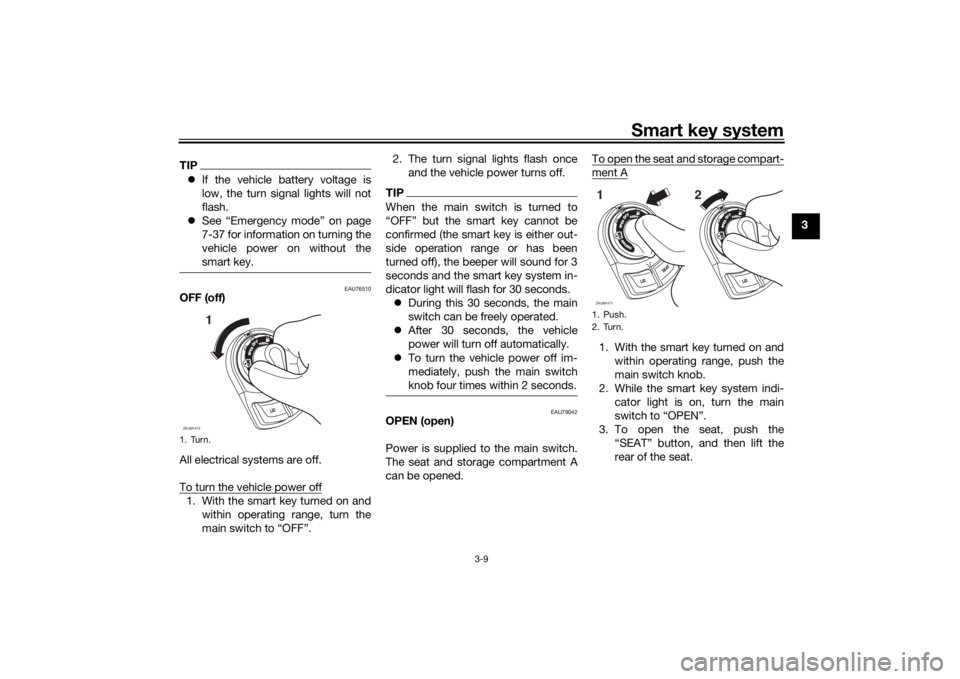
OFF (off)
All electrical systems are off.
To turn the vehicle power off1. With the smart key turned on and
within operating range, turn the
main switch to “OFF”. 2. The turn signal lights flash once
and the vehicle power turns off.
TIPWhen the main switch is turned to
“OFF” but the smart key cannot be
confirmed (the smart key is either out-
side operation range or has been
turned off), the beeper will sound for 3
seconds and the smart key system in-
dicator light will flash for 30 seconds. During this 30 seconds, the main
switch can be freely operated.
After 30 seconds, the vehicle
power will turn off automatically.
To turn the vehicle power off im-
mediately, push the main switch
knob four times within 2 seconds.
EAU79042
OPEN (open)
Power is supplied to the main switch.
The seat and storage compartment A
can be opened. To open the seat and storage compart-
ment A1. With the smart key turned on and
within operating range, push the
main switch knob.
2. While the smart key system indi- cator light is on, turn the main
switch to “OPEN”.
3. To open the seat, push the “SEAT” button, and then lift the
rear of the seat.
1. Turn.ZAUM1472
1
1. Push.
2. Turn.ZAUM14711 2
UBBAE0E0.book Page 9 Thursday, September 24, 2020 3:19 PM
Page 61 of 114
Operation and important ri din g points
6-4
6
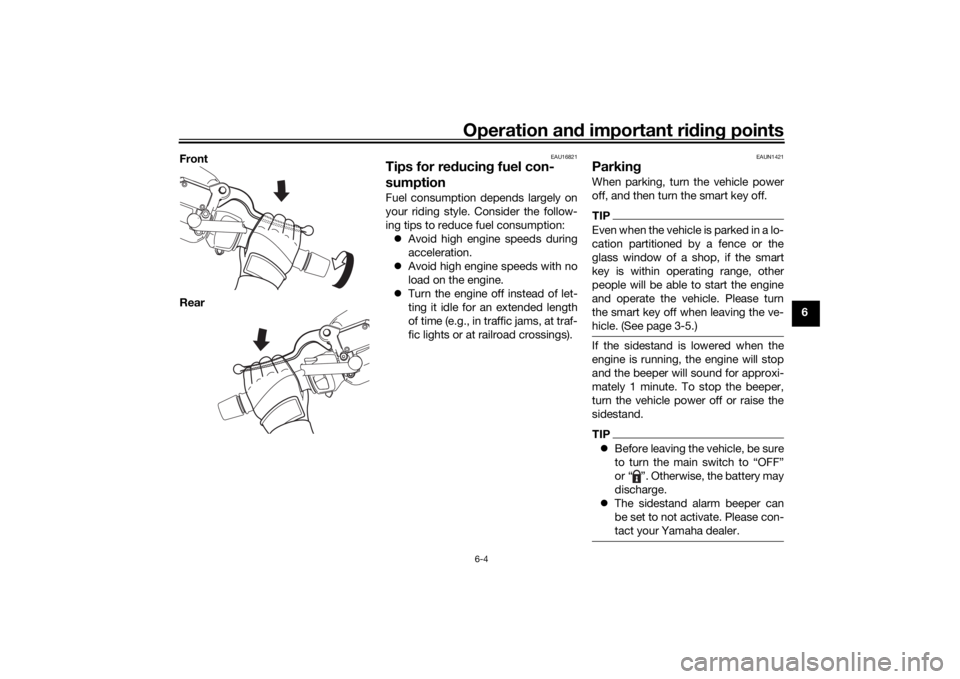
Front
Rear
EAU16821
Tips for re
ducin g fuel con-
sumptionFuel consumption depends largely on
your riding style. Consider the follow-
ing tips to reduce fuel consumption:
Avoid high engine speeds during
acceleration.
Avoid high engine speeds with no
load on the engine.
Turn the engine off instead of let-
ting it idle for an extended length
of time (e.g., in traffic jams, at traf-
fic lights or at railroad crossings).
EAUN1421
Parkin gWhen parking, turn the vehicle power
off, and then turn the smart key off.TIPEven when the vehicle is parked in a lo-
cation partitioned by a fence or the
glass window of a shop, if the smart
key is within operating range, other
people will be able to start the engine
and operate the vehicle. Please turn
the smart key off when leaving the ve-
hicle. (See page 3-5.)If the sidestand is lowered when the
engine is running, the engine will stop
and the beeper will sound for approxi-
mately 1 minute. To stop the beeper,
turn the vehicle power off or raise the
sidestand.TIPBefore leaving the vehicle, be sure
to turn the main switch to “OFF”
or “ ”. Otherwise, the battery may
discharge.
The sidestand alarm beeper can
be set to not activate. Please con-
tact your Yamaha dealer.
UBBAE0E0.book Page 4 Thursday, September 24, 2020 3:19 PM
Page 96 of 114

Periodic maintenance an d a djustment
7-34
7
EAU60701
Trou bleshootin gAlthough Yamaha vehicles receive a
thorough inspection before shipment
from the factory, trouble may occur
during operation. Any problem in the
fuel, compression, or ignition systems,
for example, can cause poor starting
and loss of power.
The following troubleshooting charts
represent quick and easy procedures
for checking these vital systems your-
self. However, should your vehicle re-
quire any repair, take it to a Yamaha
dealer, whose skilled technicians have
the necessary tools, experience, and
know-how to service the vehicle prop-
erly.
Use only genuine Yamaha replace-
ment parts. Imitation parts may look
like Yamaha parts, but they are often
inferior, have a shorter service life and
can lead to expensive repair bills.
WARNING
EWA15142
When checkin g the fuel system, do
not smoke, an d make sure there are
no open flames or sparks in the ar-
ea, inclu din g pilot lig hts from water heaters or furnaces. Gasoline or
g
asoline vapors can i gnite or ex-
plod e, causin g severe injury or prop-
erty dama ge.
EAU76551
Smart key system trou bleshootin g
Please check the following items when
the smart key system does not work. Is the smart key turned on? (See
page 3-5.)
Is the smart key battery dis-
charged? (See page 3-6.)
Is the smart key battery installed
correctly? (See page 3-6.)
Is the smart key being used in a lo-
cation with strong radio waves or
other electromagnetic noise? (See
page 3-1.)
Are you using the smart key that is
registered to the vehicle?
Is the vehicle battery discharged?
When the vehicle battery is dis-
charged, the smart key system will
not operate. Please have the vehi-
cle battery charged or replaced.
(See page 7-29.) If the smart key system does not work
after checking the above items, have a
Yamaha dealer check the smart key system.
TIPSee Emergency mode on page 7-37
for information on starting the engine
without the smart key.
UBBAE0E0.book Page 34 Thursday, September 24, 2020 3:19 PM
Page 99 of 114
Periodic maintenance an d a djustment
7-37
7
EAU76561
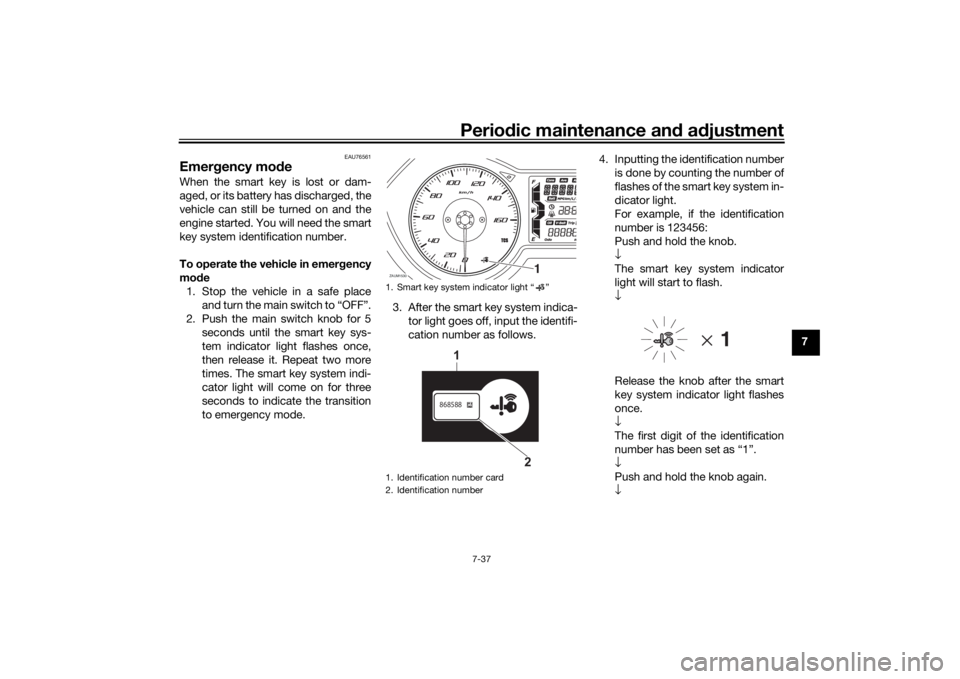
Emer gency mo de When the smart key is lost or dam-
aged, or its battery has discharged, the
vehicle can still be turned on and the
engine started. You will need the smart
key system identification number.
To operate the vehicle in emer gency
mo de
1. Stop the vehicle in a safe place and turn the main switch to “OFF”.
2. Push the main switch knob for 5 seconds until the smart key sys-
tem indicator light flashes once,
then release it. Repeat two more
times. The smart key system indi-
cator light will come on for three
seconds to indicate the transition
to emergency mode. 3. After the smart key system indica-
tor light goes off, input the identifi-
cation number as follows. 4. Inputting the identification number
is done by counting the number of
flashes of the smart key system in-
dicator light.
For example, if the identification
number is 123456:
Push and hold the knob.
↓
The smart key system indicator
light will start to flash.
↓
Release the knob after the smart
key system indicator light flashes
once.
↓
The first digit of the identification
number has been set as “1”.
↓
Push and hold the knob again.
↓
1. Smart key system indicator light “ ”
1. Identification number card
2. Identification numberZAUM1530
1
868588
1
2
UBBAE0E0.book Page 37 Thursday, September 24, 2020 3:19 PM