oil change YAMAHA XSR 700 2019 Owners Manual
[x] Cancel search | Manufacturer: YAMAHA, Model Year: 2019, Model line: XSR 700, Model: YAMAHA XSR 700 2019Pages: 98, PDF Size: 7.67 MB
Page 45 of 98
Operation and important riding points
5-4
5
EAU16842
Engine break-inThere is never a more important period
in the life of your engine than the period
between 0 and 1600 km (1000 mi). For
this reason, you should read the fol-
lowing material carefully.
Since the engine is brand new, do not
put an excessive load on it for the first
1600 km (1000 mi). The various parts in
the engine wear and polish themselves
to the correct operating clearances.
During this period, prolonged full-throt-
tle operation or any condition that
might result in engine overheating
must be avoided.
EAU17094
0–1000 km (0–600 mi)
Avoid prolonged operation above 5000
r/min. NOTICE: After 1000 km (600
mi) of operation, the engine oil must
be changed and the oil filter car-
tridge or element replaced.
[ECA10303]
1000–1600 km (600–1000 mi)
Avoid prolonged operation above 6000
r/min.1600 km (1000 mi) and beyond
The vehicle can now be operated nor-
mally.
NOTICE
ECA10311
Keep the engine speed out of
the tachometer red zone.
If any engine trouble should oc-
cur during the engine break-in
period, immediately have a
Yamaha dealer check the vehi-
cle.
EAU17214
ParkingWhen parking, stop the engine, and
then remove the key from the main
switch.
WARNING
EWA10312
Since the engine and exhaust
system can become very hot,
park in a place where pedestri-
ans or children are not likely to
touch them and be burned.
Do not park on a slope or on soft
ground, otherwise the vehicle
may overturn, increasing the
risk of a fuel leak and fire.
Do not park near grass or other
flammable materials which
might catch fire.
UBCNE0E0.book Page 4 Monday, February 4, 2019 10:04 AM
Page 52 of 98

Periodic maintenance and adjustment
6-7
6
20 Sidestand• Check operation.
• Lubricate with lithium-soap-
based grease.√√√√√
21*Sidestand switch• Check operation and replace if
necessary.√√√√√√
22*Front fork• Check operation and for oil leak-
age.
• Replace if necessary.√√√√
23*Shock absorber as-
sembly• Check operation and for oil leak-
age.
• Replace if necessary.√√√√
24*Rear suspension re-
lay arm and con-
necting arm
pivoting points• Check operation.√√√√
25 Engine oil• Change (warm engine before
draining).
• Check oil level and vehicle for oil
leakage.√√√√√√
26Engine oil filter car-
tridge• Replace.√√√
27*Cooling system• Check coolant level and vehicle
for coolant leakage.√√√√√
• Change. Every 3 years
28*Front and rear
brake switches• Check operation.√√√√√√
29*Moving parts and
cables• Lubricate.√√√√√ NO. ITEM CHECK OR MAINTENANCE JOB
ODOMETER READING
ANNUAL
CHECK 1000 km
(600 mi)10000 km
(6000 mi)20000 km
(12000 mi)30000 km
(18000 mi)40000 km
(24000 mi)
UBCNE0E0.book Page 7 Monday, February 4, 2019 10:04 AM
Page 53 of 98
Periodic maintenance and adjustment
6-8
6
EAU72800
TIPAir filter
• This model’s air filter is equipped with a disposable oil-coated paper element, which must not be cleaned with com-
pressed air to avoid damaging it.
• The air filter element needs to be replaced more frequently when riding in unusually wet or dusty areas.
Hydraulic brake service
• Regularly check and, if necessary, correct the brake fluid level.
• Every two years replace the internal components of the brake master cylinders and calipers, and change the brake
fluid.
• Replace the brake hoses every four years and if cracked or damaged.30*Throttle grip hous-
ing and cable• Check operation and free play.
• Adjust the throttle cable free play
if necessary.
• Lubricate the throttle grip housing
and cable.√√√√√
31*Lights, signals and
switches• Check operation.
• Adjust headlight beam.√√√√√√ NO. ITEM CHECK OR MAINTENANCE JOBODOMETER READING
ANNUAL
CHECK 1000 km
(600 mi)10000 km
(6000 mi)20000 km
(12000 mi)30000 km
(18000 mi)40000 km
(24000 mi)
UBCNE0E0.book Page 8 Monday, February 4, 2019 10:04 AM
Page 55 of 98
Periodic maintenance and adjustment
6-10
6
EAU36112
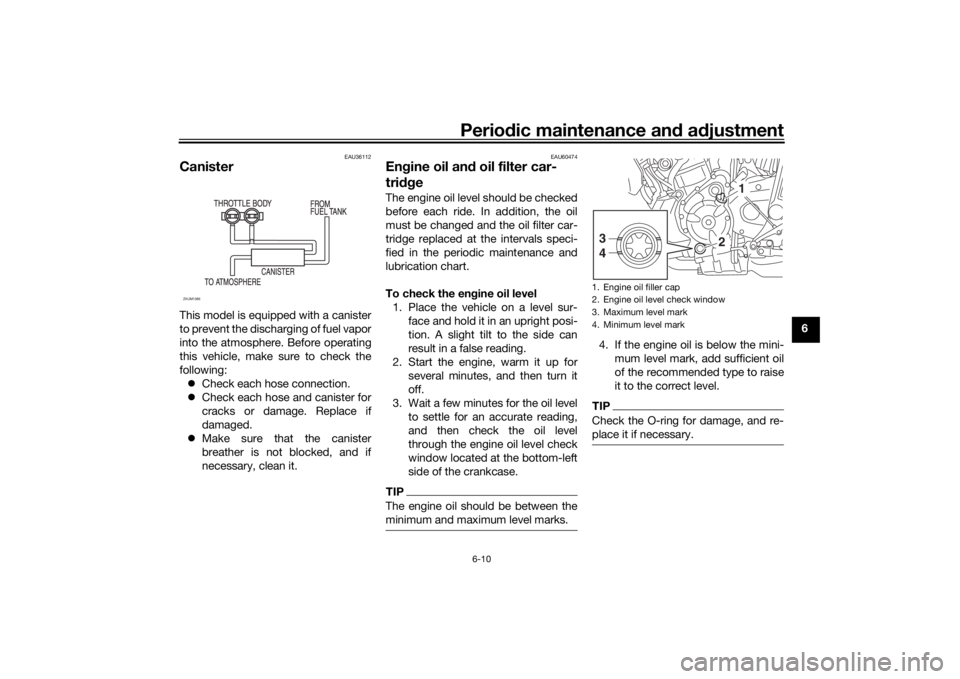
CanisterThis model is equipped with a canister
to prevent the discharging of fuel vapor
into the atmosphere. Before operating
this vehicle, make sure to check the
following:
Check each hose connection.
Check each hose and canister for
cracks or damage. Replace if
damaged.
Make sure that the canister
breather is not blocked, and if
necessary, clean it.
EAU60474
Engine oil and oil filter car-
tridgeThe engine oil level should be checked
before each ride. In addition, the oil
must be changed and the oil filter car-
tridge replaced at the intervals speci-
fied in the periodic maintenance and
lubrication chart.
To check the engine oil level
1. Place the vehicle on a level sur-
face and hold it in an upright posi-
tion. A slight tilt to the side can
result in a false reading.
2. Start the engine, warm it up for
several minutes, and then turn it
off.
3. Wait a few minutes for the oil level
to settle for an accurate reading,
and then check the oil level
through the engine oil level check
window located at the bottom-left
side of the crankcase.TIPThe engine oil should be between the
minimum and maximum level marks.
4. If the engine oil is below the mini-
mum level mark, add sufficient oil
of the recommended type to raise
it to the correct level.TIPCheck the O-ring for damage, and re-
place it if necessary.
ZAUM1386
1. Engine oil filler cap
2. Engine oil level check window
3. Maximum level mark
4. Minimum level mark
1
2 3
4
UBCNE0E0.book Page 10 Monday, February 4, 2019 10:04 AM
Page 56 of 98
Periodic maintenance and adjustment
6-11
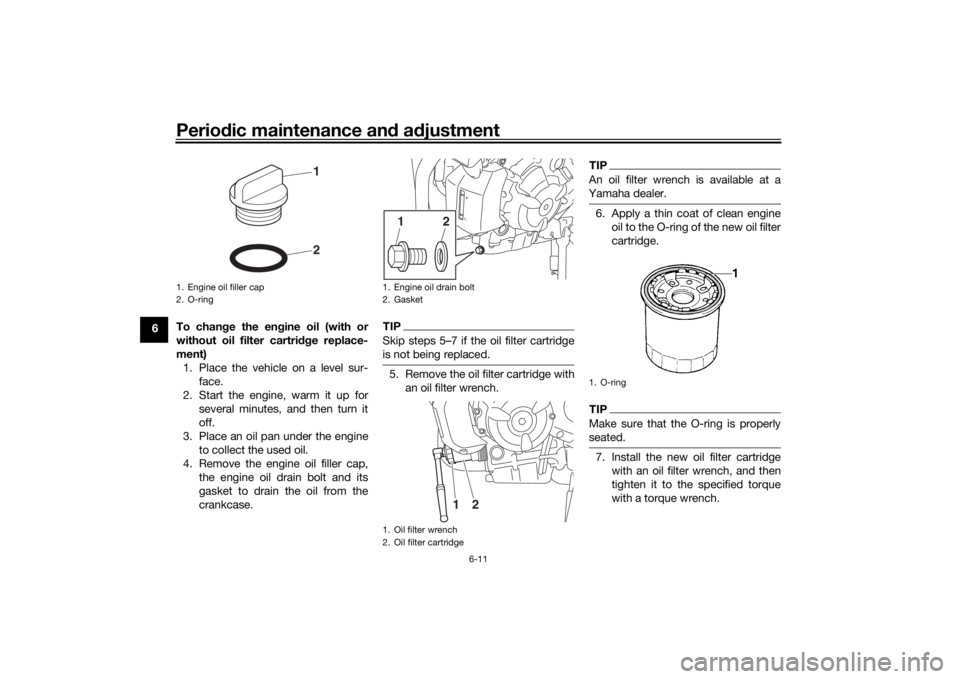
6To change the engine oil (with or
without oil filter cartridge replace-
ment)
1. Place the vehicle on a level sur-
face.
2. Start the engine, warm it up for
several minutes, and then turn it
off.
3. Place an oil pan under the engine
to collect the used oil.
4. Remove the engine oil filler cap,
the engine oil drain bolt and its
gasket to drain the oil from the
crankcase.
TIPSkip steps 5…7 if the oil filter cartridge
is not being replaced.5. Remove the oil filter cartridge with
an oil filter wrench.
TIPAn oil filter wrench is available at a
Yamaha dealer.6. Apply a thin coat of clean engine
oil to the O-ring of the new oil filter
cartridge.TIPMake sure that the O-ring is properly
seated.7. Install the new oil filter cartridge
with an oil filter wrench, and then
tighten it to the specified torque
with a torque wrench.
1. Engine oil filler cap
2. O-ring
21
1. Engine oil drain bolt
2. Gasket
1. Oil filter wrench
2. Oil filter cartridge
2
1
2
1
1. O-ring
UBCNE0E0.book Page 11 Monday, February 4, 2019 10:04 AM
Page 57 of 98
Periodic maintenance and adjustment
6-12
6
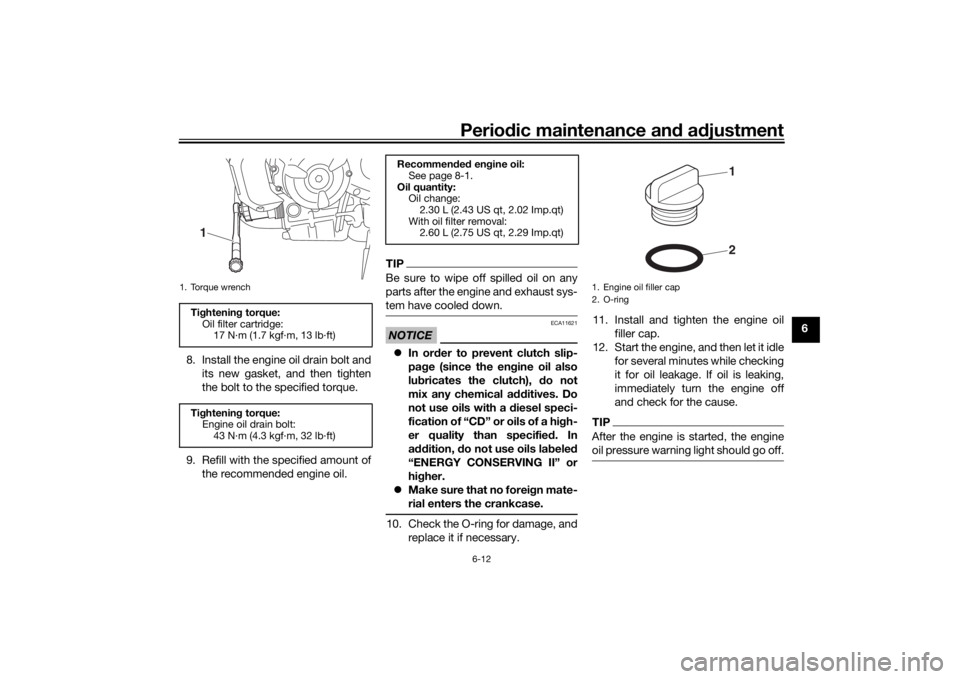
8. Install the engine oil drain bolt and
its new gasket, and then tighten
the bolt to the specified torque.
9. Refill with the specified amount of
the recommended engine oil.
TIPBe sure to wipe off spilled oil on any
parts after the engine and exhaust sys-
tem have cooled down.NOTICE
ECA11621
In order to prevent clutch slip-
page (since the engine oil also
lubricates the clutch), do not
mix any chemical additives. Do
not use oils with a diesel speci-
fication of “CD” or oils of a high-
er quality than specified. In
addition, do not use oils labeled
“ENERGY CONSERVING II” or
higher.
Make sure that no foreign mate-
rial enters the crankcase.10. Check the O-ring for damage, and
replace it if necessary.11. Install and tighten the engine oil
filler cap.
12. Start the engine, and then let it idle
for several minutes while checking
it for oil leakage. If oil is leaking,
immediately turn the engine off
and check for the cause.
TIPAfter the engine is started, the engine
oil pressure warning light should go off.
1. Torque wrenchTightening torque:
Oil filter cartridge:
17 N·m (1.7 kgf·m, 13 lb·ft)
Tightening torque:
Engine oil drain bolt:
43 N·m (4.3 kgf·m, 32 lb·ft)1
Recommended engine oil:
See page 8-1.
Oil quantity:
Oil change:
2.30 L (2.43 US qt, 2.02 Imp.qt)
With oil filter removal:
2.60 L (2.75 US qt, 2.29 Imp.qt)
1. Engine oil filler cap
2. O-ring
21
UBCNE0E0.book Page 12 Monday, February 4, 2019 10:04 AM
Page 58 of 98
Periodic maintenance and adjustment
6-13
6
NOTICE
ECA20860
If the oil pressure warning light flick-
ers or remains on even if the oil level
is correct, immediately turn the en-
gine off and have a Yamaha dealer
check the vehicle.13. Turn the engine off, wait a few
minutes for the oil level to settle for
an accurate reading, and then
check the oil level and correct it if
necessary.
EAU85450
Why YamalubeYAMALUBE oil is a Genuine YAMAHA
Part born of the engineers’ passion
and belief that engine oil is an impor-
tant liquid engine component. We form
teams of specialists in the fields of me-
chanical engineering, chemistry, elec-
tronics and track testing, and have
them develop the engine together with
the oil it will use. Yamalube oils take full
advantage of the base oil’s qualities
and blend in the ideal balance of addi-
tives to make sure the final oil clears
our performance standards. Thus,
Yamalube mineral, semisynthetic and
synthetic oils have their own distinct
characters and value. Yamaha’s expe-
rience gained over many years of re-
search and development into oil since
the 1960’s helps make Yamalube the
best choice for your Yamaha engine.
EAUS1203
CoolantThe coolant level should be checked
regularly. In addition, the coolant must
be changed at the intervals specified in
the periodic maintenance chart.TIPIf genuine Yamaha coolant is not avail-
able, use an ethylene glycol antifreeze
containing corrosion inhibitors for alu-
minum engines and mix with distilled
water at a 1:1 ratio.
EAU20097
To check the coolant level
Since the coolant level varies with en-
gine temperature, check when the en-
gine is cold.
1. Park the vehicle on a level surface.Recommended coolant:
YAMALUBE coolant
Coolant quantity:
Coolant reservoir (max level mark):
0.25 L (0.26 US qt, 0.22 Imp.qt)
Radiator (including all routes):
1.60 L (1.69 US qt, 1.41 Imp.qt)
UBCNE0E0.book Page 13 Monday, February 4, 2019 10:04 AM
Page 67 of 98
Periodic maintenance and adjustment
6-22
6 Use only the specified brake flu-
id; otherwise, the rubber seals
may deteriorate, causing leak-
age.
Refill with the same type of
brake fluid. Adding a brake fluid
other than DOT 4 may result in a
harmful chemical reaction.
Be careful that water or dust
does not enter the brake fluid
reservoir when refilling. Water
will significantly lower the boil-
ing point of the fluid and may re-
sult in vapor lock, and dirt may
clog the ABS hydraulic unit
valves.
NOTICE
ECA17641
Brake fluid may damage painted
surfaces or plastic parts. Always
clean up spilled fluid immediately.As the brake pads wear, it is normal for
the brake fluid level to gradually go
down. A low brake fluid level may indi-
cate worn brake pads and/or brake
system leakage; therefore, be sure to
check the brake pads for wear and the
brake system for leakage. If the brakefluid level goes down suddenly, have a
Yamaha dealer check the cause before
further riding.
EAU22734
Changing the brake fluidHave a Yamaha dealer change the
brake fluid every 2 years. In addition,
have the seals of the master cylinders
and brake calipers, as well as the brake
hoses replaced at the intervals listed
below or sooner if they are damaged or
leaking.
Brake seals: every 2 years
Brake hoses: every 4 years
UBCNE0E0.book Page 22 Monday, February 4, 2019 10:04 AM
Page 78 of 98
![YAMAHA XSR 700 2019 Owners Manual Periodic maintenance and adjustment
6-33
6use a fuse of a higher amperage
rating than recommended to
avoid causing extensive dam-
age to the electrical system and
possibly a fire.
[EWA15132]
3. Turn YAMAHA XSR 700 2019 Owners Manual Periodic maintenance and adjustment
6-33
6use a fuse of a higher amperage
rating than recommended to
avoid causing extensive dam-
age to the electrical system and
possibly a fire.
[EWA15132]
3. Turn](/img/51/53024/w960_53024-77.png)
Periodic maintenance and adjustment
6-33
6use a fuse of a higher amperage
rating than recommended to
avoid causing extensive dam-
age to the electrical system and
possibly a fire.
[EWA15132]
3. Turn the main switch on and turn
on the electrical circuit in question
to check if the device operates.
4. If the fuse immediately blows
again, have a Yamaha dealer
check the electrical system.
5. After the fuse is changed, place
the battery cover in the original
position, and then install the bolts.
6. Install the diagnostic connector by
pushing it downward.
7. Install the seat holder by installing
the bolts, and then tighten the
bolts to the specified torque.
8. Install the seat.
EAU34387
Replacing the headlight bulbThis model is equipped with a halogen
bulb headlight. If the headlight bulb
burns out, replace it as follows.NOTICE
ECA26690
Do not touch the glass part of
the headlight bulb. Otherwise
the luminosity and the life of the
bulb may be adversely affected.
Thoroughly clean off any dirt,
oil, or fingerprints from the bulb
using a cloth moistened with al-
cohol or thinner.
Do not use a headlight bulb of a
wattage higher than specified.
Do not affix any type of tinted
film or stickers to the headlight
lens.
Specified fuses:
Main fuse:
30.0 A
Auxiliary fuse:
2.0 A
Headlight fuse:
15.0 A
Signaling system fuse:
10.0 A
Ignition fuse:
10.0 A
Parking lighting fuse:
7.5 A
Radiator fan motor fuse:
10.0 A
ABS motor fuse:
30.0 A
ABS solenoid fuse:
20.0 A
Fuel injection system fuse:
10.0 A
ABS control unit fuse:
7.5 A
Backup fuse:
7.5 A
Backup fuse 2:
10.0 A
Tightening torque:
Seat holder bolts:
7 N·m (0.7 kgf·m, 5.2 lb·ft)
UBCNE0E0.book Page 33 Monday, February 4, 2019 10:04 AM
Page 89 of 98
Specifications
8-1
8
Dimensions:Overall length:2075 mm (81.7 in)
Overall width:
865 mm (34.1 in)
Overall height: 1120 mm (44.1 in)
Seat height: 855 mm (33.7 in)
Wheelbase:
1405 mm (55.3 in)
Ground clearance: 140 mm (5.51 in)
Minimum turning radius: 2.7 m (8.86 ft)Weight:Curb weight:188 kg (414 lb)Engine:Combustion cycle:
4-stroke
Cooling system: Liquid cooled
Valve train: DOHC
Cylinder arrangement:
Inline
Number of cylinders: 2-cylinder
Displacement: 689 cm³
Bore × stroke:
80.0 × 68.6 mm (3.15 × 2.70 in) Starting system:
Electric starter
Engine oil:Recommended brand:
SAE viscosity grades:10W-40
Recommended engine oil grade:
API service SG type or higher, JASO
standard MA
Engine oil quantity:
Oil change:2.30 L (2.43 US qt, 2.02 Imp.qt)
With oil filter removal:
2.60 L (2.75 US qt, 2.29 Imp.qt)Coolant quantity:Coolant reservoir (up to the maximum level
mark):0.25 L (0.26 US qt, 0.22 Imp.qt)
Radiator (including all routes): 1.60 L (1.69 US qt, 1.41 Imp.qt)Fuel:Recommended fuel:Premium unleaded gasoline (E10
acceptable)
Fuel tank capacity: 14 L (3.7 US gal, 3.1 Imp.gal)
Fuel reserve amount: 2.7 L (0.71 US gal, 0.59 Imp.gal)
Fuel injection:Throttle body:ID mark:1WS1 10Drivetrain:Gear ratio:
1st: 2.846 (37/13)
2nd:
2.125 (34/16)
3rd: 1.632 (31/19)
4th: 1.300 (26/20)
5th:
1.091 (24/22)
6th: 0.964 (27/28)Front tire:Type:
Tubeless
Size: 120/70 ZR 17M/C(58W)
Manufacturer/model: PIRELLI/MT60RSRear tire:Type:Tubeless
Size: 180/55 ZR 17M/C(73W)
Manufacturer/model:
PIRELLI/MT60RS
UBCNE0E0.book Page 1 Monday, February 18, 2019 9:42 AM