headlights YAMAHA XT1200Z 2014 Owners Manual
[x] Cancel search | Manufacturer: YAMAHA, Model Year: 2014, Model line: XT1200Z, Model: YAMAHA XT1200Z 2014Pages: 116, PDF Size: 3.11 MB
Page 17 of 116

INSTRUMENT AND CONTROL FUNCTIONS
3-2
3
Keep other immo bilizer system
keys away from the main switch
as they may cause si gnal inter-
ference.
EAU10473
Main switch/steerin g lockThe main switch/steering lock controls
the ignition and lighting systems, and is
used to lock the steering. The various
positions are described below.TIPBe sure to use the standard key (black
bow) for regular use of the vehicle. To
minimize the risk of losing the code re-
registering key (red bow), keep it in a
safe place and only use it for code re-
registering.
EAU26812
ON
All electrical circuits are supplied with
power; the meter lighting, taillights, li-
cense plate light and auxiliary lights
come on, and the engine can be start-
ed. The key cannot be removed.TIPThe headlights come on automatically
when the engine is started and stay on
until the key is turned to “OFF”.
EAU10662
OFF
All electrical systems are off. The key
can be removed.
WARNING
EWA10062
Never turn the key to “OFF” or
“LOCK” while the vehicle is movin g.
Otherwise the electrical systems will
b e switche d off, which may result in
loss of control or an acci dent.
EAU10693
LOCK
The steering is locked, and all electrical
systems are off. The key can be re-
moved.
P
ON
OFF
LOCK
U2BSE0E0.book Page 2 Tuesday, September 17, 2013 8:55 AM
Page 38 of 116

INSTRUMENT AND CONTROL FUNCTIONS
3-23
3Ri
ght
EAU54201
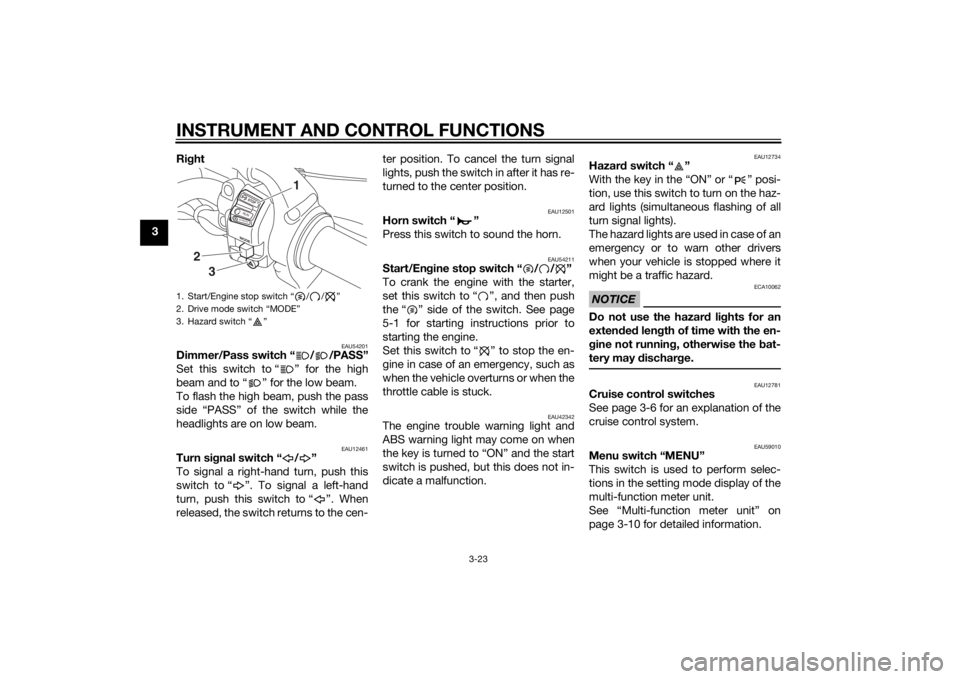
Dimmer/Pass switch “ / /PASS”
Set this switch to “ ” for the high
beam and to “ ” for the low beam.
To flash the high beam, push the pass
side “PASS” of the switch while the
headlights are on low beam.
EAU12461
Turn si gnal switch “ / ”
To signal a right-hand turn, push this
switch to “ ”. To signal a left-hand
turn, push this switch to “ ”. When
released, the switch returns to the cen- ter position. To cancel the turn signal
lights, push the switch in after it has re-
turned to the center position.
EAU12501
Horn switch “ ”
Press this switch to sound the horn.
EAU54211
Start/En
gine stop switch “ / / ”
To crank the engine with the starter,
set this switch to “ ”, and then push
the “ ” side of the switch. See page
5-1 for starting instructions prior to
starting the engine.
Set this switch to “ ” to stop the en-
gine in case of an emergency, such as
when the vehicle overturns or when the
throttle cable is stuck.
EAU42342
The engine trouble warning light and
ABS warning light may come on when
the key is turned to “ON” and the start
switch is pushed, but this does not in-
dicate a malfunction.
EAU12734
Hazar d switch “ ”
With the key in the “ON” or “ ” posi-
tion, use this switch to turn on the haz-
ard lights (simultaneous flashing of all
turn signal lights).
The hazard lights are used in case of an
emergency or to warn other drivers
when your vehicle is stopped where it
might be a traffic hazard.NOTICE
ECA10062
Do not use the hazard lights for an
exten ded len gth of time with the en-
g ine not runnin g, otherwise the bat-
tery may dischar ge.
EAU12781
Cruise control switches
See page 3-6 for an explanation of the
cruise control system.
EAU59010
Menu switch “MENU”
This switch is used to perform selec-
tions in the setting mode display of the
multi-function meter unit.
See “Multi-function meter unit” on
page 3-10 for detailed information.
1. Start/Engine stop switch “ / / ”
2. Drive mode switch “MODE”
3. Hazard switch “ ”
MODESTOPRUNS TA R
T
3
2
1
U2BSE0E0.book Page 23 Tuesday, September 17, 2013 8:55 AM
Page 95 of 116

PERIODIC MAINTENANCE AND ADJUSTMENT
6-32
6
EAU39014
Replacing a hea dlig ht bul bThis model is equipped with halogen
bulb headlights. If a headlight bulb
burns out, replace it as follows.NOTICE
ECA10651
Take care not to damag e the follow-
in g parts:
Hea dlig ht bul b
Do not touch the glass part of
the hea dlig ht bul b to keep it free
from oil, otherwise the transpar-
ency of the g lass, the luminosity
of the b ulb, an d the b ulb life will
b e ad versely affected . Thor-
ou ghly clean off any d irt and fin-
g erprints on the head light bul b
using a cloth moistene d with al-
cohol or thinner.
Hea dlig ht lens
Do not affix any type of tinted
film or stickers to the head light
lens.
Do not use a hea dlig ht bul b of a
watta ge hi gher than specified .
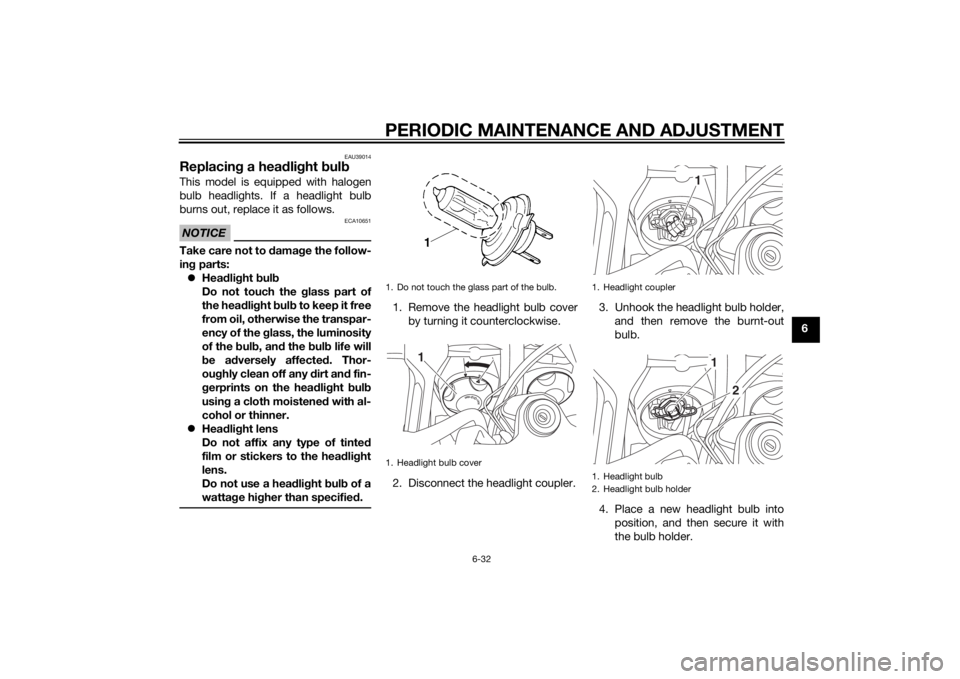
1. Remove the headlight bulb cover
by turning it counterclockwise.
2. Disconnect the headlight coupler. 3. Unhook the headlight bulb holder,
and then remove the burnt-out
bulb.
4. Place a new headlight bulb into position, and then secure it with
the bulb holder.1. Do not touch the glass part of the bulb.
1. Headlight bulb cover
1
1. Headlight coupler
1. Headlight bulb
2. Headlight bulb holder
1
1
2
U2BSE0E0.book Page 32 Tuesday, September 17, 2013 8:55 AM