AUX YAMAHA XT1200Z 2017 Owners Manual
[x] Cancel search | Manufacturer: YAMAHA, Model Year: 2017, Model line: XT1200Z, Model: YAMAHA XT1200Z 2017Pages: 120, PDF Size: 3.32 MB
Page 5 of 120

Table of contents
Safety information ............................1-1
Description ........................................2-1
Left view ..........................................2-1
Right view........................................2-2
Controls and instruments ................2-3
Instrument an d control functions ....3-1
Immobilizer system .........................3-1
Main switch/steering lock ...............3-2
Indicator lights and warning lights ............................................3-4
Cruise control system .....................3-6
Multi-function meter unit .................3-9
D-mode (drive mode) ....................3-20
Handlebar switches.......................3-20
Clutch lever ...................................3-22
Shift pedal .....................................3-22
Brake lever ....................................3-23
Brake pedal ...................................3-24
ABS ...............................................3-24
Traction control system.................3-25
Fuel tank cap.................................3-27
Fuel................................................3-28
Fuel tank overflow hose ................3-29
Catalytic converter ........................3-30
Rider seat ......................................3-30
Adjusting the rider seat height ......3-31
Windshield.....................................3-33
Adjusting the front fork..................3-34
Adjusting the shock absorber assembly....................................3-36
Carriers..........................................3-38
Luggage strap holders ..................3-39
Sidestand ......................................3-39
Ignition circuit cut-off system........3-40
Auxiliary DC jack ...........................3-42
For your safety – pre-operation
checks ...............................................4-1
Operation an d important ri din g
points .................................................5-1
Starting the engine ..........................5-2
Shifting ............................................5-3 Tips for reducing fuel
consumption................................ 5-4
Engine break-in ............................... 5-4
Parking ............................................ 5-5
Perio dic maintenance an d
a d justment ........................................ 6-1
Owner’s tool kit ............................... 6-2
Periodic maintenance chart for the
emission control system.............. 6-3
General maintenance and
lubrication chart........................... 6-4
Removing and installing cowlings ...................................... 6-7
Checking the spark plugs ............... 6-9
Canister......................................... 6-10
Engine oil and oil filter cartridge ... 6-10
Final gear oil.................................. 6-14
Coolant ......................................... 6-16
Air filter element ............................ 6-17
Checking the engine idling speed......................................... 6-18
Checking the throttle grip free
play ............................................ 6-18
Valve clearance ............................. 6-19
Tires .............................................. 6-19
Spoke wheels ............................... 6-22
Clutch lever ................................... 6-22
Checking the brake lever free play ............................................ 6-23
Brake light switches ...................... 6-23
Checking the front and rear brake pads................................. 6-24
Checking the brake fluid level....... 6-25
Changing the brake and clutch fluids .......................................... 6-26
Checking and lubricating the throttle grip and cable ............... 6-26
Checking and lubricating the brake and shift pedals ............... 6-27
Checking and lubricating the
brake and clutch levers ............. 6-27
Checking and lubricating the sidestand ................................... 6-28
Lubricating the swingarm pivots... 6-28
Checking the front fork ................. 6-29
UBP8E0E0.book Page 1 Thursday, December 8, 2016 7:25 PM
Page 6 of 120

Table of contents
Checking the steering................... 6-29
Checking the wheel bearings ....... 6-30
Battery .......................................... 6-30
Replacing the fuses ...................... 6-32
Replacing a headlight bulb ........... 6-33
Replacing an auxiliary light bulb... 6-35
Turn signal light and brake/tail
light ........................................... 6-37
Replacing a license plate light bulb ........................................... 6-38
Supporting the motorcycle ........... 6-39
Troubleshooting............................ 6-39
Troubleshooting charts................. 6-40
Motorcycle care an d stora ge.......... 7-1
Matte color caution ........................ 7-1
Care ................................................ 7-1
Storage ........................................... 7-4
Specifications ................................... 8-1
Consumer information ..................... 9-1
Identification numbers .................... 9-1
Diagnostic connector ..................... 9-2
Vehicle data recording.................... 9-3
In dex ................................................ 10-1
UBP8E0E0.book Page 2 Thursday, December 8, 2016 7:25 PM
Page 14 of 120

Description
2-3
2
EAU63401
Controls and instruments
1
9
10
2345678
1. Clutch lever (page 3-22)
2. Left handlebar switches (page 3-20)
3. Clutch fluid reservoir (page 6-25)
4. Multi-function meter unit (page 3-9)
5. Auxiliary DC jack (page 3-42)
6. Front brake fluid reservoir (page 6-25)
7. Right handlebar switches (page 3-20)
8. Brake lever (page 3-23)
9. Throttle grip (page 6-18)
10.Main switch/steering lock (page 3-2)
UBP8E0E0.book Page 3 Thursday, December 8, 2016 7:25 PM
Page 16 of 120

Instrument and control functions
3-2
3
Keep the stan dar d keys as well
as keys of other immo bilizer
systems away from this vehi-
cle’s cod e re-registering key.
Keep other immo bilizer system
keys away from the main switch
as they may cause si gnal inter-
ference.
EAU10474
Main switch/steerin g lock
The main switch/steering lock controls
the ignition and lighting systems, and is
used to lock the steering. The various
positions are described below.
TIP
Be sure to use the standard key (black
bow) for regular use of the vehicle. To
minimize the risk of losing the code re-
registering key (red bow), keep it in a
safe place and only use it for code re-
registering.
EAU26812ON
All electrical circuits are supplied with
power; the meter lighting, taillights, li-
cense plate light and auxiliary lights
come on, and the engine can be start-
ed. The key cannot be removed.
TIP
The headlights come on automatically
when the engine is started and stay on
until the key is turned to “OFF”.
EAU10662OFF
All electrical systems are off. The key
can be removed.
P
ON
OFF
LOCK
UBP8E0E0.book Page 2 Thursday, December 8, 2016 7:25 PM
Page 56 of 120

Instrument and control functions
3-42
3
EAU49453
Auxiliary DC jack
WARNING
EWA14361
To prevent electrical shock or short-
circuitin g, make sure that the cap is
installe d when the auxiliary DC jack
is not b eing use d.
NOTICE
ECA15432
The accessory connecte d to the
auxiliary DC jack shoul d not b e used
with the en gine turne d off, an d the
loa d must never exceed 30 W (2.5 A),
otherwise the fuse may blow or the
b attery may d ischarge.
This vehicle is equipped with an auxil-
iary DC jack.
A 12-V accessory connected to the
auxiliary DC jack can be used when the
key is in the “ON” position and should
only be used when the engine is run-
ning.
To use the auxiliary DC jack
1. Turn the key to “OFF”.
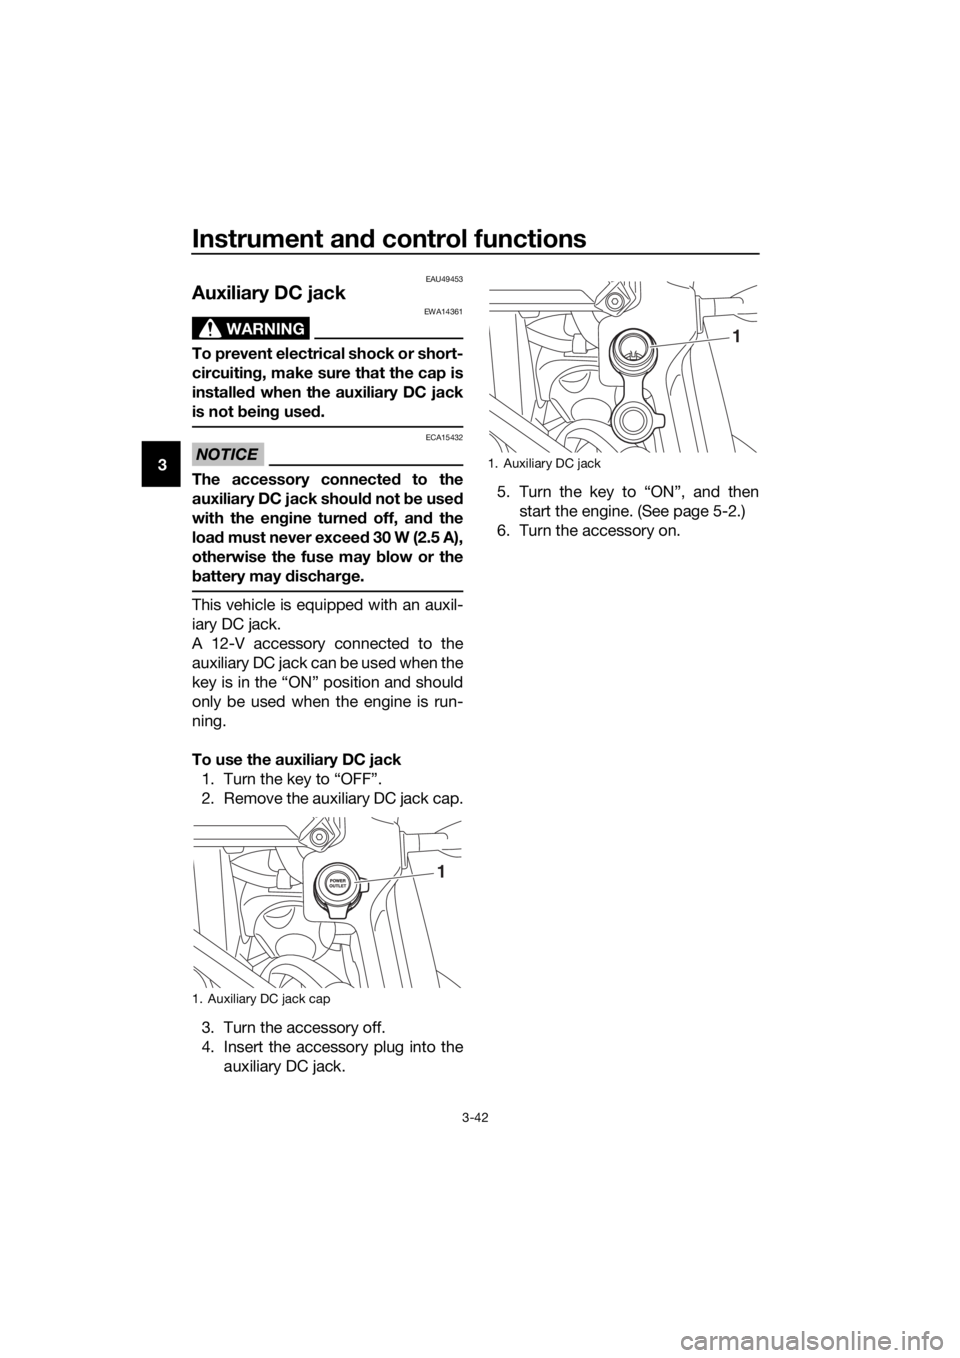
2. Remove the auxiliary DC jack cap.
3. Turn the accessory off.
4. Insert the accessory plug into the auxiliary DC jack. 5. Turn the key to “ON”, and then
start the engine. (See page 5-2.)
6. Turn the accessory on.
1. Auxiliary DC jack cap
1
1. Auxiliary DC jack
1
UBP8E0E0.book Page 42 Thursday, December 8, 2016 7:25 PM
Page 95 of 120

Periodic maintenance an d a djustment
6-32
6
EAU58963
Replacin g the fuses
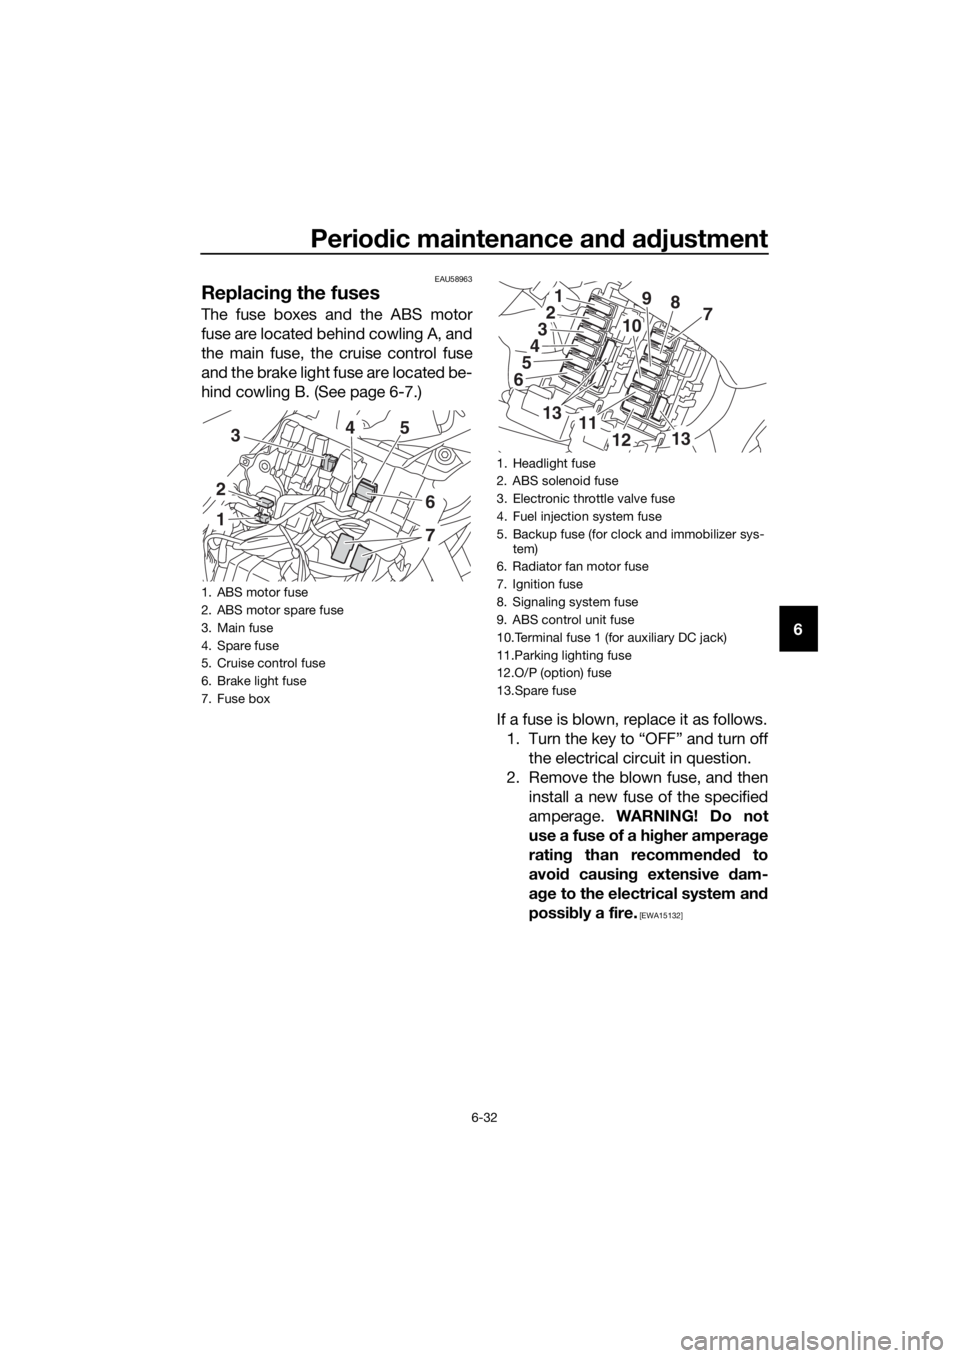
The fuse boxes and the ABS motor
fuse are located behind cowling A, and
the main fuse, the cruise control fuse
and the brake light fuse are located be-
hind cowling B. (See page 6-7.)
If a fuse is blown, replace it as follows.1. Turn the key to “OFF” and turn off the electrical circuit in question.
2. Remove the blown fuse, and then install a new fuse of the specified
amperage. WARNING! Do not
use a fuse of a hi gher ampera ge
ratin g than recommen ded to
avoi d causin g extensive dam-
a g e to the electrical system an d
possi bly a fire.
[EWA15132]
1. ABS motor fuse
2. ABS motor spare fuse
3. Main fuse
4. Spare fuse
5. Cruise control fuse
6. Brake light fuse
7. Fuse box
1
2
354
6
7
1. Headlight fuse
2. ABS solenoid fuse
3. Electronic throttle valve fuse
4. Fuel injection system fuse
5. Backup fuse (for clock and immobilizer sys-
tem)
6. Radiator fan motor fuse
7. Ignition fuse
8. Signaling system fuse
9. ABS control unit fuse
10.Terminal fuse 1 (for auxiliary DC jack)
11.Parking lighting fuse
12.O/P (option) fuse
13.Spare fuse
1
3
4
5
6
2789
10
1311
1213
UBP8E0E0.book Page 32 Thursday, December 8, 2016 7:25 PM
Page 98 of 120

Periodic maintenance an d a djustment
6-35
6
EAU58971
Replacin g an auxiliary lig ht
b ul b
This model is equipped with two auxil-
iary lights. If an auxiliary light bulb
burns out, replace it as follows.
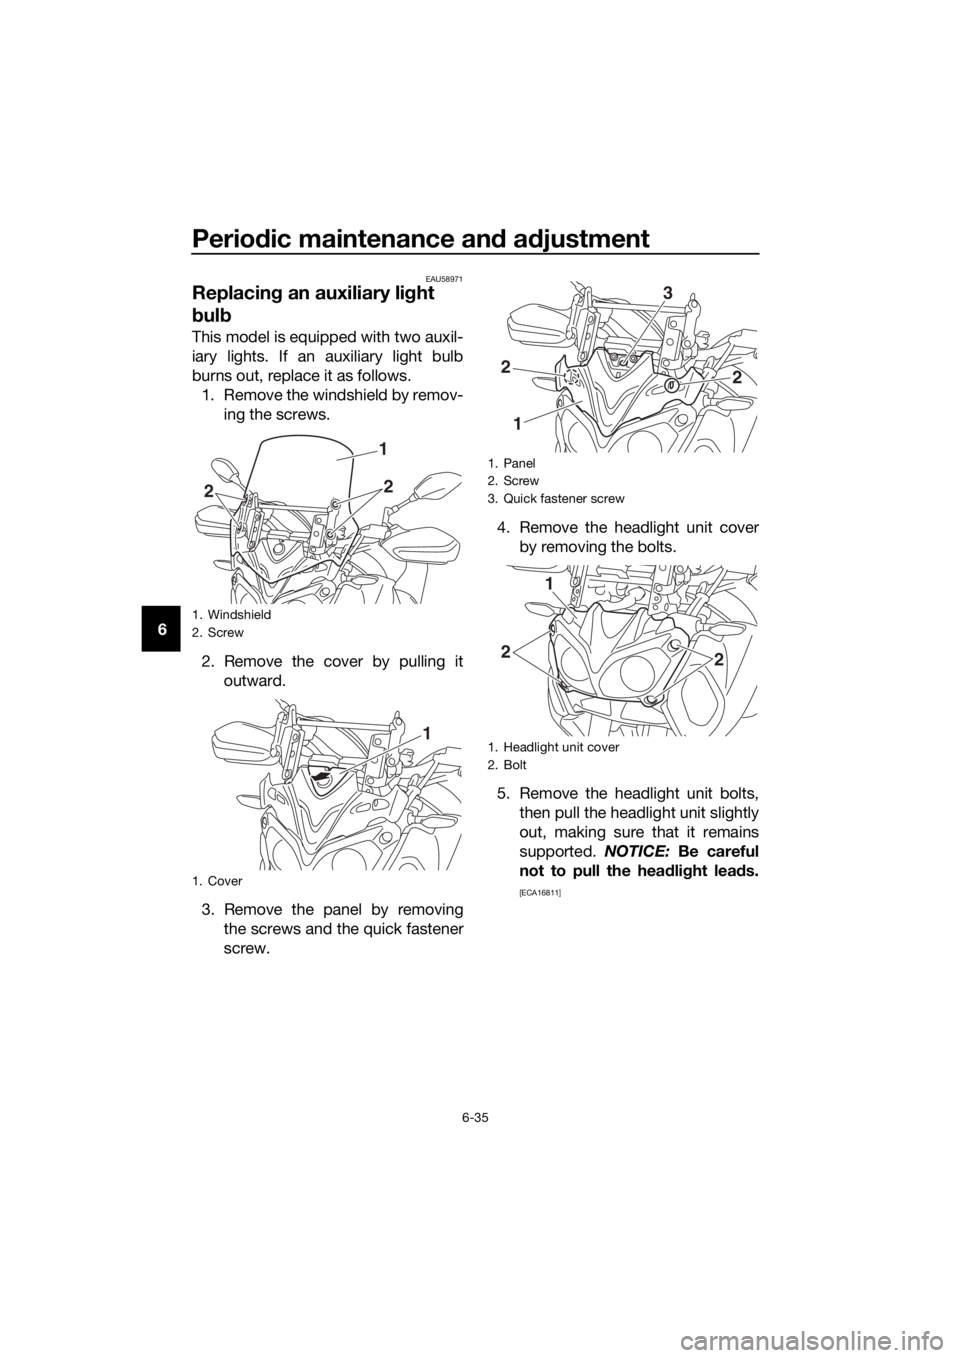
1. Remove the windshield by remov- ing the screws.
2. Remove the cover by pulling it outward.
3. Remove the panel by removing the screws and the quick fastener
screw. 4. Remove the headlight unit cover
by removing the bolts.
5. Remove the headlight unit bolts, then pull the headlight unit slightly
out, making sure that it remains
supported. NOTICE: Be careful
not to pull the hea dlig ht lea ds.
[ECA16811]
1. Windshield
2. Screw
1. Cover
1
22
1
1. Panel
2. Screw
3. Quick fastener screw
1. Headlight unit cover
2. Bolt
3
22
1
1
22
UBP8E0E0.book Page 35 Thursday, December 8, 2016 7:25 PM
Page 99 of 120

Periodic maintenance an d a djustment
6-36
6
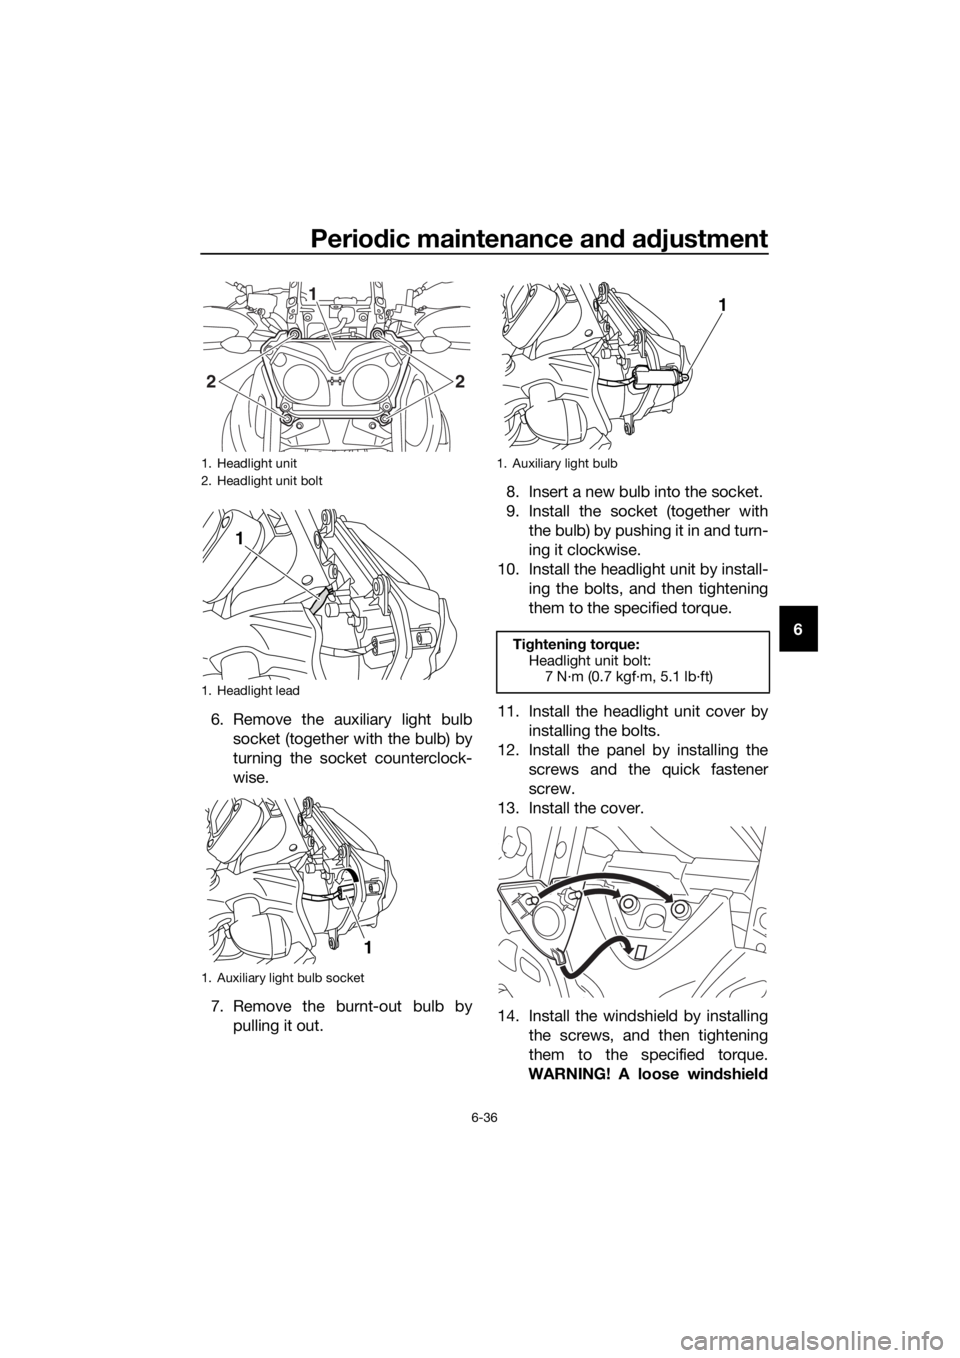
6. Remove the auxiliary light bulb socket (together with the bulb) by
turning the socket counterclock-
wise.
7. Remove the burnt-out bulb by pulling it out. 8. Insert a new bulb into the socket.
9. Install the socket (together with
the bulb) by pushing it in and turn-
ing it clockwise.
10. Install the headlight unit by install- ing the bolts, and then tightening
them to the specified torque.
11. Install the headlight unit cover by installing the bolts.
12. Install the panel by installing the screws and the quick fastener
screw.
13. Install the cover.
14. Install the windshield by installing the screws, and then tightening
them to the specified torque.
WARNING! A loose win dshield
1. Headlight unit
2. Headlight unit bolt
1. Headlight lead
1. Auxiliary light bulb socket
1
2
2
1
1
1. Auxiliary light bulb
Tightenin g torque:
Headlight unit bolt: 7 N·m (0.7 kgf·m, 5.1 lb·ft)
1
UBP8E0E0.book Page 36 Thursday, December 8, 2016 7:25 PM
Page 112 of 120

Specifications
8-3
8
Battery:
Model:YTZ12S
Voltage, capacity:
12 V, 11.0 Ah (10 HR)
Hea dlig ht:
Bulb type:
Halogen bulb
Bul b watta ge:
Headlight:
H7, 55.0 W
Brake/tail light: LED
Front turn signal light:
LED
Rear turn signal light:
LED
Auxiliary light: 5.0 W
License plate light: 5.0 W
Meter lighting:
LED
Neutral indicator light: LED
High beam indicator light: LED
Oil level warning light:
LED
Turn signal indicator light: LED
Engine trouble warning light: LED
ABS warning light:
LED
Cruise control “SET” indicator light: LED
Cruise control “ON” indicator light: LED
Immobilizer system indicator light:
LED
Traction control system indicator/warning
light:
LED
Fuse(s):
Main fuse:50.0 A
Terminal fuse 1:
3.0 A Headlight fuse:
20.0 A
Brake light fuse: 1.0 A
Signaling system fuse:
7.5 A
Ignition fuse: 20.0 A
Parking lighting fuse: 7.5 A
Radiator fan motor fuse:
20.0 A
Fuel injection system fuse: 20.0 A
ABS control unit fuse: 7.5 A
ABS motor fuse: 30.0 A
ABS solenoid fuse:
20.0 A
Cruise control fuse: 1.0 A
Backup fuse: 7.5 A
Electronic throttle valve fuse:
7.5 A
O/P (option) fuse: 20.0 A
UBP8E0E0.book Page 3 Thursday, December 8, 2016 7:25 PM
Page 116 of 120

10-1
10
Index
A
ABS ....................................................... 3-24
ABS warning light ................................... 3-5
Air filter element .................................... 6-17
Auxiliary DC jack ................................... 3-42
Auxiliary light bulb, replacing ................ 6-35
B
Battery .................................................. 6-30
Brake and clutch fluids, changing ........ 6-26
Brake and clutch levers, checking and
lubricating ........................................... 6-27
Brake and shift pedals, checking and
lubricating ........................................... 6-27
Brake fluid level, checking .................... 6-25
Brake lever ............................................ 3-23
Brake lever free play, checking............. 6-23
Brake light switches.............................. 6-23
Brake pedal........................................... 3-24
C
Canister................................................. 6-10
Care ........................................................ 7-1
Carriers ................................................. 3-38
Catalytic converter ................................ 3-30
Clutch lever ................................. 3-22, 6-22
Coolant ................................................. 6-16
Cowlings, removing and installing .......... 6-7
Cruise control indicator lights ................. 3-4
Cruise control switches ........................ 3-21
Cruise control system ............................. 3-6
D
Data recording, vehicle ........................... 9-3
Diagnostic connector.............................. 9-2
Dimmer/Pass switch ............................. 3-20
D-mode (drive mode) ............................ 3-20
E
Engine break-in....................................... 5-4
Engine idling speed, checking .............. 6-18
Engine oil and oil filter cartridge ........... 6-10
Engine serial number .............................. 9-1
Engine trouble warning light ................... 3-5
F
Final gear oil.......................................... 6-14
Front and rear brake pads, checking.... 6-24
Front fork, adjusting.............................. 3-34
Front fork, checking .............................. 6-29
Fuel ....................................................... 3-28
Fuel consumption, tips for reducing ....... 5-4
Fuel tank cap ........................................ 3-27
Fuel tank overflow hose ........................ 3-29
Fuses, replacing.................................... 6-32
H
Handlebar switches .............................. 3-20
Hazard switch....................................... 3-21
Headlight bulb, replacing ..................... 6-33
High beam indicator light ....................... 3-4
Horn switch .......................................... 3-21
I
Identification numbers ............................ 9-1
Ignition circuit cut-off system............... 3-40
Immobilizer system ................................ 3-1
Immobilizer system indicator light.......... 3-5
Indicator lights and warning lights ......... 3-4
L
License plate light bulb, replacing........ 6-38
Luggage strap holders ......................... 3-39
M
Main switch/steering lock....................... 3-2
Maintenance and lubrication, periodic ... 6-4
Maintenance, emission control system.................................................. 6-3
Matte color, caution ............................... 7-1
Menu switch ......................................... 3-21
Model label ............................................. 9-1
Multi-function meter unit ........................ 3-9
N
Neutral indicator light ............................. 3-4
O
Oil level warning light ............................. 3-4
P
Parking ................................................... 5-5
Part locations ......................................... 2-1
R
Rider seat ............................................. 3-30
Rider seat height, adjusting.................. 3-31
S
Safety information .................................. 1-1
Select switch ........................................ 3-21
Shifting ................................................... 5-3
Shift pedal ............................................ 3-22
Shock absorber assembly, adjusting ... 3-36
Sidestand ............................................. 3-39
Sidestand, checking and lubricating .... 6-28
Spark plugs, checking ............................ 6-9
Specifications ......................................... 8-1
Starting the engine ................................. 5-2
Steering, checking................................ 6-29
Stop/Run/Start switch .......................... 3-21
Storage ................................................... 7-4
Supporting the motorcycle................... 6-39
Swingarm pivots, lubricating ................ 6-28
UBP8E0E0.book Page 1 Thursday, December 8, 2016 7:25 PM